#effects tutorial
Explore tagged Tumblr posts
Visit Tumblr Blog
Explore Tumblr blogs with no restrictions, modern design and the best experience.
Last Seen Tumblr Blogs


Fun Fact
China blocked Tumblr because of pornography and censorship problems in 2013.
Text
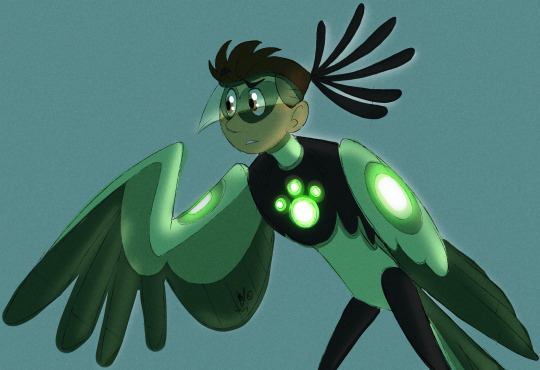
First have a Chris as a glowy confused secretary bird. I just think he's neat. X3

Next, have a MerMartin. I dreamed a villain wanted to use the creature power suits to show off at their freakshow with other "weird" animals, so they went to Zach for his disruptors and Martin got turned into half a goldfish by accident and became an instant hit being a cryptid and all. Too late for mermay I suppose. Might play around with this one.....
water tutorial
#wild kratts#chris kratt#martin kratt#freakshow au? mer au? goldfish au???#i just don't know yet lol#can't help but think about goldfish having bad memories and projecting my bad memory onto martin.......#also that one tumblr water effect tutorial works very well#my art
636 notes
·
View notes
Text

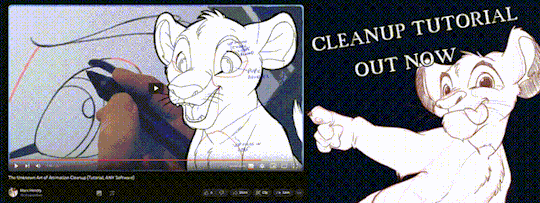
'ello folks, my Cleanup tutorial is finally done and out! hope you find it useful
#Animation#Tutorial#Advice#Lesson#The Lion King#simba#animation#Disney#character design#how to#2D#traditional animation#frame by frame#Adobe#Photoshop#Animate#Flash#After Effects#Premiere#Video#Film#Drawing#Tips#Gestures#cleanup#lines#krita#toon boom#procreate#tvpaint
1K notes
·
View notes
Text

Iridescent Skin Tutorial by Fruitegg
#art#digital art#iridescent#iridescence tutorial#painting iridescence#how to paint iridescent#digital painting tutorial#fruitegg#rainbow effect tutorial
789 notes
·
View notes
Text

Badtober prompt 8: No color!!!!!!
LET'S HEAR IT FOR MAKA, TOP-TIER REPRESENTATION FOR GOTH NERD GIRLS EVERYWHERE
#maka albarn#soul eater#soul eater fanart#soul eater art#artists on tumblr#ramblerogue#illustration#i love her and her big ole hot topic chunky boots#also happy half way to halloween everyone!#i was feeling very in the spirit since i spent the day decorating for halloween and then drawing this#arguably fanart of THE halloween anime to exist#also it was fun to incorporate type into smth like this!#i saw a tutorial for that halftone effect and thought this would be a cool place to try it out :3
205 notes
·
View notes
Note
hiya, i really liked the pyro piece ya made !! I was wondering, how'd you get the glowing effect on the beam coming outta their head?


Easy ;)
#artists on tumblr#my art#art tutorial#art tips#how to#for reference#clip studio paint#how to draw glowing#glowing effect#glow
169 notes
·
View notes
Text


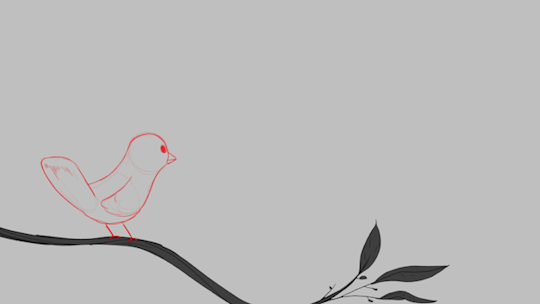
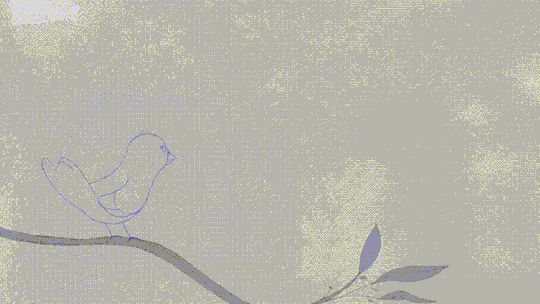
Was asked how to draw water splashes so I made a tutorial covering how I made my splashes. Decided to share this tutorial here as well. It came out lengthier than I expected, but I hope it is useful!
#water#splash#tutorial#art tutorial#my art#i use this coloring method for majority of the water effects i did for my phantom comic
119 notes
·
View notes
Note
Do you have any good beginner drag king makeup refs?
Personally, I'm not the type of king who wears makeup outside of drag, so what I started out with was trying to figure out masc contouring based off of this reference:

Some of the kings on this blog also have makeup tutorials! Probably more than I list here, so if you really like someone's look, I recommend digging through their videos wherever they have them!
Makeup:
Drag King Make-up Tutorial from Adam All
Landon Cider's makeup YouTube account with multiple tutorials
Hugo Grrrl has a couple makeup tutorials here and here
Travis Fiero has a tutorial that I liked
Tenderoni's beard tutorial
King Perka$exxx's cartoon-style makeup tutorial
Practical effect facial hair:
How To Apply A Fake Beard (Drag King Tutorial) by Majic Dyke
Spikey Van Dykey’s curly glitter mustache tutorial
Again, this is a very non-exhaustive list--I recommend checking out the artists on this blog for more! Best of luck to you, and happy kinging!
#drag king#drag king makeup tutorial#info#asks#i can personally speak more to practical effect facial hair if you want me to#but i'm sure people much more qualified than me have better advice haha#but i love hand-laying some crepe hair with spirit gum for my looks#and making my own beards#other folks please feel free to chime in with other good king makeup tutorials you know!
98 notes
·
View notes
Text
Someone has to leave first. This is a very old story. There is no other version of this story
#artists on tumblr#my art#itadori yuuji#yuji itadori#jjk#jjk spoilers#sukuna#jujutsu kaisen fanart#jujutsu kaisen#jujutsu yuji#ryoumen sukuna#I was starting to hate it so I posted it#Wanted to animate it in after effects but we have a tumultuous relationship#that is: i try to follow tutorials but i cant replicate anything and its driving me insane because idk whats different and why#the effects dont work
169 notes
·
View notes
Text

A friend of mine introduced me to a new art program yesterday and it is my new favourite thing, so I had to draw at least one Feanorian to properly test it out :D:D:D
#maglor#feanorians#silmarillion#the silmarillion#silm art#silmaril#hehehe#this is either a nightmare or the silmaril decided maglor's hands were that dirty it had to float away~#>:D#or it could be symbolism or smth.#take your pick#:D#I absolutely love this art program btw.#it's called sketchbook#and it is way better than krita#kinda reminds me of a bunch of stuff I liked about photoshop#specifically with blend modes doing WHAT THEY ARE SUPPOSED TO and it doesn't have weird 'bloom' effects where they SHOULDN'T BE-#and I just like the lineart brush options so much more#Krita didn't even taper the brush. if you wanted brush sensitivity you had to look up an entire tutorial on how to add it >:(#there are some lil annoying bits about this program too (changing brush size - and choosing colours for example)#but like.#I'm still figuring it out so I might be able to just program some shortcuts or smth#Ye#all in all I prefer this program#:)#but it's been less than 24 hours so I'll probably have a more grounded view of it by the end of the week#:):):)
49 notes
·
View notes
Text
This world is an awful, scary place, but I'm knitting a sweater and maybe everything will be ok. If not, at least I have a new sweater.
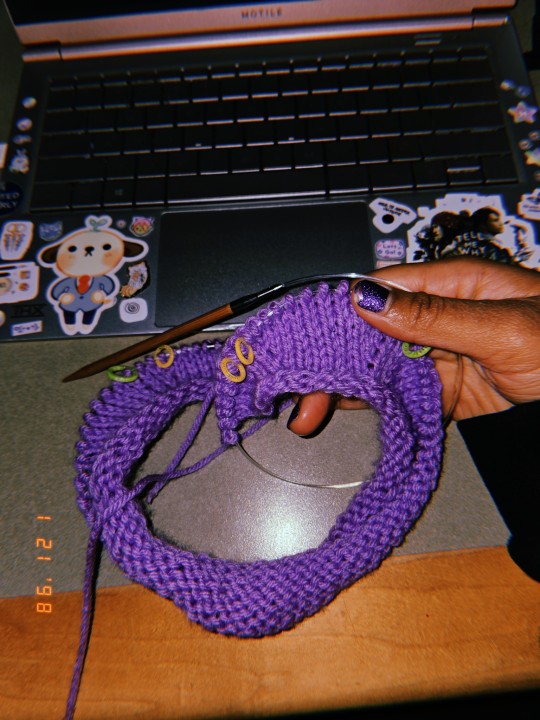
#guards! muzzle her!!!#i used the huji app to get this filter effect!#knitting#I'm following the 'step-by-step cardigan' tutorial by handmade by florence. I'm enjoying it!!!
84 notes
·
View notes
Note
How do you pick colors for the gore rendering? I'm mesmerized withe the vibrant yet mildly sickly tone of colors you use, that along with the paint marker way of shading is amazing, I love it
thanks!! admittedly I've been meaning to do more studies and such bc I'm missing out on a lot of things imo but here's my lazy guy method where I put varying reds down regardless of lighting....
i generally go between dark reds and lighter pinks/oranges, and then have some "blue(grey or just Less Red Reds" and green/yellow. green and red are just fun to work with so I think a lot of my drawings have that. Pinks and greys can be fun too so I'm trying to do more w those..... bleh. I'm very much not an expert at drawing or anatomy so. You know how it is. Here's a picture i tried to explain with a while ago

#not a tutorial but more of how i think abt it....#kind of like a tube#to be honest i#need to get back onto studies bc i want to do more stuff with like. membranes and shit but this is my Easy Quick Mindless method of doing i#i usually paint all on one layer too so my layers are like#basecolor to clipping mask on -> all shading -> lines -> a little bonus stuff sometimes#and i generally dont use layer effects. feels weird to me idk#rbs Off because its not really a tutorial. just me thinking#cw gore#iguess?
75 notes
·
View notes
Note
Looking back at your aurora and sage besties comic (its one of my favorites, only being beaten by were amy and sonic being a Simp) and I've got to ask, HOW DID YOU DO SAGES GLITCHING SO FRANKEN WELL??? IT LOOKS AMAZING AND I PERSONALLY LOVE HOW THOSE GLITCHS TURN RED WHENEVER SHES ON NEFARIOUS TIMING ARVDGDBABA
YOU ARE MY FAVORITE SONIC ARTIST.
...just wanted to say and ask.
You are so kind, thank you! I'm so happy you like them!
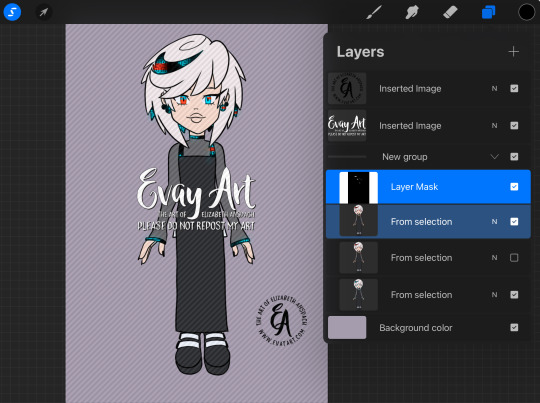
I do a lot of experimenting in Procreate until I find a technique I like. To achieve Sage's glitch, especially if she's doing something a little more wicked so her "red" side is showing, I'll start by drawing her in her blue version and her red version:

I'll select random rectangles from the red version and mask them/cut them out, so she's mostly blue but some red is showing:
I'll duplicate this layer and keep a copy of the "clean version" and apply effects to the duplicate. In Procreate, I'll use the "Glitch" effect and use the “Artifact” setting and mess with it until it achieves a result I like:
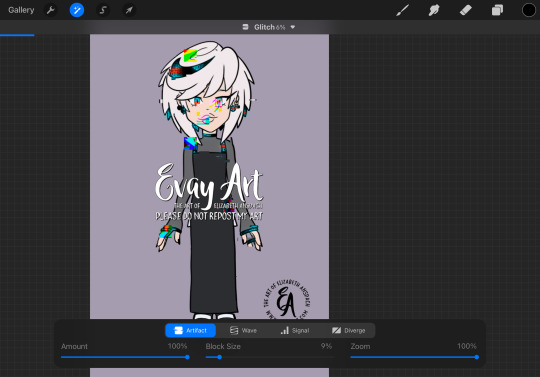
This may take several passes.
I duplicate the layers again, because again I always want to be able to go back if I don't like it. Then I'll play around with "chromatic aberration" under the “displacement” setting. She only needs a little for a subtle glitch effect, but if she's meant to look more menacing then I can go hardcore with it:
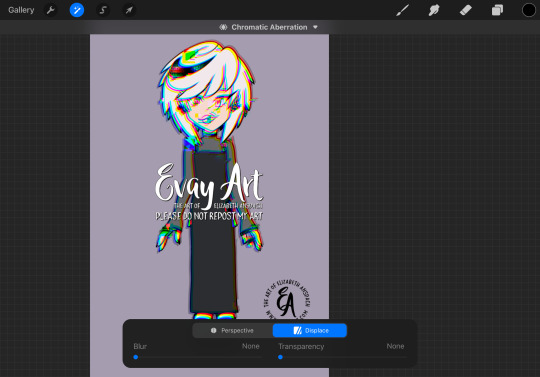
Then, I'll turn that original "clean" layer back on and I mask out the effect layer so only parts of it are coming through. When computers glitch, normally most of the image stays in tact and only some parts are scattered/messy so that's why I only have the effect in some areas.
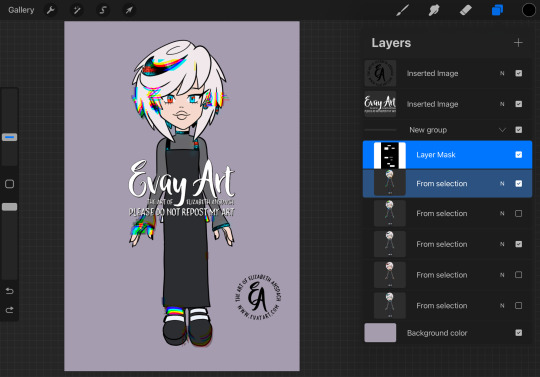
I might even slide bits of those rectangles to the left or right. It's just a matter of playing with it until I like how it looks.
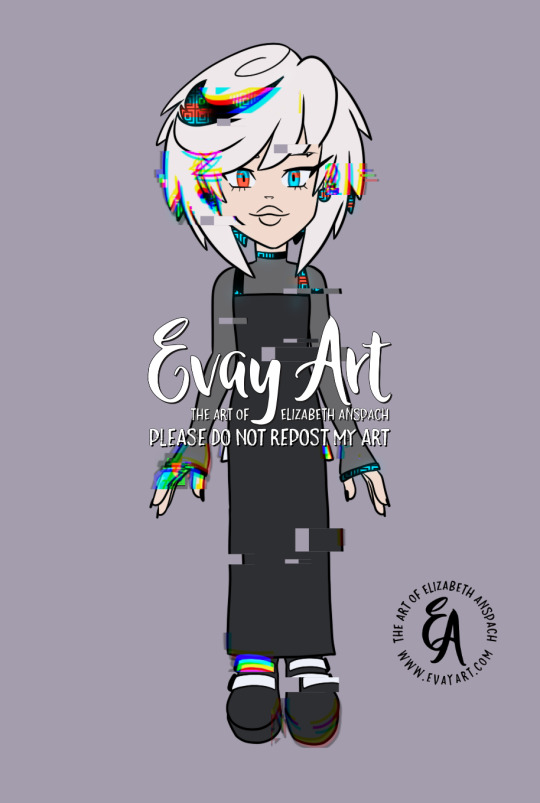
I hope that explanation was easy enough to follow along!
Again, thank you so much! I'm really really happy you enjoy my art and stories 🥰 (and I'm delighted to hear you're a fan of Were!AmyXSimp!Sonic hehehe)
#ask me#evayQA#tutorial#procreate#procreate tips#sage the ai#sage robotnik#sonic trash#art tips#glitch effect
159 notes
·
View notes
Text
"it's morally okay to pirate adobe products" HOWWWWW. HOW. HOWWWWWWWWWWWWWWWWWWWWWWWW. DO I DO IT.
#watched a whole youtube tutorial where you'd get the torrent from pb wtf#but whatever page i go to the 'magnet' download button isnt there#and also im a piracy noob and have no idea half of what anyone says on reddit#i JUST WANT AFTER EFFECTS AAAAAAAAAAAAAAAAAAAAAAA
114 notes
·
View notes
Note
Hi! Do you have any tutorials for glitter/sparkles?
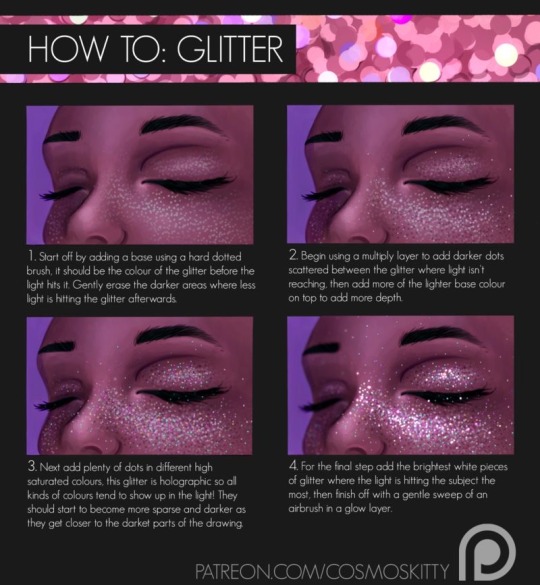
By Cosmos Kitty

by 23i2ko
#art#glitter tutorial#how to paint glitter#digital art#digital art tutorial#cosmoskitty#23i2ko#digital glitter tutorial#glitter effects#sparkle tutorial#digital sparkle tutorial
350 notes
·
View notes
Text
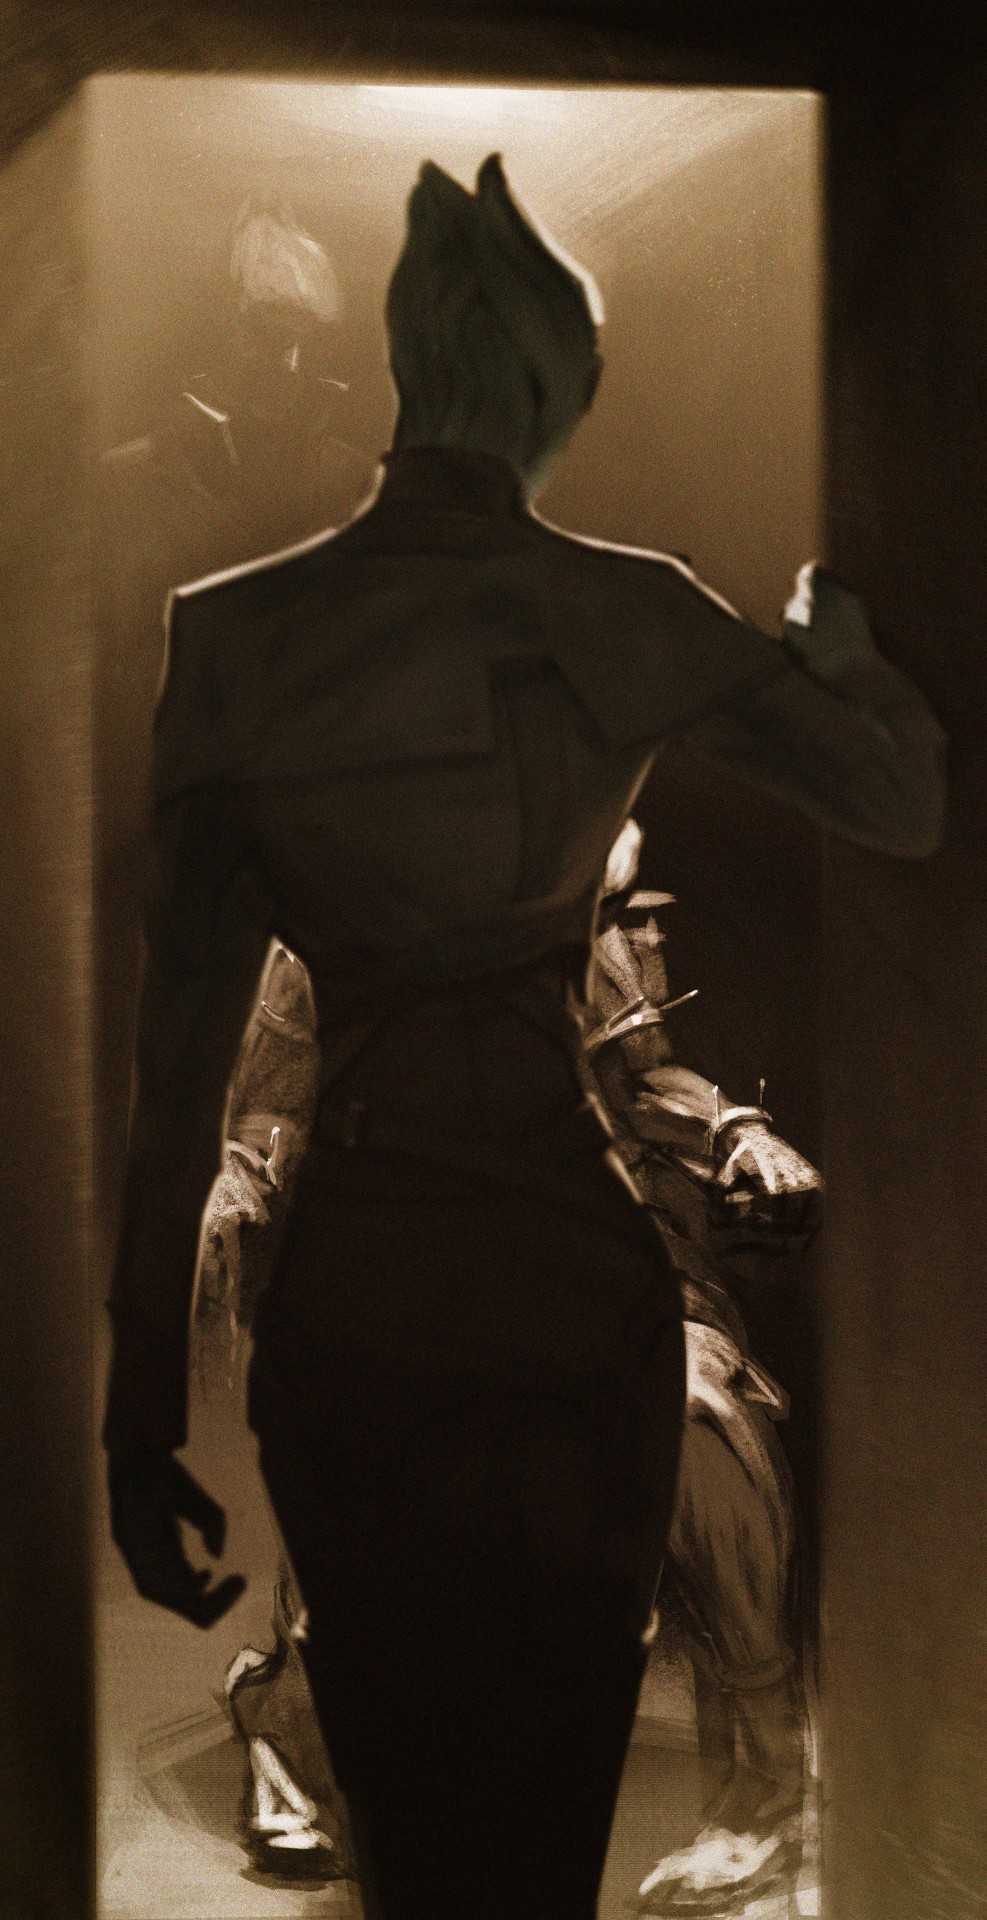
Just Business Based on GBTQ by @sigmalied Music: Legio Symphonica - Echoes of the Past
#omega#omega dlc#zuria alaris#eruam anikot#aria t'loak#mass effect#concept art#digital art#2d drawing#tutorial#drawing process#photoshop#batarian#asari#polsav
361 notes
·
View notes
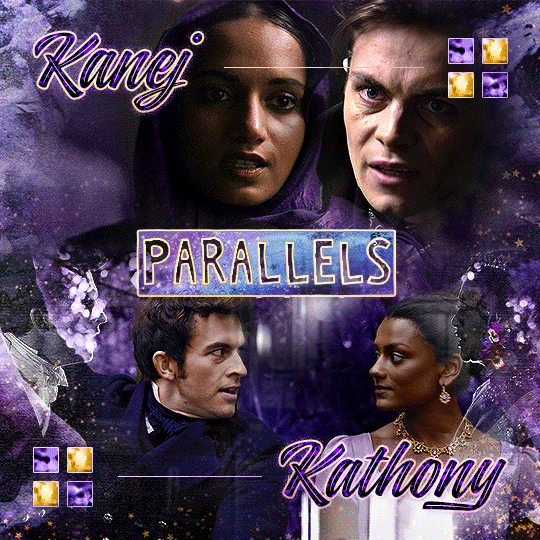
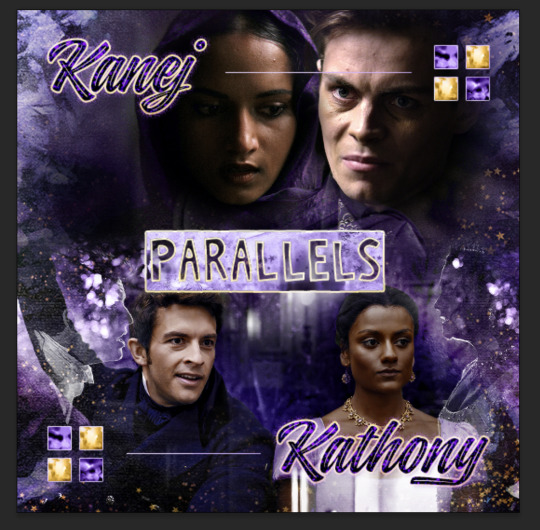
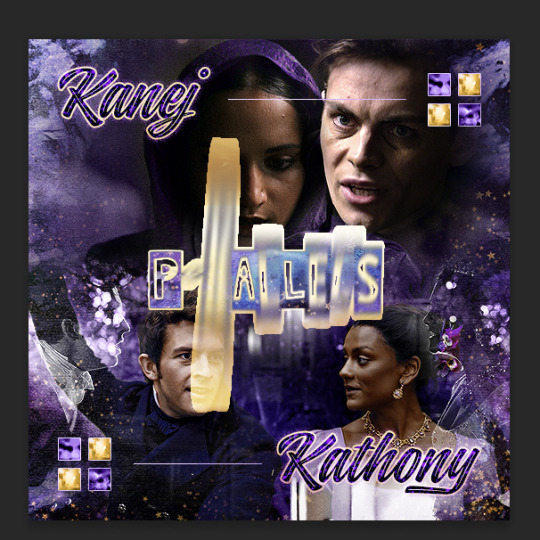
Note
Oh I’m sorry I have GOT to ask! How did you do the text animation in the first gif of 718688291365502976/pscentral-event-15-favourite-ships-kanej?? It’s just. It’s so beautiful
Hi anon! I've used After Effects to create the text animation in the first panel of this post. I'll show you the basic idea of how I've created the animated text effect here :D
What you need:
A cutout font (the font that I've used is Trouble Child Outblack by @justlikethistrain)
Adobe Photoshop with Video Timeline feature
Adobe After Effects
Supplementary files: gif prep action pack / golden outline layer style / assorted textures
Difficulty: advanced; knowledge in gifmaking with the video timeline interface assumed
Note: This tutorial assumes that you're working with all of the composite gifs in a Photoshop composition file and using the video timeline interface
Other useful tutorials to refer to: Text overlay effect / After Effects text animation / clipping mask vs layer mask
Tutorial under the cut. Like / reblog if you find this useful!
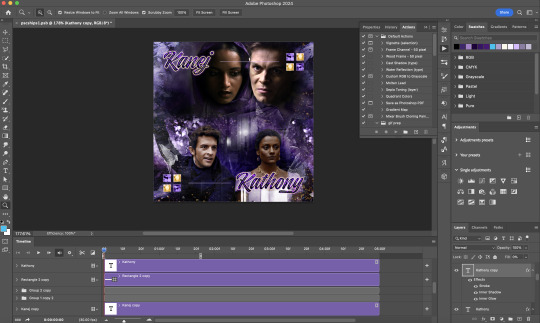
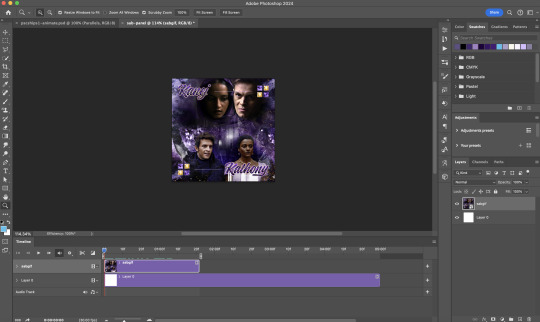
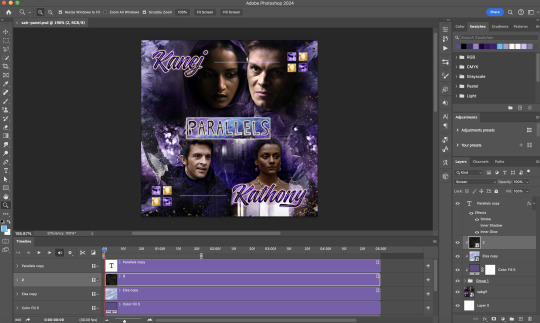
1) Photoshop: Preparing your gif panel
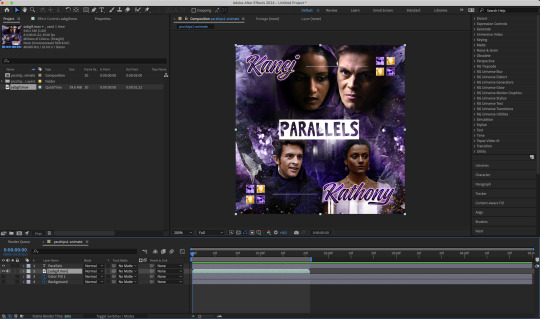
Setting up your PSD composition panel: Create a blank PSD file and set it to Tumblr dimensions (540px x 540px in this particular gifset)
Enable Video Timeline and drag all of the component gifs from your folder to the PSD composition file. Resize / move these gifs around until you're happy with the placements.
Trim the timeline work area so it's the same length as the shortest component gif you've added to the PSD composition file. You can also add some textures & additional adjustment onto this panel.
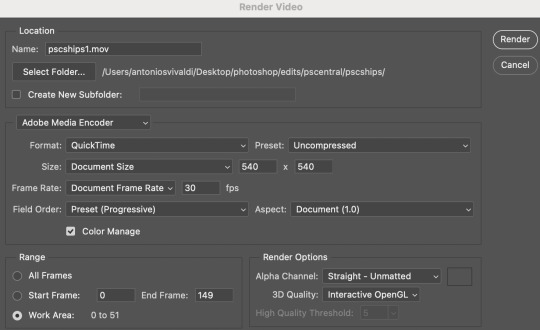
2) Photoshop: Exporting your base gif
I highly recommend exporting the base gif right now, to ensure a smoother experience scrubbing through the video timeline when adding finishing touches later on in the workflow.
My preferred method is to render the composition as a video clip from File > Export > Render video.
To get the optimal export quality, I use the following settings:
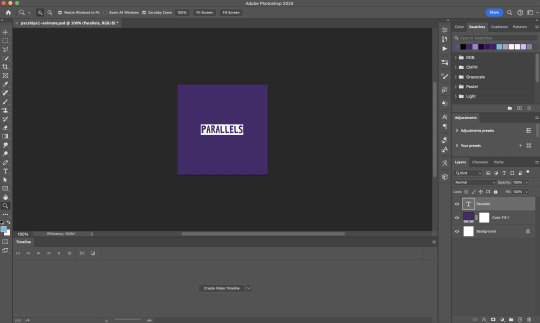
3) Photoshop: Preparing your text layer
Make a new Photoshop composition file of Tumblr dimensions

Drag in the video clip that you've just rendered (the base gif) to this composition file
Add a new text layer in your PSD composition file and set the colour to white then tweak this layer until you're happy with the text placement.
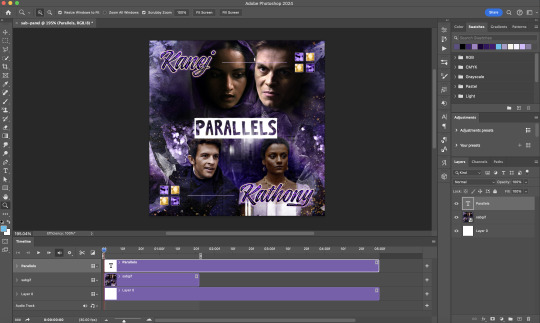
For performance optimisations on After Effects, I duplicate the PSD composition file and delete all other layers. This PSD file contains only the text layer that will be animated.
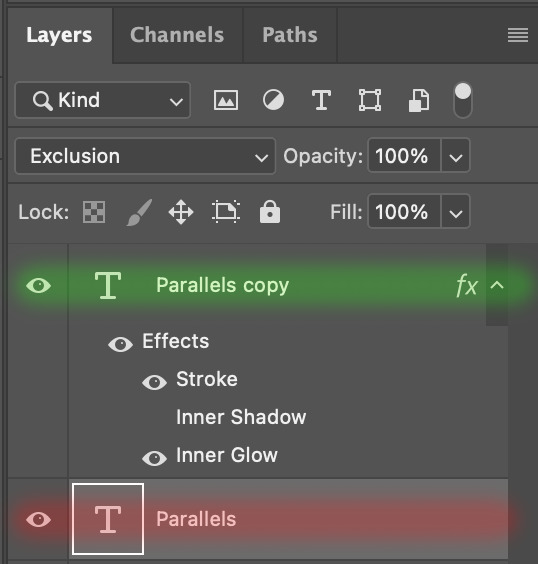
4) Photoshop: Adding overlays & decorations on the text layer
This step allows you to preview the text effect without the animations (i.e. allows you to tweak the texturings & colourings)
Duplicate the text layer. Set the bottom layer's (highlighted in red) blend mode to Exclusion and apply the gold outline layer style to the top layer (highlighted in green). Make sure the Inner Shadow is disabled!
The panel now looks like this
I want to have the liberty to use different colours & textures on the bottom text layer with animation, so the next thing I do is to right click on the bottom text layer and select "Group from Layers"
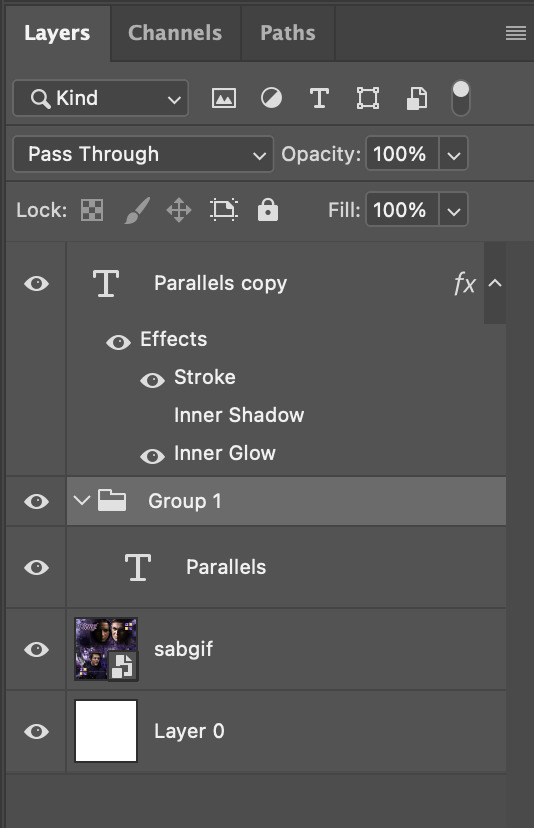
To change the colour of the filled text layer to purple:
Collapse the Group that you've just created
On top of the collapsed Group a purple Colour Fill layer,
Set the Fill layer's blend mode to "Colour"
Right click on the Fill layer and select "Create Clipping Mask"
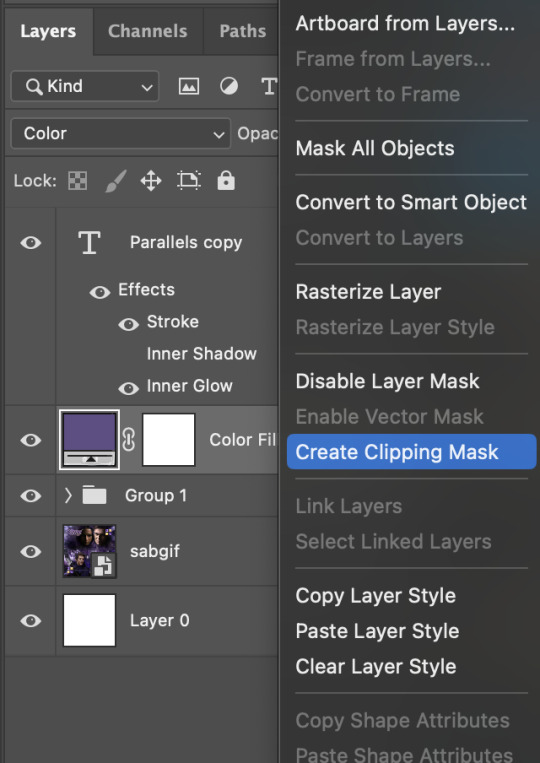
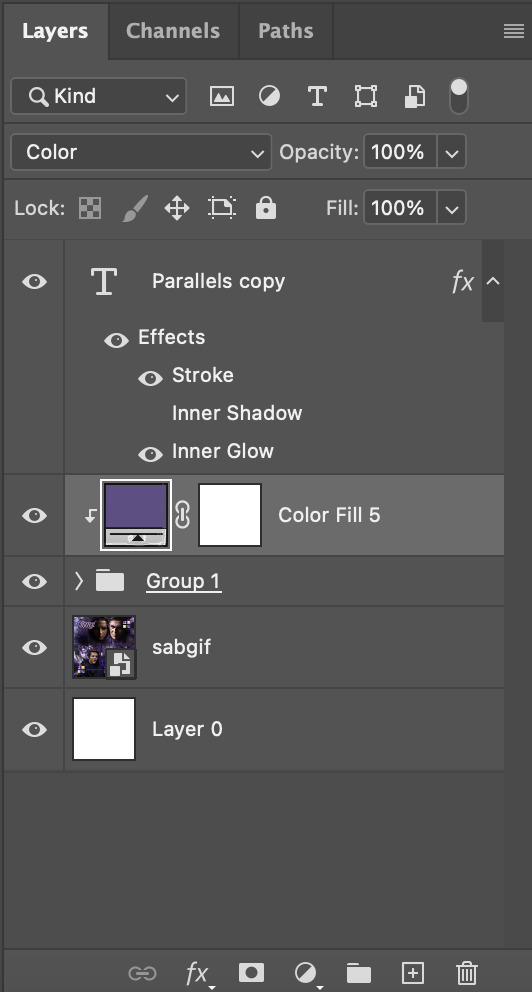
Now the colour of the filled text layer is purple
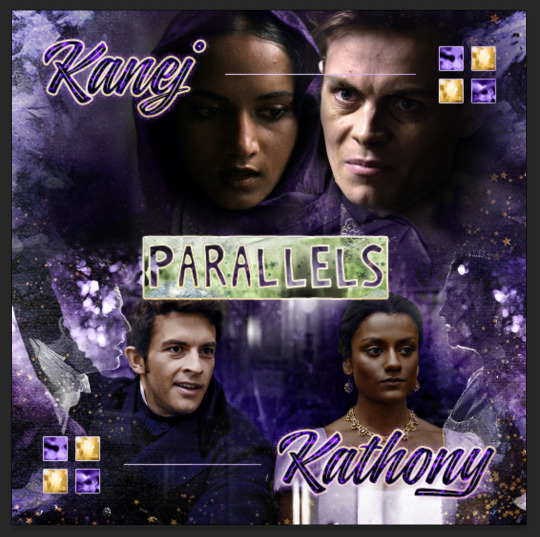
After adding more textures & decorations on the text layer (with photo negative effects) I get the following:
5) Photoshop: Adding overlays & decorations on the text layer
To avoid performance issues on After Effects, I make a new PSD file of the same dimension. With both the PSD files open, I select the text layer (highlighted in red) while holding Shift, I drag this to the blank PSD file (see the green arrow)
Holding Shift ensures that the layer's placement is preserved when it's copied to a separate PSD file.

In the new PSD file, I set the text layer's blend mode to "Normal"
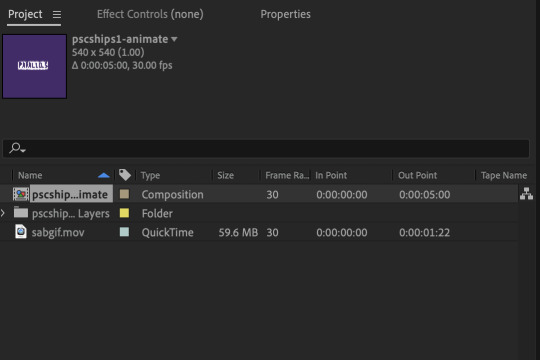
6) After Effects: Animating your text layer
Make a new project on After Effects and drag in the text layer PSD file. Import this file as a Composition

Also drag in the base gif video clip to the AE project.
While we won't be exporting anything with the base gif visible, having this file in the project file is useful if you want to have a better picture of how the animation will look in tandem with the gif.
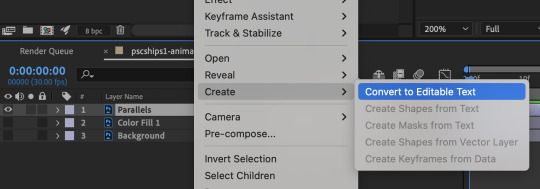
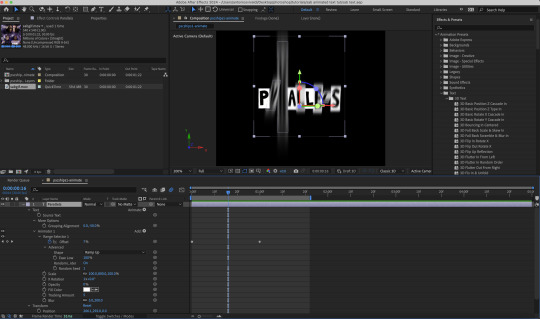
Double click on the composition. Hide the colour fill and background layers. Then right click on the text layer, go to Create > Convert to Editable Text
To be able to preview the animation with the base gif, drag the video clip to the composition file and below the text layer. The visibility of the layer can be toggled on / off anytime in the After Effects workflow
Now we prepare the text layer to be animated. Because the final animated effects is 3D & has motion blur, right click on the text layer and select "3D layer" (highlighted in green) and Switches > Motion Blur (highlighted in red)

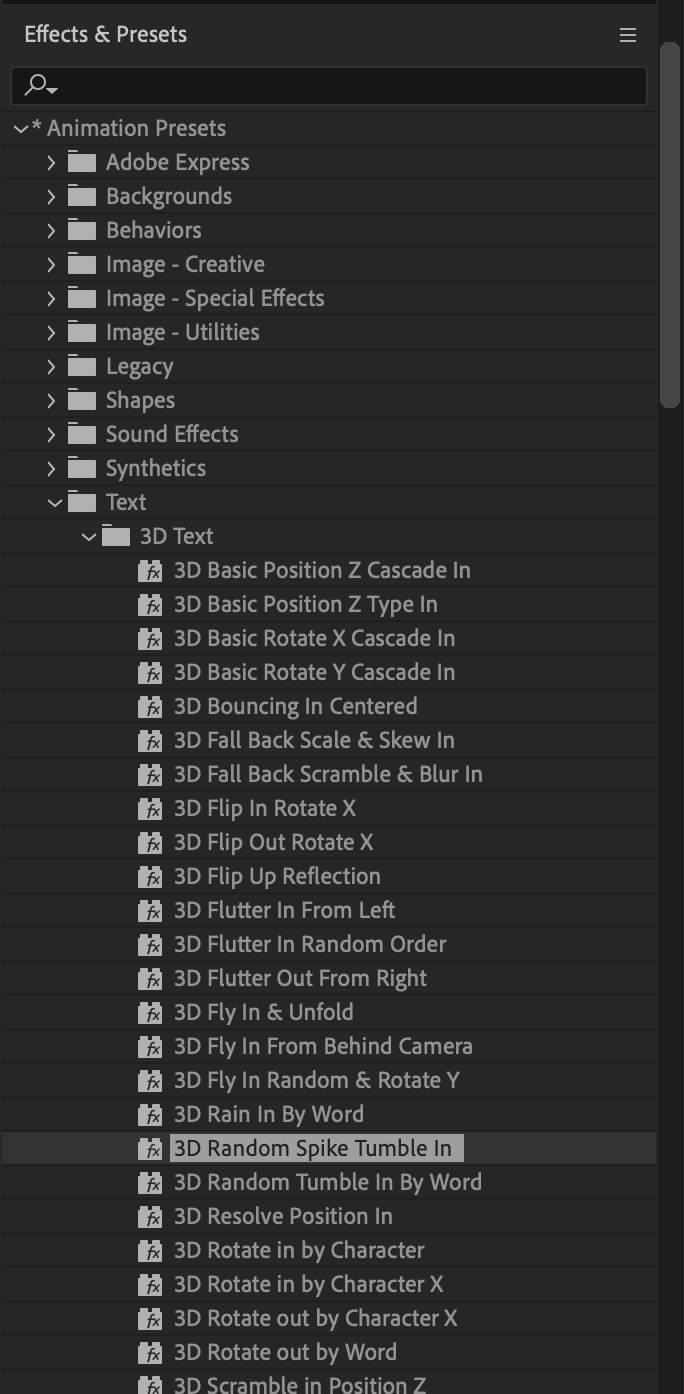
Go to Animation Presets > Text to browse through some presets that you could use to animate the text layer. For this gifset, I've used a preset within the 3D Text folder called "3D Random Spike Tumble in".
While selecting your text layer, press U to view the keyframes and you can adjust the position of these keyframes until you're happy.
For more finishing touches, press U again to tweak more options in this preset. In this case, I do to Animato 1 > Range Selector and changed the Colour Fill to #fff (the default colour is light yellow)
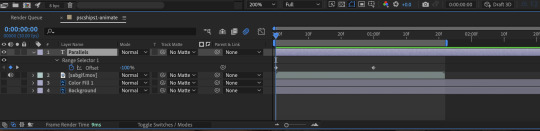
Then do you File > Export > Add to Render Queue
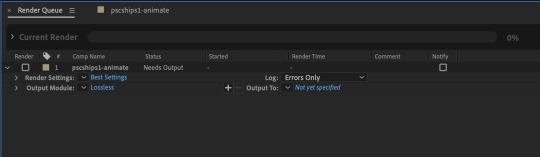
Click on the Output Module and use the following settings to render the text layer as a video file with transparency
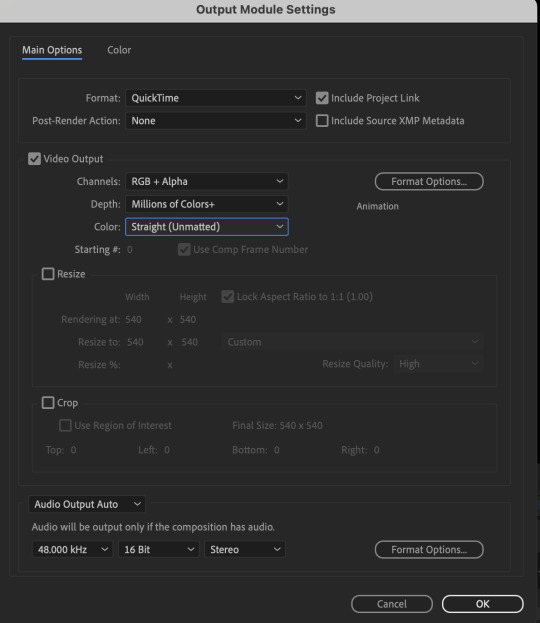
Then after specifying the folder in which you'll export the video to, click "Render" to render the video file containing your animated text layer.

7) Photoshop: Adding the animated text & finishing touches
On Photoshop, drag the rendered clip containing animated text, to the PSD composition file with the static text layers.
Duplicate the animated text video layer
Drag one of the layers inside Group 1 and set the blend mode to "Exclusion" (Highlighted in green)
Move the other layer to the top and apply the gold outline layer style with Inner Shadow disabled (highlighted in red)
Hide both text layers (highlighted in yellow)

By scrubbing through the timeline, I've noticed that the animation didn't look clean enough, so I'll add some finishing touches
By selecting the upper text layer containing layer styles, go to the timeline and add opacity keyframes going from opacity 0% to 100% a few frames apart

Once you're happy with the finishing touches, flatten / render your PSD composition file, change the frame delay to 0.05s and export your gif and voila!

I hope this helps 💖
#tutorial#gif tutorial#photoshop tutorial#after effects#chaoticresources#dearindies#userriel#useralien#userraffa#usershreyu#user.tee#useryoshi#usernik#userjoeys#usersole#arthurpendragonns#userhallie#*#my tutorials#my resources
152 notes
·
View notes