#first time properly using the gradient map
Explore tagged Tumblr posts
Visit Tumblr Blog
Explore Tumblr blogs with no restrictions, modern design and the best experience.
Last Seen Tumblr Blogs


Fun Fact
Tumblr has been providing a Korean-language service since 2013.
Text

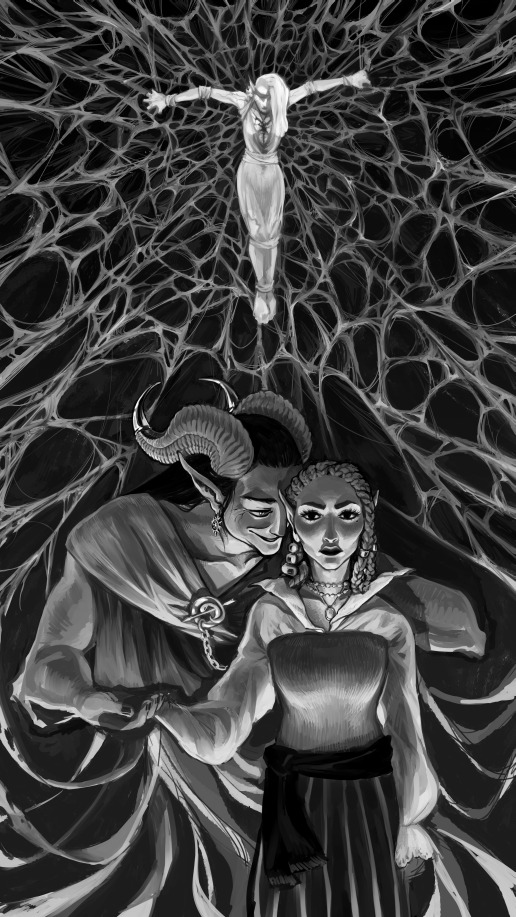
Team 7!
Bonus naruto with all my hcs

#naruto#naruto uzumaki#kakashi hatake#sakura haruno#sasuke uchiha#my art#rewatching the show and missing when they were happy and together.#not suuper happy with the kakashi so might draw him better one day#love the colors i used for sakura and naruto tho#first time properly using the gradient map#fave so far is rock lee and kakashi but one is love and one is lust.#naruto is my baby though and deserves so much better.#same with sakura bc sasuke does NOT treat her right....#starting to rlly enjoy drawing again lol i havent made full pieces in awhile
31 notes
·
View notes
Text


how i did this one
#do you like step by steps? have some#i was so tired first week that i had this idea that i couldn't even sketch it properly and just used paint#never used gradient maps before and not sure i still get how to do it effectively#anyway most of it was done last weekends in one sitting the rest took some time during the week#work in progress#DND#the girlies campaign#journey to Bunnhaivera
1 note
·
View note
Note
helllooo weirdoz!! your art is some of my favourite ever and I feel so bad if I had cash I would feed you... But the reason I ask; I am trying to learn how do draw digitally for the first time, and I don't find it that hard to replicate my traditional style, but I would really like advice on lineart and colouring. like making it look good and smooth, maybe what brush/brush settings you use I'm going around asking a few friends and favourite artists sorry if I'm bothering you,,,,
My art style is fairly cartoony, so my lineart and colouring is more or less a bit basic compared to a lot of other artists. Of course I change my style every once in a while depending on what is needed for an illustration, but overall I’d describe it as similar as your typical 2D animated cartoon.
The two brushes I use the most is a basic Round and Chisel brush, Chisel often for sketches, and the basic Round brush for lineart. Most often I use these with little to no line variety. I’ve grown sick of attempting to make my line weight to look right, so I opted to none of it. I still try to add some line variety in some areas that I feel need it. Sometimes I use a stabilizer if my lines are coming out wobbly.
I still struggle with colour theory, so most of the time I just half ass picking colours that I think look nice, but I sometimes reference other materials or make a black and white version in order to get my values right. Sometimes I even use gradient maps or blending modes if the colours still look off. I usually pick colours with lots of contrast, either really bright or really dark, because those are colours I typically like.
I could go more into detail about my art process, but I feel like I would need to make a video on that in order to articulate my thoughts properly. But overall, I don’t really do anything fancy with my art, most of my decisions just come from my preferences over the years. I find that indulging in what you personally like is what can make you like your art a lot more!
20 notes
·
View notes
Note
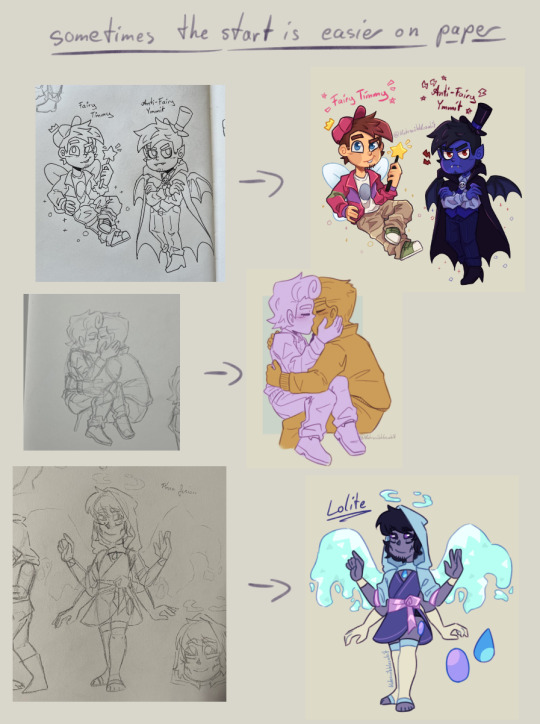
I absolutely adore your art style! Do you have any tips? Specifically for the fairies cause I am struggling to draw them.
thank you so much! well, this is gonna be a long post.
Im gonna be real, the best art advise anyone can give you is to use references and to break complicated stuff down into easier shapes. for example:
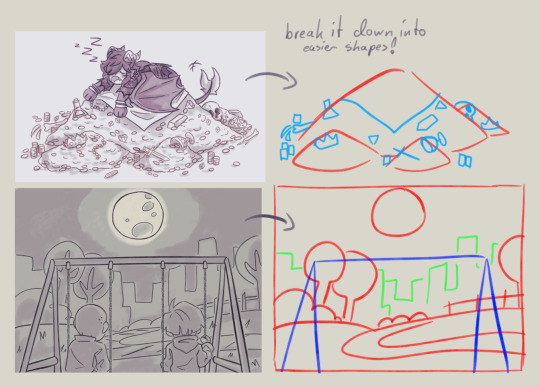
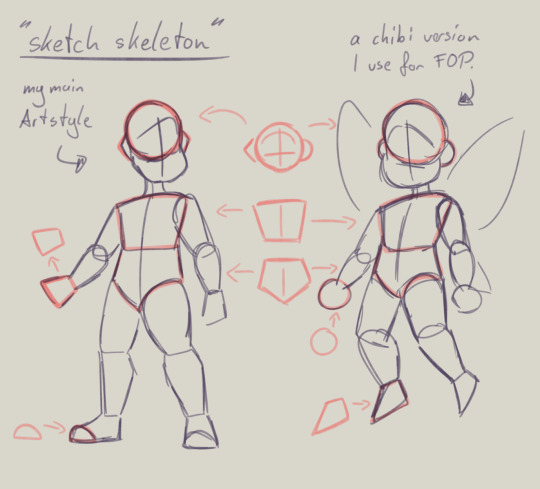
this is my basic body skeleton! i always start with the circle of the head and work my way down to the feet. i have highlighted some part of the body which are actually just simple shapes.
the center line down the middle of the torso also helps me draw on collars, bra cups, ties, or any other more difficult clothing more accurate!
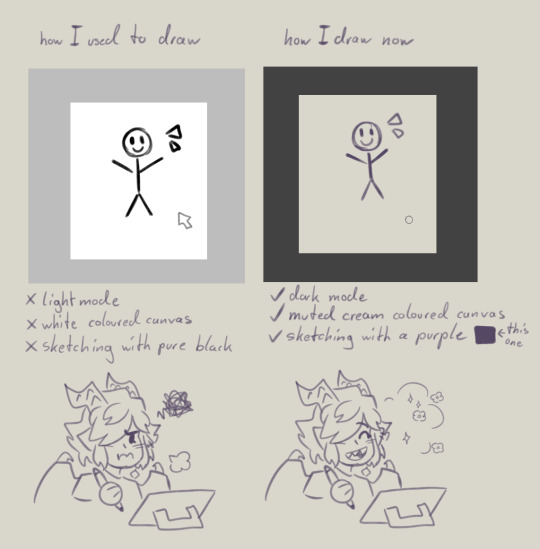
However i have to ask you, are you comfortable while you draw?
I remember when I first started drawing digital, i was really uncomfortable with the basic set up of my program. The white canvas and the light setting of the program was really bright and irritated my eyes. And the contrast of the pure black I used for drawing wasn't really helping. sketching and doing line art was my least favorite part of drawing because of this.
you don't have to draw on a white canvas, you can also use multiple colours for sketching if you wanted. Once I stoppend using a pure white canvas I noticed i stopped staring at a empty canvas not knowing what i wanted to draw anymore!
also sometimes when a drawing doesn't want to look right, i switch back to traditional. idk why but when my brain sometimes struggles with a specific pose or character design, it comes to me a lot more easier when I switch back onto paper. i guess the change of scenery opens up the creativity again haha.
don't be afraid to simplify stuff, you don't have to draw everything! As long as it still translates to the thing, it should be fine.
these two are a bit clip studio exclusive,
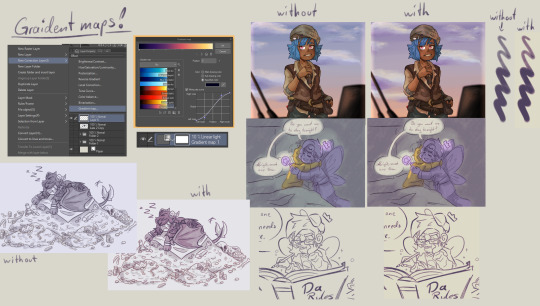
but Gradient maps! god how I love my gradient maps, it just makes the colours pop! I never draw without it anymore. I always pick the sunset gradient, put it in Linear light mode and put it on 10% (cus its really saturated on 100%)
usually i have it on while i sketch and line, and turn it off so i can properly colour and shade. i turn it back on at the end again
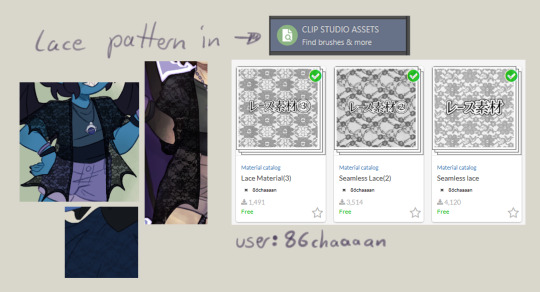
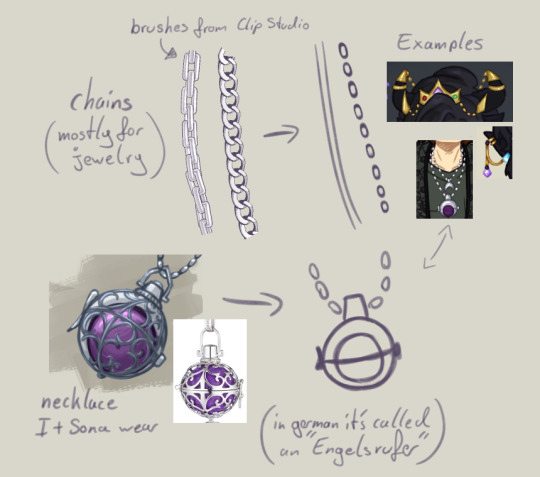
the clip studio assets has a lot of beautiful stuff in there created from other users. (a good amount for free too) for example I got the lace pattern of my shawl from there. and its really easy to import the downloaded stuff into the program.
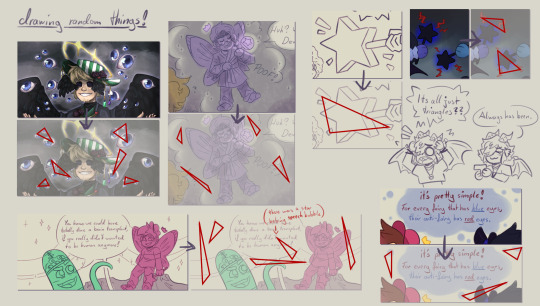
now this is a drawing hack that blew my mind when I first saw it! i use it all the time and I just have to share this!
whenever you want to draw something random like sparkles, stars, bubbles, feathers, falling leaves, or anything that you want to float around your characters, position them in the form of a triangle.
its even better if you put two points of the triangle closer together and then the third further away. this makes it look random but still looking appealing to the eye, and not oddly placed.
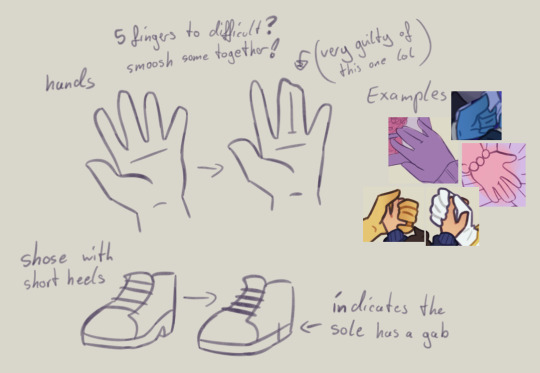
now that thats out of the way! Fairies! The one thing i struggled with when drawing them first is their hair. I suggest looking through the fop tag to see how other people have drawn them and take inspiration from your favorites and make up your own. (do not trace tho! that should be obvious!)
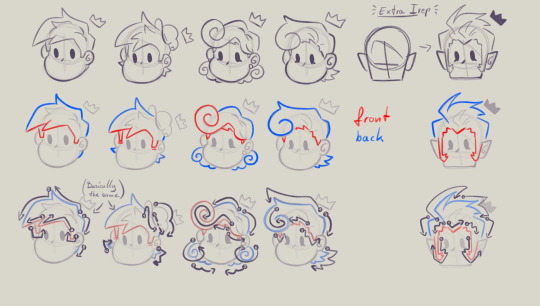
when I draw hair I think of it separated in two parts, the front and the back. I usually start with the front hair pieces, then draw in the jaw, ears and rest of the head, then continue with the back section of the hair.
the only outliers of this are Timmy and Peri. when I draw Timmy (Ymmit as well) I start with his hat, before drawing his hair. Since I draw Peris hair-swirl over his hairline, i start drawing his upper back hair style first before drawing his head and then his mullet.
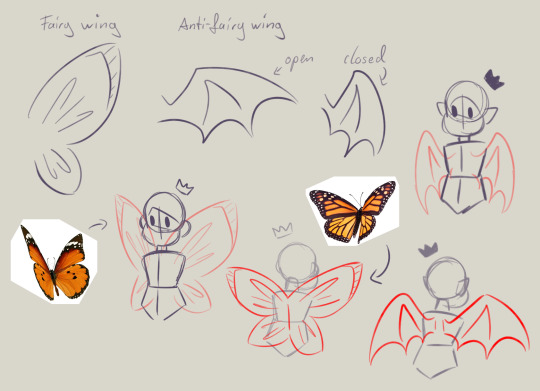
wings can also be tricky. the fairy wings i have given then have a more butterfly look. if you also want to base off the wings to real life animals or bugs you can use them flying as references to. Or you could even cut out the wing shape out of paper, fold it in the middle and take pictures in the angle you desire.
I hope this somehow helped, I thought about what could have helped me if I had known it sooner. even if most of these were for generic drawing.
#my art#asks#art tips#drawing advice#clip studio paint#fop#if anyone has more questions about how i draw#once i open up the ask boy again feel free to do so
52 notes
·
View notes
Note
the way you color things makes me want to commit crimes. any coloring tips for a baby digital artist who doesn’t know how to do the computer things good?
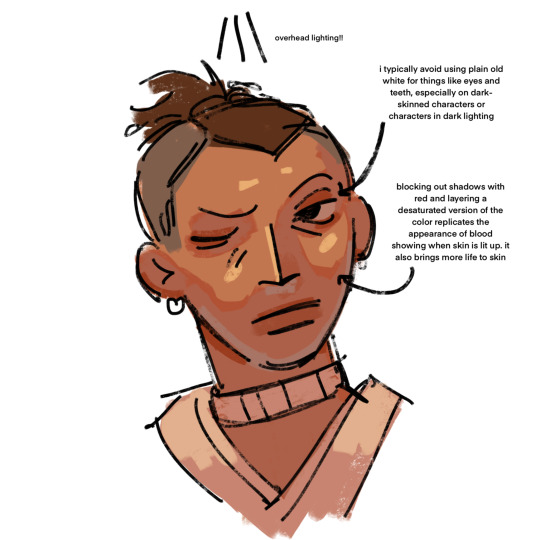
AUGH apologies for taking so long, i was in the middle of writing this answer and the whole thing was deleted as soon as i switched to another tab on my phone, and then the draft didn't save the second time i tried to write it. jfc at least i had it written out in my notes app the second time. anyway, thank you thank you thank you!! this was very nice to recieve, i love getting asks ❤️
i'm not versed in the arts of drawing on a computer, either, so i can't give tips in regards to specific programs (said in chronic procreate user voice) but i can certainly give universal advice keep in mind that i'm not professionally taught in the slightest so i lack much of the vocabulary to describe my methods, and remember that my word is not law!
in case of confusion, everything has been explained. i've added a cut because it got needlessly long. i've also added visual guides for certain tips, and image descriptions for each one
to be honest, much of what i do when picking colors is done with the help of gradient maps (more on that later) but when choosing my base colors i follow these rules:
1. you don't have to cell shade with purple + multiply and an add layer. that's the voice of lavendertowne attempting to take control of your body. stamp it out. (/j i love her)
2. bright, vivid colors!
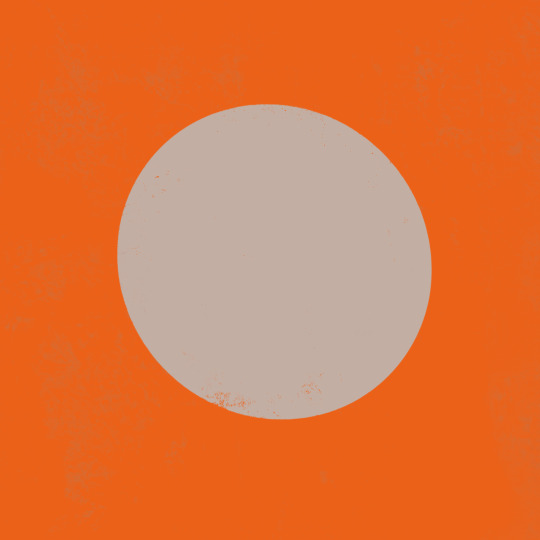
3. instead of shifting just the brightness and saturation when picking colors to shade, shift the hue, too! in the first image, we can see that the circle is dull and boring. in comparison, the second image pops!
4. so, how does this work?
without getting too much into color theory--because while i've studied it before, i don't trust myself to articulate it properly without making a fool of myself--it's all about how colors interact with each other. for example, a beige circle looks lighter when surrounded by a dark background rather than just plain white.
in the same vein, surrounding greys/desaturated colors with warm colors makes them look blue, and vice versa.

5. blue/grey shadows and warm lighting!! or the other way around. actually, you can use any color for shadows and lighting, depending on your light source. is it sunny outside, or are they beneath white light?
6. for color picking, i reccomend avoiding using the wheel, instead opting for the rgb sliders or the hue saturation brightness sliders if you're dumb like me. this allows for precision in the colors you pick, and accuracy when putting together color palettes.
7. and, finally, the actual computer stuff: gradient maps! i looove gradient maps.
as far as i'm aware, procreate and krita have the gradient map tool. ibispaint does not. i am not sure if firealpaca does.
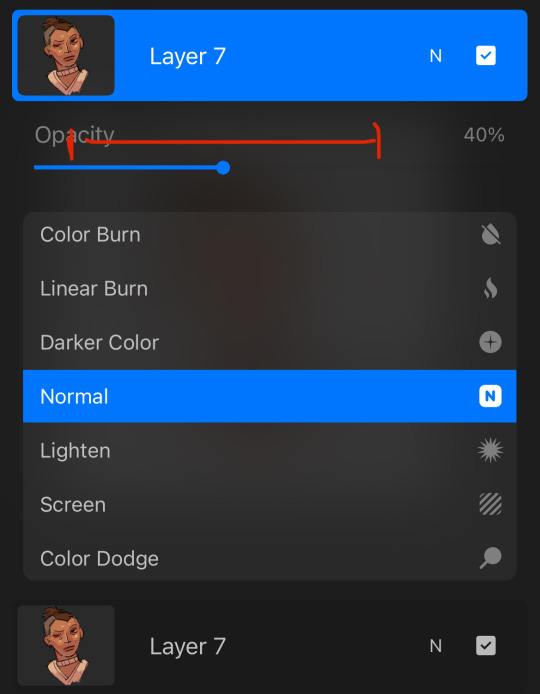
i usually use gradient maps to make my coloring more cohesive, rather than just slapping them on a monochrome drawing (which is also a totally viable method for coloring, but you'll be less precise, as gmaps only recognize values). when using gradient maps, i prefer to duplicate my completed artwork, lower the opacity of the duplicate on top of it (usually between 25 and 50%, depending on how strong i want the effect to be), and use gradient maps on the duplicate.
this makes my colors all nice and pretty!
11. if you use krita, it can be hard to find the right colors to use for your gradient maps. never fear! i'm here to give you the default templates from procreate, as well as a couple of the ones i've made.
if you have any more questions, or you want me to get further into a specific topic, feel free to send me another ask
16 notes
·
View notes
Note
What program do you use to draw? And how do you render? I hope it is okay to ask these questions
i use krita with custom brushpacks! my process often changes depending on the situation but most ofthen than not i render a sketch in greyscale untill im satisfied with it and use a combination of gradient maps and layer modes to color it before rendering it again. the finishing touch is another billion layer effects. ive been meaning to start recording speedpaints for a really long time now for the purpose of visually showing my process but i need to set up my obs properly first. and also get over my stage fright ww
15 notes
·
View notes
Text
just used a gradient map properly for the first time and i almost physically felt the lightbulb turn on
2 notes
·
View notes
Note
All the questions you wanna anwser
(this is from an old ask game)
1. When did you start creating art?
erm idk.... 2019 or so?
2. Do you do art in any professional capacity? (Graphic design, commissions, animation, etc.)
not yet but im planning on being an art teacher
3. What are your favorite subjects to draw? (OCs, your fan faves, etc.)
anime characters..........
4. What's your least favorite part of the body to draw, if any?
hands or really any part of the body that's in perspective
5. What piece of art are you still proud of to this day? (Show or describe)


i'm not particularly proud of any of my pieces but here are some that i still really like :) (i also really like that one mari & sunny lily of the valley piece that i'm not attaching directly bc i don't wanna trigger tag)
6. Favorite and least favorite angles/perspectives to draw?
i don't really have any... what's easiest is just straight-on, but that looks boring, so I can't realistically say it's my favorite... but if it's hard then I don't like it either.... sigh
7. Who are some artists that have inspired you?
see okay the thing is. artists that inspire me seem to always have an art style that i Can't Really Replicate. like i've seen so many of those painterly-style ethereal anime girls and pieces with the most gorgeous fucking colors ive ever seen in my life and they look SO PRETTY but i just Don't Understand Them At All 😭😭
so i'd say rixypill because recently i saw one of their art pieces and the amount of relief it brought me was insane. it was a gorgeous gorgeous art piece AND it looked like something i could realistically achieve. i didn't even really realize it but for such a long time i was trying to turn my art style into Something Completely Different and idk it just made me realize that i could make beautiful art Without having it stop being My Art
8. How would you describe your art style?
pink (with guest appearances from purple, orange, yellow, and blue)
9. What's the longest you've ever suffered from artblock?
several months
10. How do you deal with art block?
i don't <3 (I do challenges with predetermined prompts, and you can add deadlines if that helps you)
11. Have you ever drawn a meme with your OCs or canon characters from a fictional media?
yeah, i think i've made mini-animatics for like 2 vines. i don't do enough art shitposting tho
12. Ever participated in a multi-artist collaboration (3 or more) such as a multi-animator project?
i mean i did like 2 meps when i didn't understand what the fuck I was doing but i don't think those can really be counted........ i've done like art telephones and 3-person art trades but nothing really outside of that
13. What kind of art do you personally not see the appeal of, and why?
i think all art has appeal if you look hard enough
14. Do you prefer to make fan content or original content?
fan content
15. Do you/have you participated in Artfight or art trades in general?
i've done artfight in the past but i don't think i'll do it again because i'm usually really busy in july and even if i'm not i really struggle with doing anything for artfight 💀 i've done a good amount of art trades tho and if any of mutuals are interested in art trading with me feel free to ask :D
16. What was something you used to struggle to draw with confidence/ease, but have now mastered?
i don't think i've mastered anything really 😭 but i'm definitely a lot better at eyeballing colors than when i first started!!
17. Your personal favorite works of art (not made by you) are...?
there are lots of really awesome works in this world that i really like and if i didn't list like 500 different artworks i wouldn't feel like i'd answered properly so im gonna sit this one out lol
18. Do you typically use filters on your art?
yeah, i use saturation filters + gradient maps + blending modes at the end of every piece
19. What's your biggest insecurity when it comes to your artwork?
i have so many 😭 i'm in the "i hate all my art" stage of improvement rn..... aside from that, i hate that a lot of my art is so boring.... like there's not a lot of interesting perspectives or actual Meaning... that's the main reason why i made ychallenge! i want to make pieces that invoke emotion & mean something to me and aren't just there to look pretty
20. What motivates/inspires you artistically? (topics, emotions, etc)
fandoms mostly! if i was doing solely originally art i'd make maybe like one thing a year
4 notes
·
View notes
Text
11/03/2025 Tutorial & Presentation Refinement
During my tutorial session, the professor mentioned that I should prepare a themed presentation. This was mainly for branding purposes, as we need to present our concept to a game industry professional.
The professor suggested that I extract a color palette from my existing artwork and use a textured brush to create a background for the slides. Based on this advice, I chose dark red, pale yellow, and light blue and created a textured background, which I then applied to my presentation.

I also arranged my concept art in a structured order: Level Design → Hostile Design → Prop Design.
Issues in the First Draft & Improvements
While reviewing my first draft, I noticed that some designs that were clearly visible on a white background became hard to distinguish against the dark red background.
Additionally, the professor provided layout suggestions:
Some images needed to be brighter or have higher contrast to stand out.
Adding captions or explanations would help ensure that important details were not overlooked.
For the cover slide, he recommended including a teaser element to give the audience a hint of what to expect.
For the second version, I made these adjustments and also illustrated a small cover image to enhance the visual impact.
Additional Feedback from Another Professor
Another professor suggested that for explaining Mirror Maze tactics, I should use Blender models instead of just 2D diagrams, similar to what I did for the Merry-Go-Round tactics.
I tried replacing Reflective Mirror and Shattered Mirror with 3D models, but Rotating Mirror was difficult to present properly in Blender, so I decided to keep it as a 2D diagram.
These are what I eventually came up with:

He also recommended that I redraw the key visual for the Boss Fight to emphasize its importance as the final battle. Since I didn’t have much time before the deadline, I couldn’t create a fully detailed illustration, but I still redrew a key scene and adjusted the layout.
For this new Boss Fight visual, I took a screenshot of my Blender model. Then, I used Clip Studio Paint’s free 3D human model for figure references. I created a black-and-white sketch, then applied a gradient map for basic color.
I tried to enhance visual contrast by using two standout colors:
Red → representing the Boss’s danger signals & puppet strings controlling the player.
Blue → representing the player’s bullet trajectory.

Final Adjustments & Submission
The last piece of feedback was to include screenshots of my Blender models in the props section and label which parts of the models corresponded to my concept art.
I made all the necessary revisions and restructured the layout where needed, hoping for the best final result before the submission deadline.


Below is the first draft, with blue annotations showing the professor’s feedback.


Below is the final version, which I submitted on the due date.


0 notes
Text
Scene 10 - The Process so far
This will be somewhat of a longer post, seeing as a lot has gone into creating this scene thus far, and it isn't quite finished. Scene 10 was one I had always somewhat dreaded coming to, so I opted to place it slap bang in the middle of my schedule so I wasn't tempted to delay it or replace it entirely.
Scene 10 has the concept of a room rotating in a 2D space, one I'm not sure why I decided to torture myself with but I did. The first hurdle was deciding how to go about creating the rotating effect in the first place.
The Rotation Paradox

I began with a very fast block rendition of walls rotating in correlation with one another. As the rotation would be just beyond 90 degrees, I knew I could get away with three walls, the middle wall being the most detailed as it gets the most screen time. I thus created simple backgrounds to use in place of these blocks:


After arranging the backgrounds in place of the blocks, this is what I was left with. The floor was particularly painful to try and arrange, as I still haven't quite gotten the hang of mesh transformations in toon boom, though this will soon be ignorable with the furniture atop.

The Furniture
In order to create a believable rotation, I needed to sketch the furniture in accordance with the angles of the walls, which really helped me to mentally map out where each piece should shift. I began with the main piece, the sofa, which I soon deduced would have to be in two separate pieces in order to properly sit the character. I key framed in an end pose, a beginning pose and a middle pose, and went from there, referencing the wall angle always.
Following from this was the table, which followed the same rules, though this was a lot easier as it was just straight lines. The trickier one to get was the TV, which is designed to be big and clunky and a full artifact of the 2000s. Achieving the angle I wanted was quite difficult, so I opted for a faster rotation with more exaggerated frames, so as to get the screen on screen quicker. This is how the sketch looked:

From here, I was able to work on the lining of the furniture, as well as the colouring. I wanted some kind of gradient shading using block colours to reflect the angle of the light, and this follows suit for all of the furniture pieces. Here is the result after colouring:

Character
Though I still had the shelf to complete, I decided to begin work on the character of Em, in order to get the rotation mapped out as best I could before it came time to line her. I am currently still in the process of doing this, but here is my progress so far, with more in betweens to come:

I also took the liberty of beginning the sketch of the animation on the TV, so that things would be easier to breeze through later. Here's a quick shot of my current timeline:

As I continue to work on this scene, I will keep the blog updated.
0 notes
Text
Ombre Powder Brows and Lip Blush Treatment: The Perfect Way to Enhance Your Natural Beauty
In the world of beauty, eyebrow and lip treatments have gained immense popularity over the years. With busy lifestyles and the desire to look flawless with minimal effort, cosmetic tattooing techniques like Ombre powder brows and lip blush treatments have become the go-to solution for many. These semi-permanent makeup treatments provide stunning results that save time, boost confidence, and enhance your natural beauty.
What are Ombre Powder Brows?
Ombre powder brows are a semi-permanent eyebrow tattooing technique that creates soft, powdered eyebrows with a subtle gradient effect. The process uses a small, machine-operated needle that deposits tiny dots of pigment into the skin, gradually building up color and shaping the brows to perfection. The technique gives your eyebrows a soft, powdered look that mimics the appearance of makeup, but without the need to reapply daily.
Why Choose Ombre Powder Brows?
Long-lasting Results: One of the biggest advantages of Ombre powder brows is the longevity of the results. Unlike traditional eyebrow makeup, which needs to be touched up throughout the day, Ombre powder brows can last from 1 to 3 years, depending on skin type and aftercare.
Low Maintenance: Once your Ombre powder brows are done, they require minimal upkeep. No more daily penciling, waxing, or threading. Just wake up with perfectly shaped brows every day.
Customizable Shape and Color: Ombre powder brows are highly customizable. Whether you prefer a bold or natural look, your technician will work with you to create the ideal shape, arch, and color that complements your face and hair color.
Perfect for All Skin Types: This technique works well on all skin types, including oily skin, which can be difficult to work with when applying traditional makeup. The pigment used in Ombre powder brows is designed to stay vibrant longer and fade naturally over time.
The Process of Getting Ombre Powder Brows
The process of getting Ombre powder brows typically takes 2 to 3 hours, depending on your preferences and the skill of your technician. Here’s a breakdown of the process:
Consultation: The first step involves a consultation, where you’ll discuss your desired brow shape, color, and overall look with the technician.
Shaping and Mapping: Your technician will carefully map out your brows to ensure symmetry and a natural appearance. This involves marking the ideal start, arch, and tail of your eyebrows.
Numbing: A topical numbing cream is applied to ensure you are comfortable throughout the process.
Pigment Application: The technician will then use the machine to deposit pigment into your skin, creating the Ombre effect.
Aftercare: Following the treatment, you’ll be given specific aftercare instructions to help your brows heal properly and ensure the best results.
What is Lip Blush Treatment?

Lip blush treatment is a form of semi-permanent makeup that enhances the natural color, shape, and definition of your lips. It uses a similar technique to Ombre powder brows, where a small tattoo machine is used to deposit pigment into the skin of your lips. The treatment creates a soft, natural blush of color that can last up to 3 years, depending on aftercare and skin type.
Why Choose Lip Blush Treatment?
Enhance Lip Color: If you have pale, uneven, or dull lips, lip blush treatment can restore natural color and vibrancy. It’s a great solution for anyone looking for a subtle yet effective lip enhancement.
Shape and Definition: The lip blush technique also helps define the lip border, creating a fuller, more youthful appearance. It’s perfect for those with undefined lips or those looking to improve lip symmetry.
Smudge-Free & Long-Lasting: Say goodbye to constantly reapplying lipsticks and glosses. Lip blush treatment gives you a natural-looking tint that lasts for years, keeping your lips looking fresh and colorful without the hassle.
No More Lip Liner: If you’re tired of penciling in lip liners to create a fuller lip look, lip blush is the solution. It not only adds color but also defines the edges of your lips, making them appear plumper.
The Process of Getting Lip Blush Treatment
Similar to the Ombre powder brows process, lip blush treatment involves a few key steps:
Consultation: In the initial consultation, the technician will assess your lips and discuss your desired color and shape.
Shaping and Mapping: The technician will carefully map out your lips, ensuring they’re symmetrical and perfectly defined.
Numbing: A numbing cream is applied to minimize discomfort during the procedure.
Pigment Application: The technician will use a tattoo machine to apply the pigment to your lips, carefully blending to achieve a natural, even tone.
Aftercare: After the procedure, you’ll be given aftercare instructions to follow for optimal healing and long-lasting results.
Benefits of Ombre Powder Brows and Lip Blush Treatment
Time-Saving: Both treatments save you time in your daily beauty routine. No more worrying about smudging your makeup or needing to reapply during the day.
Enhance Natural Features: Both treatments accentuate your natural beauty, creating a more defined and symmetrical look for your brows and lips.
Confidence Boosting: With Ombre powder brows and lip blush treatment, you can wake up feeling confident, knowing your brows and lips are always on point.
Conclusion: Brow Me Beautiful
If you're ready to enhance your natural beauty and enjoy flawless eyebrows and lips without the daily effort, Brow Me Beautiful is here to help. We specialize in Ombre powder brows and lip blush treatments, offering expert services that provide long-lasting, natural results. Our team of professionals ensures that every client leaves feeling more confident and beautiful, with a customized look that perfectly suits their features.
Visit Brow Me Beautiful today and discover how these treatments can transform your beauty routine and give you the flawless, effortlessly beautiful look you’ve always wanted!
0 notes
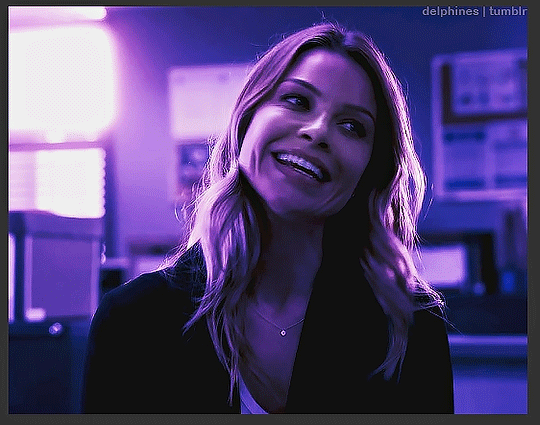
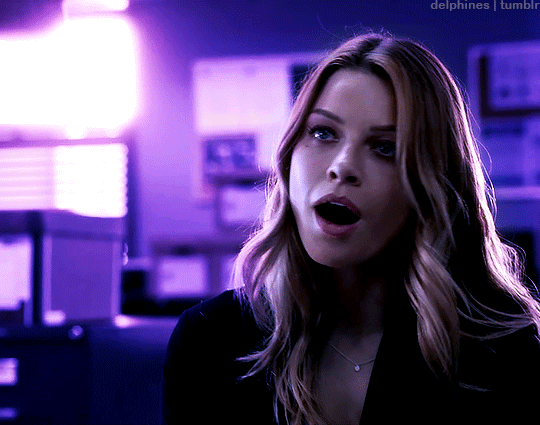
Photo
An anon recently asked me what process I use to color my gifs, and the short answer is: gradient maps! But since that process is a bit difficult to explain succinctly, I thought it was best to turn it into a tutorial. I don’t color all my gifs this way, but it is my favorite and most frequently-used method.
This tutorial assumes you have a basic understanding of gifmaking (cropping, sharpening, etc), and are using the timeline in photoshop. Tutorial under the cut!
1. Basic Adjustments
Alright, so here is what I’m starting with - the gif after just being cropped and sharpened, no coloring yet:
Before I start any coloring, I do a couple basic adjustment layers. I usually start with brightness/contrast, then curves (using the dark and light eyedropper tool), and levels. Here’s the gif now, after applying those basic adjustments:
2. Channel Mixer (if necessary)
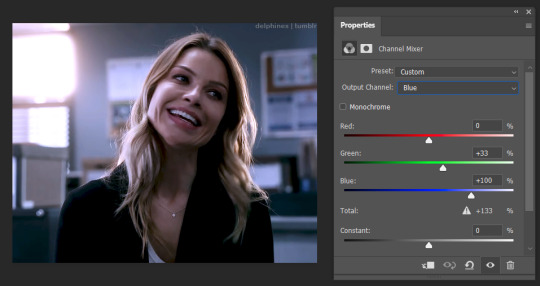
Some shows/scenes have very strong filters put on them already, a fact most gifmakers are painfully aware of. These filters can make scenes challenging to color because you’re not starting from a neutral base, but thankfully there is a solution: the channel mixer! This adjustment layer is explained in more detail in this wonderful tutorial by @selinakyle, but essentially it allows you to isolate certain colors to correct them more accurately.
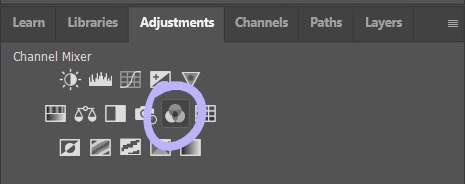
For this scene, I’ll be using the channel mixer to counteract the strong yellow-green filter that’s already baked into the footage. As you can see from my settings below, I’ve set the output channel to “blue” and then adjusted the “green” slider. That means that I’m adding blue into the green tones in the image. This will remove that yellow-green tint from my gif and allow me to start coloring with a better base.
3. Color Balance
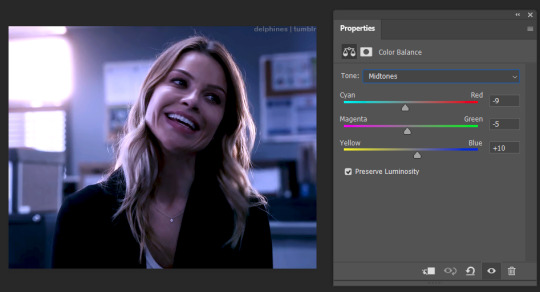
Next, I add a color balance layer. This layer allows you to adjust the color of the shadows, midtones, and highlights of your gif separately. To be honest, I feel like this layer is all about experimentation; you never know what’s going to look good until you test it. You can see me testing out the sliders below.
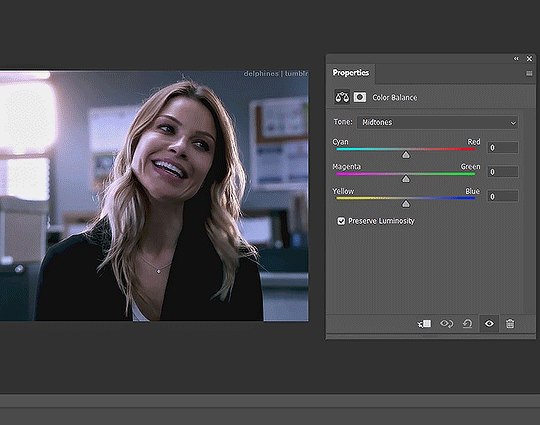
It’s not usually a good idea to move the sliders around as drastically as I did here, I did that to give you a visual of how much the color balance layer can change the look of your gif.
The color balance settings I ended up going with are below. You can only see my midtone settings here, but my shadow and highlight settings are similar.
4. Adding the Gradient Map
After the basic coloring’s done, I add a gradient map, which is also located in the adjustment layer panel.

When you first add a gradient map, it will automatically add a gradient of your foreground and background colors, which is usually not the look you’re going for. To edit the gradient, simply click on the gradient itself in the properties panel and it will open up the gradient editor.
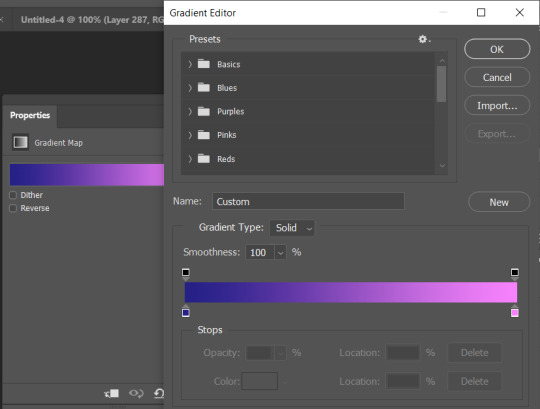
In the gradient editor, click the tiny squares on the bottom of the gradient to edit each side of it. You can also add more colors to the gradient as well if you want more than two. It’s usually a good idea to put the darker color(s) on the left and the lighter color(s) on the right so that they correspond to the shadows and highlights properly.
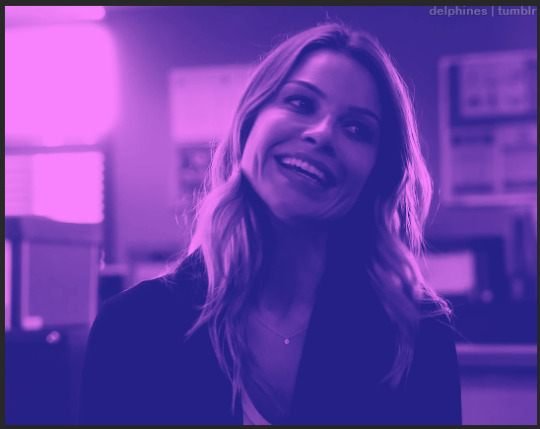
Now that my gradient is added and the colors changed to my liking, my gif looks like this:
5. Adjusting the Gradient Map
The colors are nice, but I don’t like the way they just sit on top of the image, I want the gradient to look more natural. So it’s time to adjust the gradient map’s blending mode.
Every adjustment layer’s blending mode is set to normal by default. Adjusting it is easy - simply go to the layers panel, click the button that says “normal,” and scroll through the choices in the drop-down menu.

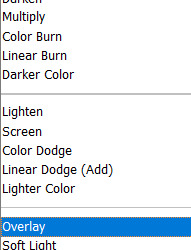
Like so many parts of coloring, which blending mode works best really depends on the scene and the look you’re going for. I usually start with overlay and see how it looks, but other popular blending modes are multiply, soft light, and color. I’ve also used hue and color burn.
For this gif, I decided to use overlay. Now that it’s been changed, my gif looks like this:
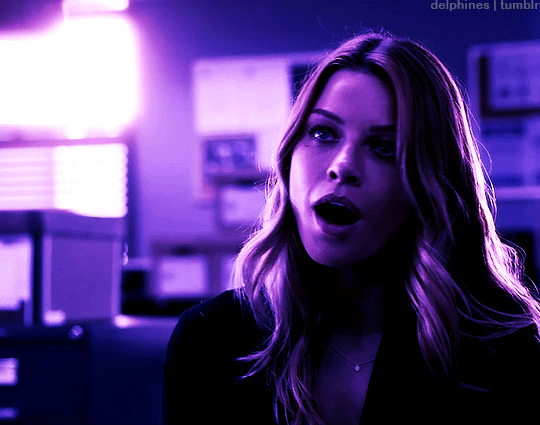
6. Adding a Layer Mask
The purple color looks great, but now the character looks unnaturally purple as well. In order to remove the purple from her face and hair, we’ll need to add a layer mask.
To add a layer mask, select the gradient map layer and then click the icon at the bottom of the layers panel that looks like a box with a circle in it.

After you click it, a small white box should appear beside your layer’s name.

Make sure it’s selected, then select the brush tool. Set the brush to black, increase the size if necessary, then start painting over the character’s face. Painting on the layer mask will obscure part of the gradient map layer itself, so that only the basic coloring we did before is visible. The darker the brush, the more opaquely it will remove the gradient map. Also, the larger the brush, the softer the look. Since I want a soft edge to my layer mask, I’m using a larger brush.
This is what a layer mask in progress looks like:
7. Keyframes
Now I’ve successfully removed the purple from the character’s face - so I should be done, right? Well, let’s export the gif and see:
Nope, still not ready. The layer mask I added is stationary, but the gif itself is not. This character moves around quite a bit, and since the layer mask stays still, it means that she dips in and out of the purple and sometimes reveals spots of the basic coloring on the wall behind her.
To fix this, we have to animate the layer mask so that it moves with her. We’ll do this using keyframes. To add keyframes, you’ll first need to unlink the layer mask. Go into the layers panel and click the little chain icon next to the mask.


Once the chain icon has disappeared, the mask is unlinked from the layer.
Next, go into the timeline, find the proper layer, and click the drop down arrow on the left side. This should show you a list of properties with little stopwatch icons beside them.
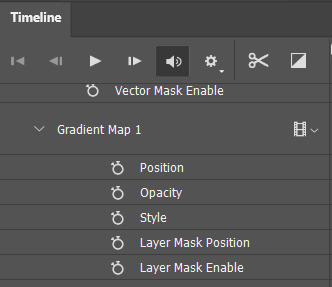
Each stopwatch toggles the keyframes for their respective property. Since we want to animate the layer mask position, we’ll want to click the stopwatch beside “layer mask position.” Now, it should show a small diamond beside the stopwatch - this means that keyframes have been enabled.
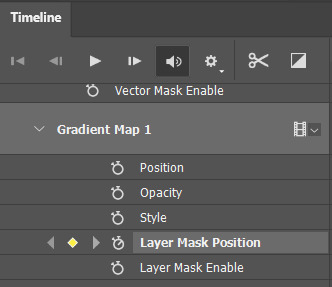
To animate the mask, make sure the timeline slider is placed at the very beginning of the gif. Drag it slowly across the timeline and stop as soon as the character moves beyond the mask. When this happens, use the move tool (do NOT use the transform tool/ctrl + t!) to drag the layer mask into the proper position.

Since keyframes are already enabled, every time you move the layer mask, you will create a new keyframe. This means that photoshop will animate the space between the two keyframes automatically. You’ll know that you’ve added a new keyframe when a small diamond shape appears at your slider’s position in the timeline.
Continue doing this throughout the whole gif, being careful to move slowly, as it’s very easy to miss a spot if you go too fast. This is how many keyframes I ended up creating for this gif:
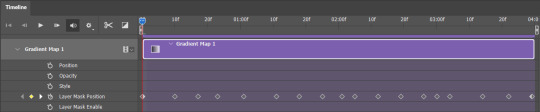
Once you’ve gone through the entire gif, you’re done!
8. Exporting the Gif
Something that’s annoying about using keyframes is that, when you either convert back to frames or save and open the gif separately to adjust the frame delay, your frames will be duplicated. What does this mean? It means your gif will look like this:

Not great. The solution is easy, but tedious. Simply select every other frame and delete them before changing the frame delay (0.05 is the standard) and exporting. Now the gif should animate at the proper speed:

And you’re done!
I feel like a lot of coloring/keyframes/etc is really hard to explain, especially through text, so feel free to send me an ask if you need further clarification. Also, my lovely friend Sole (@fionagallaqher) recently made this tutorial using a very, very similar coloring method, where she explains both how to use keyframes and how to color frame by frame. Please check that out if you’re interested in learning more!
#mytutorials#rambling#usersole#useralison#userannalise#useryoshi#userelio#tusersoph#usershreyu#uservalentina#userfnuggi#uservivaldi#supervalcsi#usernums#tuserkay#userkarolina#tuserrex#userdean#usercera#usernorah#tuserjen
473 notes
·
View notes
Note
hey! would you ever do a tutorial or walk through of one of your graphics? i love your work and would love to know your process :)
I'm not really used to share my stuff like this butttt that's the third (?) time someone asks for it so let's goooooo.
First things first my inspo was an art piece i saw on Pinterest (I've a brainstorm folder for it) with wavy, grainy and colorful shit. Also I've been CRAVING for a nice pic of lewis with the fluro gloves for me to edit him properly in them.
I used two apps: Photoroom (to erase the background easily) and Ibis paint (a mod APK 😛)
So let's go, i start opening an a4 sized archive on ibis and centralized the pic,then I used Photoroom for doing the PNG. Used a rainbow gradient map and some grain for the background, copied the layer and used this wavy effect on the background and put that layer on overlay. I liked doing it because it gives a halo effect.
In the lewis png layer i try to add a layer of a grainy gradient by hand and failed miserably, so i use the gradient effect and use the grainy over it.
To the helmet and gloves i selected the fluro color and filled it with the bucket paint on the other layer with a fluro yellow.
The spiky halo is a effect on ibis that i own my life to dkdkkdkd, also i added a rainbow grainy gradient over it to make it cohesive.
At this point i was almost done but i felt like I needed to add something to focus it all more on lewis so i added the little fluro yellow border, after that I just added some of my favorite textures and some halftones.
That's itttt i hope it's understandable and useful!!!
#tutorial.#ask answered#to the person who asked something similar and I'm taking thirteen centuries to answer....#your time will come when i discover a certain topic you asked
2 notes
·
View notes
Text
Week 4
from the powerpoint that I created I have simplified my topic down as I felt it was very broad and decided to focus on the stereotypes of how women are objectified, sexualised in the media and how they are represented as I wanted to focus on women empowerment and showing how stereotypes can negatively impact women because of them being continuously sexualised and objectified in the media and from the things that they see and show how even today. this has led me to creating experimental imagery which I could potentially use in my final project. to start it off I created 3 mind maps with 3 images and one word descriptions. I also added a paragraph on this mind map to show a summary of why these words link to the image and what message it can portray. I personally I found this interesting as it gave me time to think about what representation and meaning these images can show if we properly think about it and look closely at the image. The images I selected was a Breeze soap advert from the 50s or 60s, an image of Buffy Summers from Buffy the vampire slayer and Cher from clueless. These images can connote my theme of stereotypes as it can portray them to be self obsessed with their appearance, being strong and showing empowerment and also being objectified and sexualised.
After that I then started to create some experimental imagery using canva, procreate and photoshop and created a video to also show the stereotypes that we see in the media and how women can feel. I did this video to the song prom queen by Beach Bunny and first listened to the song to see which lyrics I could create scenes to and then I drew out a story board of the different scenes and what positioned I wanted to use and the style of clothing, accessories and placement on the person. I used. 14 scenes for each section. I then selected the type of clothing and accessories I wanted to use and created a moodpboard for each one by taking photos of the items and collaging them together. after that I then proceeded to make it and then watch dit back to make sure I was happy with it and pleased with the results.
I then experimented with some images by browsing the internet and finding a model I could use to create my first image experiment, I was determined to improve my photoshop skills which lead to experimenting with the different tools and saw I warp tool. this lead to to use two images of a model with a close up of the face and a image of a cracked wall which I the wrapped onto the face and erased all the grey areas, changed the blending mode and the lighting and gradient to make it more effective and standout and make it seem like the face was cracking from being stereotype and showing that women put on a over that they are okay with how they are represented and what they read and see in the media but in reality they are breaking down and cracking as it cause a negative impact on them
I then created another experiment using two programmes, Canva and photoshop. I used Canva to create a photo montage of 15 different sexist and stereotypical adverts that were produced in the 50s and 60s and layered then over each other in different angles, portioned and sizes to make it effective. I then though about how I could create a glass effective to as if it was smashing these sexist adverts and showing that they are harmful and very offensive towards women and by using glass can connote that theses sexist adverts are slowly being broken and there’s more equality and diversity within society
I continued with using secondary imagery but was inspired by an artist I found on Pinterest, Natalia Ivanova and used puzzle pieces to show that stereotypes are just pieces in society and it actually doesn’t actually define who we are but because of what we see we can start to be like what we see in the media. With this image I used images of a bratz doll a bar or doll and Ariel from the little mermaid and different skin tones to show how perfect these representation of women are when it’s fake but we actually don’t look like that and everyone is different. By added these dolls and people to puzzle pieces can also show that because of repetition it’s what society wants us to look like by wearing makeup.
The final piece I did this week was a landscape image of Elizabeth Olson with a plain background. I used the software of photoshop and used the stroke path to create a curved line from the face which shows that what we see in society and the stereotypes we are defined to can blur and warp our identify as a person in society
3 notes
·
View notes
Text
#showyourprocess
Hello! I was tagged by both @highwarlockkareena and @fengqing for two different gifsets: this one and this one. So I’m going to try and go through what I did for the Xichen gifset here and I’ve done the Jiang Cheng one in another post!
RULES — When your work is tagged, show the process of its creation from planning to posting, then tag 5 people with a specific link to one of their creative works you’d like to see the process of. Use the tag #showyourprocess so we can find yours!
1. Planning
When it comes to my gifsets I don’t really go in with a real plan, I just sort of have an idea in mind and see what I come up with! In the case of the request gifset I had the concept that someone had requested from the network, so I had a basis of what they wanted, almost like a commission of sorts to fulfil.
They wanted “It would be cool to have it differentiated with a contrast of b&w and color, but I trust you guys to color it however you’d like.” I decided the best option for this request was Lan Xichen and his grief over NMJ and JGY, so I started to look for scenes of them. Luckily, I have every episode downloaded in HD so I can browse as I like - so I started looking for what fit, mostly around episodes 41 (for the flashbacks) and 50 (for Xichen’s grief).
2. Creating & Colouring
I use Photoshop CS5 (old school!) to make my gifs and KMPlayer for my screencap taking (you can find a tutorial for it here!) I always have sixty frames for my gifs and set them to 0.05 speed. I don’t tend to save my psds unless I really like the colouring, but I can use screencaps! Since I wanted to incorporate the OP’s request for colour-greyscale, I decided to do it with this part of the gif:

I basically had to go through each frame / set of frames and add a layer mask to each one to make it greyscale, so it looked like this in the photoshop layer list:

Basically, I cut out the NMJ and JGY parts using a layer mask and made it so only LXC and the backgrounds were in colour. For the text I used two contrasting fonts and (after checking with the discord!!) used a dark blue background on the second part - using a blue from the background to go with it.
I also used layer masks for the second part of the gifset, this one. I then coloured NMJ with a black -> dark red gradient and JGY with a black -> dark yellow gradient to reflect their primary colours. For help with layer masks like this I reference tutorials like this one!
The third Xichen gif was another layer mask, to make him in colour and the background greyscale (and I blurred LWJ too) and the fourth was greyscale into colour, using a fade to swap between the bowing scenes and the Xichen scenes.
For the text I added a stroke of 1px in black and then made it so that it had less opacity; it adds a softer effect to the text. (I’ll go other some of the other text effects I use in my Jiang Cheng version!)
For my basic colouring process, I use the following things, generally in order:
1. Curves layer (using this trick). 2. Brightness/Contrast layer (brightness up, contrast down a little). 3. Selective Colour (to adjust the colours to pop the way I want, e.g. in the first gif I popped out the blues). 4. Vibrance (to bring up the colours a lot more). 5. Gradient map layer (to adjust colour tone - usually I use either a black->white one or the following):

I can do a more in-depth colouring tutorial (especially for the Untamed!) if people want.
3. Posting / Sharing
I always save to drafts first so that I can check that 1) tumblr didn’t mess it up 2) there are no glitches I didn’t notice in photoshop and 3) I can add captions. For coloured captions I use this tutorial just to get a colour gradient. Save as a draft to make sure it’s all saved properly and looks good and then you can post!
These are my gif saving settings, in case you’re curious:

I hope this all makes sense and if you have any questions then please let me know and I’ll be more than happy to answer them for you, any time. If you’re reading this then consider yourself tagged with your favourite gifset/graphic of your own! (I would tag specific people but I think many people have been tagged already!)
8 notes
·
View notes
Text
Appending some stuff to Slash Girl’s info, but not really expecting anyone to read it because ¯\_(ツ)_/¯ I just want it somewhere accessible to me that doesn’t involve logging into Google Docs or Dreamwidth.
DWN.054β - Slash Girl
Purpose - High-speed recon, wide-range intel/target acquisition and mapping. Dinosaur army support tracker and assistant spearhead combat robot.
Personality
Tactically quite smart
Good at noticing small changes in the environment, making her an excellent tracker.
Puts a lot of effort into hunting; extremely task oriented. A ‘hunt’ could be of the physical sort, but also extends to recon/’research’ or even menial retrieval errands.
On all other accounts, somewhere between dumb lizard and idiot bird
Hunt-motivated, but quite lazy otherwise. Spends a lot of off-time sun basking.
Has good eyesight, but difficulty with glass. Can (and frequently does) walk into glass doors if they are well-kept, lacking decals, and not automated (and will still run into automated doors while overclocked due to internalizing their opening speed while not overclocked).
Arbitrarily territorial and over-protective. High likelihood to hyperfixate.
Acts like a badass, actually very easily startled.
Due to quirks in her heating system (see below*), the quickest way to increase her internal temperature without overclocking is to imbibe blisteringly hot liquid, which has given her a reputation for being a coffee addict (as it is her most frequent blisteringly hot liquid of choice).
Given reptilian similarities and shared functions as recon bots, Slash Girl fondly considers Snake Man to be an old uncle.
Skills
High sprint speed and powerful jumping capability.
Strong senses, capable of monitoring and transmitting multiple forms of data (visual, audio, thermal, etc.) at high speeds.
Melee attacks are primarily kicks. In a game environment, this would entail:
A fast ground slide, similar to Mega Man’s, but damaging.
A three-hit standing kick (high, middle, and low)
A front-flip into a one-foot ground slam, utilizing the brake-boosters in her shins.
‘Signature’ moves involve arm-feathers:
A forward slash similar to the Slash Claw, with no shockwave.
A rapid, top-like spinning attack utilizing the brake-boosters in her arms.
May get ‘dizzy’; she can visually handle straight-shot high speeds, but her gyroscopes aren’t calibrated to handle something like this.
A three-way spread projectile. Feathers stick to terrain to form temporary hazards.
Can raise her feathers as a shield to block projectiles, but cannot obliterate them.
Other
Some ‘basic’ comprehension processing and databanks were removed to make room for the sheer amount of high-speed data she has to gather and transmit, rendering her effectively illiterate. She can still understand and speak multiple languages, but she has no databank for any written language, on the assumption that she is transmitting all visual data she collects to somebody who can.
This is fixed before she is activated in the 21XX timeline, since she is no longer needed for mapping and recon. Were she to be activated in the 20XX timeline, however, this quirk would still stand.
About a head taller than her brother, and much more heavily built.
Due to her design emphasis on distance speed, she’s built to take g-forces and to absorb the impact of sudden stops, making her surprisingly tough and sturdy for a high-speed recon bot.
Although her sprinting top-speed is higher than her brother’s she is far less nimble at close quarters.
Frequently overestimates her ability to brake; crashes are not uncommon. She even has foot spurs, and brake-boosters in her shins and arms, and she still manages to screw this up because she tends to use those more for augmenting her attacks than remembering what they’re actually for. If she used them properly, this would not be a problem. But it is.
Using her brake-boosters to augment her attacks causes unnecessary jarring wear on her joints and internals, as they were not built with that functionality in mind (they can take sudden, massive single impacts from braking, constant heavy pressure from g-forces, and rapid low-pressure joint movement and minor impacts from running fast in the first place, but repeated large impacts in a short time frame can cause compound problems). It also depletes her energy much quicker.
Higher base jump, but unable to grip and scale walls.
Shares her brother’s sensitivity to cold but with lesser severity. Completely lacks his milder vulnerability to high heat*. However, her circuitry and other components tuned for maximum efficiency at dangerously high speeds are strongly susceptible to electric-based attacks.
* Both Slash Man and Slash Girl have unique internal properties due to their high-speed functions. Since neither manipulates time to move quickly like some other speed-based Wily Numbers, both require extremely wear-resistant joints and other internals.
To get around this, both are augmented with a unique, waxy jelly with a stark heat gradient; at room temperature, it is fairly rigid and almost sticky, to allow for internal support, but at higher temperatures, it turns into a high-efficiency joint lubricant. If either robot’s core temperatures are brought too low, the jelly quickly coagulates and locks up where it shouldn’t. Directed electrical currents allow the jelly to resist thermodynamic equilibrium, so the jelly is only affected close to the heat source, allowing the material to support multiple physical states within the same compartment.
Slash Man, being an earlier model, gets around this by constantly overclocking and running hot 100% of the time, explaining why he’s… Like That. But it also means he wears out the jelly (and other internals) at a much higher rate, requiring more frequent replacement/repair. He also contains more of the jelly supporting and cushioning internal components, so high ambient heat or direct heat-based weaponry weakens structural stability overall, giving him his two-pronged temperature weakness.
Slash Girl, by contrast, has most of the jelly compartmentalized to high-wear moving parts only, and an internal toggle for her overclock to get things moving, which she leaves off when she has no important tasks, making her sluggish and lazy most of the time. Finding sources of heat to warm herself up allows her to function meaningfully when she’s not clocked up, but it usually takes a while to raise her core temperatures to a point where it can affect the pertinent portions of the jelly.
To speed up her heating process, she can drink blisteringly hot liquids... such as overheated fast-food coffee. This has given her a bit of a reputation as a caffeine-junkie, though only the thermal heat is of value to her. Dousing her internals with coffee also has a downside of causing more problems than good, so despite her requiring less maintenance than her brother in theory, she finds herself needing repairs just as frequently.
The material itself is fairly versatile for other purposes, and for a while was used as an incubation medium for certain types of robots (especially reptilian), as well as a diagnostic suspension due to its unique properties at very specific temperatures, though heated microfilaments spread through the entire medium is required to keep it at a uniform temperature given its usual resistance to equilibrium. Over time, most of its general functions were phased out in favor of less finicky substances.
It is the same goop that Slash Man throws capsules of as a means of subduing prey, since it is found in ample supply at Robosaur Park given its other uses.
7 notes
·
View notes