#gimp software review
Explore tagged Tumblr posts
Visit Tumblr Blog
Explore Tumblr blogs with no restrictions, modern design and the best experience.
Last Seen Tumblr Blogs


Fun Fact
130K people were victims of a chain letter scam that affected Tumblr in May 2011.
Text
#1 destination for finding software and services
We’re the #1 destination for finding software and services
Verified Reviews 2 million verified reviews from people like you to get the insights you need
Proprietary Insight 500+ softwarereviewforall Shortlist reports to narrow down your options and save you time
Expert Guidance Personalized software recommendations from human advisors in less than 15 minutes
Satisfied customer / FROM OUR USERS "softwarereviewforall helped us get insights from other people in our industry to make a better, more informed decision." JOSH D. Sales Engineer
Please note that "softwarereviewforall" is a placeholder, and you should replace it with the actual name or website you want to use in your text.
#software review#software reviews#antivirus software review#mint software review#you need a budget software review#jira software review#quicken software review#reaper software review#zoho software review#software testing review#xero software review#gimp software review#libre software review#topaz software review#software review sites#software review websites#software review site#nch software review#audacity software review#tax software review#video editing software review#4 vs 4s#best tax software 2023#avalanche software#what type of software controls the hardware of a computer?#hogwarts legacy review#procore#clipchamp review#shotcut review#stessa review
12 notes
·
View notes
Text
Recommended Reading for Potential Staff
Hey! This is our guide for people who want to become part of our team, to learn editing for scanlation, or to improve their skills!
Before You Apply
Here are some general internal rules you should take a look at before deciding if our group is right for you:
- This is a labor of love. There are no salaries, payments, donations, tips or any other money exchanged. We ask that no profit is made from our scanlations, and encourage people to buy the Japanese books or official English releases if at all possible in order to support the authors.
- Regular communication is essential. We're more than happy to provide you with help or additional time to complete your work, or to wish you well in your future endeavors if you decide to quit, no questions asked - so long as you let us know. Please, do not ghost us.
- We prefer to use Photoshop software to edit. If you prefer another software, it must have .psd file compatibility with PS. Gimp, Paint Shop Pro and Photopea are some options, but we’d have to check the compatibility of your submitted files first. If you don't currently own any of these programs, don’t give up! Let us know and we'll discuss our options.
- Chapter turnover period is 4 weeks, ideally. However, we realize that sometimes some chapters are longer and more challenging. So long as you keep in touch and let us know how it's going, taking more time is alright, too!
- You will be required to take a test before joining us. You can take the cleaning test, the typesetting test, or both. Please, look in the next section for a sample of what quality you should be aiming for on the said test!
- You are always welcome to reach us with questions at [email protected]
The Aim
Our group focuses on quality rather than quantity! We release HQ scans and edit out the Japanese completely. Cleaners remove the Japanese text in speech bubbles and backgrounds, and typesetters fill in the English.
Here a before/after page sample, showing what quality we aim for. Please, click on the slider mid-page below to see the transformation in real time!
Here are some materials that can help you reach this quality of editing. We recommend that you go through them before taking our test and consult them to improve your existing skills!
For Cleaners
We're looking for cleaners with a good understanding of redrawing, including suffixes. Here’s a sample of what we require from a cleaner:
- Cleaners 101: You can learn or review the cleaning basics in Photoshop through these links, courtesy of Inside Scanlation If you’re new to cleaning, focusing on these will be a great first step for you:
Photoshop shortcuts Removing text Cleaning gradient backgrounds Cleaning irregular textures Cleaning flashes Joining pages
- Cleaners 201: The same website, Inside Scanlation, offers a lot of other useful information, so after you have mastered the basics above, we recommend checking out the rest of the available materials there, too!
Once you have a solid understanding of the tools you can use to clean and redraw, we urge you to experiment more with them and see what feels fastest and most intuitive to you.
- Cleaners 301: We strongly recommend checking out Gemelli’s Cleaning Textbook. Even if you’re a very experienced cleaner, it might be worth checking it out for new tips and ideas!
Cleaning textbook: Gemelli’s Cleaning Textbook
If you’d like to take the cleaners test, please email us at [email protected] and let us know!
For Typesetters
We’re looking for typesetters with a good grasp of font choice and text placement. Here’s a sample of what we require from a typesetter:
- Typesetters 101: You can learn or review the typesetting basics in Photoshop through these links, courtesy of Inside Scanlation. If you’re new to typesetting, focusing on these will be a great first step for you.
Please note that you do not have to use the exact fonts that the examples below mention. Font choice is hard at first, and you can always ask us for font recs!
However, the overall idea of how to properly display different types of text is explained well, and you should try to follow these guidelines until you develop a good sense of placement.
Basic Bubbles
Narrative Text
SFX
Past Conversations
All about that H
Text Effects (Basic Stroke)
Text Effects (Pattern Stroke)
Text Effexts (SFX)
AfterWords
- Typesetters 201: Typesetting adds to the artwork of the manga! It is dynamic, and is not just about adding text to the page. We like to use fonts that capture the emotions, intentions and flow of the words, while retaining good legibility. You can download free fonts suitable for scanlation from this site:
There is a lot of other useful information on www.insidescanlation.com, so we recommend studying the rest of the available materials there, too.
Please, keep in mind that we prefer accessibility over aesthetic! Our readers will access our scanlations on all sorts of devices, and so ensuring readability is just as important as artistic expression. Make sure you have truly mastered the basics before you experiment and take more creative liberties!
If the choice is overwhelming, you’re always welcome to ask us for font recommendations for your projects.
- Typesetters 301: Once you’ve mastered the basics, we strongly recommend Gemelli’s Typesetting Textbook. Even if you’re a very experienced typesetter, it might be worth checking it out for new tips and ideas!
Typesetting textbook: Gemelli’s Typesetting Textbook
If you’d like to take the typesetters test, please email us at [email protected] and let us know!
Other Questions
If you’re looking to improve your skills in a certain area, or for ways to automatize repetitive tasks, we recommend the guides collected here: https://quicksandscans.wordpress.com/resources/
You can also always ask us for help, tips or ideas. We all love the projects we work on, and we’d like to present them in the best quality we can^^ Come say hi at [email protected]
23 notes
·
View notes
Text
Top Animation Software for Beginners in 2024
Starting with animation could be fun for the newcomers but at the same time it could be quite challenging. Fortunately, the animation software market of 2024 has quite a bunch of incredible tools designed to be rather friendly for the beginners. Below are the reviews of the best animation software for newbie this year. 1. Blender Blender is a free and open source 3D animation software package with which beginners will have no issues using. It comes with a one-stop package for all modeling and rigging, animation, and simulation, rendering, composite, and motion tracking. It is easy to start with because of friendly interface and there are many lessons and tutorials available. 2. Toon Boom Harmony Toon Boom Harmony is a simple and complex 2D animation tool used by individuals who are new to the field as well as animators. It is famous for having quite an interface and offers plethora of features, as well as traditional frame-by-frame animation this application also works with cut-out type of animation. The community and tutorial offerings are extensive helping new users to easily find what they are looking for. 3. Synfig Studio A other 2D and free and open source software for sociable and multimedia artist is Synfig Studio. It gives a layman an opportunity to produce professional-quality animations mainly because its working environment relies on vector graphics. Hugar has extensive documentation, which can easily be accessed as well as a strong user base, that can help one get started in the right foot. 4. Pencil2D The last one is Pencil 2D which is a basic tool and the best for a beginner interested in animating. It has simple layout and elementary tools for manual drawing; thus, it a perfect option for novices in the field of animation. It is simple, so that an inexperienced user can train himself in the fundamental functions without distractions. 5. Moho Debut Moho Debut (previously known as Anime Studio Debut) is the recommended one for beginners. In its package, there is basic animation toolset, but also features like bone rigging or vector animation. New animators will find the software easy to use due to the guided tutorials every step of the way and clear layout. Thus, 2024 has a vast variety of animation software available for novices, irrespective of whether they want to engage in 2D or 3D animation projects. Gimp, Toon Boom Harmony, Blender, Synfig Studio, Pencil2D, and Moho Debut are good ones because they allow users to have the necessary tools and advises to start animating. Happy animating!
For More Information Visit: TransCurators-The Content Factory
1 note
·
View note
Text
10 Essential Tools Every Graphic Designer Should Know
Graphic design is a creative field that relies heavily on the right tools to bring ideas to life. Whether you’re a beginner or a professional, mastering essential design software and resources can significantly boost your efficiency and creativity. If you want to learn these tools in-depth, enrolling in a Graphic Designing Course in Dehradun can provide you with hands-on training and expert guidance.
1. Adobe Photoshop
The industry standard for image editing and photo manipulation, Photoshop is crucial for creating digital artwork, retouching photos, and designing graphics.
2. Adobe Illustrator
Ideal for vector graphics, logos, and illustrations, Illustrator offers precision and scalability, essential for professional design work.
3. Adobe InDesign
Used for layout design, InDesign is perfect for creating brochures, magazines, flyers, and multi-page documents.
4. CorelDRAW
A popular alternative to Adobe products, CorelDRAW is favored for vector graphic design and page layout.
5. Sketch
A favorite among UI/UX designers, Sketch provides tools specifically tailored for designing interfaces and prototypes.
6. Canva
A user-friendly, web-based tool ideal for quick graphic creation with templates, perfect for beginners or social media content creators.
7. Figma
A collaborative interface design tool that’s gaining popularity for real-time teamwork and prototyping.
8. Procreate
An intuitive drawing and painting app designed for iPad users, widely used by illustrators and digital artists.
9. GIMP
A free and open-source alternative to Photoshop, GIMP offers powerful image editing capabilities without the cost.
10. Affinity Designer
Known for its speed and affordability, Affinity Designer is a strong contender in vector and raster graphic design.
Why Learn These Tools in a Graphic Designing Course in Dehradun?
While many tools are available, mastering them requires structured learning and practice. A Graphic Designing Course in Dehradun covers these essential software tools and their applications in real-world projects. You’ll gain:
Expert mentorship from experienced faculty
Hands-on assignments to build a professional portfolio
Exposure to industry trends and workflows

Find the Best Graphic Designing Course in Dehradun with AddressGuru
Choosing the right course is critical for your success. AddressGuru is the best platform for searching Graphic Designing Course in Dehradun, offering a curated list of top institutes with detailed course info, reviews, fees, and contact details. This helps you make an informed decision and kickstart your design career confidently.
Conclusion
Graphic design is powered by the right tools, and knowing them can set you apart in the competitive creative industry. Whether you want to design logos, websites, or marketing materials, learning these 10 essential tools through a Graphic Designing Course in Dehradun is a smart move. Trust AddressGuru to guide you in finding the best institute to begin your journey.
0 notes
Text
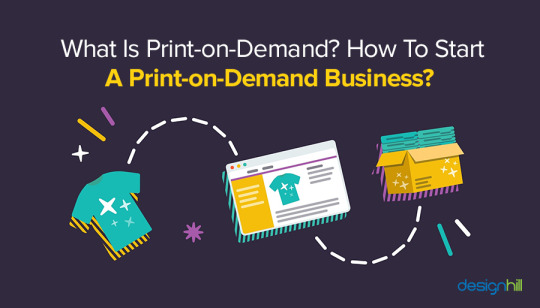
Launch Your POD Business: Step-by-Step Guide
Over the past few years, Print on Demand (POD) has become a great trend for thousands of entrepreneurs and creatives everywhere. If you want to get in on this booming market, you’re in the right place. In this blog, we will guide you through the few basic steps required to launch your own POD business from ground zero.
What is Print on Demand?
Step 1: Identify Your Niche
Finding a niche is the first step to starting a POD business. A niche is a specialized segment of the market for a specific product.
Tips for Finding Your Niche:
Passion & Interest: Think about what you actually like. Your excitement will drive your business.
Market Research: Identify themes or topics of interest with tools like Google Trends, social media analytics, or keyword research
Target Audience: Identify who your ideal customers are and what products they might be interested in.
Step 2: Choose Your Products
The next step after deciding on a niche is to decide what kinds of products you wish to offer. You may merchandise a variety of products with POD, such as:
T-shirts
Hoodies
Sweatshirts
Bottles
Mugs
Tote bags
Phone cases
Wall art and posters
Factors to Consider:
Demand: There has to be demand for the products you choose.
Customizable Products: Compare the existing customization options to make your product stand out with your own brand’s design.
Step 3: Select a POD Platform
Choosing the right POD provider is crucial for your business’s success. A good platform should offer quality products, great shipping options, and excellent customer service.
Popular POD Platforms:
Shelfmerch: Well-known for quality printing, easy setup, and efficient order fulfilment.
Printful: known for its wide selection of products and superior printing.
Step 4: Create Your Designs
The success of your POD business is greatly influenced by your designs, which should represent your brand values and resonate to your target audience.
Design Tips:
Use design software: You can create stunning designs using tools like Adobe Illustrator, Canva, or even free platforms like GIMP.
Stay Up to Date: Stay updated on seasonal themes and trends that may attract your audience's attention.
Step 5: Set Up Your Online Store
Now that your designs, products, and niche are complete, it's time to launch your online business.
Options for Web Hosting:
Shopify: Easy to use and includes a number of POD connectors.
WooCommerce: An excellent WordPress plugin for people who like self-hosted solutions.
Etsy: A platform perfect for imaginative vendors seeking to swiftly expand their customer base.
PrestaShop: An open-source, configurable platform for self-hosted online stores.
Step 6: Market Your Business
Marketing is essential to get people to your POD store. Explore multiple strategies for spreading your business the right way:
Marketing Strategies:
Social Media Marketing: Visual products do especially well on platforms like Instagram and Pinterest. Show your designs and interact with the users
Email Marketing: You can build an email list to send newsletters, this will keep the customers updated about your new products or available special promotions.
Content marketing: Create a blog about your niche and let traffic come to your store while establishing your brand authority
Step 7: Monitor and Optimize
Once you launch your store, the next step is regularly tracking performance and optimizing where you can.
Key Metrics to Track:
Sales and Revenue: Watch what sells well.
Website Traffic: Use Google Analytics to get to know your audience.
Customer Feedback: Invite reviews and use customer input to elevate your products.
Conclusion
A Print on Demand business can be a great initiative, if done with good attitude and mindset. To build a solid foundation for your POD business, follow the steps in this blog. This is to keep in mind: When starting out don't pressure yourself, give yourself time to learn and grow!
#print on demand#monetization#online store#customizable#customtshirts#customization#marketing#fashion trends#teesgraphy
0 notes
Text
The Difference Between Open Source and Closed Source Software
Open source and closed source software are two distinct approaches to software development that differ significantly in terms of access, control, transparency, and flexibility. This article aims to provide a comprehensive understanding of these concepts, highlighting their differences through examples and explanations.
Definition of Open Source and Closed Source Software: Open source software (OSS) refers to software whose source code is freely available for modification, distribution, and use by anyone. Conversely, closed source software (CSS) is proprietary software where the source code is not publicly accessible or shared with others.
Accessibility: One of the primary differences between open source and closed source software lies in accessibility. OSS allows anyone to view, modify, and distribute the software's source code. In contrast, CSS is only accessible to the original developer or those who have purchased a license from the developer.
Example: Linux, an open-source operating system, is freely available for anyone to download, modify, and distribute. On the other hand, Microsoft Windows is a closed-source operating system, and its source code is not publicly accessible.
Control and Transparency: Open source software provides greater transparency as anyone can review the code to ensure it does not contain malicious elements or backdoors. This level of scrutiny helps build trust in the software's integrity. In contrast, closed source software lacks this transparency, making it difficult for users to verify the software's security and reliability.
Example: Firefox, an open-source web browser, allows anyone to inspect its source code and contribute to its development. Google Chrome, however, is a closed-source browser, and its inner workings are not publicly accessible.
Customization and Flexibility: Open source software offers greater customization possibilities due to its accessibility. Users can modify the software to suit their specific needs, create derivative works, or even distribute modified versions under different licenses. Closed source software, on the other hand, limits customization options to what the original developer has provided or allowed.
Example: WordPress, an open-source content management system, allows users to customize themes, plugins, and functionality according to their requirements. A closed-source alternative like Wix provides limited customization options without exposing the underlying code.
Security and Licensing: Open source software often benefits from a larger community of developers who continuously review and update the codebase, identifying and fixing potential security vulnerabilities. However, some open source projects may also be targeted by malicious actors looking to exploit vulnerabilities. Closed source software typically undergoes rigorous testing and security audits by the developer before release, providing a higher assurance of security compared to open source alternatives.
Example: The Android operating system, which is partly open source, relies on a large community of contributors to maintain its security. However, it also has a dedicated team at Google responsible for ensuring its security.
Monetization and Support: Closed source software often involves a direct financial transaction between the user and the developer or distributor. This model allows for revenue generation and support services such as warranty, updates, and customer support. Open source software, while free to use, may rely on donations, sponsorships, or commercial offerings to fund development and support.
Example: Adobe Creative Suite, a collection of professional design tools, is a closed source software suite that requires a subscription fee for continued access to updates and support. On the other hand, GIMP, an open-source alternative, is free to use but relies on donations and community support for ongoing development.
The choice between open source and closed source software depends on various factors including transparency, customization, security, and monetization concerns. While open source software offers greater flexibility and transparency, closed source software often provides better security assurances and direct support channels. Understanding the differences between these two paradigms is crucial for individuals and organizations seeking to make informed decisions about software selection and usage.
1 note
·
View note
Text
Step-by-Step Process for Taking a Perfect Chinese Passport Photo at Home

Taking a perfect passport photo at home can be a convenient and cost-effective option, but it requires careful attention to detail to meet the specific requirements. This guide will walk you through each step of the process to ensure your photo meets the standards set by the Chinese government.
1. Understanding the Requirements
Before you start, it's crucial to understand the specific requirements for a Chinese passport photo. Here are the key specifications:
Size: The photo should be 48mm x 33mm.
Background: The background must be plain white.
Head Position: Your head should be centered and occupy 70-80% of the photo.
Expression: A neutral expression is required, with both eyes open and mouth closed.
Lighting: The photo should be well-lit without shadows.
Clothing: Wear dark clothing that contrasts with the white background.
Make sure to review these guidelines thoroughly to avoid common mistakes.
2. Setting Up Your Space
Creating the right environment is critical for taking a good passport photo. Follow these steps to set up your space:
Choose a Plain Background: Find a plain white wall or hang a white sheet to create a seamless background.
Position Your Camera: Use a tripod or place your camera on a stable surface. The camera should be at eye level to avoid unflattering angles.
Lighting: Ensure the room is well-lit. Use natural light if possible, but avoid direct sunlight that can cast harsh shadows. If using artificial lights, position them evenly on both sides of your face.
3. Preparing Yourself
Preparation is key to looking your best in your passport photo. Here’s what you need to do:
Dress Appropriately: Wear a dark-colored shirt to stand out against the white background. Avoid wearing uniforms or overly patterned clothing.
Grooming: Ensure your hair is neatly styled and away from your face. Avoid heavy makeup and excessive accessories.
Expression: Practice a neutral expression. Stand in front of a mirror and relax your facial muscles. Keep both eyes open and your mouth closed.
4. Taking the Photo
Now that you’re set up and prepared, it’s time to take the photo. Follow these steps carefully:
Positioning: Stand or sit straight, with your shoulders back. Ensure your head is centered and facing the camera directly.
Frame the Shot: Adjust the camera or your position so that your head occupies 70-80% of the frame. There should be enough space around your head for cropping if needed.
Take Multiple Shots: Take several photos to ensure you have options to choose from. Check each photo for lighting, shadows, and adherence to guidelines.
5. Editing the Photo
Once you have taken a few photos, select the best one for editing. Here’s how to proceed:
Choose the Best Photo: Select the photo that best meets the guidelines and has good lighting and clarity.
Use Editing Software: Open your chosen photo in an editing software like Adobe Photoshop or a free alternative like GIMP.
Crop and Resize: Crop the photo to 48mm x 33mm. Ensure your head size and positioning meet the specifications.
Adjust Brightness and Contrast: Make minor adjustments to brightness and contrast to enhance the photo without altering your appearance.
Remove Background Imperfections: If there are any shadows or imperfections in the background, use the editing tools to make it a uniform white.
6. Printing the Photo
Printing the photo correctly is just as important as taking it. Follow these steps:
Choose Quality Photo Paper: Use high-quality photo paper for printing. Matte or glossy paper can be used, but ensure it’s suitable for passport photos.
Set Print Settings: Check your printer settings to ensure the photo prints at the correct size and quality. Use the highest resolution setting available.
Print and Inspect: Print the photo and inspect it for any issues. Ensure the colors are accurate and the photo is clear.
7. Common Mistakes to Avoid
Avoiding common mistakes can save you from having to retake your photo. Here are some to watch out for:
Improper Background: Ensure the background is plain white without any patterns or colors.
Shadows and Lighting: Avoid shadows on your face or background by using even lighting.
Incorrect Size: Double-check the dimensions of the photo before printing.
Head Tilt or Expression: Make sure your head is straight and your expression is neutral.
8. Final Checklist
Before submitting your photo, go through this final checklist:
Size and Dimensions: Confirm the photo is 48mm x 33mm.
Head Position and Size: Ensure your head is centered and occupies the correct portion of the photo.
Background: Verify the background is plain white and free from shadows.
Expression: Check that you have a neutral expression with eyes open and mouth closed.
Clothing: Make sure you’re wearing dark clothing that contrasts with the background.
9. Submitting Your Photo
Once you have a perfect photo, it’s time to submit it along with your passport application. Follow these steps:
Attach Photo to Application: Affix the photo to the designated area on your passport application form. Ensure it’s securely attached.
Review Application: Double-check all details on your application to avoid delays.
Submit: Submit your application to the relevant authority, either in person or via mail, as per the instructions.
10. Conclusion
Taking a perfect Chinese passport photo at home is entirely possible with the right preparation and attention to detail. By following this step-by-step guide, you can ensure your photo meets all the requirements, saving you time and money. Remember to double-check each step, from setting up your space to submitting your application, to ensure a smooth process.
0 notes
Text
Graphic Design Tools Review: From Beginner-Friendly to Pro Picks
Hey there, design enthusiasts! Whether you're a seasoned pro or a curious newbie, navigating the world of graphic design tools can feel overwhelming. Fear not, fellow creatives! This article dives into a toolbox full of options, catering to all skill levels and budgets.
Free and Fantastic:
Canva: The reigning king (or queen) of user-friendliness, Canva boasts a drag-and-drop interface and a treasure trove of pre-made templates. Design social media posts, presentations, flyers, and more – all without breaking the bank.
GIMP: Open-source and powerful, GIMP offers features that rival paid software. Think photo manipulation, illustrations, and even animation. The learning curve might be steeper, but the reward is a free and versatile tool.
Inkscape: Another open-source champion, Inkscape lets you create stunning vector graphics. Perfect for logos, icons, and illustrations, it offers great control over scalability and precision.
Stepping Up Your Game:
Pixlr: Pixlr comes in free and paid versions, offering basic to advanced photo editing features. Edit photos, apply filters, and create social media graphics with ease.
Krita: Calling all aspiring artists! Krita is a free and open-source painting program with a natural brush engine and tons of customization options. Let your inner Van Gogh loose!
Vectr: This free, web-based vector graphics editor is a great alternative to Inkscape. With a clean interface and intuitive tools, it's perfect for creating simple logos, icons, and illustrations.
Pro Picks: Worth the Investment
Adobe Photoshop: The industry standard for photo editing, Photoshop offers unmatched power and flexibility. From basic edits to advanced retouching and compositing, it's a must-have for professional photographers and graphic designers.
Adobe Illustrator: Illustrator reigns supreme in the vector graphics world. Create logos, icons, illustrations, and intricate designs with unparalleled precision and scalability.
Affinity Designer: A budget-friendly alternative to Illustrator, Affinity Designer is packed with professional-grade features for creating stunning vector graphics.
Choosing the Right Tool:
The perfect tool depends on your needs and skill level. Here's a quick guide:
Beginner? Start with Canva or Pixlr for basic photo editing and social media graphics.
Developing your skills? Try GIMP or Inkscape for more advanced editing and vector graphics creation.
Going pro? Invest in Adobe Photoshop and Illustrator for the ultimate design toolkit.
Remember: Don't be afraid to experiment! Many tools offer free trials, so you can test-drive them before committing. The most important thing is to find a tool that inspires you to create and helps you bring your design vision to life.
1 note
·
View note
Text
Portrait Retouching Tips and Tricks: Enhance Your Images Like a Pro

Portrait retouching is an essential skill for photographers and digital artists looking to elevate their work. Whether you're refining headshots for a professional portfolio or enhancing family portraits, mastering these techniques can make a significant difference. In this article, we’ll cover top tips and tricks for effective portrait retouching.
Understanding the Basics of Portrait Retouching
Portrait retouching is a part of image editing. Before diving into advanced techniques, it’s important to understand the fundamentals of portrait retouching. The primary goal is to enhance the subject’s natural features while maintaining a realistic look. Here are the basics to keep in mind:
Skin Smoothing: Smooth out blemishes and uneven skin tones without removing natural texture.
Color Correction: Adjust the colors to achieve a balanced and flattering look.
Detail Enhancement: Sharpen eyes, hair, and other key features to make the portrait pop.
Essential Tools for Portrait Retouching
Using the right tools is crucial for effective retouching. Most professional retouchers rely on Adobe Photoshop, but there are other options like Lightroom and GIMP. Key tools within these software include:
Healing Brush Tool: Perfect for removing blemishes and imperfections.
Clone Stamp Tool: Useful for replicating skin texture and fixing larger areas.
Dodge and Burn: Essential for enhancing highlights and shadows to add depth to the portrait.
Step-by-Step Portrait Retouching Process
1. Initial Adjustments
Start with basic adjustments to set the stage for detailed retouching:
Exposure and Contrast: Ensure the image has balanced exposure and contrast.
White Balance: Correct the white balance to avoid unnatural skin tones.
Cropping and Framing: Crop the image to focus on the subject and improve composition.
2. Skin Retouching
Achieving smooth, natural-looking skin is often the primary focus of portrait retouching:
Frequency Separation: This technique separates the texture and color layers, allowing for detailed skin smoothing without losing texture.
Healing and Cloning: Use the healing brush and clone stamp tools to remove blemishes, wrinkles, and other imperfections.
Skin Tone Adjustments: Use selective color correction to even out skin tones and reduce redness.
3. Enhancing Features
Pay special attention to the subject’s eyes, hair, and other defining features:
Eyes: Sharpen the eyes and enhance the catchlights to make them stand out. You can also whiten the sclera (whites of the eyes) slightly for a brighter look.
Teeth: Use a whitening tool or adjustment layer to brighten the teeth, but be careful not to overdo it.
Hair: Enhance hair by increasing its shine and adding volume. Use the dodge and burn tools to create depth and highlights.
4. Color Grading
Color grading can dramatically change the mood and feel of a portrait:
Hue and Saturation: Adjust the overall hue and saturation to complement the skin tones and background.
Split Toning: Add subtle color tones to the shadows and highlights to create a cohesive look.
5. Final Touches
Before finalizing your retouching, make sure to review the image for any inconsistencies:
Sharpening: Apply a final sharpening pass to enhance details.
Noise Reduction: Reduce any noise that may have been introduced during retouching.
Overall Check: Zoom out and check the image as a whole to ensure everything looks natural and cohesive.
Common Mistakes to Avoid
Even seasoned retouchers can fall into common pitfalls. Here are some mistakes to watch out for:
Over-Retouching: Avoid making the subject look plastic or unrealistic by over-smoothing the skin.
Ignoring Proportions: Be mindful of the subject’s natural proportions and avoid excessive reshaping.
Inconsistent Lighting: Ensure that the retouching matches the original lighting conditions to maintain realism.
Conclusion
Photo retouching is a blend of art and science, requiring both technical skills and a keen eye for detail. By mastering the tools and techniques outlined in this guide, you can enhance your portraits while preserving the subject’s natural beauty. Practice regularly, and don't be afraid to experiment with new methods to find your unique style.
For more in-depth tutorials and resources on portrait retouching, consider exploring online courses and professional workshops to continue honing your skills. Happy retouching!
#PortraitRetouching#PhotoEditingTips#DigitalArtistry#RetouchingTechniques#PhotoshopSkills#PhotographyTips#SkinRetouching#ColorGrading#PhotoEnhancement#CreativeEditing
1 note
·
View note
Text
Effortless Raster to Vector Transformation: A Comprehensive Guide
Raster to vector conversion is a transformative process in graphic design, revolutionizing the way images are created and manipulated. Converting raster images, composed of pixels, into vector graphics built on mathematical equations offers scalability and versatility. However, the conversion process often poses challenges. This comprehensive guide unveils the secrets of effortlessly transforming raster to vector, offering a step-by-step approach for impeccable results.
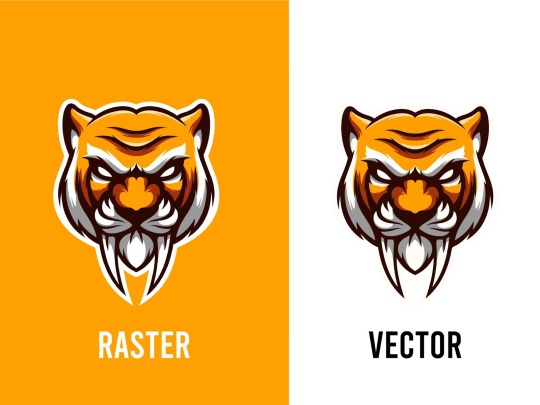
Understanding Raster and Vector Graphics
Raster graphics are composed of pixels, forming a grid where each pixel carries colour information. Common formats include JPEG, PNG, and GIF. Enlarging them can lead to a loss of quality due to pixelation.
Vector graphics, on the other hand, are based on mathematical equations, using points, lines, and curves to create shapes and patterns. They're scalable without losing quality, ideal for logos and illustrations. Formats like SVG store vector graphics, allowing easy scaling without compromising quality.
In essence, raster graphics excel in complex images like photographs, while vectors are better for clean, scalable designs. Understanding their differences helps in choosing the right format for specific needs, whether it's web design, printing, or digital art.
Choosing the Right Software
Assess Specific Needs: Identify your organisation's unique requirements and functionalities. Consider factors like scalability, user-friendliness, and compatibility with existing systems.
Research and Compare: Explore available options thoroughly, comparing features, customer reviews, and pricing models. Look for software that aligns closely with your needs and offers flexibility for future growth.
Vendor Reputation and Support: Investigate the vendor's reputation for reliability, customer service, and ongoing support. Ensure they offer regular updates, maintenance, and responsive assistance.
Scalability and Integration: Choose software that can scale alongside your business and seamlessly integrate with other tools or systems you currently use to avoid compatibility issues.
Cost vs. Value: Consider the total cost of ownership, including licensing, implementation, training, and potential future expenses. Balance this against the value and ROI the software promises to deliver.
Preparation: Cleaning Raster Images
Assess Image Quality: Begin by evaluating the raster image for imperfections, blurriness, or artifacts that may impact its clarity.
Backup Original: Prior to cleaning, make a duplicate or backup of the original raster image to avoid accidental loss or damage.
Use Image Editing Software: Utilize specialized software like Adobe Photoshop or GIMP to perform cleaning tasks such as spot healing, clone stamping, or noise reduction.
Address Specific Issues: Focus on specific areas needing improvement, like removing dust spots, correcting color balance, or enhancing details without compromising the original quality.
Save in Appropriate Format: Once cleaning is completed, save the cleaned raster image in a suitable format (JPEG, PNG, TIFF) to maintain quality and usability for future purposes.
Conversion Techniques
Compelling Call-to-Action (CTA): Craft persuasive CTAs that encourage immediate action, using clear and enticing language to prompt conversions.
A/B Testing: Implement systematic testing of various elements (such as headlines, colors, or layouts) to analyze and optimize the most effective combination for driving conversions.
Simplified Forms: Streamline and simplify conversion forms by reducing unnecessary fields, making the process effortless for users, thereby increasing completion rates.
Persuasive Copywriting: Employ persuasive and concise copy that addresses customer pain points, highlights benefits, and fosters a sense of urgency to encourage conversions.
Visual Content Optimization: Utilize high-quality images, videos, and infographics strategically placed to visually guide users towards conversion points, enhancing engagement and conversion rates.
Manual Tracing: Precision at Your Fingertips
Manual tracing is the meticulous art of precision, placing control directly in your hands to craft with finesse and accuracy. Its essence lies in the intimate connection between creator and creation, where every stroke and curve is a deliberate choice, a testament to expertise and dedication. Like a conductor leading an orchestra, manual tracing empowers you to navigate complexities, capturing intricate details with finesse and grace. It's the embodiment of craftsmanship, offering a tactile experience that transcends digital boundaries. With each deliberate movement, it grants you unparalleled control, transforming a blank canvas into a masterpiece. Manual tracing is the symphony of precision at your fingertips, where creativity harmonises with meticulousness to produce exceptional, finely crafted results.
Automated Tracing: Streamlining the Process
Efficiency Boost: Automated tracing expedites workflows by eliminating manual steps, reducing human error, and enhancing overall efficiency.
Accuracy Improvement: Advanced algorithms ensure precise tracing, minimizing inaccuracies often associated with manual processes and ensuring reliable results.
Time-Saving Solution: Automation significantly reduces the time required for tracing tasks, allowing for quicker turnaround times and faster decision-making.
Scalability Advantage: Automated tracing systems can easily scale to handle larger volumes of data or complex tracing requirements without compromising quality or speed.
Enhanced Analysis Capabilities: By automating tracing, organizations gain the ability to conduct in-depth analyses, uncover patterns, and derive valuable insights from traced data, driving informed decision-making and strategic planning.
Refinement and Optimization
Refinement and Optimization encapsulate the iterative process of improving, enhancing, and perfecting systems, processes, or ideas. Refinement involves fine-tuning existing elements, eliminating inefficiencies, and enhancing functionality. It's about scrutinising details, seeking better solutions, and polishing existing structures to achieve higher standards. Optimization focuses on maximising efficiency, effectiveness, and performance. It involves streamlining processes, leveraging resources effectively, and achieving the best possible outcomes. Both concepts synergistically drive progress by continuously evaluating, adjusting, and enhancing to meet evolving needs and standards. This cyclic pursuit of perfection fosters innovation, fosters growth, and ensures sustained excellence in various domains from technology and business strategies to personal development.
Saving and Exporting
File Formats: Choose appropriate file formats for exporting, ensuring compatibility and quality preservation. Consider formats like PDF for documents, JPEG/PNG for images, and MP4 for videos.
Regular Backups: Implement a routine backup schedule to safeguard your data. Use cloud storage, external drives, or dedicated backup software to secure information in case of system failures or data loss.
Version Control: Maintain multiple versions of your work. Versioning helps track changes, revert to previous iterations, and avoid accidental loss of crucial information.
Optimized Settings: When exporting, adjust settings for file size, resolution, and quality. Opt for compression or resolution adjustments to balance size and quality, especially for large files.
Metadata and Organization: Embed relevant metadata and organize files systematically. Proper labeling, tagging, and folder structures streamline retrieval and maintain clarity across exports.
Conclusion
Effortless raster to vector transformation is a skill that combines technical prowess with artistic finesse. Understanding the nuances between raster and vector graphics, selecting suitable software, meticulous preparation, choosing the right conversion method, and refining the output are pivotal steps in achieving impeccable results. Embrace the versatility and scalability of vector graphics, transcending the limitations of raster images, to unlock endless creative possibilities in graphic design. With practice and perseverance, mastering raster to vector conversion becomes a gateway to unparalleled design precision and flexibility.
0 notes
Text
Exploring the World of Online Free Freelancers Tools: A Comprehensive Review
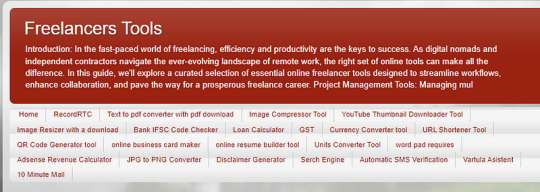
In the dynamic realm of freelancing, efficiency and productivity are paramount. As a seasoned freelancer, I have recently delved into the plethora of online free tools available to enhance my workflow. This review aims to shed light on my experience with these tools and their impact on my freelance journey.
Project Management Made Seamless: Trello and Asana
In my quest for streamlined project management, Trello and Asana have emerged as invaluable allies. Trello’s intuitive Kanban boards allow for seamless task organization, while Asana’s robust features facilitate collaboration with clients and team members. Both platforms have significantly improved my ability to track project progress and meet deadlines.
Enhancing Creativity with Canva and GIMP
Visual appeal is crucial in the freelance world, whether it’s designing a striking logo or creating engaging social media posts. Canva’s user-friendly interface and vast template library make graphic design a breeze, while GIMP’s powerful image editing capabilities provide a free alternative to industry-standard software. These tools have undoubtedly elevated the quality of my creative deliverables.
Safeguarding Time and Finances: Clockify and Wave
Keeping track of billable hours and managing finances are common challenges for freelancers. Clockify’s straightforward time tracking feature ensures accurate invoicing, while Wave simplifies accounting tasks with its user-friendly interface. Incorporating these tools into my routine has not only saved time but has also contributed to a more organized financial management system.
Communication Simplified: Slack and Zoom
Effective communication is the cornerstone of successful freelancing. Slack’s real-time messaging and channel-based organization have revolutionized team collaboration, while Zoom’s seamless video conferencing capabilities facilitate virtual meetings with clients. These tools have become indispensable in fostering clear and efficient communication throughout my projects.
Ensuring Cybersecurity: LastPass and ProtonMail
As a freelancer handling sensitive information, cybersecurity is a top priority. LastPass, a password manager Click now Start Use Free Tolls
#FreeOnlineTools#Freeware#WebApps#DigitalUtilities#FreeSoftware#OnlineResources#TechFreebies#DigitalTools#FreeTech#InternetUtilities#DigitalSolutions#NoCostTools#CloudApps#OpenSourceSoftware#WebUtilities#FreeDownloads#TechForFree#NoFeeTools
1 note
·
View note
Text
Image Background Change

Changing an image background involves altering the backdrop behind a subject in a photo. This process is commonly done using various software tools such as Adobe Photoshop, GIMP, or online background removal services.
To change an image background manually using software like Photoshop, follow these steps:
Open the Image: Start by opening the image you want to edit in your preferred software.
Select the Subject: Use selection tools like the Pen Tool, Lasso Tool, or Quick Selection Tool to carefully outline the subject you want to keep.
Remove the Background: Once the subject is selected, use tools like the Eraser Tool or the Background Eraser Tool to delete the background around the subject.
Add a New Background: After removing the old background, insert a new one by placing another image layer behind the subject layer. Ensure it covers the entire background area.
Refine Edges: To make the transition between the subject and the new background smooth, refine the edges using tools like the Feather or Refine Edge tool.
Adjustments: Make any necessary adjustments to blend the subject with the new background, such as altering lighting, colour balance, or contrast.
Finalize and Save: Review the image for any imperfections and make final touch-ups. Once satisfied, save the edited image in your desired format.
If you're looking for a simpler way to change a background without using software, various online background removal tools offer quick solutions. These platforms allow you to upload your image and remove the background automatically or manually, providing options to replace it with preset backgrounds or your own image.
Remember, the success of changing an image background depends on the quality of your selections, the complexity of the image, and the tools or software you use. Practice and patience can greatly improve your skills in this area.
#photoshop#design#retouching#image clipping service#background remove#clipping path company#flashing images#reaction image#editing#clippingpathservice
0 notes
Text
Mastering the Art of Image Compression: How to Compress JPEG to 20KB
In the digital age, where visual content dominates our online interactions, optimizing images for efficient storage and fast loading times has become a critical skill. If you've ever found yourself in need of reducing an image's compress jpeg to 20kb without compromising its quality, you're not alone. This article delves into the art and science of compressing JPEG files to achieve that elusive balance between visual appeal and file size efficiency.
Understanding the Need for Image Compression: As websites, social media platforms, and digital communication channels become increasingly visual, the demand for quick-loading, space-efficient images is more significant than ever. Large image files can slow down websites, consume excessive storage space, and lead to frustrating user experiences. compress jpeg to 20kb allows you to strike a harmonious chord between maintaining image quality and optimizing file size.

Tools and Techniques for Effective Compression:
Online Compression Tools: Numerous online tools offer quick and hassle-free image compression. Websites like TinyPNG, Compressor.io, and ImageOptim allow you to upload your JPEG image and automatically reduce its size while preserving visual clarity. These tools employ advanced algorithms to remove unnecessary data from the image without compromising its overall look.
Adjust Image Dimensions: Resizing an image can significantly impact its file size. Consider reducing the dimensions of your JPEG image while maintaining its aspect ratio. This approach directly affects the amount of data present in the image, leading to a smaller file size. However, exercise caution not to make the image too small, as it may affect its visual quality.
Compression Software: Software applications like Adobe Photoshop and GIMP provide more control over the compression process. You can manually adjust compression settings, such as image quality and metadata retention. Experiment with different settings while previewing the output to find the right balance between file size and visual fidelity.
Selective Compression: JPEG images often consist of different elements, some of which may be less critical than others. Applying higher compression to less important areas while preserving essential details can help reduce the file size without compromising the overall impact of the image.
Export Formats: When saving your compress jpeg to 20kb image, consider using alternative formats like Web. Web files offer better compression than traditional JPEGs while maintaining comparable image quality. However, be mindful of the compatibility of Web images across different platforms.
The Art of Balancing Quality and Size: Achieving a file compress jpeg to 20kb requires a delicate balance between image quality and compression. While it's tempting to reduce the file size as much as possible, always prioritize maintaining the image's intended visual impact. Regularly review the compressed image to ensure it meets your expectations and remains suitable for its intended purpose.
0 notes
Text
How Do You Improve Your Graphic Design Skills?
How Do You Improve Your Graphic Design Skills?
Are you passionate about graphic design? Do you dream of creating stunning visual masterpieces that captivate and inspire? Well, my friend, you're in the right place! In today's digital age, having top-notch graphic design skills is more important than ever. Whether you want to enhance your professional career or simply indulge your creative side, improving your graphic design skills will open up a world of possibilities for you. So, let's dive into some effective strategies that can help take your graphic design game to the next level! Ready? Let's go.
Graphic Design Software
When it comes to improving your graphic design skills, having the right tools at your disposal is essential. Graphic design software provides a powerful platform for unleashing your creativity and bringing your ideas to life. One of the most popular choices among designers is Adobe Creative Cloud, which includes industry-leading applications like Photoshop, Illustrator, and InDesign. These programs offer a wide range of features and functionalities that enable you to create stunning designs with ease. If you're looking for more affordable options or open-source alternatives, programs like GIMP and Inkscape are worth exploring. They may not have all the bells and whistles of their pricier counterparts but can still deliver impressive results when used skillfully. Experimenting with different graphic design software allows you to familiarize yourself with various workflows and techniques, expanding your creative repertoire. So don't be afraid to try out different programs – find the one that suits your style best! Remember: proficiency in graphic design software goes hand in hand with mastering fundamental design principles. Software alone won't make you a great designer; it's how you use it that counts! So take the time to learn the ins and outs of these tools while honing your artistic abilities simultaneously. With practice, patience, and perseverance, you'll soon see improvement in no time!
Read more: How Can You Work With A Graphic Designer?
Online Courses
Online Courses are a valuable resource for improving your graphic design skills. With the convenience of the internet, you can access a wide range of courses that cater to different levels of expertise and cover various aspects of graphic design. One advantage of online courses is their flexibility. You can learn at your own pace and fit it into your schedule. Whether you're a beginner looking to grasp the basics or an experienced designer seeking advanced techniques, there's a course out there for you. Many platforms offer interactive lessons with video tutorials, quizzes, assignments, and feedback from instructors. This allows for hands-on practice and helps reinforce what you've learned. Another benefit is the diverse range of courses available. From typography to color theory to logo design, you can choose courses specific to your interests or areas where you feel most challenged. Engaging with other learners in online forums or communities associated with these courses provides opportunities for networking and collaboration. Sharing ideas and receiving constructive criticism from peers can greatly enhance your growth as a designer. Remember that not all online courses are created equal. Do thorough research before enrolling in any course to ensure its credibility and relevance to your goals. Check reviews, syllabi, instructor qualifications, and student testimonials if available. By taking advantage of online courses dedicated to graphic design, you have access to expert instruction wherever you may be located – all while enhancing your skillset in an efficient manner! So why wait? Start exploring today!
Books
Books are a valuable resource for improving your graphic design skills. They provide in-depth knowledge and insights from experienced designers that can help you develop a strong foundation. Whether you are a beginner or looking to enhance your existing skills, there is always something new to learn from the pages of a well-written book. One advantage of books is their ability to delve deeply into specific aspects of graphic design. From typography and color theory to layout and composition, there are books dedicated to almost every facet of the field. This allows you to focus on areas where you feel the weakest or want to expand your expertise. Another benefit of books is their timeless nature. Unlike online tutorials that may become outdated as software updates occur, many graphic design concepts remain relevant regardless of technological advancements. Books offer enduring wisdom that can stand the test of time and continue to be referenced throughout your career. Furthermore, reading books exposes you to different perspectives and styles within the world of graphic design. By studying works by renowned designers, such as Paul Rand or Saul Bass, you can gain inspiration and broaden your creative horizons. In addition, some books include practical exercises or case studies that allow you to apply what you have learned in real-world scenarios. These hands-on activities encourage active learning and enable you to hone your skills through practice. Incorporating books into your journey towards improving your graphic design skills can greatly contribute to your growth as a designer. With their depth of knowledge, timeless insights, exposure to diverse perspectives, and interactive learning opportunities they offer an invaluable resource for any aspiring designer seeking continuous improvement.
Internships
Internships are a valuable opportunity for aspiring graphic designers to gain real-world experience and enhance their skills. By immersing themselves in the professional environment, interns can learn from seasoned professionals and apply their knowledge to actual projects. During an internship, you'll have the chance to work on various design tasks under the guidance of experienced mentors. This hands-on experience will not only improve your technical skills but also teach you about project management, client communication, and teamwork. One of the greatest benefits of internships is the networking opportunities they provide. You'll be able to meet industry professionals, build connections, and potentially secure future job prospects. These connections can open doors for collaborations or even lead to full-time employment after graduation. Moreover, internships allow designers to see how different organizations operate and understand how design fits into broader business strategies. This exposure provides a unique perspective that can shape your approach as a designer. Internships may also help you discover which specific area of graphic design interests you most—whether it's branding, illustration, web design, or something else entirely. It's an opportunity for self-discovery and exploration within the field. Internships play a crucial role in improving your graphic design skills by providing practical experiences that complement what you've learned through formal education or online courses. Don't miss out on this chance to grow both personally and professionally!
Networking
Networking is a crucial aspect of improving your graphic design skills. It involves building connections and relationships with other professionals in the industry. By networking, you open yourself up to new opportunities, ideas, and collaborations. One way to network is by attending industry events such as conferences or workshops. These events provide a platform for meeting like-minded individuals who share your passion for graphic design. You can exchange knowledge, learn from others' experiences, and even find potential clients or employers. Another effective networking strategy is joining online communities or forums dedicated to graphic design. These platforms allow you to connect with designers from all around the world, sharing insights and feedback on each other's work. It's also an excellent opportunity to showcase your own portfolio and gain valuable exposure. Don't forget about social media platforms! They are powerful tools for networking in the digital age. Engage with fellow designers by liking, commenting on their posts or sharing their work with credit. This not only helps build connections but also establishes yourself as an active member of the creative community. Don't underestimate the power of word-of-mouth referrals within your existing professional network. Let colleagues, friends, and family know about your graphic design skills and ask them if they could spread the word among their contacts who might be interested in hiring a designer. In conclusion (as per writing instructions), networking plays a significant role in improving your graphic design skills by connecting you with peers, expanding your knowledge base through shared experiences and resources while potentially leading to exciting opportunities for growth in your career journey as a designer
Conclusion
Improving your graphic design skills is an ongoing journey that requires dedication, practice, and a willingness to continuously learn. By utilizing various resources and opportunities available to you, such as graphic design software, online courses, books, internships, and networking events, you can enhance your abilities in this creative field. Graphic design software provides the necessary tools for creating stunning visuals. Experimenting with different programs like Adobe Photoshop or Illustrator allows you to explore new techniques and expand your skill set. Online courses offer structured lessons taught by industry professionals who can provide valuable insights and feedback on your work. Books are another valuable resource for improving your graphic design skills. They provide in-depth knowledge on topics such as color theory, typography principles, layout composition, and more. Reading books written by experienced designers can inspire creativity and help you develop a deeper understanding of the craft. Internships offer hands-on experience working in real-world settings alongside seasoned professionals. This invaluable opportunity allows you to apply theoretical knowledge into practical projects while learning from those with industry expertise. Internships not only enhance your technical skills but also provide insight into the business side of graphic design. Networking is crucial for any creative professional looking to improve their skills. Attending conferences or joining local meetups enables you to connect with fellow designers and gain exposure to new ideas or trends within the industry. Networking can lead to collaborations or mentorship opportunities that further enhance your growth as a designer. In conclusion (without using those words specifically), there are numerous avenues available for improving your graphic design skills: exploring different software options; taking advantage of online courses taught by experts; reading educational books; seeking out internships for practical experience; and actively engaging in networking events within the community. Remember that mastery takes time – don't be discouraged if progress feels slow at times. Stay committed to honing your craft through consistent practice
See more:https://sites.google.com/view/50graphics/home
0 notes
Text
damn i was not expecting to get a bunch of good suggestions at like 2am. you're earth's strongest warriors. here are my reviews

clipchamp but it's an exe: i knew it had some kind of ms integration because i logged into it with my ~microsoft account~ but had no idea there was an downloadable version in the windows store. unfortunately this version also limits framerate. i am mildly annoyed that it limits framerate without even telling you. anyway bummer, i got excited
capcut: this thing evokes like the same heebie-jeebies as clipchamp. dodging prompts to 'start with AI magic' or some shit like i'm in the matrix. managed to find 'just fade these into each other' (they call it 'mix'???) after digging through a bunch of really wild instagram filters and My Movie.wmv-ass transitions. that said it did get the job done: it gave me output with identical framerate and resolution. though the file size is double the file size of the two clips i put together combined, which feels weird, but i don't actually know anything about video compression. it's probably fine but tumblr's video backend is held together with spit and tape and i'm nervous about giving it stuff any larger than i have to.
unfortunately i think web apps are just Like This now. you can't use the internet without getting the Stink on you anymore. going on the computer used to be cool and they ruined it

kapwing: oooohhh my god this ai persona thing is so weird WHAT IS THIIIIISSSSSS

sorry. sorry. i got distracted
the fade in this one is 'cross dissolve'. it's possible i just don't know what this shit is called. anyway it preserves framerate, but unfortunately the free version doesn't give me 1080p and, more critically, it adds a watermark. sorry kapwing that's gonna be a no from me
shotcut: now THIS one has the sauce honestly. i hear 'free and open-source' and my ears perk up. open-source software generally has the most miserable UX you've seen since 1996 but they're the only motherfuckers i trust anymore. and yeah this is a little ugly but it's reasonably intuitive. it's got some helpful text, the features page told me how to fade two clips together, and i was able to blunder my way into what i wanted to do pretty easily. i wish i had known about this when i was editing together shit for that video game course
AND it's well compressed, somehow; i dunno what magic it did but the output is dinky despite not visibly losing any quality. 10/10 no notes, this is Normal Software for Normal People, everybody give it up for FOSS. i'm still never using gimp though
davinci resolve: i was gonna check it out just to see how it was different, because this too seems like Real Software, but it wanted me to register an account and i frowned and decided i'd stick with shotcut. i'm cranky and old and i can't just be creating accounts willy-nilly anymore. i already get two suspicious login attempts on my razer account per week. i haven't used a razer product in 4 years
anyway crisis solved, thank you for the help. i have now used 3 new web apps in one night though so please stay tuned for the 'my identity has been stolen' post
the middle of the night is not the time to ask this so i will probably reblog it tomorrow. this is all predicted on somebody following me who has ideas here which. who knows
i need something very simple to edit video with. when i say very simple i mean i'm not really doing anything any more complicated than 'slam these clips together and fade between them'.
in the past i have used clipchamp because it is a free website and 'slam these clips together and fade between them' takes like 60 seconds to accomplish. unfortunately it seems to cap framerate at 30 or something, and that's kind of a dealbreaker. i don't need anything fancy but i do need to retain source framerate and ideally source resolution. presumably if i gave clipchamp money they'd give me 60fps but I Will Not Be Doing That.
does anybody have a recommendation? actual software tends to be horribly expensive but if it's easy to pirate then that's fine. i'm skeptical of adobe shit being easy to pirate but i'm open to trying.
tyvm
11 notes
·
View notes
Note
rlly thrilled to hear both of you are doing well with ur books. if u don't mind me asking: is it financially viable? Could u do something like that and support urself or is it more like pocket money? are there startup costs? (feel free to ignore this ask if this is something you don't want to talk about)
Hey Anon,
I don't know if you're the same anon but I'll post the link to the ask that sparked this question for any who are curious here.
The answer to all your questions can be yes (helpful, right?)
Details below the cut...
Is it financially viable?
In my opinion, yes but you and I may be at very different stages in our lives. Are you a student? A parent with young children? Are you struggling to pay the light bill? Do you have time and energy to throw into writing daily or nightly around real life? These things matter.
Could I live off what I'm earning since I started self-publishing nearly a year ago? Hell no. I have a very good full-time job with benefits and an excellent retirement package. My husband and I have both agreed I can't walk away from that for anything less than six-figure earnings but I can say our mortgage has been covered by my writing for the past six months. That's meaningful to us and worth my time and effort.
Does success happen? It does but I won't sugarcoat it. For every Lucy Score, Cora Reilly and T.L. Swan, self-published romance authors who are millionaires, there are thousands out there who are making much, much less. From $20 to $10,000 in a month, it varies widely! But there are things you can to do increase your chances of hitting it big.
Also, I should mention that Amy and I are Amazon exclusive, part of their Kindle Unlimited subscription service. The good part about that? We earn 70% of our sales versus 30% if we were classified as Wide authors (people who can publish elsewhere like Smashwords, etc). The not so good part, you're very dependent on Amazon. For now, it's worth it for us and the (very different) niches we chose do well in KU.
Startup costs -
KEEP IT MINIMAL! I would not throw tons of money into fancy formatting software or professional editing if you're looking to self-publish your first novel. Do the work yourself, take advantage of free resources, sites and tools and see a profit (hopefully). I published my first book May 31st last year and I had made up my initial startup costs by the time my second book was released in late July.
What you actually need..
Royalty free images to make covers - $40 and up, up, up
Catch deals from Deposit Photos. Twice a year they do a deal through appsumo where you can get 100 images for $40. It's a steal of a deal. GIMP is free software you can download to make covers. Find YouTube videos to show you how. It's all out there and free. But it takes effort. Sorry, no shortcuts there :)
Reader Services - $10/month
Many, many self-published authors use bonus stories or free stories as Reader Magnets to draw readers and future fans to their newsletters. You need a system to funnel those readers and collect emails. Bookfunnel is who I use. Some of their services are free but you pretty much need that $10/month to make use of the good stuff. They also offer author swaps and newsletter building promos if you want to grow your list of followers. StoryOrigin is an alternative site some people use.
Newsletter - $0
I use Mailerlite which is free up to 1k subscribers. There's also Mailchimp. You can have freebie landing sites from Mailerlite. I haven't bothered with a paid website domain yet but I know this is something I'll need to look into soon.
ARCs - $10 to $20/month
Booksprout is the one I use. There are probably others. I think it's about $10/month for the beginner subscription to get those reviewers. I'm using a mid-list author plan now ~ $190/year. Some niches make use of SM more for this.
Advertising - $0 to thousands
Don't bother until you've got a book or two out there (come ask me if you get to that point). I'd say the only advertising you should focus on to start with is your passive marketing - your blurb, your cover and the keywords you enter on Amazon that make your book discoverable. Beyond that, paid advertising can wait.
However, you can use Tiktok to get your book noticed. Amy is learning the ropes of this and we've both seen people whose sales have skyrocketed thanks to one or two good Tiktoks to draw readers. One person made $10k in a month off of ONE good Tiktok. Other SMs have their successes, too. This is not an area I excel at though. I'd need one of my kids to teach me more... lmao.
Finally, I'll say, I didn't go into this thinking it would make me rich and famous. I wrote 3 million words of Jonsa out of love over the course of five years. I've written 350k words of original fiction the past year and it's paying the mortgage. Thankfully, I love what I'm writing and I've set myself a five-year plan for my 'side hustle' to see how I feel in 2027. We'll see where I am then. Fingers crossed I can claim I'm a six-figure author!
But what you can achieve in self-publishing can be phenomenal if you're writing to market (giving romance readers those tropes they love and hitting the expected story beats) in a genre and niche that has hungry readers. Our discord has verified tiers so people who say they're making 50k in thirty days aren't just blowing smoke. They've proven it. Imagine making money like that and then, if you're at a point in your life where you want to try, GO FOR IT.
29 notes
·
View notes