#high quality 3D Printer
Explore tagged Tumblr posts
Visit Tumblr Blog
Explore Tumblr blogs with no restrictions, modern design and the best experience.
Last Seen Tumblr Blogs


Fun Fact
Tumblr is available in 18 languages.
Text

Buy 3D Printer Parts at Best Price Online – TOMSON ELECTRONICS
Get the best prices on 3D printer parts and accessories online. Buy a wide range of high-quality items to enhance your 3D printing experience. Fast shipping available!
0 notes
Text
I second this!
"we need cops at pride to protect people!" WRONG. ASEXUALS WITH FLAMETHROWERS.
#Okay but I’ve actually been meaning to buy a flamethrower#Like I haven’t looked too far into it but I’m pretty sure I can legally get one#If I can’t my brother can so already got a way around that#The only issue is that a good high quality 3D printer is higher on my list oh and also a wheellock or flintlock rifle#But I do want a flamethrower
23K notes
·
View notes
Text
Explore High-Quality 3D Printers at Bambu 3D Printer UK
Discover a wide selection of top-tier 3D printers at Bambu 3D Printer UK. Whether you’re a hobbyist or a professional, we offer cutting-edge 3D printing technology to help bring your ideas to life. Browse through our collection for reliable, innovative, and high-performance 3D printers designed for all levels of expertise.
Visit : https://bambu3dprinter.co.uk/product-category/3d-printers/
0 notes
Text

How much does your craft cost? And why "cost of supplies X2" formula is absolutely harmful for artists?
A lot of artists & artisans keep asking this question: how much should I charge for my craft?
There is a simple way to calculate the cost of the item: calculate the cost of supplies that went into it, and multiply by 2.
I can't track the origin of this idea, but I keep stumbling upon it in many craft groups - and I can't help, but cringe every time.
Why this formula is used by many? It's no secret for me. Many artsy people are not great with math and finances, so they cling to it because of its simplicity.
Why offering this formula to craft novices is a major disservice that may severely harm their approach?
Because each type of craft has its own financial accounting.
What actually should be calculated:
- The cost of supplies, including shipping to your location,
- The amount of time spent on the item, multiplied by the cost of your single working hour,
- The time spent on making photos of the item,
- The cost of packaging,
- The cost of time you spend on packaging and shipping the item.
These are easier to calculate.
Also there are costs that you spend every now and then, like monthly or even once in a several years, like:
- The time and cost of maintaining site (if any), Etsy, Pinterest, etc., and also social media presence,
- The cost of rent if you rent the space, or the cost of maintenance if you own it,
- The cost of electricity/water/etc. you spend while doing the job,
- The cost of tools used (sewing machine, 3D printer, scissors, hammers, glues, paints, photo gear, whatever), it's called amortization,
- The cost of courses, workshops, etc. you attend to improve your skills, or time&supplies you spend self-learning or experimenting.
I mentioned just the major ones, but it may vary from craft to craft greatly.
I suggest to calculate all that stuff for a single month. If it's some tool like a sewing machine that you know you'll be using for many years, I'd recommend to set its amortization time to 5 years (aka 60 months), so after that term, if the tool is still usable, you kinda use it for free. And you can add 1/60th of the cost of the tool to your monthly accounting.
And, knowing the cost of the monthly expenses and number of hours spent on all of your items during a month, you can calculate the percent of the cost that you should add on top of each item.
As you already know, I do doll stuff. To simplify the process, I count the cost of my working hours only, and then add a certain percent to the cost, that I calculated previously. It still may vary from item to item, but it all evens out in a long run.
As for the "cost of supplies x2" formula, let's see how it absolutely doesn't work for me.
Let's say I do faceups. I charge $150 per faceup. My supplies are:
- high quality Rembrandt pastels, Albrecht Duhrer watercolor pencils, acrylic varnish, ox gall and some brushes that were a noticeable investment, but will serve me not for 5 years, but for like 20 years ahead. Even the initial investment is completely covered within a single faceup.
- MSC. I don't overspray, so a single can lasts for at least 5 faceups. Definitely a spendable, but less than $5 per faceup.
- Cotton discs, cotton swabs, some toothpicks, nail polish remover, electricity, whatever else - definitely less than $5 again.
- 3M respirator mask with cartridges. Lasts for at least 5 years, is used for not only faceups but for many other tasks, its cost is almost non-noticeable.
So how much should I charge???
Obviously, I charge for skills mostly.
What if there is a developed market already, you calculated everything, and you see that people aren't ready to pay the honest price?
Then you should think twice if you want to sell your craft, or to move to other business. Or to admit you do it as a hobby and sell for whatever people are ready to pay you, and don't call it a business. And make sure people whom you sell your stuff are informed about the difference. Because skilled manual labor never should cost as little as mass produced items.
123 notes
·
View notes
Text
Since this response got out of hand, I'm giving it its' own post.
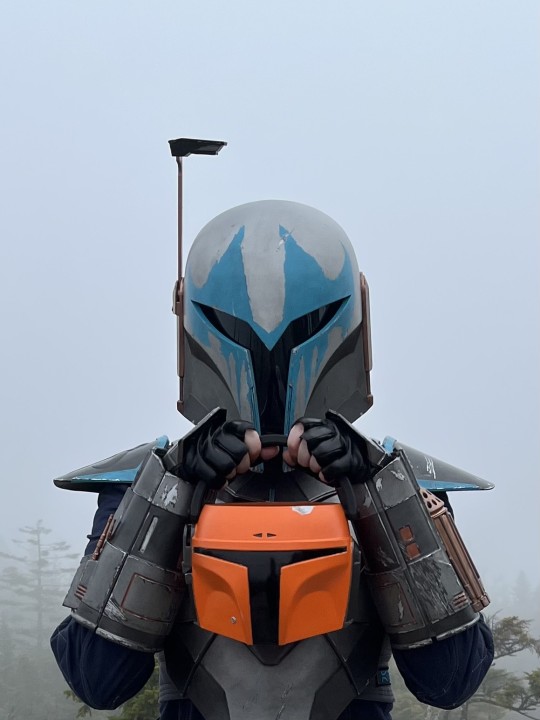
It's dangerous to ask a maker (artist?) about their processes @lonewolflupe @ulchabhangorm. But since you're curious, please accept my very first:

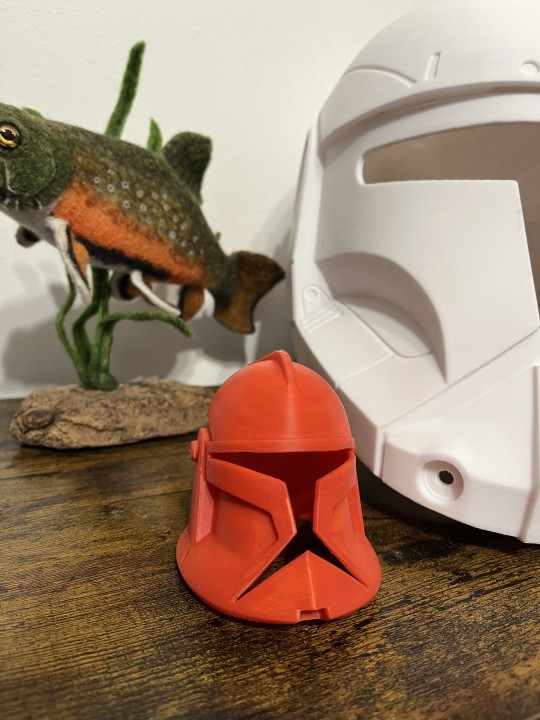
All of the pictured things were 3D printed by me on my FDM printer (Bambu Labs A1), including the teeny helmets. The non-helmet bits are pieces of Tech's armour. I'm currently building a Tech kit for 501st Legion approval. I "like" Crosshair and Scorch the most, but I am "most like" Tech. /sigh
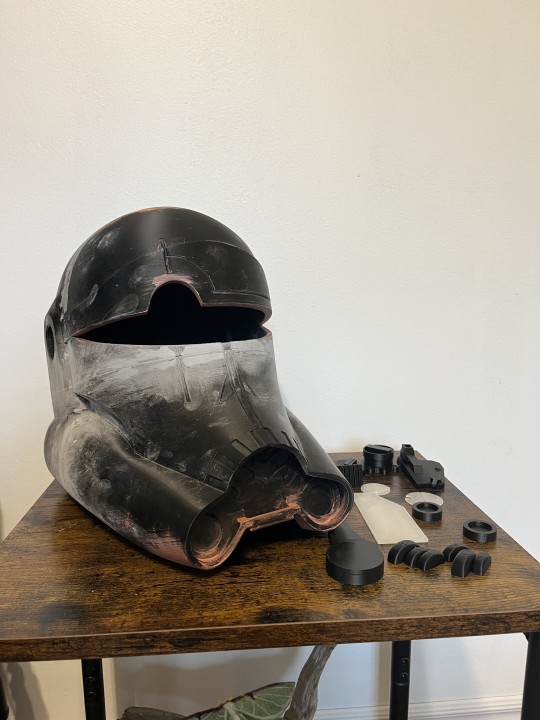
I do! (Mostly) All of the armour parts of Archers' kit were 3D printed and finished by me on my FDM printer, with the exception of my pauldrons which were resin printed by someone else, but finished by me. I initially began making the kit for a Halloween costume, challenged by a coworker to a work-Halloween costume contest, but ended up meeting a couple vode from the Mando Mercs club (MMCC). I was invited (gently coerced?) to complete the kit to their standards and join the club. I'm in that process now, but still have a few things to finish before I gain Official Member status. 🙂
I made a lil' Boba candy bucket!!
3. I mostly print with PLA+. I can print with PETG, ABS, and other materials but my printer is running inside a spare room and I'm not set up with an enclosure or awesome ventilation yet to print with materials which off gas more toxic VOCs. Although PETG would be stronger for a buy'ce that is going to be worn PLA+ works just fine for most folks who are not in very hot conditions. (PLA will sag and melt in high heat) . The first time I wore my full kit, I was at work, and did a full day of fieldwork in it. The whole kit survived apart from one of the thrusters on my jetpack which I accidentally busted off while putting it back in the kit box (adhesive failure, I should have used hardware but I was in a rush to finish it before Halloween) . All fixed now! PLA would be just fine for printing teeny and/or decorative helmets. Just don't toss full size ones onto the floor off of a shelf (ask me how I know).

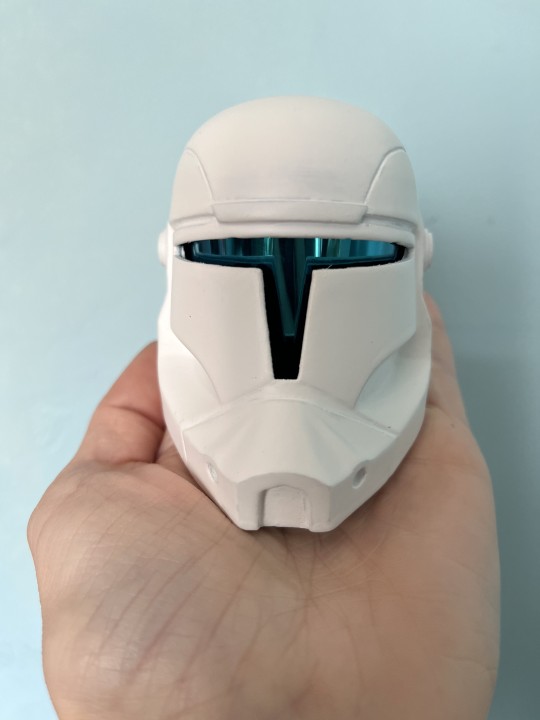
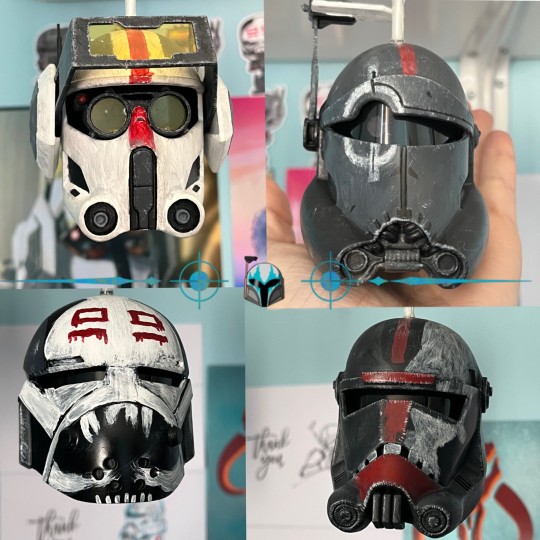
4. You can get STLs for clone helmets in all the places you'd expect (cults, thingiverse, etc) and from vendors on Etsy. Be careful, though, some of those files are stolen, and some are REALLY terrible and inaccurate. I usually avoid 'free' files, as for things as complex as helmets often end up being more costly in other ways, or are just not the quality I want. Galactic Armory has a nice selection of clone helmets (I have..... all of them. /embarrassment). Marko of Mystery Makers has really great Bad Batch (and other SW) helmets. He always tries to go a step beyond other modelers with his designs, both with functionality and accuracy. The Crosshair and RC helmet in my original post are both printed from Mystery Makers files. The RC helmet is the closest to the game design available, and the Cross helmet has a super cool functional rangefinder (like the different lenses are there and flip up and down, not just the whole rangefinder stalk moving). The Tech helmet is printed from Galactic Armory files, as are the rest (with the exception of Archers helmet which is AlterEgo, if I recall). The teeny helmets are printed from the full size files, just scaled down to 25%. I wouldn't' try to print these on an SLA/LCD resin printer, because the supports would be a nightmare I think, but it works just fine on an FDM printer. The most difficult part is printing the teeny greeblies for them which are super teeny at 25%. I almost always end up breaking the lil' rangefinder stalks, and am pretty sure I've lost the tusks for Rex's helmet more than once.
Cross WIP (Mystery Makers) with teeny (30%) Cross (Galactic Armory) 💙 Guess how many times I broke that teeny rangefinder stalk? Yeah. Four. 😖
Likewise, guess how many times I broke and lost the SUPER TEENY antennae on Tiny Tech's helmet? 😫
5. The visors in the full size helmets are generally welding/grinding replacement shields (Hobart brand, usually - available on Amazon). They are dark enough to obscure the wearers face and can be fairly easily cut to shape and installed. Tech's visor and goggle lenses are cut yellow acrylic, and in my original post still have the protective backing on them as they aren't 'officially' installed yet - which I why you can't see through them.
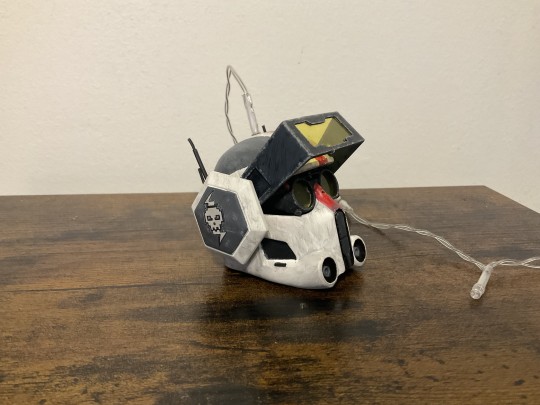
The visors for the full-size RC boys are more complicated. I believe the exact details of how I’ve been taught to do it are considered proprietary 🥺😏. To achieve the “Flirtation Mask” effect, two visors, a diffuser, and a strip of LEDs are installed in a very secret, not so secret, way. I’m working on a Scorch bucket, full size, and will have help to do this for the first time. Stay tuned. 😆 For the teeny helmets I use automotive window tint for the visors. It's easier to cut and bend into tiny shapes to fit inside the helmets. I got some blue stuff for the commando helmets, which should look cool once I install the lights. 😎
Teeny Gregor bucket WIP, with blue window tint FLIRTATION MASK 💙
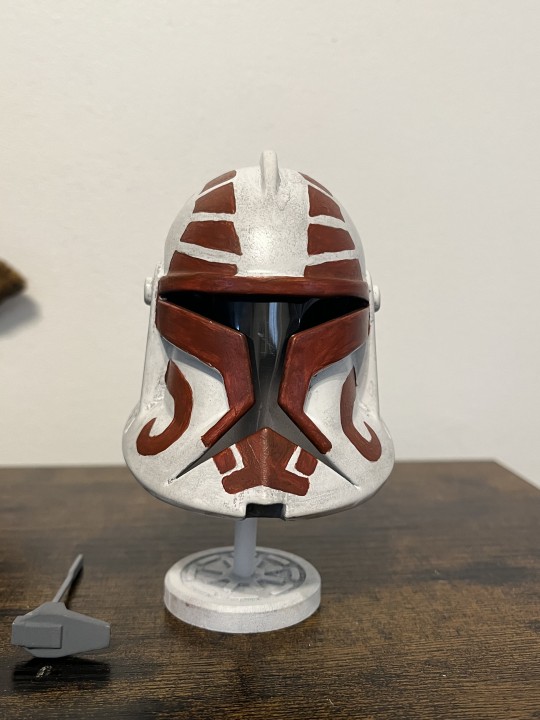
6. The lil helmet stand under teeny Keeli (which I'm making for @eobe) is printed from a file from Galactic Armory. It's been through the ringer, because I use it to hold all the little helmets while I'm spray painting them and letting them cure. It did look nice when it was newer, and has the republic cog on the base. There is also a wall-mounted version which I have printed to hang Archer's helmet. I'll probably make more for the other helmets eventually.
7. VPLs (Visible Print Lines) are the enemy! As an MMCC member, it has been drilled into me that VPLs are evil and must be vanquished with extreme violence. I try to finish everything (with the exception of the flexi things people keep asking me to make) to an excellent standard with no VPLs - including the teeny helmets.
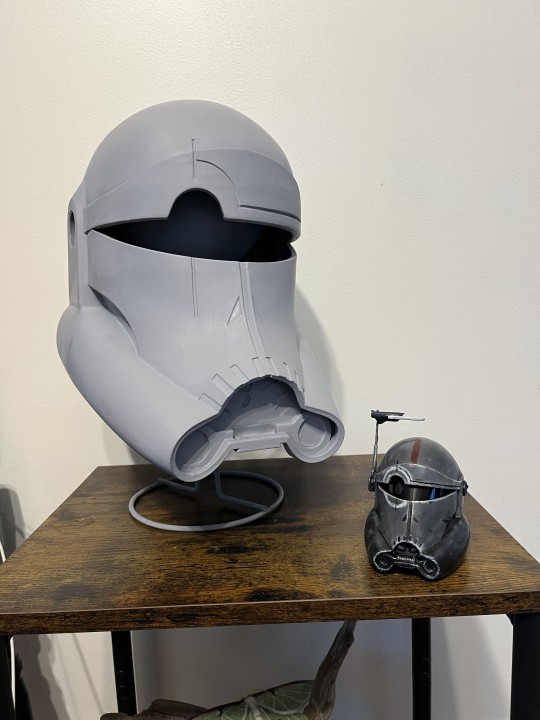
Raw Phase 1 (Animated) clone helmet and RC (Scorch) helmet). My printer does an excellent job, but still there are VPLs to be dealt with!
8. This question - how to get rid of VPLs could warrant it's own post. There are SO MANY techniques - some good, some NOT - but which ones you use depends largely on your print characteristics and what you intend to do with it. A lot of people lately have been recommending bathing the entire piece in a Bondo spot putty and acetone slurry several times until the lines are filled. I DO NOT recommend doing this for a piece that you intend to wear. I experimented with this and found out that after a small amount of wear the bondo likes to expel your paint in large chips, leaving ugly bondo-red spots behind. It would probably work ok for decorative pieces though. Other people have used UV curing resin to coat pieces to fill VPLs. It works, but UGH that stuff is toxic to touch and breathe, and it needs to be properly washed and cured, and cured some more. It's also much more difficult to sand than automotive body work products (which in all fairness are also toxic to breathe and touch - WEAR YOUR PPE).
My general process for armour pieces is to remove supports and then roughly sand (120 grit) only the really rough spots (like things that were overhangs or had a lot of supports). Sanding happens with a combination of sanding papers, sanding sticks, and needle files - depending on the piece. I then adhere pieces together (if they were printed in pieces like some of the larger full-size helmets) with plastic bonder. Seams are filled with Bondo plastic metal or EverCoat depending on the piece and I often plastic weld and staple the inside for strength. The seams are then sanded smooth. After I'm happy with the smoothness of the seams the entire piece will get 2-3 coats of automotive high-build filler primer (from a rattle can, though I have used the 1:4 mix stuff and brushed it on - I'd only recommend this with a large piece as that stuff REALLY fills things in quick - including the things you don't want it to) and a wet sand to 320 grit. At this point most of the print lines are filled, but stubborn areas, such as the top of the dome may still necessitate more coats. I generally end up applying 5 coats of filler primer, wet sanding between them. Following the final coat of filler primer, I'll wet sand again to about 400 grit (much more if we're going for the Beskar finish which needs a SUPER SMOOTH finish to work) and then put on a coat of regular primer. Black for helmets that will be dark (Most of the CF99 boys), and white for the other clone helmets. At this point they should be completely VPL free and ready for greebly installation and the "real" paint job. This process takes me at least a few days on full-size helmets as the paints have to cure between sanding and reapplication, and painting has to happen outside in good conditions. It's not inexpensive, but it is the most efficient and long-lasting way to do it, in my experience.
Cross helmet WIP. You can see the seam just under the visor cut out. This one printed in three pieces and needed ALL the seam filling and sanding. The pinkish and grey stuff are body fill products to fill in rough spots and seam lines. If you look at the last photo - of the same helmet - you can see they did a decent job of hiding that there was a seam. 😊
9. I use a lot of automotive products and paint. Since all my full size helmets are mean to be worn they need to be finished to a fairly high standard and be relatively tough. Archer's helmet body was finished entirely with Rustoleum brand filler primer and four layers of metallic paints (all rattle cans). The blue on the front was a Montana brand acrylic rattle can, and the copper parts (ear caps, rangefinder stalk) were enamel paint (Alclad copper) airbrushed on. The weathering - chips and scratches - were achieved by layering on a liquid latex medium between coats, so that when it was peeled off it revealed small bits of the coats beneath. It gives the damage a more realistic look than painting silver 'scratches' on after the fact. This liquid latex medium can be used to give the paint applied to clone helmets the chipped look to their painted designs as seen in the animation. It's a little more challenging to do in small scale though. After all the top coat paints are applied, I'll seal them in with a clear layer of satin or gloss sealant (rattle can). After that, I'll go over the entire piece with an acrylic black wash to make it look "dirty" and worn. 😅. After all that process, padding, visors, and electronics (HUD lights, fans, voice amps) are installed if needed. The whole thing is pretty time-consuming. I now understand why quality finished helmets cost as much as they do. My teeny helmets are all finished as I described above in the VPL section, but I use acrylics hand-painted on with a brush to apply the designs. In the animation versions of these helmets, particularly in TBB, the helmets all look like they've been (roughly) hand painted, so this technique works ok, I think. I apply the chipping and weathering at edges with dry brushing acrylics. I could apply a liquid latex mask and airbrush them, but eh. I'm using these little guys as fairy light "lanterns". They're super cute with the light showing a bit through the visors, particularly Tech. :)
The Teeny Batch boys that I've got finished. Echo is coming, he just needs his top coat and weathering. :D
Lil' Keeli almost finished, with his unfinished rangefinder. Have not broken the stalk yet! /cheer 🎉
10. Acrylics brand? Hmm... I've used the Montana Gold rattle can acrylics which some of the MMCC mandos seem to like. I'm not sure if the ones I got were duds, but I wasn't super impressed. The cans did a lot of spitting and messed up my paint a few times. My brush on acrylics are Liquitex or Golden. Both can be thinned and airbrushed, and are more costly than cheap crafting brands but are more highly pigmented and last longer (plus the finish is nicer).
11. Base colour is whatever primer I finish with - white or black, depending on what color the final piece will be. For Mando helmets, the base colour is a metallic silver, so that when I peel off the liquid latex layers, the pint chips down to “bare metal/beskar”. Since clone helmets are plastioid, the base colour for them remains white or black.
12. I finish with a rattle can sealant. Satin finish usually, but that depends on the look you want. Always try to stick with the same brand of primer, paint, and sealant. Different brands have different chemistry - accelerants and so on, and can, and often do react with one another. The frustration of having to sand down a piece that was almost finished cannot be described.
To avoid paint heartache, always also paint in good conditions. Temperature, humidity, wind, etc can all ruin you day and paint job. Please also always wear your PPE!
13. Are they? I hope they are. They sure are a labour of love, and much work - but it makes me happy to make them and to look at them. 😅
I'm very fond of Archer's buy'ce, and the whole kit really. It was the first one I 'finished' (every mando's kit is an ongoing WIP - forever), and the process of making it kept me focused on something positive during a rough time in my life. Wearing it is super fun! Ibic Manda!


WOW that got lengthy, so sorry! I had ALL the questions when I started, and a lot of the info you need is hard to find or in bits and pieces all over the internet. If you have any other questions, feel free to ask! I can only share my experience, but I have spent a huge amount of 2024 working on these for what that's worth. 🫣
#star wars#the bad batch#tbb crosshair#chaos squad#mandalorian oc#star wars oc#tbb#3d printing#tcw keeli#tcw gregor#tbb tech#tbb hunter#tbb wrecker#clone force 99#Archers Chaotic InfoDump Series
44 notes
·
View notes
Text
One of my favorite movies of all time is Men in Black, and I've always wanted a neuralyzer prop. All I could ever find online were plastic Burger King toys or DIY kits that required a 3D printer and experience soldering electronics, neither of which I had. Two years ago, an online prop store started selling a high-quality, metal, screen-accurate replica, the exact thing I was looking for, at a cost of $600, which was absolutely unconscionable. I could not justify the expense, but I REALLY thought about it... At that point I had been saving up for years to buy a car and came in well under budget, so I had more than $600 to spare, but I was also planning a move across the state and was saving up to get my own apartment. As luck would have it, I found a 4-bedroom unit with three roommates for under $600. Would I rather have a prop that would ultimately sit untouched in a box on a shelf forever, or a full month of rent? I chose the latter because I wanted to be a fiscally responsible adult, but I think I made the wrong choice. My savings ran dry within four months at my apartment, and my parents have had to help me pay my rent ever since because I have been unable to find and hold a full time job that didn't make me want to self-immolate on the bossman's doorstep. That $600 didn't do jack shit for me in the long run, and I have to move back in with my folks next month anyway. I would be in the exact same financial boat as I'm in now if I had bought the neuralyzer, but at least then I'd have something to show for it. I still want it, but I'm not gonna have $600 to burn anytime soon.
If you really want something and can afford it, don't pass it up. There are people who spend more than that per year on video games or funko pops. A one-time expense for Christmas 2023 would have been completely reasonable, and I regret choosing the "responsible" option knowing where that got me today. Life is short and painful and largely meaningless, so try to have fun with it while it lasts.
12 notes
·
View notes
Text

I don't want to put anyone in the notes on the print/steal a replacement knob for an oven post on blast but nope. wrong. printer beam attack.

also wrong, but with more qualifiers. Taking a peek at the local hardware store, a low end stove is in the $800s on sale. A good medium-high quality 3D printer is also in the $800s. A cheapshit 3D printer can be had for $200. So you can do the math on that one.
But to discuss a 3D printer paying for itself in home repairs, that's actually pretty easy.
I got a 3D printer for about $800 in 2018. In the last two years, for home repairs, improvements, and quality of life, I've printed about:
30 custom color matched brackets for a lighting system, none of which could be purchased. To approximate it, you'd need to buy all of the pieces and then modify them using sandpaper, primer, and paint and just the materials to modify the pieces would run you about $30 and 2-3 days of work.
Nail guides for installing a pocket door, not a purchasable item
12 fancy shelf brackets for the bathroom closet, $10+ per piece
36 basic shelf brackets for the basement storage racks, $5+ per piece
various glue and cut guides
cover for drier exhaust tube hole
4 brackets for curtain to cover unwanted mirror, can't be bought
6 custom brackets for curtains over main windows, can't be bought
2 windowsill cleats to tie off the curtain pulls, $5+ each
3 bends for the hand rail replacement project, $60+ each
blast gates for dust collection system for power tools in the basement, $30 per gate
30 clips for the gallery hanging system to work with my cheapass frames, the clips that don't work are $2+ a piece
plumbing pieces for the wet/dry vacuum, can't be bought
plumbing pieces for the rain collection system, can't be bought, similar parts $15/piece
various small boxes and organizers, $5-30 piece
tabs to secure forces air register covers to the wall, $0.50/piece but they'd look like shit
and some stuff I'm forgetting
Not counting the things that couldn't be bought, gas to run to the store, shipping costs, or the money my time is worth and using the minimum estimates, that list totals $1017. Estimating the uncountables, I guess that I've gotten upwards of $2000 of value from the printer.
Materials cost, not counting the printer:
about two hours per model (average, some take like 10 minutes) to create the model, total 32 hours. At $20/hr for my time, that's $640.
about two hours per print run (average, some take a few minutes, others take 6 hours).
electricity for the computer to model and the printer to run. Given that heating and cooling and cooking in this house is all electric, I consider this round off to the total costs of operating the house.
filament to feed the printer: three reels at $30/reel (estimated) = $90
That totals about $730 of costs to operate the printer.
Subtracting operating costs from obtained value, I get $1270. So in two years, the printer has well and thoroughly paid for itself and left $400+ in my pocket.
And the convenience of having parts made exactly the way I want them, the first time, with limited modifications, almost zero waste, and almost instantly is truly a lifesaver. I cannot overstate how much better that has made my life. I can start work on something, realize I need a part, and have the part ready to go by the time the work gets to where the part is needed. And I live super close to the store; it would be even more valuable to me if I lived further from the store.
and for funsies I've also printed:
hand wheel for antique sewing machine. If you can buy the parts, it'll run you over $1000.
Spinning wheel. IDK $300-$3000.
cute watering can for my plants. Can't buy it but equivalent would be $30-50.
and more!
I joke about the 3D printer being my most valuable tool but it really is. Many, most even, of my most annoying problems can be solved with it.
#While I'm having unwanted opinions on the internet#3D printing#Ill advised posts#$400 ain't much but it ain't nothing that's for sure#And it's been fun to run the numbers#So much stuff I couldn't have or do without the printer#And I really don't make novelties and toys#This is a utility printer for solving problems
12 notes
·
View notes
Text

Forgive the low-quality photo and the half-assed edit to make the figure stand out from the background, last time I had access to decent photography equipment was when I was in middle school and even then that was only decent photography equipment for the time by hobbyist standards
I posted some pics of this figure on my Twitter, the one for my other handle, back in I think January, figured now that I have this handle I could stand to post it here. Luigi's Mansion has been my favorite video game ever since my sister got the Gamecube for her birthday when I was seven. That day I went with my dad to pick out games for it and lied through my teeth that she REALLY wanted the Luigi ghost game, when actually she really didn't, I did, I got a game for my sister's birthday like a little asshole and I'd do it again! I'd spend so much time on Google Images searching "Luigi's Mansion" and scrolling as far as I possibly can, I wouldn't be surprised if I'd actually seen every result that would come up at the time, so I was aware of the Luigi's Mansion figure made by Joyride. It was at the top of my Christmas list that year. I didn't get it. Even by then it was already pretty hard to find. I have no way of knowing what it went for on Ebay back then, but by the time it occurred to me to check, it was years later and already going for hundreds. I may be an adult now with disposable income, but there's no way in hell I was spending 600+ on an action figure and feeling good about it. That memory came back to me shortly after the movie came out last year when I was standing in a Walmart toy aisle looking at its merch line, marveling at the high-quality of the sculpts, the abundance of articulation, how they're really are the definitive action figures of these characters. I thought the only thing that was really missing was a Poltergust for Luigi, then it would be like a Mega Evolved version of that figure I wanted as a kid.
Then it occurred to me that I own a 3D printer.
I bought the Mario and Luigi figures, twice actually since later that year my favorite game store was doing a toy drive so I bought an extra set to donate to that, and then never got around to making that Poltergust because of just how busy last year was for me. I forgot all about it until getting a package of filament for Christmas in all the colors I would need to do it. This was exactly twenty Christmases after I originally asked Santa for that Joyride figure, so I couldn't pass up the opportunity to use that particular filament to see it through.
The point I'm getting at? Adulthood is a lot more fun and rewarding if you take advantage of it to get stuff you wanted as a kid but couldn't. I may not have much going for me in my life, but at most times of my day I can pivot my head about 45 degrees to the right and be reminded of a simple time when a video game and a toy were the most important things ever to me.
13 notes
·
View notes
Text
Punk Skunk Girl and Punk Cat Boy doll set finished Sat. Nov. 16 2024 with pictures—took forever, finally done
I was really pleased with how these anthropomorphic cat boy and skunk girl dolls turned out. The heads (with original hairstyles) came from the 2020s MGA LOL OMG Hair Hair Hair pets line, which were all music-themed. The bodies came from Tomy(?) posable artist figures from AliExpress. I made most of their clothes (with contributions from toy companies MGA, Zuru, and Mattel), and I made all of their rock and rock accessories.
The tiny, male and female, black vinyl hinged and ball socket artist figure bodies caused many delays in finishing these this year, as the joints would break when they were moved. I had to use a combination of superglue with water putty powder, and sometimes black felt and super glue to stabilize and repair breaks. (Then I’d seal, paint black, seal, and repeat the steps when the joints inevitably broke again.) But there was nothing else available for doll bodies in black in this scale.
I made his black jeans, his black mesh top, her red sweater, her stretchy black tights, and her skirt from scratch from old jeans, an unused Forever 21 clearance cocktail dress, black scraps, and a new holiday-themed sock. His gold tone belt buckle is a tiny piece broken off of some bit of doll accessory or doll jewelry (likely Mattel Barbie). The printed top layer of her skirt was made by gathering the long printed satin care instructions in multiple languages from the dress tag.
His clear neon green “studded” vest came in a handful of MGA LOL OMG doll clothes and accessories bought at this spring’s Port Costa town-wide yard sale (studs had to be reglued, as they shed off the vinyl). His black cotton jacket and her black, red, and silver sleeveless top came from a new set of MGA Little Bratz clothes bought years ago. (The top came with “punk” printed in red on the fabric and the faux silver zipper trim.) Her boots were bought this year with a Barbie Extra Mini doll (which I bought primarily for parts) and painted black and sealed with Testor’s sealant.
His black Doc Marten-style boots (with real laces and tongue) and her black polka dotted bow came from this year’s Zuru Mini Fashion series 3 surprise ball pack. (A high quality detailed series of miniatures—I bought only the 2023-2024 series that came with fashion doll shoes.)
I made his neon green “studded” wrist bands from cheap plastic tube beads from Michael’s and painted the studs on with textured silver fabric paint (sealed with Testor’s Dullcote before and after), which is how I made the “studded” red band in her hair.
The parts of the outfits I was most pleased with are their 1980s rock band buttons and emblems. I printed out images from the original band merchandise online on our injet printer, then affixed them to either white thumb tacks, white card paper, or off-white felt with Mod Podge, then I sealed them with Mod Podge 3D “dimensional” clear coating.
His Oingo Boingo square green album button (with cat and Christmas graphic) is from “Nothing to Fear.” (I bent a wire into a square to be a “pin back” attachment glued to the card backing in this button.) His jacket patch (attached to his jacket with a rougher punk DIY style of stitching) is from the first EP “Oingo Boingo,” featuring the Louis Wain cat. Her yellow, pink, and orange Oingo Boingo Louis Wain cat button is supposedly the first button from the first EP.
I used the same method to create her Dead Milkman cow logo button, but I used a rubbery earring packaging plug (which comes on the ends of new earring wires) to affix it to the lapel, instead bending the thumb tack stem back with needle nose pliers, as I did with the other buttons. On her blouse collar’s lapel is a Siouxie and the Banshees band button with a portrait of the lead singer. Some of the ink came off in the glueing, so I carefully filled in the missing bits with a black felt tip pen before sealing.
Saturday morning, I photographed the pair posing together and dancing (including tgeir doing the Pogo) on our white brick mantel in the living room, with the natural light supplemented by a clip-on halo light (attached to my iPhone 13) and my flexible bedroom lamp twisted up from under my arm.
I enjoyed putting these together. It was a similar creative process as when, a few years ago, I repaired and made over some damaged old Sunshine Family dolls into 1980s teens and 1990s Seattle grunge skater kids. I think the pink and black mohawk on the MGA cat head gave me the impetus for this pair.


18 notes
·
View notes
Text
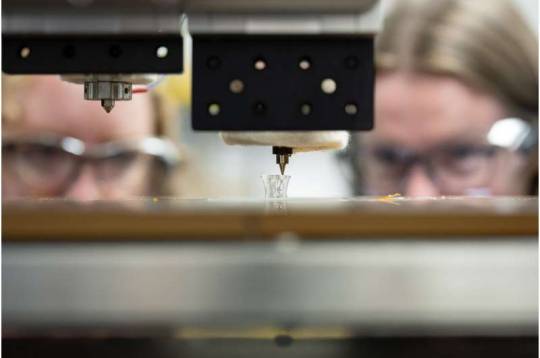
Stretchable, flexible, recyclable: 3D printing method creates fantastic plastic
Princeton engineers have developed an easily scalable 3D printing technique to manufacture soft plastics with programmed stretchiness and flexibility that are also recyclable and inexpensive—qualities not typically combined in commercially manufactured materials. In an article in the journal Advanced Functional Materials, a team led by Emily Davidson reported that they used a class of widely available polymers called thermoplastic elastomers to create soft 3D printed structures with tunable stiffness. Engineers can design the print path used by the 3D printer to program the plastic's physical properties so that a device can stretch and flex repeatedly in one direction while remaining rigid in another. Davidson, an assistant professor of chemical and biological engineering, said this approach to engineering soft architected materials could have many uses, such as soft robots, medical devices and prosthetics, strong lightweight helmets, and custom high-performance shoe soles.
Read more.
#Materials Science#Science#3D printing#Plastics#Polymers#Elastomers#Block copolymers#Nanotechnology#Princeton University
10 notes
·
View notes
Note
Have you had problems with durability or warping when shipping your dolls in hot weather? I’d love to start 3d printing my dolls but I saw people talk about those potentially being issues with PLA and it scared me off… I thought it was basically impossible to 3d print high quality dolls without a resin printer but yours look amazing!
i have shipped several dolls during heat waves this summer, and haven't had any problems so far. i don't think it's impossible to get warping during shipping, but also a hundred other things could go wrong, and PLA is not the only material that can break, so i try to pack my dolls well and not worry about it too much. in the worst case scenario, at least the warped parts would be easy to reprint and replace.
i also used to think an fdm printer wouldn't work for dolls, but i've learned to live with the pros and cons of it, because i just don't have a workspace where i can handle resin. in the end, i make dolls for myself, because i find it fun. i like running a little shop on the side, but if i was making crafts primarily for money, i would Just Make Something Else. so if a potential customer is turned off by layer lines or the material in general, i'm alright with that.
19 notes
·
View notes
Text
Exploring the Exciting World of 3D Printing with QIDI Tech!
Hello everyone!
I hope you're all having a fantastic day. Today, I want to dive into the innovative and inspiring world of 3D printing, specifically focusing on the incredible brand QIDI Tech. If you’re as fascinated by technology as I am, you’ll definitely want to explore what QIDI Tech has to offer!
QIDI Tech is known for its high-quality 3D printers that cater to both beginners and experienced users. One of the standout features of their printers is the user-friendly 3D printer software that makes the printing process seamless and enjoyable. Whether you’re creating intricate designs or simple prototypes, their software is designed to enhance your experience and ensure great results.
I recently got my hands on one of their latest models, and I must say, the quality of prints is remarkable! The ease of use, combined with the robust capabilities of the 3D printer software, allows for a smooth workflow that brings your creative ideas to life.
For those of you who are just starting out, I highly recommend checking out QIDI Tech's tutorials and resources. They provide helpful guidance on how to make the most of your 3D printer and software. Plus, the community around this brand is supportive and full of inspiration!
If you're looking to explore your creativity and dive into the world of 3D printing, QIDI Tech is definitely a brand worth considering. Let’s embrace this technology and create something amazing together!
Happy printing!
Sent from my laptop using QIDI Tech's 3D printer software.
3 notes
·
View notes
Text
Japanese Artist Creates Astonishingly Detailed Wristwatch Replicas Entirely from Paper

Manabu Kosaka, an artist from Saitama, Japan, has a very special skill – he can recreate virtually any wristwatch model exclusively out of high-quality Kent paper. The results of his painstaking labor are so utterly incredible that the saying “seeing is believing” doesn’t really apply.

So how does one go about recreating a seemingly perfect replica of a Rolex or Casio wristwatch out of nothing but paper? You could probably use a special 3D printer or some other advanced device, but Manabu Kosaka does it all by hand, first drawing the design on a sheet of Kent paper, and then using rudimentary tools like glue, dremels, an Xacto knife to cut tiny characters as small as 1 mm in size, and tweezers to place them at just the right place. I still can’t understand how he can mould the paper dials and the wristbands of the watches in such great detail, but they are certainly impressive to look at.

Mr. Kosaka told Spotlight Media that he has been making these incredible paper replicas for the last 15 years, but while the extensive experience definitely helps, he can still fail countless times while trying to get certain tiny details just right. What really makes him special is his will to keep trying until he succeeds.

Some of Manabu Kosaka’s most amazing creations include almost perfect replicas of iconic watches like the Casio G-Shock, the IWC Portugieser Chronograph, a Frank Muller, and of course, a Rolex. They all look simply stunning, but his most incredible achievement has to be the paper replica of the legendary Speedsmaster, complete with a clear view of the internal mechanism of the watch. How he managed to make all those tiny gears and then put them together to mimic the original is beyond my understanding.

5 notes
·
View notes
Text
Trusted Heating Element Manufacturers in India: Quality Cartridge Heaters with Thermocouple Solutions
In the rapidly evolving industrial sector, heating elements are critical components across various applications, from plastic molding and packaging to food processing and pharmaceutical manufacturing. As demand for precise and energy-efficient heating solutions grows, heating element manufacturers in India are gaining global recognition for their innovation, durability, and customization capabilities.
The Rise of Indian Heating Element Manufacturers
India has become a hub for advanced and reliable heating element production. With a strong focus on quality, cost-efficiency, and rapid delivery, Indian manufacturers cater to both domestic and international markets. These companies specialize in a wide range of products, including:
Cartridge heaters
Tubular heaters
Mica band heaters
Ceramic infrared heaters
Coil and nozzle heaters
Among these, cartridge heaters with thermocouples are especially in demand due to their precise temperature control and compact design.
What is a Cartridge Heater with Thermocouple?
A cartridge heater is a cylindrical heating element that provides localized, high-intensity heat. When integrated with a thermocouple, it becomes a smart heating solution capable of automatically monitoring and adjusting temperature. This combination is essential in processes where temperature consistency and safety are paramount.
Key Benefits of Cartridge Heaters with Thermocouples:
Precise Temperature Monitoring: Real-time feedback from the thermocouple ensures better control.
Compact Design: Ideal for tight spaces in molds, dies, and hot runner systems.
Energy Efficiency: Reduces wastage and improves operational performance.
Customizable: Available in various wattages, lengths, diameters, and termination options.
Applications Across Industries
These heaters find wide usage across:
Plastic and rubber molding industries
Packaging machinery
Medical equipment manufacturing
3D printers and electronics
Food and beverage processing
Indian manufacturers offer custom-engineered solutions to match these diverse applications, ensuring compatibility, durability, and compliance with global standards.
Choosing the Right Manufacturer
When selecting from heating element manufacturers in India, consider the following:
ISO certifications and quality assurance processes
Use of high-grade raw materials like SS 304/316
Custom design capabilities
After-sales support and service
Timely delivery and competitive pricing
Many reputed Indian manufacturers are now exporting globally, offering OEM services and adhering to international safety standards like CE and RoHS.
Final Thoughts
The future of industrial heating is precision-driven, and cartridge heaters with thermocouples are at the forefront of this transformation. With a growing ecosystem of heating element manufacturers in India, businesses now have access to world-class solutions that are reliable, affordable, and tailored to their specific needs.
If you're sourcing heating elements or exploring a trusted cartridge heater supplier, India offers a wealth of options worth considering.
Would you like this blog formatted for your website, or need suggestions for top manufacturers to mention?
1 note
·
View note
Text
Bring Tough Prints to Life Using Premium TPU 95A from Tinmorry

Unlock a new level of flexibility in 3D printing with Tinmorry’s advanced materials built for performance and precision. Whether you're printing phone cases, wearables, or flexible hinges, our filament ensures strong results with a smooth, clean finish. Engineered for maximum stretch and durability, TPU 95A is ideal for functional prototypes and impact-resistant parts that need to bend without breaking. With excellent layer adhesion and minimal warping, it performs consistently across various printer models and settings. Tinmorry also offers high-quality PLA in 1.75mm and 2.85mm diameters, available for bulk orders at unbeatable prices. Choose Tinmorry when you need filaments that meet the highest standards in quality and performance. From flexible filaments to vibrant finishes, our products are trusted by professionals and hobbyists alike. Let your next design move, bend, and last longer—because great prints start with great materials. Tinmorry – Crafting Innovation, One Layer at a Time. Visit our website to know more: https://tinmorry.com/product-category/tpu95a/
#marble petg#marble petg filament#metallic petg#petg-gf#metallic petg filament#pp cf filament#industrial filament#buy abs filament#95a tpu
1 note
·
View note
Text
A Czech company is 3D-printing a giant Eiffel Tower model for a local Olympics event, using recycled ocean waste as the primary material.
The 14-metre-high (46-foot) model will be installed at an Olympic festival in the north of the Czech Republic, where the public can try different Olympic sports during the Paris Games in July and August.
Jan Hrebabecky, the owner of the 3DDen printing farm, uses printing filament made from ocean waste.
"The material for the Eiffel Tower comes from the shores of Thailand," he told AFP.
"It has excellent mechanic and chemical qualities, great UV resistance, and it is practically immortal."
Collected by Thai fishermen, the plastic waste is sorted, cleaned, desalinated and dried.
A Swiss company turns the waste into granules which a Czech company then processes into 3D-printing filaments.
Hrebabecky had to build a new printer to cope with the material.
"It can crystallise in the printer and destroy it immediately," Hrebabecky said.
But advantages prevail, including the price which is lower than that of traditional filaments.
"There are huge deposits of this priceless material, and anybody can come and take it," said Hrebabecky.
Plastic Eiffel Tower
With more than 200 printers, his company has so far printed key rings, miniature sculptures, medals and USB keys.
"But my goal is to print really large things, so we're making furniture and interior decorations as well," Hrebabecky said.
His printers are now busy with the Eiffel Tower, a puzzle of 1,600 3D-printed pieces fortified with steel rods, which Hrebabecky says will be solid enough to hold a helicopter.
He said the two-tonne structure, made from material equivalent to 800,000 plastic bottles, would stand next to the Most lake in northern Czech Republic, which will host the Olympic festival on July 26-August 11.
Nada Cerna, a Czech Olympic Committee manager in charge of the event, said it would allow people to try 52 Olympic sports, watch the Games on large screens and meet Czech athletes in person.
She told AFP 3DDen had impressed the organisers with its environmental-friendly approach.
"It's very important for us. Oceans are a place where people do sports like sailing and windsurfing," she said.
"So if we can highlight the problem in this way and maybe help a bit, we're really happy," Cerna added.
For Hrebabecky, the Eiffel Tower is a step towards a dream he wants to accomplish soon -- a printed house.
"If you build a house using this material, it is almost certain that it will never return to the ocean again," he said.
7 notes
·
View notes