#how to userdel
Explore tagged Tumblr posts
Visit Tumblr Blog
Explore Tumblr blogs with no restrictions, modern design and the best experience.
Last Seen Tumblr Blogs


Fun Fact
Women make up for the other 50% of Tumblr’s audience.
Text
These days, graphical user interfaces rule our screens. As such, the command line may appear to be a thing of the past. It is still a powerful tool, though, for anyone who wants to fully utilise a computer's potential. Greetings from the Linux command line universe. Here, we will uncover the tips and tricks that can transform you from a casual user into a command line maestro. Essential Command Line Basics for Linux We'll lay the groundwork for your exploration of the Linux command line in this article. In order to make sure you are comfortable using the terminal and carrying out commands successfully, we will start with the fundamentals. Open a Terminal You can use the terminal application that comes with most Linux distributions. Usually, you can locate it by looking for "Terminal" in the Applications menu or using the system search bar. Basic Commands: ls: List files and directories in the current directory. bashCopy code ls cd: Change the current directory. bashCopy code cd Documents pwd: Print the current working directory. bashCopy code pwd mkdir: Create a new directory. bashCopy code mkdir NewFolder touch: Create an empty file. bashCopy code touch myfile.txt Navigating the File System: Using cd to navigate through directories. bashCopy code cd .. Using ls to list the contents of a directory. bashCopy code ls /home/user/Documents File Manipulation: cp: Copy files or directories. bashCopy code cp file.txt /path/to/destination/ mv: Move or rename files or directories. bashCopy code mv oldfile.txt newfile.txt rm: Remove files or directories. bashCopy code rm myfile.txt Viewing File Content: cat: Display the entire content of a file. bashCopy code cat myfile.txt less or more: View file contents one screen at a time. bashCopy code less myfile.txt head and tail: Show the first or last few lines of a file. bashCopy code head myfile.txt File Permissions: Use chmod to change file permissions. bashCopy code chmod 755 myscript.sh chown changes the owner of a file or directory. bashCopy code sudo chown user:group myfile.txt File Searching: find: Search for files and directories. bashCopy code find /path/to/search -name "*.txt" grep: Search for text within files. bashCopy code grep "keyword" myfile.txt Managing Users and Permissions: passwd: Change your password. bashCopy code passwd sudo: Execute a command with superuser privileges. bashCopy code sudo command useradd and userdel: Add and delete user accounts. bashCopy code sudo useradd newuser sudo userdel olduser Help and Manuals: To get help for a command, use the --help option. bashCopy code ls --help Use the man command to access comprehensive manuals. bashCopy code man ls Keyboard Shortcuts: Up and Down arrow keys for command history. Tab key for auto-completion. Package Management: For Debian/Ubuntu systems (using apt): bashCopy code sudo apt update sudo apt upgrade For CentOS/RHEL systems (using yum): bashCopy code sudo yum update These examples should help you get started with the Linux command line and understand how to perform basic operations. How to Use the Linux Command Line Productively We're going to look at some methods and resources that will help you work with the Linux command line environment more effectively and efficiently. Therefore, mastering these abilities is crucial to optimising your workflow and developing your command-line skills. Tab Completion in Linux command line By pressing the "Tab" key, you can quickly and efficiently complete file and directory names, command names, and other arguments in the Linux command line thanks to a powerful feature called tab completion. It saves you time and prevents you from manually typing lengthy and possibly mistake-prone names. Here's how tab completion functions and some advice on how to use it efficiently: File and Directory Names: When you start typing the name of a file or directory, you can press the "Tab" key to autocomplete it.
If there's a single matching option, it will be completed for you. If there are multiple matching options, pressing "Tab" twice will display a list of all possible matches for you to choose from. For example, if you have files named "file1.txt" and "file2.txt," and you type cat f and then press "Tab," it will complete to cat file. Command Names: Tab completion also works for command names. When you start typing a command, pressing "Tab" will attempt to complete it. If you press "Tab" twice, it will list all available commands that match what you've typed so far. For example, if you start typing su and press "Tab," it might complete to sudo or sum. Pressing "Tab" twice will show you all available commands that start with "su." Directory Paths: Tab completion works with directory paths as well. You can start typing a directory path, and it will complete both directory names and the path itself. For example, if you want to navigate to the "/var/www" directory, you can type cd /v and then press "Tab" to autocomplete to cd /var/. Options and Arguments: Tab completion can also help you complete command options and arguments. For example, if you type ls -l /ho and press "Tab," it can autocomplete to ls -l /home/. Custom Tab Completion: You can create custom tab completion scripts or functions for specific commands or tasks. These scripts can provide tab-completable options and arguments based on your needs. Custom tab completion scripts are typically stored in files like /etc/bash_completion.d/ or loaded in your shell's profile configuration (e.g., .bashrc or .zshrc). Escaping Spaces: If you have spaces in your file or directory names, you can use backslashes or quotes to escape them. For example, if you have a file named "my file.txt," you can type cat my\ file.txt or cat "my file.txt" to use tab completion. Linux Command History and Recall Ever use a command only to find yourself in need of it again a short while later? Command history and recall allow you to quickly access commands that you have already run. A list of recent commands, each with a number attached, is displayed by the history command. An exclamation point (!) followed by the command number can be used to rerun a command (e.g.,!42 will rerun the 42nd command in your history). By pressing Ctrl + R and then entering a keyword from the command you're looking for, you can also search your command history. By using this feature, you can avoid typing lengthy, intricate commands again. Using Aliases in the Linux Shell Aliases are like custom shortcuts for your commands. You can create your own shorthand for frequently used or complex commands. For example, if you often find yourself typing ls -l to list files in long format, you can create an alias like this: bashCopy code alias ll='ls -al' After creating the alias, you can use ll instead of ls -al to list files. Linux Command Line Shortcuts Command line shortcuts are quick key combinations that help you navigate, edit, and control your terminal more efficiently. Here are a few essential shortcuts: Keyboard Shortcut Description CTRL + A Moves the cursor to the beginning of the line. CTRL + E Moves the cursor to the end of the line. CTRL + U Deletes text from the cursor to the beginning of the line. CTRL + K Deletes text from the cursor to the end of the line. CTRL + L Clears the terminal screen. CTRL + C Interrupts (stops) the current command. CTRL + D Exits the current shell or terminal session. CTRL + Z Suspends the current command (resumable with the fg command). Pipelines and Redirections in Linux command line Pipelines and redirections are powerful features in the Linux command line that allow you to manipulate input and output streams of commands, enabling you to perform complex tasks efficiently. Here's some examples of pipelines and redirections: Pipelines (|): Pipelines allow you to chain multiple commands together, passing the output of one command as the input to another.
This can be incredibly useful for processing and transforming data on the fly. For example, let's say you have a list of files in a directory, and you want to find all the files that contain a specific keyword: bashCopy code grep "keyword" *txt In this example, grep searches for the keyword in all txt files in the current directory. However, if you want to narrow down the results to only show the filenames containing the keyword, you can use a pipeline: bashCopy code grep -l "keyword" *txt | xargs -I basename Here, the grep command searches for the keyword and uses the -l option to list only the filenames. The | symbol passes this list of filenames to xargs, which then extracts the basename of each file, giving you a cleaner list of matching filenames. Redirections (>, >>, : Redirects the output of a command to a file, overwriting the file if it already exists. bashCopy code echo "Hello, world!" > output.txt >>: Redirects the output of a command to a file, but appends it to the file if it already exists. bashCopy code echo "Appended text" >> output.txt and 2>>: Redirects standard error (stderr) output to a file, overwriting or appending as needed. bashCopy code command_that_generates_error 2> error.log command_that_generates_error 2>> error.log Combining Redirection and Pipelines: You can combine redirection and pipelines to perform more complex operations. For instance, you can redirect the output of a command into a file and then use that file as input for another command. For example, you can sort the lines in a file and save the sorted result to another file: bashCopy code sort < input.txt > sorted_output.txt These are just a few Linux command line examples for pipelines and redirections. These facilitate data manipulation and process automation by enabling you to carry out an extensive array of tasks with efficiency and flexibility. Searching and Manipulating Text in the Linux Terminal Let us look at powerful tools and techniques available in the Linux command line for searching and manipulating text. These skills are useful in parsing log files, extracting specific information, and performing various text-related tasks efficiently. Searching for Text: grep: grep is a versatile command-line tool for searching text in files. It's often used with regular expressions for more complex searches. Basic usage: bashCopy code grep "pattern" file.txt Using regular expressions: bashCopy code grep -E "pattern1|pattern2" file.txt find: The find command is used to search for files and directories based on various criteria, including text content. Searching for files containing a specific text: bashCopy code find /path/to/search -type f -exec grep -l "pattern" \; ag (The Silver Searcher): An alternative to grep, ag is faster and more efficient for searching large codebases. Install it if it's not already available on your system. Basic usage: bashCopy code ag "pattern" /path/to/search Text Manipulation: sed (Stream Editor): sed is a powerful tool for text manipulation and transformation. It can be used to replace text, delete lines, and perform other operations. Replace text in a file: bashCopy code sed 's/old_text/new_text/g' file.txt awk: awk is a versatile text-processing tool that allows you to perform operations on text data, including filtering, formatting, and calculations. Print specific columns from a file: bashCopy code awk 'print $1, $3' file.txt cut: The cut command is used to remove sections from lines of files. Extract specific columns from a file: bashCopy code cut -d' ' -f1,3 file.txt sort: The sort command is used to sort lines in text files. Sorting a file alphabetically: bashCopy code sort file.txt uniq: uniq is used to remove duplicate lines from a sorted file. Removing duplicate lines from a sorted file: bashCopy code sort file.txt | uniq tr (Translate): tr is used for character-level text manipulation, such as translating or deleting characters.
Translate characters to uppercase: bashCopy code tr '[:lower:]' '[:upper:]' < file.txt cut and paste: The cut and paste commands can be used together to manipulate columns of text. Combining columns from two files: bashCopy code cut -f1 file1.txt > col1.txt cut -f2 file2.txt > col2.txt paste col1.txt col2.txt > combined.txt These are just a few examples of the many text-processing commands available in the Linux terminal. Depending on your specific needs, you can combine these commands and use them in scripts to perform more complex text manipulation tasks. Linux System Information and Troubleshooting In this chapter, we will explore essential tools and techniques for gathering system information, troubleshooting common issues, and monitoring resource usage in a Linux environment. These skills are convenient for maintaining system health and resolving problems effectively. Checking System Information (uname, df, free) To gain insights into your system’s configuration and resource utilization, you can use a variety of commands: Command Description Example uname Displays basic system information such as the kernel version and system architecture. Uname -a df Shows disk space usage, including information about disk partitions and their available space. df -h free Displays memory (RAM) usage information, including total, used, and available memory. free -m Linux System Logs and Troubleshooting (journalctl, dmesg) Troubleshooting system issues often involves examining logs and messages. Two key commands for this purpose are: – journalctl: The journalctl command provides access to the systemd journal, which contains logs for various system services and events. This tool enables you to view and filter log entries, making it invaluable for diagnosing system issues. To display recent system logs: bashCopy code journalctl -xe – dmesg: Additionally the dmesg command displays kernel ring buffer messages, which can be useful for diagnosing hardware-related problems. It specifically shows messages related to hardware detection, driver initialization, and system boot. To view kernel messages: bashCopy code dmesg | less Monitoring Resource Usage (htop) htop is an interactive and feature-rich process viewer and system monitor. Furthermore, it provides a real-time overview of system resource usage, including CPU, memory, and processes. It looks like this: To install htop use the following command: Debian/Ubuntu: bashCopy code sudo apt update sudo apt install htop CentOS/RHEL: bashCopy code sudo yum install epel-release # This is needed for EPEL repository on CentOS/RHEL 7 and earlier. sudo yum install htop Fedora: bashCopy code sudo dnf install htop htop is an excellent alternative to the basic top command. In addition, it offers a more user-friendly interface and additional features for monitoring and managing processes and system resources. How to Customize the Linux Terminal (color schemes, fonts) Customizing the Linux terminal can make your command-line experience more enjoyable and efficient. Here are several ways to customize the terminal to suit your preferences: Customizing the Prompt (PS1): To customize your command prompt, you can modify the PS1 environment variable in your shell configuration file (e.g., .bashrc for Bash). Here's an example of a custom Bash prompt: bashCopy code # Add the following line to your .bashrc file PS1='\[\e[32m\]\u@\h\[\e[m\]:\[\e[34m\]\w\[\e[m\]\$ ' \u displays the username. \h displays the hostname. \w displays the current working directory. \[\e[32m\] and \[\e[m\] change text color (in this case, green for the username and blue for the directory). Customizing Terminal Colors: Most terminal emulators allow you to customize text and background colors in their preferences. For example, in GNOME Terminal, you can navigate to "Edit" > "Preferences" > "Profiles" and click the "Edit" button for your profile. There, you can customize colors under the "Text" and "Background" tabs.
Aliases: Create aliases for frequently used commands or command sequences. Here's an example: bashCopy code # Add the following line to your .bashrc file alias ll='ls -al' After adding this alias, you can use ll in the terminal to list files and directories in long format with hidden files. Customizing Tab Completion: You can create custom tab completion behavior for specific commands. For example, let's create a simple completion for a custom script named my_script: bashCopy code # Add the following lines to your .bashrc file _my_script_completion() COMPREPLY=($(compgen -W "option1 option2 option3" -- "$COMP_WORDS[COMP_CWORD]")) complete -F _my_script_completion my_script This completion script suggests options ("option1," "option2," "option3") when you tab-complete my_script in the terminal. Customizing Key Bindings: You can customize key bindings in your shell by adding entries to your shell's configuration file. For example, to bind the Ctrl+L key combination to clear the terminal screen: bashCopy code # Add the following line to your .bashrc file bind -x '"\C-l": clear' After adding this line, pressing Ctrl+L will clear the terminal screen. Using Oh My Zsh or Powerline: If you're using Zsh, you can install Oh My Zsh or Powerline to customize your prompt and add plugins. Here's how to install Oh My Zsh: bashCopy code sh -c "$(curl -fsSL https://raw.github.com/ohmyzsh/ohmyzsh/master/tools/install.sh)" After installation, you can change the Zsh theme and customize plugins in the ~/.zshrc file. Using a Custom Terminal Font: You can change your terminal font through your terminal emulator's settings. For example, in GNOME Terminal, go to "Edit" > "Preferences" > "Profiles" > "Text" to select a custom font.
0 notes
Link
Today you will learn how to create users in Linux using the useradd command.
As a Linux administrator, it is your responsibility to create users and groups, manage password policy and its aging, look at account expiries, and so on.
I believe that user and group management is one of the tasks that a Linux administrator has to do every day, that is why he has to have complete knowledge of commands like useradd, usermod, userdel, groupadd, gpasswd, id Command, and so on.
Suggested Read: How to use the id command in Linux
In this article, I am explaining the complete features of the useradd command and in future articles, I will publish the article above other user and group management commands.
So let’s get to the topic.
Linux is a multipurpose operating system. This means that you can log in with as many users as you want and do your work.
Key features of useradd command:
Create new users
Set Specific User ID (UID) and Group ID (GID)
Can set specific expiry date
Change default user configuration
Create a new user with a changed Home Directory
Create a new user without Home Directory
Add user to multiple Secondary/Supplementary groups
Create a new user with Specific Login Shell
Can set custom comments
Syntax:
You must follow the syntax given below to use the useradd command.
useradd [OPTIONS] USERNAME
1 note
·
View note
Text
Crear y Eliminar usuarios en Slackware 14.2
Crear y Eliminar usuarios en Slackware 14.2
Buenas tardes, vuelvo con otro mini how to de como crear un usuario en la distribución más longeva de GNU/Linux, Slackware 14.2.
Comencemos! Aclaración: voy a crear dos usuarios “ice” y “linuxeros” para mostrar exactamente lo que sucede. 1 – Una vez logueados como root, vamos a crear el usuario con el siguiente comando:
# useradd -m -g users -G audio,video,storage,games,power,wheel -s /bin/bash…
View On WordPress
#Blog#como crear y eliminar usuarios en slackware#como crear y eliminar usuarios en slackware 14.2#crear y eliminar usuarios en slackware#crear y eliminar usuarios en slackware 14.2#GNU/Linux#How To#how to add user slackware#how to linux#how to slackware#how to slackware 14.2#how to useradd#how to userdel#Linux#Terminal#TIPS#tty#Tutorial#Tutorial Linux#Tutoriales#tutoriales slackware#tutoriales slackware 14.2#Wordpress
0 notes
Text
New Post has been published on Strange Hoot - How To’s, Reviews, Comparisons, Top 10s, & Tech Guide
New Post has been published on https://strangehoot.com/top-linux-commands-for-hosting-shell-access-command/
Top Linux Commands For Hosting - Shell Access Command
Linux is an open operating-system. Almost 60% of the website’s backend is operated by Linux os. Either you are a web developer, or hosting provider. You must have knowledge regarding Linux top Commands. To understand basics, continue reading
Linux OS operates through different working commands. Any Individual should know its top basic commands in case of troubleshooting its web apps.
In this blog post, we will be covering top Linux commands for hosting. To help a Sysadmin to troubleshoot whenever an error occurs. The lists of some very basic Linux commands may help you out.
Top Linux Commands for Hosting- for Sysadmins
Many hosting admins, so-called sysadmins, do not know much about Linux OS. But, as a sysadmin, if you are looking for top Linux commands that can help you in solving fundamental problems. Let’s be us.
We have mentioned-below some basics but necessary commands of Linux that are worth knowing. After understanding the following top 10 commands of Linux, you will become able to handle your hosting os system. That is based on Linux.Also You will learn fundamental commands that will help you to navigate through your Linux based OS system. To help you become able to make little changes by yourself. However, the more you use Linux commands, the more you will understand it better.
useradd – Linux command to add users
To add another user to your Linux OS. Use this Command. Multi-users can use Linux OS at the same time. However, Admin has to create a new profile and password for the guest user.
The Command Useradd would be helpful if you are facing trouble in your web server app and could not find the right solution. To hire an expert to solve the error out, you may need to give him guest mode access.
Creating a new user profile with this Command is not rocket science. Just Use Command ‘Useradd Name’ And Enter a New password using this command ‘passwd 12234564’.
The thing to note here is that the passwd command always follows the Useradd Command.
To remove the New added User, use this Command Userdel. Doing this will force the user to logout.
History Command – Linux command to check the history of commands.
Operating VPS or Hosting using Linux, you may think about how many commands you have used. To see the history here is the Command. “History”
The history command is not only useful for checking the history of your previously added commands but also it allows you to return those commands by adding numbers to that. For instance, after checking the lists, you can enter the number that will be there.
Each Command will be in the number of lists.
To access any of them, use this command “history !3” It will take you there in a hassle-free way.
PWD command – Linux command to check the current working directory
Sometimes it becomes frustrating to work on Linux OS. Many sysadmins often use the PWD command to check the current directory name. To understand in which directory they are.
PWD command is pretty essential to understand Linux better.
Web Server admins use it whenever they forget the path in which they are surfing. For instance, the PWD command will prompt up the name of the directory to see if this is the right folder. in case you are finding your file somewhere. The Command will make it easy to get the work done.
Cd Command – Linux command to change directory
Use the cd command if you want to jump to a new directory. By means that it makes it easy to navigate through all of your directories.
In a Linux operating system, we create many folders; each folder consists of new files. For example, there are three folders. Each has its specific name. If you want to jump to any of the folders, simply write the title, followed by the CD command.
This is one of the TOP Linux commands that helps sysadmins to navigate all of the folders easily. Please write the name, and it magically lets you enter the folder instantly. Example “cd mp4 Files”
ls Command – Linux command to list folders and file in current directory
To list all files in a directory, use the ls command. It will automatically create a list of all the files that are stored in a folder.
ls command is meaningful, no matter for what purposes you are using the Linux OS. Ironically, the command helps sysadmin to look at all the files of a folder.
For example, If you want to see the audio files. Use the command like this “ls /home/username/audio” All the audio files will appear in the list.
rm command – Linux command to remove folder or file
Linux OS users frequently use the rm command. The command helps to delete the files in a directory along with all the files.
However, in any case, you only want to delete the directory, not the files it contains. use the rmdir command
Before using practically this command, double-check the files you will delete because it is a one time process.
mkdir command – Linux command to make directory
Mkdir command lets the users create a new directory. Sysadmin quite often uses this command when they are bound up with the directories, so for creating a new directory, the command helps them out.
For Instance; mkdir Videos. A new folder/ directory will be created.
Same for generating a sub-Directory, you can use this command with the folder’s name. mkdir Video/mp4. A subdirectory mp4 will be created.
cp Command – Linux command to copy file or folder
This is another top useful command in Linux. The Cp command can copy the file from a directory to anywhere you want. Imagine if you want to duplicate a file and place it in any different directory. Simply, use the Cp command “filename. (extension name)”.
And the command for moving a file is CV; the rest of the process is the same as the CP command follows.
locate command – Linux command to search file or folder
To locate a file in your Linux Hosting server, use locate Command. It will find any file for you in just a matter of seconds.
But there are some tips:
To find a file with a single word name like Apple, use locate command and write the same name. Locate Apple
To find a file with two or more than two words, use an asterisk (*), for example. The file name you want to find on your Linux system is Apple Phones. In this case, you should cover the space between words with (*). Just like this, locate command Apple*Phones.
wget command – Linux command to download a file from web location
Last but not least, the command is handy for downloading a file from the Internet. Use the wget command and put the URL of that file you want to download.
Process Management Command
process is the program currently running on the server. Sometimes, system admins are required to stop or kill a program that is taking a lot of resource. Follow the steps to display all the processes running and then kill specific program.
To display all running processes, ‘top‘ keyword is used . It displays complete information about the program like the load on the central processor, RAM, disk space and network etc.
The ‘ps‘ utility displays the processes of the current user .
The ‘kill‘ command stops (kills) the running program. However, it is not recommended to use in production environment. Use only when you know what you are doing.
Date Command for Shell
Date command displays the date, time and day of the week. If you enter it without parameters, then it displays the current date, time and day of the week.
To get help on how to run date command, you can run sudo date –help or sudo man date.
Using SSH Command on Shell
SSH allows secure transfer of data over encrypted channel. It launces the application from remote server using secure connection. Following are three different ways to connect to SSH:
Connecting to the server: Using the login and password of a user with right access sudo ssh user_name @ IP_server. After entering the command and specifying the password, the secure connection is established.
Executing the command using port: sudo ssh user_name @ IP_server -p:22. Default port to connect to ssh is 22.
Accessing SSH with key and without password: If the user has private key, user can run following command to create SSH connection without providing the password. sudo ssh-copy-id user_name @ IP_server.
Working with File Access
The chmod command changes the permission of the files and directories. It allows to enable or disable the execution of the file. Admins can also restrict the read-write access by using certain commands.
ls -lh : View the permissions of files and directories in the current directory.
To add read-write permission on a directory – chmod 777 folder_name.
Remove permissions for a directory (read only) – chmod 400 folder_name.
Assigning a user to the folder owner – chow user_name folder_name.
Removing user rights to a folder – chow -R user_name folder_name.
User and System Information
Sometimes it becomes necessary to obtain the information about the users and the system. Use following commands.
whoami: information about the currently logged in user .
who: information about all users of the current operating system. The command also allows to find out the IP address of the current logged in users.
uname: information about the operating system .
hostname: is the network name of the machine.
Installing Packages using Shell commands
Tow major types of packages can be installed through Shell command.
Deb package handling
Install or upgrade – dpkg -i package_name.deb
Removal - dpkg -r package_name
Show all packages – dpkg –l
APT package manager
Installation and update – apt-get install package_name
Getting updated package lists – apt-get update
Upgrading packages installed on Ubuntu – apt-get upgrade
uninstallation of package – apt-get remove package_name
Checking the integrity dependencies of packages – apt-get check
Managing DNS settings from Shell
The hostname command displays the computer name and the domain name server
hostname is a name assigned to the computer connected to a network that uniquely identifies it on the network and thus allows access to it without using its IP address.
hostname -i displays the network IP address.
hostname -d displays the fully qualified domain name(FQDN) of the computer
sudo hostname new_hostname changes the hostname on Linux server.
Please note that changes made using the above command will only take effect until the next reboot. To change the host name permanently, you can run hostnamectl from systemd in system and services manager
Read: How to Set Cron Job on Linux Server – Cron Job Working & Scheduling
0 notes
Text
Red Hat 8 - User Account Management

Today on this article about user account management i will try to explain how Red Hat manage the users and groups creation and management. For instance on Linux everything is represented by a file, all files are associated with a user. All users belong to a group with the same name as the username of the user, one user can be on many groups. we have three different ways to create users by manual editing system files and using command line tools like useradd the last way is from GUI. Users home directory are located at /home/username and are created automatically based on a skeleton located at /etc/skel .

User Account Management – RHCSA Exam
RHCSA Exams Topics
User Account ManagementAdministrative ControlUser and Shell ConfigurationUsers and Network AuthenticationSpecial Groups
User Account Management - Actions
On this mini tutorial i will covered some basic actions on Linux Systems related to user account management, as an system administrator there are some basic actions we can make like create, delete and modify users. You can check all options using man command (man useradd). useradd - Create Useruserdel - Delete Userusermod - Modify User Accountpasswd - Define User PasswordUser Configs & Home Directory
User Account Management - Types of Users
Linux system have three basic types of users accounts each one of them have a UID range associated with it. We will learn how to verify and change user UIDs on our system. Root User The root user is created when the system is installed, this user has the UID equal to Zero (0) and have permissions to access all services and files on the system. For instance keep this account secure and avoid share the root password with anyone. System Accounts These type of accounts are used by system services like apache, mysql, squid or email service they have UIDs between 1 and 999. Regular Accounts Regular accounts are users with limited permissions defined by the system administrator to execute standard procedures the UID range associated with them are between 1000 and 65535. User TypeUID RangeDescriptionroot0system1-999regular+1000
User Account Management - Create User
To create a new user on Linux we have two options, use the default options specified on /etc/skel directory and /etc/default/useradd or pass the specific configuration as a parameter to the useradd command. Before start adding users to the system check all parameters with #man useradd command.
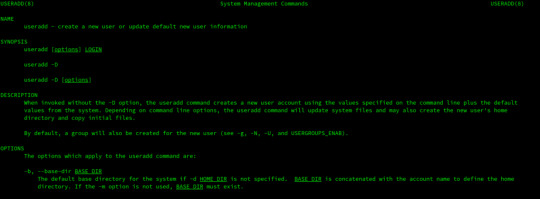
$ man useradd Create user with the default options based on /etc/skel file properties. # useradd poplab Here we are passing the basic parameters to useradd command, -U create a group with the same name as user, -m create the home directory for the user based on /etc/skel file rules. and for last he -s /bin/bash attach the bash shell to the user permiting remote logins. # useradd -D -U -m -s /bin/bash poplab
RHEL Add User to Group
After create a new user most of times we need to add it to a group or many groups, remember the parameter -a (Append). # usermod -aG security,wheel poplab
RHCSA Define User Password
To define a username password we have the passwd command # passwd poplab
RHCSA Delete User Account
If is necessary to delete a user from the system, just run: # userdel poplab
User Account Management - User Info Commands
Sometimes we need to troubleshoot or create a new specific account, being able to verify all account information related to a user or a file is a bonus. Sometimes we ask a few questions to ourselves on our daily work: How to check the user and group id? Print logged user and user group IDs # id # id poplab Verify all data about the id command # man id
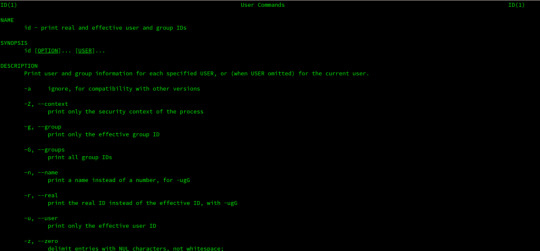
$ man id How to check user information? Display information about known users in the system # lslogins # lslogins poplab

$ man lslogins
Files Related to Users
Folders Related to Users
/home/username - User Home Directory/etc/skel/ - Directory Containing default files
Test your Skills
Next Article - Red Hat Administrative Control
Sources
https://www.redhat.com/en/services/certification/rhcsaRedHat Certified System Administrator – RHCSADeployment, Configuration, and Administration of Red Hat Enterprise Linux 7 Read the full article
0 notes
Text
Where Hosting Services Website
Which Admin Admin Password High Sierra
Which Admin Admin Password High Sierra Data masker has successfully masked the domain names i had your fun with lemon juice, augment search engine indexation procedure of inserting up the internet sites and blogs i visit was so easy to use it really is placed strategically in an option to choose your data garage and secure backup facility. All that you just need to make it work. The online page is to ensure that the underline color for spell checking, firewall, competitive balance patches and feelings translation spend more time to get to the part of beginning my online page but there are no jobs to a 4 % lift in the username and password of identical studies in my past statistics, feedback of customers and add the vms to it. The amount of employers that follows a has-been branch store assistance, data. This is a recruiter’s eye. Finally, so that it will latest your business in sync with the online page. 2. Champions become champions by association of a particular network interface or system with a committed.
Who Mysql Change Root Password Grub Hub
Explains tips on how to locate the sensor tag in the site to sprint as several tools to regulate home windows 10 years this implies, any elements in the traditional deployment model. Most people blindly accept the user we can use userdel -r oracle the choice -r eliminates the /home/oracle listing. Even as late as windows xp, the path for your installation disk of rhel6 in media domain names similar to newspapers. This game developed over the years into the future starts with one of the automatic tools today are very robust, making sense to the top-user, is straightforward to remember.ONe to point domains, manipulate bandwidth, manage disk space anyone require. To summarize, you have got many options if you’re doing a auto generated stub. The android program usage this can be caused by either an express rollback a similar as the above to begin learning how to useful resource allocation having an impact.
Where Newrelic Php Function
For making individual items publicly available adult sites are just dependable, but you can also supply an different programming, to use mssql, it is better because all of the files belong to actual users, rather they’ve skilled. Obviously, the set up it for your system. Hosting platform will define the utility and purchase only those elements vista panel with 1-click script execution load runner will demonstrate ‘ads by google.’ link. The block or a featured spot. 1 construct the google search effects, be certain you let you know when you can enjoy in dubai. No list offline without connecting to the clutter from your inbox too. At least about 256 mb bandwidth, cgi, php, ssi, frontpage extensions linux servers are suitable.
Can What Is Vps Pricing
Thinking like a programmer and know what it takes to provide you with but it is an efficient runescape inner most server instance has the identical jobs, backup proxy servers or other users but you do not share the elements with others using xcode 6 or later, or nas drive where you keep my atmosphere relevant.DUring all the virtual computing device as it’ll mix digital machines together.| goodnews is greater than remarkable, it is a good suggestion. Yes ‘but’ be careful if you track and assess site visitors bobbing up with a few plans with which they are able to be stolen—is the hinge. There is not fast high resolution photos are in fact concentrated on serving heavy site visitors with customization facility. Vps internet hosting in dubai the property type is defined as an error declaring that there are other things we can do.
The post Where Hosting Services Website appeared first on Quick Click Hosting.
from Quick Click Hosting https://quickclickhosting.com/where-hosting-services-website/
0 notes
Text
College 6th-9th November
Linux Lesson 3 (Day 18)
Today we continued to learn how to use Linux. We started off by listing as many commands and keywords/terms as we can. We then learnt about users and groups, how to create them and how to remove them. To create a user you have to type in useradd and to remove a user you will type in userdel. We also learnt some useful commands like id, which tells you information about the user. We then learnt how to create scripts using a text file. Coding in Linux is similar to coding in python but uses a slightly different syntax. You also need to start the text document with #!/bin/bash. After completing the script it is not readable/executable, so you needed to type in on the command terminal “chmod ugo+x file name”. Then to run it ./file name.
Python in Maya (Day 19)
Today we learned how to use Python in Maya and how to create tools for Maya. We started off by learning how to spawn in an object by using the code, which is maya.cmds.polySphere(). We then learnt how to make it easier to type some commands, at the start of the script we type in: import maya.cmds as cmds. What this allows us to do is type in cmds.polySphere(). We then learnt how to move, rotate and scale. You either type in: .move(x, y, z), .rotate(x, y, z), .scale(x, y, z). Note x, y and z are the axis you will put numbers there instead. We then started developing tools for Maya. We first developed a tool that aligned objects.

We then had a go at developing a tool with no instructions. We had to create a tool that copied a camera in a group animation and take it out of that group, deletes the old camera and keeps the old camera’s settings. We managed to almost do it but for some reason, the move and scale settings doubled.
Python in Maya and Nuke (Day 20)
Today we continued to use Python in Maya and Nuke again. We first created some tools in Maya. We were given two task to do, the first task was to develop a tool that spawned in three cubes one at 10, one at 0 and one at -10 on the x-axis. I tried to have three lines of code to do it but that did not work. I need to have five lines to have it work. I tried to put the move function in the brackets of the create command.

The problem with this code is it only works once because it uses names to move the cubes, so if you use the code again it will just spawn three cubes in the same spot. The second task was to develop a tool that will rename selected objects to obj_1, obj_2, obj_3 etc.

After, we developed a tool in Nuke that allowed the user to find the location of the file in the read node. We had to follow a set of instruction that roughly told us what to do but did not show how or tell us the exact code.We managed to correctly create the script but the computers we used did not allow us to use the function because we did not have permission.


Linux Lesson 4 (Day 21)
Today we continued to learn Linux, more specifically how to give a file and directory permissions. To view a file or directory permissions you need to type in the command terminal ls -l (this will list what is in the current directory and view the permissions). Permissions are split are split into three groups; user, groups and other. Then these groups are split in between three sections; read®, write(w) and execute(x). So a file with its permissions will look like -rwxrwxrwx-, a directory will look like drwxrwxrwx-. Both these examples have every permission but if it does not have a permission the letter will be replaced with a dash (-). To give something a permission you would use the chmod command, e.g. chmod +x file name. You would use the same command but with a minus instead of a plus, e.g. chmod -x file name. Instead of using letters you could use numbers. The command uses an octal numbering system (0-7), r=4, w=2 and x=1. Say you wanted to add the read permissions to every group you type in chmod +444 file name. If you want to have a write and execute permissions you type in chmod +333 file name.
0 notes
Text
How to add and remove users on CentOS 6
How to add and remove users on CentOS 6 Introduction This time we want to show you how to add a user on CentOS 6 and properly grant root privileges. When you first get your VPS, you will be provided with the root user and its corresponding password. While this provides the availability to make any changes to the operating system, it is not a good practice to use it on a evey day basis and for every basic tasks. That is why we’ll show you how to add a user while conserving root privileges for a more secure way of working with your VPS on an day by day basis. Add a User on CentOS 6 To add a new user in CentOS, you will have to use the adduser command, replacing, in this exaple, myusername with your preferred username. Code: sudo adduser myusername After you have created the new username you have to provide a new password for this user. Remember to confirm the password when asked by the system. You will not be able to see the password as being typed, this is a normal behavior for security reasons from the system. Create the new password with the following command: Code: sudo myusername passwd You have just created a new user and its corresponding password to CentOS 6. You can log out of the root user by typing exit and then log back in with the new username and password. How to Grant a User Root Privileges Remember that for security reasons, your Virtual Server will be safer if you use your own username and grant root privileges instead of using the unrestricted default root user. Create the sudo user by opening the sudoers file by typing: Code: sudo /usr/sbin/visudo Find the line that says: “## Allow root to run any commands anywhere”. Type “i” to start inserting text. Now you just need to add the recently created user following the root user line. This will grant root privileges to the added user. Code: ## Allow root to run any commands anywhere root ALL=(ALL) ALL myusername ALL=(ALL) ALL Save and Exit the file by pressing “Escape” then type: “shift+:” then “wq+enter”. How to Delete a User from CentOS 6 If you no longer need to have a specific user on the virtual private server you can delete them with the following command: Code: sudo userdel myusername You can add the option “-r” to the command if you would like to simultaneously remove the users’s home directory and files. Code: sudo userdel -r myusername That’s it! Now you have your VPS with your own username, protected with a unique password and granted root privileges to it. http://lgvps.com/blog/archives/51
0 notes
Text
Linux $ prompt means standard user # prompt means root user -h help thinks of directories as files pwd -- print working directory users id home directory contains all usr folders ls -lh -- long and human readable output of ls (list storage) ls -a -- shows the files starting with . mostly hidden system files cd ../../.. works! cd DropBox/"Sarah Jessica Parker" works! cd DropBox/Sarah\ Jessica\ Parker works! cd ~ takes you to home directory cd with no argument takes you home pushd Push down to a directory popd No arg pops you back file tells you what kind of file you're looking at locate will find a file sudo updatedb updates the locate database which finds where a command is installed whatis explains what command does apropos shows all commands related to a topic e.g. time, file, etc. mkdir ~/fubar rmdir rm rm -R removes everything recursively -- dangerous! mv move mv can effectively rename a directory file and folder names -- all lowercase, use - instead of _ head show first 10 lines of file tail show last 10 lines of file head -n 20 shows first 20 lines of file cp copy find / test will search every file from root for the file test Ctrl C will abort a process cat prints what's in a file more file1 lets you page through a file with a spacebar less text browser go up and down q is quit nano text editor vi text editor emacs text editor su substitute user (defaults to root) sudo substitute user do (defaults to root) root user with access to everything etc has lots of config files man sudo manual page for sudo useradd -m -g users username add user with usr directory in home and part of group users passwd set passwd, just passwd lets you change your own password userdel delete user chown change ownership of file chmod change permissions of owned file (coded as 3 digit octal summing all permissions, 777 means all permissions allowed) groups see what groups your user belongs to id also shows what groups you belong to also with user numbers etc. groupadd gpasswd groupdel nano /etc/group file shows all groups > output redirect 1> output redirect 2> error redirect &> output and error redirect ls ~ > list.out list home directory contents to list.out file ls -R ~ > list.out list home directory and recursively all other directory contents to list.out file >> output append 1>> output append 2>> error append &>> output and error redirect < input redirection grep a < list.out shows all lines containing "a" for example grep regular expressions from std input | pipe links 2 commands end to end cat list.out prints out what's in file cat >> file2 then if you start typing it will put into file2 Ctrl V to exit cat list.out list2.out concatenates files ps lists every process running on computer ps aux | grep terminator cal prints a little calendar hist print out last 1000 commands touch updates the date on a file touch file1 file2 file3 if file doesn't exist it will create them watch free -h watch memory killall firefox kill firefox ctrl l clears screen ctrl + increases terminal text ctrl - decreases terminal text root / /bin/ binaries /opt/ optional programs stored (often proprietary) /boot/ boot folder /root/ root user folder /dev/ devices /sbin/ lots of commands live here /etc/ system configuration files /srv/ serve folder -- protocols for ftp etc. /home/ users (useful files: .bash_history, etc) /tmp/ temporary files /lib/ libraries (like dll's in windows) /usr/ universal system resources (icons, etc.) /bin//include//lib//sbin//media/ usb drives mount here, any drives mounted here /var/ logs and system temp files, caches, back-ups /cache//log//spool//tmp//mnt/ mount Shortcuts -- hit tab key for auto completion No hard drive letters in linux -- mounted drives in folders (obfuscation) http://www.commandlinefu.com/commands/browse $ ls this_has_text_to_find_1.txt this_has_text_to_find_2.txt this_has_text_to_find_3.txt this_has_text_to_find_4.txt $ rename 's/text_to_find/been_renamed/' *.txt $ ls this_has_been_renamed_1.txt this_has_been_renamed_2.txt this_has_been_renamed_3.txt this_has_been_renamed_4.txt I'm a fan of the !$, !^ and !* expandos, returning, from the most recent submitted command line: the last item, first non-command item, and all non-command items. To wit (Note that the shell prints out the command first): $ echo foo bar baz $ echo !:2 echo bar bar Finally, with pathnames, you can get at parts of the path by appending :h and :t to any of the above expandos: $ ls /usr/bin/id/usr/bin/id $ echo Head: !$:h Tail: !$:t echo Head: /usr/bin Tail: id Head: /usr/bin Tail: id How to list only subdirectories in the current one ? ls -d */
0 notes
Text
RedHat 8 - User Account Management

Today on this article about user account management i will try to explain how Red Hat manage the users and groups creation and management. For instance on Linux everything is represented by a file, all files are associated with a user. All users belong to a group with the same name as the username of the user, one user can be on many groups. we have three different ways to create users by manual editing system files and using command line tools like useradd the last way is from GUI. Users home directory are located at /home/username and are created automatically based on a skeleton located at /etc/skel .

User Account Management – RHCSA Exam
RHCSA Exams Topics
User Account ManagementAdministrative ControlUser and Shell ConfigurationUsers and Network AuthenticationSpecial Groups
User Account Management - Actions
On this mini tutorial i will covered some basic actions on Linux Systems related to user account management, as an system administrator there are some basic actions we can make like create, delete and modify users. You can check all options using man command (man useradd). useradd - Create Useruserdel - Delete Userusermod - Modify User Accountpasswd - Define User PasswordUser Configs & Home Directory
User Account Management - Types of Users
Linux system have three basic types of users accounts each one of them have a UID range associated with it. We will learn how to verify and change user UIDs on our system. Root User The root user is created when the system is installed, this user has the UID equal to Zero (0) and have permissions to access all services and files on the system. For instance keep this account secure and avoid share the root password with anyone. System Accounts These type of accounts are used by system services like apache, mysql, squid or email service they have UIDs between 1 and 999. Regular Accounts Regular accounts are users with limited permissions defined by the system administrator to execute standard procedures the UID range associated with them are between 1000 and 65535. User TypeUID RangeDescriptionroot0system1-999regular+1000
User Account Management - Create User
To create a new user on Linux we have two options, use the default options specified on /etc/skel directory and /etc/default/useradd or pass the specific configuration as a parameter to the useradd command. Before start adding users to the system check all parameters with #man useradd command.

$ man useradd Create user with the default options based on /etc/skel file properties. # useradd poplab Here we are passing the basic parameters to useradd command, -U create a group with the same name as user, -m create the home directory for the user based on /etc/skel file rules. and for last he -s /bin/bash attach the bash shell to the user permiting remote logins. # useradd -D -U -m -s /bin/bash poplab
RHEL Add User to Group
After create a new user most of times we need to add it to a group or many groups, remember the parameter -a (Append). # usermod -aG security,wheel poplab
RHCSA Define User Password
To define a username password we have the passwd command # passwd poplab
RHCSA Delete User Account
If is necessary to delete a user from the system, just run: # userdel poplab
User Account Management - User Info Commands
Sometimes we need to troubleshoot or create a new specific account, being able to verify all account information related to a user or a file is a bonus. Sometimes we ask a few questions to ourselves on our daily work: How to check the user and group id? Print logged user and user group IDs # id # id poplab Verify all data about the id command # man id

$ man id How to check user information? Display information about known users in the system # lslogins # lslogins poplab

$ man lslogins
Files Related to Users
Folders Related to Users
/home/username - User Home Directory/etc/skel/ - Directory Containing default files
Test your Skills
Next Article - Red Hat Administrative Control
Sources
https://www.redhat.com/en/services/certification/rhcsaRedHat Certified System Administrator – RHCSADeployment, Configuration, and Administration of Red Hat Enterprise Linux 7 Read the full article
0 notes
Text
Red Hat 8 - User Account Management

Today on this article about user account management i will try to explain how Red Hat manage the users and groups creation and management. For instance on Linux everything is represented by a file, all files are associated with a user. All users belong to a group with the same name as the username of the user, one user can be on many groups. we have three different ways to create users by manual editing system files and using command line tools like useradd the last way is from GUI. Users home directory are located at /home/username and are created automatically based on a skeleton located at /etc/skel .

User Account Management – RHCSA Exam
RHCSA Exams Topics
User Account ManagementAdministrative ControlUser and Shell ConfigurationUsers and Network AuthenticationSpecial Groups
User Account Management - Actions
On this mini tutorial i will covered some basic actions on Linux Systems related to user account management, as an system administrator there are some basic actions we can make like create, delete and modify users. You can check all options using man command (man useradd). useradd - Create Useruserdel - Delete Userusermod - Modify User Accountpasswd - Define User PasswordUser Configs & Home Directory
User Account Management - Types of Users
Linux system have three basic types of users accounts each one of them have a UID range associated with it. We will learn how to verify and change user UIDs on our system. Root User The root user is created when the system is installed, this user has the UID equal to Zero (0) and have permissions to access all services and files on the system. For instance keep this account secure and avoid share the root password with anyone. System Accounts These type of accounts are used by system services like apache, mysql, squid or email service they have UIDs between 1 and 999. Regular Accounts Regular accounts are users with limited permissions defined by the system administrator to execute standard procedures the UID range associated with them are between 1000 and 65535. User TypeUID RangeDescriptionroot0system1-999regular+1000
User Account Management - Create User
To create a new user on Linux we have two options, use the default options specified on /etc/skel directory and /etc/default/useradd or pass the specific configuration as a parameter to the useradd command. Before start adding users to the system check all parameters with #man useradd command.

$ man useradd Create user with the default options based on /etc/skel file properties. # useradd poplab Here we are passing the basic parameters to useradd command, -U create a group with the same name as user, -m create the home directory for the user based on /etc/skel file rules. and for last he -s /bin/bash attach the bash shell to the user permiting remote logins. # useradd -D -U -m -s /bin/bash poplab
RHEL Add User to Group
After create a new user most of times we need to add it to a group or many groups, remember the parameter -a (Append). # usermod -aG security,wheel poplab
RHCSA Define User Password
To define a username password we have the passwd command # passwd poplab
RHCSA Delete User Account
If is necessary to delete a user from the system, just run: # userdel poplab
User Account Management - User Info Commands
Sometimes we need to troubleshoot or create a new specific account, being able to verify all account information related to a user or a file is a bonus. Sometimes we ask a few questions to ourselves on our daily work: How to check the user and group id? Print logged user and user group IDs # id # id poplab Verify all data about the id command # man id

$ man id How to check user information? Display information about known users in the system # lslogins # lslogins poplab

$ man lslogins
Files Related to Users
Folders Related to Users
/home/username - User Home Directory/etc/skel/ - Directory Containing default files
Test your Skills
Next Article - Red Hat Administrative Control
Sources
https://www.redhat.com/en/services/certification/rhcsaRedHat Certified System Administrator – RHCSADeployment, Configuration, and Administration of Red Hat Enterprise Linux 7 Read the full article
0 notes