#how to create Gmail account tutorial
Explore tagged Tumblr posts
Visit Tumblr Blog
Explore Tumblr blogs with no restrictions, modern design and the best experience.
Last Seen Tumblr Blogs


Fun Fact
Tumblr has been banned in Indonesia for providing people with access to pornographic content.
Text
Create account with IP Banido // Twitter Shawdoban IP (PC/NOTEBOOK)
Hello guys I will teach you how to create an account with IP banned, I will teach here … If you help you follow me there and reblog for more range soon, I will bring a tutorial for cell phones

1 - Use the Brave browser 2 - Go to Settings> Privacy and Safety> Delete Navigation Data and Delete the entire period from your navigation 3 - In the same page you go down to '' Website and Security Settings ''> See permissions and data stored on websites and then look for X (Twitter) and delete everything, cache and data
***That done let's go to the vpn and proxy part***

1 - Look for the WindSribe website, he Dara VPN and Proxy 100% Free 2 - Create an account with some email of yours and confirm then so you will earn 10gb vpn + proxy 3 - Download the Windscribe extension on your brave and uses VPN in the Autopilot option 4 - Create a new account in Gmail using VPN Windscribe 5- - Open X (Twitter) and create an account with that same email
Never open X (Twitter) without VPN on to have the risk of being detected

Some of you can already be aware of this method but there are a lot of people who do not know so I just pass this tutorial :>
follow me
#tccblr#tc community#tcc fandom#tw trauma#tcc edit#tcc dylan#tcc tumblr#tcc columbine#teeceecee#true cringe community#adamlanza#true cream community#dylan columbine#columbine 1999#columbine school shooting#eric columbine#eric and dylan#pekka eric auvinen#tcc eric#tcc dylric#adam tcc#school#randy stair#crimescene#crime rp
20 notes
·
View notes
Text


HOW USE MSN NOW DAYS✮⋆˙
!( tutorial)!
U will need a computer for that works
access the website ( https://escargot.chat/ )
click on " lear how to get started " and make an account with a gmail that you have access to
when creating an account go to your gmail and click on the gmail sent by escargot to activate your account
With your account already activated, go to the escargot website again and look at the top of the website for "download"
click on " MSN/Windows Live Messenger "
choose the language you prefer
make the the download
Go to your computer's files and unzip the downloaded file, download the server and the program
Log in to the account created on the escargot website
NOW U HAVE THE MSN IN UR COMPUTER
( if u guys want a tutorial how to use it, i can do it!!)
#y2k#early 2000s#2000s nostalgia#2000s aesthetic#2000s older brother#2000s tech#2000s web#older brother core#2000s older brother core#old web#y2k aesthetic#cats#cats of tumblr#2000s internet#2000s#tutorial#msn#MSN
17 notes
·
View notes
Text
host your gif packs on google sites
Since I received a question from an anon about how I upload my gifs to the google site, you can find the answer here. This is my first tutorial, and english is not my native language, but I hope it will be understandable and sorry if I wrote something wrong in english. I hope it's understandable and good luck, feel free to write if you have any questions and I'll try to help.
First of all, I always create the gif pack page on tumblr, it's easier to see the code there, it's easier for me to change things, because there is more space. And there I can see if everything is okay. However, it is important that there is a few code that works here, but not on the google site. When I find everything in perfect, I copy the code of the gif page and paste it to the google site page.
So I always open the google site page (You must log in with your gmail account to be able to use it.) : https://sites.google.com
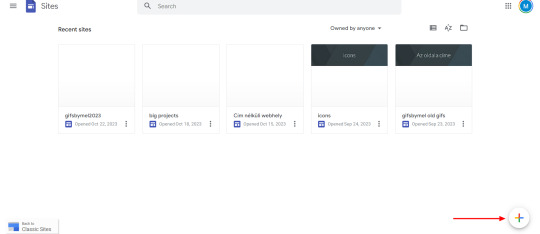
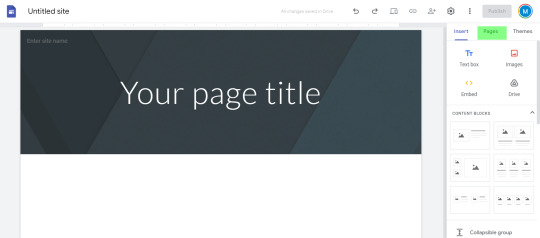
When you open it, it will be a blank page, but there will be that colored plus sign at the bottom right. You can create a new page with it. I already have several, I tried to organize things there.
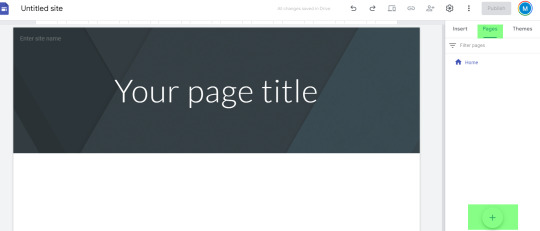
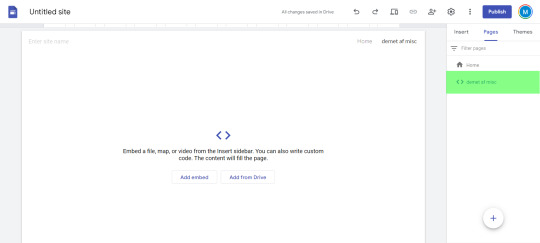
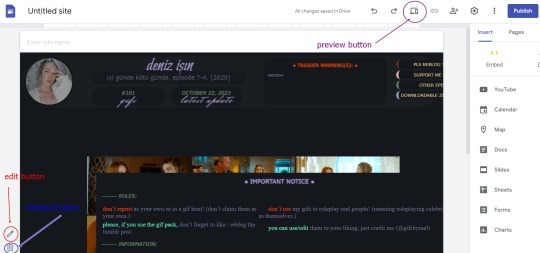
4. If you click on the plus sign, it brings up this, I don't usually change anything here. In the right-hand bar, there is "pages" (marked in green in the picture), you have to select it.
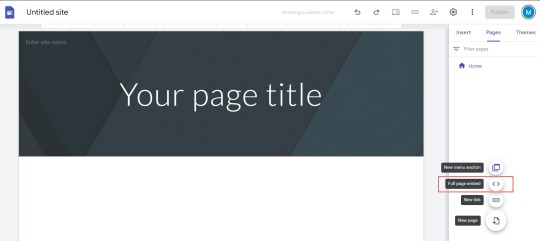
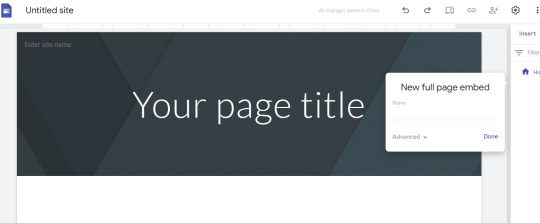
5. If you have selected the pages menu, you will see a plus sign again in the lower right corner. Click on it and select "full page embed". (I circled it in red in the second picture)
6. If you selected this, it will ask you to name the page. Enter the name you want. I usually include the name of the actor/actress + the name of the series and the episode in various formats. (Since I create the page both here and on the tumblr page, sometimes I copy the name given on the tumblr page.) When you press done, you will see what is in the second picture.
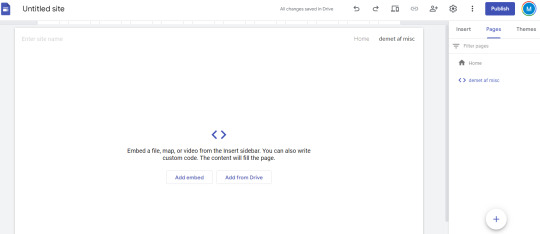
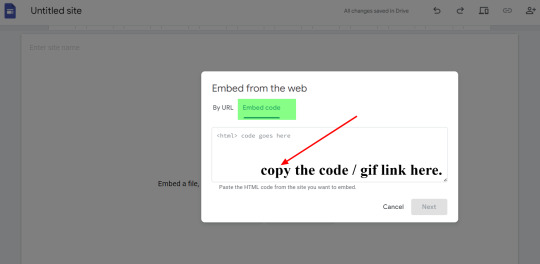
7. If you move the mouse over the part marked in green, i.e. on the name of the created page, 3 small dots will appear on the far right. Click on it and select "hide from navigation". If this was the case, then the small sign will be crossed out in front of the page name in the right side bar and there will be no menu bar at the top of the displayed page. After that, all that's left is to paste the code of the gif page, i.e. the gifs. You have to click on the "Add Embed" , which is in the middle and can be clearly seen in the picture. And choose "Embed code" and copy the cod / gif link here. [second picture]
8. I have marked on the picture where you can find after this, the edit button [in red], if you want to delete the page [in blue], or if you would like to preview it. [with purple color in the picture]
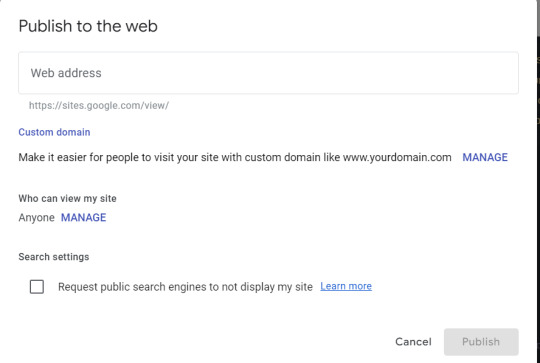
9. If you find everything OK, then all that's left is to press the "publish" button in the upper right corner. The previous picture shows where you can find it. Then it will ask you to enter a name for your web adress. Name it whatever you want, think of it as the name of a main tumblr page where you can always create gif packs. This only needs to be entered once, unless you want several main pages, as I have several (as can be seen in the very first picture). Eg: I named the current one gifsbymel2024.
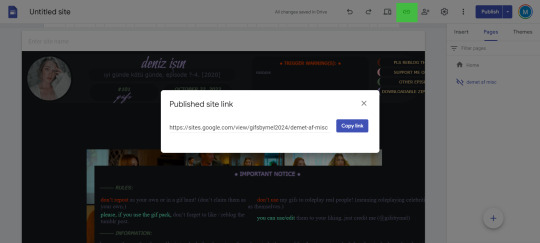
10. I marked the paper clip / chain (?) icon in green on the picture, you have to click on it and then the link of the created page will pop up and you can share it with whoever you want.
11. If you always want to upload a new gif pack to your page after that, all you have to do is open the Google site page, select your page from the already created "recent sites" section and then go to the "pages" tab on the right side and repeat the steps as before featured. Only the name of the "recent site" will be omitted if you add the gif packs to an existing one.
#host your gif packs on google sites#tutorial#gif pack tutorial#gif page tutorial#google site#google site tutorial#m.txt#suggestion by anon#gif page
109 notes
·
View notes
Text
How to make a//invite others to a group blog ,, the tutorial !!
I got an azk about it and I've zeen zome beingz ztruggle zo here it iz :3
Thiz iz all written zuppozing you're on your phone !!
All info under the cut ^^
Firzt of all ,, the blog muzt be a zecondary blog ,, meaning it cant be the 'firzt' account you created (( to put it zomehow )) .
Log in to Tumblr in google/your zearching engine ! It wont work if you're uzing the app .

Click on the zecondary acc you want to uze az a group blog )) then it zhould let you click on a little arrow [ v ] [It'll be zhown in the zext zcreenzhot dw]

Then click on 'members' ,, it'll lead you to [next image]

Then on '[email protected]' put the uzer of the perzon you want to invite to the blog ! [Like lavendergalactic or zmth] it'll zend them an invite link from your acc to their dmz )) I think you can alzo uze the gmail they're logged in with but I haven't tried + itz eazier to uze the uzer ..
And thatz all to make // invite otherz to a group blog :3 )) if you have any queztionz feel free to zend an azk or comment !!
15 notes
·
View notes
Text
For the Dropbox file to work, you will need to create your Gmail account to download it. It is very easy and this post is
here on Tumblr because nothing has been added, as soon you may need this link to help you install the Ura Zelda mod. This was not easy
to work on and work on, as it took me a long time to publish. Today I will be publishing the download links. Soon, I will provide a video
tutorial in Spanish on how to download and install it. Please do the same thing so you don't make SH**. Oh, Shift.
Don't use complicated methods. If you read it and didn't understand, read it
again and let's move on.
Latest information and updates:
16/10/2024
Exact download links, below:
https://beta-of-light-64-zelda.webnode.page/my-blog-4-articles-tumblr-page/
https://www.tumblr.com/hugo-articles-remix-123?source=share
https://ura-zelda-remix-1-0---the-official-web---hg-design.webnode.page/ura-zelda-alpha-4-windows-download/
2 notes
·
View notes
Text
6 Things to Keep in Mind to Find the Best CRM Systems for Small Businesses

In this competitive world, running a startup or small business is a real task. You need to juggle a lot of tasks at once, including sales, customer service, marketing, and inventory. That’s why you will need to find the best crm systems so you can change the way to manage your business. A good CRM helps you manage your customer interactions, follow up on leads, and stay organised. So that you can save on your operational time and can also boost your productivity.
But with so many CRM tools out there, how do you choose the best crm systems for your small business? In this guest blog, we will explore the six key things to keep in mind so you can find the right crms for your unique needs.
1. Easy to Use and Set Up
Simplicity is the key for every small business. You don’t want to spend weeks learning how to use a CRM or hire a dedicated IT person just to run it. So you should look for a CRM system that offers:
A user-friendly interface
Clear navigation
Simple onboarding or tutorials
If it takes more than a few hours to understand the basics, it may not be the right fit. Many crm platforms providers offer free trials, so you can also use them to see if you can easily understand how to use them and set them up.
2. Fits Your Business Needs
There is no best crm systems that fits every business. Some are focused on sales tracking, while others are better for customer service or marketing automation. So while you are choosing the CRM for your business, you should ask yourself:
What are your main goals? (e.g., tracking leads, managing customer data, automating emails)
Who will use it? (Just you, or a team?)
Do you need mobile access?
You can match your business needs with the features of customer relationship management crm so you can avoid paying extra. It means you can only for the feature that you want to use.
3. Affordable Pricing
Budget is always a concern for small businesses. Luckily, many CRM providers offer plans for smaller companies. Some even have free versions with limited features. It is perfect so that you can just start using the CRM system.
Here’s what to check to find the best crm systems:
Monthly cost per user
Hidden fees (like data migration or customer support)
Discounted yearly plans
You should always choose a customer relationship management system that fits your budget, but that also offers you the features that you actually need.
4. Customization Options
Every business is different. That’s why customisation is so important. Your CRM should let you:
Add custom fields
Create personalised sales pipelines
Set up task reminders that fit your workflow
If you are able to tailor your CRM system as per your business’s needs, then you can save hours of time and stay more organised.
5. Integration with Other Tools
Your CRMs should work well with other software you already use, like:
Email platforms (e.g., Gmail or Outlook)
Accounting tools (e.g., QuickBooks)
Marketing tools (e.g., Mailchimp)
Project management software
By integrating the best crm systems with your current tools, you can offer a smooth workflow to your team. They will not have to jump between apps or re-enter the same data.
6. Strong Customer Support
Things can go wrong. When they do, good customer support can make all the difference. So you should look for crm platforms that offer:
Live chat or phone support
Helpful tutorials and FAQs
Quick response times
Before you make any decision, you can also check online reviews to see what other users say about the company’s support. This gives you a good idea of what to expect if you run into problems.
Conclusion
Finally, when you are choosing the best crm systems for your small business then it doesn’t have to be overwhelming. You should focus on your business needs, budget and ease of use. So that you can offer an easier experience to your team instead of a complicated one.
Take the time to test a few CRM systems before committing. Use free trials, read reviews, and talk to other business owners. So that you can build stronger customer relationships, save time, and grow your business faster than ever before.
#customer relationship management system#crm platforms#customer relationship management crm#best crm systems#crms
0 notes
Text
What is Zapier? Pricing, Setup & How It Works (2025 Complete Guide)
Zapier is a smart tool that connects your favorite apps. It helps them work together without you needing to do anything. You don’t need to know coding. Just set it up once, and it runs by itself.
Think of it like this: if something happens in one app, Zapier tells another app to do something next. That’s called a Zap.
A Zap has two parts:
Trigger – This starts the Zap (like getting a new email).
Action – This is what happens next (like saving the email to Google Sheets).
For example:
When you get a new customer form → Add the details to Google Sheets.
In 2025, Zapier connects with over 6,000 apps like Gmail, Slack, Notion, Trello, HubSpot, WordPress, and more. Once you create a Zap, Zapier runs it in the background all day long. It saves time and makes your work easier.
Top Benefits of Using Zapier for Automation
Zapier helps people and businesses do things faster. It cuts out boring work so you can focus on more important stuff.
Here are the top benefits of Zapier in 2025:
Saves Time: No more repeating tasks. Zapier handles things for you.
Easy to Use: No code. Just click, connect, and go.
Works with 6,000+ Apps: From Google tools to Shopify, Zoom, Slack, and more.
Keeps Things Organized: No need to move files or copy/paste info.
Better Team Work: Everyone stays in the loop without extra effort.
Fewer Mistakes: Zapier is consistent. It doesn’t forget.
Whether you're a student, a freelancer, or a business owner, using Zapier makes daily tasks simple.
Zapier Pricing in 2025: Free & Paid Plans Compared
Zapier has a free plan and a few paid plans. You pick the one that works best for your needs. Here’s what they look like in 2025:
Free Plan
5 simple Zaps
100 tasks/month
Single-step Zaps
Basic apps only
Starter Plan (around $20/month)
20 Zaps
750 tasks/month
Multi-step Zaps
Use filters and delays
Some premium apps
Professional Plan (around $50/month)
Unlimited Zaps
2,000 tasks/month
Advanced features like logic paths
Priority support
Fast updates
Team & Company Plans
Custom plans for big teams
Shared Zaps
Team tools
Admin controls
SSO and onboarding help
You can start with the free version and upgrade later. Zapier’s plans are based on how many tasks you run each month.
Is Zapier Free? What’s Included in the Free Plan?
Yes, Zapier has a forever free plan. It’s great if you want to try automation without spending money.
Here’s what the free plan gives you:
Up to 5 Zaps
100 tasks/month
Single-step Zaps (one trigger, one action)
Access to basic apps
15-minute update time
This plan is perfect for:
Small tasks
Simple workflows
Trying things out before going big
If you want to use advanced features or connect premium apps like Salesforce or Facebook Leads, you’ll need to upgrade to a paid plan.
Zapier Alternatives in 2025: Best Automation Tools Compared
Zapier is great, but there are other tools out there in 2025. Each has its own special features.
Here are some top alternatives:
Make (Integromat)
Powerful, visual editor
Great for complex workflows
Cheaper for heavy users
Learning curve is higher
Pabbly Connect
One-time lifetime deal available
Good for beginners and startups
Growing list of apps
Integrately
1-click automation setup
User-friendly
Budget-friendly
n8n (Open Source)
You host it yourself
Super flexible
Best for developers
IFTTT
Very easy to use
Best for personal tasks and smart homes
Fewer options for business use
If you need a simple tool and wide app support, Zapier is still the best choice. But for complex jobs or low budgets, tools like Make or Pabbly might be better.
How to Set Up Your First Zap (Step-by-Step Tutorial)
Making your first Zap is super easy. You don’t need any tech skills. Just follow these steps:
1. Create a free Zapier account Go to zapier.com and sign up.
2. Pick your Trigger app Choose the app that starts the Zap. Example: Gmail – “New email with attachment”
3. Pick your Action app Choose what you want to happen. Example: Google Drive – “Upload file”
4. Connect your accounts Zapier will ask for permission to use your apps. Sign in to both apps.
5. Customize the settings Choose what kind of email to watch and where to save the file.
6. Test the Zap Zapier will run a quick test to make sure everything works.
7. Turn it on Once it works, switch it on. Zapier will now run this automation every time.
And that’s it! You’ve just saved yourself time by letting Zapier do the work.
Popular Zapier Integrations for Businesses
Zapier is loved by businesses because it connects tools that teams use every day. Here are some popular ones:
Gmail → Google Sheets Log new emails into a spreadsheet
Typeform → Mailchimp Send new form sign-ups to your email list
Shopify → Slack Get a Slack message every time you get a new order
Facebook Leads → HubSpot Send new leads to your CRM system
WooCommerce → QuickBooks Send order details into your accounting app
Calendly → Google Calendar & Zoom Create Zoom meetings automatically when someone books a call
These Zaps help teams work faster, avoid mistakes, and never miss an important update.
Zapier Use Cases for Marketing, eCommerce, and Teams
Zapier isn’t just for techies—it helps marketers, eCommerce stores, and teams save hours every week. With just a few Zaps, you can turn hours of busy work into smooth, automatic flows.
For Marketing Teams Zapier is a marketing helper that never sleeps. It connects tools like Facebook, Instagram, Mailchimp, HubSpot, and Google Ads. Here are some cool things it can do:
Automatically add new leads from Facebook Ads into your CRM
Send thank-you emails through Mailchimp when someone fills out a form
Track campaign results in Google Sheets without touching a spreadsheet
Post social media updates across multiple platforms at once
This helps marketers stay focused on creative work instead of boring copy-paste jobs.
For eCommerce Businesses Running a store is hard. Zapier makes it easier by connecting your shop with the tools that keep things running:
Send new Shopify or WooCommerce orders to Google Sheets for tracking
Notify your team on Slack when a high-value order comes in
Update inventory in your warehouse system when a product is sold
Send order details to accounting tools like QuickBooks or Xero
It’s like having a virtual assistant who never forgets and works 24/7.
For Teams and Project Managers Need to keep everyone in sync? Zapier works with apps like Trello, Notion, Asana, ClickUp, and Microsoft Teams to help your team stay on track:
Create Trello or Asana tasks from new emails or form submissions
Alert your team on Slack when someone completes a task
Save meeting notes from Zoom or Google Meet into Google Docs automatically
Share weekly reports via email every Friday—without lifting a finger
If you’re tired of tracking work manually, Zapier does it all in the background.
Zapier + Pipedrive Integration: How to Automate Sales Workflows
Sales teams often lose time doing small tasks—copying info from emails, adding deals, updating notes. But with Zapier and Pipedrive, you can skip all that.
Here’s what Zapier + Pipedrive can do:
New Leads to Deals: Every time someone fills out a form on your site, Zapier can create a new deal in Pipedrive.
Emails to Activities: When you get a sales email, Zapier can add a task or note in Pipedrive so you don’t miss follow-ups.
Calendly to Pipedrive: When a prospect books a meeting, Zapier can log it into Pipedrive and send a reminder to your Slack.
CRM Updates: When a deal moves to a new stage, Zapier can alert your team or update spreadsheets.
Pipeline Reports: Zapier can push updates to Google Sheets, email reports, or even post updates in your team’s Slack channel.
This integration removes the boring stuff and helps you focus on closing deals faster.
Is Zapier Safe to Use? Privacy and Security Overview
Yes, Zapier is safe to use and takes your privacy seriously. As of 2025, Zapier follows high security standards to keep your data protected.
Here’s what makes it secure:
Encryption: Zapier uses bank-level encryption (HTTPS/SSL) to protect your data as it moves between apps.
App Permissions: You only connect the apps you choose. You can remove access any time.
Two-Factor Authentication (2FA): Extra protection for your account. You can turn this on in settings.
Trusted Infrastructure: Zapier uses secure cloud servers with 24/7 monitoring.
Data Handling: Your data is not stored forever. It’s used to run your Zaps and then removed safely.
Compliance: Zapier is GDPR-compliant and follows privacy laws like CCPA.
Plus, you get full control. You can view, pause, or delete any Zap at any time.
Still, it’s a good idea to:
Use strong passwords
Turn on 2FA
Review your connected apps regularly
Zapier has never had a major data breach, and its team keeps improving security as tech evolves.
How to Delete Your Zapier Account Safely
If you’ve decided to stop using Zapier, you can delete your account in just a few steps. But make sure to do it safely so no data is left behind.
Here’s how:
1. Log in to Your Zapier Account Go to zapier.com and sign in.
2. Cancel Paid Plan (if you have one) Before deleting, cancel your subscription to avoid future charges.
3. Turn Off or Delete All Zaps Deactivate or delete every Zap you’ve created. This ensures no automation keeps running after your account is gone.
4. Go to Account Settings > Close My Account In the dashboard, go to settings. Scroll to the bottom. Click “Close my account.”
5. Confirm Your Password You’ll need to confirm your password and agree to delete everything.
6. Done! Your account is now closed, and your data will be erased from Zapier’s systems after a short time.
Make sure to download any data or Zap setups you might want to keep for later. Deletion is permanent.
What Happens After You Delete Your Zapier Account?
When you delete your Zapier account, a few important things happen:
All Zaps Stop Immediately Your automations will no longer run.
Data Is Erased Zapier removes your account data from its systems after a short holding period.
No More Access You won’t be able to sign in or recover your Zaps. It’s a one-way trip.
Connected Apps Lose Access Zapier will no longer connect with Gmail, Slack, Trello, or any other app you linked.
You Stop Getting Emails All newsletters, product updates, or Zap notifications stop.
Zapier keeps your data for a short time (in case you change your mind), but after that, it’s gone forever.
So make sure you export any important information before deleting your account.
Zapier Account Deletion Alternatives: What to Consider
Before you delete your account for good, think about your options. You might not need to remove everything.
Here are some alternatives:
Pause Your Zaps Maybe you just need a break. You can turn off your Zaps without deleting them. Later, you can switch them back on.
Downgrade to Free Plan Not using paid features? Switch to the free plan. You’ll still keep your Zaps (up to 5) and can use them again later.
Remove Specific App Access If you're worried about privacy, you can disconnect certain apps instead of deleting your whole account.
Turn Off Notifications Too many emails? Just change your notification settings in your profile.
Contact Support Zapier’s team is friendly and can help you adjust your plan or account settings.
Deleting is permanent. If you're not 100% sure, take one of the steps above instead. That way, you don’t lose your setups and hard work
0 notes
Text
📧 How to Create a Google Account in Just 5 Minutes! 🚀
Want to create a Google account but not sure where to start? 🤔 Don’t worry—it’s super easy and takes less than 5 minutes! 🚀
With a Google account, you’ll get access to Gmail, Google Drive, YouTube, and so much more! 🌍✨ Just follow a few simple steps, and you’re all set.
Need a step-by-step guide to walk you through it? Check out this detailed tutorial 👇 🔗 https://www.izoate.com/blog/how-to-create-a-google-account-sign-in-to-google-accounts/
0 notes
Text
This is the best option to backup window emails with a number of features
The advantage of using outlook is that it comes compatible to Windows as well apart from Mac. So, it generates email files in the form of PST compatible window. Outlook has its own interface compatible with Windows. It is precise important to backup and restore the mails on windows outlook. You can learn more about windows backs and restore through the below link so that I can discuss the different features on how to backup windows emails.
I used Mail Backup X by InventPure for my Windows 8 with a bunch of incredible features. The download version of this tool comes for 32bit and 64bit processor so you can suit yourself according to the system you are using.
This is the best way to backup windows emails along with a number of features.
The tool can backup Outlook for Windows
The tool works on the platform of incremental backup support system as they mail arrives. No matter you work for windows outlook, the tool can backup Windows emailsvery easily.
It can import stored mails
If you plan for windows backup and restore, you can also import mail archive files exported from other mail clients like Outlook 2011 or 2016 Archive), eml files etc.
The tool has an inbuilt mail viewer
The tool comes with an inbuilt mail viewer in order to have a look at the archived emails without switching between multiple mail clients.
An advanced search option
The feature of advanced search module allows you to search emails from any particular person, subject or with a specific word in the entire database. Also, you can search for specific mails with attachments using AND and OR logics in the tool.
Organize Archive Mails in a PDF format
A very convenient option to archive al your mails as PDF retaining the folder structure. It creates a future proof and accessible account for all the archived mails. Also, protects the inbound and outbound mail messages from personal or business mail accounts suited for printing purpose.
Compresses the files for extra storage
The toolmakers uses a high compression algorithm, which is specially design to secure the mail data. It compresses and extracts the files reducing to required storage place. The tool also supports repair recovery record in case of any hardware corruption so that you may not end up losing any data.
All in one conversion mail tool
The tool gets you the freedom to move from different mail clients to mail client of your choice. It includes the format like (.pst, .eml) supported by all popular Mail clients like Outlook Windows, Office 365, Gmail, Yahoo.
Auto USB Backup Sync
The tool has an in-built auto USB backup feature where you can just map a USB drive to copy a backup of mails. The tool plays a smarter role in detecting when the drive is plug in and where to copy the data on that drive. For more information to backup windows, simply log on to the below link www.mailbackupx.com/windows-email-backup-tool/.
Video Tutorial to backup Windows mail with Step by Step Guide
youtube
1 note
·
View note
Video
youtube
How to Create a YouTube Channel for Beginners (Step-by-Step Tutorial) This Think Media youtube channel of How To Create A Youtube Channel For Beginners (Step by Step Tutorial) contains some helpful and easy to understand information. I also enjoy the step by step feature generously provided by the youtube author on how a person can start their own youtube channel via another gmail account if it is preferred that the viewer prefers to start their youtube channel via a medium external to their other gmail accounts.
0 notes
Text
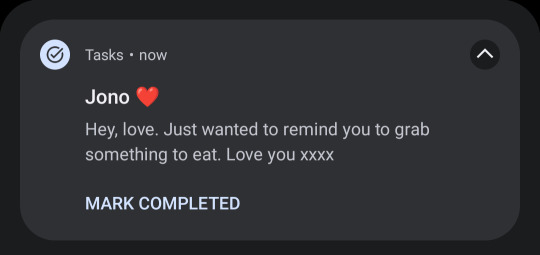
Some people wanted to know how this is done so I've made up a quick tutorial.
The app I use is Google Tasks
Once you've tapped to create a new task, you'll see this at the bottom of your screen:

Tapping the symbol I've circled will give you the option to add details. If you're on an android device, this will also display on the notification.

Here, I've put the contact name as the name of the task. I use the details for the messages.
From my experimentation, I've found that the details don't display on the notification on iOS. (See Below)

You can adapt this by including the message in the name of the task. (See Below)

Since this also displays the email of the Google account, another option is to create a Gmail account with your f/o's name to use for Google Tasks and exclude the contact name.
Hope this was helpful. Lmk if anything in this needs further explanation.
Self-shipping life hack
Write your reminders as texts from your f/o
800 notes
·
View notes
Text
Mastering Tech Basics: Empower Your Daily Life
In today's world, it's crucial to have a grasp of basic technology. Whether you are a student, a professional, or someone just trying to remain connected, technology influences nearly every part of our lives. It’s no longer confined to just IT professionals but has become an essential skillset for everyone. When I first started diving into technology, it felt like learning a new language, but this journey is truly rewarding.
Why Basic Technological Knowledge is Important
Understanding technology can seem daunting, but having basic knowledge opens doors to numerous opportunities. First and foremost, it enhances communication and makes information easily accessible. Consider how often we use emails, social media, or search engines. Knowing simple things like crafting an email, efficiently searching for information online, or using social media responsibly can significantly streamline our daily activities.
Technology also boosts productivity. Tools like Microsoft Office, Google Suite, and other productivity apps make organizing and completing tasks more efficient. Having these skills can set you apart in the workforce. During my time at Burton and Meyer, mastering tools like Excel and Google Docs was a game-changer. It made me more efficient in handling complex data and collaborative projects.
Getting Started with Technology: Tips for Beginners
You don't need to dive into coding or advanced IT systems right away. Familiarize yourself with using a computer, browsing the internet, and understanding basic software. Simple tasks like understanding how to use a word processor, creating folders or files, and using email applications are excellent starting points. A friend of mine, James, once helped me set up my first Gmail account, and it was a gateway to exploring other Google tools.
There are countless free and paid resources available for beginners. Websites like Khan Academy, Coursera, and edX offer fantastic courses on technology basics. You can find YouTube tutorials on almost any technical topic. During my initial stages, I relied heavily on online tutorials and free courses. They provided me with a structured learning path and helped in building a strong foundation.
Consistency is the key. Make technology a part of your daily routine. Even if it's something simple like drafting daily emails, making spreadsheets, or using presentation software, the more you practice, the better you get. I remember dedicating time each evening to explore a new feature in Microsoft Excel, and over time, my proficiency improved tremendously.
Using the Right Tools
Choosing the right tools can make learning technology easier and more enjoyable. For instance, Google Workspace is user-friendly and great for collaboration. Tools like Slack and Trello can enhance your organizational skills and teamwork capabilities. When I first started using Trello for project management, it streamlined my tasks and facilitated better coordination with my colleagues at Burton and Meyer.
Additionally, learning how to manage your tech environment is essential. Simple practices, such as keeping your software updated and regularly backing up data, can save you from potential technical issues. I cannot stress enough the importance of regular backups; it saved me from losing critical project files more than once.
Overcoming Technological Fears
It's natural to feel intimidated by technology, but overcoming this fear is essential. Start small, celebrate little victories, and gradually progress to more complex tasks. I once struggled with creating pivot tables in Excel, but breaking down the process into small steps made it manageable and less overwhelming.
Don't hesitate to ask for help. There's a vast community, both online and offline, willing to assist. Joining forums, participating in group studies, or just asking a tech-savvy friend for guidance can make a significant difference. During my early days, our intern, Samantha, played a pivotal role in guiding me through various technological intricacies, making the learning process much smoother.
The world of technology constantly evolves, and while it’s challenging to keep up with every change, having strong fundamentals makes adapting easier. Technology is not just for tech experts; it’s for everyone. By embracing it, we've got the opportunity to enhance our personal and professional lives tremendously.
Let’s commit to learning and embracing technology, making it an integral part of our daily lives. The rewards of understanding the basics are substantial, from improved communication and productivity to increased job opportunities and personal growth.
#TechnologyBasics #LearningTech #DigitalSkills #TechForEveryone #EmbraceTechnology
0 notes
Text
How to send email from localhost using PHP

In this tutorial, we will learn how to send an email from localhost using PHP and Gmail. In the PHP web application, mail() function used to send the mail. But mail() function will not work in the localhost environment. In this tutorial, we will send an email from the localhost system using PHP and Gmail.
In this tutorial, we will use PHPmailer to send email from the localhost using PHP. The PHPmailer library provides the way to send an email from localhost with the SMTP server using PHP. We will use the Gmail account as an SMTP server to sending the email from localhost. Before using the Gmail SMTP server we need to configure the setting in our Gmail account.
Click: https://phpgurukul.com/how-to-send-email-from-localhost-using-php/
Login into your google account.
Go to the security page.
<?php
use PHPMailer\PHPMailer\PHPMailer;
use PHPMailer\PHPMailer\Exception;
require ‘vendor/autoload.php’;
$mail = new PHPMailer;
if(isset($_POST[‘send’])){
// getting post values
$fname=$_POST[‘fname’];
$toemail=$_POST[‘toemail’];
$subject=$_POST[‘subject’];
$message=$_POST[‘message’];
$mail->isSMTP(); // Set mailer to use SMTP
$mail->Host = ‘smtp.gmail.com’; // Specify main and backup SMTP servers
$mail->SMTPAuth = true; // Enable SMTP authentication
$mail->Username = ‘[email protected]’; // SMTP username
$mail->Password = ‘Your_Gmail_Password’; // SMTP password
$mail->SMTPSecure = ‘tls’; // Enable TLS encryption, `ssl` also accepted
$mail->Port = 587; // TCP port to connect to
$mail->setFrom(‘[email protected]’, ‘Your_Name’);
$mail->addReplyTo(‘[email protected]’, ‘Your_Name’);
$mail->addAddress($toemail); // Add a recipient
// $mail->addCC(‘[email protected]’); // Set CC Email here
// $mail->addBCC(‘[email protected]’); // Set BCC Email here
$mail->isHTML(true); // Set email format to HTML
$bodyContent=$message;
$mail->Subject =$subject;
$bodyContent = ‘Dear’.$fname;
$bodyContent .=’<p>’.$message.’</p>’;
$mail->Body = $bodyContent;
if(!$mail->send()) {
echo ‘Message could not be sent.’;
echo ‘Mailer Error: ‘ . $mail->ErrorInfo;
} else {
echo ‘Message has been sent’;
}
}
?>
Explanation of the above code
Include the PHPMailer library and create an instance of this class.
Set SMTP credentials (host, username, password, and port).
Specify sender name and email ($mail->setFrom('[email protected]', 'Your_Name')).
Set recipient email address ($mail->addAddress($toemail)).
Set email subject ($mail->Subject).
Set the body content of the email ($mail->Subject =$subject;).
Use the mail->send() method of PHPMailer class to send an email.
Here is the Full code with HTML Form and PHP Code
<?php
use PHPMailer\PHPMailer\PHPMailer;
use PHPMailer\PHPMailer\Exception;
require ‘vendor/autoload.php’;
$mail = new PHPMailer;
if(isset($_POST[‘send’])){
// getting post values
$fname=$_POST[‘fname’];
$toemail=$_POST[‘toemail’];
$subject=$_POST[‘subject’];
$message=$_POST[‘message’];
$mail->isSMTP(); // Set mailer to use SMTP
$mail->Host = ‘smtp.gmail.com’; // Specify main and backup SMTP servers
$mail->SMTPAuth = true; // Enable SMTP authentication
$mail->Username = ‘[email protected]’; // SMTP username
$mail->Password = ‘Your_Gmail_Password’; // SMTP password
$mail->SMTPSecure = ‘tls’; // Enable TLS encryption, `ssl` also accepted
$mail->Port = 587; // TCP port to connect to
$mail->setFrom(‘[email protected]’, ‘Your_Name’);
$mail->addReplyTo(‘[email protected]’, ‘Your_Name’);
$mail->addAddress($toemail); // Add a recipient
// $mail->addCC(‘[email protected]’);
// $mail->addBCC(‘[email protected]’);
$mail->isHTML(true); // Set email format to HTML
$bodyContent=$message;
$mail->Subject =$subject;
$bodyContent = ‘Dear’.$fname;
$bodyContent .=’<p>’.$message.’</p>’;
$mail->Body = $bodyContent;
if(!$mail->send()) {
echo ‘Message could not be sent.’;
echo ‘Mailer Error: ‘ . $mail->ErrorInfo;
} else {
echo ‘Message has been sent’;
}
}
?>
<!DOCTYPE html>
<html lang=”en”>
<head>
<meta charset=”utf-8">
<meta name=”viewport” content=”width=device-width, initial-scale=1, shrink-to-fit=no”>
<title>How to send email from localhost using PHP</title>
<link rel=”stylesheet” href=”https://fonts.googleapis.com/css?family=Roboto|Courgette|Pacifico:400,700">
<link rel=”stylesheet” href=”https://stackpath.bootstrapcdn.com/bootstrap/4.5.0/css/bootstrap.min.css">
<link rel=”stylesheet” href=”https://maxcdn.bootstrapcdn.com/font-awesome/4.7.0/css/font-awesome.min.css">
<script src=”https://code.jquery.com/jquery-3.5.1.min.js"></script>
<script src=”https://cdn.jsdelivr.net/npm/[email protected]/dist/umd/popper.min.js"></script>
<script src=”https://stackpath.bootstrapcdn.com/bootstrap/4.5.0/js/bootstrap.min.js"></script>
<style>
body {
color: #000;
background: #fcda2e;
font-family: “Roboto”, sans-serif;
}
.contact-form {
padding: 50px;
margin: 30px auto;
}
.contact-form h1 {
font-size: 42px;
font-family: ‘Pacifico’, sans-serif;
margin: 0 0 50px;
text-align: center;
}
.contact-form .form-group {
margin-bottom: 20px;
}
.contact-form .form-control, .contact-form .btn {
min-height: 40px;
border-radius: 2px;
}
.contact-form .form-control {
border-color: #e2c705;
}
.contact-form .form-control:focus {
border-color: #d8b012;
box-shadow: 0 0 8px #dcae10;
}
.contact-form .btn-primary, .contact-form .btn-primary:active {
min-width: 250px;
color: #fcda2e;
background: #000 !important;
margin-top: 20px;
border: none;
}
.contact-form .btn-primary:hover {
color: #fff;
}
.contact-form .btn-primary i {
margin-right: 5px;
}
.contact-form label {
opacity: 0.9;
}
.contact-form textarea {
resize: vertical;
}
.bs-example {
margin: 20px;
}
</style>
</head>
<body>
<div class=”container-lg”>
<div class=”row”>
<div class=”col-md-8 mx-auto”>
<div class=”contact-form”>
<h1>Get in Touch</h1>
<form method=”post”>
<div class=”row”>
<div class=”col-sm-6">
<div class=”form-group”>
<label for=”inputName”>Name</label>
<input type=”text” class=”form-control” id=”inputName” name=”fname” required>
</div>
</div>
<div class=”col-sm-6">
<div class=”form-group”>
<label for=”inputEmail”>Email</label>
<input type=”email” class=”form-control” id=”inputEmail” name=”toemail” required>
</div>
</div>
</div>
<div class=”form-group”>
<label for=”inputSubject”>Subject</label>
<input type=”text” class=”form-control” id=”inputSubject” name=”subject” required>
</div>
<div class=”form-group”>
<label for=”inputMessage”>Message</label>
<textarea class=”form-control” id=”inputMessage” name=”message” rows=”5" required></textarea>
</div>
<div class=”text-center”>
<button type=”submit” class=”btn btn-primary” name=”send”><i class=”fa fa-paper-plane”></i> Send</button>
</div>
</form>
</div>
</div>
</div>
</div>
</body>
</html>
PHP Gurukul
Welcome to PHPGurukul. We are a web development team striving our best to provide you with an unusual experience with PHP. Some technologies never fade, and PHP is one of them. From the time it has been introduced, the demand for PHP Projects and PHP developers is growing since 1994. We are here to make your PHP journey more exciting and useful.
Website : https://phpgurukul.com
0 notes
Text
Are there any ways to bypass Rapid Gator download speed limitations in 2024?
If you have tried various methods to bypass the download speed limit without success and wondering are there any ways to bypass RapidGator download speed? Your answer is Premiumdownloader
It is a reliable and efficient link generator that allows users to generate premium links for various file hosting services, including RapidGator. With its user-friendly interface and fast download speeds, it provides a seamless experience for users looking to download files from RapidGator.
Advantages
No need to create a premium account.
No need to purchase a premium membership.
No need to install additional tools.
Supports the transfer of both files and folders to Google Drive.
No more connectivity issues (Even with a premium account on other platforms, direct access to folders and large-sized items may be stricted).
Eliminates the need for third-party tools (which may pose a risk viruses).
No need to change user agents or employ other tricks
Simply input your email (preferably Gmail). We will facilitate the transfer within a few minutes to a few hours.
How can use it
To use Premiumdownloader.net, simply visit their website and follow these steps:
1. Copy the RapidGator link you want to generate a premium link for.
2. Paste the link into the designated field on Premiumdownloader.net.
3. Click on the "Checkdownloadlink" button.
4. Make payment
5. Wait 2-10 Direct download link will send to your email.
Premiumdownloader.net offers various premium plans to cater to different user needs. These plans provide additional benefits such as faster download speeds, parallel downloads, and no waiting time.
Here's the tutorial: https://www.youtube.com/watch?v=TkMrJ_fLcNI
1 note
·
View note
Text
BOTH FREE AND SUPER-FAST DOWNLOADS FROM RAPID GATOR?
If you have tried various methods to bypass the download speed limit without success and wondering are there any ways to bypass RapidGator download speed? Your answer is Premiumdownloader.
It is a reliable and efficient link generator that allows users to generate premium links for various file hosting services, including RapidGator. With its user-friendly interface and fast download speeds, it provides a seamless experience for users looking to download files from RapidGator.
Premium Downloader - Best Premium Link Generator - Rapidgator - Keep2share
We are one of the best premium link generator service on internet, with which you can perform your downloads from file hosts like Rapidgator
PREMIUM DOWNLOADER

WHY USE PREMIUMDOWNLOADER.NET FOR RAPIDGATOR
Wide Compatibility
PremiumDownloader.net is made to work with lots of different file hosting services, and RapidGator is one of the main ones it focuses on. This means it's easy for users to make premium links for RapidGator and other sites.
Faster Downloads
One great thing about PremiumDownloader.net is that it can make downloads faster by getting around the speed limits that free RapidGator users usually face. This means people can download big files, videos, and folders much quicker.
Simple Interface
Some premium link downloaders can be hard to figure out, but PremiumDownloader.net isn't like that. It's designed to be easy to use for everyone, no matter how much they know about computers.
Downloading More at Once
With PremiumDownloader.net, users can start multiple downloads at the same time. This is really helpful when dealing with big files or lots of stuff to download because it saves time.
Customizable Settings
PremiumDownloader.net lets users change how their downloads work, like where they go, how fast they are, and how the downloaded files are organized.
Keeping Data Safe
PremiumDownloader.net takes security seriously, so users can trust that their information is safe when they download big files, videos, and folders from RapidGator.
BENIFIT OF USING PREMIUMDOWNLOADER.NET
NO need to create a premium account.
NO need to purchase a premium membership.
NO need to install additional tools.
SUPPORT the transfer of both files and folders to Google Drive.
NO more connectivity issues (Even with a premium account on other platforms, direct access to folders and large-sized items may be restricted).
ELIMINATE the need for third-party tools (which may pose a risk of viruses).
NO need to change user agents or employ other tricks.SIMPLY input your email (preferably Gmail). We will facilitate the transfer within a few minutes to a few hours.


HOW CAN USE IT
To use Premiumdownloader.net, simply visit their website and follow these steps:
1. Copy the RapidGator link you want to generate a premium link for.
2. Paste the link into the designated field on Premiumdownloader.net.
3. Click on the "Checkdownloadlink" button.
4. Make payment
5. Wait 2-10 Direct download link will send to your email.
Premiumdownloader.net offers various premium plans to cater to different user needs. These plans provide additional benefits such as faster download speeds, parallel downloads, and no waiting time.
Here's the tutorial: https://youtu.be/jjEnek6fIgY?si=YPCyE-KIvEelCWJy
NEED HELP OR HAVE ANY QUESTIONS?
Please send them over to us via either our:
Homepage: https://premiumdownloader.net/
Email: [email protected]
Telegram: https://t.me/premiumdownloader
Youtube Channel: https://www.youtube.com/channel/UCnA8SU23R3R-ASoJXdJ70uA Facebook Page: https://www.facebook.com/premiumdownloader.net
0 notes
Video
youtube
How to Create a New Gmail Account - Easy and Quick Tutorial!
0 notes