#it's pop! by pxelbox
Explore tagged Tumblr posts
Visit Tumblr Blog
Explore Tumblr blogs with no restrictions, modern design and the best experience.
Last Seen Tumblr Blogs


Fun Fact
In 2020, 27% of US Tumblr users had an annual household income of over $100,000.
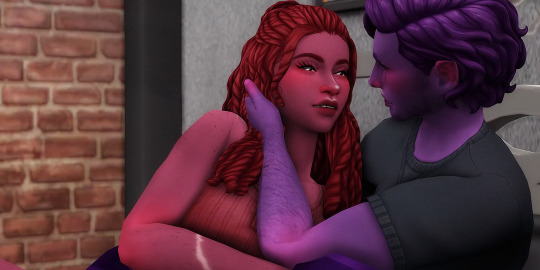
Photo


#ts4#ts4 vanilla#ts4 gameplay#the sims 4#june#i tried different action on these screenshots#i used it before#2 years ago maybe#it's pop! by pxelbox#not sure if i will use it again#just tried it for fun :-)
44 notes
·
View notes
Note
your pictures are stunning! can you share the rehade your using and how you edit your pics?
aww thank you so much! i try very hard to make my pictures look good. 🙈
sadly i can’t tell you exactly how i’m editing my pictures because it’s honestly a lot of different actions running together and then some own adjustments - plus i made the actions quite some time ago so i don’t really remember myself what all went into it. and all my saves have a different action that i run on the pictures.
but i’m gonna try my best to commulate all my resources and process under the cut so you can try yourself! oh, and i use photoshop cc 2018 (i don’t like the newer interface).
so let’s start with my entangled pictures. i use intramoon‘s elysian reshade preset with some slight adjustment. this is how a picture with just the reshade looks like:
then i run my first action which is really just running topaz clean & topaz denoise (those are photoshop plugins, a guide on how to install them should be on the website) to clean up the texture and make it look smoother and then some vibrance adjustments and crop the image (2:1 dimensions for entangled). so i have this:
after that i have lots of adjustments running that tweak the vibrance, hue, colour balance, and levels of the picture. for the kearemy entangled pictures i like it when they have some cooler tones. i also resize the image to be 1080 pixels wide (because that makes them look at least a little sharp on tumblr) and flatten all my layers.
usually that would be it but recently i started adding noise by duplicating the layer and using the noise filter in photoshop on the top layer (and then play with the opacity until it looks how i want it):

this change is very subtle but i feel like it gives the image a bit more life. and then i run aveira’s preview pictures action and play a little with the opacity there too until i get a picture that i like and that’s it for the entangled kearemy pictures. oh, and flatten the entire image:
when i feel a picture is too dark i duplace the layer again and set the top layer style to screen and the opacity to around 50%:
for cahlby pictures, their tweaks are a little different but the main difference is that i add a yellow gradient layer in the end to make everything sem a bit warmer:

for my nsb pictures, i use berryconfetti’s confetti clover reshade preset, also with some minor tweaks. this is how those pictures look without any editing and just the reshade:

then, i run aveira’s preview picture action on it (the option with topaz):
after that, i use the create a sim action from pxelbox’s color POP action set:

don’t forget to flatten the image after running each action! then i first run the sharp action of the same set, and then the smooth action, crop the image & resize it (i take a little away on each side and from the top and bottom):
and finally, i change the canvas size so the pictures get a white border (set the canvas extension colour to white!), and once again resize the image to be 1080 pixels wide:
and that’s it! i hope i could help you with this!!
16 notes
·
View notes
Note
Sorry I forgot to mention in my last ask hehe oops , but mainly bright psds thanks again 😊
None I made personally..Howsa’ bout I list some of the ones I use!
Let’s start with an unedited SS. This way you can compare PSD’s (My image is already pretty bright since I like to take SS during the morning hours w/lots of natural light and bright surroundings.) You’re most likely going to want to adjust the opacity on all of these! Some of them can be…obnoxiously bright. I’ll leave all opacity settings @ 100% for this!
Unedited:

IN NO PARTICULAR ORDER;
1. Clover by virtuchem

2. NSB by foursims **** (MY most used ‘go to’ PSD!)

3. POP! by pxelbox

4. HAPPY PILLS by nookstones

5. Cilantro by gloomfish

6. Calm morning by smubuh *** (Second most used PSD)

7. Honeycomb by glitchysims **

8. Basil & things by glitchysims

9. Retro pepsi by surprisepeach *** LOVE!!!!

10. Rose coloured lenses by okruee

11. Pastel winter v2 by andromedasims

******* HIGHLY RECOMMEND USING “Keep dark sims dark” by glitchysims for a lot of these as they may not work very well for darker skin tones….
KDSD by glitchysims

I hope this helps Nonny!! ~
200 notes
·
View notes
Note
eHEM... Wcif your talents dude? All your pics are so smooth and pretty
I mainly use several different actions (but I tend to have a hard time remembering how I edit which is my my editing is inconsistent :P) :
@cowplant-pizza Yogi bear action
@pheetu Bucket o sunshine (download is gone and so is the blog)
@simphonious topaz knockoff ( I tried looking through their downloads but it’s not there anymore)
@smubuh homesweethome
@complicite au’natural
@daniparadise - paradise november action
@eversims photoshop actions
@poolbrop Fake it! Reshade action
@virtuchem Happy Pills action
@pxelbox aka @virtuchem POP!
ophelia-nygmos Smooth Larkin Curves
@script-error-sims Syrup Action
43 notes
·
View notes
Photo


maxis-match recolor of @shunga ‘s vans slip-ons (you need the mesh). the tag and the logo are now in simlish; in pxelbox nookstone’s vibrancy extended palette or cupidjuice’s dream pop palette; only for females for now.
credit: @shunga for the mesh, @nookstones and @cupidjuice for the palettes, gazifu at MTS for the simlish font, @pixelddump for my model (again!)
download vibrancy | dream pop
8K notes
·
View notes
Note
hi! I was wondering how you made that photo edit in your most recent post? it’s so lovely!
hey anon!!! im not quite sure which part youre talking about?? but here’s a lil step by step of what i did, but remember that whatever i did wouldnt fit every screenshot ok!!!!

tutorial under the cutt vv
1. ok so i used the pop! gameplay psd by nookstones (aka pxelbox) and played with the hue/saturation and brightness/contrast toggles to get this:

2. afterwhich i used complicite’s au natural psd (which i LOVE okay) and i get this

3. after that, i played with the colour balance setting:

and i get this!!

5. then i add the lens flare by downloading a png and using layer mode screen!! this also adds some ‘light’ to the screenshot!!
and youre done b!!!
for the other pic, i followed the same steps, but used okyio’s technique to darken + lighten some areas!!
47 notes
·
View notes
Photo


i love the preppy little button up that came with get to work i use it a lot and most notibly worn on none other but my preppy lil declan flynn SOO i named this recolor after him ;^ )
comes in solids & patterns
50 solid swatches from pantone’s fall 2017 fashion report + @cupidjuice‘s dream pop pallet + @pxelbox‘s vibrancy extended palette
15 pattern swatches in three different pattern variations [bird print + dots + confetti]
download solids + patterns together or seperately
requires get to work
DOWNLOAD [SFS]
#cc#mine#ts4cc#s4cc#ts4mm#ts4mm cc#ts4 male cc#ts4 menswear#ts4mm male cc#s4mm male cc#s4 male cc#s4 menswear#sims 4 cc#ts4 cc#sims 4 maxis match#maxis match
4K notes
·
View notes
Note
Hi!! I hope you don't mind a more general WCIF, but I admire your style a whole lot! <3 Anyway, do you have any favourite Simlish posters, or paintings?
Hello! Thank you so much, thats super sweet :) I had a couple creators pop into my head when I read your message! (and I do have some I’ve made myself in my downloads if you wanted to take a look).AroundTheSims@yves-sim-laurent @kandiraver-sims@pxelbox@pleyita@tamo-sim@ohmysims@zx-ta@teekapoa (doiwannasims)@goodieslalaland@trutjesims@gfvsims@lemonjellysims
and for all things simlish, for TS3 and TS4, check out @strictlysimlish ♥
#Anonymous#replies#text#wcif#im sure im forgetting a bunch more#i totally dont mind wcif of any kinds ♥
34 notes
·
View notes