#lcd controller board
Explore tagged Tumblr posts
Visit Tumblr Blog
Explore Tumblr blogs with no restrictions, modern design and the best experience.
Last Seen Tumblr Blogs


Fun Fact
Tumblr has 4 main sources of revenue.
Text
Key Points of Industrial Control & Outdoor High-Brightness LCD Screens
Industrial control LCD screens are specialized displays designed for demanding environments, with features like wide temperature tolerance (−30°C to +80°C) and high brightness (over 400 nits), ensuring clear visibility under strong light. These are widely used in instrumentation, communication equipment, automation, and outdoor systems.
Analog vs. Digital LCD Panels:
LCD screens differ based on their driver circuits:
Analog input uses a D-SUB interface and converts RGB analog signals to digital within the display.
Digital input uses DVI or similar interfaces, offering better signal integrity and sharper images.High-quality lcd display modules often support both, enhancing compatibility.
Internally, all LCDs operate digitally; the difference lies in how signals are received and processed.
Outdoor High-Brightness LCD Advantages:
Expanding Business Opportunities:
Outdoor lcd display screens are widely adopted in high-traffic areas—airports, malls, museums, metro stations—for advertising and information display. Their clarity, vivid colors, and sunlight readability make them more effective than traditional LED screens.
Low Environmental Impact:
Modern lcd panels minimize radiation and visual pollution, offering a cleaner, safer viewing experience. Customizable solutions adapt to various installations without overwhelming the environment.
Conclusion:
With their durability, clarity, and low energy footprint, industrial and outdoor tft lcd modules, lcd display panels, and touch lcd screens offer powerful display solutions across industries.
Shenzhen Zhiyan Optronics Co., Ltd. (zylcdshop.com) is a reliable China-based supplier with 18+ years of experience in high-performance LCD screens, offering quality products, customized solutions, and competitive factory-direct prices.
#lcd replacement screen#tft display module#display original#buy lcd panels#tft panel#truly lcd#lcd screen panel#wholesale lcd#replacement screen#wholesale lcd screen#lcd monitor panel#module lcd#tft lcd display module#7 inch display#lcd replacement panels#lcd panel display#display panel#lcd controller board#touch screen lcd display
0 notes
Text
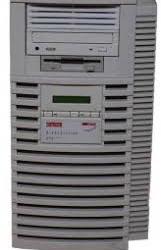
I still have TWO of these suckers, both different models of the Sony Trinitron. I sleep next to one and use it as a night stand and the other is used as a monitor for a media PC in my art room and it's uh... That monitor's casing is umm... Is held partly together with gorilla tape and the colors are separating in one corner.
Good to know I'm literally within arms reach of a tiny reactor. I love them.

#also fun story.#i was putting in a window ac in my window#on my own mind you.#and I knocked over my curved lcd i use for my desktop somehow. and it feel forward onto my ihome alarm clock#and ipod classic#that broke cause LCDs are the most fragile fxcking monitors in existence#well not really but in comparison to crts and some Samsung phones I've owned it was#and of course more fragile than the ipod classic (still works PERFECTLY FINE by the way. apple go back to making things sturdy#but after removing the other things from the top of the CRT including my desktop#(I unplugged stuff don't worry. I'm not THAT careless. just careless enough to balance a monitor on top of a sony triniton facing my bed#in a way that can be easily knocked off lol)#so I move the CRT right? problem is I'm the only person moving it from in front of the window I'm putting the AC in#cause I have to block off the rest of the window- it's a big window#so I end up Knocking it over and it falls screen first on the floor of my room on top of chords and other junk that I need to clean up#I don't freak out too much mostly cause it's a glorified side table to me right now. i barely use it#just a little sad if it does break#I get the board in with much struggle with the ac and tack up the curtain so it isn't in the way#so I lift the tv/night stand and pop the control panel back into its spot#i hold my breath and it doesn't look like anything happened. same picture#meanwhile my monitor for my desktop is internally shattered#luckily i had an older back up monitor that uses the old blue display connectors.#But
153K notes
·
View notes
Text

Discover tailored solutions for your display needs with CCest.com's customized LCD controller boards. Our versatile boards cater to a range of applications, offering customizable features and functionalities. Explore our offerings to unlock precise control and optimization, ensuring seamless integration and enhanced display performance tailored to your specific requirements. Read More : https://www.ccest.com/LCD-controller-board/
#gaming monitor#outdoor digital signage totem#customized lcd controller board#industrial panel pc size from 7inch to 32inch
0 notes
Video
youtube
3.4 inch 800x800 TFT LCD color round screen MIPI interface touch round d...
#youtube#Youritech is a world leading display panel agent designer and manufacturer (lcd/oled touch screens controller board etc.) Here are recently
1 note
·
View note
Text
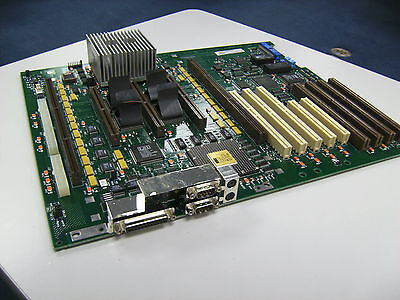
If any of you happen to be trying to get your DEC Alphastation 600 working and are frustrated that there are no LEDs for showing POST codes (power on self test), not my fault.
When I was designing this board I begged our management to ok adding them, but I was not successful because they were in love with this idea of using the LCD to display diagnostic info.
The problem with this is, the LCD is connected to an I2C controller, which is connected to an ISA bus, connected an ISA bridge, connected to our CIA controller chip. All of which need to be configured by the CPU before they can function.
So in other words, pretty much the whole board has to work before we can display any diagnostic about why it is broken. Dumb, the LEDs would not have cost much and not have added much to my already substantial routing headache for this board.
107 notes
·
View notes
Text
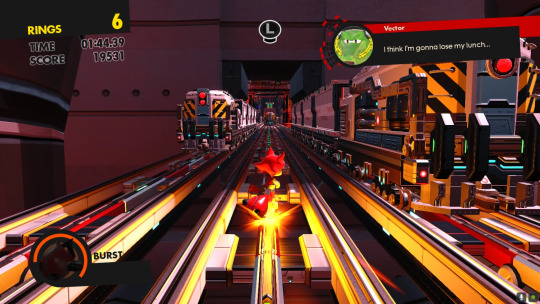
Mod Spotlight: Sonic Forces Overclocked
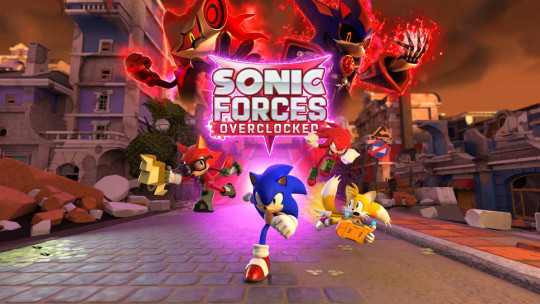
So this is an interesting little thing. For those of you not aware, Sonic Forces Overclocked (if I'm remembering right) was originally an attempt to "fix" Sonic Forces by expanding all of the levels and even completely rewriting the story. Obviously that's a big task, and the developers eventually realized that, scaling it down into what could best be described as an "Encore" of sorts -- an epilogue story where the villains make one last desperate final push, spread out across remixed versions of eight of the game's best levels. All told, it's about an hour worth of content.
Which is... actually totally fine. With eight (technically seven, but the final boss still counts) levels, there's plenty to see. Actually, pacing is probably Overclocked's strongest suit.

The original Sonic Forces was a pacing disaster; levels often felt like they were cut off at the knees, usually ending just as they were getting started. That's never true in Overclocked, as each level took me a good 3-5+ minutes to finish. Levels in Overclocked are also massively improved in other ways, too -- all that extra length is put to good use with Sonic's trademark alternate pathways, new enemies, and new interactive elements. Interactivity is up across the board. Sonic Forces loved to lock you into long, obnoxious scripted set pieces but Overclocked keeps you firmly in control most of the time.
Which brings me to something I'm not entirely sure is a complaint: difficulty balance. If you've been reading this blog long enough you know I can be pretty picky about difficulty balancing, and the way its handled in Overclocked is interesting.
Generally speaking, Overclocked treats the boost like "expert mode." It's there for people who know the levels already and want to push themselves to do it faster. At first it's fine -- boosting means you'll miss some alternate paths (shortcuts, most likely) but you can still bumble your way to the end of the level and coast by on C ranks. The further you get into the game, though, the more it starts to punish you for trying to go fast without knowing what you're doing. The safety nets that would catch you in earlier levels go away and Overclocked tells you to either slow down or get serious.
Which... I think I'm fine with? The thing it brings to mind for me is the two Sonic Rush games. My favorite one is Sonic Rush Adventure, because it's more accessible (read: easier to learn) than the first Sonic Rush. At the same time, the first Sonic Rush ends up being the more replayable of the two games, because it's a lot harder to master. The higher skill ceiling has kept me coming back to Sonic Rush long after it felt like I wrung all of the gameplay out of Sonic Rush Adventure.
So the idea of a Sonic game not only facilitating a higher skill ceiling but maybe even encouraging that? Not the worst way to balance things, as long as you keep the less skilled players in mind and communicate things correctly. Which, at least for me, I feel like Overclocked does. It started to kick my butt at certain points, but never in a way that felt too mean or unfair. And that's exactly the way it should be, though it should be noted I haven't exactly put myself through the hell of trying to go for higher ranks.
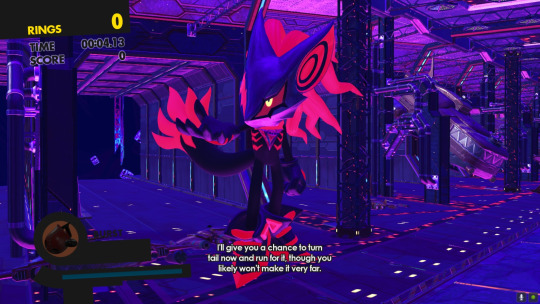
The one real complaint I have about the levels is something I've been observing for years, and unfortunately my fears came true: the lighting.
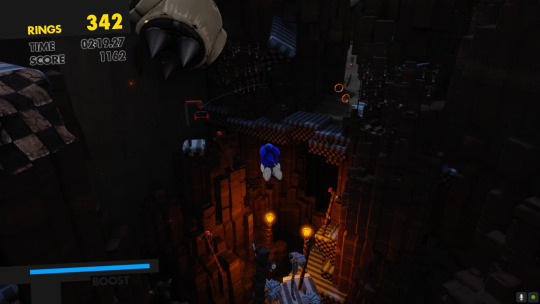
I've talked about my monitor in the past. I bought it somewhere between 2011 and 2012, so it's getting up there in years. I believe it was the first thing I ever purchased with my Youtube Earnings. It's starting to get kind of dim in its old age, and it's exacerbated by the fact I like to keep it on its "Theater Mode" setting, which gives me really good black levels (for an LCD) and amazing color. But it's an aging monitor, so those amazing black levels end up feeling a little dark, depending on the game. For those of you who caught my halloween streams this year, you know I ended up switching my monitor to its "Standard Mode" because it flattens the contrast and makes the darkest darks more visible. It could be argued that I should just leave the monitor in "Standard Mode" at this point, but I can't stand how Windows looks with it turned on.
To cut to the chase, I had to turn on "Standard Mode" for Sonic Forces Overclocked. In keeping with the theme of this being an encore, a lot of levels have wildly new lighting applied to them, with many levels set later in the evening or at night.
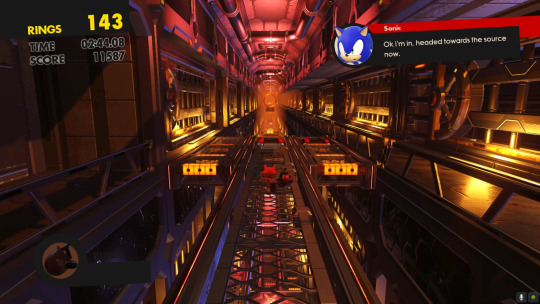
This blankets a lot of levels in a single color and lots of high-contrast shadows, which makes character, enemy, and hazard visibility incredibly difficult. In some levels with a lot of high-frequency noise (like Chemical Plant) it can be difficult to tell where your character even is on screen sometimes. In other levels, like the revamped Mystic Forest, the blue-on-purple-on-teal color scheme makes for a readability nightmare (as does the Death Egg Core level with Buddy, with a red character navigating a level full of orange fog, lit by pink and yellow lights).
When you're running through these stages at a couple hundred miles per hour, it all blurs together into something that's sometimes either too dark or too muddy to parse. At one point Sonic jokes that Infinite's aesthetic is "monochrome colors" but I'd rather have the levels be readable at a glance than hanging a lampshade on it. Things just need to be a little brighter, with a little more diversity of color to highlight the edges of roads and incoming hazards.

The story is... fine. It's not incredibly deep, and it doesn't need to be, so it works well enough. There's actually a surprising amount here, though, from mid-level chatter, map screen debriefings, and even full on cutscenes. Voice acting duties seem to be handled by Adrenaline Dubs, who I subscribed to last year for their surprisingly good dubs of Archie and IDW Sonic comics. They turn in some pretty high quality work here, often rivaling Sega's official dubbing efforts. My only real complaint is that Sonic's dialog is a little too referential; his call-outs during levels often reference other infamous lines from different Sonic games ("The whole city's on fire!", etc.), and sort of like how the game pokes fun at the monochromatic lighting, there's a line where Sonic even cringes at his own dialog a little bit. "We're admitting it's bad, but still doing it anyway" is not a healthy design ethos.
Earlier I mentioned cutscenes, and rather than the complex, high-budget cutscenes Sega had in the original Forces, Overclocked instead opts for motion comic videos. Artistic duties for these cutscenes are shared between a handful of 4 or 5 different artists, each bringing their own art style to their scenes. Generally, I think this is a good move. A little more consistency between artists would make it feel a bit more polished, but seeing the art style change between scenes has its own charms, too. It really drives home how much of Sonic Forces Overclocked was not only a team effort, but to some degree, a community effort. Many different hands touched this project, and it is better for it.

It's easy to focus on the negative things I said about Sonic Forces Overclocked here and think I came away not really liking it. Nothing could be further from the truth. I think this is a genuinely impressive mod, with significantly better level design than the base game. It has a few problems, sure, but the overall product, when taken as a whole, is absolutely wonderful. This might be a bit incendiary and hyperbolic, but this close to the top of the list as the most fun I've had with a Sonic game this year. If you own Sonic Forces on Steam, it's not to be missed.
Download: https://gamebanana.com/mods/485051
45 notes
·
View notes
Text
A Practical Guide to Customizing TFT LCD Displays for Embedded Projects
When designing an embedded system, picking the right display module is more than a technical choice — it directly shapes how users interact with your product.
From medical devices and HMIs to industrial controllers and smart panels, standard TFT LCD modules may not always be enough. That’s where custom displays come in — offering flexibility in electrical interface, mechanical layout, and visual performance.
This guide covers the five key areas you should consider when customizing a TFT LCD for your embedded project.
1. FPC Layout and Pin Mapping
The Flexible Printed Circuit (FPC) connects your LCD module to the mainboard, and in custom designs, this interface is often the first thing to change.
Ask yourself:
Do you need a uniquely shaped or angled FPC to fit inside your housing?
Are there ICs, resistors, or other components on the backlight or CTP that require mechanical clearance?
Is your SBC’s connector pinout compatible with the LCD’s FPC layout?
A mismatch here can lead to signal errors, mechanical stress, or even damage to components.
2. Backlight Brightness and Color Temperature
Not all embedded devices live under the same lighting.
If your product is used outdoors or in industrial lighting, consider high-brightness backlights (≥800 nits). For environments where aesthetics and color warmth matter (like smart mirrors or indoor kiosks), choose the right LED color temperature:
3000K (Warm White): Soft, suitable for medical or ambient lighting
5000K (Neutral White): Balanced tone, accurate colors
6500K+ (Cool White): Sharper, more industrial feel
A poorly lit display can make a great device feel underwhelming.
3. Touch Panel Shape and Bonding Options
If your display includes a touch interface, customizing the Capacitive Touch Panel (CTP) is critical.
Typical customizations include:
Round corners, logo cutouts, button holes
Bonding methods:
Optical bonding: Improves visibility, reduces reflections, stronger seal
Air bonding: More affordable and easier to assemble
The bonding method directly impacts touch accuracy, display clarity, and long-term reliability.
4. Surface Treatments: AG, AR, and AF
For devices exposed to bright light or frequent finger contact, display surface treatments make a noticeable difference.
AG (Anti-Glare): Scatters reflected light, improving readability
AR (Anti-Reflection): Enhances contrast in sunlight or strong lighting
AF (Anti-Fingerprint): Reduces smudges, improves touch feel
Combining AG+AF is a common choice for public-facing touchscreen displays.
5. Want to Learn More?
If you’re building with platforms like RK3566, PX30, or Allwinner boards and need a reliable display solution — including driver compatibility and electrical tuning — check out our full technical article:
👉 Read the Full Custom TFT LCD Guide
You can also browse driver/device tree examples on GitHub:
📂 rocktech-tft-display-configs
2 notes
·
View notes
Text

I repaired this sick ass digital clock I got from a thrift store very cheaply a few years ago. It's just a floating LCD panel and I think it looks so frigging amazing. (Really makes me think of that cool Dutch YouTuber, Posy, and his love of LCD panels. (And I'm like "hell yeah!! There's so much beauty in the mundane!!! Just look how frigging cool this clock is!!"))
Anyhoo, it wasn't working when I got it. Probably why it was so cheap.
It has a little on/off switch on the back, but nothing would happen when you flipped it, but sometimes if you held its solar panel under a very bright light the clock would turn on
...for one second
before turning off again
and then back on again.
Very rhythmically.
So there was still some life left in the old girl... somewhere... 🤔
Unscrew the back of it and have a look see.
Discover a pair of circuit boards, one of which has a cr2032 coin cell clamped onto it. Hooray, a Vital Clue!
Fortunately, I have one of those batteries lying around. A second spare from when I replaced the batteries in some Digimon v-pets.
So I replace it.
Aaaaand nothing happens...
:(
Next step: fully disassemble the clock to look for More Clues.
Discover that its LCD panel isn't wired in to anything. There's just a row of teeny tiny contacts along its base which press up against a matching row of teeny tiny contacts along its control board, held together by the frame of the clock and a kind of thin pink foam buffer ring around the contacts. Very cool!
(Like two mouths kissing but only one of them has any lips. 😆)
Examine the two circuit boards under a loup. Maybe there's a visibly-broken component!
(I hope there's a visibly-broken component, else I have to dig out my multimeter and start systematically testing them one by one)
(I hope there aren't any visibly-broken components. If it's the quartz crystal or one of the two capacitors, then I might be able to replace it, because those are regular-sized, through-hole, components; but if it's one of the surface-mount resistors then I'd have to scrap the whole clock, because I just don't have the tools, experience, or know-how to deal with those microscopic little guys... :/ )
There aren't any visibly-broken components. Phew, but also consternation, because now what?
But hmm, there are some teeeeny tiny white flecks of crusty residue here and there over the circuit boards... I guess the old battery must have leaked at some point?
I gently scrape them off with the tip of a very fine pair of tweezers and then reassemble the clock enough to test it.
(LCD panel & solar panel back into front-frame, control board back over them to hold them into place and make contact with the LCD; everything else [coin-cell daughterboard, piezo buzzer, and the user-input buttons] dangling free in the breeze Winnie-The-Pooh-style)
It turns on! It chirps out a happy little song of high-pitched beeps!! It blinks "12:00" at me!!!

I fully reassemble the clock with a song in my heart and set its time and date.
Goddamn this clock looks so cool. 🥰
7 notes
·
View notes
Text
DIY: Marauder with Screen and GPS For Flipper Zero
Many of you would have seen the humongous ESP32 add-on module with touch screen and GPS for Flipper Zero shared in discussion groups, forums, etc. Well, this tutorial will provide you with all the information you need to build one yourself.
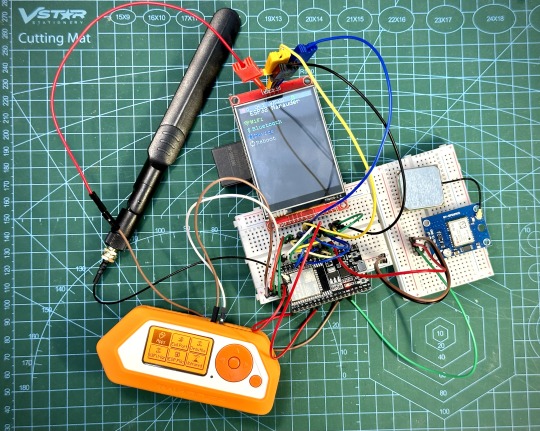
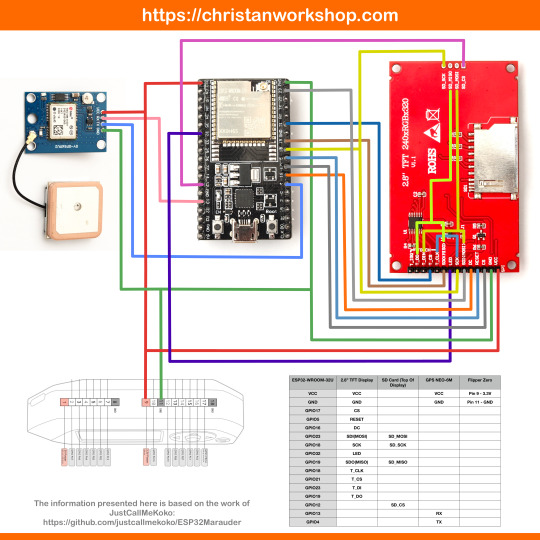
This build consists of mainly 4 parts. The TFT LCD 2.8" 240x320 SPI ILI9341 Touch Display cost me around US$5.50, the ESP32-WROOM-32U module cost around US$3, the NEO-6M GPS module cost around US$2.20 and an 8dbi 2.4GHz Wifi Antenna which cost around US$2. All of these parts can be easily found in online marketplaces like Aliexpress, Amazon, etc. Here is how you need to wire them up together. How you wish to lay this out or mount on a prototyping board is entirely up to you. As long as the connections are correct, you are good to go. The GPS module is optional, and mainly, it's used for the war driving functionality.
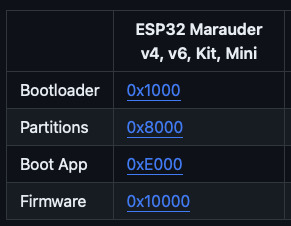
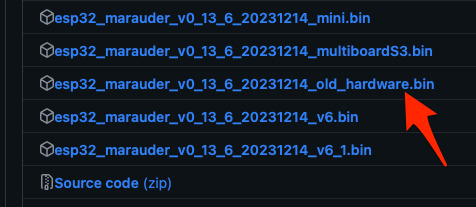
Next, you need to download all the firmware needed from here. Please download the Bootloader, Partitions, Boot App and Firmware files for v4 (Yes, v4 files, not any others) and save it on your computer.
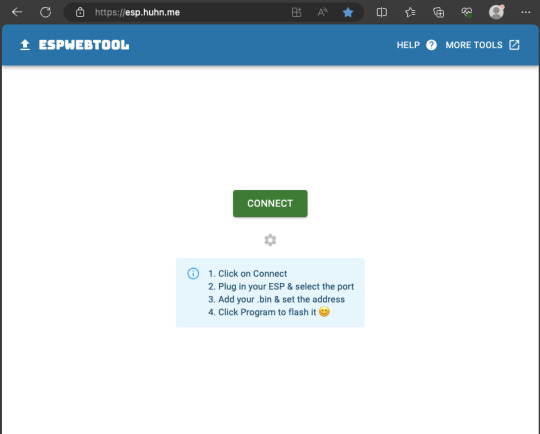
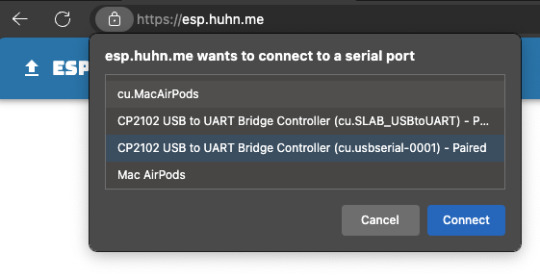
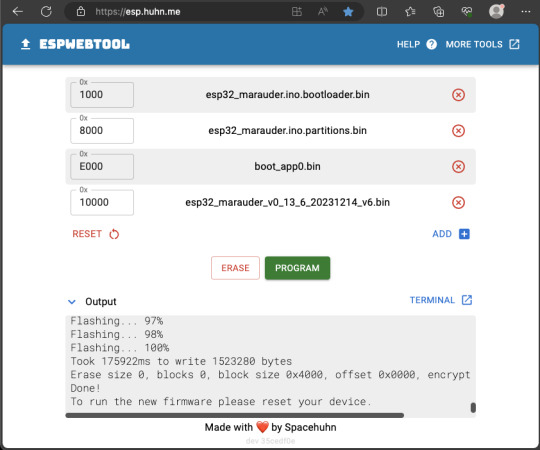
Now, press and hold the BOOT button on your ESP32-WROOM-32U module and connect it to your computer using a data-capable USB cable (some USB cables can only charge), then let go the BOOT button. Open Google Chrome or Microsoft Edge browser and go to ESPWebTool. Click the CONNECT button, then select the ESP32 usb serial connection. It should look something like below but can vary a little between different computers and operating systems.
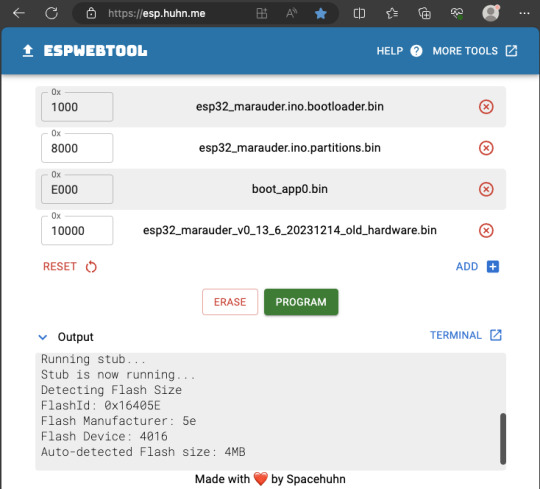
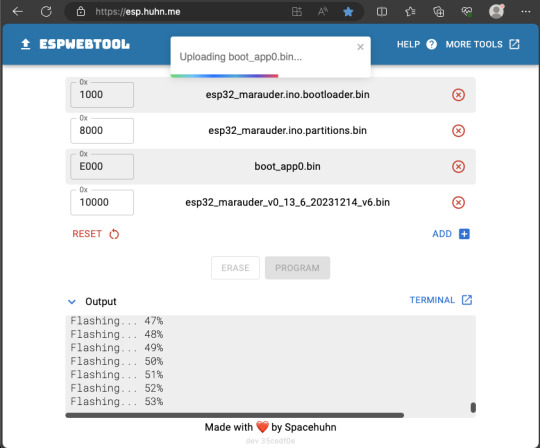
Select the firmware files for each slot exactly like below (take note of the 0x1000, 0x8000, etc. and their corresponding .bin files), then hit the PROGRAM button.
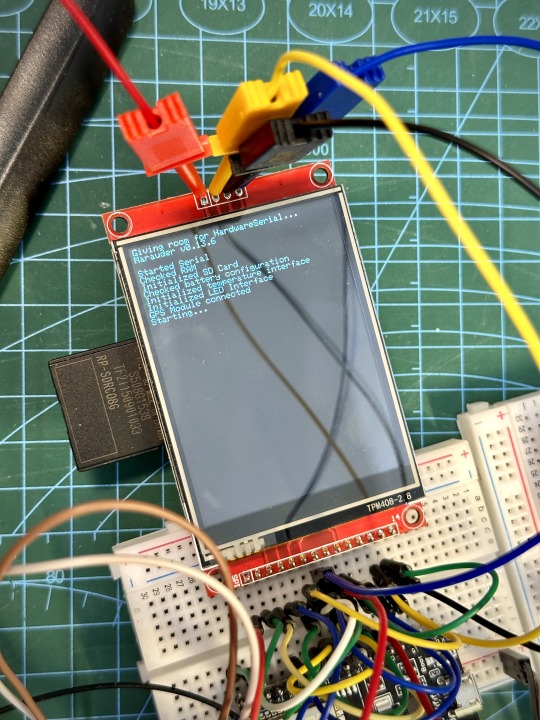
When completed successfully, you can unplug the USB cable from the ESP32 module and now you can connect your Marauder module to your Flipper Zero. Please ensure that your Flipper Zero is turned off before you connect it, and also turn off your Flipper Zero before disconnecting it. The 3.3V pin is also used by your Flipper Zero's SD card reader and connecting/disconnecting external modules that use this pin while the Flipper Zero is on can potentially corrupt the SD card. So, if everything went according to plan, your Marauder module should boot up and everything should look like below.
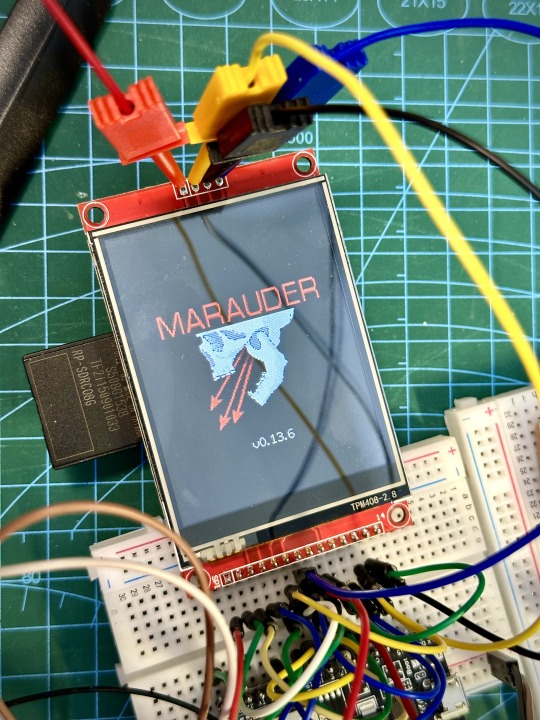
NOTE: If your Marauder boots up, but when you try to touch the screen and get no response, try tapping around the bottom part of your screen and see if the touch panel seems to be in inverted position from the actual display. Should this happen to you, just flash your ESP32 module again following the steps above, but use the v6 firmware. This should resolve the issue.
In this build, I just prototyped this on breadboard, but you can of course make it permanent by soldering it on to a prototype board and 3D print a case for it. This setup is essentially just using the Flipper Zero as a battery pack, instead of using the Flipper Zero to control Marauder. The large screen does make some things easier to do, compared to the small screen of the Flipper Zero, and there may be some functionality (not much) that is not currently in the Flipper Zero Marauder companion app. Here is a video showing the different menus in Marauder.
Personally, I don't think I will actually want to bring something so big around with me, along with my Flipper Zero. I think what makes Flipper Zero special is just how compact it is and all the different functionality cramped into it. This would probably be better off as a standalone unit by just hooking up a battery, but that's just me. Well, that's it for this tutorial. I hope you found this helpful.
Here's a good intro to Marauder if you are unfamiliar.
youtube
18 notes
·
View notes
Text

Modernized A-50U AWACS aircraft is delivered to the Russian Air Force
Fernando Valduga By Fernando Valduga 09/22/2023 - 16:00in Military
The United Aircraft Corporation (UAC) delivered to the Russian Air Forces a modernized aircraft of the A-50U Airborne Alert and Control System (AWACS) that will help in the detection of aircraft and missiles launched from Ukraine.
On July 3, 2023, Russian Defense Minister Sergei Shoigu, in a conference call with officers of the Russian Armed Forces, highlighted the need for a rapid modernization of the A-50.
According to the government-controlled RIA Novosti, Shoigu said: “These flying radars are used in special military operations. The timely modernization of the fleet of these aviation complexes will significantly increase the effectiveness of troop groupings in solving the tasks they face."
The upgraded A-50U has undergone a comprehensive modernization, significantly improving its capabilities. This advanced version has the ability to detect and identify new types of aircraft, while tracking a greater number of targets, including hostile fighters, compared to its predecessor. The integration of state-of-the-art equipment resulted in the reduction of the aircraft's weight, thus expanding its flight range and mission durability.

The renewed aircraft features all-new electronic components with improved performance and speed, allowing improved functionality in its software. In addition, the use of larger and higher resolution LCD monitors has greatly improved the efficiency of the radar display system, improving the overall ergonomics of the aircraft to reduce crew fatigue. Notably, the A-50U is now equipped with an advanced flight and navigation system.
Rostec emphasized the vital role of the A-50U long-range surveillance and radar guidance complex in modern combat scenarios. Through this modernization effort, the aircraft received new technical equipment that significantly increases its speed and detection range of air, land and sea targets, thus increasing its effectiveness in combating potential threats. This modernization initiative is aligned with the plan of the state defense order to upgrade the AWACS aircraft fleet.
Concern Vega, operating under Ruselectronics, played a key role in the modernization process, while United Aircraft Corporation's TANTK also contributed to the effort.
Vyacheslav Mikheev, general designer of Concern Vega, said there are plans underway to complete the modernization of another A-50 complex in the near future.
Tags: Military AviationAWACSBeriev A-50UROSTECRussia
Sharing
tweet
Fernando Valduga
Fernando Valduga
Aviation photographer and pilot since 1992, he has participated in several events and air operations, such as Cruzex, AirVenture, Daytona Airshow and FIDAE. He has work published in specialized aviation magazines in Brazil and abroad. Uses Canon equipment during his photographic work throughout the world of aviation.
Related news
The U.S. Army announced the delivery of the first two AH-64E Version 6 Apache Guardian attack helicopters, but only provided photos of the two previous AH-64D they replaced, being prepared for a flight back to the United States. (Photo: U.S. Army)
HELICOPTERS
U.S. Army Aviation Unit in Europe receives new Apache helicopters
22/09/2023 - 14:00
MILITARY
Germany acquires 13 state-of-the-art LUNA drones and new radar for Eurofighters
09/22/2023 - 11:00
MILITARY
VIDEOS AND IMAGES: F-35A fighters operate from a highway for the first time
22/09/2023 - 09:00
MILITARY
French Air Force closest to retiring its C-135FR tankers after receiving the 12º A330 MRTT
09/22/2023 - 08:27
MILITARY
AUDIO: USMC F-35B fighter flew for more than 100 kilometers, without the pilot on board, before falling
21/09/2023 - 23:25
MILITARY
Boeing negotiates sale of more P-8I Poseidon maritime patrol planes to India
21/09/2023 - 18:24
7 notes
·
View notes
Text
The Fire Alchemist
Hagane wo tsugu mono: Garo is back, along with Dougai Ryuga, this with season is I believe the character, beside Zaruba, with the most appearances, if he wasn't already. It's been over 5 years since his last appearance, and 10 years since his debut but the man who restored Garo's shine is here again. So HAGANE, despite its status as the generic armour worn by nameless Makai Knughts has appeared all of twice in the franchise, once in the Makai Senki finale, where we saw legions, and one in Honoo no Kokuin, used briefly by Marcelo, and been depicted a little in side media, Raiga is seen donning one in PGARO Saeijima Kouga, and I believe Akatsuki is implied to have acquired one in Yoseki no Wana. Nameless Knights have frequently appeared, but until now one has not been a main character. PS: Official Subs on youtube.
A Horror using LCD advert boards as a gate is interrupted in hunting by Ryuga and Zaruba (back to the classic design it seems), after a fight it tries to flee to the gate, but Ryuga destroys it, forcing the Horror, Chaurus to fight, he destroys it by summoning his armour, for he is Ougon Kishi GARO Sho. On his way out he is approached by Makai Priest Koyori, who delivers Orders from Mutsugi, her Priest superior, requesting his help, as the Gate of Destruction is opening, she wants him to accompany her to CREACITY. A Gate of Destruction is apparently a particularly ancient gate, able to increase people's Ingatestone so they fall, they know it is opening as Horrors have been appearing more and more, from people who shouldn't have been at risk, Zaruba agrees there is a darkness in the air. The city is lively, and while Koyori confirms they have a Makai Knight in town, she doesn't discuss him further, instead sharing how she wants to protect her home. A construction foreman is hung out to dry by his boss after their attempt to skirt regulations was discovered, and in that moment of despair and rage is seduced by a Horror, murdering the boss and a henchman with a hammer, the last man flees. Ryuga and Zaruba sense the Horror and rush into action to Koyori's amazement. Ryuga interrupts as the Horror has the man cornered, fighting the Hammer wielding form of Regrege while trying to protect the man, he is saved by Koyori arriving, though her hand-to-hand strike doesn't achieve what she hoped, she still helps Ryuga keep the Horror off balance until it flees then takes care of the man as Ryuga chases. Ryuga's chase is interrupted by a Makai Knight in Hagane Armour, who manages to destroy the Hammer then cut down the Horror. The Makai Knight is annoyed to see Ryuga in his territory, even when Koyori turns up, leaving while snapping not to get in his way. Koyori explains he is Shirahane Souma, Makai Knight for CREACITY.
Blazar: The 3rd Wave Kaiju, observed by cameras on the dark side of the moon, has been dubbed Vallaron, and is placing organic bombs with the aim of causing explosions large enough to disrupt the lunar orbit and send it in to earth. On hearing if this development Dobashi burns Emi's father's journal. Haruno has been relieved of duty to make up for SKaRD disobeying orders, and they are now expected to take the rushed to completion Earth Garon Mod.4 to fight Vallaron. Anri and Teruaki will pilot, with Gento and Yasunobu controlling the Mod.3 unit. With 24 hours before they are mission ready, Gento gives everyone 18 hours leave. While the others have moments relating to their focus episodes, Gento tries one last attempt to have Haruno talk, and Emi discussed with Earth-kun how they still don't know what the V99 Kaiju's motive is, leading it to reveal it does know but program blocks prevent it discussing it, but in the name of friendship it gives her an encrypted SD card with the data. After talking with his family, Gento returns to duty while Jun is asleep. Earth Garon deploys, and as it approaches the moon Dobashi intrudes in CCP to watch the mission up close, and Emi starts trying to look at the data in Mopy. Earth Garon is hit by a bomb explosion point blank, knocking out everyone except Gento, including Earth-kun, and he has to strongly request Blazar's help, while Dobashi's men come to stop Emi just as she gains access to the files. Blazar struggles with Varallon until another string of explosions knocks down the immobile Earth Garon and knocks the moon out of orbit, Blazar grabs Earth Garon and leaves it to drift back to earth, then puts massive effort into trying push the moon back. Recognising the exertion is knocking it out, Blazar says a goodbye to Gento and returns him to the cockpit before freezing as well, the moon back in its proper place, but Varallon was blasted free and is now en route to earth. Dobashi orders it be destroyed before making planet fall, but with only Gento conscious aboard an immobile Earth Garon, and Blazar's body drifting near the moon, is there any true hope.
Gotchard: Minato has disappeared and nobody at school remembers him. Greyon tells the Abyssal Sisters that the dolls are only suited to creating Malgam, leaving other stuff to Minato. Renge is basically giving up before the Malgam appears and captures both her and Sabimaru, then snatched Kudoh next to Ichinose, who with Gotchard Daybreak manages to fight it off using JungleJan and RaiDenji. When his counterpart offers him the Gotcha Igniter Ichinose refuses, knowing he should create his own power, he is told he'll have to create it from the treasured item he first created with Alchemy, and lent Daybreak's TimeLord to go back. He finds himself in the Ouroboros Realm 10 years ago, and is shocked to find his younger self there playing with Hopper1 and SteamLiner, and witnesses the Chemies create for him the item, a replica of his father's goggles. While he was warned not to interact with himself, Ichinose accidentally does so and plays while trying to make a plan, TimeLord comes under strain after the interaction. Hopper1 suddenly detects a presence, Greyon and the Abyssal Sisters arriving looking for Kudoh Fuga, they find his book which includes the plans for the key to the door of darkness. SaboNeedle attempts to drive them off, but encased in golf by Greyon. Fuga arrives, Greyon informing him he's already altered the assemblies' memories to believe him a traitor who stole the Chemies. Working in sync with UFO-X, X-Wizard and X Fortress, Fuga incapacitates the sisters and struggles with Fuga, who starts gathering the Chemies in one place, young Hotaro tries to shield his friends, and ours in turn shields both him and the Chemies. The distraction gives Fuga the edge he needs to drive Greyon away. When the dust settles young Hotaro gives the goggles as thanks, and when Ichinose is gone Fuga thanks the boy for his courage, secretly erasing his memories while hoping he keeps the memories if his friends in his heart. Returned to the present, Gotchard Daybreak tells Ichinose that in 5 years Greyon will have nearly wiped out humanity and Chemies alike, as such, to Alchemise his Gotcha Igniter, Ichinose infuses his wish of a world where Chemies and Humans can have peace. When he confronts the Malgam and becomes Fire Gotchard, Gotchard Daybreak notices the form is distinct from the one he created, feeling his counterpart has changed the course of their fate. Fire Gotchard saves everyone and completely defeats the Malgam to save NemineMoon. Gotchard Daybreak, seeing TimeLord cannot keep him there any longer, gives some last encouragement, Ichinose realising his word choice reveals him as his future self too late. Renge and Sabimaru are now motivated to help despite the lack of the Academy, while Minato assures Greyon he will deal with his errant pupil.
Kingohger: While Yanma is forcing Racles to sort gears, he suggests the others kings should try and awaken their sealed royal powers, sealed by the original 6 kings 2000 years ago along as Shugoddom's Ohger Crown was. Yanma starts studying his ear piercing, about the only thing the previous N'Kosopa king left when he abandoned the nation, Himeno's crown, Kaguragi's amulet and Rita's glove chain, and Racles suggests they decide a leader, to Yanma's irritation. Dugded decides it's time to put Tikyu in the collection, sending the Jesters to clear things out. The Kings gather for a competition to decide the leader, despite Gira arguing they don't really need one, Racles acting as judge, but it soon devolves into a full on fight to Gira's horror, and when he asks Yanks for help he just uses the now unlocked power to blast the Shugods and Shugoddom with lightning from God Tonbo, laughing as he declares himself on top. Gira was blasted down to the city, finding the people also fighting, only now realising Hilbill has controlled practically everyone. Kaguragi, immune, distracts her enough for Gira to rush to Yanma as Dugded starts preserving citizens in amber, Gira slugs Yanma and reminds him of his duty of protection, as Hilbill self hypnotises herself into believing herself invincible and grows giant. Now aware and properly able to use his kingly power, Gira and Yanma form King-Ohger and successfully destroy Hilbill. Later, Yanma asks Racles how he felt when he was ruling the world, Racles admitting that despite all his goals he felt on top of the world and drank on power, even revelling in Yanma's seeming death. Realising now he isn't so different from Racles, Yanma goes to everyone to request a resigning to the Six Kingdom Alliance, one establishing everyone as equal and imposing a duty to stop any of the kings if they are endangering the people. Suzume visits Racles in his cell to tell him of this, realising he suggested finding a leader to make them realise this, as he explains the 6 powers were originally one, and the original kings split them in the hopes that they would only be awoken again when their successors united as one in purpose for the good of their people.
#toku explained#ohsama sentai kingohger#ultraman blazar#kamen rider gotchard#garo hagane wo tsugu mono
4 notes
·
View notes
Text
LCD screen daily care tips
Cleaning the screen:
Use a soft, lint-free cloth to gently wipe the screen surface, and avoid using rough materials or corrosive cleaning agents. For stubborn stains, you can use a slightly damp cloth to clean, but make sure to avoid water droplets entering the monitor.
Avoid long-term static display:
If you need to use the monitor for a long time, it is recommended to change the display content regularly or enable the screen saver to avoid image retention caused by long-term static display.
Prevent excessive heat and humidity:
The monitor should be placed in a well-ventilated, suitable and relatively low temperature environment. Avoid exposure to direct sunlight or high humidity, which may cause the monitor to malfunction or damage.
Pay attention to setting the display resolution correctly:
Make sure the resolution of the monitor is set to the best state to obtain the clearest image effect. The wrong resolution setting may cause blurred or distorted images.
Check the connection cable regularly:
Check whether the cable connection is firm to avoid looseness or poor contact. Regularly check the connection between the monitor and the computer or other device to ensure that the signal transmission is normal.
Avoid vibration and impact:
The monitor should be placed on a stable surface and avoid vibration or accidental collision. This helps prevent damage to the internal components of the screen.
Perform maintenance and repairs promptly:
If you find that the monitor is faulty or abnormal, contact a professional repairman for inspection and repair in time. Do not try to repair it yourself to avoid causing greater damage.
Shenzhen Zhiyan Optronics Co., Ltd. (zylcdshop.com) is a reliable China-based distributor specializing in LCD screens. With a strong commitment to quality and customer satisfaction, we deliver premium display solutions and personalized support to meet your specific LCD display needs.

#buy lcd panels#tft panel#truly lcd#lcd screen panel#wholesale lcd#replacement screen#wholesale lcd screen#lcd monitor panel#module lcd#tft lcd display module#7 inch display#lcd replacement panels#lcd panel display#display panel#lcd controller board#touch screen lcd display
0 notes
Text
So for today's random post-work obsession: RC car controllers - specifically, how one might make a more interesting one.
Now the generic RC controller is effectively just a twin-stick layout put in a square box - you have two sticks and trims for each axis. More modern examples often add a display, some configuration options, and maybe a few flip switches or even the odd shoulder button to the mix, but at heart it remains a simple twin-stick layout.

When it comes to controlling ground vehicles, the typical control layout is either using the left stick for forward/back and the right stick for steering left/right; more rarely you might see forward/back and left/right both combined into the left stick if the right stick is instead being used for something else, like maybe act as a manual gear shifter or steering a camera gimbal or the like.
This kind of controller is generally more suitable for flying than for driving however, so most RC cars of today instead tend to use a pistol grip controller design.

With this controller layout, you have more of a steering wheel - often designed to resemble more of an actual driving wheel than a steering wheel - which you control with one hand whilst holding the controller with the other, using the pistol-shaped trigger to control the speed, pushing down to go forwards, pushing forward to brake and/or reverse.
Again there's usually some trim knobs thrown in plus maybe some lever switches or other toggles - higher end models might also have LCD displays and various other settings and so forth, but RC controls are typically very simple.

Comparably, things look somewhat different when you look at modern racing games - the left thumbstick is now generally your steering input, while acceleration and braking/reverse are often split up between the left and right shoulder triggers. The right thumbstick meanwhile tends to serve as camera controls, while there's usually also some functions concocted for the buttons and possibly even the D-pad to do.
So basically I'm thinking of what if you took the game controller and ran with that basic layout, but then replaced the main circuit board to fit in a microcontroller and a 2.4GHz transmitter - if you build out of a wireless controller there should already be dedicated space for batteries even. Big question is whether you could somehow increase the steering throw, and basically what to do with the entire rest of the controller.
Honestly part of me is kind of thinking what if you put some kind of key ignition module in there just for the tactile feeling of turning the thing on, lmao
5 notes
·
View notes
Text
Versatility and Robustness: Industrial Panel PCs from 7 to 32 Inches

Industrial Panel PCs are integral to modern manufacturing and industrial environments, offering robust and versatile computing solutions. Available in sizes ranging from compact 7-inch models to expansive 32-inch displays, these devices cater to diverse applications, providing reliability and performance in the most demanding settings.
The smaller 7-inch to 10-inch Industrial Panel PCs are ideal for space-constrained environments where portability and ease of installation are paramount. These compact units are often used for machine control interfaces, data collection, and monitoring systems. Despite their small size, they offer powerful processing capabilities and high-resolution touchscreens, ensuring precise and responsive interaction.
Medium-sized Industrial Panel PCs, ranging from 12 to 19 inches, are perfect for more intensive tasks requiring a balance between screen real estate and device footprint. These models are commonly found in applications such as Human-Machine Interfaces (HMIs), supervisory control and data acquisition (SCADA) systems, and process control. Their larger displays facilitate better visualization of complex data and enhance user interaction, making them indispensable in control rooms and industrial workstations.
The larger 21-inch to 32-inch Industrial Panel PCs are designed for applications demanding extensive screen space, such as factory automation, digital signage, and industrial-grade kiosks. These models provide ample display area for detailed monitoring, multiple data streams, and comprehensive dashboards. Their robust construction ensures durability in harsh environments, including exposure to dust, moisture, and extreme temperatures.
One of the key features of Industrial Panel PCs, regardless of size, is their rugged design. Built to withstand challenging conditions, these PCs are typically equipped with reinforced casings, IP-rated protection against water and dust, and resistance to vibrations and shocks. This durability ensures long-term reliability and minimal downtime, essential for maintaining operational efficiency in industrial settings.
Moreover, Industrial Panel PCs offer extensive connectivity options, including multiple USB ports, serial ports, and Ethernet interfaces, allowing seamless integration with other industrial equipment and networks. This connectivity is crucial for real-time data acquisition, process control, and automation.
In conclusion, Industrial Panel PCs in sizes ranging from 7 to 32 inches provide versatile, robust, and high-performance computing solutions tailored to the needs of various industrial applications. Their durability, connectivity, and scalability make them essential tools for enhancing productivity, efficiency, and control in modern industrial environments. As technology advances, these panel PCs will continue to play a pivotal role in the evolution of industrial automation and smart manufacturing.
#outdoor digital signage totem#gaming monitor#customized lcd controller board#industrial panel pc size from 7inch to 32inch
0 notes
Text
Rotary Encoder - LED Array & Touch LCD for ESP32/Pico/HAT @raspberrypi @EspressifSystems @kickstarter @SBComponentsLtd
Open-Source, Easily glide through menus, adjust settings, and control parameters with unmatched precision

Introducing Rotary Encoder build with 32 RGB LED Array and amazing 1.28" Round Touch LCD and how can we forget GPIO’s breakout to explore its features and also an intuitive user interface and stunning visual effects. Compatible with LVGL (https://lvgl.io/), the most popular free and open-source embedded graphics library, Rotary empowers users to create beautiful and customized UIs for any MCU, MPU, and display type. This compatibility allows for limitless design possibilities and enables users to tailor the user interface of their Rotary to their specific needs.
The best part is Rotary is built for every electronic community from Espressif (ESP) to Raspberry Pi Pico to Raspberry Pi Boards. so whether you are ESP fan, Pico Fan or using Raspberry Pi Board, Rotary build for you. With the Rotary Encoder, you can easily navigate menus, adjust settings, and control parameters with precision. The 32 RGB LED Array adds a vibrant and customizable circular display, allowing you to create captivating visual effects and animations. The 1.28" Round Touch LCD provides a user-friendly interface, enabling seamless interaction and real-time feedback.
youtube
The GPIO breakout expands the capabilities of the device, allowing you to connect additional sensors, actuators, and peripherals. This opens up a world of possibilities for your projects, from home automation and IoT applications to interactive installations and creative displays. Join us today and be among the first to experience the Rotary Encoder Touch LCD. Pledge now and secure your spot in this revolutionary journey. Thank you for your support!
Visit Official Page — https://www.kickstarter.com/projects/arushi/rotary-vibrant-visuals-and-seamless-interaction/
2 notes
·
View notes
Text
Complete Porsche Instrument Cluster Repair: Renew Your Dashboard Like New!
Imagine you’re behind the wheel of your Porsche, feeling the thrill of every rev and every mile... then suddenly, the speedometer needle starts jumping erratically, or your tachometer goes blank. Maybe warning lights flicker on and off, or the entire instrument cluster screen dims unexpectedly. It’s confusing, distracting, and honestly scary, especially in a high-performance machine like a Porsche where precision matters.
Your instrument cluster isn’t just a dashboard decoration; it’s the control center of your car, constantly feeding you real-time information about your speed, engine health, fuel, and safety alerts. When it starts acting up, you lose that vital connection to your car’s performance and safety systems. Ignoring these problems only makes matters worse, often leading to expensive repairs or even putting you at risk on the road.
Why Does Your Porsche Instrument Cluster Matter So Much?
Unlike older cars with simple gauges, Porsche instrument clusters are sophisticated systems combining mechanical components, sensors, LCD screens, circuit boards, and complex software. These high-tech clusters monitor everything from your speed and RPM to tire pressure and brake warnings, all calibrated for peak performance and accuracy.
When your instrument cluster malfunctions, it’s usually a sign of deeper electrical or mechanical issues. It could be due to cracked solder joints, failing LEDs, damaged LCD displays, or software glitches. For example, if your speedometer needle jitters or the backlighting dims, that’s more than just annoying, it can be downright dangerous. Not knowing your true speed or fuel level on a busy highway is a serious safety hazard.
Thinking About Fixing It Yourself? Beware!
While DIY repair videos can look tempting, Porsche instrument clusters are delicate and complex. One wrong step can cause irreversible damage, void warranties, and cost you far more in the long run. These clusters require special tools, expert knowledge, and precise diagnostics to repair properly. Plus, sometimes the real culprit isn’t the cluster but related wiring or ECU issues, which only pros can identify.
Why Professional Repair Is the Best Choice
That’s where specialists like Dashboard Instrument Cluster come in. They focus exclusively on Porsche and other high-end vehicle clusters, combining years of expertise with genuine OEM or premium parts. Their process includes:
Careful diagnostics to pinpoint the exact problem
Replacing faulty components like LEDs, stepper motors, or circuit boards
Reprogramming your cluster to factory specs
Fast turnaround with warranty-backed repairs
Nationwide shipping for Porsche owners across the USA, Canada, and nearby regions
Repairing instead of replacing your cluster saves you hundreds, sometimes thousands of dollars, and brings back that flawless Porsche driving experience.
👉 Read the Full Blog Here
#PorscheInstrumentCluster#dashboardinstrumentcluster#custominstrumentcluster#instrumentcluster#PorscheDashboardRepair#LuxuryCarRepair#DigitalDashboardRepair#InstrumentClusterRepair
1 note
·
View note