#lcd display for inverter
Explore tagged Tumblr posts
Visit Tumblr Blog
Explore Tumblr blogs with no restrictions, modern design and the best experience.
Last Seen Tumblr Blogs


Fun Fact
Post activity is at the highest at 4:00 pm EDT; notes peak at 10:00 pm EDT.
Text
Why Are Industrial LCD Screens More Expensive?
Industrial LCD screens are a type of screen display specifically designed for demanding industrial environments. Unlike conventional lcd display screens found in consumer electronics, these lcd display modules are engineered to meet higher performance standards.
1. Why Are Industrial LCD Screens More Expensive?
LCD display panels are commonly used across various electronic devices. Typically, displays are divided into industrial lcd panels and civilian-grade panels. Industrial versions—such as tft lcd modules, lcd modules tft, and touch lcd screens—are generally priced higher. Many wonder why. As a trusted lcd supplier, we break it down for you.
What drives the higher cost of industrial tft lcd screens is their superior design and enhanced features:
Key Differences
1. Brightness Civilian lcd display screens typically operate indoors with brightness levels around 250–300cd/m², which is sufficient for normal use. However, industrial tft displays—like lcd display 7 inch or larger panel lcds—must function in outdoor or high-light environments, requiring significantly higher brightness. This makes industrial screen lcd displays far more advanced.
2. Reliability Industrial lcd display modules are essential for applications in automation, military, and medical equipment. They are often built to be shockproof and can operate in extreme temperatures from -30°C to 80°C. These replacement lcd screens offer greater durability and consistent performance, even in harsh environments.
3. Service Life The lcd module backlights in industrial panels can last over 50,000 hours, compared to about 30,000 in standard display lcd units. Some replacement screens can even last 70,000 to 100,000 hours, allowing the lcd panels to operate 24/7 without failure. These panel displays and screen modules are designed for long-term industrial use.
Applications & Use Cases
From 7 inch displays to custom tft lcd panels, industrial display modules are found in sectors requiring long-lasting, high-resolution touch lcd displays. Whether for screen displays in factories or lcd screens replacement in medical monitors, these products deliver consistent performance.
Conclusion
Industrial lcd display panels are more expensive than consumer-grade displays due to their high brightness, extended lifespan, and rugged reliability. Whether you’re sourcing a tft screen, lcd display screen, or lcd screens replacement, investing in a high-quality panel lcd means investing in stability and performance.
Need help finding the right tft lcd module or replacement lcd screen? Contact us—your reliable lcd supplier for all types of panel displays and screen lcd display needs.
Shenzhen Zhiyan Optronics Co., Ltd. (zylcdshop.com) is a reliable China-based supplier with 18+ years of experience in high-performance LCD screens, offering quality products, customized solutions, and competitive factory-direct prices.

#40 inch lcd screen#replacement screen#50 inch display#lcd display for inverter#small screen display#tn lcd display#lcd 30 pin#8 inch lcd display#liquid crystal display#resistive touch#lt104ac54000#3.5 inch screen#40 pin lcd display#touch screen glass#10 inch lcd display#monitor display panel#lcd replacement panels#lcd screen panel#lcd monitor panel#led screen replacement#20 inch display#monitor panel#lcd 7#automotive lcd display#small display screen#24 inch lcd#projector module#22 inch lcd panel#lcd 8 inch#display driver board
0 notes
Text
How to Maximize the Use of Your Car Inverter with EASUN POWER
Hello everyone! I'm excited to share some insights on how to make the most of your car inverter, especially if you’re using EASUN POWER products.
Car inverters are amazing devices that allow you to convert DC power from your vehicle into AC power, enabling you to charge and run various electronic devices while on the go. To maximize the use of your car inverter, here are some helpful tips:
Choose the Right Inverter: EASUN POWER offers a variety of inverters with different wattage ratings. Make sure to select one that meets your power needs. Whether you need to charge small gadgets or run larger appliances, there's an EASUN inverter that's perfect for you.
Understand Your Power Requirements: Before plugging in devices, it's crucial to know their power consumption. This way, you can avoid overloading your inverter. EASUN POWER inverters are designed with safety features to prevent overload, but it's always best to stay within recommended limits.
Keep Your Inverter Ventilated: Ensure your inverter has enough airflow to prevent overheating. EASUN POWER inverters are built with ventilation in mind, but placing them in a well-ventilated area will enhance performance.
Use Quality Cables: Invest in high-quality cables to connect your devices to the inverter. This helps in reducing power loss and ensures efficient charging.
Regular Maintenance: Keep your inverter clean and check for any signs of wear or damage. EASUN POWER products are designed for durability, but regular checks can help maintain optimal performance.
Utilize Smart Features: Some EASUN POWER inverters come with smart features such as USB ports and LCD displays. Take advantage of these features to monitor power usage and charge devices more efficiently.
By following these tips, you'll not only enhance the performance of your EASUN POWER car inverter but also enjoy the convenience of powering your devices wherever you go. Happy travels!
#EASUN POWER#portable power#charging devices#car inverter#power requirements#ventilation#DC to AC#LCD displays
0 notes
Text
"Hello, you've reached 🏯🎸. Please leave a message after the beep!"

[Bleach TYBW e18]
This is the phone tree Mayuri set up so Kyouraku could call the entire Gotei--or the 30% still online, as Mayuri notes. (Sidenote: Impressive! Even Zoom Enterprise only allows for 500 participants, and that assumes nothing's exploded or been inverted into a shadow realm.)
The caller ID node in the center is the character for the 'Kyou' in Kyouraku, which makes sense, but it makes me wonder how they decide who gets what username?
If people have the same name (Kuchiki and Kuchiki and Kuchiki and Kuchiki and Kuchiki) do they just figure, well, we'll assume people can guess which one is most likely to be calling them and leave it at that? Maybe if you stare at it long enough it displays the rest of the name, (but it didn't really seem like it, purely based on how much flashing the other nodes did without the middle one changing. Also: booooring! Not arcane enough!).
Or you could be like Akon and Abarai Renji, and share the same leading 'a' kanji, even though you're not related. How do you distinguish yourselves in the caller ID? It's probably a fairly common problem in the Gotei. I mean, how are you supposed to know whether you're getting a call from YAMAda Hanatarou or YAMAmoto Genryuusai? They probably sound exactly the same on the phone!
NB: I'm pretty sure Akon and Renji don't actually have this problem, because when Byakuya set up Renji's phone privileges he entered him in as "Renji," because calling your new vice captain by his given name is a very normal thing to do, why would he have typed in anything else.
If these phones have color displays, they could color code the caller IDs and reduce some ambiguity that way (provided people actually remember division colors, though given that cross-division communication probably isn't that common under normal circumstances, perhaps this solves nothing)
This doesn't solve the 6th's Kuchiki problem, regardless
Maybe they do it like train schedules, where like, Haneda Airport (羽田空港) gets abbreviated to 羽空, the first two kanji of each word. Like, for Byakuya and Rukia, maybe they shove two characters into the circle, with a big one for KUCHI and then a small one for 'Byaku' or 'Ru' Maybe they use the furigana setting to type the second one in lol.
Either way, unless you're very good with names, the caller ID might leave something to be desired in the Gotei. Rich potential for hijinks. Not knowing who's calling until you pick up the phone? Please. Unheard of. Unacceptable. Perhaps this is why Hell Butterfly culture and "some guy from the Onmitsukidou" culture remain such strong presences in the Gotei information network! Passenger pigeon or LCD flip phone, THERE IS NO MIDDLE GROUND
There's probably a campaign to introduce emojis into the called ID library to give people some additional ID options. Kyouraku is vaguely considering it as a fundraising opportunity, like a vanity plate.
Anyway, no, it doesn't matter; I just find it charming in the way of like, super old school text abbreviations or generally needing to find efficient ways of displaying libraries of unique information. There's only so many pixels!
#someone in the 12th is like “UI design is my passion :3”#and they're having the BEST time with this#shinigamiology#bleach headcanons#no brain just bleach
37 notes
·
View notes
Text
DIY: Marauder with Screen and GPS For Flipper Zero
Many of you would have seen the humongous ESP32 add-on module with touch screen and GPS for Flipper Zero shared in discussion groups, forums, etc. Well, this tutorial will provide you with all the information you need to build one yourself.
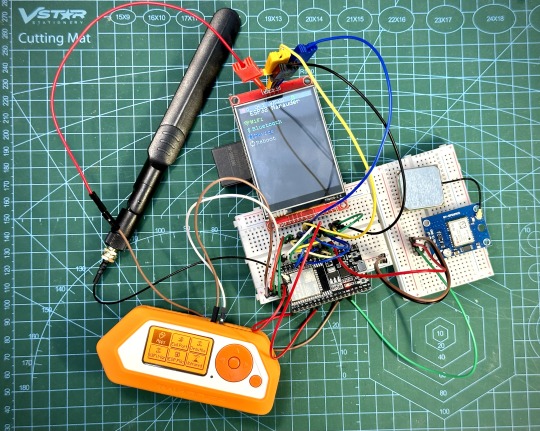
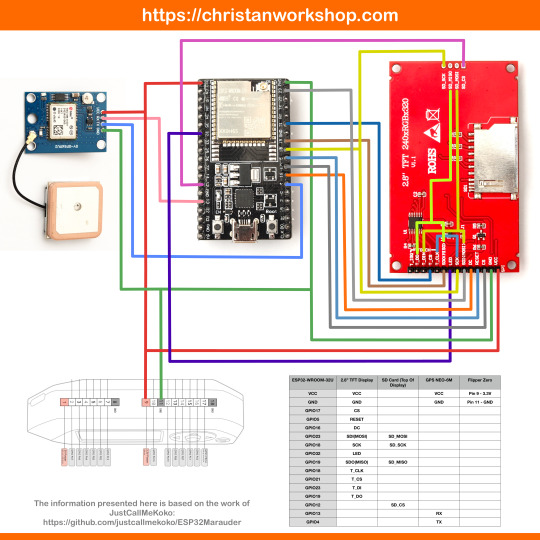
This build consists of mainly 4 parts. The TFT LCD 2.8" 240x320 SPI ILI9341 Touch Display cost me around US$5.50, the ESP32-WROOM-32U module cost around US$3, the NEO-6M GPS module cost around US$2.20 and an 8dbi 2.4GHz Wifi Antenna which cost around US$2. All of these parts can be easily found in online marketplaces like Aliexpress, Amazon, etc. Here is how you need to wire them up together. How you wish to lay this out or mount on a prototyping board is entirely up to you. As long as the connections are correct, you are good to go. The GPS module is optional, and mainly, it's used for the war driving functionality.
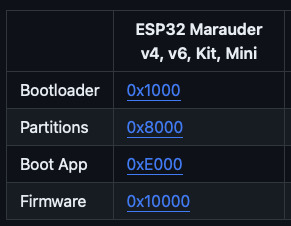
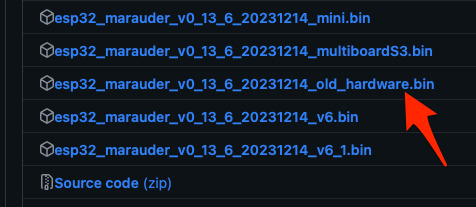
Next, you need to download all the firmware needed from here. Please download the Bootloader, Partitions, Boot App and Firmware files for v4 (Yes, v4 files, not any others) and save it on your computer.
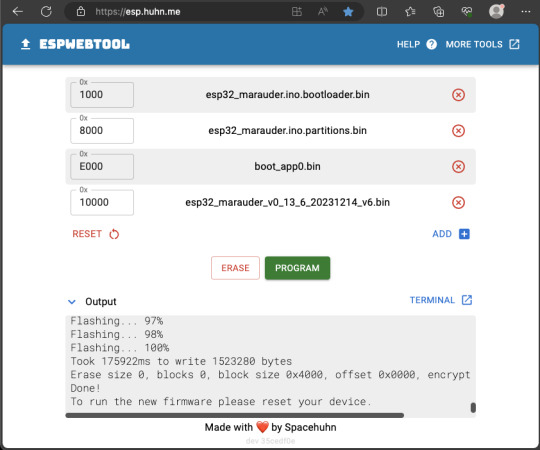
Now, press and hold the BOOT button on your ESP32-WROOM-32U module and connect it to your computer using a data-capable USB cable (some USB cables can only charge), then let go the BOOT button. Open Google Chrome or Microsoft Edge browser and go to ESPWebTool. Click the CONNECT button, then select the ESP32 usb serial connection. It should look something like below but can vary a little between different computers and operating systems.
Select the firmware files for each slot exactly like below (take note of the 0x1000, 0x8000, etc. and their corresponding .bin files), then hit the PROGRAM button.
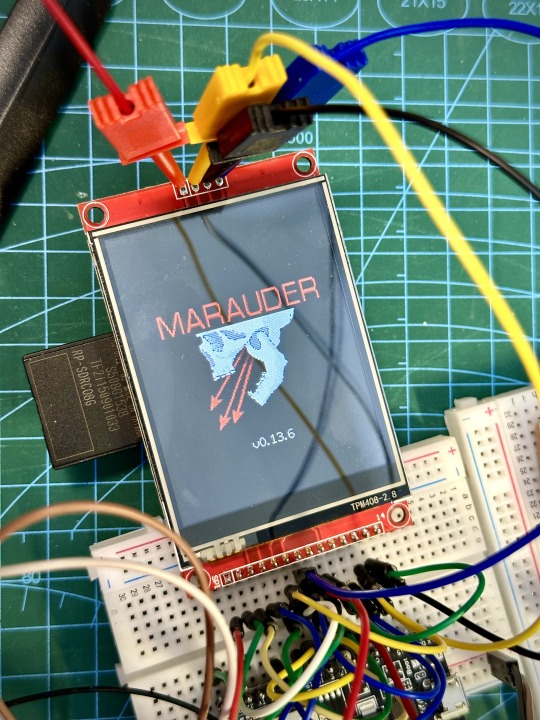
When completed successfully, you can unplug the USB cable from the ESP32 module and now you can connect your Marauder module to your Flipper Zero. Please ensure that your Flipper Zero is turned off before you connect it, and also turn off your Flipper Zero before disconnecting it. The 3.3V pin is also used by your Flipper Zero's SD card reader and connecting/disconnecting external modules that use this pin while the Flipper Zero is on can potentially corrupt the SD card. So, if everything went according to plan, your Marauder module should boot up and everything should look like below.
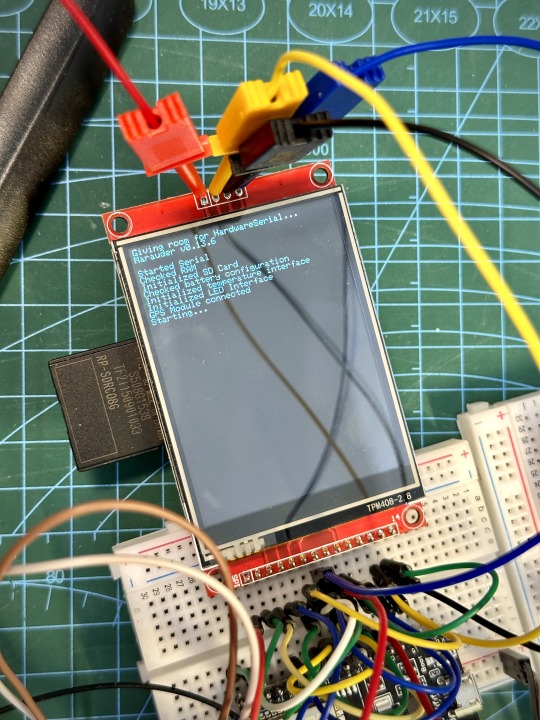
NOTE: If your Marauder boots up, but when you try to touch the screen and get no response, try tapping around the bottom part of your screen and see if the touch panel seems to be in inverted position from the actual display. Should this happen to you, just flash your ESP32 module again following the steps above, but use the v6 firmware. This should resolve the issue.
In this build, I just prototyped this on breadboard, but you can of course make it permanent by soldering it on to a prototype board and 3D print a case for it. This setup is essentially just using the Flipper Zero as a battery pack, instead of using the Flipper Zero to control Marauder. The large screen does make some things easier to do, compared to the small screen of the Flipper Zero, and there may be some functionality (not much) that is not currently in the Flipper Zero Marauder companion app. Here is a video showing the different menus in Marauder.
Personally, I don't think I will actually want to bring something so big around with me, along with my Flipper Zero. I think what makes Flipper Zero special is just how compact it is and all the different functionality cramped into it. This would probably be better off as a standalone unit by just hooking up a battery, but that's just me. Well, that's it for this tutorial. I hope you found this helpful.
Here's a good intro to Marauder if you are unfamiliar.
youtube
18 notes
·
View notes
Text
Top 10 Projects for BE Electrical Engineering Students
Embarking on a Bachelor of Engineering (BE) in Electrical Engineering opens up a world of innovation and creativity. One of the best ways to apply theoretical knowledge is through practical projects that not only enhance your skills but also boost your resume. Here are the top 10 projects for BE Electrical Engineering students, designed to challenge you and showcase your talents.
1. Smart Home Automation System
Overview: Develop a system that allows users to control home appliances remotely using a smartphone app or voice commands.
Key Components:
Microcontroller (Arduino or Raspberry Pi)
Wi-Fi or Bluetooth module
Sensors (temperature, motion, light)
Learning Outcome: Understand IoT concepts and the integration of hardware and software.
2. Solar Power Generation System
Overview: Create a solar panel system that converts sunlight into electricity, suitable for powering small devices or homes.
Key Components:
Solar panels
Charge controller
Inverter
Battery storage
Learning Outcome: Gain insights into renewable energy sources and energy conversion.
3. Automated Irrigation System
Overview: Design a system that automates the watering of plants based on soil moisture levels.
Key Components:
Soil moisture sensor
Water pump
Microcontroller
Relay module
Learning Outcome: Learn about sensor integration and automation in agriculture.
4. Electric Vehicle Charging Station
Overview: Build a prototype for an electric vehicle (EV) charging station that monitors and controls charging processes.
Key Components:
Power electronics (rectifier, inverter)
Microcontroller
LCD display
Safety features (fuses, circuit breakers)
Learning Outcome: Explore the fundamentals of electric vehicles and charging technologies.
5. Gesture-Controlled Robot
Overview: Develop a robot that can be controlled using hand gestures via sensors or cameras.
Key Components:
Microcontroller (Arduino)
Motors and wheels
Ultrasonic or infrared sensors
Gesture recognition module
Learning Outcome: Understand robotics, programming, and sensor technologies.
6. Power Factor Correction System
Overview: Create a system that improves the power factor in electrical circuits to enhance efficiency.
Key Components:
Capacitors
Microcontroller
Current and voltage sensors
Relay for switching
Learning Outcome: Learn about power quality and its importance in electrical systems.
7. Wireless Power Transmission
Overview: Experiment with transmitting power wirelessly over short distances.
Key Components:
Resonant inductive coupling setup
Power source
Load (LED, small motor)
Learning Outcome: Explore concepts of electromagnetic fields and energy transfer.
8. Voice-Controlled Home Assistant
Overview: Build a home assistant that can respond to voice commands to control devices or provide information.
Key Components:
Microcontroller (Raspberry Pi preferred)
Voice recognition module
Wi-Fi module
Connected devices (lights, speakers)
Learning Outcome: Gain experience in natural language processing and AI integration.
9. Traffic Light Control System Using Microcontroller
Overview: Design a smart traffic light system that optimizes traffic flow based on real-time data.
Key Components:
Microcontroller (Arduino)
LED lights
Sensors (for vehicle detection)
Timer module
Learning Outcome: Understand traffic management systems and embedded programming.
10. Data Acquisition System
Overview: Develop a system that collects and analyzes data from various sensors (temperature, humidity, etc.).
Key Components:
Microcontroller (Arduino or Raspberry Pi)
Multiple sensors
Data logging software
Display (LCD or web interface)
Learning Outcome: Learn about data collection, processing, and analysis.
Conclusion
Engaging in these projects not only enhances your practical skills but also reinforces your theoretical knowledge. Whether you aim to develop sustainable technologies, innovate in robotics, or contribute to smart cities, these projects can serve as stepping stones in your journey as an electrical engineer. Choose a project that aligns with your interests, and don’t hesitate to seek guidance from your professors and peers. Happy engineering!
5 notes
·
View notes
Text
Costa Power Hitachi Power Online UPS Distributors in Mumba has three major components, Charger / Rectifier, Storage Batteries and Power Inverter Incoming alternating current from the utility company enters the charger / rectifier where it is converted to direct current. This direct current charges the and supplies power to the which converts the direct current back to alternating current. Power Online UPS dealers in Mumbai offers the advantage of supplying power to the loads continuously, no matter what happens to the utility power. But the benefits of same go beyond its ability for continuousg. The process of taking alternating current from the utility and converting it to direct current, then back to alternating current, eliminates practically all power disturbances, including transients, noise, and voltage fluctuationsprovides Hitachi Hi-Rel ups systems for IT & Infra UPS – Hitachi itPower Online UPS Manufacturers in India for 10 Input - 10 Output System with IP11 & HS11 Series ranging from 1 kVA to 10 kVA, 30 Input - 10 Output System with HS31 Series ranging from 10 kVA to 20 kVA, 30 Input - 30 Output System with HS33 Series ranging from 10 kVA to 40 kVA and HM33 Series ranging from 60 kVA to 500 kVA. Its itPower Online UPS is eminently suited for application in Banks, Small Networks, Servers, IT Equipment’s, Telecom, V-SAT, ATM, Medical, Small & Medium Data Centres.
Costa Power offer Hitachi i4 industrial UPS suppliers in Mumbai with Hitachi single phase ups system with range available from 10 kVA to 300 kVA. We offer Customized Hitachi i4 Industrial UPS distributors & Hitachi office UPS suppliers in Mumbai also tailored to your needs along with standard products. We serve entire gamut of Industries along with Commercial Establishments like Power, Oil & Gas, Steel & Metal, Cement, Fertilizer, Pharmaceutical, Textile, Chemical, Automotive, Plastic, Packaging, Aluminium, Water, FMCG, Hospital, Airports, Infrastructure Projects, IT, Medical Lab, Minerals, Mining, Paper, Printing, Railway, Sugar, Telecom, Engineering and other Light Industries. We also cater typical applications like supporting DCS, PLC and other Automation Systems; usually a part of Control &Instrumentation Package.
Features :-
Cutting Edge IGBT based Design
Fully Digital Control Logic
Easy Monitoring through LCD Display with Fault Logging Capability
Battery Health Monitoring Feature Available
Interfacing Capability via MODBUS, PROFIBUS, SNMP Communication Protocols Input Circuit Breakers Six Pulse, Full Bridge, Phase Controlled Thyristorised Rectifiers / Charger Programmable Automatic Two Stage Charger compatible with NiCd, Plante, Tubular battery and VRLA Battery Battery Reverses Polarity Protection Battery Earth Leakage Protection Built-in Advanced Battery Management System DSP based Digital Control and Redundant Control Power Supply
#Upsbattery#Upsbatterydealers#Upsbatterydistributor#Upsbatterysuppliers#Upsamc#Upsapc#Microtekinverter#Quatabattery#Luminousups#Emersonups#Onlineups#Digitalups#Offlineups#Bestups#Bestbattery#Servostabilizer#Vertivups#Exidebattery#Luminousinverter#Upsdealers#Upssuppliers#Upsdistributors
0 notes
Text
Industrial UPS for Offset & Digital Printing

Eprompt Enterprise stands out as a pioneer in supplying effective and dependable printing solutions in the fast-paced world of digital printing. One critical factor in their success is their use of superior uninterruptible power supply (UPS) technology. In this blog article, we'll look at the characteristics and benefits of Eprompt Enterprise's UPS systems, emphasizing how they help digital printing processes.
High-Frequency and Double-Conversion Online Technology :
By utilizing high-frequency and double-conversion online technology, Eprompt Enterprise incorporates the most recent innovations in UPS technology. This provides a smooth transition from utility to battery power, ensuring a steady and dependable power source for digital printing equipment. Eprompt Enterprise's UPS systems give uninterrupted, high-quality prints to their clients by avoiding power outages and fluctuations.
Completely Digitized Microprocessor Control :
Eprompt Enterprise's UPS systems have completely digitized microprocessor control, which allows for exact monitoring and control of power settings. This sophisticated control system provides peak performance, efficiency, and dependability. The computer continually monitors input and output voltages, battery state, and other vital factors, enabling fast reaction and modification to ensure stable power output.
Broad Input Voltage Variety :
Eprompt Enterprise's UPS systems are built to work with a broad variety of input voltages. They can manage variable input voltages while still delivering a stable and controlled output voltage even in areas with unreliable power networks. This adaptability provides constant performance while also protecting digital printing equipment from harm caused by voltage fluctuations.
Highly Efficient and High Input Power Factor :
In every digital printing process, efficiency is critical. UPS systems from Eprompt Enterprise have excellent efficiency levels of up to 91%, saving energy usage and operational expenses. The UPS systems optimize power utilization with a high input power factor of 0.99, resulting in greater productivity and less environmental impact.
LCD Display and Smart Monitoring :
The LCDs on Eprompt Enterprise's UPS systems give real-time information on essential parameters like as input/output voltages, battery status, load levels, and system diagnostics. This enables operators to efficiently monitor and troubleshoot the UPS system. The UPS systems also feature clever RS232 connections, allowing for simple interaction with monitoring software and optional SNMP cards for remote monitoring and administration.
Robust Protection and Reliability :
Eprompt Enterprise's UPS systems provide full protection against short circuits, overloads, and voltage surges, protecting digital printing equipment from harm. IGBT technology, which is employed in both the inverter and rectifier stages, guarantees exceptional reliability and long-term performance. Additionally, the UPS systems have EMI/RFI noise filters, which reduce electrical noise interference that might compromise print quality.
Eprompt Enterprise's advanced UPS technology is critical in enabling digital printing processes. Eprompt Enterprise ensures uninterrupted power supply, optimal performance, and reliable operation of their digital printing equipment with features such as high-frequency and double conversion online technology, fully digitized microprocessor control, wide input voltage range, high efficiency, LCD, and robust protection mechanisms. Eprompt Enterprise is a trusted partner for organizations seeking efficient and high-quality printing solutions in today's competitive digital printing market by employing innovative UPS technology.
0 notes
Text
A Comprehensive Guide to Instrument Cluster Repair

Your vehicle's instrument cluster—the dashboard display behind your steering wheel—plays a vital role in delivering essential driving information. From speed and RPM to fuel levels and warning lights, the instrument cluster ensures you're always in tune with your vehicle's performance and safety.
With the evolution of technology, the traditional analog displays have been replaced or supplemented by the Automotive Digital Instrument Cluster. These digital systems offer enhanced features, improved aesthetics, and better integration with vehicle electronics. However, like all electronic components, they are not immune to failure.
In this comprehensive guide, we’ll explore the intricacies of instrument cluster repair, from diagnosing common issues to steps for repair and replacement. Whether you're a DIY enthusiast or seeking guidance before visiting a repair shop, this guide will provide the clarity you need.
What is an Instrument Cluster?
The instrument cluster is the collection of displays behind the steering wheel, traditionally composed of analog gauges that show:
Speed (speedometer)
Engine RPM (tachometer)
Fuel levels
Engine temperature
Odometer and trip meter
Warning indicators (battery, oil, seatbelt, check engine)
In today’s vehicles, particularly newer and luxury models, this area has become highly digitized. Instead of analog dials, you’ll find LCD or LED displays powered by embedded software. These modern systems are referred to as the Automotive Digital Instrument Cluster, offering real-time insights, customization options, and seamless communication with other car systems.
Introduction to the Automotive Digital Instrument Cluster
An automotive digital instrument cluster replaces traditional analog gauges with sleek, high-resolution LCD or LED screens. These cutting-edge interfaces go far beyond just showing your speed or fuel level. They serve as a central hub for driving intelligence, bringing together essential data from various vehicle systems in one streamlined view.
Unlike older dashboards with fixed dials and limited functionality, digital clusters are dynamic and fully programmable. They not only provide basic driving information like speed, RPM, fuel level, and engine temperature, but also support advanced capabilities such as:
Turn-by-turn GPS navigation
Real-time traffic and weather alerts
Driver-assist system feedback
Adaptive cruise control status
Media and phone integration
Live engine diagnostics and maintenance alerts
Heads-up display (HUD) compatibility
In vehicles equipped with a fully digital cockpit, the instrument cluster often works in tandem with the infotainment system and central control unit, delivering a unified driving experience.
Common Problems in Instrument Clusters
Instrument clusters, whether traditional analogue or advanced digital, are essential for providing drivers with real-time feedback about their vehicle's performance and safety status. However, over time or due to electrical faults, they can develop various issues. Below are some of the most common problems seen in both analogue and automotive digital instrument cluster systems, along with brief explanations of their causes.
a. Dead Gauges
Gauges like the speedometer, tachometer, oil pressure, or fuel level indicators may stop responding entirely. This is usually caused by a failed stepper motor (in analogue clusters), damaged internal circuits, or faulty sensor input from the vehicle's ECU. In digital clusters, software bugs or a corrupted display controller can also cause gauges to freeze or disappear.
b. Flickering or Dim Display
This issue is prevalent in automotive digital instrument clusters with LCD or LED screens. A flickering display may point to a failing backlight inverter, degraded ribbon cables, or a fluctuating power supply. Inconsistent brightness or a completely dim screen makes the cluster unreadable and dangerous while driving at night.
c. Malfunctioning Warning Lights
The check engine, ABS, airbag, and battery lights are essential for vehicle diagnostics. These lights may illuminate falsely (when no issue exists) or fail to turn on when a real fault occurs. This could be due to a damaged cluster PCB (printed circuit board), short circuits, or corrupted firmware. In digital systems, it may also stem from software errors or CAN-bus miscommunication.
d. Pixelation or Screen Failure
In digital clusters, screen degradation may show up as missing pixels, horizontal/vertical lines, or full blackouts. This could be caused by water damage, physical impact, or a malfunctioning TFT/LCD controller. Over time, wear and tear can also degrade the screen’s contrast and refresh rate, affecting visual clarity.
e. Data Errors
Incorrect readings—such as a fuel gauge showing full when the tank is empty or a speedometer stuck at zero—can occur due to faulty sensors, damaged wiring, or software bugs in the digital processor. In automotive digital instrument clusters, improper calibration or firmware glitches can lead to frequent data inconsistencies, which not only confuse the driver but may also hinder safety system functions.
f. Power Issues
If the entire cluster doesn’t power on, randomly resets, or experiences intermittent operation, it might be due to blown fuses, shorted circuits, or a faulty power control module. In digital systems, software crashes, battery voltage drops, or grounding issues may also cause the display to reboot unexpectedly, especially during engine cranking or cold starts.
g. Communication Faults
Modern vehicles rely heavily on internal communication networks like CAN (Controller Area Network) or LIN Bus. If there’s a disruption in these networks, the Automotive Digital Instrument Cluster may lose connection to essential data sources such as the engine control unit (ECU) or transmission control unit (TCU). This often results in missing information, ghost warnings, or a completely non-functional dashboard.
Accurate Diagnosis Before Instrument Cluster Repair
Before jumping into the repair process, an accurate diagnosis is required. The automotive digital instrument cluster is a sophisticated component that integrates with various vehicle systems, meaning an issue might originate from the cluster itself—or from external sensors, wiring, or the ECU. Misdiagnosing the problem can lead to unnecessary repairs, higher costs, or recurring faults.
Here’s a step-by-step guide to correctly identifying the root cause of the problem:
Step 1: Visual Inspection
Start with a thorough visual check of the instrument cluster and its immediate surroundings. Remove the cluster housing if necessary and inspect:
Connectors: Look for loose plugs, corroded pins, or damaged locking tabs.
Burnt Components: A burnt smell or visible discoloration may indicate a short circuit on the cluster's PCB.
Cracked Solder Joints: Especially around areas where the cluster experiences vibration.
Moisture or Water Damage: This is a common cause of display issues and pixelation in digital clusters.
If the vehicle has recently undergone dashboard work or an aftermarket device was installed (e.g., stereo, alarm, GPS tracker), ensure no harnesses were tampered with or misrouted.
Step 2: Use a Diagnostic Scanner
Plug in an OBD-II (On-Board Diagnostics) scanner to retrieve fault codes related to the cluster, ECU, or communication lines. Many automotive digital instrument clusters are tied into CAN-bus or LIN-bus systems, and scanning will reveal if the cluster is receiving or transmitting incorrect data.
Look for fault codes such as:
U0155 – Lost Communication With Instrument Panel Cluster
B2601/B2603 – Display circuit failure
U0422 – Invalid Data Received From Body Control Module
Advanced scan tools (e.g., Autel, Launch, Bosch, Snap-On) may also let you run live tests on the cluster's display, gauge response, and warning lights.
Step 3: Electrical Testing
Use a digital multimeter to perform voltage, continuity, and ground checks:
Battery Voltage: Ensure the cluster is receiving the correct voltage from the fuse box. A voltage drop can cause flickering or a complete power-off.
Ground Connection: A poor ground can lead to erratic behavior, dim lights, or failure to boot.
Continuity Tests: Check the wiring harness from the cluster to the ECU and sensors for breaks, corrosion, or shorts.
Backlight Circuit Check: If backlights are dim or flickering, test for stable power supply to the LED driver circuits.
Testing the circuit at different ignition stages (ACC, ON, CRANK) can help determine if a voltage drop or power surge is causing intermittent faults.
Step 4: Observe Symptom Patterns
Pay close attention to when and how the problem manifests. Tracking symptom patterns will help narrow down the cause:
During Ignition: Flickering or rebooting during engine start may indicate weak power delivery or cluster capacitor failure.
After Hitting a Bump: Suggests a loose connector, dry solder joint, or vibration-sensitive failure.
Intermittent Glitches: Points toward failing internal components, memory corruption, or thermal sensitivity.
Only in Cold/Hot Weather: Might indicate temperature-sensitive components, particularly in LCD screens or solder joints.
Specific Driving Modes: If issues only arise in Eco/Sport modes, it could involve software conflicts or CAN-bus messaging faults.
This observational data will be especially valuable if you need to consult a technician or plan for a deeper teardown.
Step 5: Test with a Known Good Unit
If available, swap out the suspected cluster with a working, compatible instrument cluster. This is often the most direct way to isolate whether the fault lies within the unit itself or elsewhere in the vehicle system.
Important Considerations:
Ensure the test cluster matches the vehicle make, model, and trim level to prevent communication mismatches.
Some automotive digital instrument clusters require VIN-coding or immobilizer sync, so you may need dealer-level diagnostic tools (e.g., Techstream, VCDS, Forscan).
If the symptoms disappear after the swap, the original cluster is faulty. If they remain, focus on sensors, wiring, or control modules.
Repair vs. Replacement: What Should You Choose?
Depending on the issue, you may consider repairing or replacing your cluster. Here’s a breakdown:
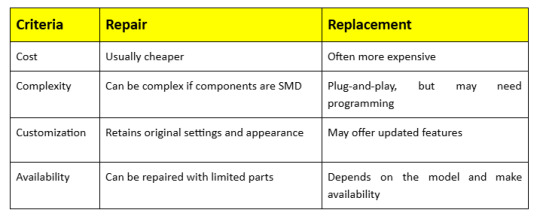
For rare or luxury vehicles with unique automotive digital instrument clusters, repair is often the only feasible option.
Step-by-Step Instrument Cluster Repair Process
Repairing an instrument cluster, especially a modern automotive digital instrument cluster, requires precision, attention to detail, and a basic understanding of electronics. Here’s a detailed breakdown of the general repair process:
Step 1: Disconnect the Battery
Safety always comes first. Before touching any part of your vehicle’s electrical system, disconnect the car battery, preferably starting with the negative terminal. This eliminates the risk of short circuits, electrical shocks, or accidentally triggering airbags when handling digital dashboard components. Let the vehicle sit for a few minutes after disconnecting to allow any residual charge to dissipate from the capacitors.
Step 2: Remove the Instrument Cluster
Carefully dismantle the dashboard.
Remove surrounding panels using a trim removal tool to avoid damaging plastic clips.
Unscrew mounting bolts holding the cluster in place—usually Torx or Phillips screws.
Gently pull out the cluster, being mindful of its size and shape.
Disconnect the wiring harnesses one by one, ensuring you don’t bend or damage the pins. Some clusters also have locking tabs on connectors that need to be depressed before removal.
Marking connector positions or photographing the setup beforehand helps during reinstallation
Step 3: Open the Cluster
Once removed, place the cluster on a clean, static-free surface. Use an anti-static wrist strap and proper tools to open the casing, which often includes plastic clips or small screws.
Take your time here—modern clusters, especially digital ones, use delicate PCB assemblies and ribbon cables that can be damaged easily. If the cluster is sealed or potted (common in some digital models), you may need specialized tools or heating methods to soften the adhesive.
Step 4: Identify Faulty Components
Visually inspect the internal components:
Look for physical damage like burnt resistors, leaking capacitors, or blackened areas.
Check solder joints, especially on high-vibration areas like connector pins and voltage regulators—cracks can cause intermittent faults.
In automotive digital instrument clusters, check the LCD driver circuits, processor ICs, and signal transceivers.
Use a magnifying glass or microscope if needed to spot fine cracks or corrosion, particularly in high-humidity environments.
If you’re unsure, a thermal camera or oscilloscope can help locate malfunctioning components.
Step 5: Repair or Replace Components
Use a fine-tip soldering iron or hot air tool to remove and replace faulty capacitors, resistors, or ICs. For LCD issues in automotive digital instrument clusters, replace the screen or driver board carefully, handling ribbon cables with caution. After repairs, clean the PCB with isopropyl alcohol to remove solder residue and ensure solid, clean solder joints.
Step 6: Test the Cluster
Before reinstalling, test the cluster using a bench simulator if available to verify gauge movements, display clarity, and warning light functionality. If no simulator is available, temporarily reconnect the cluster in the vehicle to check for errors or abnormal behavior during startup and operation.
Step 7: Reinstall and Reconnect
Reconnect all wiring harnesses securely, mount the cluster properly, and replace any dashboard panels. Reconnect the battery, start the car, and observe the instrument cluster for proper startup, gauge sweep, and accurate readings. Take a short test drive to confirm everything works correctly.
7. Tools Required for Instrument Cluster Repair
Screwdrivers (Phillips and Torx)
Soldering iron and solder
Multimeter
Anti-static mat and wrist strap
OBD-II scanner
Digital cluster simulator (optional)
Magnifying glass or microscope (for PCB inspection)
Hot air rework station (for surface-mounted devices)
Preventative Maintenance Tips
While electronic failures in instrument clusters can sometimes be unavoidable, there are several proactive steps you can take to minimize the risk and prolong the life of your automotive digital instrument cluster:
a. Avoid Electrical Surges
Install a surge protector or voltage stabilizer to shield your vehicle’s electrical system from sudden voltage spikes. Regularly maintain your battery’s health by checking terminals and charging levels to prevent unexpected surges that can damage sensitive instrument cluster components.
b. Protect From Moisture
Keep your vehicle’s interior dry by promptly fixing leaks and using moisture absorbers if necessary. Moisture can cause corrosion on circuit boards and connectors, leading to malfunction or failure of the instrument cluster’s delicate electronic parts over time.
c. Gentle Driving
Drive carefully over rough terrain, avoiding sharp bumps and potholes whenever possible. Harsh jolts and vibrations can loosen or damage internal cluster components, especially fragile solder joints and delicate sensors, which may cause intermittent faults or complete failure.
d. Software Updates
Keep the Automotive Digital Instrument Cluster’s firmware up to date by following manufacturer recommendations or visiting authorized service centers. Software updates often include bug fixes, improved system stability, and new features that enhance cluster performance and reliability.
Professional Repair Services: What to Expect
If DIY repair isn’t your style, professional services offer precision and warranty-backed repairs.
What They Offer:
Detailed diagnostics
Chip-level repairs
Screen and LED replacements
Firmware updates
Odometer correction (legal limitations apply)
Choosing a Repair Shop:
Look for specialization in digital clusters
Check online reviews
Ask for warranty terms
Ensure compliance with legal standards for odometer readings
Cost of Instrument Cluster Repairs
Costs vary depending on the vehicle make, model, and the type of cluster (analog vs. digital).
Estimated Costs:
For high-end vehicles with a sophisticated Automotive Digital Instrument Cluster, prices can climb significantly.
Conclusion
Your instrument cluster is more than just a display—it’s a critical part of your vehicle’s communication system. It provides you with essential information such as speed, fuel levels, engine temperature, and warning indicators that help ensure your safety on the road. As technology advances, the automotive digital instrument cluster becomes increasingly central to the driving experience, offering customisable interfaces, navigation, and integration with driver-assist systems. However, with this increased complexity comes a higher chance of malfunction or failure, which can affect your ability to monitor vital vehicle functions accurately.
Understanding how to diagnose, repair, or replace your cluster empowers you to make informed decisions, whether you’re tackling the repair yourself or working with a professional technician. By staying proactive—performing regular maintenance, updating software, and promptly addressing warning signs—you can ensure your instrument cluster remains reliable and accurate for years to come. This not only enhances driving safety but also helps preserve your vehicle’s value and performance over time.
#InstrumentClusterRepair#CarDashboardRepair#AutomotiveRepairGuide#DashboardDisplay#CarTechFix#DigitalInstrumentCluster#VehicleDiagnostics#AutoTechTips#InstrumentPanelFix#DIYCarRepair#AutomotiveDigitalInstrumentCluster#ClusterRepairTips#CarMaintenance#AutomotiveTechnology#FixYourCar
0 notes
Text
Single Phase Hybrid Solar Inverter
Upgrade your energy system with the Single Phase Hybrid Solar Inverter, a state-of-the-art solution that seamlessly integrates solar energy with battery backup and grid power.
Key Features:
Hybrid Functionality: Supports solar panel input, grid connection, and battery storage to ensure uninterrupted power supply and optimal energy usage.
High Efficiency: Advanced MPPT technology ensures maximum solar power harvesting with up to 98% efficiency.
Real-Time Monitoring: Equipped with a digital LCD display for clear system status, including voltage, current, power flow, and battery charge levels.
Smart Energy Management: Automatically switches between solar, battery, and grid to reduce electricity bills and improve energy independence.
Compact Design: Sleek, wall-mountable unit with robust build quality, suitable for indoor and outdoor installations.
Safety Assured: Built-in protections for overvoltage, overload, short-circuit, and temperature variations.
0 notes
Text
How to Choose the Right Havells Solar Inverter: Price & Features Explained
Choosing the right solar inverter is crucial to get the most out of your solar power system. Havells, one of India’s trusted electrical brands, offers a variety of solar inverters suited for different needs and budgets. In this guide, we’ll explain how to choose the right Havells solar inverter by understanding its price, features, and how they match your power requirements.
Why Havells Solar Inverters?
Havells is known for manufacturing reliable and energy-efficient products tailored to Indian conditions. Their solar inverters come with advanced technologies like MPPT (Maximum Power Point Tracking), high conversion efficiency, and smart displays. This ensures optimal solar energy conversion and real-time system monitoring.
Key Factors to Consider When Choosing a Havells Solar Inverter
1. Capacity and Power Requirements
The inverter’s capacity (measured in kilowatts, kW) should match your daily energy consumption. Smaller homes with low power usage can opt for 1kW or 2kW inverters, while larger homes or commercial setups may require 5kW or even 10kW inverters.
2. On-Grid vs Off-Grid
On-Grid Inverters work with the utility grid and allow surplus power to be fed back, which helps in earning credits or reducing bills.
Off-Grid Inverters work with battery storage and are suitable for areas with unreliable grid power or complete power cuts.
3. Features and Technology
Look for features like:
MPPT technology for maximum solar power harvest
LCD or LED displays for monitoring system status
Remote monitoring via apps or Wi-Fi (available in some models)
Protection features: over-voltage, short circuit, temperature control
4. Price and Budget
Havells solar inverters range from ₹15,000 for basic 1kW models to around ₹1,00,000 for advanced 10kW systems. Make sure your choice balances features with budget.
Havells Solar Inverter Price Overview
1kW Model: ₹15,000 – ₹20,000
2kW Model: ₹22,000 – ₹28,000
3kW Model: ₹30,000 – ₹42,000
5kW Model: ₹50,000 – ₹65,000
10kW Model: ₹85,000 – ₹1,00,000
Prices can vary by dealer, region, and offers.
Tips for Choosing the Best Havells Solar Inverter
Evaluate your daily power consumption before choosing capacity.
Consider future power needs; it’s better to have slightly higher capacity for growth.
If you want grid backup and sell excess power, choose an on-grid inverter.
For complete power backup, go for off-grid models with battery compatibility.
Check warranty and service network coverage.
Conclusion
Choosing the right Havells solar inverter requires understanding your power needs, the type of system (on-grid or off-grid), and the features you want. The Havells Solar Inverter Price List provides a wide range of options, from budget-friendly small-capacity models to advanced inverters for large setups. Balance price and features carefully to get the best value and long-term performance.
0 notes
Text
The role of LCD screens in agricultural production
In modern agricultural production, LCD screens, as important display and interactive devices, play an increasingly important role. It not only improves the efficiency and accuracy of agricultural production, but also provides more convenient and intuitive tools for agricultural management.
1. Environmental monitoring and control
LCD screens are widely used in the monitoring and control of greenhouses and breeding environments. By connecting various sensors, the screen can display environmental parameters such as temperature, humidity, light intensity, and carbon dioxide concentration in the greenhouse in real time. Farmers can remotely control the ventilation system, irrigation system, shading system, etc. of the greenhouse through the operation interface on the screen based on these data to ensure that crops grow in the best environment. In the breeding industry, LCD screens can display parameters such as temperature, humidity, and ammonia concentration in the breeding farm, helping farmers to adjust environmental conditions in time and improve the growth efficiency and health level of animals.
2. Precision agriculture
Precision agriculture is an important development direction of modern agriculture, and LCD screens play a key role in it. Through the satellite positioning system (GPS) and the geographic information system (GIS), the LCD screen can display detailed maps and soil data of the farmland to help farmers carry out precise sowing, fertilization and irrigation.
3. Agricultural machinery operation
In agricultural machinery operation, LCD screens provide an intuitive operation interface and real-time equipment status display. LCD screens can also be used for the operation of agricultural drones, displaying flight paths, captured images and videos, and helping farmers monitor farmland and control pests and diseases.
4. Agricultural product quality inspection
LCD screens are also widely used in agricultural product quality inspection. By connecting high-resolution cameras and sensors, the screen can display the appearance, color, size and other characteristics of agricultural products to help farmers grade and screen them.
5. Agricultural information management
In terms of agricultural information management, LCD screens provide convenient data input and query functions. Farmers can record and query information such as the planting history, fertilization records, and pest and disease control records of farmland through the operation interface on the screen. These data can help farmers make scientific planting plans and decisions. In addition, LCD screens can also be connected to the Internet to help farmers obtain market information, weather forecasts, agricultural technical guidance, etc., and improve the overall level of agricultural production.
Shenzhen Zhiyan Optronics Co., Ltd. (zylcdshop.com) is a trusted China-based supplier specializing in high-quality LCD screens. With over 18 years of industry experience, we’re dedicated to providing reliable display solutions and personalized service tailored to your unique business needs.

#lcd display for Electronic Components & Supplies#Easy to use LCD screen#LCD screen repair#LCD screen for repair#lcd touch panel repair#lcd module repair#lcd screen repair#touch screen repair#lcd panel repair#lcd panel service#lcd module service#lcd screen service#lcd torch screen service#EL DISPLAY MODULE#LAPTOP LCD PANEL#LCD CCFL BACKLIGHTS#INDUSTRIAL MONITOR#DISPLAY ACCESSORY#LCD INVERTER#Best price lcd panel#nice lcd panel
0 notes
Text
Smarten Hybrid Solar Inverter – Efficient Power for Modern Living
Smarten Hybrid Solar Inverter is a powerful and intelligent energy solution designed for homes and businesses that seek to optimize electricity usage while reducing dependency on the grid. Combining the best of both worlds—solar and grid power—this inverter smartly manages energy flow to ensure uninterrupted power supply and maximum savings.
With advanced hybrid technology, Smarten Hybrid Inverter automatically switches between solar power, battery backup, and grid supply depending on availability and load demand. It efficiently charges the battery using solar energy during the day and switches to grid power only when necessary, ensuring efficient energy usage and longer battery life.
Smarten Hybrid Inverters come with MPPT (Maximum Power Point Tracking) or PWM-based charge controllers, depending on the model, to extract the maximum power from solar panels. The inverter also supports various battery types and features a user-friendly LCD display for easy monitoring of system performance.
Ideal for residential and small commercial setups, Smarten Hybrid Inverter is built with safety features like overload protection, short-circuit protection, and overcharge protection. Whether you are dealing with frequent power cuts or aiming to go green, the Smarten Hybrid Solar Inverter offers a smart, reliable, and eco-friendly power backup solution.
0 notes
Text
DAYANG 's New Cruiser TCV450 Was Released In The Chinese Market, Priced At 19980 RMB

On May 17, DAYANG launched a medium-to-large displacement cruiser TCV450, with an official price of 19,980 RMB in the Chinese market.
TCV450 adopts a new "sharp lines" design language, injecting speed and tension into every body line. The whole vehicle is full of dynamic shape, combined with aerodynamic optimization, with both visual impact and practicality. Continuing the classic American cruiser style, the round LED headlights, teardrop-shaped fuel tank, integrated handlebars and other elements have a strong retro flavor, while the details are handled with practicality. The D-class LED headlights and round retro turn signals are not only practical but also extremely retro. The body lines are smooth and round, and the overall shape is atmospheric and stable.

It is equipped with a self-developed 438cc water-cooled eight-valve V-twin engine with a maximum power of 28kW/8000rpm and a maximum torque of 38.5N・m/6250rpm. The engine has a large torque plateau, which can produce more than 35N・m of torque from as low as 3500rpm and lasts until 7500rpm. The power output is linear and abundant, and it takes only 9.27 seconds to accelerate from 0 to 100, which is very suitable for the low-torque requirements of cruise vehicles.

The whole motorcycle uses 18-inch front and 15-inch rear wheels with a long wheelbase setting, which not only ensures cruising stability, but also shows flexible control when turning at small angles. The front inverted hydraulic shock absorber and the rear double-spring hydraulic shock absorber allow the vehicle to meet the daily use range while adding some comfort attributes. The braking system is equipped with a front opposed four-piston caliper + 320mm brake disc and a rear floating single-piston brake caliper, equipped with a dual-channel ABS and TCS traction control system to escort riding safety.


The color LCD instrument with five levels of daytime brightness supports basic information display. A PD fast charging interface is set on the left side of the 16.8L super-large fuel tank, supporting two interfaces: USB and Type-C. In addition, it adopts a dual-zone anti-scalding design, with double protection of the engine water pump + exhaust pipe to avoid burns to the greatest extent. Details such as sliding clutch and side support flameout switch are all available. By using high-nickel-based alloy valve materials, which are resistant to oxidation corrosion and high temperature wear, the official claims that the valve clearance can be adjusted for life, solving the maintenance trouble after long-term use.
TCV450 is available in main colors such as matte light gray, metallic black, matte black, cool orange, ruby red, and taffeta white. It presents subtle changes in light and shadow under the sun, which makes people fall in love with it at first sight.
As DAYANG ’s first cruiser, TCV450 is remarkable in terms of shape, color, and overall vehicle performance, and may become a new favorite among cruiser consumers.

Read the full article
0 notes
Text
How to Troubleshoot Laptop Screen Issues Yourself
Have you ever turned on your laptop only to face a flickering, dim, or completely blank screen? Laptop screen issues are frustrating but surprisingly common. Fortunately, many common screen problems can be diagnosed and even resolved right at home. This guide walks you through easy steps to troubleshoot your laptop screen issues yourself.
Step 1: Perform a Quick External Check
Before diving deep, make sure the issue isn't a simple one:
Brightness settings: Sometimes accidental keystrokes lower brightness. Increase brightness (usually Fn + brightness keys).
Check connections: For external monitors, ensure cables are firmly attached.
Restart: A quick reboot resolves many temporary glitches.
Step 2: Connect to an External Monitor
To verify if the issue is hardware-related:
Connect your laptop to an external display using HDMI or VGA.
Press Fn + F4/F5 (check your laptop's specific key combination) to toggle display modes.
If external display works perfectly: The issue likely lies with your laptop’s internal screen or connection cable.
If external display doesn't work: The problem might be related to your graphics hardware or software drivers.
Step 3: Update Your Graphics Drivers
Outdated or corrupted graphics drivers often cause screen problems.
Windows Users:
Right-click Start, choose Device Manager.
Expand "Display adapters", right-click your graphics adapter, select "Update Driver".
Mac Users:
Ensure macOS is up-to-date via System Settings → General → Software Update.
Restart your laptop after updating drivers.
Step 4: Inspect for Overheating
Overheating can affect your graphics chipset, causing flickering or distorted screens.
Check your laptop vents—are they clean and unobstructed?
Use compressed air to gently clean your laptop’s vents and fans.
Consider using cooling pads or elevating your laptop for better airflow.
Step 5: Check Internal Screen Connections (Advanced Users)
If you're comfortable opening your laptop (ensure it's powered off and disconnected):
Check ribbon cables connecting your screen and motherboard.
Gently reseat these cables if loose or disconnected.
Always follow online guides specific to your laptop model for safety.
Step 6: Run Built-in Hardware Diagnostics
Most laptops have built-in diagnostic tools accessible during startup:
Dell & HP: Press F12 or ESC during boot, select "Diagnostics."
Apple (MacBooks): Restart holding down the D key for diagnostics.
Follow on-screen prompts to identify hardware issues.
When to Seek Professional Help
If the above steps don't resolve your issue, it’s time to consider professional laptop screen repair services. Problems like damaged LCD panels, inverter failures, or deeper hardware malfunctions require expert attention.
Laptop Screen Repair: Key Takeaways
Troubleshooting your laptop screen can save you time and money, and help you clearly understand when a professional fix is needed. Regular maintenance, driver updates, and careful handling can significantly reduce screen-related issues.
For professional laptop screen replacement services in Singapore, consider choosing Esmond Service Centre. Our experts provide fast, reliable, and quality screen replacements to get your laptop back to peak performance. Learn more about our laptop screen replacement services here.
1 note
·
View note
Text
Simplify Your Power Backup with Single Phase Inverters
Ensure uninterrupted power with Okaya single-phase inverters, featuring pure sine wave output, smart load handling, energy efficiency, and advanced LCD display.
#Inverter#UPS Inverter#Inverter for Home#Home UPS#Inverter Price#Best Inverter#Inverter UPS#Home Inverter#Best Inverter Company in India#Inverter Near Me#Inverter Repair Near Me#Inverter Service Near Me#Inverter Shop Near Me Best Inverter for Home
0 notes
Text
Boost Your Solar System Performance with an MPPT Solar PCU
Discover how an MPPT Solar PCU enhances energy efficiency, battery life, and overall solar system performance. Learn the key benefits and tips for choosing the right model.

Also Read: https://unipar.in/
Reach Us: 9035024760 or [email protected]
Introduction
In today's energy-conscious world, solar power is more than just a green alternative—it's a smart investment. But to truly maximize the efficiency of your solar power system, using the right equipment is essential. One key component that can significantly boost your system's performance is a Solar PCU with MPPT (Maximum Power Point Tracking) technology.
What Is a Solar PCU?
A Solar PCU (Power Conditioning Unit) is an integrated device that manages power flow from solar panels, batteries, and the grid. It combines the functions of a solar charge controller, inverter, and grid charger—making it a one-stop solution for solar energy management.
Why MPPT Technology Matters
MPPT stands for Maximum Power Point Tracking, an advanced technique used to optimize the power output from solar panels. Unlike traditional PWM (Pulse Width Modulation) controllers, MPPT continuously tracks and adjusts to the panel's most efficient voltage and current levels, even during cloudy conditions or temperature fluctuations.
Benefits of MPPT:
30% More Efficient: Extracts up to 30% more power than PWM charge controllers.
Faster Charging: Improves battery charging speed and reduces downtime.
Better Low-Light Performance: Delivers consistent power even in variable weather.
Key Benefits of an MPPT Solar PCU
Higher Efficiency & Output MPPT ensures your solar panels operate at their optimal power point, resulting in higher energy harvest.
Extended Battery Life With intelligent charging, MPPT helps prevent battery overcharging or deep discharging.
Reduced Grid Dependency A solar PCU prioritizes solar power usage, using grid electricity only when necessary—lowering your monthly bills.
Integrated Functionality Combines solar inverter, grid charger, and charge controller in one unit, saving space and simplifying installation.
Smart Energy Management Some models come with LCD displays, remote monitoring, and programmable settings for better control.
Choosing the Right MPPT Solar PCU
When selecting a solar PCU, consider the following:
System Size Compatibility: Match the PCU’s capacity (in kVA or watts) to your solar panel array and battery bank.
MPPT Voltage Range: Ensure the voltage range supports your solar panel configuration.
Battery Type Support: Look for compatibility with lithium, lead-acid, or gel batteries.
Brand Reputation: Choose reliable brands with good after-sales service.
Warranty & Support: A longer warranty period reflects product reliability.
Conclusion
Upgrading to an MPPT Solar PCU is one of the most effective ways to enhance the performance of your solar system. It not only increases energy yield but also ensures better power management, longer battery life, and a greater return on your solar investment.
#solarpower#solar energy#solar inverter#best inverter#greenenergy#inverter battery#inverter ac#online ups#sustainablefuture#solar system#solar power#solarballs#solarpunk#solar panel#mppt#MPPT charge controller
0 notes