#linux untar
Explore tagged Tumblr posts
Visit Tumblr Blog
Explore Tumblr blogs with no restrictions, modern design and the best experience.
Last Seen Tumblr Blogs


Fun Fact
Tumblr’s reach among the 26-to-35-year-olds in the US is 11%.
Text
the joys of new computers (in linux):
to install a new package you need pip to install pip you need pipx so you install pipx, you install pip, you install packages, yes please install all the dependences too
to install program you need cmake so you install cmake and then you download the program and to untar it you need bzip2 so you install bzip2 untar your program install all the dependencies run make and get errors about missing more system tools, install g++, run make again, install the program ...
like, i appreciate that the process is actually easier than when I last did it four years ago, but i feel like I'm trying to corral kitten into a box, chasing around all the dependencies
2 notes
·
View notes
Text
Download Steam Cleaner 2.3.0.0 For Cracked
The new programme has just been published. You can already read how to Download Steam Cleaner 2.3.0.0 For Cracked. The link to this programme is https://bestfile24.com/windows/download-steam-cleaner-2-3-0-0-for-cracked/ Steam Cleaner is a portable tool for removing junk game files left behind by Steam, Origin, Uplay and GoG. The program is as simple as this kind of application can be. It’s a single executable, no installation required, no settings to think about, not even a “Scan”... _______________________________________________________ It is necessary to check and follow our other profiles in social media: Our Facebook Group -> https://www.facebook.com/groups/bestfile24/ Blogspot -> https://gamesandprogrammesofhighestquality.blogspot.com/ Flipboard -> https://flipboard.com/@bestfile/games-and-programmes-of-highest-quality-pcc33hc8y Livejournal -> https://bestfile24.livejournal.com/ Medium -> https://medium.com/@adriennesilberman543 Pinterest -> https://pl.pinterest.com/bestfile24/ Our Best Pin Board -> https://www.pinterest.com/bestfile24/games-and-programmes-of-highest-quality/ Twitter -> https://twitter.com/bestfile24 Plurk -> https://www.plurk.com/bestfile24 Tumblr -> https://www.tumblr.com/blog/bestfile24 Vk -> https://vk.com/id484318694 Google+ -> https://plus.google.com/u/0/111792510074743799172 Wordpress Blog -> https://bestfile24.wordpress.com/blog/ For more information, please visit! Games and Programmes of Highest Quality
0 notes
Photo

How to Extract Files From a .tar.gz or .tar.bz2 File on Linux Fatmawati Achmad Zaenuri/Shutterstock.com Tar files are compressed archives. You’ll encounter them frequently while using a Linux distribution like Ubuntu or even while using the terminal on macOS. Here’s how to extract—or untar—the contents of a tar file, also known as a tarball. What Does .tar.gz and .tar.bz2 Mean? Files that have a .tar.gz or a .tar.bz2 extension are compressed archive files. A file with just a .tar extension is uncompressed, but those will be very rare. The .tar portion of the file extension stands for tape archive, and is the reason that both of these file types are called tar files. Tar files date all the way back to 1979 when the tar command was created to allow system administrators to archive files onto tape. Forty years later we are still using the tar command to extract tar files on to our hard drives. Someone somewhere is probably still using tar with tape. The .gz or .bz2 extension suffix indicates that the archive has been compressed, using either the gzip or bzip2 compression algorithm. The tar command will work happily with both types of file, so it doesn’t matter which compression method was used—and it should be available everywhere you have a Bash shell. You just need to use the appropriate tar command line options. Extracting Files from Tar Files Let’s say you’ve downloaded two files of sheet music. One file is called ukulele_songs.tar.gz , the other is called guitar_songs.tar.bz2. These files are in the Downloads directory. Let’s extract the ukulele songs: tar -xvzf ukulele_songs.tar.gz As the files are extracted, they are listed in the terminal window. Read the remaining 33 paragraphs https://buff.ly/2FRo03i
1 note
·
View note
Text
How to Install LibreOffice 7.5 on Ubuntu & Linux Mint

In this article, we will provide a comprehensive guide on how to install LibreOffice 7.5 on Ubuntu and Linux Mint. LibreOffice is a popular open-source office suite that offers a range of tools for word processing, spreadsheets, presentations, and more. It is a free alternative to Microsoft Office and is compatible with the most common file formats, making it an ideal choice for those who want to save money on office software.
Prerequisites for LibreOffice 7.5
Before we get started with the installation process, it's important to ensure that your system is up to date sudo apt update && sudo apt upgrade -y
Downloading LibreOffice 7.5
The first step in installing LibreOffice 7.5 is to download the software. There are two ways to download the software - using the PPA or using an installer file. Method 1: Using the PPA Open a terminal window and run the following command to add the LibreOffice repository to your system. sudo add-apt-repository ppa:libreoffice/ppa Update the system and install LibreOffice 7.5 sudo apt update && sudo apt install libreoffice Method 2: Using the Installer file - Open a web browser and navigate to the LibreOffice download page. - Select the version of LibreOffice that you want to download - in this case, LibreOffice 7.5. - Click the Download button to start the download process or use the below command to download using wget wget https://mirror.freedif.org/TDF/libreoffice/stable/7.5.0/deb/x86_64/LibreOffice_7.5.0_Linux_x86-64_deb.tar.gz - Once the download is complete, untar the file and start the installation by using the below commands. tar -xf LibreOffice_7.5.0_Linux_x86-64_deb.tar.gz && cd LibreOffice_7.5.0.3_Linux_x86-64_deb/DEBS/ sudo dpkg -i *.deb
Updating LibreOffice
Once you have successfully installed LibreOffice 7.5, it's important to keep it up to date with the latest version. This ensures that you have access to the latest features, bug fixes, and security updates. sudo apt update && sudo apt upgrade libreoffice
Uninstalling LibreOffice 7.5
In the unlikely event that you need to uninstall LibreOffice 7.5, follow these steps: open the terminal and run the below command to uninstall sudo apt remove libreoffice
Conclusion
Using the terminal or a web browser, LibreOffice 7.5 installation on Ubuntu and Linux Mint is a simple procedure. It's crucial to maintain the software updated with the most recent version after installation. If my articles on TipsonUNIX have helped you, kindly consider buying me a coffee as a token of appreciation

Thank You for your support!! Read the full article
0 notes
Text
.xz file mac

.xz file mac install#
.xz file mac archive#
.xz file mac software#
.xz file mac software#
However, when extracting them on Windows, you will have to download third-party decompression software like 7zip or WinZip. XZ compression compresses files to smaller sizes than some alternatives, such as gzip and bzip2 compression. Users often use XZ files to share compressed files over the Internet, via email, and on USB drives. It supports various formats to compress or decompress files. It can be used to compress or decompress a file according to the selected operation mode. Xz is a new general-purpose, command line data compression utility, similar to gzip and bzip2. Windows users need a tool named 7zip to extract tar. xz file simply right-click the file you want to extract and select Extract.
.xz file mac archive#
-f : Tells tar the name of the archive to operate upon.
-z : Tells tar to decompress the archive using gzip.
-v : Tells tar to verbosely list all the files being extracted.
-x : Tells tar to extract files from an archive.
To extract or untar the file to the current directory, type the following, (Making sure to replace file_name.tar with the actual filename) tar -xvf file_name.tar.
From the terminal, change to the directory where your.
How to Extract, Open or Untar a tar file in Linux or Unix
The files will be extracted in the current folder (most of the times in a folder with the name ‘file-1.0’).
Type at the command prompt tar xzf - to uncompress a gzip tar file (.tgz or.
To extract an archive, use the tar -xf command followed by the archive name, and to create a new one use tar -czf followed by the archive name and the files and directories you want to add to the archive. The most common uses of the tar command are to create and extract a tar archive. They are created by utilizing the tar command on Linux or UNIX operating systems, which is where the file type got its name. XZ file is a lossless data compression file format used for compressed streams. How do I unzip a tar xz file in Windows?Ī TAR.
.xz file mac install#
Debian/Ubuntu Linux users try apt install xz-utils command.Install xz using the dnf install xz on a CentOS/RHEL/Fedora Linux.For more verbose output, use the -v option. Xz file simply right-click the file you want to extract and select Extract. Click 1-click Unzip and choose Unzip to PC or Cloud in the WinZip toolbar under the Unzip/Share tab.Select all the files and folders inside the compressed file.Launch WinZip from your start menu or Desktop shortcut.gz file, mouseover extract, and select an option to unpack the archive What is a tar xz file?Ī TAR. Simply right-click the item you want to compress, mouseover compress, and choose tar. How do I open a tar xz file in Windows?.How do I unzip a tar xz file in Windows?.
0 notes
Text
Untar .gz file

Untar .gz file archive#
Untar .gz file zip#
Untar .gz file windows#
You may also choose to email it, share it in an instant message or via supported social media platforms.
Untar .gz file zip#
Choose any local, network or cloud location where you wish to save your new ZIP file.Find and select the files you wish to ZIP from your PC, network, or cloud services in the files panel.In order to create a Zip file, please follow these simple steps: Zip files are similar to Tar GZ files and have many of the same benefits and more accessibility. While WinZip does not create Tar GZ files, it does create Zip files.
Untar .gz file windows#
While the TAR GZ file format may be more common for Linux, you may also create and compress TAR GZ files on other operating systems by using WinZip.Ĭreating Tar GZ files can be done quickly in Windows and macOS by using a file archiver that supports GZIP. Compress a single file to Tar GZ on Linux: tar -zcvf /path/to/filename.Compress an entire directory to Tar GZ on Linux: tar -zcvf /path/to/yourdirectory/.GZ file without tar on Linux: $ gunzip file.gz To view the Tar GZ files table of contents on Linux: $ tar -tvf.Uncompressing a Tar GZ file on Linux: $ tar xvzf -C /path/to/yourdirectory.Opening and extracting Tar GZ files on Linux: $ tar xvzf.With the Linux command line, you can create, open, and extract Tar GZ files by pressing Ctrl + Alt + T and following these simple commands: Since the Tar GZ file format is native to Linux, you can use the Linux command line to execute various commands on your Tar GZ files. While Tar GZ can be opened and used on Windows and macOS with WinZip, you’re much more likely to spot the Tar GZ file format on Linux operating systems. Compressing single files to store locally.Sending and receiving larger files in a compressed format.The tar GZ file extension is widely used on UNIX based operating systems but can also be used on Windows and macOS with WinZip. This format can be sent by email or social media platforms that support the Tar GZ file format. Since the tar GZ file format is used to compress and store multiple files in one, it’s most commonly used to deliver package files, programs or installers online or simply for storing files locally.īy compressing several files into one Tar GZ file, you’ll be able to send multiple files as one single archived folder.
Untar .gz file archive#
Combined into the tar GZ file extension, you can archive and compress multiple files into one. In short, a TAR file creates one archive file out of multiple files without compressing them, while the GZ file format compresses a file without creating an archive. Similarly, the TAR GZ file extension is created when compressing archived TAR files with the GNU zip utility. Short for Tape Archive, a TAR file is used to store multiple files in one to send over the internet or for archiving purposes. We will right-click to the gz file and then hover over 7z and then click Open archive.To understand what a Tar GZ File is, you first need to understand what a TAR file is. Some applications which can be used are WinZip, RAR, 7zip, etc. Windows operating system provides a lot of files to list gz file attributes. We will use gzip command with the -l option like below. We can use command line native gzip command in order to list gz for the following attributes. In this part we will provide the applications or programs those can be open, create, extract GZ files. gz is natively created for Linux and Unix but currently supports all major operating systems like Windows, MacOS, BSD etc. Gz or GZ files are compressed files using gzip algorithm or a related application.
0 notes
Text
Untar .gz file

Untar .gz file how to#
Untar .gz file archive#
Untar .gz file software#
In Gnome’s Files application, just right-click the file you want to zip and click Compress. If you would rather not work in the terminal, graphical desktop environments have what you need. If we want to backup our documents, d ownloads, and p ictures directories in a single archive, we just issue this command: tar -czvf /home/jeff/documents /home/jeff/Downloads /home/jeff/PicturesĬompressing and Decompressing Files Using the GUI One of the great aspects of tar is you can include multiple directories in the archive.
-f: Specify the filename of the archive.
-v: Display the progress while creating the archive.
Lots of options there, so let’s look at what each one does. Just issue this command from the terminal: tar -czvf /home/jeff/documents We want to preserve the directory structure, bundle it all into one archive, then compress it.
Untar .gz file archive#
Now, let’s say we want to make a compressed archive of our documents directory, which has a number of subdirectories. If you want to keep the original in place, add the -k option. The original file is deleted, leaving only the compressed version. That command will compress annual-profit.xlsx. If you need to compress a file, once again use the command gzip, but without any options other than the file you want to compress.
Untar .gz file how to#
However, it’s also important to know how to create these archives and/or compressed files in the first place. gz and tar.gz files might be the most important task you need. The command automatically determines what sort of compression was used, and extracts the archive into the current working directory. To extract a tar.gz file, we use this command: tar -xf Instead, we use tar, a holdover from tape archive days (hence the name) that’s still very useful today. If you need to bundle multiple files together, or an entire directory structure, you’ll use both tar and gz. It’s important to note, the gzip algorithm is designed to compress a single file. If you want to keep the compressed version of the file, you again add -k to the command: gunzip -k file.gz Once again, this will unzip the archive and delete the compressed file. This means decompressing a file doesn’t require the -d option if you use gunzip: gunzip file.gz The command gunzip is also available on most systems, as an alias to gzip -d. If you want to keep the compressed file, just add the option -k to the command: gzip -dk file.gz This decompressed the file to its original state and removes the. Just issue this command from the terminal: gzip -d file.gz
Untar .gz file software#
You’ll even find the software in macOS, How to Extract a GZ File in LinuxĮxtracting a file compressed using gzip is easy. Gzip is widely used not just in Linux, but also in many open-source software projects. This made including compress in any GNU offshoots impossible.Īs luck would have it, gzip uses a superior compression algorithm compared to compress. Unisys and IBM patents covered the LZW algorithm compress used. Jean-loup Gailly and Mark Adler developed gzip for the GNU project as a replacement for compress. A file compressed using the gzip algorithm will usually end in the file extension. Gzip is the compression algorithm, reducing the file size while still keeping the original file mode, ownership, and time stamps. If you want to interact with these files, you’ll need to know how to extract a GZ file in Linux-here’s how. Linux uses a similar algorithm, called gzip. On Windows, these files are usually compressed as zip files.
0 notes
Text
WSL2 の import / export
Cドライブがいっぱいになったので WSL2 の仮想ディスクを移動しようと思ったら --import でエラーが発生した。Unspecified Error とのこと。
関連issue: WSL --import returns Unspecified error
untar がこけてるように見える。展開しようとした Ubuntu.tar は 50GB 弱。 上記 issue に書いてあることを試したが全部ダメだったので、再インストールしたうえで、色々と導入する前に --import / --export を試すことにした。
再インストールから import / export まで
wsl --install -d Ubuntu
デフォルトのユーザ名とパス��ードを入力する。
エクスポートする。wsl --export Ubuntu D:\wsl\Ubuntu.tar
仮想ディスクのインストール先を用意する。mkdir D:\wsl\Ubuntu
インポートする。wsl --import Ubuntu D:\wsl\Ubuntu D:\wsl\Ubuntu.tar --version 2 そういえば事前に wsl --set-default-version 2 は実行済みだった(上記 issue の中で行っていた)。無事インポートできた。
一度ログインしてみると root だった。そのままログアウトして wsl --shutdown
root のままだとイヤなのでデフォルトユーザを変更する。まず wsl -d Ubuntu -u <user> -e id -u として UID を取得する。<user> は 2 で入力したユーザ名。
次にレジストリを変更する。HKEY_CURRENT_USER\Software\Microsoft\Windows\CurrentVersion\Lxss\ の下に {<guid>} というキーがある。多分これはWSLにインストール済みの distro ごとにある。その中の Ditribution = Ubuntu となっているキーを探して、DefaultUid を先ほど取得した UID に変更する。
もう一度ログインすると 2 のユーザでログインできた。
参考にしたサイト:
WSL上のLinuxをCドライブから移動させる
WSLでimport、export、デフォルトユーザー名を変更
なお上のサイトには「起動時にデフォルトユーザを指定しても、ターミナル起動時のカレントディレクトリがホームディレクトリでない」と書いてあるが、今はきちんと /home/<user> がカレントディレクトリとして設定されるっぽい。
その他設定
Windows 側の PATH が WSL2 側に引き継がれていることに気づいた。これは気持ちが悪い。以下を参考に設定を変更した。/etc/wsl.conf を作成して
[interop] appendWindowsPath = false
とした。
WSL2でWindowsのPATH設定が引き継がれるのを解除する
0 notes
Text
This guide is intended to help you install and host your WordPress website using Caddy Web server. Caddy is an open-source, production-ready that is build to be fast, easy to use, and makes you more productive. Caddy is available for Windows, Mac, Linux, BSD, Solaris, and Android. You can also use some of the popular WordPress hosting platforms for your website hosting needs. If you don’t have Caddy Web server installed, use our guide Install Caddy web server on an Ubuntu 18.04 with Let’s Encrypt SSL to set it up. For Nginx users, see How to Setup WordPress Multisite Network with Nginx and Let’s Encrypt Once you have Caddy web server up and running, proceed to configure it for WordPress hosting: Using Caddy Web Server to host WordPress Website In this section, we will install and configure WordPress to be powered by Caddy web server. To run a WordPress website, you need PHP, Web server, and Database server sudo apt -y update sudo apt -y install php-fpm php-mysql php-curl php-gd php-mbstring php-common php-xml php-xmlrpc For CentOS 7 server run: sudo yum install http://rpms.remirepo.net/enterprise/remi-release-7.rpm sudo yum install epel-release sudo yum install yum-utils sudo yum-config-manager --disable remi-php54 sudo yum-config-manager --enable remi-php72 sudo yum -y install php-cli php-fpm php-mysql php-zip php-devel php-gd php-mcrypt php-mbstring php-curl php-xml php-pear php-bcmath Install and Configure MariaDB Database server Install and configure MariaDB database server using: Install MariaDB 10.x on Ubuntu 18.04 and CentOS 7 Once done, login as root user and create a database for WordPress $ mysql -u root -p Enter password: Welcome to the MariaDB monitor. Commands end with ; or \g. Your MariaDB connection id is 520 Server version: 10.3.9-MariaDB-1:10.3.9+maria~bionic-log mariadb.org binary distribution Copyright (c) 2000, 2018, Oracle, MariaDB Corporation Ab and others. Type 'help;' or '\h' for help. Type '\c' to clear the current input statement. MariaDB [(none)]> CREATE DATABASE wp_site; Query OK, 1 row affected (0.001 sec) MariaDB [(none)]> GRANT ALL PRIVILEGES ON wp_site.* to 'wp_user'@'localhost' IDENTIFIED BY 'StrongPassword'; Query OK, 0 rows affected (0.001 sec) MariaDB [(none)]> FLUSH PRIVILEGES; Query OK, 0 rows affected (0.001 sec) MariaDB [(none)]> quit Bye Download WordPress and Install Now download WordPress and untar the archive wget http://wordpress.org/latest.tar.gz tar xvf latest.tar.gz This will extract all content of the tarball to a folder named wordpress on your working directory. Move the wordpress folder to /var/www directory sudo mv wordpress /var/www Change ownership permissions to userwww-data and group. sudo chown -R www-data:www-data /var/www/wordpress Configure WordPress database connection mv /var/www/wordpress/wp-config-sample.php /var/www/wordpress/wp-config.php Edit the file to configure sudo vim /var/www/wordpress/wp-config.php Set below variables // ** MySQL settings - You can get this info from your web host ** // /** The name of the database for WordPress */ define('DB_NAME', 'wp_site'); /** MySQL database username */ define('DB_USER', 'wp_user'); /** MySQL database password */ define('DB_PASSWORD', 'StrongPassword'); /** MySQL hostname */ define('DB_HOST', 'localhost'); /** Database Charset to use in creating database tables. */ define('DB_CHARSET', 'utf8'); /** The Database Collate type. Don't change this if in doubt. */ define('DB_COLLATE', ''); Configuring Caddy to Serve the WordPress Site We have WordPress installation ready, we now need to configure Caddy Web server to serve our WordPress website. Start by creating a Caddy configuration file on /etc/caddy/Caddyfile sudo vim /etc/caddy/Caddyfile Add the content example.com tls [email protected] root /var/www/wordpress gzip fastcgi / /run/php/php7.2-fpm.sock php rewrite if path not_match ^\/wp-admin
to path path/ /index.php?query Replace example.com with your actual domain for WordPress website and [email protected] with an actual email address used to request Let’s Encrypt certificate. We’re using php-fpm via fastcgi to support php. Start caddy service sudo systemctl start caddy.service If the start was successful, you should get a successful message: # systemctl status caddy ● caddy.service - Caddy HTTP/2 web server Loaded: loaded (/etc/systemd/system/caddy.service; enabled; vendor preset: enabled) Active: active (running) since Sun 2018-09-02 14:34:26 EAT; 7s ago Docs: https://caddyserver.com/docs Main PID: 32443 (caddy) Tasks: 12 (limit: 4704) CGroup: /system.slice/caddy.service └─32443 /usr/local/bin/caddy -log /var/log/caddy.log -agree=true -conf=/etc/caddy/Caddyfile -root=/var/tmp Sep 02 14:34:26 wp.computingpost.com systemd[1]: Started Caddy HTTP/2 web server. Sep 02 14:34:34 wp.computingpost.com caddy[32443]: Activating privacy features... done. Sep 02 14:34:34 wp.computingpost.com caddy[32443]: https://wp.computingpost.com Sep 02 14:34:34 wp.computingpost.com caddy[32443]: //wp.computingpost.com Access the WordPress dashboard by visiting.https://example.com You should get initial wordpress setup page. Provider username and password. Thank you for reading our guide on how to Install Caddy web server on an Ubuntu 18.04 with Let’s Encrypt SSL. I like Caddy simplicity, robustness and the fact that it uses HTTPS by default. No routing and redirects needed to host your website.
0 notes
Text
Poky linux kernel

Poky - eL.
Out-of-Tree Kernel Modules - Legato Docs.
Make(3): execvp: /bin/sh: Argument list too long --Compilation Error.
Enable AD7298 with IIO on imx6ul with Yocto - Q&A - Linux Software.
KGDBoE on RaspberryPi - building out of the kernel tree.
Compiling Linux | Documentation | RocketB.
GitHub - chargebyte/poky.
(poky) Custom Kernel Recipe: How to specify KCFLAGS args during kernel.
Atmel-aes Linux driver works on the sama5d31ek board.
Dunfell - ERROR: ca-certificates-20211016-r0 do_fetch: Fetcher failure.
What is Poky and Bitbake in the Yocto Project - Tutorial.
How to use Poky — pengwyn-sdk 1.0.0 documentation.
Poky – Yocto Project.
Reconfiguring Linux kernel and adding drivers into Galileo's.
Poky - eL.
For how to compile the fmac backport driver, we have a README file along with the release. #1. Untar the Cypress backports package. #2. (Native) compile local tools and generate (in a new terminal. #3. (Cross) compile kernel modules. #4. The kernel modules are available here. The following steps will recreate the kernel and device tree for the MitySOM-A10S development kit. This will use the yocto SDK that is provided on the files section. Please note that the kernel and dtb will normally be built through the yocto build but the steps here are provided for development.
Out-of-Tree Kernel Modules - Legato Docs.
Poky Linux. Poky is an embedded Linux build system, distribution and developer environment which builds upon OpenEmbedded technologies. It is less generic than OpenEmbedded, but on the other side, you may find it more tuned and optimized for such devices as PDAs and smartphones.... Linux kernel has Root on NFS feature, allowing mounting root. Indeed this is the case. The actual problem command is buried inside the kernel's build system and is quite hard to find. But the reason it is too long is because the $(c_flags) variable is huge. This is huge because qualcomm's wifi driver has a poor design for its headers. Feb 24, 2016 · The steps I did to build the custom image: (1) Build standard image. (2) source poky/oe-init-buid-env (step 4 in the Board support package on page 7) (3) bitbake virtual/kernel -c menuconfig (step 1 in the Board support package on page 14) (4) include your stuff.
Make(3): execvp: /bin/sh: Argument list too long --Compilation Error.
Loadable kernel modules ( files) are object files that are used to extend the kernel of the Linux Distribution. They are used to provide drivers for new hardware like IoT expansion cards that have not been included in the Linux Distribution.
Enable AD7298 with IIO on imx6ul with Yocto - Q&A - Linux Software.
. Aug 03, 2007 · Through integration with QEMU (both ARM and x86 host virtualisation) or chroot-like tools, Poky provides a unique cross-application development environment. Features include; * Linux 2.6.x kernel support. * x86 and ARM (both OABI and EABI) architecture support out the box with provision for others too.
KGDBoE on RaspberryPi - building out of the kernel tree.
Overview. The OEM Linux OS is based on the Poky Linux distribution — the reference distribution by YoctoProject. It contains the OpenEmbedded build system as well as a collection of useful meta-layers for hardware support and system components, allowing Linux software developers to get off to an immediate start on our hardware. Poky/meta/recipes-core/images$ tree. ├── build-appliance-image │ ├── README_VirtualBox_Guest_A │ ├── README_VirtualBox_T │ ├── Yocto_Build_A │ └── Yocto_Build_A ├── ├── ├── ├──. The Yocto Project. It's not an embedded Linux Distribution, It creates a custom one for you. The Yocto Project (YP) is an open source collaboration project that helps developers create custom Linux-based systems regardless of the hardware architecture. The project provides a flexible set of tools and a space where embedded developers worldwide.
Compiling Linux | Documentation | RocketB.
...
GitHub - chargebyte/poky.
Answer. There is a test method TCYPT which could be used to test the encoding and decoding speed for various cryptography algorithms implemented by hardware or by software. Attached is the test log. - Kernel compiled with none built-in atmel-crypto driver but atmel-aes, tcrypt driver module. 但是,编译器不使用所指向的共享对象文件,而是尝试链接到符号链接本身,因此存在兼容性问题 以下是运行conf. 我正在尝试为飞思卡尔I.MX6处理器交叉编译Qt5。. 我已经使用最新的Yocto软件包构建了一个映像 在编译qtbase之前,首先通过编译一些OpenGL代码. Yocto Project.
(poky) Custom Kernel Recipe: How to specify KCFLAGS args during kernel.
Hi everyone, I've seen a variety of posts on the best way to incrementally build Yocto without clearing all your cache and work directories. However, I've found that when I modify the kernel in the following ways: - Add a patch. - Change a menuconfig option. - Edit a kernel source file. And rebuild using the methods I found, the changes don't. Jun 29, 2014 · cd /tmp/meta-clanton_v1.0.1 source poky/oe-init-build-env yocto_build/ bitbake -c configure linux-yocto-clanton. That will build a bunch of utilities, fetch and configure Linux kernel sources. Configuration. After it's done, let's enable our driver using standard kernel configuration process. The default way to do this is to run. Toggle navigation Patchwork Linux ARM based TI OMAP SoCs mailing list Patches Bundles About this project Login; Register; Mail settings; 4880081 diff mbox (09/16) tty: serial: 8250_dma: Add a TX trigger workaround for AM33xx. Message ID: 1410377411-26656-10-git.
Atmel-aes Linux driver works on the sama5d31ek board.
Linux kernel modules can be loaded/unloaded in runtime, which allows for smaller core kernel images and more flexibles systems. Note: Legato AF also provides a way to load kernel modules with applications. If you do not wish to rebuild your Linux Distribution this is the prefered way of adding new drivers. Set Build Environment.
Dunfell - ERROR: ca-certificates-20211016-r0 do_fetch: Fetcher failure.
. Build Configuration: BB_VERSION = "1.16.0" TARGET_ARCH = "arm" TARGET_OS = "linux-gnueabi" MACHINE = "zynq-zx3-pm3" DISTRO = "poky" DISTRO_VERSION = "1.3.2". Writing "2" to the authorized_default attribute causes kernel to only authorize by default devices connected to internal USB ports. Example system lockdown (lame) ¶ Imagine you want to implement a lockdown so only devices of type XYZ can be connected (for example, it is a kiosk machine with a visible USB port).
What is Poky and Bitbake in the Yocto Project - Tutorial.
Step 4: Build an Image. Execute the following command to build a minimal image of a GNU/Linux distribution for your Raspberry Pi: bitbake rpi-basic-image. Please note that the build may take up to several hours depending on the hardware of your personal computer and the speed of the Internet connection. Add Tip..
How to use Poky — pengwyn-sdk 1.0.0 documentation.
Jul 03, 2022 · GitHub - ystk/linux-poky-debian: Linux Kernel Source for Poky. Share on Reddit. OpenedHand has released Poky Linux 3.0, the latest version of the company#39;s OpenEmbedded derivative for GNOME mobile development. Poky is both a Linux distribution and a versatile. How to use Poky pengwyn-sdk 1.0.0 documentation. The kernel pieces have been touched more recently. Some moved into the core, mostly its just example boiler plate type code now. I think this needs moving to a better named repository if its still wanted/useful, or we delete it.... * Re: poky-extras 2013-06-28 8:51 poky-extras Richard Purdie @ 2013-06-28 12:52 ` Bruce Ashfield 2013-06-28 12:57.
Poky – Yocto Project.
The Poky project incorporates a stable BitBake release, so to get started with Yocto, we only need to install Poky in our Linux host system. Note This is not recommended and can be a source of problems, as BitBake needs to be compatible with the metadata used in Yocto.
Reconfiguring Linux kernel and adding drivers into Galileo's.
Hi, I downloaded Legato Linux Distribution Legato-Dist-Source-mdm9x28-SWI9X07Y. I extracted this distro. I also have toolchain installed in my machine. Feb 22, 2022 · Yocto builds the kernel as well, you can rebuild with usual Yocto commands: bitbake linux-renesas -c cleansstate. bitbake linux-renesas -c compile. also: bitbake linux-renesas -c menuconfig. etc. Or do you want to build the kernel outside of Yocto?. Hi, I am trying to build a vexpress-qemu machine targe from poky's master. |. fatal error: linux/compiler-gcc6.h: No such file or directory. Apparently it is picking gcc 6.1 and kernel 4.1.24, which do not play. well together. The best approach is probably to use kernel 4.2 or newer. Is there a bug.
Other links:
Celeb Hard Pokies Pics
Phantom Pokie Machine Free
Celeb Huge Pokies
Charli Damelio Pokies
0 notes
Text
How install tar gz file in Linux?

How do I install a Tar GZ file?
How do I install a tar file in Linux?
How do I tar a GZ file in Linux?
How install tz file in Ubuntu?
How do I open a Tar gz file?
How do I unzip a Tar gz file?
How do I open a tar file in Linux?
How do I install a tar XZ file?
How do I open a tar XZ file in Linux?
What is Tar gz file in Linux?
How do you tar and untar?
How do I install a .GZ file?
How do I install a .sh file?
How do I install Java on Linux?
0 notes
Text
Download Yapbam 0.20.5 NOW Repack
The new programme has just been published. You can already read how to Download Yapbam 0.20.5 NOW Repack. The link to this programme is https://bestfile24.com/finance-and-accounts/download-yapbam-0-20-5-now-repack/ Yapbam (Yet Another Personal Bank Account Manager) is a portable cross-platform Java-based personal finance manager. Getting started is relatively easy. An Import tool might be able to import your transactions from another account manager or your bank’s online statements. An Entry... _______________________________________________________ It is necessary to check and follow our other profiles in social media: Our Facebook Group -> https://www.facebook.com/groups/bestfile24/ Blogspot -> https://gamesandprogrammesofhighestquality.blogspot.com/ Flipboard -> https://flipboard.com/@bestfile/games-and-programmes-of-highest-quality-pcc33hc8y Livejournal -> https://bestfile24.livejournal.com/ Medium -> https://medium.com/@adriennesilberman543 Pinterest -> https://pl.pinterest.com/bestfile24/ Our Best Pin Board -> https://www.pinterest.com/bestfile24/games-and-programmes-of-highest-quality/ Twitter -> https://twitter.com/bestfile24 Plurk -> https://www.plurk.com/bestfile24 Tumblr -> https://www.tumblr.com/blog/bestfile24 Vk -> https://vk.com/id484318694 Google+ -> https://plus.google.com/u/0/111792510074743799172 Wordpress Blog -> https://bestfile24.wordpress.com/blog/ For more information, please visit! Games and Programmes of Highest Quality
0 notes
Text
Comando alias no Linux (atalhos de teclado) [Guia Básico]

Uma facilidade importante do shell é a possibilidade de criarmos apelidos ou atalhos para os comandos. Ele pode ser utilizado para simplificar comandos com muitas opções ou executar diversos processos em sequência. O comando alias cria estes atalhos: $ alias apelido="comandos" Neste exemplo o apelido psweb corresponde aos comandos ps -e | grep nginx: $ alias psweb="ps -e |grep nginx" $ psweb 9113 ? 00:00:00 nginx 9115 ? 00:00:22 nginx 9116 ? 00:00:00 nginx A lista de apelidos pode ser exibida com o comando alias sem nenhum parâmetro: $ aliasalias ..=��cd ..’alias ...=’cd ../..’alias l=’ls -alF’alias la=’ls -la’alias ll=’ls -l’alias ls=’/bin/ls $LS_OPTIONS’alias psweb="ps -e |grep nginx" Algumas distribuições fazem uso de alguns apelidos pré-configurados para facilitar a "transição" de usuários acostumados com prompt do Windows. Outras incluem opções em comandos como rm e mv, para evitar sobrescrever arquivos sem perguntar: $ alias alias rm=’rm -i’ alias mv=’mv -i’ Um alias interessante para verificar o tamanho de um diretório e seus subdiretórios pode ser feito com: $ alias dus='du -sh ./*/' Outro alias bem "preguicinha" é para abrir um arquivo tar: $ alias untar='tar -zxvf ' Se você quiser uma forcinha pra criar uma senha de 8 caracteres: $ alias senha='openssl rand -base64 8' Você também pode imitar o ping do Windows com somente 5 pongs: $ alias ping='ping -c 5' Se precisar de um servidor web em qualquer diretório para fazer uns testes rápidos: $ alias www='python -m SimpleHTTPServer 8000' Quer saber qual é o seu IP externo (válido na Internet) direto no shell? $ alias meuip='curl ipinfo.io/ip' Vários comandos podem ser executados com o alias de uma só vez, utilizando o ponto-e-virgula ";" para separá-los: Neste exemplo, os comandos w, free e df são executados com o apelido "verifica": $ alias verifica='w|grep load ; free -h; df -h'$ verifica 11:13:51 up 20:54, 1 user, load average: 0,00, 0,00, 0,00 total used free shared buff/cache availableMem: 983M 139M 201M 11M 642M 661MSwap: 0B 0B 0BSist. Arq. Tam. Usado Disp. Uso% Montado em/dev/xvda1 16G 11G 5,3G 68% /tmpfs 99M 0 99M 0% /run/user/1000 É importante ressaltar que um apelido criado no shell somente existirá de forma permanente se for salvo em algum script de carga do Bash ou nos arquivos de configuração de perfil. Se você não salvar seus alias, quando se desconectar, irá perder seus atalhos de teclado. Sugere-se para tornar permanente os atalhos, salvá-los no arquivo .bashrc no diretório HOME do usuário. https://youtu.be/P8xSXzKaC-I Conclusão Se você usa bastante o shell, você precisa criar sua própria lista de atalhos com o comando alias para ganhar produtividade. Só não fique dependente.... :-D Aprenda muito mais sobre Linux em nosso curso online. Você pode efetuar a matrícula aqui. Se você já tem uma conta, ou quer criar uma, basta entrar ou criar seu usuário aqui. Gostou? Compartilhe Read the full article
0 notes
Text
Can you really develop with Linux GUI Apps on Windows 10 with WSLg? How about PyCharm?
I blogged about How to run Linux GUI apps on Windows 10 with WSL and WSLg, but how "real" is this? Are these just toy apps? Nope.
I wanted to see if I could install the Community Edition of PyCharm on Ubuntu 20.04. Even though I can't use "snaps" yet on WSL (because of systemd support in progress) I can easily just get the tar file, untar it, and run it and it works.
I did a wget of the standalone, then tar xzf'ed into a folder and ran pycharm.sh and it literally just worked.
When debugging I did get an "unable to execute x86_64-linux-gnu-gcc" error but that's just because I hadn't setup build-essentials yet. Once I installed the right stuff I was all set.
sudo apt-get install build-essential autoconf libtool
Cool looking, eh?
I prefer to do most of my Linux dev using VSCode Remote but there's a TON of options here now that you can run Windows apps, Linux apps, or split-brain apps with half inside Linux and half in Windows. Amazing stuff!
You can learn about WSLg over in their GitHub, it's all open source.
Sponsor: Extend your runway and expand your reach. Oracle for Startups delivers enterprise cloud at a startup price tag with free cloud credits to help you reel in the big fish—confidently. Learn more!
© 2021 Scott Hanselman. All rights reserved.


Can you really develop with Linux GUI Apps on Windows 10 with WSLg? How about PyCharm? published first on https://deskbysnafu.tumblr.com/
0 notes
Text
Can you really develop with Linux GUI Apps on Windows 10 with WSLg? How about PyCharm?
I blogged about How to run Linux GUI apps on Windows 10 with WSL and WSLg, but how "real" is this? Are these just toy apps? Nope.
I wanted to see if I could install the Community Edition of PyCharm on Ubuntu 20.04. Even though I can't use "snaps" yet on WSL (because of systemd support in progress) I can easily just get the tar file, untar it, and run it and it works.
I did a wget of the standalone, then tar xzf'ed into a folder and ran pycharm.sh and it literally just worked.
When debugging I did get an "unable to execute x86_64-linux-gnu-gcc" error but that's just because I hadn't setup build-essentials yet. Once I installed the right stuff I was all set.
sudo apt-get install build-essential autoconf libtool
Cool looking, eh?
I prefer to do most of my Linux dev using VSCode Remote but there's a TON of options here now that you can run Windows apps, Linux apps, or split-brain apps with half inside Linux and half in Windows. Amazing stuff!
You can learn about WSLg over in their GitHub, it's all open source.
Sponsor: Extend your runway and expand your reach. Oracle for Startups delivers enterprise cloud at a startup price tag with free cloud credits to help you reel in the big fish—confidently. Learn more!
© 2021 Scott Hanselman. All rights reserved.


Can you really develop with Linux GUI Apps on Windows 10 with WSLg? How about PyCharm? published first on http://7elementswd.tumblr.com/
0 notes
Text
Install JDK
We need to install Java Developer Kit.
I download from https://www.oracle.com/technetwork/java/javase/downloads/jdk8-downloads-2133151.html
For download the installer, we need a account in Oracle. I discharged “jdk-8u241-linux-x64.tar.gz” for web explorer and after copy the file to three VM.
I tried download JDK directily from VM , but i had problem with login Oracle.
Ok, let’s go to install java.
First “Untar” the file:

Now we need to set the enviroment variable “JAVA_HOME”. for that we write the path in the file “.bash_profile”.
For edit the file, typing

Wirte the new enviroment variable, and add the new variable to PATH
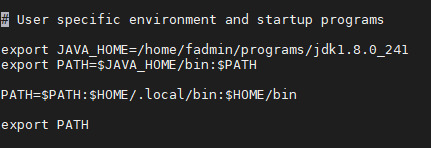
Save the changes, press “esc”,“:wq”, “enter”.
Now we need reload the enviroment variable, typing

Just now we can use “java”.
For test the install. Check the version:

0 notes