#netgear ex2700 setup without wps
Explore tagged Tumblr posts
Visit Tumblr Blog
Explore Tumblr blogs with no restrictions, modern design and the best experience.
Last Seen Tumblr Blogs


Fun Fact
Users from the US are the majority of Tumblr visitors.
Link
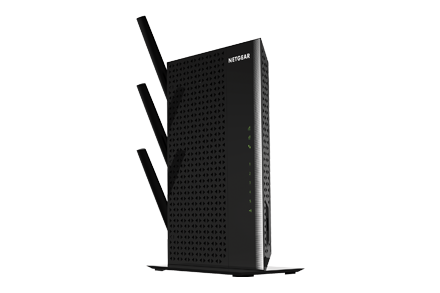
Netgear EX2700 setup. Step-by-step procedure to setup Netgear EX2700 using mywifiext.net 192.168.1.250. Also Setup Netgear via WPS.
Netgear Ex2700 setup via 192.168.1.250
Follow the beneath steps to setup:
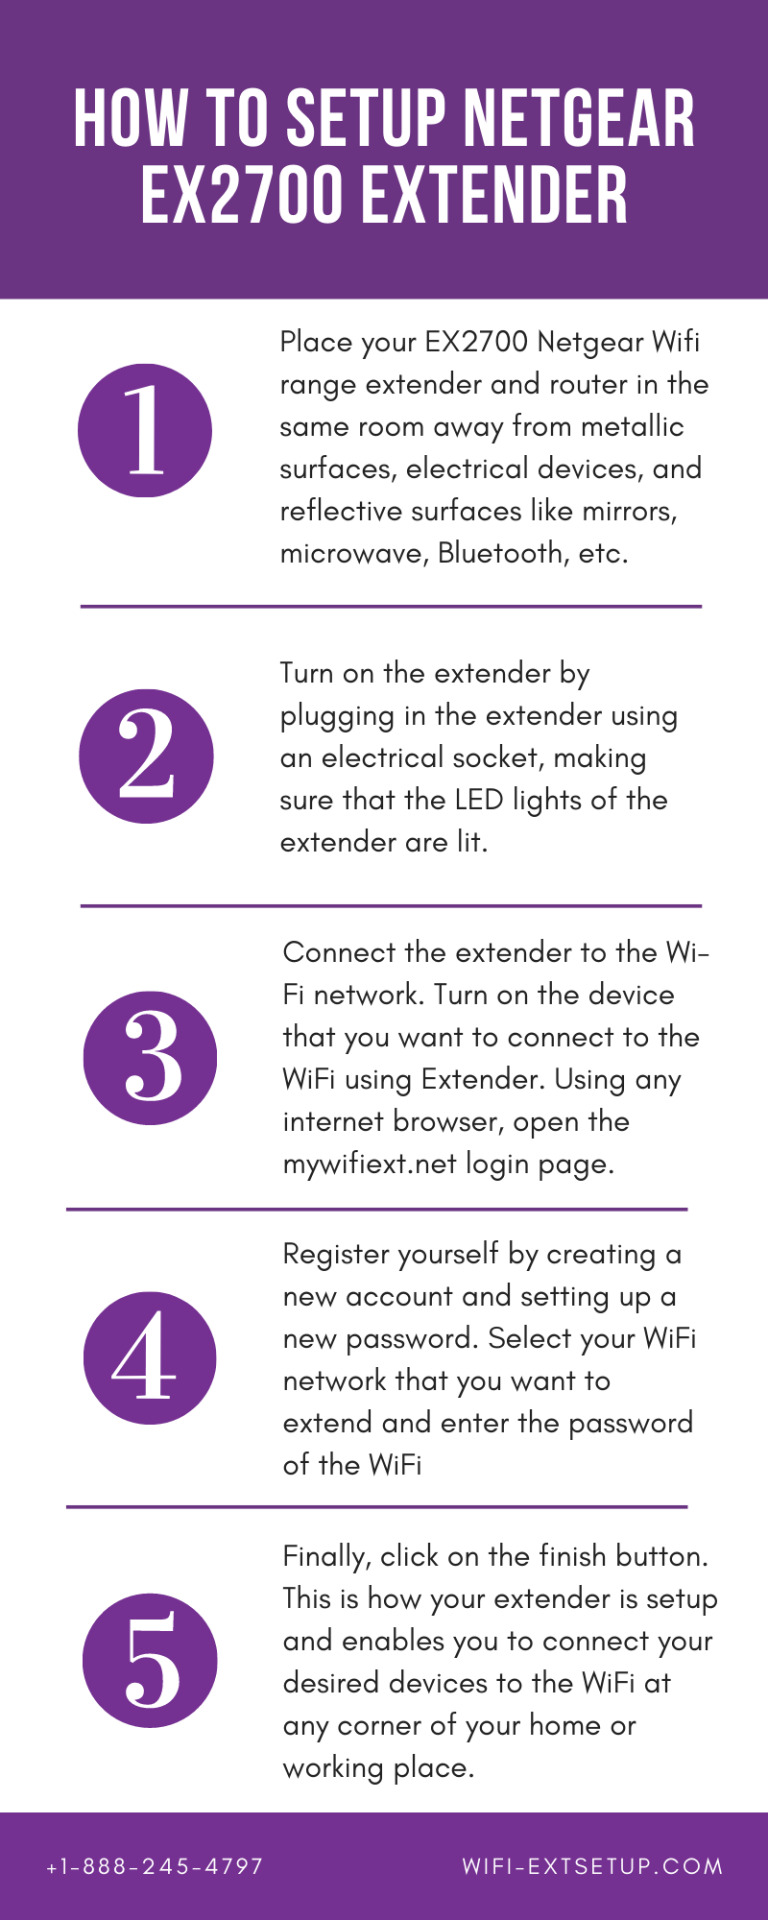
Firstly make sure to plug in your extender near to the router and hold on till the power LED turns amber.
Now take your device, go to wifi list and connect with Netgear extender’s default wifi called Netgear_Ext.
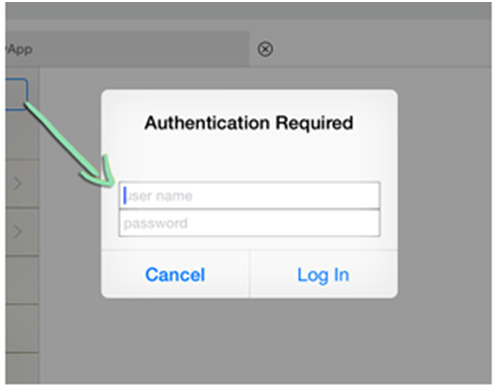
Then from your connected device open any web browser and enter 192.168.1.250 or mywifiext.net in the address bar.
Further, you will see the New Extender Setup page, here create your new extender account.
After that, it will automatically scan your available wifi list among the wifi names select your main wifi network, and enter the password.
#netgear ex2700 setup#netgear ex2700 manual#netgear wifi range extender ex2700 setup#netgear ex2700 setup ethernet port#netgear ex2700 setup without wps#netgear ex2700 setup manual#netgear wifi extender ex2700 setup without wps#new extender setup netgear ex2700#netgear range extender ex2700 setup#netgear wifi booster ex2700 setup#Mywifiext.net#mywifiext.net ac750#mywifiext.net login#http mywifiext net setup
0 notes
Text
How to Setup Mywifiext Ex2700 Extender Without WPS?
Wifi range extension has now become essential to carry. Settling down with provided wi-fi range is so conventional; chart out with mywifiext ex2700 setup and never let wifi range come in your way to success.
0 notes
Text
Netgear Ex2700 Wireless Range Extender Setup | Mywifiext- Setup.
youtube
The EX2700 has a manual Method include which effectively associates with gadgets that likewise have WPS ability. This article will show the bit by bit methodology on the best way to introduce the EX2700 Wireless Range Extender and Mywifiext.Net Extender Setup utilizing the Manual Setup button.
To install the EX2700 via Manual Setup:
Spot the extender in a similar room as the Wi-Fi Router.
Ensure you have a live web association coming from the fundamental switch. Additionally, ensure that the switch is WPS able.
Note: WPS doesn't uphold WEP Security. Change the security of your primary switch to WPA2-PSK(AES) for ideal execution.
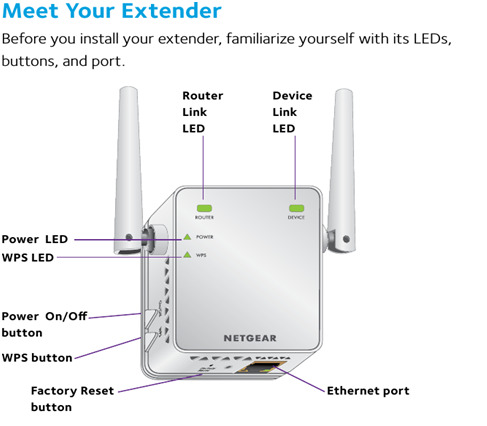
Attachment the extender into an electrical source and sit tight for the Power LED to get steady.
In the event that it doesn't turn ON, press the On/Off catch as an afterthought board of the extender.
Press the WPS button for around 2 seconds as an afterthought board of the extender. The WPS LED flickers.
Inside 2 minutes, press the WPS button on your principle switch.
The WPS LED on the Extender should go to strong green and
Router Link LED ought to likewise turn strong green to show that your EXT is associated with your fundamental organization.
Move the extender to your favored area however ensure it is in the middle of the switch and the remote gadgets to acquire a decent sign. See What is the best situation to put my Netgear Ex2700 Extender Setup in my present organization arrangement?
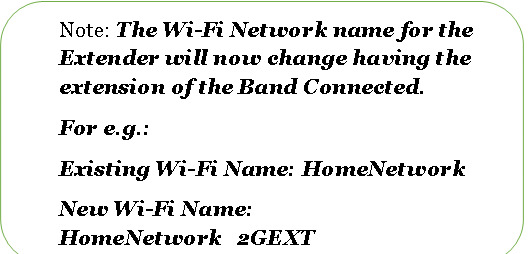
You would now be able to interface your remote gadgets to the Extender's new SSID.
The extender's remote organization name (SSID) changed to your current WiFi network name with "_EXT" toward the end.
The secret word to be utilized will be a similar Wi-Fi secret phrase on your fundamental switch.
Model:
Existing WiFi Network name (SSID): MyHomeNetwork
New Extender WiFi Network name (SSID): MyHomeNetwork_EXT
Note: If your remote gadgets has a WPS highlight; press the WPS button
on the EXT and inside 2 minutes, press the WPS button on your remote gadget to quickly associate them without composing the remote secret word.
#Wifi Ext Setup#Mywifiext.Net#Netgear Extender Setup#Mywifiext local#Mywifiext-Help#Mywifiext-Setup#EX2700 Setup#Range Extender Setup#Wifi Extender support#SSID Extender Setup#Netgear Extender. Net#Netgear Extender tech#Wifi Network Setup
1 note
·
View note
Text
Netgear EX2700 Setup |N300

How do I set up my Netgear EX2700? Open your web browser and go to mywifiext.net.
Setup instructions for the Netgear EX2700After that, you'll see the New Extender Setup button, which you must select.
All you have to do now is follow the instructions on the screen.The Netgear EX2700 is now ready to be relocated to its new home.External antennas on the EX2700 WiFi Range Extender let you extend the range of your wireless router, improve WiFi range, and eliminate dead spots for better performance.
Netgear EX2700 Setup without WPS | N300
To set up your Netgear EX2700 WiFi Range Extender without utilising WPS, follow the steps below:
Wait for the Power LED to stabilise before connecting in the Netgear N300 EX2700 extender.
Place the extender in the same room as the WiFi router for the initial Netgear EX2700 configuration without WPS.
The extender will take some time to get up to speed.
Your router is connected to the Netgear N300 extender EX2700.
After connecting, the Device Link LED should be solid green.
Open a web browser to get started. This should take you to NETGEAR genie, which can help you set up your router.
If you don't see NETGEAR genie in the address bar, try mywifiext.net or mywifiext.net EX2700.
It will be necessary to create a Username and Password.
Netgear N300 EX2700 Setup Common Issues
Mywifiext.net is currently unavailable.
The password for mywifiext is wrong.
Despite the fact that the WiFi extension is connected, there is no internet access.
Because the WiFi extender is not connected to the network, Mywifiext.local is unavailable.
The Netgear genie app was not able to be launched.
N300 is not available at www mywifiext net.
The IP address 192.168.1.250 is not reachable.
The configuration has been lost. CD
Wi-Fi connectivity issues
The Netgear genie smart setup page appears even after the Netgear N300 EX2700 is set up.
Have you forgotten the default password for your Netgear extender?
Extender's LED lights aren't always reliable.
Mywifiext.com is not accessible.
My Netgear EX2700 extender won't let me log in.
The EX2700 is unable to connect to the internet.
My Netgear router's firmware cannot be updated.
Due to MAC address filtering issues, I am unable to browse mywifiext.net after updating the EX2700.
After a failed upgrade, the EX2700 has stopped working.
The WiFi extension does not seem to be able to connect to the internet.
The name of the Netgear range extender network has been forgotten.
Netgear's extender isn't working.
On the Netgear EX2700, there is no internet.
My Netgear extension's red light is causing me trouble.
Incompetent to perform Set the Netgear extender to its default settings.
Although there is internet access, it is not operational.
Netgear WiFi Extender EX2700 Setup | N300 Troubleshooting Steps
Follow the troubleshooting techniques given below to resolve Netgear WiFi Extender EX2700 configuration issues:
Examine the wall outlet to determine if the Netgear N300 EX2700 extender is receiving enough power.
Check to verify if the extension is hooked into a damaged or short-circuited wall plug.
Use your device to connect to a high-speed internet connection.
Check that all of the wiring connections are in good working order.
Avoid using any cable that has been tampered with.
Keep your extension cord away from walls, room corners, microwave ovens, fish tanks, cordless phones, Bluetooth devices, metal objects, aluminium studs, and other potential interference sources.
Check that the URL in the address bar is correct if you're having problems with www mywifiext net N300.
After restarting your Netgear extender, try setting it up again.
Only use the most recent version of your web browser while logging onto mywifiext.net.
Your extender's Netgear firmware should be updated to the most recent version.
Reset the addon's settings to their factory defaults.
Have you exhausted all of the aforementioned troubleshooting options and still can't find a solution? Don't be concerned. To resolve any Netgear N300 EX2700 extender configuration concerns, simply contact us.
Netgear EX2700 Setup via WPS
If you're looking for instructions on how to set up a Netgear EX2700 with WPS, you've come to the right place. The procedure is as follows:
Turn on the Netgear N300 EX2700 extender.
In the same room, place the WiFi router and extender.
Connect your extension to an electrical outlet once you're done.
Wait for the Power LED on the EX2700 to turn green.
Press the WPS button on the extender.
If When the Netgear EX2700 Link Status LED turns white, your router and extender are connected properly.
Note: If your router supports the 5 GHz band, your extender will attempt to connect to the router's 5 GHz band the first time you press the WPS button. If your Netgear EX2700 WiFi extender fails to connect to the router's 5 GHz band the first time, it could cause a plethora of issues during setup.
Move your extender to a new spot.
Bring your WiFi-enabled PC or smartphone to an area where the WiFi router's signal is weak.
Join the expanded network with your WiFi-enabled PC or mobile device.
That's how you end your Netgear EX2700 setup with the WPS button.
Netgear EX2700 Setup Firmware Update
Is your WiFi extender behaving weirdly lately? Is it still not providing the desired speed after a successful Netgear WiFi extender EX2700 configuration? If this is the case, you should update the firmware on your Netgear extender as soon as possible. Firmware is a set of instructions embedded into the hardware of the Netgear Extender. In layman's terms, Netgear extender firmware is an operating system tailored to your particular brand and model number of extender. As a result, make sure the firmware on your extension is up to date. To upgrade the firmware on a Netgear EX2700, follow these steps:
Turn on your Netgear N300 EX2700 WiFi extender to get started.
Connect the router to the extender.
Open your favourite web browser after that.
Type www mywifiext net N300 into the address box and hit enter.
Log in to your extender using the username and password.
Go to the settings menu and select Firmware Upgrade to upgrade the firmware.
Then, on the next screen, click the Check button.
If a new version of the firmware is available, select yes to upgrade it.
Allow time for the Netgear EX2700 firmware to be updated properly.
0 notes
Text
How To Setup Netgear AC750 Wifi Range Extender | EX3110
With so many of us now working from home, or just bingeing on Netflix and YouTube because of lockdown restrictions, it’s easy to find that your home Wi-Fi network starts to struggle with all that online activity, even if you have one of the best wireless routers money can buy. In this article we will provide a step-by-step procedure on how to configure the Access Point functionality of an EX3110 to boost the Wi-Fi signal.Netgear AC750 Extender can help you to extend your home network up to 1000 square feet. Netgear AC750 EX3110 WiFi Range Extender boosts your dual-band WiFi.
youtube
When to Use Your Extender
NETGEAR recommends that you connect through the extender network only when the WiFi device is in a “dead zone” where connection from the existing network is poor or nonexistent. Data traffic routed through the extender is inherently slower than traffic routed directly from the network.
Three ways To Setup Your AC750 | EX3110 Netgear Wifi Range Extender
When you buy a brand new AC750 EX3110 extender, you will get a manual in the package. This Netgear EX3110 Manual contains a series of setup steps from starting to ending. With the help of these instructions you can easily setup AC1750 EX3110 Extender. But these Netgear AC750 EX3110 Setup instructions are very difficult to understand for regular users.In this blog post we try to help to set up your new extender in a very easy way. There are three different ways to set up to extender:-
1. Manual Method 2. WPS Method 3. With Ethernet Cable
AC750 EX3110 Extender Setup Using Manual Method
Setting up your EX3110 Netgear range extender is really easy and you can do it on your own without the help of anyone else, all you need is to follow this step by step guide.
1. The first thing that you need to do is attach the antennas to the extenders, turn them clockwise in order to tighten them, and make sure that the antennas are properly tightened.
2. Turn On Your Extender by plugging it into the extender, Wait till the extender is turned on and the power led light to stop blinking Once the device is fully booted up.
3. Connect your extender using an ethernet cable or the wifi connection with your devices such as a laptop or mobile
4. Open a web browser on your device and type URL mywifiext.net. Netgear EX3110 Setup page display on your screen.
5. Log in to your account with your user name and password. Create a new account if you don’t have one. follow all steps that come your way and connect your device to your router network.
6. Select your location where you want to set up your extender.
7. Finally, Now you can connect your devices with the extender network and enjoy the network.
Congrats, you have successfully set up your new Netgear range extender, in case you are facing an issue with login into your Netgear extender read our extender login guide.

Connect your AC750 EX3110 range extender using WPS Method:
WPS connection lets you join a secure WIFI network without selecting the network name and entering the password.
1. Place your extender in the same room as your WiFi router.
2. Plug the extender into an electrical outlet. If the Power LED does not light, press the power button on the extender.
3. Press and hold the WPS button on the extender until the WPS light starts blinking green.
4. If the Netgear AC750 Link Status LED lights white, the connection between your router and extender is good.
5. Move the extender to a new location that is about halfway between your router and the area with a poor router WiFi signal. Wait until the Power LED lights solid green and router link LED lights up.
6. Connect your WiFi-enabled computer or mobile device to the extended network.

Extender EX3110 Setup Through Ethernet
With the help of an Ethernet extender, it's quite simple to do. Ethernet extenders are typically plug-and-play devices, so they're easy to set up.
1. Connect the Ethernet cable that came with your extender to an Ethernet port on your router or connection hub. Before you installed the extender, your computer was connected to the router or connection hub through a cable; that can remain in place.
2. Plug the other end of the Ethernet cable into the Ethernet port on the extender.
3. Connect the extender to a power source.
4.Plug the router or connection hub into a power source, if it is not already plugged in. Wait for the router and extender's signal lights to illuminate, confirming a connection. Every product is slightly different, so consult the user manual for your extender to determine what type of signal lights you should be looking for.
5. Lastly, It’s time to connect all your devices back to the extender Still unable to complete the Netgear extender setup. Looking for some help.
In case if you are facing any issue with login into your Netgear extender Call us on Toll-Free Number +1-888-245-4797.If you want to set up your EX2700 – N300 Netgear Extender So go to this post and learn how to setup EX2700 N300 Extender. We try to explain in a very easy way.
0 notes
Text
configure Netgear EX2700 WiFi extender
When you step out in the market to get the best extender, you will find a range of routers and extenders. You will find it a lot confusing and we are going to make it quite easier for you. There are multiple settings that are present on these modern routers that will make sure you are getting the best security for your network. access control feature for netgear wifi extender

The mywifiext setup is the portal that will be used to configure the extender. If the host router that you have installed comes with a WPS button, you will not need any web browser or app to configure the extender. All you will need to do is press the WPS button on the host and then, press the Sync/Internet button present on the extender.
How to configure?
In this section, we are going to discuss the steps you need to follow to successfully configure the extender. Let’s dive in.
1. When you are about to set up, make sure that the host and the extender are in the same room.
2. Next, cross-check if the internet is up and running without any issue.
3. Now, you will need to plug the extender into the power socket and wait for it to turn on. The power LED will get stable.
4. Connect your device to the extender using an ethernet cable. Launch a browser on your device.
5. It will automatically take you to the mywifiext net setup and enter the login credentials.
6. Follow the on-screen instructions to configure it successfully.
These are also the steps you will need to follow if you are setting up the extender wirelessly. The older routers don’t come with the WPS setup and for that, you will have to use the web browser or the app. The router/extender will also provide you with a range of security features to keep the network safe.
0 notes
Text
NetGear EX2700 Setup Wizard
NetGear EX2700 is one more addition to the Extender device available with NetGear. Wireless Extender is a hardware that provide a more strengthened Wi-Fi signal by enhancing the strength of the already existing Network in your home or work area. Generally, if you have to be using high resolution console or if you are into Gaming zone, then definitely a wireless extender will come into use for an enhanced signal area.
Setting up the device can be easily done using two methods:
· Automatic WPS setting
· Manual Setting using www.mywifiext.net
Let’s learn both in easy steps:
Automatic WPS setup:
Wi-Fi protected Setup(WPS) allows you to get connected with any Wi-Fi network without the need of the Network name and password. WPS Button is present on the device, on the rear-side.
Let’s walkthrough the steps involved in WPS setup:
1. As soon as the device is connected to the power cable, make sure all the connections are tight and firm.
2. Let the lights on the device come to stand as Solid Green.
3. Now press the circle WPS button and wait for the corresponding WPS light to start blink.
4. Wait for next 1 to 2 minutes and then go ahead to press the WPS button on the other Device you want the connection to be with.
5. On the successful connectivity of both the devices, the WPS light of the EXENDER DEVICE should now turn to Green Solid along with the 2.4GHz link Light on the other device.
6. Repeat the same steps as described in 4 and 5 steps to connect if you have a router of 5GHz band.
Setup with NetGear Genie or through www.mywifiext.net:
www.mywifiext.net is the page where you can customize your preference in the settings of the router or extender you have. Let’s learn it a simple way:
1. As soon as you are ready with all the devices connected along and with the power supply, check that all the connections are firm and tight.
2. Similar to already defined steps, turn on the EXTENDER and wait for the GREEN light to come solid.
3. Now reach out for an Ethernet Cable to connect your Mobile devices or Computer to the Internet.
4. Open the browser and go to the www.mywifiext.net and the Genie wizard will open up.
5. Provide your credentials in terms of USERNAME and PASSWORD and choose LOG IN.
6. If you don’t have already setup account, then DEFAULT USERNAME: admin and DEFAULT PASSWORD: password
7. You will be redirected to a new window, choose the option Netgear WN2500RP Extender Setup
8. Again, if you don’t already have an account so you will get the option to create one and click the NEXT button

#My Wifi Extender Setup#Netgear EX7500 Mesh Extender#Netgear EX7700 Mesh Extender#Netgear EX6100 Extender Setup#Netgear WN2500RP Extender Setup#Netgear EX6400 Mesh Extender#Netgear EX6150 Extender Setup#Netgear Mesh Extender
0 notes
Text
Netgear wifi range extender wn3000rpv3 factory reset
The NETGEAR WiFi Range Extender helps you to increase the distance of your WiFi network by boosting the existing one and enhancing the overall signal strength over long distances. These extenders repeat the signals from the existing WiFi router and access points.
Connect with web browser setup
When the extender is connected to your existing WiFi network, then you can connect a wired device using an Ethernet cable. The device can then access your current network through the WiFi connection. Use an Ethernet cable to connect the extender to the Ethernet port on a router LAN access. Check out the way here to work the device EX2700 as the internet booster.
The NETGEAR provides the best service in fixing the extender in online too. Their experienced network engineers help you to set up a perfect and wide range network in your home and workplace. Log on to www mywifiext net login and get the step by step procedure to connect your extender with your router.
www mywifiext net login provides the best service in WiFi extenders. In extended mode, the Netgear wifi range extender repeats the same signal from the existing WiFi router.
A simple step to connect the extender with your WiFi network places it in the required place, power on, and connects it to with your WiFi network.

Place the Extender and Apply Power
1. Place your extender where your WiFi router is fixed.
2. Plug the extender in an electrical outlet and wait for the Power LED to get green.
3. If the LED does not light green, then press the Power ON/OFF button on the extender.
Connect the extender to an Existing WiFi Network
To extend the range of your WiFi network, you must connect an extended to your existing WiFi network. You have two options for connecting:
• Connect with WPS
WPS - Wi-Fi Protected Setup allows you to add a secure WiFi network without the requirement of network name and password.
0 notes
Text
Netgear EX2700 WiFi extender setup using WPS button
We all are aware of the most common and well-known computer networking company namely, Netgear. Basically this company is based in San Jose, California and having offices in the other countries too. This company deals in three major operations which are retail, commercial and also acts as the service provider.
Netgear deals in wireless products like Wifi and LTE. The main goal of netgear is to provide their customer a regular internet supply.
The most common products made by Netgear is EX2700. From this blog, you can get the answer of how to extend wifi setup by the use of WPS button. You can also visit the weblink www. mywifi ext. net setup for more information related to this topic.
Step 1: Before starting operation make sure that you have placed your extender and wifi in the same room.
Step 2: Check your internet connection just make sure that your internet connection must be coming from the main router.
Note: WEP security is not supported by WPS. So, it is important to change security of your main router to WPA2-PSK(AES) for getting best results.
Step 3: Attach the extender into the power supply and let the power LED to be stable. In case if it does not turn on, then press ON/OFF button which you can find on the side of the extender.
Step 4: After pressing the ON/OFF button for around 2 seconds, the WPS LED will blinks
Step 5: Wait of around 2 minutes press your WPS button on your main router.
Step 6: Both of WPS LED and router link must turn into solid green, which will show that your EXT and network is successfully connected.
Step 7: You can change the location of your extender, but always keep in mind that your wireless device and your router must be on that location so that they can acquire good or efficient signal strength.
Step 8: Good news! Now you can connect any of your wireless device to your extender. After doing all this procedure the name of your wirless device has been changed to your existing Wifi network name having “_EXT” at the end.
You can use the same wifi password on the router
For example
o Existing WiFi Network name (SSID): MyHomeNetwork
o New Extender WiFi Network name (SSID): MyHomeNetwork_EXT
Special note: Just press the WPS button on the EXT, if you are having WPS feature for your wireless device and after the waiting around 2 minutes, just press the WPS button on your wireless device which will let you to connect without typing any wireless password.
#Netgear booster setup#www mywifiext net login#Netgear_ext#Netgear extender wn2000rpt#Netgear wn2000rpt reset#Netgear wn2000rpt setup#WiFi extender n300
0 notes
Text
How to Setup Mywifiext Ex2700 Extender Without WPS?
Wifi range extension has now become essential to carry. Settling down with provided wi-fi range is so conventional; chart out with mywifiext ex2700 setup and never let wifi range come in your way to success.
0 notes
Text
Netgear AC750 Wifi Range Extender Setup | EX3110
With so many of us now working from home, or just bingeing on Netflix and YouTube because of lockdown restrictions, it’s easy to find that your home Wi-Fi network starts to struggle with all that online activity, even if you have one of the best wireless routers money can buy. In this article we will provide a step-by-step procedure on how to configure the Access Point functionality of an EX3110 to boost the Wi-Fi signal.Netgear AC750 Extender can help you to extend your home network up to 1000 square feet. Netgear AC750 EX3110 WiFi Range Extender boosts your dual-band WiFi.
youtube
When to Use Your Extender
NETGEAR recommends that you connect through the extender network only when the WiFi device is in a “dead zone” where connection from the existing network is poor or nonexistent. Data traffic routed through the extender is inherently slower than traffic routed directly from the network.
Different ways To Setup Your AC750 | EX3110 Netgear Wifi Range Extender
When you buy a brand new AC750 EX3110 extender, you will get a manual in the package. This Netgear EX3110 Manual contains a series of setup steps from starting to ending. With the help of these instructions you can easily setup AC1750 EX3110 Extender. But these Netgear AC750 EX3110 Setup instructions are very difficult to understand for regular users.In this blog post we try to help to set up your new extender in a very easy way. There are three different ways to set up to extender:-
1. Manual Method 2. WPS Method 3. With Ethernet Cable
AC750 EX3110 Extender Setup Using Manual Method
Setting up your EX3110 Netgear range extender is really easy and you can do it on your own without the help of anyone else, all you need is to follow this step by step guide.
1. The first thing that you need to do is attach the antennas to the extenders, turn them clockwise in order to tighten them, and make sure that the antennas are properly tightened.
2. Turn On Your Extender by plugging it into the extender, Wait till the extender is turned on and the power led light to stop blinking Once the device is fully booted up.
3. Connect your extender using an ethernet cable or the wifi connection with your devices such as a laptop or mobile
4. Open a web browser on your device and type URL mywifiext.net. Netgear EX3110 Setup page display on your screen.
5. Log in to your account with your user name and password. Create a new account if you don’t have one. follow all steps that come your way and connect your device to your router network.
6. Select your location where you want to set up your extender.
7. Finally, Now you can connect your devices with the extender network and enjoy the network.
Congrats, you have successfully set up your new Netgear range extender, in case you are facing an issue with login into your Netgear extender read our extender login guide.

Connect your AC750 EX3110 range extender using WPS Method:
WPS connection lets you join a secure WIFI network without selecting the network name and entering the password.
1. Place your extender in the same room as your WiFi router.
2. Plug the extender into an electrical outlet. If the Power LED does not light, press the power button on the extender.
3. Press and hold the WPS button on the extender until the WPS light starts blinking green.
4. If the Netgear AC750 Link Status LED lights white, the connection between your router and extender is good.
5. Move the extender to a new location that is about halfway between your router and the area with a poor router WiFi signal. Wait until the Power LED lights solid green and router link LED lights up.
6. Connect your WiFi-enabled computer or mobile device to the extended network.

Extender EX3110 Setup Through Ethernet
With the help of an Ethernet extender, it's quite simple to do. Ethernet extenders are typically plug-and-play devices, so they're easy to set up.
1. Connect the Ethernet cable that came with your extender to an Ethernet port on your router or connection hub. Before you installed the extender, your computer was connected to the router or connection hub through a cable; that can remain in place.
2. Plug the other end of the Ethernet cable into the Ethernet port on the extender.
3. Connect the extender to a power source.
4.Plug the router or connection hub into a power source, if it is not already plugged in. Wait for the router and extender's signal lights to illuminate, confirming a connection. Every product is slightly different, so consult the user manual for your extender to determine what type of signal lights you should be looking for.
5. Lastly, It’s time to connect all your devices back to the extender Still unable to complete the Netgear extender setup. Looking for some help.
In case if you are facing any issue with login into your Netgear extender Call us on Toll-Free Number +1-888-245-4797.If you want to set up your EX2700 – N300 Netgear Extender So go to this post and learn how to setup EX2700 N300 Extender. We try to explain in a very easy way.
#Login to Netgear AC750 EX3110 extender#Netgear AC750 EX3110 extender setup#AC750 EX3110 extender setup#Extender setup guide#Extender setup help#Wifi-extsetup#How to setup EX2700 extender#Install your EX2700 extender#Netgear 2700 extender setup#Simple steps for extender setup#How to setup AC750 EX3110 extender#Install your AC750 EX3110 extender
0 notes
Text
How to Setup Netgear Range Ex2700 Extender | guide step by step?
youtube
The EX2700 range extender has a WPS feature which easily connects to devices that also have WPS capability. This article will show the step-by-step procedure on how to install the EX2700 – N300 Wireless Range Extender using the WPS button.
To install the EX2700 via WPS:
Place the extender in the same room as the Wi-Fi Router.
Make sure you have a live internet connection coming from the main router. Also, make sure that the router is WPS capable.
Note: WPS does not support WEP Security. Change the security of your main router to WPA2-PSK(AES) for optimal performance.
Plug the extender into an electrical outlet and wait for the Power LED to become stable. If it does not turn ON,
press the On/Off button on the side panel of the extender.
Press the WPS button for about 2 seconds on the side panel of the extender. The WPS LED blinks.
Within 2 minutes, press the WPS button on your main router.
The WPS LED on the Extender should turn to solid green and
the Router Link LED should also turn solid green to show that your EXT is connected to your main network.
Move the extender to your preferred location but make sure it is in between the router
and the wireless devices to acquire a good signal.
See What is the best position to place my EX2700 in my current network setup?
You can now connect your wireless range extender devices to the Extender’s new SSID.
The extender’s wireless network name (SSID) changed to your existing WiFi network name with “_EXT” at the end.
The password to be used will be the same Wi-Fi password on your main router.
Example:
Existing WiFi Network name (SSID): MyHomeNetwork
New Extender WiFi Network name (SSID): MyHomeNetwork_EXT
Note: If your wireless device has a WPS feature; press the WPS button on
the EXT and within 2 minutes, press the WPS button on your wireless device to instantly connect them without typing the wireless password.

#Wifi Ext Setup#Mywifiext.Net#Netgear Extender Setup#Mywifiext local#Mywifiext-Help#Mywifiext-Setup#Netgear Extender#Range Extender Setup#Ex2700 Login Setup#Login Netgear Extender#Wifi Network Setup#Wifi Extender support#SSID Extender Setup
0 notes