#oauth2 authorization code
Explore tagged Tumblr posts
Visit Tumblr Blog
Explore Tumblr blogs with no restrictions, modern design and the best experience.
Last Seen Tumblr Blogs


Fun Fact
Forty percent of Tumblr users are between the ages of 18 to 25.
Text
PSA: A pretty clever phishing email
I got a message warning me that my Twitter account was about to be suspended for suspicious activity, inviting me to click a button to prevent this. The URL the button went to *was* an x.com link, but it used a security vulnerability in Twitter's backend that allowed redirections to push me to an OATH server that would prompt me for my Twitter login and 2FA, and then send the attacker a valid token they could use to take over my account.
Here's the (redacted) attack link:
https://x.com/ [BREAK INSERTED] i/oauth2/authorize?response_type=code&client_id= [UNIQUE ID REMOVED] Q&redirect_uri=https%3A%2F%2Ftwo.opensourced.us%2Fapi%2Fcallback%3Fi%3Dtwit&scope=tweet.read+users.read+mute.write+tweet.write+tweet.moderate.write+offline.access&code_challenge= [UNIQUE ID REMOVED] &code_challenge_method=plain
123 notes
·
View notes
Text
Spring Security Using Facebook Authorization: A Comprehensive Guide
In today's digital landscape, integrating third-party login mechanisms into applications has become a standard practice. It enhances user experience by allowing users to log in with their existing social media accounts. In this blog post, we will walk through the process of integrating Facebook authorization into a Spring Boot application using Spring Security.
Table of Contents
Introduction
Prerequisites
Setting Up Facebook Developer Account
Creating a Spring Boot Application
Configuring Spring Security for OAuth2 Login
Handling Facebook User Data
Testing the Integration
Conclusion
1. Introduction
OAuth2 is an open standard for access delegation, commonly used for token-based authentication. Facebook, among other social media platforms, supports OAuth2, making it possible to integrate Facebook login into your Spring Boot application.
2. Prerequisites
Before we start, ensure you have the following:
JDK 11 or later
Maven
An IDE (e.g., IntelliJ IDEA or Eclipse)
A Facebook Developer account
3. Setting Up Facebook Developer Account
To use Facebook login, you need to create an app on the Facebook Developer portal:
Go to the Facebook Developer website and log in.
Click on "My Apps" and then "Create App."
Choose an app type (e.g., "For Everything Else") and provide the required details.
Once the app is created, go to "Settings" > "Basic" and note down the App ID and App Secret.
Add a product, select "Facebook Login," and configure the Valid OAuth Redirect URIs to http://localhost:8080/login/oauth2/code/facebook.
4. Creating a Spring Boot Application
Create a new Spring Boot project with the necessary dependencies. You can use Spring Initializr or add the dependencies manually to your pom.xml.
Dependencies
<dependencies> <dependency> <groupId>org.springframework.boot</groupId> <artifactId>spring-boot-starter-security</artifactId> </dependency> <dependency> <groupId>org.springframework.boot</groupId> <artifactId>spring-boot-starter-web</artifactId> </dependency> <dependency> <groupId>org.springframework.boot</groupId> <artifactId>spring-boot-starter-oauth2-client</artifactId> </dependency> <dependency> <groupId>org.springframework.boot</groupId> <artifactId>spring-boot-starter-thymeleaf</artifactId> </dependency> </dependencies>
5. Configuring Spring Security for OAuth2 Login
Next, configure Spring Security to use Facebook for OAuth2 login.
application.properties
Add your Facebook app credentials to src/main/resources/application.properties.spring.security.oauth2.client.registration.facebook.client-id=YOUR_FACEBOOK_APP_ID spring.security.oauth2.client.registration.facebook.client-secret=YOUR_FACEBOOK_APP_SECRET spring.security.oauth2.client.registration.facebook.redirect-uri-template={baseUrl}/login/oauth2/code/{registrationId} spring.security.oauth2.client.registration.facebook.scope=email,public_profile spring.security.oauth2.client.registration.facebook.client-name=Facebook spring.security.oauth2.client.registration.facebook.authorization-grant-type=authorization_code spring.security.oauth2.client.provider.facebook.authorization-uri=https://www.facebook.com/v11.0/dialog/oauth spring.security.oauth2.client.provider.facebook.token-uri=https://graph.facebook.com/v11.0/oauth/access_token spring.security.oauth2.client.provider.facebook.user-info-uri=https://graph.facebook.com/me?fields=id,name,email spring.security.oauth2.client.provider.facebook.user-name-attribute=id
Security Configuration
Create a security configuration class to handle the OAuth2 login.import org.springframework.context.annotation.Bean; import org.springframework.context.annotation.Configuration; import org.springframework.security.config.annotation.web.builders.HttpSecurity; import org.springframework.security.config.annotation.web.configuration.EnableWebSecurity; import org.springframework.security.config.annotation.web.configuration.WebSecurityConfigurerAdapter; import org.springframework.security.oauth2.client.oidc.userinfo.OidcUserService; import org.springframework.security.oauth2.client.userinfo.DefaultOAuth2UserService; import org.springframework.security.oauth2.client.userinfo.OAuth2UserService; import org.springframework.security.oauth2.core.oidc.user.OidcUser; import org.springframework.security.oauth2.core.user.OAuth2User; import org.springframework.security.web.authentication.SimpleUrlAuthenticationFailureHandler; @Configuration @EnableWebSecurity public class SecurityConfig extends WebSecurityConfigurerAdapter { @Override protected void configure(HttpSecurity http) throws Exception { http .authorizeRequests(authorizeRequests -> authorizeRequests .antMatchers("/", "/error", "/webjars/**").permitAll() .anyRequest().authenticated() ) .oauth2Login(oauth2Login -> oauth2Login .loginPage("/login") .userInfoEndpoint(userInfoEndpoint -> userInfoEndpoint .oidcUserService(this.oidcUserService()) .userService(this.oAuth2UserService()) ) .failureHandler(new SimpleUrlAuthenticationFailureHandler()) ); } private OAuth2UserService<OidcUserRequest, OidcUser> oidcUserService() { final OidcUserService delegate = new OidcUserService(); return (userRequest) -> { OidcUser oidcUser = delegate.loadUser(userRequest); // Custom logic here return oidcUser; }; } private OAuth2UserService<OAuth2UserRequest, OAuth2User> oAuth2UserService() { final DefaultOAuth2UserService delegate = new DefaultOAuth2UserService(); return (userRequest) -> { OAuth2User oAuth2User = delegate.loadUser(userRequest); // Custom logic here return oAuth2User; }; } }
6. Handling Facebook User Data
After a successful login, you might want to handle and display user data.
Custom User Service
Create a custom service to process user details.import org.springframework.security.oauth2.core.user.OAuth2User; import org.springframework.security.oauth2.core.user.OAuth2UserAuthority; import org.springframework.security.oauth2.client.userinfo.OAuth2UserService; import org.springframework.security.oauth2.client.oidc.userinfo.OidcUserService; import org.springframework.security.oauth2.core.oidc.user.OidcUser; import org.springframework.security.oauth2.client.userinfo.DefaultOAuth2UserService; import org.springframework.security.oauth2.client.oidc.userinfo.OidcUserRequest; import org.springframework.security.oauth2.client.userinfo.OAuth2UserRequest; import org.springframework.stereotype.Service; import java.util.Map; import java.util.Set; import java.util.HashMap; @Service public class CustomOAuth2UserService implements OAuth2UserService<OAuth2UserRequest, OAuth2User> { private final DefaultOAuth2UserService delegate = new DefaultOAuth2UserService(); @Override public OAuth2User loadUser(OAuth2UserRequest userRequest) { OAuth2User oAuth2User = delegate.loadUser(userRequest); Map<String, Object> attributes = new HashMap<>(oAuth2User.getAttributes()); // Additional processing of attributes if needed return oAuth2User; } }
Controller
Create a controller to handle login and display user info.import org.springframework.security.core.annotation.AuthenticationPrincipal; import org.springframework.security.oauth2.core.user.OAuth2User; import org.springframework.stereotype.Controller; import org.springframework.ui.Model; import org.springframework.web.bind.annotation.GetMapping; @Controller public class LoginController { @GetMapping("/login") public String getLoginPage() { return "login"; } @GetMapping("/") public String getIndexPage(Model model, @AuthenticationPrincipal OAuth2User principal) { if (principal != null) { model.addAttribute("name", principal.getAttribute("name")); } return "index"; } }
Thymeleaf Templates
Create Thymeleaf templates for login and index pages.
src/main/resources/templates/login.html
<!DOCTYPE html> <html xmlns:th="http://www.thymeleaf.org"> <head> <title>Login</title> </head> <body> <h1>Login</h1> <a href="/oauth2/authorization/facebook">Login with Facebook</a> </body> </html>
src/main/resources/templates/index.html
<!DOCTYPE html> <html xmlns:th="http://www.thymeleaf.org"> <head> <title>Home</title> </head> <body> <h1>Home</h1> <div th:if="${name}"> <p>Welcome, <span th:text="${name}">User</span>!</p> </div> <div th:if="${!name}"> <p>Please <a href="/login">log in</a>.</p> </div> </body> </html>
7. Testing the Integration
Run your Spring Boot application and navigate to http://localhost:8080. Click on the "Login with Facebook" link and authenticate with your Facebook credentials. If everything is set up correctly, you should be redirected to the home page with your Facebook profile name displayed.
8. Conclusion
Integrating Facebook login into your Spring Boot application using Spring Security enhances user experience and leverages the power of OAuth2. With this setup, users can easily log in with their existing Facebook accounts, providing a seamless and secure authentication process.
By following this guide,
2 notes
·
View notes
Text
I appear to be having some brain glitching getting in my way here tonight. And, I know that I've got some mutuals who no doubt know way more about this subject than I do. So, I thought I would go ahead and ask for some guidance over here, partly because y'all are likely to be nicer than average about it.
So, what I am trying to accomplish atm: finally get bbolli's tumblr-utils up and running locally, primarily to run personal backups. I am familiar enough with python scripting. What I have fuck all experience with thus far is OAuth.
I do know that I need to obtain my own API key, roughly how to do this, and where to paste that info in.
My major practical level wtf right at the moment is the same as this person was asking about, over 10 years ago:
That is the most relevant thing I could readily find searching. And there was nothing of direct help in replies.
On the registration page, Tumblr is asking for a couple of mandatory fields that I am not sure how to fill in, where the "application" that needs to call the API is a few personal scripts running entirely on localhost.
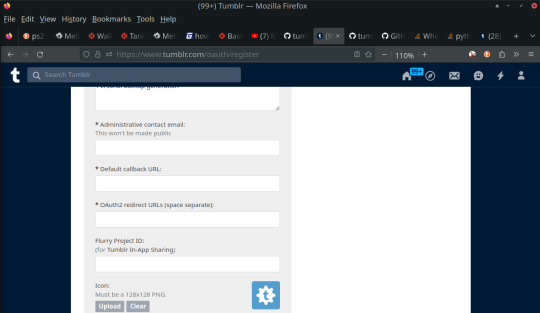
For that matter, I was not sure what to put in under an "Application Website:" URL, but figured that probably made less difference. It's not like this is for public consumption whatsoever, so it got a placeholder.
The only thing I could find about this in tumblr-utils documentation:
Get your personal Tumblr API key. Before June 2020, the author's API key was distributed with the source code, the then Tumblr denied access using this key. Now, each user needs to get their own key at https://www.tumblr.com/oauth/apps. Follow the instructions there; most values entered don't matter. The API key must then be copied between the single quotes in the source code at around line 105 (the line starts with API_KEY = ).
So, does it actually matter what goes into those particular fields in order to get the API key? Or should I just fill in some placeholder URLs for this particular use case? Do these instead need to refer to some script-relevant locations on localhost?
[ETA: From what I understand, the CALLBACK_URL is indeed intended so that Tumblr can call the application back during registration. I am just not sure how this is supposed to work with a local script. Same thing with the OAuth2 redirect URL called for there. What, if anything, would that be? Is it relevant here?]
As is no doubt clear by now, I have zero prior experience in this department. Feeling pretty dumb right now. And I really would appreciate it if anyone with more knowledge could offer some practical advice here.
Right now, I should probably take a little refueling break.
2 notes
·
View notes
Text
You can learn NodeJS easily, Here's all you need:
1.Introduction to Node.js
• JavaScript Runtime for Server-Side Development
• Non-Blocking I/0
2.Setting Up Node.js
• Installing Node.js and NPM
• Package.json Configuration
• Node Version Manager (NVM)
3.Node.js Modules
• CommonJS Modules (require, module.exports)
• ES6 Modules (import, export)
• Built-in Modules (e.g., fs, http, events)
4.Core Concepts
• Event Loop
• Callbacks and Asynchronous Programming
• Streams and Buffers
5.Core Modules
• fs (File Svstem)
• http and https (HTTP Modules)
• events (Event Emitter)
• util (Utilities)
• os (Operating System)
• path (Path Module)
6.NPM (Node Package Manager)
• Installing Packages
• Creating and Managing package.json
• Semantic Versioning
• NPM Scripts
7.Asynchronous Programming in Node.js
• Callbacks
• Promises
• Async/Await
• Error-First Callbacks
8.Express.js Framework
• Routing
• Middleware
• Templating Engines (Pug, EJS)
• RESTful APIs
• Error Handling Middleware
9.Working with Databases
• Connecting to Databases (MongoDB, MySQL)
• Mongoose (for MongoDB)
• Sequelize (for MySQL)
• Database Migrations and Seeders
10.Authentication and Authorization
• JSON Web Tokens (JWT)
• Passport.js Middleware
• OAuth and OAuth2
11.Security
• Helmet.js (Security Middleware)
• Input Validation and Sanitization
• Secure Headers
• Cross-Origin Resource Sharing (CORS)
12.Testing and Debugging
• Unit Testing (Mocha, Chai)
• Debugging Tools (Node Inspector)
• Load Testing (Artillery, Apache Bench)
13.API Documentation
• Swagger
• API Blueprint
• Postman Documentation
14.Real-Time Applications
• WebSockets (Socket.io)
• Server-Sent Events (SSE)
• WebRTC for Video Calls
15.Performance Optimization
• Caching Strategies (in-memory, Redis)
• Load Balancing (Nginx, HAProxy)
• Profiling and Optimization Tools (Node Clinic, New Relic)
16.Deployment and Hosting
• Deploying Node.js Apps (PM2, Forever)
• Hosting Platforms (AWS, Heroku, DigitalOcean)
• Continuous Integration and Deployment-(Jenkins, Travis CI)
17.RESTful API Design
• Best Practices
• API Versioning
• HATEOAS (Hypermedia as the Engine-of Application State)
18.Middleware and Custom Modules
• Creating Custom Middleware
• Organizing Code into Modules
• Publish and Use Private NPM Packages
19.Logging
• Winston Logger
• Morgan Middleware
• Log Rotation Strategies
20.Streaming and Buffers
• Readable and Writable Streams
• Buffers
• Transform Streams
21.Error Handling and Monitoring
• Sentry and Error Tracking
• Health Checks and Monitoring Endpoints
22.Microservices Architecture
• Principles of Microservices
• Communication Patterns (REST, gRPC)
• Service Discovery and Load Balancing in Microservices
2 notes
·
View notes
Text
Master Modern Web Development with a .NET Core Course
In the current tech ecosystem, the demand for scalable, high-performance, and cross-platform applications is greater than ever. Microsoft’s .NET Core framework—now unified as .NET 7/8 under the ".NET" umbrella—is at the heart of enterprise-grade software development, powering everything from web APIs to microservices, desktop apps, cloud-native solutions, and even AI/ML workloads. Whether you're a beginner or an experienced developer, enrolling in a structured .NET Core course is one of the most efficient ways to break into backend development or level up your full-stack skills.
This comprehensive article will guide you through why .NET Core is still a top framework in 2025, what a quality .NET Core course should teach you, the technical competencies you’ll gain, and how this knowledge can open doors to lucrative development careers.
What is .NET Core?
.NET Core is a cross-platform, open-source development framework from Microsoft, designed to replace the Windows-only .NET Framework. It allows developers to build and run applications across Windows, macOS, and Linux. It’s modern, modular, and extremely fast — perfect for cloud-native, microservices, and serverless architectures.
The framework is now part of the unified .NET 7/8 platform, but developers and courses still commonly refer to it as .NET Core due to its branding history and distinction from the legacy .NET Framework.
Why Take a .NET Core Course in 2025?
If you're aiming to build high-performance APIs, enterprise solutions, or cloud-native apps, a .NET Core course is your gateway to learning:
Modern C# development practices
Microservices and API design
Integration with cloud platforms like Azure
Secure authentication and authorization
Real-time features using SignalR
.NET Core skills are highly sought after, especially by companies in fintech, healthcare, insurance, government, and large-scale enterprise platforms. With the evolving architecture of distributed systems and increasing adoption of DevOps, a solid understanding of .NET Core is more relevant than ever.
What You'll Learn in a .NET Core Course
A high-quality .NET Core course should be hands-on, project-based, and comprehensive enough to cover foundational concepts as well as advanced patterns used in real-world applications.
Here’s a detailed breakdown of topics that an ideal course would cover:
✅ 1. Introduction to .NET Core and Development Tools
What is .NET Core vs .NET Framework?
.NET CLI vs Visual Studio/VS Code
Installing SDKs and runtime environments
Your first console and web app using .NET Core
✅ 2. C# Fundamentals (if beginner-friendly)
Variables, data types, and control structures
Classes, objects, and methods
OOP principles: Encapsulation, Inheritance, Polymorphism
Exception handling
Asynchronous programming with async/await
✅ 3. Web Application Development with ASP.NET Core
MVC Architecture (Model-View-Controller)
Razor Pages and Blazor introduction
Middleware pipeline and routing
Dependency Injection (DI) in ASP.NET Core
✅ 4. RESTful API Development
Creating Web APIs using Controllers and Routing
CRUD operations with Entity Framework Core
Model validation using Data Annotations
API versioning and OpenAPI (Swagger) integration
✅ 5. Entity Framework Core (EF Core)
Code-first vs database-first approaches
Working with Migrations
Writing LINQ queries
Repository and Unit of Work pattern
✅ 6. Authentication and Authorization
ASP.NET Core Identity
Role-based and claims-based authorization
JWT (JSON Web Tokens) for API security
OAuth2 integration (e.g., Google, Facebook login)
✅ 7. Advanced Configuration and Middleware
Custom middleware creation
Logging with Serilog/NLog
AppSettings.json configuration
Secrets and environment variables
✅ 8. Real-Time Features with SignalR
Hub setup and client communication
Building a real-time chat or notification system
Scaling SignalR with Redis or Azure SignalR Service
✅ 9. Testing and Debugging
Unit testing with xUnit/NUnit
Mocking with Moq
Integration and end-to-end testing
Debugging with Visual Studio tools
✅ 10. Deployment and DevOps Basics
Publishing apps to IIS, Azure App Services, or Docker containers
CI/CD pipelines with GitHub Actions or Azure DevOps
Containerization with Docker and Kubernetes (K8s)
Cloud integration with Azure Storage, Functions, or Cosmos DB
Best Platforms for Learning .NET Core in 2025
Here are some highly recommended platforms where you can take a .NET Core course:
🔹 Udemy
Courses like “ASP.NET Core Web API” and “.NET Core Microservices”
Project-based, suitable for beginners and advanced developers
🔹 Microsoft Learn
Modular, interactive tutorials on ASP.NET Core, C#, EF Core, Azure
Great for certifications and role-based learning paths
🔹 Pluralsight
Deep dives into testing, clean architecture, and domain-driven design
Advanced topics like SignalR, gRPC, and performance tuning
🔹 Coursera / edX
Academic-style learning with quizzes and peer-reviewed projects
Includes certifications from top institutions
🔹 YouTube Channels
IAmTimCorey, Nick Chapsas, and Raw Coding offer full tutorials and architecture patterns
Sample Projects You’ll Build in a .NET Core Course
A project-oriented .NET Core course will typically have you build:
🛠 1. Book Management System
CRUD app with EF Core
Role-based login and admin panel
��� 2. E-Commerce Backend
REST API for products, cart, checkout
JWT authentication and order processing
🛠 3. Microservices App
Multiple services with gRPC or RabbitMQ
API Gateway and service discovery
🛠 4. Real-Time Task Tracker
Using SignalR for live updates
Angular/React frontend integration
🛠 5. Blog CMS with Admin Panel
Rich text editor, comment system
Deployment to Azure Web App
Career Opportunities After a .NET Core Course
Mastering .NET Core opens the door to a variety of lucrative job roles:
Job Title
Average Salary (Global)
.NET Core Developer
$75,000 – $120,000
Full-Stack .NET Developer
$80,000 – $130,000
Backend Engineer (.NET Core)
$85,000 – $140,000
Cloud Developer (.NET + Azure)
$95,000 – $150,000
Microservices Architect (.NET)
$110,000 – $170,000
.NET Core vs Other Frameworks
Feature
.NET Core
Node.js
Django
Spring Boot
Performance
🔥 Very High
High
Moderate
High
Language
C#
JavaScript
Python
Java
Cross-platform
✅ Yes
✅ Yes
✅ Yes
✅ Yes
Tooling (IDE)
✅ Excellent
Good
Average
Good
Enterprise Adoption
✅ Widely used
High
Moderate
High
.NET Core shines in performance, enterprise integration, and long-term support from Microsoft.
Learning Paths After Completing a .NET Core Course
Once you’re done with a .NET Core course, you can specialize further with:
Clean Architecture + CQRS + MediatR
Advanced Blazor (WebAssembly + Hybrid)
Domain-Driven Design (DDD) in .NET
Building Microservices with Dapr and gRPC
Serverless apps using Azure Functions
Integration with React/Angular + Web API
These will prepare you for senior roles or specialized engineering positions.
Final Thoughts
Taking a .NET Core course in 2025 is not just about learning another framework—it's about mastering a modern, versatile, and enterprise-backed technology that’s engineered for performance, scalability, and long-term viability. Whether you’re building small-scale APIs or architecting enterprise-grade microservices, .NET Core gives you the tooling, structure, and performance to get the job done right.
So whether you’re a student, a career-switcher, or an experienced developer, now is the perfect time to dive into a .NET Core course and start building modern, production-grade applications from the ground up.
1 note
·
View note
Text
How to Choose the Right Security Stack for Your Business Website
In an age where cyberattacks are growing more frequent and sophisticated, a secure website isn’t just a best practice—it’s a business necessity. Whether you're running an eCommerce store, SaaS product, or a company website, your security stack plays a critical role in protecting sensitive data, maintaining customer trust, and ensuring compliance.
A professional Web Development Company will always prioritize building a tailored security framework that addresses both current risks and future vulnerabilities. But how do you decide which tools and layers should be part of your website's defense system?
Let’s break down what a “security stack” means and how to choose the right one for your business.
What Is a Website Security Stack?
A security stack is a layered approach to website protection. It combines various technologies and tools—each targeting a specific set of threats—to create a comprehensive shield around your web infrastructure.
Think of it like a multi-lock system for your home:
One layer protects your doors (authentication)
Another secures your windows (firewalls)
And another watches for unusual activity (monitoring tools)
When configured properly, these layers work together to identify, prevent, and respond to attacks—without compromising website speed or functionality.
1. Start With an SSL/TLS Certificate
This is the most basic, yet crucial, layer. An SSL/TLS certificate encrypts the data exchanged between your website and its users. It ensures that personal information, passwords, and payment details can't be intercepted by third parties.
Make sure:
Your certificate is issued by a trusted Certificate Authority (CA)
It’s renewed automatically
All pages (not just the login or checkout) are secured with HTTPS
Modern browsers now flag non-HTTPS sites as "Not Secure"—a red flag for users and search engines alike.
2. Use a Web Application Firewall (WAF)
A WAF monitors and filters HTTP traffic between your website and the internet. It blocks common threats like SQL injection, cross-site scripting (XSS), and brute-force attacks.
Choose a WAF that:
Offers customizable rules
Supports DDoS protection
Provides real-time traffic analytics
Popular WAFs include Cloudflare, Sucuri, and AWS WAF—each with varying levels of control and reporting. Your development agency can help configure the best fit based on your tech stack and risk exposure.
3. Implement Secure Authentication Protocols
Weak passwords and poorly managed login systems are among the top causes of data breaches. Strengthen this layer with:
Two-Factor Authentication (2FA)
OAuth2 or SSO integrations for enterprise-level users
Rate-limiting and lockout mechanisms for failed login attempts
Make sure admin panels, user dashboards, and CMS backends are protected with hardened authentication protocols—not just simple passwords.
4. Harden Your CMS and Framework
If you’re using platforms like WordPress, Webflow, or custom frameworks like Laravel or Django, security starts with how well the code and plugins are managed.
Best practices include:
Removing unused plugins and themes
Regularly updating core software
Using only trusted third-party packages
Applying role-based access controls
A Web Development Company will often audit your codebase and extensions for hidden vulnerabilities and outdated dependencies.
5. Monitor and Log Everything
Security isn’t static—it requires continuous monitoring. Use log management and monitoring tools to detect suspicious behavior in real time.
Your stack should include:
Application-level logging (failed logins, unusual traffic)
Server and file integrity monitoring
Alerts for changes in configuration or permissions
Tools like Sentry, Datadog, or even open-source solutions like Fail2Ban can help detect threats early before they escalate.
6. Secure Your Hosting Environment
Your server and hosting setup must be as secure as your code. Ensure:
Firewalls are configured at the OS level
SFTP (not FTP) is used for file transfers
Admin panels are IP-restricted or hidden behind VPNs
Automated daily backups are stored off-site
Many breaches happen at the server level due to misconfigured permissions or outdated software—especially on unmanaged VPS environments.
7. Regular Penetration Testing and Updates
Security isn’t a one-time setup. Schedule regular penetration testing and vulnerability scans to identify new risks. Ensure:
Your software dependencies are up-to-date
Security patches are applied immediately
Reports are reviewed and acted upon
This proactive approach protects your business from evolving threats and demonstrates compliance with security standards and regulations.
Conclusion
Choosing the right security stack is not just about installing tools—it's about building a customized, layered defense system that protects your website from every angle. From SSL certificates and firewalls to authentication protocols and monitoring tools, each element plays a role in safeguarding your digital assets.
To ensure nothing is overlooked, work with a Web Development Company that specializes in security-first development. With the right guidance and configuration, your website can stay protected, performant, and trusted—no matter how fast your business grows.
0 notes
Text
How to Set Up Postman to Call Dynamics 365 Services

Overview
A wide range of setup postman to call d365 services to allow developers and administrators to work programmatically with their data and business logic. For calling these D365 services, Postman is an excellent tool for testing and developing APIs. Your development process can be streamlined by properly configuring Postman to call D365 services, whether you're integrating third-party apps or running regular tests. You may ensure seamless and effective API interactions by following this guide, which will help you through the process of configuring Postman to interface with D365 services.
How to Set Up Postman Step-by-Step to Call D365 Services
Set up and start Postman:
Install Postman by downloading it from the official website.
For your D365 API interactions, open Postman, create a new workspace, or use an existing one.
Obtain Specifics of Authentication:
It is necessary to use OAuth 2.0 authentication in order to access D365 services. If you haven't previously, start by registering an application in Azure Active Directory (Azure AD).
Go to "Azure Active Directory" > "App registrations" on the Azure portal to register a new application.
Make a note of the Application (Client) ID and the Directory (Tenant) ID. From the "Certificates & Secrets" area, establish a client secret. For authentication, these credentials are essential.
Set up Postman's authentication:
Make a new request in Postman and choose the "Authorization" tab.
After selecting "OAuth 2.0" as the type, press "Get New Access Token."
Complete the necessary fields:
Name of Token: Assign a moniker to your token.
Type of Grant: Choose "Client Credentials."
URL for Access Token: For your tenant ID, use this URL: https://login.microsoftonline.com/oauth2/v2.0/token Client ID: From Azure AD, enter the Application (Client) ID.
Client Secret: Type in the secret you made for the client.
Format: https://.crm.dynamics.com/.default is the recommended one.
To apply the token to your request, select "Request Token" and then "Use Token."
Construct API Requests:
GET Requests: Use the GET technique to retrieve data from D365 services. To query client records, for instance:
.crm.dynamics.com/api/data/v9.0/accounts is the URL.
POST Requests: POST is used to create new records. Provide the information in the request body in JSON format. Creating a new account, for instance:
.crm.dynamics.com/api/data/v9.0/accounts is the URL.
JSON body: json
Copy the following code: {"telephone1": "123-456-7890", "name": "New Account"}
PATCH Requests: Use PATCH together with the record's ID to update already-existing records:
.crm.dynamics.com/api/data/v9.0/accounts() is the URL.
JSON body: json
Code {"telephone1": "987-654-3210"} should be copied.
DELETE Requests: Utilize DELETE together with the record's ID: .crm.dynamics.com/api/data/v9.0/accounts()
Add the parameters and headers:
In the "Headers" tab, make sure to include:
Bearer is authorized.
Application/json is the content type for POST and PATCH requests.
For filtering, sorting, or pagination in GET requests, use query parameters as necessary. As an illustration, consider this URL: https://.crm.dynamics.com/api/data/v9.0/accounts?$filter=name eq 'Contoso'
Submit Requests and Evaluate Answers:
In order to send your API queries, click "Send."
Check if the response in Postman is what you expected by looking at it. The answer will comprise status codes, headers, and body content, often in JSON format.
Deal with Errors and Issues:
For further information, look at the error message and status code if you run into problems. Authentication failures, misconfigured endpoints, or badly formatted request data are typical problems.
For information on specific error codes and troubleshooting techniques, consult the D365 API documentation.
Summary
Getting Postman to make a call A useful method for testing and maintaining your D365 integrations and API interactions is to use Dynamics 365 services. Through the configuration of Postman with required authentication credentials and D365 API endpoints, you may effectively search, create, update, and remove records. This configuration allows for smooth integration with other systems and apps in addition to supporting thorough API testing. Developing, testing, and maintaining efficient integrations will become easier with the help of Postman for D365 services, which will improve data management and operational effectiveness in your Dynamics 365 environment.
0 notes
Text
Oracle Apex Oauth2 Example

OAuth2 in Oracle APEX: A Practical Guide and Example
OAuth2 is a contemporary and secure authorization framework that allows third-party applications to access protected resources on behalf of a user. By implementing OAuth2 in Oracle APEX, you can provide controlled access to your APEX application’s data and functionality, enabling seamless integration with other services.
Why use OAuth2 with APEX?
Enhanced Security: OAuth2 offers a robust security layer compared to traditional username and password-based authentication. It uses tokens rather than directly passing user credentials.
Fine-grained Access Control: OAuth2 allows you to define specific scopes (permissions) determining the access level granted to third-party applications.
Improved User Experience: Users can conveniently authorize applications without repeatedly sharing their primary credentials.
Prerequisites
A basic understanding of Oracle APEX development
An Oracle REST Data Source (ORDS) instance, if you want to integrate with ORDS-defined REST APIs
Steps for Implementing OAuth2 in Oracle APEX
Create an OAuth2 Client:
Within your APEX workspace, navigate to Shared Components -> Web Credentials.
Click Create and select the OAuth2 Client type.
Provide a name, ID, client secret, and any necessary authorization scopes.
Obtain an Access Token:
The method for obtaining an access token will depend on the OAuth2 flow you choose (e.g., Client Credentials flow, Authorization Code flow).
Utilize the Access Token:
Include the access token in the Authorization header of your API requests to protected resources. Use the format: Bearer .
Example: Accessing an ORDS-based REST API
Let’s assume you have an ORDS-based REST API endpoint for fetching employee data that requires OAuth2 authentication. Here’s how you would configure APEX to interact with it:
Create a REST Data Source:
Go to Shared Components -> REST Data Sources.
Set the authentication type to OAuth2 Client Credentials Flow.
Enter your OAuth2 token endpoint URL, client ID, and client secret.
Use the REST Data Source in Your APEX Application:
Create APEX pages or components that utilize the REST Data Source to fetch and display employee data. APEX will automatically handle obtaining and using the access token.
Additional Considerations
Access Token Expiration: OAuth2 access tokens usually have expiration times. Implement logic to refresh access tokens before they expire.
OAuth2 Flows: Choose the most suitable OAuth2 flow for your integration use case. The Client Credentials flow is often used for server-to-server integrations, while the Authorization Code flow is more common for web applications where a user is directly involved.
youtube
You can find more information about Oracle Apex in this Oracle Apex Link
Conclusion:
Unogeeks is the No.1 IT Training Institute for Oracle Apex Training. Anyone Disagree? Please drop in a comment
You can check out our other latest blogs on Oracle Apex here – Oarcle Apex Blogs
You can check out our Best In Class Oracle Apex Details here – Oracle Apex Training
Follow & Connect with us:
———————————-
For Training inquiries:
Call/Whatsapp: +91 73960 33555
Mail us at: [email protected]
Our Website ➜ https://unogeeks.com
Follow us:
Instagram: https://www.instagram.com/unogeeks
Facebook: https://www.facebook.com/UnogeeksSoftwareTrainingInstitute
Twitter: https://twitter.com/unogeeks
0 notes
Text
Petit recapitulatif du flow OAuth2
OAuth2 permet a des 3ce partie d'acceder a des données utilisateurs sans reveler leur mot de passe via l'échange de tokens.
client: celui qui désire acceder à une resource
resource owner: l'utilisateur qui possède une resource
auth server: serveur qui authentifie les utilisateur et emet des jetons
resource server: héberge une resource protégée
Oauth2 flows
Authorization code:
le client désire acceder à une resource a nom de l'utilisateur
l'utilisateur est dirigé vers l' auth server pour login et donner les accès au client
ensuite l'auth server envoie un code d'authorisation au client
le client envoie le code d'authorisation à l'auth server en échange d'un token courte durée
le client contacte le resource server avec le token qui lui donne accès
Client credential:
le client désire accéder à des resources qui lui appartiennent
le client s'authentifie au serveur via ses credentials (clientId + clientSecret)
l'auth server envoie un access token au client
le client peut utiliser ce token pour accéder les données
0 notes
Quote
Ever since we announced our intention to disable Basic Authentication in Exchange Online we said that we would add Modern Auth (OAuth 2.0) support for the IMAP, POP and SMTP AUTH protocols. Today, we’re excited to announce the availability of OAuth 2.0 authentication for IMAP and SMTP AUTH protocols to Exchange Online mailboxes. This feature announcement is for interactive applications to enable OAuth for IMAP and SMTP. For additional information about non-interactive applications, please see our blog post Announcing OAuth 2.0 Client Credentials Flow support for POP and IMAP protocols in Exchange Online. Application developers who have built apps that send, read or otherwise process email using these protocols will be able to implement secure, modern authentication experiences for their users. This functionality is built on top of Microsoft Identity platform (v2.0) and supports access to email of Microsoft 365 (formerly Office 365) users. Detailed step-by-step instructions for authenticating to IMAP and SMTP AUTH protocols using OAuth are now available for you to get started. What’s supported? With this release, apps can use one of the following OAuth flows to authorize and get access tokens on behalf of a user. 1.OAuth2 authorization code flow 2.OAuth2 Device authorization grant flow Follow these detailed step-by-step instructions to implement OAuth 2.0 authentication if your in-house application needs to access IMAP and SMTP AUTH protocols in Exchange Online, or work with your vendor to update any apps or clients that you use that could be impacted.
Announcing OAuth 2.0 support for IMAP and SMTP AUTH protocols in Exchange Online - Microsoft Community Hub
0 notes
Text
YouTube Short | What is Difference Between OAuth2 and SAML | Quick Guide to SAML Vs OAuth2
Hi, a short #video on #oauth2 Vs #SAML #authentication & #authorization is published on #codeonedigest #youtube channel. Learn OAuth2 and SAML in 1 minute. #saml #oauth #oauth2 #samlvsoauth2 #samlvsoauth
What is SAML? SAML is an acronym used to describe the Security Assertion Markup Language (SAML). Its primary role in online security is that it enables you to access multiple web applications using single sign-on (SSO). What is OAuth2? OAuth2 is an open-standard authorization protocol or framework that provides applications the ability for “secure designated access.” OAuth2 doesn’t share…
View On WordPress
#Oauth#oauth2#oauth2 authentication#oauth2 authentication flow#oauth2 authentication postman#oauth2 authentication server#oauth2 authentication spring boot#oauth2 authorization#oauth2 authorization code#oauth2 authorization code flow#oauth2 authorization code flow spring boot#oauth2 authorization server#oauth2 authorization sever spring boot#oauth2 explained#oauth2 spring boot#oauth2 spring boot microservices#oauth2 spring boot rest api#oauth2 tutorial#oauth2 vs saml#oauth2 vs saml 2.0#oauth2 vs saml2#saml#saml 2.0#saml 2.0 registration#saml authentication#saml tutorial#saml vs oauth#saml vs oauth 2.0#saml vs oauth vs sso#saml vs oauth2
0 notes
Text
HOW TO MAKE A SIMPLE DISCORD BOT THAT RESPONDS TO MESSAGES!!!
(updated tutorial! trust me, it's super easy!!)
Pretty much every Discord bot tutorial I’ve seen is either outdated, way too complicated, or a video... so I’ve decided to take matters into my own hands and make my own tutorial!!!
So here’s how to make a response bot with Python and Repl.it, step by step, with pictures. NO CODING EXPERIENCE NEEDED

Step 1: HAVE A DISCORD ACCOUNT AND A SERVER!
Seeing as you’re here, I’ll assume you know what discord is and have an account. I won’t explain this bit to you (:
Step 2: MAKE A REPL.IT ACCOUNT
Repl.it is where your bot’s code is gonna live, so you need to make an account for it!!
https://repl.it/signup?goto=%2F~
Step 3: STARTING THE BOT!
Now you’re gonna go to https://discord.com/developers/applications and make an application!
Once you’re there, click that blue “New Application” button and make a new application!

Once you've done that, you should be here
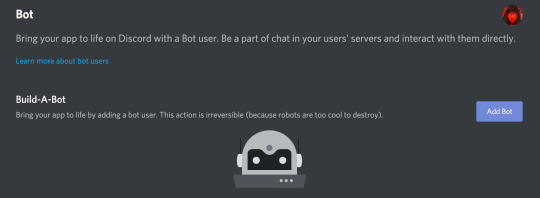
Now go to the bot section and click add bot
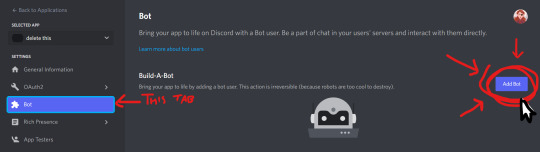
Congrats! You've got the beginnings of a robot! Do not close this tab, we'll need it later!
Step 4: ADDING THE BOT!
Now, you need to add the bot to a server so you can use it!
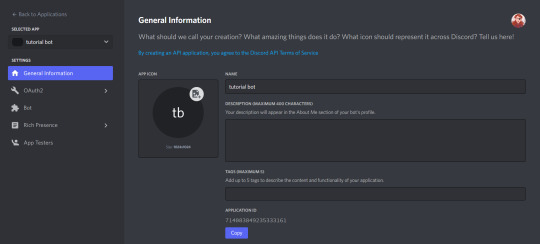
Go to the “General Information” page of your bot/ app, and copy the application ID by clicking the handy little copy button
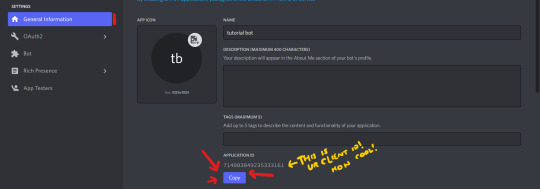
now, replace where this link says [YOUR CLIENT ID HERE] with your client ID and go to said link:
https://discordapp.com/api/oauth2/authorize?scope=bot&client_id=[YOUR CLIENT ID HERE]
(example: https://discord.com/oauth2/authorize?scope=bot&client_id=714083849235333161)
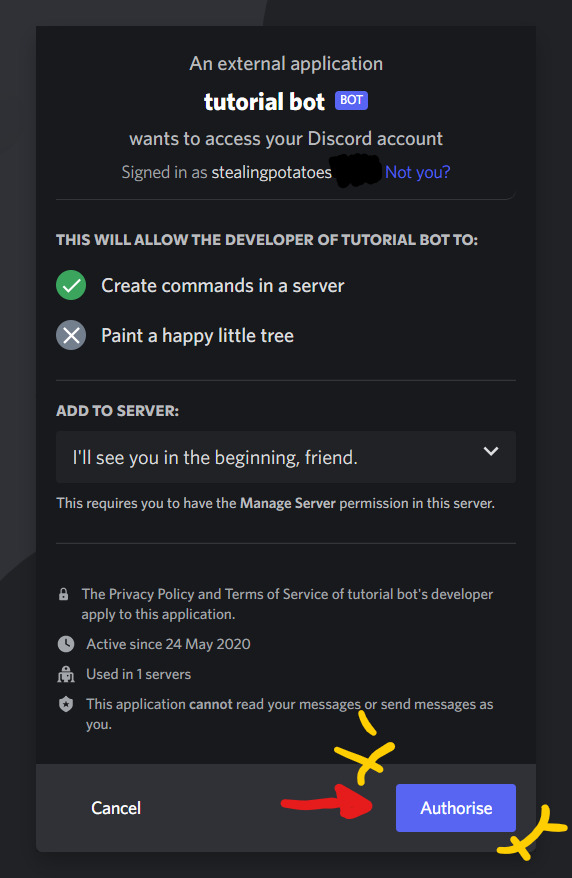
Authorise it and bam! It's in your server!
Step 5: ACTUALLY CODING THE BOT!!
FINALLY!
This bit is REALLY easy, because I’ve made you some base code, so you don’t have to do much!!
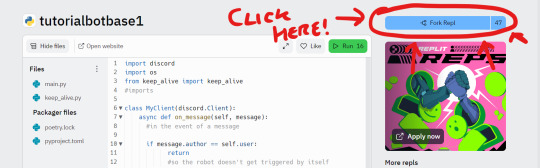
Go to: https://repl.it/@stealingpotatos/tutorialbotbase1
Now click the "Fork" button and you've got your own copy of the code!!! Well done!!
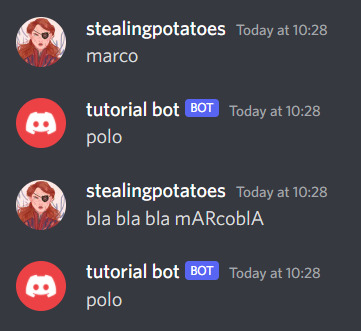
Here comes the actual coding! Replace "trigger word" with whatever you want to trigger the bot, and "response" with the-- well I'm sure you can work it out!
THE TRIGGER NEEDS TO BE IN ALL LOWER CASE

But your bot won't work just yet!
step 6: JOINING YOUR BOT AND CODE
Back in the Discord Dev Portal, go to the Bot tab and click "RESET TOKEN" and then copy it!
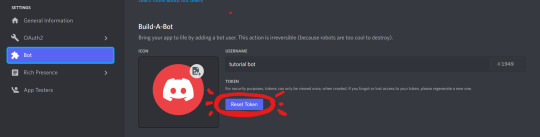

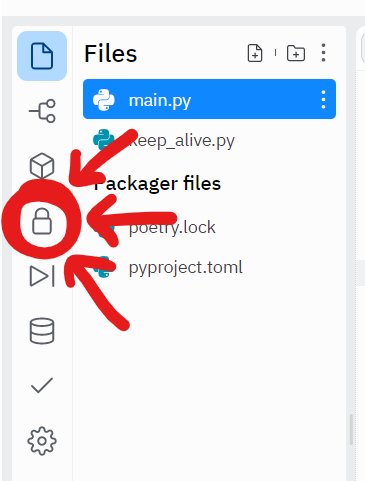
Back on repl.it, click the lock icon to enter the Secrets tab
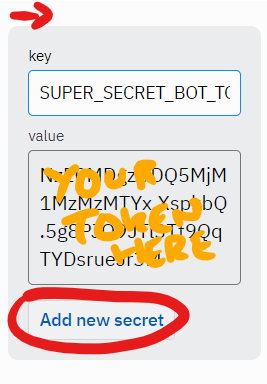
Once you're there, add a new secret called "SUPER_SECRET_BOT_TOKEN" and make the value your copied bot token!
AND THATS IT!!! You have a working bot!!
I'm so proud of you!!!! :D
Have fun botting!!
extras: KEEPING YOUR BOT ONLINE
Because of the “keep_alive” function, your bot will continue to be online for about an hour after you close the tab.
But if you want it online all the time, here's a tutorial I made a while back on keeping your bot online 24/7!
extras: ADDING MORE RESPONSES
Super simple!!
If you want multiple triggers for the same response, copy & paste the “(””) in message.content.lower()” part of the statement, + add an or

Like that!
And for adding another trigger/response entirely, just copy & paste the statement entirely, and change the “if” to an “elif” if you don’t want both things to trigger at once.

Like this!!
If you don’t already know python, I’d very much recommend learning it if you’re going to be doing more bot coding!!
Thank you for reading, and if you have ANY QUESTIONS AT ALL, my askbox is open (and has anon if you think the question is kinda dumb and don’t want your name on it. It’s not a dumb question, ask me!)
Also if you have any questions about adding new functions, I’ll try to help you too! This blog is gonna be all abt that!!
81 notes
·
View notes
Text
OAuth 2 on the Tumblr API
Ten years ago HTTPS wasn't as nearly as widespread as today. It is hard to believe that HTTPS was essentially opt-in, if available at all! Back then, people also had to get creative when inventing means to delegate access to someone else. One solution was OAuth 1, conceived by the IETF, later adopted by Tumblr in 2011.
Time went by, and here we are in 2021, with hardly any popular website not shielded with HTTPS (including your own blog!). Today, it wouldn't make much sense to adopt OAuth 1 as inconvenient as it is. Yet here we are, still asking people to use outdated protocols for their new fancy Tumblr apps. Not anymore!
Starting today, you have another option: we're officially opening up OAuth 2 support for the Tumblr API!
Get started
OAuth 2 flow requires you to know two key URIs:
For authorization requests, you should use /oauth2/authorize
To exchange authorization codes and refresh tokens, you'll need to use /v2/oauth2/token
If you're familiar with OAuth 2, register an application and check out our API documentation (specifically the section on OAuth 2) to get up and running.
The future of OAuth 1
There are no plans to shut down OAuth 1. Your app will continue to work as usual. But be sure to keep an eye on this blog just in case anything new pops up that would prevent us from serving OAuth 1 requests.
What's more, if you wish to adopt OAuth 2 in your app, given its superior simplicity, you don't have to migrate entirely to OAuth 2 at once. Instead, you can keep the old sign-up / log-in flow working, and exchange OAuth 1 access token to OAuth 2 tokens on the fly. There's only one catch: this exchange will invalidate the original access token, so you should be using only the OAuth 2 Bearer authentication for any subsequent requests.
Next steps
We'll be adding support for OAuth 2 to our API clients in the coming months. Follow this blog to learn firsthand when this happens.
Although we do support client-side OAuth 2 flow, we can't recommend using it unless absolutely required. We might harden it with PKCE someday, though.
That's all from us today. Happy hacking!
117 notes
·
View notes
Text
How To Set Up Your Own Discord Bot: A Guide [v13 update]
Step 1: Go to https://discord.com/developers/applications
Make sure you are signed in to discord. On the top right hand corner, you will see a button that says New Application. Get to clicking!

Step 2: You will be asked for a name. This could be any name, but preferably the one you want your bot to have. Make sure it has a cool name, like Potato Queen, or Jack the Ripped Bot.
Once you have done that, click Create.

Step 3: You will come to a page that shows all the General Information. But you have not created your bot yet! This is just the application page. You can put in your App Icon, Description and the likes, before clicking on Bot at the side bar.
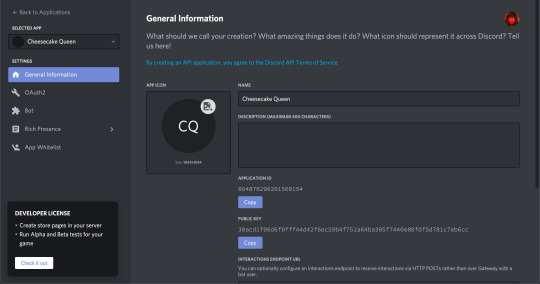
Step 4: You should reach a page with a button that says Add Bot. Well, what are you waiting for? Go ahead and click it!
A whole new page will pop up, with information about your new bot. Remember, you can’t destroy a bot, so make sure you’re definitely wanting a bot when you’re doing this.
From here, you can see your bot’s username as well as its profile picture. You can change it if you want.
IMPORTANT: There is also something called Token. YOU SHOULD NEVER SHOW THIS TO ANYONE ELSE. It is the one thing that will bring your bot to life (it basically controls your bot) and if it’s out in the open, it is best to regenerate a new one.
When you scroll down, you will see Authorization Flow. This is where you can choose to make your bot public or private. Making it public means that others can add it to their own servers, without your help. If it’s private, only YOU can add this bot to servers.

Step 5: Invite your bot into your server.
The link to do this should be: https://discord.com/oauth2/authorize?client_id=[clientidhere]&scope=bot&permissions=[permissionnumber]
An example is: https://discord.com/oauth2/authorize?client_id=707835242475421767&scope=bot&permissions=8 [this has admin permissions]
or you can just use: https://discord.com/oauth2/authorize?client_id=707835242475421767&scope=bot
And you’re done! At least with the application part.
NOW WE MOVE ON TO THE CODING PART. [Note: This is in JS because I love JS. Someday I might do a guide for Python too but we will see.]
The basic things you need: 1. Visual Studio Code 2. Node JS
You can see how to download either one from HERE.
Then, you will need to download discord.js.
Create a folder for your discord bot things, and then open up Visual Studio Code.
Create a new file called index.js and this will be your main page, where you get your bot running. The basic codes inside it would be:

TOKEN: Remember that token that I said you can’t tell anyone? Yeah, put it in there like client.login(”IWEUTWEITU”) where that keysmash is your token.
From here, if you’re using Visual Studio Code, just go to your console.
NOTE: If you do not know where to find the console, follow this:
Click Terminal from the top tab > New Terminal. This will pull up the console for you.
Make sure that the directory of your terminal is the place where your index.js file is at. If not, you can always use ls to list the different folders in that directory and cd to change into that directory as shown below:
My terminal was in the Github folder and I used ls to list all the folders in the Github folder. From there, I can see the cafe-bot folder where my hello.js file is located in. So I used cd cafe-bot to move into that folder.

From there, type npm install discord.js
Once you’re done with that, once again, type node index.js.
[Sometimes you might run into errors that let you know that “The term node is not recognized as the name of a cmdlet”. This either means that you have NOT installed Node JS, in which you can go to this post to see how to do it HERE OR you might have some issues with directories in which you can look at this: https://www.youtube.com/watch?v=pg4t48BPmh8]
You should see “Bot is ready!” and with that, your bot is up!
Go ahead, explore it, enjoy it! You can do it!
#discord bot#discord js#discord.js#js#javascript#discord application#business guides#discord guide#discord beginner#coding#discord
83 notes
·
View notes
Photo

Spring Boot and OAuth2: Getting the Authorization Code ☞ http://on.morioh.net/7bca260048 #Spring #OAuth2 #Authorization #Code
0 notes
Text
HOW TO MAKE A DISCORD BOT THAT RESPONDS TO THINGS!!!
TRUST ME IT’S SUPER EASY!!!
Pretty much every Discord bot tutorial I’ve seen is either outdated, way too complicated, or a video... so I’ve decided to take matters into my own hands and make my own tutorial!!!
So here’s how to make a response bot with Python and Repl.it, step by step, with pictures. (Dw, you don’t even need to know how to code, I’ll run you through everything!!)

Step 1: HAVE A DISCORD ACCOUNT AND A SERVER!
Seeing as you’re here, I’ll assume you know what discord is and have an account. I won’t explain this bit to you.
Step 2: MAKE A REPL.IT ACCOUNT
Repl.it is where your bot’s code is gonna live, so you need to make an account for it!!
https://repl.it/signup?goto=%2F~.
Step 3: STARTING THE BOT!
Now you’re gonna go to https://discord.com/developers/applications and make an application!
Once you’re there, click that blue “New Application” button and make a new application!

Once you’ve done that, you should be here:

Ok, now go to the “Bot” section and add a robot to this thing!!

Keep this tab open, we need it for the rest of the tutorial.
Right, now we’re getting somewhere!!!!!
Step 4: ADDING THE BOT!
Now, you need to add the bot to a server!
Go to the “General Information” page of your bot/ app, and copy the client ID

now, replace where this link says [YOUR CLIENT ID HERE] with your client ID and go to said link:
https://discordapp.com/api/oauth2/authorize?scope=bot&client_id=[YOUR CLIENT ID HERE]
(example: https://discord.com/oauth2/authorize?scope=bot&client_id=714083849235333161)

Authorise it, and bam! It’s in your server!
Step 5: ACTUALLY CODING THE BOT!!
FINALLY!
This bit is REALLY easy, because I’ve made you some base code, so you don’t have to do much!!
Go to: https://repl.it/@stealingpotatos/tutorialbotbase1

Click the “fork” button, and you’ve got your own copy of the code!!!
Now, replace trigger word with whatever sentence/ word you’d like your bot to respond to. IT’S GOTTA BE IN LOWER CASE. IT WON’T WORK IF IT’S NOT.
Then replace response with whatever you’d like your bot’s response to be!

But you’re not done yet!! Your bot still won’t work!!
For your bot to work, you’re gonna need to make a new file called “.env”

This is where your super secret bot token is gonna go! You’re putting it in a seperate file due to how repl.it code is public, and we don’t want people messing with your bot!
In your .env file, write “SUPER_SECRET_BOT_TOKEN=”, like this:

Now, we need to go back to your bot page, and copy the bot token

Now, paste that bot token after “ SUPER_SECRET_BOT_TOKEN=“

(that’s a made up token by the way)
NOW YOU’RE DONE!!!!
Click that big green “run” button at the top, give it a minute, and test your bot!

I’M SUPER PROUD OF YOU, LOOK AT YOU GO!!!!
Your bot will respond to anyone saying the trigger word/ sentence in a message.
If it’s not working, double check you followed the tutorial right. If it’s still not working, send me a message or ask, and I’ll try to help you!!
Extras: KEEPING YOUR BOT ONLINE
Because of the “keep_alive” function, your bot will continue to be online for about an hour after you close the tab.
If you want to keep your bot online all the time, make an https://uptimerobot.com/ alert for the link in the bot alive page!

Extras: ADDING MORE TRIGGERS/RESPONSES
Super simple!!
If you want multiple triggers for the same response, copy & paste the “(””) in message.content.lower()” part of the statement, add an or

Like that!
And for adding another trigger/response entirely, just copy & paste the statement entirely, and change the “if” to an “elif” if you don’t want both things to trigger at once.

Like this!!
If you don’t already know python, I’d very much recommend learning it if you’re going to be doing more bot coding!!
Thank you for reading, and if you have ANY QUESTIONS AT ALL, my askbox is open (and has anon if you think the question is kinda dumb and don’t want your name on it. It’s not a dumb question, ask me!)
Also if you have any questions about adding new functions, I’ll try to help you too!
36 notes
·
View notes