#pattern making and garment construction
Explore tagged Tumblr posts
Visit Tumblr Blog
Explore Tumblr blogs with no restrictions, modern design and the best experience.
Last Seen Tumblr Blogs


Fun Fact
28.6 is the average number of monthly visits per US mobile user.
Text
Master the Art of Fashion with a Diploma in Garment Design & Pattern Making at Wisdom College for Creativity & Design

Introduction:
In the dynamic world of fashion, the ability to transform a creative vision into a tangible garment is a skill that sets exceptional designers apart. Pattern making and garment construction form the backbone of fashion design, bridging the gap between imagination and reality. At Wisdom College for Creativity & Design, we offer a Diploma in Garment Design and Pattern Making that equips aspiring designers with the technical expertise, creative flair, and industry insights needed to thrive in the competitive fashion industry.
This comprehensive program is designed for those who aspire to master the art of creating flawless garments—from sketching initial ideas to drafting precise patterns and constructing finished pieces. Whether you’re a budding designer, a hobbyist looking to turn passion into profession, or a professional aiming to refine your skills, our diploma program offers a transformative learning experience.
What Are Pattern Making and Garment Construction?
Pattern Making is the process of creating templates (patterns) that serve as blueprints for cutting fabric pieces. These patterns determine the shape, fit, and structure of a garment. Mastery of pattern making ensures that designs translate seamlessly from paper to fabric.
Garment Construction involves assembling these fabric pieces using sewing techniques, finishes, and trims to create a wearable garment. It requires precision, attention to detail, and an understanding of fabrics, stitches, and machinery.
Together, these skills empower designers to create garments that are not only aesthetically pleasing but also functional and well-fitted.
Why Pursue a Diploma in Garment Design & Pattern Making?
The fashion industry values professionals who can blend creativity with technical proficiency. Here’s why this diploma in garments design and pattern making is a game-changer:
Industry Demand: Brands seek skilled pattern makers and garment technicians to reduce production errors and ensure quality.
Creative Control: Knowledge of pattern making allows designers to bring their unique visions to life without relying on external technicians.
Sustainability: Efficient pattern making minimizes fabric waste, aligning with the growing demand for eco-friendly practices.
Entrepreneurship: Launch your own label or offer freelance services with confidence in your technical abilities.

Why Choose Wisdom College for Creativity & Design?
Wisdom College stands out as a leader in fashion education, offering a blend of traditional craftsmanship and modern technology. Here’s what makes our diploma in pattern making program unique:
Industry-Driven Curriculum: Developed in collaboration with fashion experts, the curriculum covers everything from basic draping to advanced CAD pattern making.
Hands-On Learning: Work with industrial sewing machines, dress forms, and software like Optitex and Gerber AccuMark in our state-of-the-art studios.
Experienced Faculty: Learn from seasoned professionals with decades of experience in haute couture, ready-to-wear, and sustainable fashion.
Real-World Projects: Collaborate on projects simulating industry workflows, such as creating a capsule collection or solving fit challenges.
Sustainability Focus: Explore zero-waste pattern making, upcycling techniques, and eco-friendly materials.
Global Recognition: Earn a diploma accredited by leading fashion institutions, enhancing your employability worldwide.

Course Curriculum: A Deep Dive
Our Pattern making and garment construction is structured to provide a holistic understanding of garment design and pattern making. Here’s a breakdown of key modules:
1. Fundamentals of Fashion Design
Principles of design (balance, proportion, harmony).
Fashion sketching and illustration.
Fabric science: Understanding fibers, weaves, and drape.
2. Pattern Making Techniques
Manual Pattern Drafting:
Basic blocks (bodice, skirt, sleeve).
Dart manipulation, pleats, gathers, and seam allowances.
Grading patterns for different sizes.
Digital Pattern Making (CAD):
Introduction to software like Optitex and Gerber AccuMark.
Creating and modifying patterns digitally.
Draping:
Sculpting fabric directly on a dress form for complex designs.
3. Garment Construction
Sewing techniques: French seams, zippers, buttonholes, and hems.
Working with specialized fabrics (knits, lace, denim).
Quality control: Identifying and fixing construction flaws.
4. Advanced Techniques
Tailoring: Crafting structured garments like blazers and coats.
Lingerie and activewear: Stretch fabrics and functional design.
Couture techniques: Hand-embroidery, beading, and lace appliqué.
5. Sustainable Practices
Zero-waste pattern making.
Upcycling old garments into new designs.
Ethical sourcing of materials.
6. Portfolio Development
Compile a professional portfolio showcasing your best work.
Receive feedback from industry mentors.
7. Industry Internship
Gain hands-on experience with fashion houses, manufacturers, or design studios.
Career Opportunities After the Diploma
Graduates of our program are equipped for diverse roles in the fashion ecosystem:
Fashion Designer: Create original collections for brands or your own label.
Pattern Maker: Specialize in drafting technical patterns for production.
Garment Technician: Oversee quality and fit during manufacturing.
Costume Designer: Work in film, theater, or TV.
Sustainable Fashion Consultant: Advise brands on eco-friendly practices.
Freelance Designer: Offer pattern-making or design services globally.
FAQs About the Diploma in Garment Design & Pattern Making
1. Who should enroll in this course? Aspiring designers, tailors, fashion students, or professionals seeking to deepen their technical skills. No prior experience is required.
2. How long is the program? The diploma spans 12 months, with flexible online and in-person options.
3. What software will I learn? You’ll master industry-standard tools like Optitex, Gerber AccuMark, and Adobe Illustrator.
4. Is there a focus on sustainable fashion? Yes! Sustainability is woven into the curriculum, from fabric selection to waste reduction.
5. Will I need to buy expensive equipment? Basic sewing tools are required, but the college provides access to industrial machines and software.
6. What’s the difference between this diploma and a degree? This diploma is shorter, more focused on technical skills, and ideal for those seeking quick industry entry.
7. Do you offer job placement assistance? Yes! We partner with leading brands and provide resume-building workshops and interview prep.
8. Can I start my own brand after this course? Absolutely! The program includes modules on entrepreneurship and brand development.
The Evolution of Pattern Making: From Hand Drafting to Digital Innovation
Pattern making has evolved dramatically over the decades:
Traditional Methods: Hand-drafted patterns using rulers, curves, and muslin toiles.
Digital Revolution: CAD software enables precision, scalability, and virtual prototyping.
3D Integration: Tools like CLO3D allow designers to visualize garments on avatars and adjust patterns in real-time.
This blend of tradition and technology ensures our students are prepared for the future of fashion.
Why Pattern Making is the Unsung Hero of Fashion
While designers often steal the spotlight, pattern makers are the unsung heroes who ensure garments fit perfectly and function flawlessly. A well-drafted pattern:
Saves time and money during production.
Reduces returns due to poor fit.
Enhances brand reputation for quality.
Conclusion: Stitch Your Future in Fashion
The Diploma in Garment Design and Pattern Making at Wisdom College for Creativity & Design is more than a course—it’s a gateway to a rewarding career in an industry that values creativity, precision, and innovation. With a curriculum rooted in practicality, sustainability, and cutting-edge technology, we empower you to become a versatile professional capable of shaping the future of fashion.
Whether you dream of launching a sustainable label, working with luxury brands, or revolutionizing fit in ready-to-wear, this diploma provides the tools and confidence to succeed.
Enroll today and take the first stitch toward your fashion legacy!
#Diploma in Garment Design and Pattern Making#pattern making and garment construction#diploma in garments design and pattern making#diploma in pattern making#pattern making courses#pattern making college#pattern making campus#diploma courses
0 notes
Text
What is patternmaking?
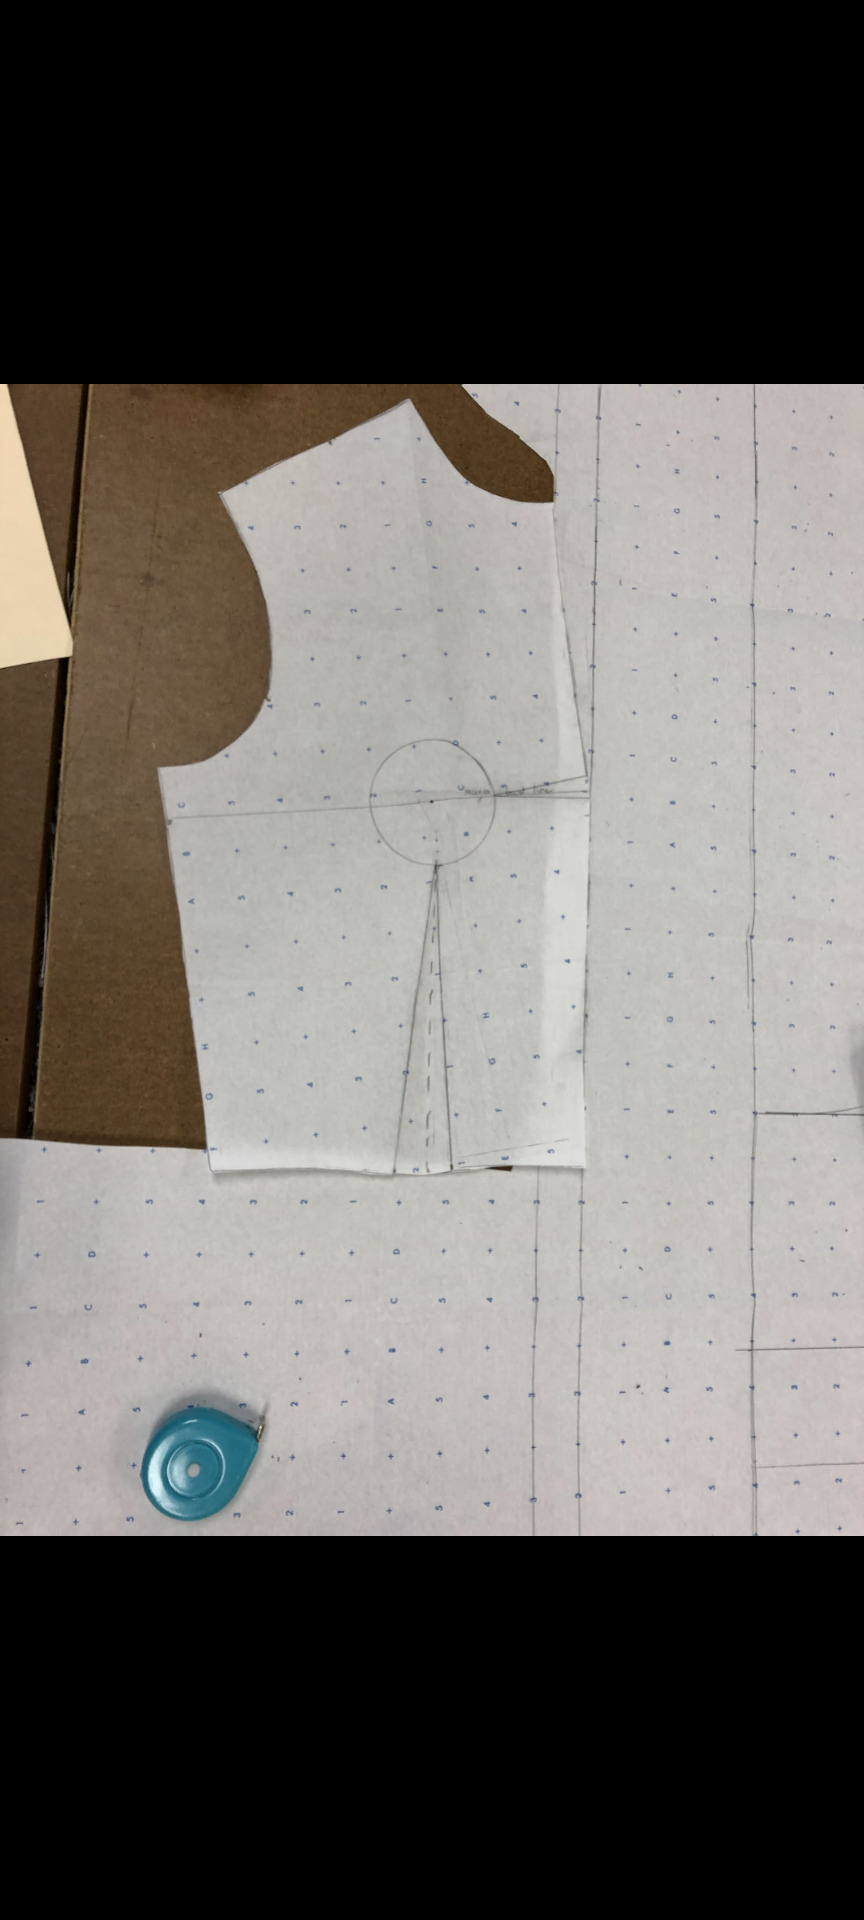
As this is my first post, I would like to explain what patternmaking is.
I am creating this post to those that are unfamiliar with the basics of patternmaking. As part of my journey, I want to become a teacher; and I think this is a good platform to improve those skills. All critical feedback is appreciated.
Patternmaking is the process of designing garments from homemakers to mass productions. This process uses a preexisting basic garment template. I refer to it as a sloper, which is drafted and fitted before it's used by a patternmaker.
The sloper is then traced onto pattern paper. After this, the trace outline is then manipulated in the following areas:
• dart manipulation
• seams
• fullness
• pleats
I will explain each category in the upcoming posts. I will also explain the tools in more details as well.
10 notes
·
View notes
Text
Master the Art of Pattern Making & Garment Construction at Wisdom College for Creativity & Design

Introduction
Fashion is not just about aesthetics—it's about precision, structure, and craftsmanship. The backbone of any well-crafted garment lies in accurate Pattern Making & Garment Construction. At Wisdom College for Creativity & Design, students receive comprehensive training in these core fashion skills, preparing them for successful careers in the dynamic world of fashion design.
What is Pattern Making & Garment Construction?
Pattern Making & Garment Construction involves translating design ideas into tangible clothing through precise measurements, cutting, and sewing techniques. Pattern making is the blueprint of a garment, while garment construction brings that blueprint to life through stitching, fitting, and finishing processes.
Why Study at Wisdom College for Creativity & Design?
Industry-Focused Curriculum: Tailored to meet global fashion standards.
Expert Faculty: Learn from fashion professionals and experienced instructors.
Hands-on Training: Real-time pattern development and garment creation in fully-equipped fashion labs.
Portfolio Development: Create a professional body of work showcasing your technical and creative abilities.
Career Support: Placement assistance, internship opportunities, and career counseling.
Course Overview
The Pattern Making & Garment Construction course at Wisdom College is designed to equip students with fundamental and advanced skills in fashion production.
Key Modules Include:
Basics of Pattern Drafting
Draping Techniques
Fabric Cutting & Manipulation
Sewing Techniques & Seam Finishes
Construction of Basic to Advanced Garments
Fit Analysis & Alteration
Use of Industrial Machines
Tools & Technologies Taught
Manual and Digital Pattern Drafting
Garment Construction using Industrial Sewing Machines
CAD Software for Fashion (e.g., TUKAcad, Optitex)
Tailoring Tools and Finishing Equipment
Learning Outcomes
By the end of the Pattern Making & Garment Construction Course, students will be able to:
Interpret design sketches into production-ready patterns
Construct garments from scratch with professional finishing
Modify and grade patterns for various sizes
Apply design principles for functional and fashionable clothing
Work collaboratively with designers, merchandisers, and production teams
Who Should Enroll?
Aspiring Fashion Designers
Tailoring Professionals Looking to Upskill
Boutique Owners
Fashion Enthusiasts Interested in Garment Construction

Career Opportunities
Completing the Pattern Making & Garment Construction course opens up career pathways such as:
Pattern Maker
Garment Technologist
Tailor or Dressmaker
Apparel Production Manager
Technical Designer
Sample Room Coordinator
Why Pattern Making & Garment Construction Skills Are In-Demand
In an era of fast fashion and bespoke tailoring, having strong pattern-making and garment construction skills ensures:
Better product development
Reduced sample errors
Increased production efficiency
Higher-quality, well-fitted garments
Wisdom College Facilities
Students at Wisdom College benefit from:
Fully-equipped sewing and tailoring labs
Draping mannequins and dress forms
CAD-enabled fashion design classrooms
Fabric resource library and sampling lab
Testimonials
“This course completely changed how I see fashion. I now understand how design turns into reality!” — Ayesha, Graduate
“Wisdom College gave me the tools to start my own boutique. The faculty were so supportive!” — Meera, Entrepreneur
Know More About What is Animation in Computer Graphics: A Brief Overview- https://wisdomdesigncollege.in/blogs/what-is-animation-in-computer-graphics
FAQs
Q1: Do I need any prior experience in fashion to join this course? No. The Pattern Making & Garment Construction course is beginner-friendly and starts with foundational skills.
Q2: What is the duration of the course? Depending on the program level, the course ranges from 6 months (certificate) to 1 year (diploma).
Q3: Is this course practical or theory-based? It is predominantly practical with regular hands-on sessions and real-time project work.
Q4: Will I get a certificate after completion? Yes. Students receive an industry-recognized certification from Wisdom College for Creativity & Design.
Q5: Are there any job placement opportunities? Yes. Wisdom College offers placement support and connects students with leading apparel and fashion brands.
Conclusion
Whether you're stepping into the world of fashion or looking to elevate your technical skills, the Pattern Making & Garment Construction course at Wisdom College for Creativity & Design is your gateway to becoming a skilled fashion professional. With a perfect blend of creativity and precision, this program will help you transform your passion into a rewarding career in fashion design.
Enroll today and stitch your way to success with Wisdom College for Creativity & Design!
#Pattern Making & Garment Construction course#pattern making#pattern making course#Garment Construction course#Paper Practice#Machine Practice#Fabric Practice#fabric printing#fabric manufacturers
0 notes
Text
I have a lot of sewing projects to do but I also kind of want new fabric to try the adjustable pants pattern oen of my favorite YouTubers came out with so I’m conflicted? Because like adjustable pants pattern.
#adjustable clothing patterns have done so much for my body image tbh#even if it’s 90% a bunch of skirts I make#they make construction of garments easier AND they last forever#although sometimes I feel bad with old projects that turned out bad bc I don’t wear them#but I usually just use it as a petticoat for new projects tbh
0 notes
Text
A postgraduate diary: The league of extraordinary problem solvers
In the almost 9 months of my programme, I have come to realise that I am in the business of problem solvers. Allow me to explain. One of my intentions with undertaking a masters in fashion was to improve my pattern cutting/drafting skills, particularly in the area of developing complex designs using dart manipulations. I did not go into this a novice at manipulating patterns. I actually…
View On WordPress
#basic bodice#design#Fashion#Garment Construction#Life#MA Project#pattern#Pattern making#Patterns#postgrad#Postgraduate#Skirt variation#support#tips#tricks
1 note
·
View note
Text
Tailoring Classes in Chennai: Master the Art of Stitching
In the bustling city of Chennai, the demand for skilled tailors and fashion enthusiasts who possess the art of stitching and garment construction is ever-growing. Moreover, Tailoring classes in Chennai offer individuals a golden opportunity to acquire the essential skills needed to excel in the fashion industry. Of course, One prominent institution leading the way is the renowned Chennai Fashion…

View On WordPress
#Advanced garment construction#Advanced stitching#Advanced tailoring classes#Alteration workshops#Boutique fashion courses#Boutique Management Courses#Chennai#Chennai fashion design institute#Chennai Fashion Institute#Chennai Fashion Institute courses#Chennai fashion school#Chennai fashion school programs#Chennai tailoring academy#Couture sewing#Couture tailoring techniques#Creative craftsmanship#Creative fabric selection#Creative fashion design courses#Creative garment making classes#Creative pattern making#Creative sewing#Creative stitching techniques#Custom fitting#Custom fitting workshops#Custom garment making#Customized tailoring workshops#Draping and pattern drafting#Dress alteration and repair#Dressmaking classes in Chennai#Dressmaking workshops
1 note
·
View note
Text
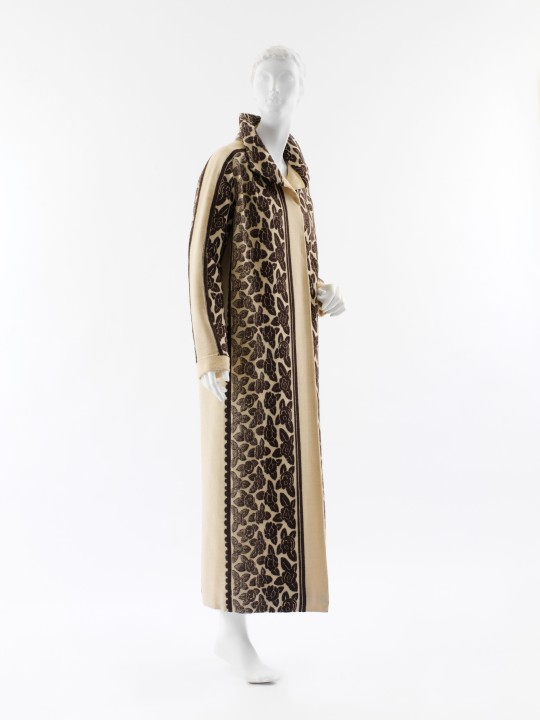

Coat
Paul Poiret (Paris, France)
c.1923
A complicated piecing of two different but related textiles emphasizes the straight lines of this coat. Poiret's signature rose is woven into two broad, faintly ombré running lengths bracketed by narrow unmatched stripes. The actual design of this textile is evidenced only by the incorporation of the outer boundaries of the pattern to form the garment's sleeves. Another fabric, of confronting scalloped stripes, is inserted at either side of the coat. The narrow band cuffs are in the same plain, loosely woven wool that comprises the lining. The yarn of the lining is identical in color to the ivory ground of the floral and striped patterned textiles that make up the body of the coat. The design reveals none of the virtuosity of its construction, with the coat's apparent simplicity obscuring its technical complexity.
The MET (Object Number: C.I.64.7.2)
#coat#fashion history#historical fashion#vintage fashion#paul poiret#1920s#1923#outerwear#off white#black#wool#floral#20th century#france#up close#the met
164 notes
·
View notes
Text
Master Pattern Making and Garment Construction at Wisdom College for Creativity & Design
Pattern Making and Garment Construction Course offers you the skills and knowledge to excel in the fashion industry. Join our program and turn your creative visions into beautifully tailored clothing.
Take the first step towards a successful career in fashion design by enrolling in the Pattern Making and Garment Construction Course at Wisdom College for Creativity & Design. Contact us today to learn more about our program and schedule a campus tour.

0 notes
Text
Hanfu in Components: Hanfu Anatomy, Tops (pt 3.1)
navigation: hanfu in components 1 2 3.1 3.2 4 5 6 ...
Now that you know about the names of different garments, what about the parts of each garment? There are so many confusing terms!!! I gotchu :>
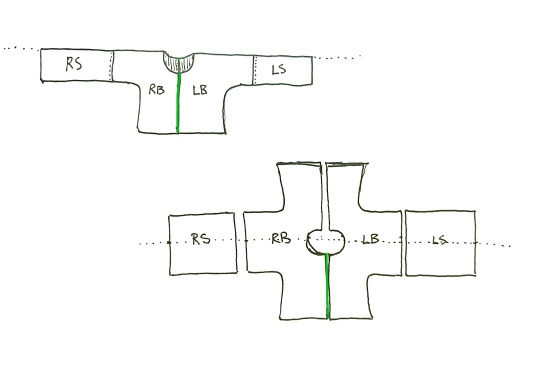
When looking at hanfu and parts of hanfu, it can help to see how the garment is constructed. To do that, we have to look at the pattern of the garment. Sewing patterns are the templates that tell sewists how to cut their fabric into the shapes that are needed to make their clothes. Hanfu sewing patterns are fairly standard. They look roughly like this.
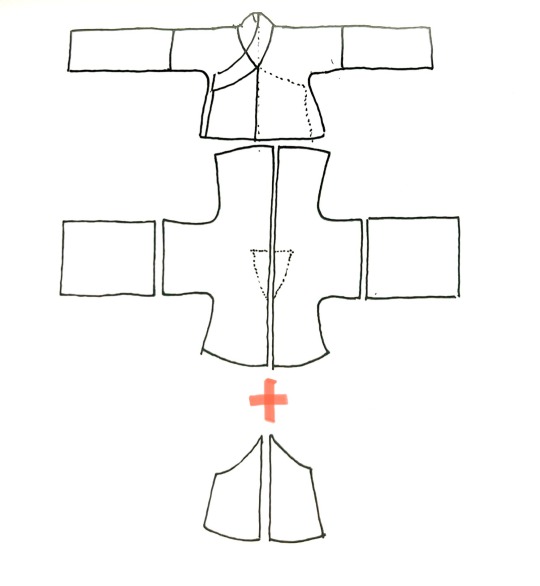
(blue = shoulder fold line // red = center front // green = center back)
To help you understand how this all comes together, when defining different parts of hanfu anatomy, I'll show it on the sketch above, and also on photos of people wearing hanfu, highlighted in green.
身/SHEN1/BODY
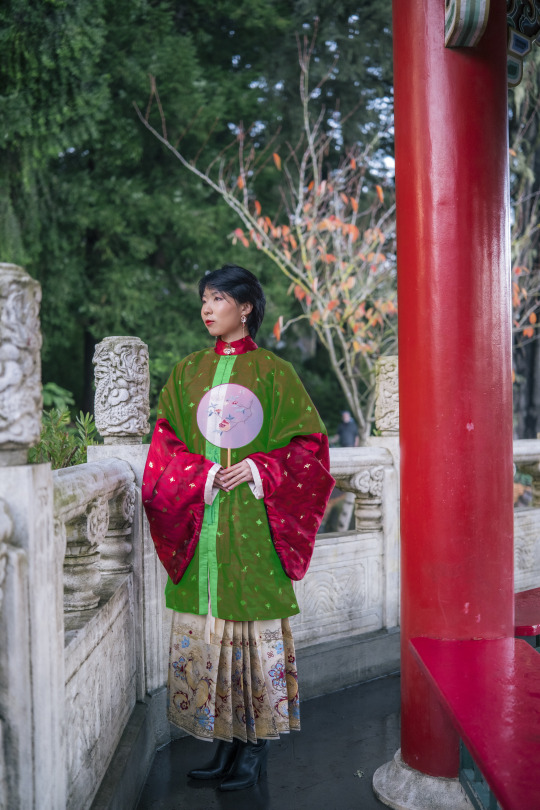
This refers to the body of the garment—the part that would cover your torso. Typically there are two pieces of cloth making up the body: one on the left and one on the right.
Once again, one of hanfu’s main defining characteristics is that traditionally, THE SAME PIECE OF FABRIC MAKES UP THE FRONT AND THE BACK. There is no shoulder seam separating the front and back of the garment.
袖/XIU4/SLEEVE
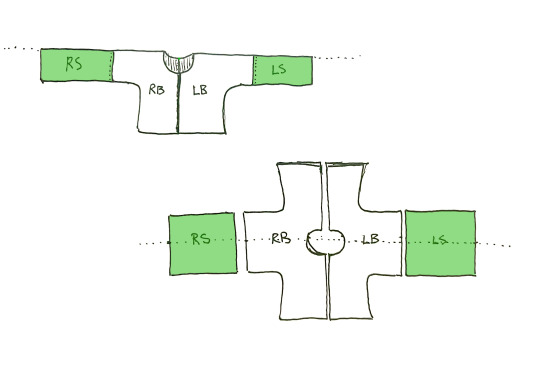

袖 means sleeve (in both technical and colloquial terms). There are many shapes that the sleeve can take: they can be narrow like normal clothing or they can be big and dramatic like the kind you see in cdramas. Like the body, there is no seam separating the front and back of the sleeve—the sleeve piece is draped over the arm and sewn together at the bottom. Another important characteristic is that the sleeves are joined to the body at the bicep or elbow area, NOT at the shoulder. (Short or half-sleeve tops might not have a separate sleeve piece.)
領/领/LING3/COLLAR
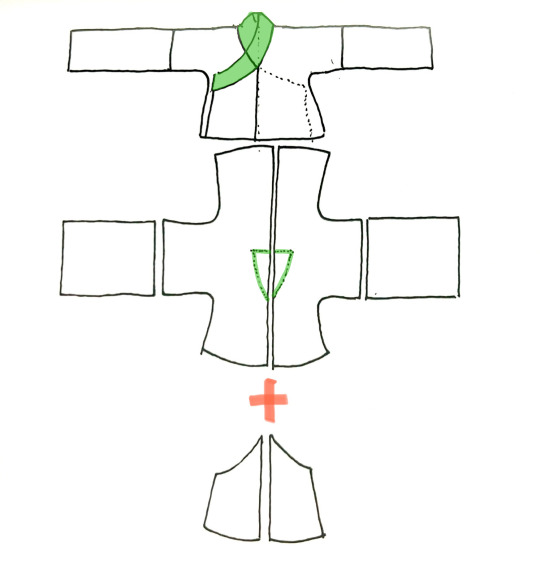
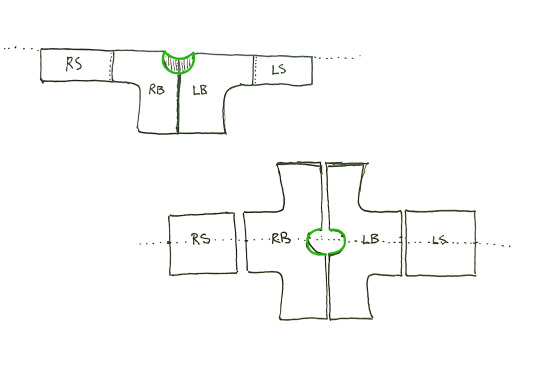


領 means collar (in both technical and colloquial terms). This can refer to two things: one, the general shape of the neck area (round, square, standing, cross etc.) and the actual strip of fabric that is attached at the neck to form the collar.
襟/JIN1/LAPEL
This can be translated as collar or lapel; I choose to say lapel to distinguish it from 領. This refers to the area where an open-front top would open. It’ll look different based on the collar type—generally a 對襟/对襟/dui4 jin1/parallel collar top’s jin coincides with the front centerline.
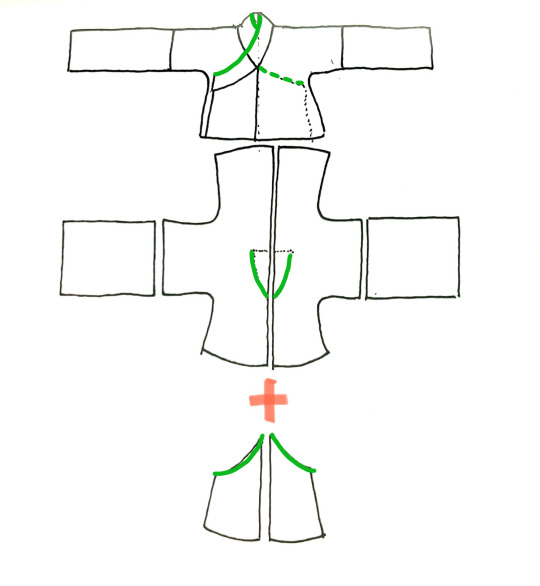

With a 交領/交领/jiao1 ling3/cross-collar top, however, it would coincide with the outer edge of the collar. (Will have a more detailed post about this later.)
下擺/下摆/XIA4 BAI3/HEMLINE
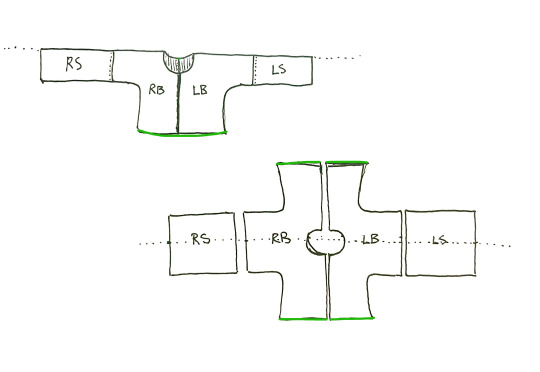

Refers to the bottom hem of the garment. 下 means down/bottom. Note that 擺 can refer to different things in different contexts. If you see someone talk about the 下擺 of a top, they’re talking about this bit.
The following terms only apply to a subsection of hanfu tops and may have fewer images as a result.
衽/REN4/LAPEL EXTENSION
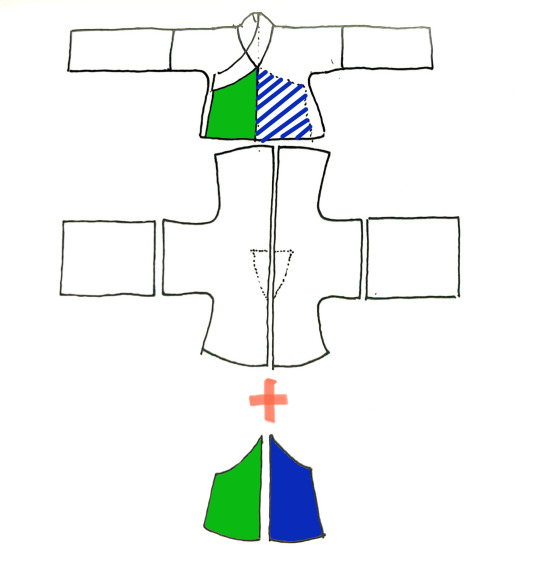

This one is a little harder to translate. Applies to non-parallel lapel tops like cross collar, diagonal-lapel standing collar, and overlapping round collar garments. It’s an extension of the BODY piece on the front, sewn to the vertical center front seam, that overlaps over the other side. (Will have a more detailed post about this later.)
衩/CHA4/VENT


Also called vents or slits—an optional open slit, usually made on each side of a longer shirt or robe, to allow for ease of movement. Might be combined with the word 開/开/kai1/open to form the phrase 開衩/开衩/kai1 cha4/open slit. Mostly applies to longer robes or tops, where the length reaches the knee, so that you don’t have issues with walking.
襴/LAN2/WAIST EXTENSION

Also a little harder to translate. This only applies to 襦/ru2/Ru tops and 襴衫/襕衫/lan2 shan1/Lanshan robes, plus some varieties that were derived off of those two. The 襴/襕/lan2 is an extra rectangle of fabric appended to the bottom of a shirt/top to extend its length. It can be made of a contrasting fabric or the same fabric, and often has pleats on the sides to allow for movement. (Will have a more detailed post about this later.)
緣/缘/YUAN2/TRIM


Refers to the trim or decorative contrasting bits on a piece of clothing. Specific location goes in front of the character. For example, 袖缘 means sleeve trim, aka the cuff. Some specific trims might have their own special names but that’s for another post.
Later post about skirts/pants to come soon!
navigation: hanfu in components 1 2 3.1 3.2 4 5 6 ...
#hanfu#hanyuansu#chinese hanfu#chinese history#chinese fashion#hanfu photoshoot#hanfu fashion#terminology#reference#chinese#ft tangtang's shitty drawings again#long post#cloud9hanfu#九雲閣#cloud9 hanfu#hanfu in components
357 notes
·
View notes
Text
Making medieval underwear - linen edition
So you want to make some medieval clothes? I, along with many others, would recommend you to start with a set of underwear. If you haven't sewn a lot before, it's a good way of getting into it with some slightly cheaper fabric before you break out your lovely wool (assuming you want to use period appropriate fabrics, that is). It's also a nice way of getting used to the shapes and checking fit, as shirts and shifts will often be similar to the clothes that go over them.
In Europe, underwear in the middle ages would most often have been made out of linen or hemp. These fabrics are great for garments you will wear next to your skin because they get softer the more you use them and they can take a beating so you can wash them as needed. Unfortunately, they also do not last very well from an archaeological standpoint - in conditions where animal fibres are fantastically preserved, plant fibres will rot away. This means that cold and wet places (north west Europe for instance) will have very few linen garments preserved that we can look at to see how they were made. We do have some shirts preserved, but I don't believe we have a single pair of braies - something that has led to a lot of head scratching regarding their construction. We do have a lot of depictions of them though!
But you're here for the links, so let's go.
A bit of everything
An article on underwear in the Maciejowski Bible - here we have a few different patterns for braies, some nice tables of hose and tunic colours, some information on hose construction (not what I want to focus on in this post but it's there), pictures of braies, shirts and shifts, plus links to further reading.
Shirts and shifts
Handcrafted History's medieval linen shirt tutorial - Handcrafted History is a treasure of a blog with plenty of tutorials. I'll probably be linking to other specific posts in the future but I can really recommend just having a browse if you're into medieval stuff.
Maille is riveting's medieval under linen shirt - shirts are fairly straight forward but it can be nice to look at a few different takes. This is another general blog recommendation as well!
Handcrafted History's viking/medieval shift or underdress - it's basically a shirt but longer!
Braies
I saved a bunch of links mostly focused on long braies when I was trying to figure out their construction. You could just open one of these links and go for it but I like to have options and there are a few different solutions going on here.
Experimental underwear - using 6th-7th century linen trousers from Egypt and Syria as a basis.
Quick&Dirty Braies - I'm into the H construction of these because they could theoretically be made from just one big rectangle with zero waste, and we know that people wasted as little fabric as possible.
Buck's Retinue braies - this site features two types of braies. The classic baggy ones plus a pair of short braies that appear later in the period as clothes get tighter and shorter. I feel like the short braies could be made in a very packer friendly way if that's relevant to your needs.
Maille is riveting's medieval long braies - basically the same pattern as the link above, but with more pictures. I think I want to try this version at some point in the future. (I particularly like cutting out a little rectangle of fabric to make attaching ("pointing") your hose easier. I have small eyelets on mine and it's. Frustrating.)
Damberg's brokor - a Swedish site with good pictures of some different types of braies. Google translate usually does fairly well with Swedish to English.
Viking history's early medieval braies video - this pair is slightly more fitted than many of the others.
ArmStreet's how to wear medieval braies - I had to share this as the posture of the guy putting on the braies is so endearing to me. I even giffed it so I could put it in the group chat. The construction of these seems pretty cool! I wish they sold a pattern for them as well because I don't want to spend that much money on something I could just make.
BONUS: Handcrafted History's bathing dress - you could definitely use this type of dress as a general purpose shift as well. Or make yourself a nice bathing dress!
#historical dress reference series#medieval#there's a book related to this that i want to talk about so bad that smoke is coming out of my ears#but it deserves its own post so. cliffhanger.
112 notes
·
View notes
Note
Dude!!! You costumes r so incredible!!! You make 'em mostly by yourself right??? Do you also make the patterns yourself or do you rely on pre-existing patterns? (Be it historical or reproduction?) do you also use period accurate materials?
Oh!!! As for making the clothes, how closely do you stick to historically accurate sewing methods? Considering how low making a whole garment can take by hand, do you kinda cheat a little by using a sewing machine??? (Which is fair tbh)
Sry if these r too many questions ;w; ur clothes r just soooo cool
Hello ! Thanks a lot ! Yes I do pretty much everything by myself, except for things made with leather. I sometimes start off with printable patterns from historical costuming stores like Reconstructing History, Laughing Moon Mercantile, Blacksnail Patterns and others to use as a base, but recently I've been drafting my own patterns more. I've no formal education in that so it's very trial-and-error, but I use books like The Medieval Tailor's Assistant or Patterns of Fashion as references and it helps a lot.
I sometimes do costumes all in period-accurate materials like for my landsknecht costume (I used only pure wool, linen and linen thread with wax, and I braided the lacing cords with wool yarn), but sometimes I don't ; for the gamurra I used reproduction brocade and duchesse satin that are only part silk. It really comes down to budget and occasion. I'm glad I didn't use super expensive period accurate pure silk for the gamurra because I wore it outside all day for two days and went dancing with it (and I couldn't afford it anyway). Also, that project was less made out of historical curiosity and more so for fun and flamboyance.
When it comes to sewing methods, out of preference I only use the machine for very long seams that won't show on the outside. I enjoy hand sewing a lot and I'm not very straight and precise with the machine so a lot of the time, I only do the most basic and discreet things with it. Then, I'll sometimes go full historical and research proper interlining methods and seam types, and sometimes speedrun a project and skip some of the steps when I feel like I can find another solution. It really depends. The research itself is a lot of the fun so I do tend to try and follow historical construction, but I'm also not a dress historical or a reenactor so I'll usually adapt to the current situation because there's no pressure to go either way.
#my sporadic use of the sewing machine is not do to pedantry but mostly to incompetence#I think my machine might be shitty too#revolution fairies#replies
179 notes
·
View notes
Note
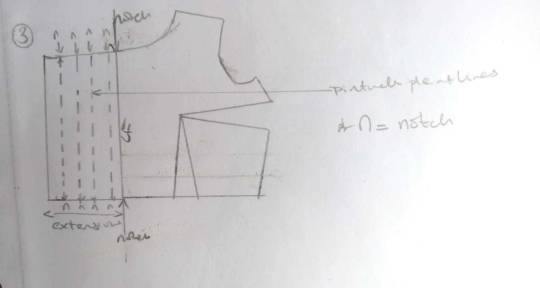
You've mentioned before that it is acceptable to sew the sleeve onto the torso of a garment before sewing into a tube, and also that construction for something may be different when done by hand vs machine. So far, all the tutorials about sleeves w/ gussets I've seen involve sewing the gusset onto the sleeve, making a tube, and then attaching it to the body. If I do it by hand, can I get away with putting the sleeve on before I turn it into a tube?
Oh nonono that's not just an acceptable way to do it, it is THE way to do the sleeves on certain types of garments!
Obviously with anything tailored it doesn't work - fitted jackets and coats are too structured and the seams there usually don't line up anyways. But if you're making a shirt or shift or nightgown, or basically anything unstructured, one layer, and with sleeve seams and side seams that line up, put the sleeve on first!!! Your shirt should resemble a large + right after the sleeves go on.
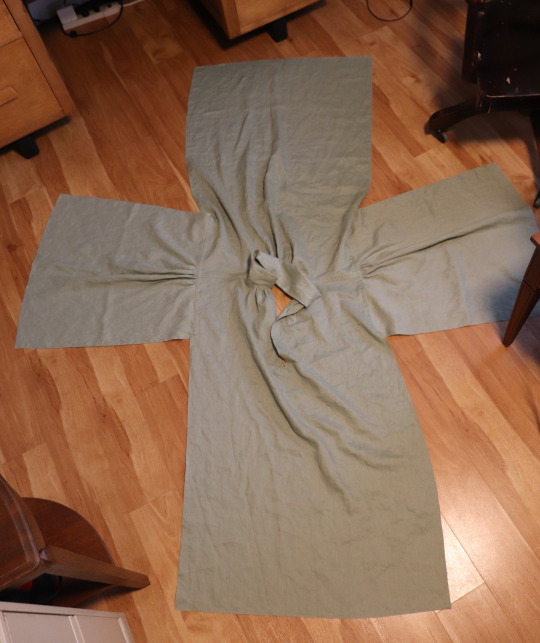
It doesn't matter if there's a gusset or not, or if you're doing it by hand or machine, this method is objectively better either way.
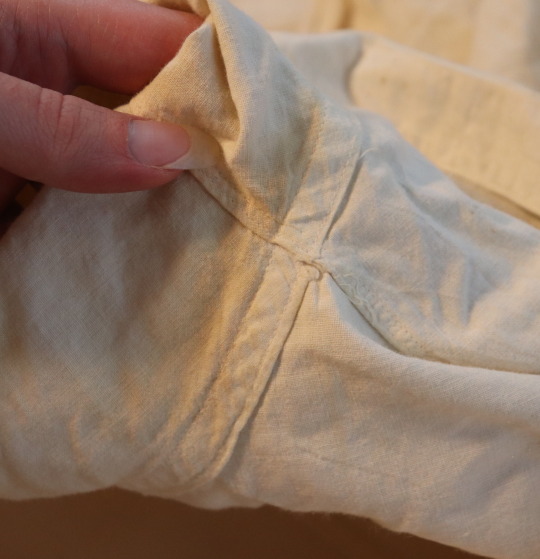
Attach the sleeve, finish the seam allowance, and THEN close the side and sleeve up as one. If there's a gusset then sew it in on all 4 sides before closing up the rest of the side and sleeve.
(And trim down the seam allowances of the sleeve and body pieces next to the gusset, and then fold the edges of the gusset outwards around them when you fell the seams. I'm still chugging along on my extremely long shirt tutorial and I'll go over all of this thoroughly in it.)
I know I like to say that there's no one right way to sew things, and that's true a lot of the time, and technically you can sew the sleeves on second but. please never do that. It's so so much easier to do it while they're nice and flat. Please don't make your life that much harder for no reason.
It's been about 13 years since the first and only time I used a commercial sewing pattern, but I'm pretty sure the sleeves went on in that order in the instructions for it, and commercially made shirts are done the same way!
(This one's antique from maybe the 1910's-20's because it's the only shirt I own that I didn't make myself, but you can see that the sleeve was sewn on and felled first, and I promise the modern button ups I alter at work are done the same way.)
303 notes
·
View notes
Text
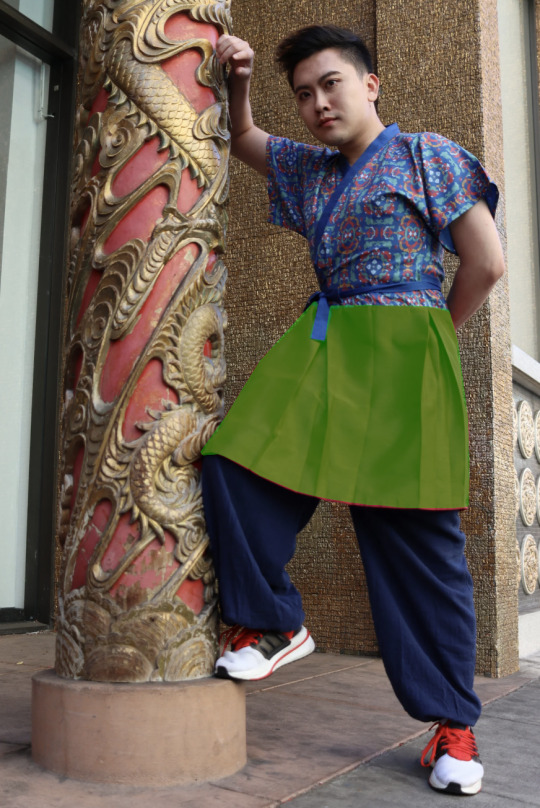
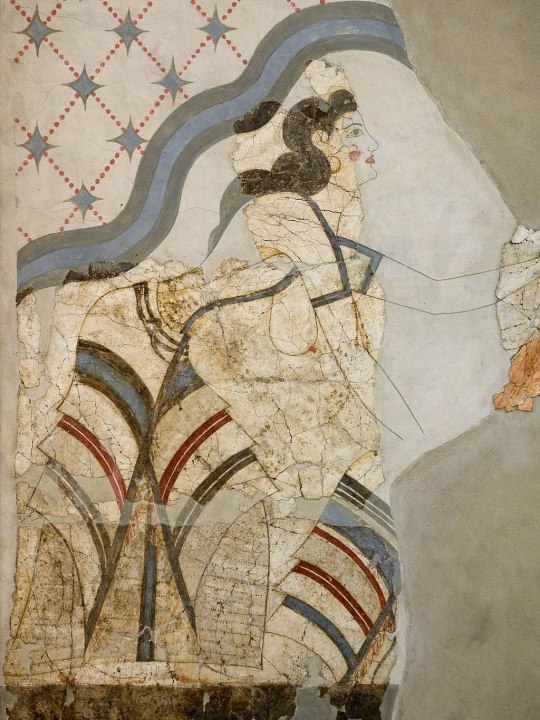
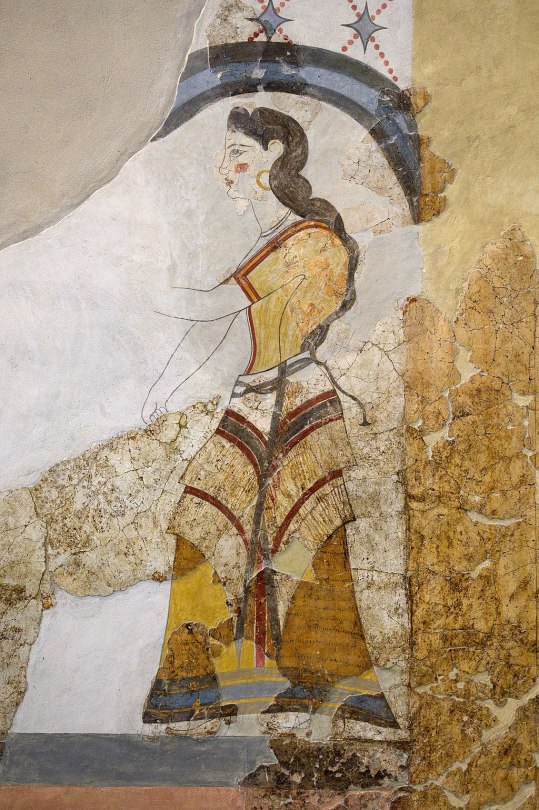
Minoan Kilt
The large, structural skirt worn by Minoan women in art is instantly recognizable, and when I made my own I combined current best guesses with my own personal tastes.

My kilt shape follows the hypothesis laid out by Bernice Jones in her book Ariadne's Threads: The Construction and Significance of Clothes in the Aegean Bronze Age. She describes the shape of that of a labrys, a double-headed axe with apparent ceremonial significance in Ancient Minoan culture. This garment may be depicted in Linear-B logogram *166 + we, we-being the backwards-s-shaped squiggle in the center which identifies the piece as a garment.

See pages 336 and 341 in Marie-Louise B. Nosch, The Textile Logograms in the Linear B Tablets
Actual details on construction and materials below the cut:
Construction:
The top and bottom edges of the kilt are concave, so the sides are longer than the middle. This gives the chevron-shape seen on layered kilts in art. In addition, the curved top half makes the skirt flare out, accommodating the hips and giving more freedom of movement to the legs. My kilt measured from my waist to my anklebone at the longest point, and about 1.5 times around my waist.
I chose to make a flounced kilt, with smaller strips of fabric and trim applied to a large base piece, rather than a tiered kilt, in which multiple kilt shapes of varying length are layered one on top of the other, so you end up wrangling 3 layers of fabric around the waist. The flounced kilt saves fabric and gives you a lot more freedom with whatever trim you might want. Jones' diagram for a flounced kilt is seen below:

Unlike the version in the diagram above, I chose not to attach ties to the garment itself both because the linen I used was very heavy and I was concerned about weight, and also because folding the skirt and securing it with a separate tie worked just fine for my tastes. In total I had four flounces: 2 alternating rows each of fabric and fringe.
The vertical edges of most kilts are left plain, probably representing either the selvage or an edge otherwise finished off to prevent fraying. For my kilt, however, I ended up with a couple inches of self-fringe on either side as I adjusted the fabric to the correct width. At least three examples of kilts with fringed vertical edges are known, all three from the so-called "House of the Ladies" in Akrotiri
Photos from Wikimedia Commons. Image 1. Image 2.
The vertical edges of these kilts are reinforced with a colored band or tape, probably to keep the garment from unintentional further fraying. Accordingly, I did the same on my kilt. I also like that it gave a nice vertical diagonal to counterbalance the horizontal ones.
Materials
I tried to use mainly linen and wool, the fibers most available on Ancient Crete, but some of my trim was cotton because sometimes you just have to use what's cheap and available in the today times.
The base of my kilt is a heavy, patterned linen in what's called a diaper weave, meaning that a repeating diamond pattern is woven into the pattern itself. A lot of the Minoan textiles depicted in frescoes are characterized by repeating geometric patterns, likely woven into the fabric itself, and that was something I wanted to capture in my own piece. My linen is woven with both cream and natural colored threads. The heavy weight is important to give structure to the garment--otherwise it would be kind of limp. My linen was from Burnley & Trowbridge (shameless plug), as was the plain cotton twill tape I used to bind the top and bottom edges of the kilt, and the dark red wool twill tape I used along the vertical edges.
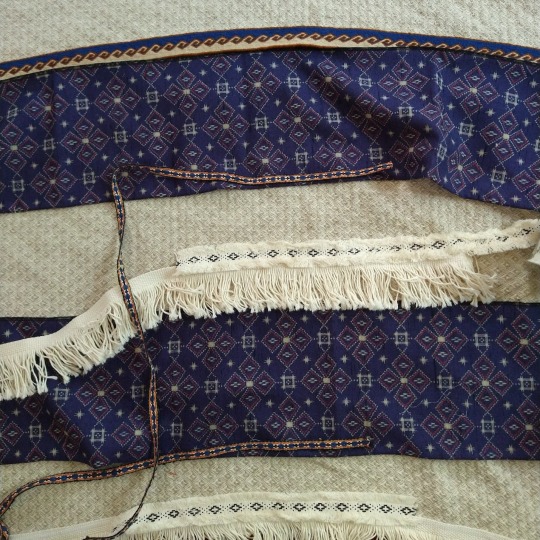
I bought my cotton fringe from a rug supply store. I had to search a while to find a fringe that would work for me, and I ultimately chose fringes with a woven header rather than the more common knotted one, so that it would lay flat against the kilt. I hid the woven header under a layer of cotton fringed trim from Michaels (yes, Michaels) with this really great diamond and dots pattern woven in black.
The blue layers are from a bolt of vintage wool Kimono fabric. Blue appears frequently in frescoes, likely achieved with indigo or woad dye, or even murex/mollusk dye. The fabric is printed with an imitation ikat pattern of diamonds and squares that made me think "the vibes seem right!" because quite frankly, you aren't going to get "historically accurate" Minoan textiles (which there probably isn't enough archaeological evidence to definitively describe) without, like, hand-weaving it yourself or paying someone hundreds of dollars to do it for you (and that price is if the weaver really likes you). Neither of which appealed to my desire to just make a fun, low stress project. Good enough is good enough.
The narrow trim on the bottom of the blue flounces is vintage cotton/poly woven trim. This trim, while narrow, was quite thick and stiff, which was great because it added more weight and structure to the end of my flounces since the wool fabric itself was quite thin.
The top layer is a custom tablet-woven wool trim that I commissioned from MAHTAVAhandicraft on Etsy. I imagined this as the "centerpiece" of my kilt, and I'd arrange everything to complement it.
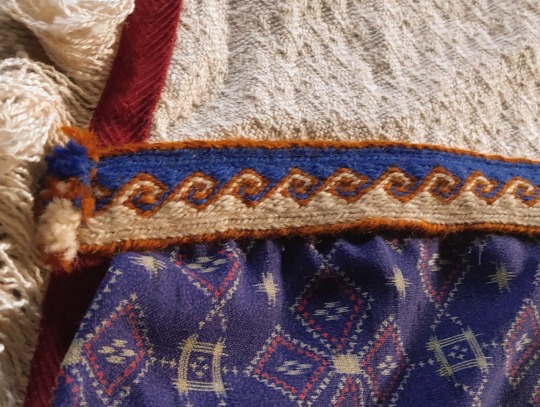
It's a kivrim pattern, which has itself only been traced to 19th-century Anatolia, but I didn't care. The way it looks like waves reminded me of how central the sea was to life in the Ancient Aegean and Mediterranean and it captured the idea and aesthetic I was pursuing. I mean, doesn't it remind you of these dolphins?
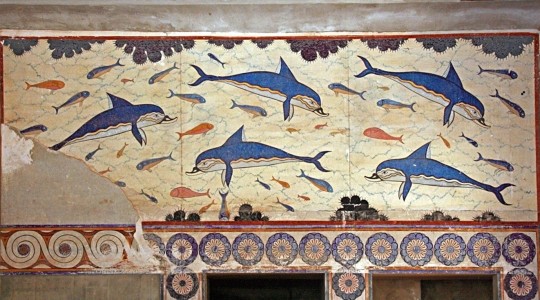
(I like the dolphins)
The whole thing was machine sewn with the exception of hemming and adding trim to the blue flounces. If you were to look at it from the back, you'd see lots of zigzag stitches, because i wanted to be fast! and have fun! not chase some unreachable ideal of "accurate."
As for wearing it, I chose to wear it with the top part folded/rolled down over a belt, so I have a thick tube of fabric around my waist. Many images, like the frescoes above of women with fringed kilts, appear to just show the kilt being tied closed. Other images are so fragmented or stylized that it's unclear what kind of skirt closure was used. Sculptures and figurines definitely show some kind of SOMETHING around the waist, whether this is folded fabric or a kind of belt is unclear. Different art could show different things!

I think I see evidence of a continuous line from the skirt to the waist-roll on the figure on the left, found in Troas, which I think indicates some kind of skirt-folding situation. The woman on the right, found in Crete, looks more like she's wearing some kind of long coiled belt, or perhaps snakes. Who knows? I don't! For my own part, I found the combination of rolled waist + tie belt the most secure for doing things like kneeling, stomping around, and wading into rivers to rescue bees. I also liked that it gave me the bulk around the hips that gives Minoan figurines such a powerful silhouette, and proportionally gives more of an hourglass shape. If you wanted to do something more firmly grounded in the sources, stick just with the waist tie or belt, wrapped around a couple times and tied in back. If you want to be like me, just say "well we don't KNOW it didn't happen" and just do whatever you want. Have fun! Whatever happens, it should be fairly easy to move around in the kilt--this is not a restrictive garment, just a heavy one.
886 notes
·
View notes
Text
Bought a pattern from Reconstructing History and it just arrived and it seems nice. It has like a bibliography and talks about the garment and history they're basing the pattern from and seems to have detailed sewing instructions (even includes stuff about period-accurate construction) plus it goes over how to get the pattern to fit you if your waist fits one size but bust fits another (which is great for me, since I don't have tits), and for the dress I got a pattern for, it includes instructions for a camica too. This looks like it's gonna be fun. I'll keep yáll updated once I start making the pattern. (Idk when that's gonna be though, I need a fair amount of fabric so I have planning to do and I was gonna start with a different chemise/camica/shift)
47 notes
·
View notes
Note
Hello River! Have you ever noticed patterns between the different mediums that people prefer expressing themselves creatively in terms of their/yours astro placements? 👀 I think everybody has the potential to enjoy creativity. It's just a matter of HOW they like to explore & express it. Tysm for reading this! 🤗
Hello, thank you for such an intriguing question. Here is a gross generalisation. I might make a more detailed post in the future.
Astrology and creative mediums

*Note: My knowledge about different types of creative mediums is limited so take these with a grain of salt. Let me know if there are any specific mediums that you want to know more about.
Creativity is usually linked with your Sun/Moon/Venus. But when you choose to express it, I think it has to do with Mercury. Mercury can tell us about the skills we harness, the channel we choose to communicate our creativity.
Other planets' influence on Mercury:
Painting: Moon, Venus, Jupiter and Neptune influence
Designing: Venus, Saturn, Neptune, Uranus influence
Photography and filming: Moon, Neptune and Uranus influence
Acting: Also Moon and Neptune influence
Music: Venus and Neptune influence
Writing: Moon, Jupiter, Neptune and Uranus influence
Dancing: Sun, Mars, Saturn, Pluto influence
Any crafts that require manipulation with the hands: A strong Mercury, Mercury in 5th house
Some observations:
Taurus and Libra, Venus ruled signs, usually excel at music and visual art. People with these signs in their charts usually have lovely voice and a distinguished sense of colour and harmony.
Gemini, Libra, and Sagittarius love to dance and are good at dancing.
Gemini placements also loves to write.
Cancer and Leo united for the love of photography.
People with a strong 5th house like to make/create things.
Fire signs like performative arts.
Virgo and 6th house like to make garments or anything that has practical uses.
People with Scorpio in their charts are low-key about their creative endeavours. They just do what they love without the need to talk about it to everyone.
Sagittarius and Pisces placements, strong Neptune and Uranus usually have a very unique style but still can appeal to the mass. These are placements that create inspiration.
Capricorn and Aquarius seems to have a liking for construction like knitting and crocheting, papercraft or writing music.
Pisces placements love to be transformed, to be in various different worlds, hence the love for acting and cosplay.
#astro observations#astrology aspects#astrology placements#astrology observations#astro posts#astro notes#astro community#astroblr#natal chart#birth chart#creativity#ask me questions#astrology asks
57 notes
·
View notes
Text
Years ago, I had the immense luck of finding a genuine seagreen japanese haori in a vintage shop for a ridiculously low price. I did not hesitate to snag it, and it has kept me comfortable through many chilly autumn and early winter evenings.
As far as I can determine it is made of genuine silk and it was constructed in the traditional way aka loosely sewn together with big running stitches so that it can be easily deconstructed, to be washed in pieces instead of as a whole.
Those stitches had been steadily letting go throughout the years and despite the fact I never wore it outside or next to my skin it was starting to smell a bit funky... time to wash it... the traditional way...
First step... unpicking all those seams

From top to bottom, the two sleeves with their lining ( note the bits of facing on the lining near the "cuffs"), the collar,plus the cotton interlining ( the only non silk piece I think), the two small side strips with their lining and then the central body plus its lining.
One of the things that I quickly noticed while unpicking is that how little cutting must have been involved while making this haori.
Haori and kimono are traditionally made out of tanmono, bolts of fabric that are usually 12 m long and between 35 to 40cm wide ( enough for one kimono or two haori). The bolt my haori was made of must have been 35 cm wide.
The fabric is sewn together at the back for width and there has been some cutting done for the neck, collar and side pieces but other wise the only place where the edges are not the selvedges are at the bottoms where the fabric has been cut to make the individual panels for the body and the sleeves

That said, the previous owner of this haori wasn't very tall nor very wide. The back is only 71 cm long and 54 cm wide. On me ( and I am not very tall either) it means it only barely comes to mid- butt while most haori come to mid-thigh and while loose enough this hoari doesn't have the drama of my other haori ( probably a man's) which has a 63cm broad back.
So how did the seamstress manage to reduce a double width of 35 cm to a 54 cm back without cutting off the selvedge and reduce a length of 2m to 71cm front and back ( so only 142cm total)? Well, by having a center seam of 3cm,side seams of 5 cm and doing some clever pleating at the bottoms.

So why all the effort of keeping the selvedges?
One of the reason obviously is that the edges wouldn't fray. The other I think is that this garment was meant to be passed along, and if the new owner was taller and wider than the previous one, the seams could be let out at the sides and at the bottom and you'd only need a new lining.
Another funny thing I noticed when unpicking is that while the outer fabric is the same everywhere, the lining is not. While the whole lining is white at first sight, there were subtle white on white brocade patterns at a closer look, and there were three different motifs.

An abstract swirl pattern at the sleeves, a floral pattern at the top part of the body, and a bishamon kikko pattern at the bottom of the body. Maybe the previous owner was not the first either, and the owner before that was even smaller!
So after unpicking this baby it was time to wash it. Because what edges that had been cut were never finished in any way beyond a bit of pinking I did not dare to put it in the laundry machine even on the gentlest delicate cycle I had for fear of fraying. So hand-wash it was. I used 1 sheet of Cosmeau's wool and silk laundry detergent in a 10 l bucket of luke warm water and set to gentle stir the whole...
whooo boy am I happy I decided to wash this baby because even if I could not really see it, it turned out my haori was one dirty,dirty boy... the smell that came off after even a couple of stirs was pretty disgusting and the water quickly turned a grotty grey. The rinse cycle after also turned fairly grey so I decided that a second wash was necessary

The second wash.
The second wash was only a tiny bit grey and the rinse actually ran clear after that so I squeezed as much water out as I could without wringing and laid out the pieces to dry on towels or on my laundry rack
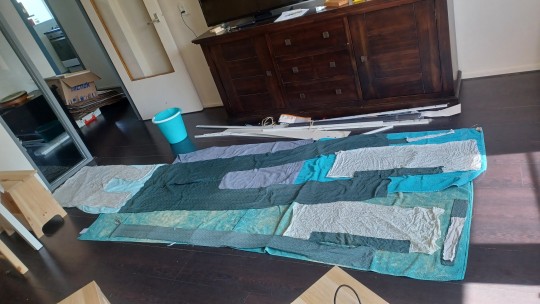
So now it's a matter of letting it all dry, and hopefully soon, I will have another post detailing the process of (hand)sewing this baby back together
#haori#sewing#garment construction#japanese culture#japanese clothes#unpicking#sewists of tumblr#sewblr
33 notes
·
View notes