#pressed space on a highlighted piece of text and it deleted
Explore tagged Tumblr posts
Visit Tumblr Blog
Explore Tumblr blogs with no restrictions, modern design and the best experience.
Last Seen Tumblr Blogs


Fun Fact
Tumblr was created by web developers David Karp and Marco Arment.
Text
About to kms. Just accidentally deleted 4K words of my new fanfic chapter that I was trying to upload. I’ve got no backup either.

#hahaha#so fucking funny#everlark fanfic#fanfiction#ao3#why is this happening to me rn#lord help me#katniss everdeen#peeta mellark#the hunger games#everlark#pressed space on a highlighted piece of text and it deleted#why is that even a feature#ao3 curse hit so hard it’s actually trying to prevent me from posting on there#everlark au#katniss and peeta#gale hawthorne#archive of our own#ao3 fanfic#ao3 writer#using this tag to sort out my own posts bc they’re unorganised
21 notes
·
View notes
Text
A QUICK GUIDE TO AO3 CUSTOMIZATION FROM SOMEONE WHO KNOWS NOTHING ABOUT CODING

ft adding pink to everything and my secret to writing long comments
note: I originally posted this to twt but if that place burns in a fiery pit I spent too long on this for it to disappear, so I'm putting it here too :)
so many people know way more about this than I do, but this is a step-by-step walkthrough of the changes *I've* made, and hopefully it works as an introduction people can build from for whatever they'd like to do
There are a lot of images in this post! (click to enlarge)
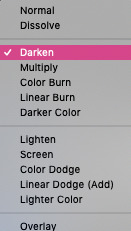
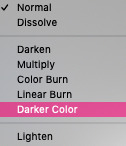
to start, AO3 skins
site skins change how the AO3 website appears when logged in (even on mobile), mine is pink and blue!

I'll have my skin turned off throughout the post so the guides appear as they will for you
to create, edit, and view skins, go to the "skins" tab from the left-hand menu. you can also view public site skins from there or from the button in the preferences.


public site skins are made by other users. i would really encourage previewing and exploring them to become familiar with the possibilities (maybe you just want to use one of them and now you're done!)
to create your own skin
on the skins page, click "create site skin"
if you don't know CSS (same), use the wizard! clicking on the "?" will give more information about each option
I only use the colours section you'll see a link right there for hex codes I use pink as a header colour and bue for accent but lots of people change the background colour and that looks really cool!
submit


The next step (optional!!!) is to add CSS from a public skin to your own. I use "ByLine" by Branch. this separates the tag categories and adds spacing to make them easier to read.
here is a before and after using the fic "Landslide" by @roosterbruiser as an example


to see the CSS of a skin, click the title
copy all the text below the CSS heading
in the skin creator/editor press the custom CSS option and paste all the text into the CSS box


you can have both wizard and custom CSS settings, in mine you can see the header and accent colours as well as the CSS

level up: USERSCRIPTS
userscripts are small pieces of code that modify a website. for AO3, this may involve adding shortcuts and buttons or even advanced tagging functions (computer people, I'm so sorry if this is wrong, I'm trying). I use Greasy Fork and Tampermonkey.
This is how I write long and formatted comments!
Greasy Fork is an archive of userscripts and Tampermonkey is a browser extension and userscript manager. You don't need to use these two in particular. please use your common sense when downloading anything or adding permissions to your browser.
Greasy Fork guide on installing scripts
Install Tampermonkey on Chrome
there are TONS of user scripts for AO3. This is another good opportunity to explore all the possibilities. there are lots of more complicated options I haven't explored.
scripts for AO3

i use this floaty review box
and this comment formatting
EDIT: if you use chrome you might need to turn on developer mode in your chrome extension manager - you can google "tampermonkey developer mode" and it should explain that :)
to install (once you have Tampermonkey installed):
open the script you want in Greasy Fork and press install
Tampermonkey will open, press install again


clicking the Tampermonkey extension will let you toggle scripts on and off, and opening the dashboard will let you view, edit, and delete scripts


i find i can only have a few turned on at a time before they cancel each other out, but that depends on which ones you're using and someone more savvy might be able to fix that
how to use the floaty review box - write more comments!
there will now be a "floaty review box" button at the top of the work, it will open a floating text box you can move anywhere on the page. highlighting any text and pressing the insert button will paste the text with italics into the box


anything you type in the review box will appear in your comment at the bottom of the page!
if you have also installed the comment formatting script, you'll be able to highlight any text in your comment and use the new buttons above the comment box to format it

thats all ive got! Hopefully this is a good starting point to get familiar with some of the terms and basics for skins and scripts <3
if you want some inspo for how to comment on fics i made a whole fic rec list on twitter based on comments I've left, it's here. i have a masterlist of recs there mostly for darklina/reylo and similar ships.
the tag #reading with ru has cod recs and me talking about books
:)
#please no one follow me from this im never helpful otherwise#ao3 skins#ao3#fanfic#ao3 community#fandom#ao3 resources#im sorry if the image quality is awful lmk if I should clarify any of the text!#floating comment box#floating review box#ao3 guide
779 notes
·
View notes
Note
hiii abby!! can you post a tutorial for how you make edits like your latest one? the url edit fro taylorswifh? it’s so prettyyy
♡ edit tutorial for this edit, requested by anon ♡

hiii so! this is quite long, but that’s because I wanted to capture my whole entire process to hopefully help you! I used photoshop (2018) for this tutorial, and all the resources I used are listed here (everything except for photoshop is free)! I’ve sort of split this tutorial up into sections, by the different steps. thank you and have a lovely day!! ♡
so before I begin, I always think about the edit, like what I want the final outcome to look like (or if I don’t know what that’ll look like yet, what direction I want it to go in, the main themes/ideas/colour schemes that I have). I personally love using a minimalist range of colours, all of them being light and pastel (that’s just my personal liking though). I also consider the main themes or ideas that I want to translate through my edit. you also need to have the passion and desire to edit, I’ve learned that there’s nothing more draining than editing when you really don’t want to. so I think that you should think about all these things before starting!!
tip; put on some music, it gets your creativity and thinking flowing if you’re in a good mood ldkjkl
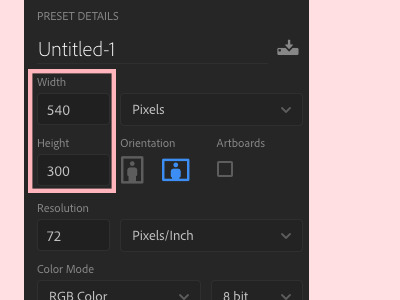
so! when creating the edit; first of all, I created a new document in photoshop - 540 x 300 pixels for this specific edit (just because that shows up as high quality on tumblr, but it doesn’t really matter!) when you click ‘create’, a white canvas should open up.
— creating the book
next! I used a book psd for my edit, which you can find and download here!! so I just opened that psd up (a psd is just a photoshop file that has like all the layers in place so it’s not just one photo);
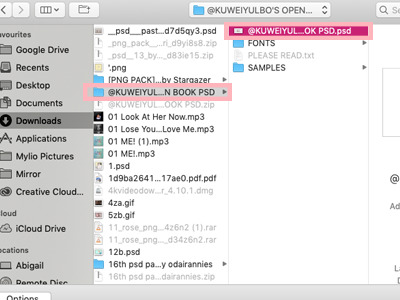
when you open the file up, this is how it should look (well not really, because I’d edited it to look like this, but it should have this general layout);
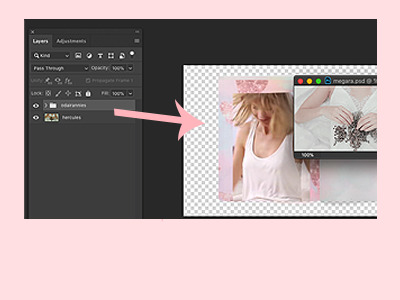
now what you have to do is sort of literally drag the file out and then, drag all the layers from that file into your white canvas, like this;

— giffing
I just wanted to quickly mention that giffing is definitely an optional step. I do it in pretty much all of my edits, but I wouldn’t recommend it if you’re just beginning to edit, because giffing takes the most time and it can be really draining and messy if not done right ldkjd.
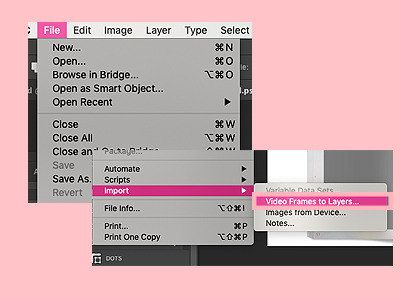
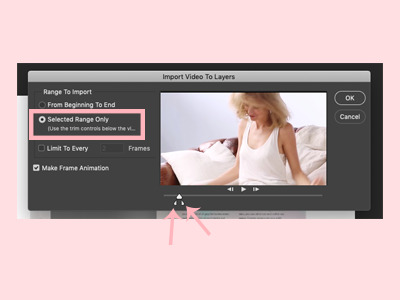
to create my gifs, I use youtube videos, which I download through 4k video downloader (it’s really simple with 4k, you just have to copy the youtube link and paste it into the app!). so to open up a video, go to ‘file’ then ‘import’ and finally ‘video frames to layers’;
once you’ve chosen the video you want to use, open that up (don’t know why that’s so blurry dlkjdlj but you get the idea);

now this should pop up! make sure it’s on ‘selected range only’ and then use the toggles at the bottom to select the specific part of the video that you want to use (I usually gif about 20 frames because it’s sooo much work for me to do more than that lkdjldj)
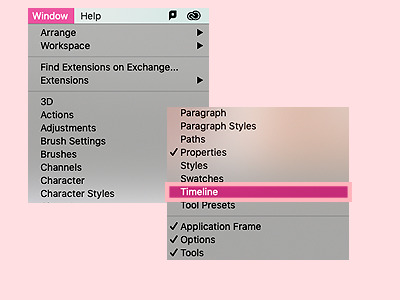
when you’re in the file, go to ‘window’ then ‘timeline’ for the gif to show up frame by frame;
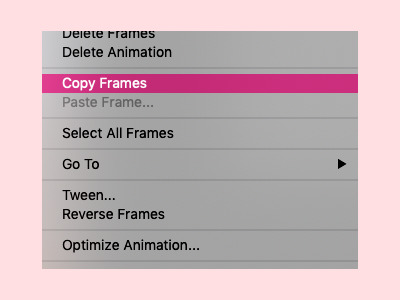
now highlight the specific frames that you want by literally dragging across them with the timeline bar at the bottom. then click the three bars on the top right of the bar, and click ‘copy frames’;

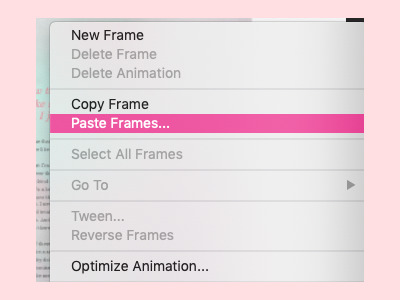
now go back to your book psd file, and at the timeline bar at the bottom, click ‘create frame animation’;

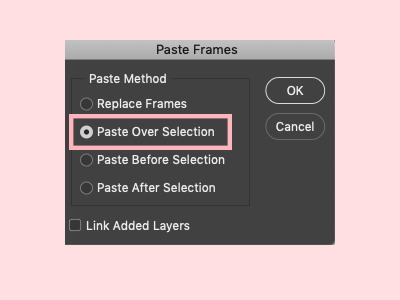
click on the three bars on the top right of the timeline bar and paste the frames over the selection;
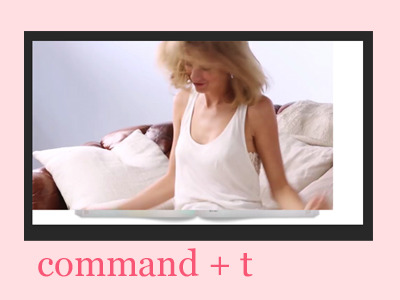
your file should now look something like this! to resize the gif, just press command + t and adjust it from there!
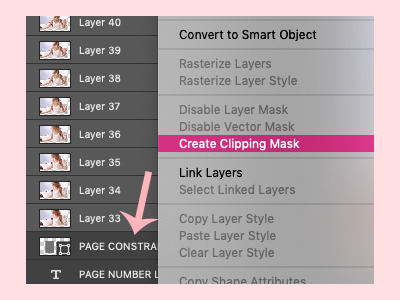
now to give it the effect that it’s a part of the book, you have to create a clipping mask (so it sort of clips onto the book layer like a paper clip). to do this, select all the layers of the gif, drag it right above the layer that you want to clip it onto (the page constraint layer in this case). then right click the gif layers and click ‘create clipping mask’;
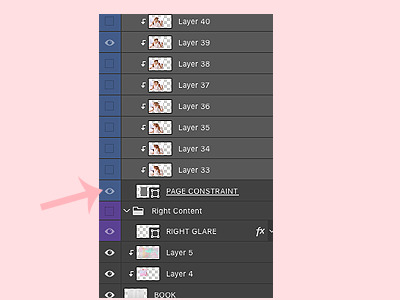
as a result, your layers should now look like this. you can use command + t again to adjust the gif size;
tip; press command + g to group the layers together so they take up less space!

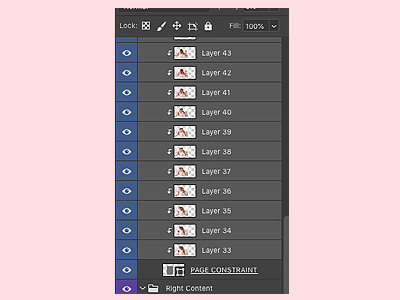
now, with your gif, this step is pretty tiring and takes forever dlkdjl, but for the layer to show up in every frame of the gif, you have to click on the box button on the left of each layer so that an eye shows up. you can also press the eye button at the top of the settings, in the unify bar, so that it stays visible throughout the entire gif. I don’t know if I’m explaining it properly dlkdjl but just go through every layer and press the box so an eye shows up.

sometimes the unify button doesn’t work for some reason, and you’ll have to manually go through every single frame just to click on the eye button. it’s excruciating, but it’s worth it in the end lkdjdl
this is how your edit should look now!

now what I do is apply a psd (sort of like a filter) so it looks softer and prettier! these days, all of the psds that I apply come from this lovely pack!

in the same way that you dragged your book psd in, drag the psd *folder* into your edit;
your edit should now look like this!

— adding the photo
now’s the fun part! you can add whatever you want to, but what I did in my edit was I cut out a photo of taylor. now what you can do if you’re running short of time is find a transparent photo of taylor on google or on deviantart, but if you want to take the time to actually crop the photo out like me (even though I’m horrible at it), here’s how I do it! first find the photo you’d like to crop out. I usually use taylorpictures, they have the most high quality photos of taylor!
so find the photo you want to use, copy it;

then just paste it into your edit;

use command + t again to adjust the size;

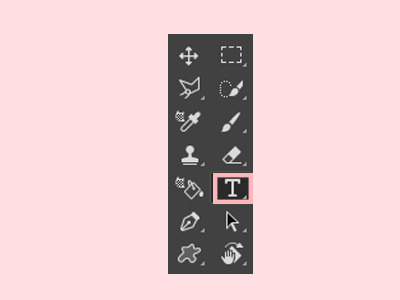
and now to crop it out, what I do is use the quick selection tool, which is this button right here;

in this mode, you can easily just select the part of taylor that you want to cut out (that sounds weird lkjd);

at the top, there should be a bar with a number of buttons, one of them being ‘select and mask’;

if you click on that, you should be taken to another page, similar to this;

now you can play with the settings on the right, then press ‘ok’ when you’re happy with it (the numbers change for each photo and your style, it entirely depends on how you want it to look);

now you should be back to your edit, click on the ‘add layer mask’ button on the bottom left of your page;
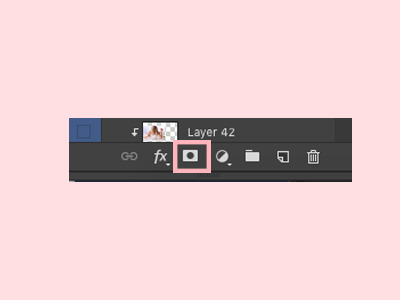
and taylor should now be cropped out from her background!
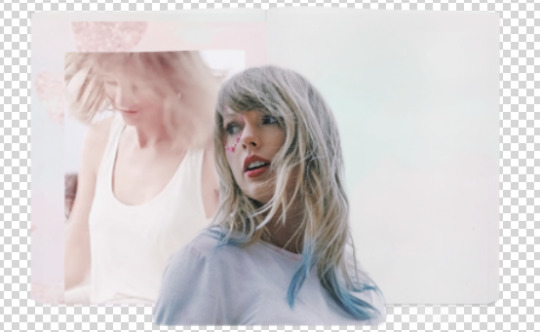
make sure all the layers are below the psd pack, including the photo of taylor that you just cropped out;


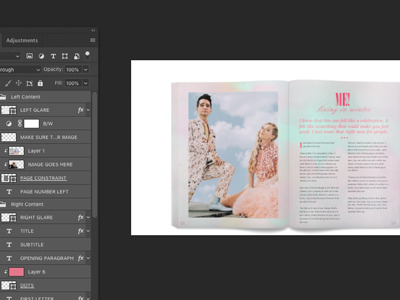
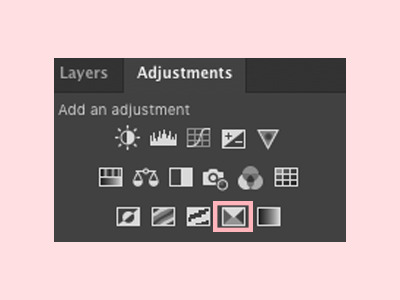
now for the colouring!! ‘selective colour’ is your best friend, and you can find that button here, in your adjustments (if you can’t find your adjustments, go to window > adjustments);
add a clipping mask (by right clicking the layer and clicking ‘create clipping mask’) of the selective colour onto the layer you want to colour, so that it only affects that one layer;

then on the selective colour panel, you can adjust the specific colours in that layer to your liking;

in addition, you can press command + u to change the whole colour scheme, saturation and lightness of the layer. make sure to press ‘ok’ when you’re done;

basically just play around with the colouring until you’re happy with it!

if you want it to look more realistic, you can also play around with the effects (I use layer effects all the time, they’re the best) on the layers bar, so the layer blends into the layers below it, like this;

— adding decoration
now you can decorate your little piece of work with whatever you’d like to, such as a background colour (layer > new fill layer > solid colour) ;

a texture (textures are honestly so amazing and you can find them all over tumblr and google; like you can search the word ‘texture’ up and then paste it into your edit);

I usually place my texture at the top of the edit, then use one of the effects to blend it into all the layers;

final embellishments!! this step is optional you can add anything else that you’d like to, such as pngs (you can search these up on google and paste them into your edit, or find psd packs on tumblr and drag them in). again, you can add selective colour and a layer effect to these layers;
tip; finding already transparent images saves sooo much time, so try doing that instead of cropping the image out.

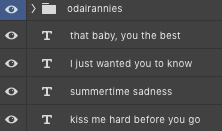
text;
tip; use a new layer for each line!

and so on. the flowers that I used come from this pack and the wax seal stamp comes from this pack from the beautiful @newrcmantlcs!! my main advice is to just play around with everything till you’re happy with it. don’t be afraid of deleting something or starting over completely if you’re not.

— giffing again
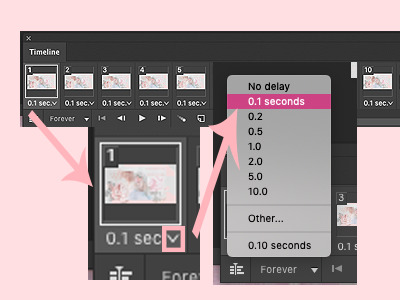
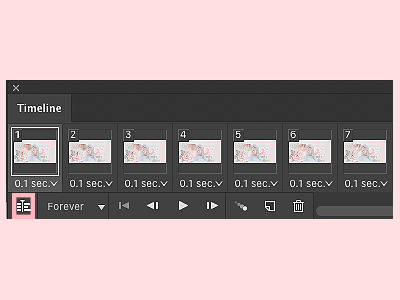
now to control the speed of the gif, highlight all of the frames, then click on the tiny dropdown button and change the speed to however fast or slow you want each frame to be. I usually make mine 0.1 seconds, but it’s completely up to you (and worth testing it out to see what speed you prefer!)
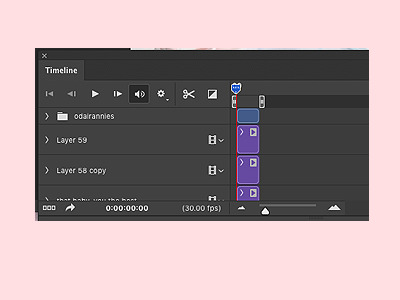
when you’re happy with everything, it’s time to sharpen it! first, you have to convert the frames to a video timeline, and do this by clicking on the button on the bottom left of the timeline bar.
your timeline should now look like this. everyone’s process is different, like some people like to start off their whole edit with a video timeline, but I find it a lot easier to start with a frame animation then convert it when I’m done with everything.
now to sharpen (in this case at least, sometimes I add a grainy effect instead) it, highlight the layers that you want to sharpen;
then click filter > convert for smart filters. this will turn your layers into one layer.
tip; if you do something you don’t like, command + z!!
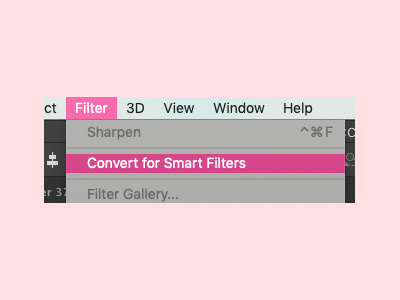
now go to filter > sharpen > sharpen;
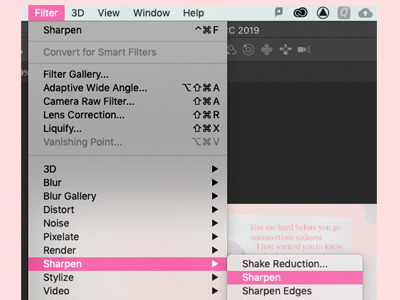
and your gif should now be sharpened! you can simply go to filter > sharpen if you want to sharpen a layer that isn’t a gif. play around with your edit a bit more until you’re happy, and finally, add a watermark if you’re going to post it online!
finallyyyyy! to save, go to file > export > save for web, if it’s a gif. if it’s a static photo, just click ‘save as’!

and yayyyy, you just finished an edit!!!!!
ahhh so this was my tutorial on how I created this specific edit, I hope it helped! If you create something similar or follow this tutorial, I’d loveee to see it; so if you post it on tumblr, you can tag me with #tuserabigail, or you can just dm me!
my process usually isn’t this rigid or precise, I usually edit on a tangent and in cluttered daydreams, it’s never like “oh, I have to make a gif now” or “ahh it’s time to add a texture!” so really, it’s just about playing around with your edit until you like it! it’s definitely okay to skip some steps or do things in a different order, because like I said, everyone has a different process, and this was just mine for this one specific edit (my process changes all the time too ldkdljk)
anyway, I hope this helped, and thank you!! ♡
126 notes
·
View notes
Text
Laptop on Rent Delhi, Noida, Gurugram INDIA
55 Laptop Shortcuts To Increase Your Productivity
Ever been in a situation when you are in a productive zone while working on your laptop and you have to take a moment to use the mouse or drag your cursor to complete your next action? How does it feel?
The moment your momentum takes a pause is one of the worst feelings ever because you're riding the horse of maximum productivity who just ate the creative power bar and is forced to slow down only to reach that highest gear of efficiency again.

We all have been there and through these situations. It doesn't feel right at all. First of all, we rarely achieve this samurai state of working in our day and then when we achieve it we are taking a break only because we are unaware of the few hacks or shortcuts we can take to avoid such pit-stops and continue to ride our momentum to task completions.
So here are a few keyboard shortcuts to save our precious seconds and streamline our work process. We should practice these regularly and add them to our arsenal.
Windows logo key to the rescue
Open or hide start screen - Windows Key or CTRL + Esc
Maximize/minimize your window - Windows Key + Up/Down Arrow (Up arrow for maximize and Down arrow for minimize) Laptop on Rent
Cycle through apps on the taskbar - Windows Key + T
Switch between open apps - Windows Key or Alt + Tab
Switch to Desktop - Windows Key + D or M
Shutdown options - Windows Key + X
Take a screenshot - Windows Key + PrntScr
Snap. Split the screen evenly between two to four applications.
Snap a window to the left side of the screen - Windows Key + Left Arrow
Snap a window to the right side of the screen - Windows Key + Right Arrow
Now snapping into the quarters after dividing the screen into 2 parts -
Windows + Up Arrow or Windows Key + Down Arrow
It's important to lock your computer whenever you walk away - Windows Key + L or to switch users.
Output your screen to a projector, connect to external monitors or broadcast to a wireless display - Windows Key + P
Open my computer or file explorer to view all your drives and folders - Windows Key + E
Move app from one monitor to another - Windows Key + Shift + (Left/Right) Arrow Key
Open ease of access center - Windows Key + E
Open quick link menu - Windows Key + X
Open Run dialog box - Windows Key + R
Search quickly in your computer - Windows Key + F
Find other PC's in your network - Windows Key + Ctrl + F
Selection and actions
Selecting a required area requires precision. And our touch screen PC's and sometimes even the mouse fail to deliver this accuracy.
Select all of the content in a given window - Ctrl + A.
Select rows in an Excel spreadsheet, blocks of text in Word or files in File Explorer - Shift + Click the first row or the first line, hold down the Shift key and then click the last row or line.
Iterate through words and select the desired area as per your requirements - Shift + Arrow Key.
Select two or more non-adjacent items at the same time - Hold down Ctrl and Ctrl + Click all the items. If you click without Ctrl being pressed down, you'll lose all the previous selections.
Basic actions that can be taken now –
Copy the content - Ctrl + C
Cut the selected the area - Ctrl + X
Paste the cut or copied content - Ctrl + V
Open formatting options in MS Word after selection - Ctrl + D
If you want to skip the wide variety of options presented by the Format Dialog Box simply use -
To make the text bold or to remove the bold effect - Ctrl + B
To make the text italic or to remove the italic effect - Ctrl + I
To add or remove the underline on the selected area - Ctrl + U
Everyone loves a fresh piece of content. Thesaurus or online search for particular words can add these vibes to your language. To do so, highlight the word and press Shift + F7 and Word shows a comprehensive list of related terms in a panel on the right side of the screen.
If you want to reverse your recent actions use UNDO - Ctrl + Z and if you want to reverse the undo command use REDO program - Ctrl + Y. If nothing was undone then the Redo option will not do anything.
If you want to order a print, use this command - Ctrl + P
Open task manager to view the currently active tasks and manage them in case a task is not responding - Ctrl + Alt + Delete
Permanently delete files by skipping their entry to recycle bin - Shift + Del
Zoom in - Ctrl + plus sign(+) | Zoom Out - Ctrl + minus sign(-)
Shutdown windows - Alt + F4
Save your work - Ctrl + S
Rename a file - Fn Key + F2
Rename multiple files at the same time by selecting all the files at once using the shortcuts mentioned above and then press F2. Enter the new name and Vola, all your files will have the same name and a number in the end.
Browsing made easy
You don't need to rush to your mouse to take you to the previous page. Alt + Left Arrow takes you to the previous page of the current tab and Alt + Right Arrow takes you forward. Computer on Rent
Eliminate unwanted format when you paste in a snippet of text from a web page or any other document by using Ctrl + Shift + V. This copies the content into your browsers clipboard, free of all the formatting provided by the page or document owner and from there you can select and paste the content into your desired file.
Restore the recent opened tabs in case you wildly closed the tab you were working on using CTRL + SHIFT + T. This works for all the major web browsers such as Chrome, Firefox, Edge, Internet Explorer.
Select or highlight cells or rows while editing a spreadsheet in Excel or Google Docs by using Shift + Space. Furthermore you delete the selected rows using Ctrl + minus sign(-). In case you wish to select all the rows below or above the current row, use Ctrl + Shift + Up or Down Arrow.
Hide or reveal the bookmarks bar using Ctrl + Shift + B
Open bookmarks menu in chrome in a new tab using Ctrl + Shift + O
If you want to send your email with the speed of light after you're done composing it use Alt + S Outlook or other desktop mail clients. If you want to perform the same lighting action in Gmail use Ctrl + Enter.
Initiate a quick reply to an email in Outlook using Ctrl + R
You can create your own custom keyboard shortcuts in Gmail by switching on the keyboard shortcuts settings.
Update, reload, Refresh the stuck pages using F5 or Ctrl + R in any Windows web browser.
Search the web pages for a particular phrase or your desirable words using CTRL + F
If you like what you are reading on the internet it's better to bookmark that page and revisit it and gain precious seconds by not taking your cursor or mouse to the star button, using CTRL + D.
Rent A PC
1 note
·
View note
Text
BECOMING A KEYBOARD JEDI USING SHORTCUTS(WINDOWS 10)

Dr. Dave Bradley has been given the task of writing the basic input-output system of the IBM personal computer. The year is 1980. In his hands is the most advanced piece of technology. Even with an elite team of engineers and designers, nothing runs smoothly when you are building a computer. Programs crashing during development stage is the norm after every five to ten minutes. The only way to restart the computer is to turn the power off, wait a while and turn the power back on and the computer would go through a very long self-test. An ingenious way for the restart process is urgently needed.
The first thing that comes to mind is placing a reset button. Its downside is that one can accidentally press the button, and all data gets lost. His team decides to create a three key sequence to reset the computer, which couldn’t be hit by mistake. Their deliberations yielded this solution: a single control key, a single alt key, and all the way to the right-hand side, a single delete key, and the computer would restart. It also enabled them to skip many tests, which would generally take 1-2 minutes, took only 10-15 seconds. It wasn’t a big deal at the time because there was a pile of issues they had to fix. That solution just brought one of the 99 problems off their backs. Other programmers began developing that feature into their application, and thus Ctrl+Alt+Del was released into the wild. The rest is history. When Chrome decides to freeze your computer, hit Ctrl+Alt+Del, and you unlock the terminator mode. The force was finally within us by using the Three Finger Salute.
There is no doubt that keyboard hot-keys make computer usage seamless. Some keyboard shortcuts save one from a quagmire while others are just cool. Windows 10 now supports cool trackpad gestures to make life easy, but they can’t beat the force of keyboard hot-keys. Possessing the force requires knowledge and practice. Some of the useful hot-keys you should be using are:
1. Change Case Keyboard shortcut
You are typing an essay while rushing to meet the deadline when you realize you left the caps lock on the whole time. The only way you can think of to edit this error is to redo. Stress hormones begin to flood your mind. I am here to end that nightmare (knight in shiny armor vibes). In order to edit this error, highlight the affected sentences and press Shift+F3 once to go all caps, again to go to initial caps, and again to go all lowercase.
2. Opening Task Manager
When running many programs simultaneously, your computer may freeze. In order to unfreeze it without having to restart it due to fear of loss of valuable data in other background programs, press Ctrl+Shift+Esc to access the task manager, which will enable you to force quit the unresponsive programs.
3. Lock Screen
When you have a program(s) running on your computer, and you want to leave the room for a short period and assurance that no one will meddle with your work, press Windows key+L. Your screen will lock and require your security authentication to access it.
4. Minimizing Windows
Let’s say you are doing something confidential on your computer, and your friend enters your workspace abruptly. The fastest way you can hide what your doing is by pressing Windows Key+D. This minimizes all windows instantly, and he/she will wonder why you are staring on your blank desktop vehemently.
5. Split Screen Between Two Apps
If you want to split the screen between two apps without using your mouse to allocate screen space and snap windows, you can press the Windows Key+Left Arrow key (<) or Right Arrow key (>) and your current window will snap to the left or right smoothly.
6. Creating and Rename Folders
The alternative way of creating a folder is by pressing Shift+Ctrl+N. Renaming a folder traditionally uses two clicks, but an easier way is by selecting the file or folder and press fn+F2.
7. Creating and Switching Between Virtual Desktop
Mac users are more familiar with this functionality. Windows 10 is the first Windows to have this feature. When you press Windows key+Ctrl+D, a new virtual desktop will be opened. If you want to switch across those virtual desktops, press Windows key+Ctrl+Left (<) or Right Arrow key(>). This will enable you to run different programs without the need to crowd one desktop.
8. Paste Without Formatting
When copy things like references from multiple websites, the text may get pasted in a formatted method and will make your document look messy. To maneuver this, copy in the usual method but paste using Ctrl+Shift+B instead of Ctrl+Shift +V.
9. Taking screenshots
It’s one of the easiest hot-keys to remember due to the need for capturing screenshots and snippets. In order to capture the whole screen, press Windows key+Print Screen key. The picture will be saved in Pictures>Screenshots folder. For capturing a part of your screen, hit Windows Key+Shift+S. This will open the Snip & Sketch app, which will allow you to create your screenshot. You will have to paste it and save it manually.
10. Game bar
When you launch a game on Windows 10, a pop up on starting the game bar appears. It recommends you should press Windows key+G. That will enable you to access Xbox tour directly, record live gaming sessions, and broadcast the gameplay on Xbox Live. One can also use it to take screenshots.
11. Zoom Shortcuts
If you want to zoom something on your screen, press Ctrl+Plus key/Minus key to zoom in or out, respectively. To return to the original resolution, press Ctrl+Zero key.
12. Open Taskbar apps
In order to launch your taskbar apps quickly, press Windows key+1 to open the first app from the left. If you want to open the third app on the taskbar from the left press Windows Key+3 e.t.c.
13. Opening File Manager
This is an inbuilt shortcut from Windows. Press Windows key+E.
14. Opening Settings App
Press Windows key+I.
Finally, you can create your own Windows shortcut by right-clicking the app or folder in question. In the pop-up, click the Send To option and create a desktop shortcut of the app or folder. Right-click the shortcut on the desktop and head down to properties. In the properties there is a shortcut tab, click on the shortcut key option and press the keyboard shortcut you want. Anyway, have fun with these hot-keys, and the more you practice, the more you are going to get good at them. May the force be with you in your quest to be a keyboard Jedi and keep it fleming.
3 notes
·
View notes
Text

MS Word Legal - Quick But Very Effective
Shift F5
When in the middle of editing, Shift+F5 goes back to up to three editing points, and when you press it for a fourth time, it will then return to where you started with your cursor. When you open a document, it only “remembers” the last editing point
Alt Left Click - Vertical Highlighing
Alt and Left Click: Lets you highlight a vertical column of text at a time, (straight down), meaning as small as a character width wide to as wide as you need "vertically". So you can highlight text vertically and across without "involving the entire line of text or entire paragraph".
Control Space Bar: Removing Direct Formatting
Taking off direct formatting by use of Control Spacebar does not affect anything that is part of the actual styles being used within the document. It simply removes direct formatting.
Quick Deletion of a Table
1. Place your cursor in your table.
2. Click on the Target Symbol (top left of table) to select the entire table in 1 click.
3. Press your Back Space key 1x which will then delete the entire table text and structure.
4. That is all you need to know
Shift F9 - Update All Field Codes
1. Use this for your Cross References, and other automated items such as TOC, TOA and Index of Terms.
Lock and Unlock a TOC, TOA and Index
Select the field you want to lock.
Update the field, if desired, by pressing Shift+F9.
Press Ctrl+F11.
To Unlock:
Select the field you want to unlock.
Press Ctrl+Shift+F11
Quickly Remove Borders of a Table:
1. In Print Layout View select the Target symbol that comes up on the Top Left portion of the Table and do Control Alt U.
2. That is it!
MS Office Legal and Corporate Word Processing Training for Secretaries, Word Processing Operators, Paralegals, Law Students, Attorneys, Business People and Entrepreneurs, Test Prep, Placement Assistance
Training From An Inside Perspective
888-422-0692 Ext. 1 or 2
www.advanceto.com
www.awalkinthecenter.com
Teacher Connected Books and Video…
Hey Students! AdvanceTo offers a great Multilevel Outline Class for beginners. This 3 set hands on Zoom class will cover Litigation and Corporate Formatting and Styling. We will go over each document piece by piece. You learn a ton of new info, technique, tricks of the trade and you substantially increase your depth of knowledge. The cost for each individual class is $175.00 but…if you purchase the 3 class set upfront, you will receive a discount of $150.00 per 4.5 hour class. Great narrative material and homework is included. All groups receive a discount! This class is great for Secretaries, WP Operators as well as Paralegals. Call us today 888-422-0692 Ext. 1 and 2.
0 notes
Video
youtube

professional essay writers
About me
5 Steps To Becoming A Professional Writer
5 Steps To Becoming A Professional Writer Eventually one thing will click on and you'll begin to give you concepts which are more helpful. You can at all times delete/throw out what you wrote later however you must begin someplace. Entrepreneur Networkis a premium video community providing leisure, education and inspiration from successful entrepreneurs and thought leaders. 1- If you sit down at your specified time and are drawing a blank, get a brand new document/piece of paper and freewrite. Write ANYTHING, even should you just write “I don't know what to say” again and again. It additionally occurs that fresh ideas flood your mind regarding even different issues you could have written about or are yet to write down about. This is nice recommendation, and it’s all the time good to listen to what the professionals have to say. I attempt to squeeze in an afternoon session every so often, but most of these end of being unproductive. It’s far better to write down for 3 significant hours than 6 mediocre ones. We provide experience and opportunities to accelerate brand progress and successfully monetize video and audio content material distributed across all digital platforms for the business style. Donald H. Hewitt wrote screenplays for several successful anime films, including ‘Spirited Away,’ and ‘Howl’s Moving Castle.’ He stated the common author wage range can be in comparison with the average pro-athlete’s wage. Don’t let anyone tell you that knowledgeable writing profession is impossible. It’ll take work and dedication, identical as anything, but in at present’s world, it’s extra doubtless than ever earlier than. No author ever offered one million copies of an unfinished story…not whereas they were still alive.” Like you mentioned, DISCIPLINE!!! That is the distinction between a publsihed wirter and an aspiring writer. Her most up-to-date collection of essays is known as I Wasn't Always Like This . She continues to evaluate books, and sells her own at the Ladysmith Farmers’ Market in Ladysmith, BC on Tuesdays. Her most up-to-date e-book is I Wasn’t Always Like This . The Moon Watched It All (illustrated youngsters’s book) shall be out in 2016 with Red Deer Press. But when you learn to deal with writing as a business, it’ll start to pay like a business. Learn to view creative writing through a business-oriented lens. In different phrases, in terms of knowledgeable writing profession, it’s easier than ever to fake it ‘til you make it. Whether you’re at present employed or in-between jobs, it’s important to have a resume and canopy letter tailor-made for when the right opportunity comes alongside. It’s a proven fact that profitable firms, large and small, typically pay exterior professionals to create essential texts. Why do they outsource a primary ability like writing? Shelley A. Leedahl is a prolific multi-genre writer. Honestly, I really feel that if this guide doesn’t make even somewhat stir—and albeit, earn me even a modicum of income—it would simply be time to cease scribbling. I’ve been writing and publishing books in multiple genres since 1990, when Thistledown Press released my first collection of poetry, A Few Words For January. Back in those days, I truly had the chutzpah to sell books door-to-door in my neighbourhood. I’d prefer to make a correction about frail bladders. I’m not making a full time dwelling yet, however made it via 5 novellas and doing five more even when my bladder curses me each morning. Not a writer myself, however I will spend the remainder of my nights in search of a space dragon peeking around the moon. I dabble in writing, and work full-time as an Author Account Manager for a self-publishing firm. I want I may show this article to all of my authors. So many people need to merely be capital W “Writers” and go to e-book signings, but need to skip previous that pesky “writing” portion. And these days, we’ve received everything we have to learn later. I normally like to go through completely different articles describing conflicting opinions a couple of topic before I fireplace up my word processor. The drawback is there’s so much materials and so little time to read all of it. And things tend to get tedious if you’re trying to find key highlights and differences between articles written a couple of comparable subject. Nonetheless AI-powered writing assistance is quick changing into a aggressive market.
0 notes
Note
i can't exactly manage to format the reply i'm supposed to write for a para, because i can't put the starter of my opponent in a quote box. and some general formatting advice would be great as well!
Ah! You need to install the Editable Reblogs extension from New XKit. Download New XKit if you haven’t already, click on the ‘Get Extensions’ tab in the New XKit pop-up and search ‘Editable Reblogs’. Hit ‘install’, refresh the page, and then when you go to reblog the para, there’ll be a symbol under your icon with a little pencil. Press it and it’ll automatically put your partner’s starter into a blockquote for you.
And some general formatting advice:
If you’re writing a multi para, keep individual paragraphs between four to six lines long, seven max. Huge chunks of texts are exhausting to look at and your partner’s more likely to miss certain pieces of information when it’s all crammed together.
If you’re writing a single para and your reply is getting long, don’t be afraid to turn it into a multi para. Same rules apply.
Indenting each paragraph by hitting the space bar three to ten times (depending on how deep you want the indent) at the beginning can also help to visually separate them.
Consider giving dialogue its own line instead of putting it in the middle of your paragraph --- if you don’t want to do that, consider emphasising the quotation marks (ie. bolding them) to help separate the dialogue from the rest of the text.
In regards to HTML formatting, when using Editable Reblogs after the starter, you’re going to be left with your previous reply blockquoted inside your partner’s reply. Highlight the entire thing, including your URL link above the blockquote, and hit the backspace key. Then hit backspace again to remove the remaining empty line. Hitting delete instead can sometimes cancel your partner’s quote box or remove the gif/icon from their reply if it’s at the top.
If you’re in indie and you want to get involved in the fancy indie formatting, do your best to keep things accessible. No double small text, and try to restrict the bold/italics/caps to words that might naturally be emphasised if you were reading it aloud instead of emphasising every other word.
I hope this helps!
1 note
·
View note
Photo

NATALIE’S TUTORIALS: 002 - IMAGE BACKGROUNDS
In this tutorial, I will be explaining how you can crop the background of your images and make them all the same matching colour. Here are some examples of what you should be able to achieve by the end of this tutorial: x x x
Please let me know if you experience any problems / notice any mistakes and I will try and help you / correct them.
- requested by @mollyprewett
Before we start, it's important to mention that I will be using Adobe Photoshop CS3 Extended. If you are using a more recent version then this should all still work (although I can't promise that for older versions).
Also, if you need any guidance on how to find the right images, feel free to read my guide on obtaining images.
STEP ONE: Setting Up
Okay so really, this is easiest when the background of your image is one solid colour, but it's possible to do for any image whatsoever if you're patient enough. Please also note that there are many different methods to doing this, and I will just be describing my own personal method. First of all, you will need to set everything up. What I like to do is import all of my images as layers in one PSD. This makes it easier to edit them all so that they look the same. So, paste your images on top of each other and then delete the background layer. If you're making a moodboard, you need to have at least nine layers. Then, normally there is one image that looks like it would be impossible to remove the background from it - normally the one with text, because text is so awkward and fiddly. For example, in this moodboard, I knew that the centre image would be the most difficult to edit the background of. The white text was tiny and it would take the most time and patience. So I decided to use the background of that image and apply it to all the other images. So, the most important part of step one is to identify the most problematic / impossible image and grab the background colour from it. You can do this by using the Eyedropper Tool (see image below). You will need to make sure that you have the current layer selected or this may not work.

STEP TWO: Selecting the Background
In the image above, I have highlighted all the tools you will need to use. In this stage, we will be focusing on the Quick Selection Tool. Clicking on this tool should hopefully bring up a panel that looks similar (if not the same) as the bar at the top of mine. It will include the functions to select / deselect / define the brush size and refine the edge. First of all, though, we are going to be focusing on just selecting that background. Depending on the current background of your image, this could either be easy or difficult. The easiest images to do this with are ones with solid colour backgrounds and bold outlined shapes. It becomes far more difficult when you are working with text, faded colours, images with faded outlines, texturised backgrounds, and shadows (to name a few). For example, the image I am using in this tutorial is going to make my life very easy - it has a solid white background and the shape I'm trying to crop has a nice outline in a solid bold black. Here are some images that would be a bit more difficult though:
this image is difficult because the stars are all faded and it's very difficult to see where some of them end and where the background begins, and the Quick Selection Tool is going to struggle with this, so you would have to do most of it manually
this image will be difficult because of the texturised background - however it shouldn't be too difficult because it has nice strong outlines
Right so, once you've selected the Quick Selection Tool, you need to make sure you're on the select function rather than the deselect function (see above image). Also, make sure your brush size is quite small - the smaller the better to be honest. It might take longer but it's far more likely to be accurate that way. There are then two ways for you to select your background - either clicking or dragging. Both work fine, it's just about figuring out which one you prefer. You can either click your background a few (or a million) times, going around the whole back of it, or you can click once and drag your mouse. The clicking option requires a lot more patience, but it's also more accurate. Hopefully your Quick Selection Tool will eventually recognise the background and select it all. However sometimes Photoshop decides to be a Pain and it will either make you select it a bit at a time, or it will select too much. If it selects too much, and you find that it's now selected your background and half of the image you want to keep, that's when it's time to break out the deselect function. It often helps to zoom in when you're doing this, if you have to do this. Deselecting can be tricky and annoying and it will require a hell of a lot more accuracy and patience. Keep fiddling around with this until you've selected everything but the part of the image you want to keep. Don't worry if it's not perfect. The next step should correct any tiny little splodges of mistakes (as long as they are just tiny). Your end result should look like this:

STEP THREE: Refining the Edge
Now, as you can see, that's not perfect. Some of the black line has been selected and some of it hasn't. To correct this, you need to refine the edge of your selection. If you refer back to the first image I posted detailing all of the tools you will need, you will see a box that I highlighted which says "Refine Edge". You should hopefully be able to click on that now. That will bring up a toolkit that looks like this:
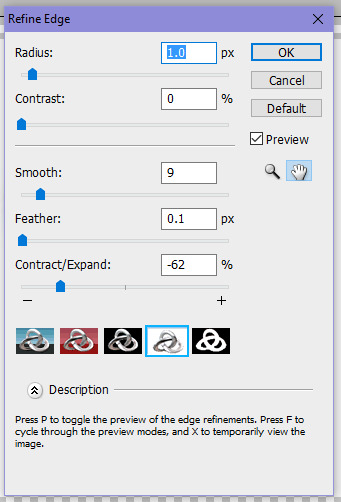
You can also see in that image the settings that I use. I very rarely change these settings. The only one I ever really play around with is the Feather option, which will basically determine how much extra space outside of your selection you will need. I usually leave it as low as possible, but it all depends on how accurate your selection is. A quick piece of advice - if your current image background is a very different colour from the background you're going to try and use, try and make sure that the feather is as small as possible. Play around with these settings until you're happy. You can undo and redo it as many times as you like. Please Note: Your edge will not automatically refine itself everytime you edit. You will always need to open up this dialogue box and you will always need to press "OK" at the end in order to actually refine the edge of your selection. Once you have plugged in the settings and made sure your feathing is sorted, and you've pressed "OK", you will see that your selection is a little different, and it should have spaced out from the edges of your image a little. Now, press the Delete button on your keyboard, and tadaa the background will disappear. However, and this is very important, do not deselect yet. You still have one more step to come and you will need that selection for a bit longer.
STEP FOUR: Colouring Your Background
Now, hopefully you will still have the background colour that you want to use. If you're not sure what colour you've currently got selected, you can always check in your toolbar (see my first image on this post where I have labelled the box that should show your current colour). You will now need to switch to the paintbrush tool. I tend to set my paintbrush so that it's as big as possible, because why not? You will only be able to paint within your current selection anyway. Now, colour. Colour it all, make it that pretty colour that you want. Now you should deselect everything. To do this, right click anywhere within the image and press "Deselect". Sometimes, there will be small things that you need to correct - some bits that are still showing the old background colour, specifically (normally) around the edges of the image you have cropped. For this, make your brush size tiny, zoom in super close, and just quickly but carefully go around these edges and colour them in.
And there you should have it!
Feel free to send me tutorial requests!
39 notes
·
View notes
Text
InDesign Zine

“File” – “new document”

- Intent – print – best of web and print
- Number of pages – 12
- Facing pages needs to be ticked
- Page size – A5
- Portrait

Make sure InDesign is set to essential

Click pages and stretch so you can see all the pages
- Can delete pages by dragging to the bin
- Can add pages by clicking on “create new pages” icon
- Double click activities the page you just double click in the page margin
Add text

- Select the text box
- Make a text box
- Type “title”

Change size, type face

Can change space between letters with “tracking/curning”

Highlight the word/s

Have the selection tool as your mouse

Double click bottom of blue box so it goes to the right size of the word/s
Put directly in the middle of the page

Choose the rectangle tool

Make a shape

With the shape selected go to “stroke box” and put it in “none”

Change the colour

Double click colour box and an option comes up to choose whatever colour and press “ok” when done.

Click “gradient feather”

Draw a line through the shape


“alt” and drag to copy the object/item

Can edit the second one to whatever and it keeps the original one the same

“shift” + “w” make the work pop up fully so you can get a better look at the work

Go to page 2 and select “pencil tool”

Draw something

Select “type on path tool”

Click on lines just made and type

To make line disappear go on “stroke” and select “none”.
Click page 4
“layout” – “margin and columns”

Unclick chain link

Change “top” to “80”
Columns – 2
Press “ok”

Click type tool
Press top of pink box and drag so it clips and makes it the size/ shape as pink box

“type” – “fill with place holder text”.

Do it for every page + pink box

“Line tool”
Draw line
Add “weight” (thickness) to it


Change the line and keep looking with full screen to see final result

“File – “Place”
Choose an image
Double click on chosen image

Click and drag for blue box

When clicking off the image appears where the blue box was made

Reshape image by holding down “ctrl” + “shift” + click and drag

For future double click the circle in the middle of the image
Right click – edit with – can edit image in another software such as Photoshop.

“Link” – tight click image - “embed link”


“New document” – keep everything the same
Double click “A – masters” and only show 2/3 page – the actions will apply to every page in “A – masters”

Select “rectangle frame tool”

Draw rectangle where the pink lines are.


Make the box small and centre it


Duplicate – rotate – centre it
Duplicate to next page
If you want to add an image go to “file” – “place” – select an image, click + drag image in dotted box.

Printing the A5 Zine
File > Print Booklet

Booklet type: 2-up saddle stitch
Make sure ‘Print blank printer spreads’ is checked.
Press ‘Print Settings’

Printer: CMFD for colour AND black and white
‘Print blank pages’ is ticked
Select setup (underneath the blue highlighted ‘general’ option)

Paper size: CHANGE TO A4
Orientation: landscape (second icon along)
Page position: Centred
Press setup

click on ‘Preferences’

Job type: normal print
Paper: A4
2-sided printing: 2 sided print, flip on short edge
Finishing: NO STAPLING
Print Quality: High resolution
Finally – i needed to venture back through all the dialogue boxes.
Follow these steps to get my document to print:
This dialogue box: OK
Next dialogue box: Print
3rd Dialogue box: OK
We’re back to our first print dialogue box. Here I needed to select ‘preview’ in the options section.
Make sure the first spread you see is the FRONT and BACK cover. As these will be printed on the same page.

I pressed print and was ready to go.
Questions
What is Adobe InDesign?
InDesign is an Adobe software. It can be used to create and edit work/ pieces such as booklets, flyers, zines, newspapers, brochures, books etc.
What is a zine?
A zine is a form of self-publication. It has been traced back to have been used since 1517 when Martin Luther published his “Zine” – “Ninety-five Theses”. Many young artised used zines for their creations since the 1990’s. Apparently in the US people used zines to publish and trade their own science fiction stories - 1930. Zines have been around for a very long time, helping people to self- publicise their work/ creations, with many different eras and genres of people/ work big used in zines such as punk, science fiction, art. “The zine has always offered an outlet of self-expression for young people.” - https://www.theguardian.com/childrens-books-site/2016/jan/10/what-are-zines-and-which-should-i-start-reading
Where did the idea of a ‘zine’ come from?
The word “Zine” comes from the words magazine and fanzine. The idea became bigger when people were writing letters to the science fiction magazine “pulp” saying how their stories were impossible. So over time they published these letters with the return address, this allowed fans to contact each other and write their own fan fiction and science fiction fanzines. They then moved on through “the punk movement with the accessibility of copy machines, home printing and publishing software”. - https://en.wikipedia.org/wiki/Zine and it’s carried on through many eras, genres, times and still used today.
What form / context are they often printed?
They are usually small, handmade, usually non-commercial booklet/ magazine. It can be produced by one person or “small” group.
Most zines are self-published – why do you think this is?
I think that most zines are self-published because it’s coming from their mind, its their voice/ voices and doesn’t have someone trying to sensor it or change it. They can put whatever they want in a zine and it will be off their own back.
1 note
·
View note
Text
Camtasia Custom Animation

Now that you have all of your recordings together it’s time to assemble your video. The first step in this process is dragging your media clips (video recordings and other resources such as pictures, audio, etc. you have collected for the video) from the media bin onto your timeline and laying them out roughly in the order that you want them to be played in the final video. This will help you visualize the “flow” of your video and allow you to edit the video in the natural way it will be viewed; from the starting media clip to the ending clip.
Camtasia 9 Download
Animated Characters For Camtasia
Camtasia Custom Animation How Move Image Across Slide
Camtasia Custom Animation
Assembling On The Timeline
Once the media clips have been roughly aligned on the timeline, it’s time to start the actual editing process. Let’s take a closer look at the basic editing tools and features of the timeline to maximize your efficiency when assembling your video:
Click, Drag, Select, and Delete:
You can arrange the media clips on the timeline by holding your left click on the mouse over the media you are trying to move and dragging them to specific areas on the timeline even if they are not necessarily in the point where you want them when you first dragged them from the media bin.
There are 10 different animations within Camtasia, these are: Custom – set your own start and stop positions and Camtasia will animate the clip accordingly; Full opacity – increases the opacity of the video to 100%; No opacity – decreases the opacity of the video to 0%; Restore – returns the clip to it’s original state. Select Animations in the tools panel and switch to the Animations tab. Click and drag the Scale Up animation to the clip you want to zoom. This adds an animation to the clip, with a default zoom already applied. To preview the animation, click and drag the playhead. Learn to grab your viewers’ attention with custom animations. This tutorial offers a deep dive into creating animations, working with visual properties, easi.
One thing to note is that you can only edit clips that are selected in the timeline, this is done to prevent you from editing pieces of your video that you do not wish to adjust (a clip is selected when it is highlighted or outlined on the timeline). There are multiple ways to select one or multiple clips:
To select a single clip, left-click on it.
To select multiple clips, hold “Shift+Click LMB(left mouse button)” on the clips you want to select or alternatively you can click and hold left click on the timeline to drag a selection box around the clips you wish to select.
You will also be able to select and resize clips on the canvas area itself, allowing you to adjust media clips that are playing at the same time, just like you would control them on the timeline.
A Note on the Relationship Between the Media Bin and Timeline:
When assembling on the timeline, you can always go back and delete or add more media clips or duplicates of the same media clip into your timeline as you see fit during the editing process. Once a media clip is added to your project’s media bin, you will always be able to access the original unedited media from the media bin as long as you do not delete it from the media bin itself.
For example, if you edit a media clip incorrectly on the timeline and want to start over with the original version of the media clip, you can delete the clip out of the timeline “RMB (right mouse button over the clip) > ‘Delete’ from drop-down menu” or “Delete” on Mac “Backspace” on Windows, then drag the original clip from the media bin into the timeline to start editing it again.
The Trim Feature:
The Trim feature allows you to adjust the beginning and end of a selected clip. By hovering your mouse over the beginning or end of your clip you’ll to click and drag that side of the clip to make it start and stop at the desired place. For example, if you want to cut off the beginning and end of the clip when you are preparing to speak at the beginning of the recording or trying to stop your video at the end of the recording, you can simply take the ends of your clip and drag them into your desired positions.
The Split Tool:
One of your best friends when it comes to editing your videos together in Camtasia is the Split Tool. The Split tool allows users to break apart clips into smaller clips in the timeline, allowing you to delete portions of the recording you don’t want to show or making individual adjustments to certain parts of the video that you don’t want to reflect over the entire timeline. To split a clip, select it and go over to the split icon on the top left-hand side of the Timeline. You can also press “COMMAND+T” on Mac or “S” on Windows to split your clip. Just keep in mind, that wherever the play head is where the split will take place, but even if the split is a little off from your intended location you can always go back and use the trim feature to adjust the clips.
Other Functions and Shortcuts (ONLY FOR CAMTASIA 3 – ONWARD):
While the first three functions are the primary tools for clip assembly in the timeline, there are a few lesser-known functions and buttons that will help you in your edits. These features have icons that can be accessed at the top left-hand side of the timeline where the split tool is located.
1. Undo and Redo:
If you need to undo an editing action that you have just completed on the timeline or in the Canvas, you can use the Undo Button or “COMMAND+Z” on Mac “CONTROL+Z” on Windows to go back in time to before you made the edit. If you want to redo that edit again, press the redo button to the right of the Undo Button or “COMMAND+SHIFT+Z” on Mac or “CONTROL+SHIFT+Z” on windows.
2. Cut:
If you want completely move a clip from one part of the timeline and place it in a different part of your timeline without having to click and drag it, you can select the clip or multiple clips and use the Cut Button or “COMMAND+SHIFT+X” on Mac or “CONTROL+X” on windows.
3.Copy:
If you want to make an identical copy of a clip to paste into a different part of your timeline without removing the original one, you can select the clip or multiple clips and use the Copy Button or “COMMAND+C” on Mac or “CONTROL+C” on windows.
4.Paste:
To paste a copied clip or group of clips into a different part of the timeline, use the Paste button or “COMMAND+V” on Mac or “CONTROL+V” on windows. Just keep in mind that the clip or clips will paste at were your play head is located and will go to an empty track.
5.Timeline Zoom:
The Timeline Zoom will allow you to zoom in and out of your timeline content to make precise adjustments to individual clips by zooming in or view the entire video timeline by zooming out. For example, if you are trying to make a precise split on a clip, you can use the timeline zoom to view the individual second or frame marks on the Timeline.
Spacing Clips
It is important to understand how clips work on the timeline and how the timeline translates into your final video. The timeline is a direct reflection of what the timing will be for your video and what is displayed. When a Camtasia project is rendered (turned into its final product such as a playable .mp4 or .mov file), the video starts at 0:00 mark on the timeline and end at the end of the final clip.
When your video is closer to the way you want your final product to look, you want to make sure there is no space between the clips so they flow right into each other. If there is a blank space with no clips anywhere on your timeline before your final clip, there will only be a solid black matte that plays on screen. So, have your first clip pushed all the way to the left side of your timeline at the 0:00 time mark on your timeline and shove clips together so there is no space in between them.
Clips automatically “snap” or attach their respective beginnings and ends together when you drag them close to each other on the timeline, you can see snapping occurs when it is indicated by an adjustment line that appears between two clips when dragged close to each other. This is done to prevent blank spaces or clips being overlapped where they should not. Clips also snap to either side of your playhead so make sure to have your playhead pushed away from the end of clips you are trying to push together.
Editing With The Tool Bin
The Tool Bin is where the different editing features and effects are stored in “bins” or a tabbed system. While we have already covered the Media Bin, let’s explore the other editing features and effects that we can find in the Tool Bin by clicking through each bin on the left-hand side of your Editor.
A Note On The Properties Tab For Tool Bin Effects and Assets:

Some tools, effects, and assets have individual parameters that can be adjusted to suit the user’s preference. Once a feature has been applied to the timeline, click on the clip it is housed in and select the “Properties” button above the timeline to open up thehidden properties tab on the right-hand side of your screen. This tab will allow you to adjust individual parameters such as color, text, size, etc.
The Library Bin (ONLY FOR CAMTASIA 3 – ONWARD):
The Library Bin is where you can browse the library of assets such as pictures, music, icons, and videos that Camtasia has pre-included in the software. You can use the dropdown menu at the top of the Bin to select a different area of your computer you would like to take assets from, but by default, it will open up to the included Camtasia Library. You can add more of your own assets to these folders by clicking on the plus icon or click on the “Download More Assets” to browse Camtasia’s online catalog of stock assets.
WARNING ON CAMTASIA STOCK ASSETS ONLINE:
THE USE OF CAMTASIA STOCK ONLINE IS NOT RECOMMENDED BECAUSE IT INVOLVES EXTRA COSTS TO THE USER, YOUR CSU LICENSES WILL NOT COVER THE COST OF THE ASSETS AND THE USE OF CAMTASIA’S LIBRARY WILL INVOLVE SIGNING UP FOR A PERSONAL ACCOUNT.
The Annotations Bin :
The Annotations Bin is where you can add text or shapes into your project to draw your viewer’s attention to a specific part of your video or to communicate information through text. The Annotations Bin has six separate tabs within it to help organize these assets.
Callouts Tab:
The Callouts Tab is where you can add text over your video. To add a callout, just drag the callout onto your timeline like you would any other pieces of media. This will create a media clip your callout will live in. By double-clicking on a callout in the Canvas, you can change the text within the callout clip. From here you can go over to the properties tab to modify the size, color, and text style of the callout to fit your needs. If you can’t see your callout, make sure it is in its own track above the video clip you want it displayed in.
Arrows and Lines Tab:
The Arrows and Lines Tab is where you can add arrows and lines into your video. They can be dragged onto the timeline and live in their own media clip. To change the direction and size of an arrow or line, click on the arrow or line within the Canvas. This will show the two control points that will allow you to place the two ends of the arrow or line wherever you desire. Individual parameters of arrows and lines such as color and size can be adjusted in the Properties Tab.
Shapes Tab:
The Shapes Tab is where shapes can be added to your video. They work just like the other assets mentioned above and can be modified in the Properties Tab.
Blurs and Highlights Tab:
The Blurs and Highlights Tab is where you can drag specific shapes onto your video that are designed to either highlight or hide specific parts of your video. They work just like the other assets mentioned above and can be modified in the Properties Tab.
Sketch Motion Tab:
The Sketch Motion Tab is where you can add animated Shapes and arrows into your video. They are slightly more limited when it comes to editing, these assets can be dragged and resized within the Canvas but can only be edited for color and thickness within the Properties Tab.
Keystroke Callout Tab:
The Keystroke Callouts tab is where you can visualize keyboard shortcuts for you viewers. For example, if you were creating a tutorial video for a specific application, you can use a keystroke callout to show a visual graphic of what buttons a user would need to press on their keyboard in order to perform an action. These callouts can be modified in shape and size by adjusting them on the Canvas. The keys within the callout can be edited by going over the Properties Tab and click on the “Keys” box to highlight it. Once this box is highlighted, you can perform the shortcut on your keyboard to change the keystroke visual.
The Transitions Bin:
The Transitions Bin is where you can add transitions to the beginning and end of two clips that are snapped to each other on the timeline or modify a single media clip. To add a transition, begin to drag a desired transition onto your timeline. You will notice that the beginning and end of every clip will highlight itself, indicating the places that you can add transitions. If you drag and drop a transition to either end of a clip, it will only create a transition to that end. If you drag and drop a transition to the middle of a clip, it will add a transition to both ends of a clip. Finally, if you drag and drop a transition between two snapped clips or clips that are touching each other on the same track, it will create a transition between the clips.
You can tell that a transition has been applied to a clip when you see the Transition Handles appear at the ends of the video in your Timeline. You can modify how long a transition will take by click and dragging the Transition Handles left and right on the ends of the clips they are applied to. To remove a transition from the clip, select the transition on the timeline and press the “Delete” key or right-click on the handles and select “Remove Transition”.
The Behaviors Bin:
The Behaviors Bin is where you can add animation effects that modify annotation clips within your timeline. Behaviors are different than transitions because they can happen in the beginning and end of a clip and throughout the clip, depending on your desired outcome.
You can customize how the behavior enters the canvas, what it does when it’s on the canvas and how it leaves by adjusting its behavior properties in the Properties Tab once it is applied by dragging onto the desired clip in the Timeline. To remove a behavior from a clip, select the clip and go over to its properties in the Properties Tab and click on the “X” next to the name of the behavior.
The Animations Bin:

The Animations Bin is where you can apply custom camera movement to your video clips that you have in your timeline. For example, the animated GIFs in this guide were created by recording a full Camtasia window and then the “Scale Up” and “Scale Down” animation were applied to the recording clips to show the specific features that were being interacted with on-screen.
To apply a animation to a clip, drag it from the bin onto the desired clip in the timeline. You will then see a arrow appear on the clip with two dots at either end, these two dots are the Animation Control Points. These control points are where the animation begins and where the animation ends and the space between them determines how quickly or how slowly the animation plays in the video.
Using the “Scale Up” animation as an example, let’s try setting up an initial and ending scale to the animation (what is being shown in the Canvas before and after the animation takes place). The initial scale of a clip can be adjusted by moving the Timeline Playhead before the first Animation Control Point and going over to the Properties Tab to adjust the scale of what is being shown before the animation (which will most likely be the original clip size if it has not been modified after dragging it onto the timeline). To adjust the Ending Scale, drag the Timeline Playhead to after the second Animation Control Point which will light up red, indicating you are now working on the scale of what is displayed after the animation.
The Cursor Effects Bin:
The Cursor Effects Bin is where you can automatically track your cursor movement and actions in that clip. After dragging this effect onto your clip in the Timeline, it will automatically track cursor movements and clicks with no editing necessary. This feature is useful for web and application tutorials when you want to direct your viewer’s attention to what areas of the screen you are interacting with.
The Voice Narration Bin (ONLY FOR CAMTASIA 3 – ONWARD):
The Voice Narration Bin allows you to make voice-over narration for the video you are assembling within your timeline. This feature works just like audio recordings would in the Recording Window. You can select which microphone you wish to use, mute your computer speakers during the audio recording to prevent audio feedback, and the Voice Narration Bin even provides space for you to type or paste a script to reference during the voice recording.
To record a voice over, drag the Playhead where you want your narration to start and press the “Start Voice Recording” button in the Voice Narration Bin. Once you are done with the voice over, press the “Stop” button in the bin and the audio recording you just made will automatically drop itself into the timeline depending on where your Playhead began to move and where it ended. You will still be able to edit, adjust, and move this clip in the Timeline and a master copy will save to the Media Bin.
The Audio Effects Bin:
Camtasia 9 Download
The Audio Effects bin is where you can enhance or correct audio for media clips. Audio effects can be dragged onto a clip in the timeline and modified through the Properties Tab to produce specific outcomes. Let’s go over these effects and how to use them to enhance your videos:
Noise Removal:
The Noise Removal Tool helps reduce the background noises and interference hisses that may happen during an audio/video recording. In the Properties Tab, Windows users can automatically remove noise by pressing the “Analyze” button and using the “Amount” slider to get the desired noise removal level when the Noise Removal effect is added to a clip. Mac users can manually adjust their noise removal “Sensitivity” and “Reduction” sliders to achieve their desired levels.
Volume Leveling:
The Volume Leveling Tool helps even out audio levels throughout a clip, equalizing the maximum and minimum peaks in your audio. When this is applied to a clip, you can go into the Properties Tab to either choose a automatic amount of audio level variation from the “Variation” drop-down menu or manually adjust the “Ratio”, “Threshold”, and “Gain” sliders to dial in the desired effect.
Fade In/Fade Out (ONLY FOR CAMTASIA 3 – ONWARDS):
The Fade In/Fade Out effects creates a smooth audio transition at the beginning or end of your clips with either an increase or decrease of sound. This will create an Audio Point on your audio level when applied to a clip in the Timeline that can be dragged along the clip to adjust the speed at which the fade happens.
A Note When Working with Audio Points and Custom Levels:
When working with audio editing an important tool is the independent clip levels that can be found on a clip within the timeline. The Audio Level (volume of the clip) is represented by a small teal line across the clip and is set to 100% or original recording volume by default. To make the clip volume louder or softer, click and drag the line either up or down.
To edit a smaller section of audio within a clip, double click on the clip’s level to create an Audio Point. Audio Points will specify the beginning ends of audio edits and will automatically ramp the audio before and after the section between two Audio Points to create a smoother transition of increase or decrease in audio up to or down from the edit. The suggested method of working with custom audio points is to create at least four points for each edit. The two inner points will control the volume of the section you are trying to modify and the two outer points will create a smooth ramps in and out of this edit to make it seem more natural.
Captioning (ONLY FOR CAMTASIA 3 – ONWARDS):
Captioning is the ability to include text of your video transcript within the video to improve accessibility for audience members. Captioning is an advanced process that is not recommended to be done through the Camtasia Editor. CSUCI offers captioning services for education material that meet legal DASS requirements and more information about captioning services provided to faculty of CSUCI can be found here.
Clip Speed:
Causes audio and video clips to playback faster and slower when applied. This effect is also not recommended for use because it can distort audio and video rendering it unusable. More information about clip speeding can be found here.
FrostWire 4.21.5 Change Log. Fixes newly introduced bug where it would not recursively share the files in a folder. Fixes newly introduced bug where it wouldn't correctly display the title of a file on the Playlist. Fixes issue where it would not kill torrent uploads until the next restart. Frostwire 4.21.
The Visual Effects Bin:
The Visual Effects Bin a collection of effects that can be applied to video clips on the timeline. Once these effects have been added to a clip, their individual parameters can be edited from the Properties Tab. There are little to no visual effects that would be useful to your day to day workflow for creating and editing videos, but more information about individual visual effects can be found here.
The Interactivity Bin (ONLY FOR CAMTASIA 3 – ONWARDS):
The Interactivity Bin is where you can add interactive quizzes and response questionnaires into your video using the Timeline. This is not a recommended feature to use and will not be covered due to the advanced and confusing control system and the fact that it requires a specialized player to view the final video once it is exported and is not supported by CSUCI online classroom grading. More information about the Interactivity Bin can be found here.
The Gesture Effects Bin:
The Gesture Effects Bin works just like the Cursor Effects bin by automatically tracking touch commands that happen during a recording of a touch screen enabled device. After dragging this effect onto your clip in the Timeline, it will automatically track gestures like pinches, swipes, and taps with no editing necessary. If you do not have a touch screen device, gesture effects will not work in your video.

Tips and Tricks for Workflow and Editing
When you are working on creating videos on a weekly or daily basis, there are a few tips and tricks that you can follow to help you efficiently produce your video and to prevent frustrations and lost time as a content creator.
Setting Up Your Save Locations Manually and Understanding Camtasia File Types:
Saving a Camtasia Project & Project File Types
The first thing you should do when you open up a new Camtasia project is set up where your project will be saved, even if there is no content or clips in it yet. This is done to insure your project will remain organized. When you are in the Editor, you can save your Camtasia project by going to “File>Save or Save As…” or “COMMAND+S” on Mac computers or “CONTROL+S” on Windows computers. This will create either a .TSCPROJ or .CMPROJ file on your computer in the location you choose to save it in. The “PROJ” file type is the project itself. You can click on this file in your computer to access the project and open Camtasia to the project’s Editor.
The best practice is to create a folder on your computer for each project you are working on and saving all of your related files there. If you forget to choose a custom destination or can not for some reason, the default save location for Camtasia project files on your computer will be “C:UsersusernameDocumentsCamtasia” (AKA your documents folder).
Saving Recording Clips & Recorded Clip File Type
.TREC files are the default file format produced after recording in Camtasia Recorder. TREC stores audio, screen recording, camera recording, and metadata into a single package. It is important to know where your .TREC files are and they are pair with your project file so your project does not “break” (AKA cannot find or play its recording files) if you happen to move your project file somewhere else on the computer or onto the cloud. By default, Camtasia automatically names and saves all .TREC recordings to the Camtasia to the default location: “C:UsersusernameDocumentsCamtasia”.
To add recordings and other media into your video project file (.TSCPROJ), select “Camtasia > File > Import > Media”. Select the files in your project directory (same default location as mentioned above). Camtasia imports the files into the Media Bin or simply dragging and dropping them from two open Camtasia project Editor windows will do the same thing.
You can configure Camtasia Recorder to open a Save dialog to enter a filename and location for each .TREC recording file after recording to make this kind of file management easier:
For Windows:
In the Camtasia Recorder, select “Tools > Options”.
The Tool Options dialog appears. Click the File options button.
Select the Ask for filename option.
Click OK.
After stopping the recording, a Save dialog appears where you can enter a filename and save the recording to the project folder.
For Mac:
In the Camtasia Editor, select “Camtasia 20xx > Preferences”
Select the “Recording” Tab in the Preferences Window.
Go to the “After recording:” dropdown menu and select “Prompt to Save“.
Constantly Saving Your Files:
There is always a chance that your application can crash when editing a video project, so make sure to manually save your project every few minutes while you are editing it down to a final product. Another good rule of thumb is to do this before and after large edits or changes to your project such as apply an effect to all clips on the timeline or doing custom animations because these types of edits put strain on your computer’s processing power and could crash the application.
Working on Multiple Project Files:
(IF NOT MANUALLY HANDLING FILE STRUCTURES) If you know you are going to try to record and edit multiple videos in one editing session, start with just one project. While you cannot export different videos on the same Timeline without having to clear and reassemble the Timeline over and over again, you can record all of your clips for multiple videos in the same project file and then disperse them to their individual projects. For example, if you were going to make three separate videos on three separate parts of a website in one recording session, you can record all of your screen recording clips into one project, then open up two or three new projects and drag and drop the clips into the separate project’s media bins to start editing the individual videos.
Repairing Lecture Mistakes:
Sometimes you will notice mistakes after a long Camtasia recording session (like lecture recordings). Instead of having to record the whole lecture over again, there are a few things you can do to edit around these mistakes:
Animated Characters For Camtasia
Inserting Fixed Lecture Slides:
If you notice a misspelling in a recorded lecture slide you can use an image of a corrected version of the slide to repair it. First, edit your original slide in PowerPoint or Google Slides and save it as an image file such as a .jpg or .png.
Next, import the file into Camtasia and prepare the clip you are editing for the replacement. In most cases, screen recordings of slides will have an audio file attached within the clip. Use the split tool to create a clip out of the section you are trying to edit. To separate a clip into the individual audio and video clips in your timeline, right-click on the clip and select “Separate Video and Audio” from the dropdown menu.
When the split clip is separated, delete the video clip and drag the corrected image into the timeline where the video clip once was. Resize the image to fit the Canvas and use the trim tool to keep the image playing where the original video clip once was, creating a seamless repair.
Juniper simulator gns3 wiki. This can be configured using VirtualBox or using Qemu.These are the steps required to setup JunOS on GNS3 using Qemu. Acquire an image of JUNOS. The image file should be with the extension.img. Open GNS3 and go to Edit- Preferences- Qemu. Make sure the settings in the General Settings section are correct. Below is a screenshot of what the Qemu settings should look like.
Editing Around Incorrect Audio, Outtakes, or Noises
Sometimes you will need to do a second take of a slide while recording a lecture or edit around a large cough or other disturbances.
Camtasia Custom Animation How Move Image Across Slide
During the recording, give yourself a moment of pause to reset yourself and try the slide again, then, after the recording is done, use the timeline to correct the clip.
To take out a mistake or seperate takes within a recorded clip, simply split the mistakes from the rest of the clip and delete them from the timeline. You can use the “Timeline Zoom” feature to make precise splits, only trimming out the clip parts that you don’t want in your video. After the mistakes are taken out, drag the remaining clips in the timeline to fill in the gap where the mistakes were and keep editing. While editing static video like lecture slides, editing outtakes and audio trimming usually goes unnoticed by the viewer because there is no movement in the video which would give them a visual indication of the edit. However, if you are trying to cover up this type of edit in a moving video, you can use a “Fade” Transition between the clips to make the edit seem more natural and less jarring to the viewer.
Was this article helpful?
Related Articles
Need Support?
Can’t find the answer you’re looking for? Don’t worry we’re here to help!
Camtasia Custom Animation
Contact Support
0 notes
Text
Outlook 2016 cheat sheet | Computerworld
New Post has been published on https://www.articletec.com/outlook-2016-cheat-sheet-computerworld/
Outlook 2016 cheat sheet | Computerworld
The pundits will have you believe email is being supplanted by texting, social media, chat apps like Slack, and direct communications software such as Skype and Google Hangouts Meet.
Don’t believe them.
Email is still big, the mainstay of workplace communications as well as a popular way for people to keep in touch with friends and families. And for many people, email means Outlook. Although Microsoft has recently announced the availability of Office 2019 to commercial users, many businesses will stick with Office 2016 (and thus Outlook 2016) for some time to come — especially because the company is now saying that Office 2016 users can connect to Microsoft’s online services until 2023.
But although you may have been using Outlook 2016 for some time, you might be missing out on some of its worthwhile features. In this story, we’ll clue you in on the most important features introduced in Outlook 2016 for Windows.
Your copy of Outlook may have been purchased as standalone software or as part of an Office 365 subscription. The subscription version gets continually updated, while the standalone version (which Microsoft calls the perpetual version) stays static. But fear not, we’ve got help for whichever version you use. The first part of the article covers both versions, while the latter sections focus on features available only to Office 365 subscribers. Then we wrap things up with a list of handy keyboard shortcuts for all Outlook 2016 users.
Share this story: IT folks, we hope you’ll pass this guide on to your users to help them learn to get the most from Outlook 2016.
Use the Ribbon
The Ribbon interface that you came to know and love (or perhaps hate) in earlier versions of Outlook hasn’t changed much in Outlook 2016. Because the Ribbon has been included in Office suite applications since Office 2007, we assume you’re familiar with how it works. If you need a refresher, see our Outlook 2010 cheat sheet.
The Ribbon in Outlook 2016 has a flattened look that’s cleaner and less cluttered than in Outlook 2010 and 2013. The 2016 Ribbon is smaller than it was in Outlook, the title bar now is now blue rather than the previous white, and the text for the Ribbon tabs (File, Home, Send/Receive and so on) is now a mix of upper- and lowercase rather than all caps. But it still works in the same way, and you’ll find most of the commands in the same locations as in Outlook 2010 and 2013.
IDG
The Ribbon hasn’t changed a great deal from Outlook 2013. (Click any image in this story to enlarge it.)
To find out which commands live on which tabs on the Ribbon, download our Outlook 2016 Ribbon quick reference. Also see the nifty new Tell Me feature described below.
As in previous versions of Outlook, if you want the Ribbon commands to go away, press Ctrl-F1. (The tabs above the Ribbon stay visible.) To make them appear again, press Ctrl-F1.
You’ve got other options for displaying the Ribbon as well. To get to them, click the Ribbon Display Options icon at the top right of the screen, just to the left of the icons for minimizing and maximizing Outlook. From the dropdown menu, you can choose Auto-hide Ribbon (hide the entire Ribbon, both the tabs and commands underneath them), Show Tabs (show the tabs but hide the commands underneath them, as when you press Ctrl-F1), or Show Tabs and Commands (show the whole Ribbon).
And if for some reason the blue color on the title bar is too much for you, you can turn it white, gray or black. To do it, select File > Options > General. In the “Personalize your copy of Microsoft Office” section, click the down arrow next to Office Theme, and select Dark Gray, Black or White from the drop-down menu. To make the title bar blue again, instead choose the “Colorful” option from the drop-down list. Just above the Office Theme menu is an Office Background dropdown menu — here you can choose to display a pattern such as a circuit board or circles and stripes in the title bar.
IDG
You can change Outlook’s blue title bar to gray, black or white: In the “Personalize your copy of Microsoft Office” section, click the down arrow next to Office Theme and pick a color.
Try Tell Me for greater efficiency
Outlook is so full of features it can be tough to remember where to find commands you haven’t used in a while. So Outlook 2016 has made it easier with a new feature called Tell Me, which puts even buried tools you rarely use in easy reach.
To use it, click the “Tell me what you want to do” text to the right of the Help tab on the Ribbon. (Those who prefer keyboard shortcuts can instead press Alt-Q.) Then type in a task you want to do, and you’ll get a menu showing potential matches for the task.
For example, if you want to filter your mail to see only messages with attachments, type in “filter email.” In this instance, the top result is a Filter Email listing with an arrow to its right, indicating that it has many options. Hover your mouse over it and you get multiple options for filtering your mail, including Unread, Has Attachments, This Week and others.
Choose the option you want to use, and the task will be performed instantly. If you’d like more information about your task, the last two items that appear in the Tell Me menu let you select from related Help topics or search for your phrase using Smart Lookup. (More on Smart Lookup below.)
IDG
Outlook 2016’s Tell Me feature makes it easy to perform just about any task.
For the most common basic tasks, you won’t need Tell Me. But for more complex ones, it’s worth using because it’s much more efficient than hunting through the Ribbon to find a command. It also remembers the features you’ve previously clicked on in the box, so when you click in it, you first see a list of previous tasks you’ve searched for. That makes sure that the tasks you frequently perform are always within easy reach. while at the same time making tasks you rarely do easily accessible.
Use Smart Lookup for online research
Sometimes emails are just quick notes that don’t require much research, and you can toss them off with little or no thought. Other times, though, you’ll want to include relevant information before sending them off. Those are the times you’ll appreciate the new Smart Lookup feature. It lets you do research from right within Outlook while you’re creating an email, so you won’t have to fire up your browser, search the web, and then copy the information or pictures to your message.
To use Smart Lookup, right-click a word or group of words in an email — it can be a new draft, a message you’ve received, or one you’ve already sent — and select Smart Lookup from the menu that appears. Outlook then uses Bing to do a web search on the word or words, displaying definitions, related Wikipedia entries, pictures and other results from the web in the Smart Lookup pane that appears on the right. If you just want a definition of the word, click the Define tab in the pane.
IDG
Smart Lookup lets you do web research from right within Outlook.
To use Smart Lookup in Outlook or any other Office 2016 app, you might first need to enable Microsoft’s intelligent services feature, which collects your search terms and some content from your presentations and other documents. (If you’re concerned about privacy, you’ll need decide whether the privacy hit is worth the convenience of doing research from right within the app.) If you haven’t enabled it, you’ll see a screen when you click Smart Lookup asking you to turn it on. Once you do so, it will be turned on across all your Office 2016 applications.
Keep email messages out of the way but handy with the Archive folder
Outlook has long offered email message archiving — that is, the option to move messages out of your Outlook mailbox and into a separate PST file as a space-saving measure. Corporate versions of Office, such as Office 365 for Enterprise, offer their own archiving features that automatically archive users’ older messages, again to save space. These methods remove the messages from the user’s Outlook mailbox. You can still get them back, but it takes some doing.
There’s another option in Outlook 2016: You can move specific pieces of mail out of your Inbox or other folders and into the Archive folder. That way, when looking for a message, you can browse or search the Archive folder and find the message more quickly.
Using the Archive folder doesn’t reduce the size of your mailbox; it simply helps tidy up your inbox while keeping older messages instantly accessible. Microsoft recommends that you use the Archive folder to store messages that you’ve already responded to or acted on. If you already have a system of folders and subfolders in Outlook, you might not need the Archive folder, but it can be a boon for those of us who tend to leave everything in the inbox. And even if you do have a folder system, you might find that not all of your email fits neatly into your folders and subfolders; you can move these messages to the Archive folder to keep your inbox clean.
To move messages to the Archive folder, first select one or more that you want to archive. (Select multiple messages by holding down the Control key and clicking each one you want to select.) With the message or messages selected, go to the Ribbon’s Home tab and click Archive in the Delete group, right-click the message or group of messages and select Archive, or simply drag the selected message(s) to the Archive folder. You can also move an individual email to the Archive folder by pressing the Backspace key when the message is highlighted or when you’re reading it.
IDG
Choose the last item in the pop-up menu to move the selected messages to the Archive folder.
Now when you need to find a message, you can browse the Archive folder or else go to the Archive folder and launch a search.
To move a message out of the Archive folder to a different folder, simply drag it to its destination.
Find attachments more easily — and share “cloud attachments”
We’ve all been there: We want to attach a file we were recently working on, but don’t remember its precise location — or sometimes even its name — and spend far too much time navigating and searching for it.
Outlook 2016 solves the problem neatly. When you click the Attach File icon, a list of the twelve most recent files you’ve been using pops up. The list includes all the files you’ve been using on any device, as long as you’re signed in to your Office 365 or Microsoft account. So if you were working on a file on your desktop, then later in the day took your laptop to work outside your office, Outlook would show you the files you had opened on both devices. If a file is stored in OneDrive, OneDrive for Business, or SharePoint, you’ll see a cloud on its icon.
If the file you want isn’t in the list, click Browse this PC to browse your local hard disk, or Browse Web Locations to browse OneDrive, OneDrive for Business, or SharePoint.
IDG
Outlook shows you a list of Office files you’ve recently used, making it easier to find and attach them to an outgoing email.
Click the file you want to attach. What happens next depends on where the file is stored and whether you or your company has an Office 365 subscription. If you choose a file that’s stored on your local hard drive, a copy of it will be attached to the email in the usual way. If you don’t have an Office 365 account, files that are stored in the cloud are also attached in the usual way.
If you do have an Office 365 account and you click on an Office file that’s stored in OneDrive, OneDrive for Business or SharePoint, you’ll be given a choice: You can choose “Attach as copy” to send the file as a normal attachment or “Share link” to send a link to the file in its cloud location, something Microsoft informally calls a “cloud attachment.” The latter option ensures that people will see the most recent version of the file and lets them collaborate on it. For example, if you send a link to a Word file to multiple people, when they click the link, they’ll open the file and be able to collaborate on it with each other live using Word’s collaboration features.
IDG
Sharing a link to ann Office file stored in OneDrive, OneDrive for Business or SharePoint lets you collaborate on the file with others.
If you’re in a business environment, by default anyone within your organization can edit the file, and for individuals, the default is that anyone can edit the file. But you can change the collaboration permissions. After you’ve attached the link to the email message, click the down arrow next to the attachment icon and select Change Permissions from the drop-down menu. Individual users will have a choice of Anyone Can Edit or Anyone Can View. Business users have a few more options: Anyone Can Edit, Anyone Can View, Organization Can Edit, Organization Can View, Recipients Can Edit, and Recipients Can View. Make your selection and then send the file on its way.
IDG
Choosing collaboration permissions for a shared file link.
Source link
0 notes
Text
10 reasons Why PCs Crash U Must Know ?
Fatal error: the system has become unstable or is busy," it says. "Enter to return to Windows or press Control-Alt-Delete to restart your computer. If you do this you will lose any unsaved information in all open applications."
You have just been struck by the Blue Screen of Death. Anyone who uses Mcft Windows will be familiar with this. What can you do? More importantly, how can you prevent it happening?
1 Hardware conflict
The number one reason why Windows crashes is hardware conflict. Each hardware device communicates to other devices through an interrupt request channel (IRQ). These are supposed to be unique for each device.
For example, a printer usually connects internally on IRQ 7. The keyboard usually uses IRQ 1 and the floppy disk drive IRQ 6. Each device will try to hog a single IRQ for itself.
If there are a lot of devices, or if they are not installed properly, two of them may end up sharing the same IRQ number. When the user tries to use both devices at the same time, a crash can happen. The way to check if your computer has a hardware conflict is through the following route:
* Start-Settings-Control Panel-System-Device Manager.
Often if a device has a problem a yellow '!' appears next to its description in the Device Manager. Highlight Computer (in the Device Manager) and press Properties to see the IRQ numbers used by your computer. If the IRQ number appears twice, two devices may be using it.
Sometimes a device might share an IRQ with something described as 'IRQ holder for PCI steering'. This can be ignored. The best way to fix this problem is to remove the problem device and reinstall it.
Sometimes you may have to find more recent drivers on the internet to make the device function properly. A good resource is www.driverguide.com. If the device is a soundcard, or a modem, it can often be fixed by moving it to a different slot on the motherboard (be careful about opening your computer, as you may void the warranty).
When working inside a computer you should switch it off, unplug the mains lead and touch an unpainted metal surface to discharge any static electricity.
To be fair to Mcft, the problem with IRQ numbers is not of its making. It is a legacy problem going back to the first PC designs using the IBM 8086 chip. Initially there were only eight IRQs. Today there are 16 IRQs in a PC. It is easy to run out of them. There are plans to increase the number of IRQs in future designs.
2 Bad Ram
Ram (random-access memory) problems might bring on the blue screen of death with a message saying Fatal Exception Error. A fatal error indicates a serious hardware problem. Sometimes it may mean a part is damaged and will need replacing.
But a fatal error caused by Ram might be caused by a mismatch of chips. For example, mixing 70-nanosecond (70ns) Ram with 60ns Ram will usually force the computer to run all the Ram at the slower speed. This will often crash the machine if the Ram is overworked.
One way around this problem is to enter the BIOS settings and increase the wait state of the Ram. This can make it more stable. Another way to troubleshoot a suspected Ram problem is to rearrange the Ram chips on the motherboard, or take some of them out. Then try to repeat the circumstances that caused the crash. When handling Ram try not to touch the gold connections, as they can be easily damaged.
Parity error messages also refer to Ram. Modern Ram chips are either parity (ECC) or non parity (non-ECC). It is best not to mix the two types, as this can be a cause of trouble.
EMM386 error messages refer to memory problems but may not be connected to bad Ram. This may be due to free memory problems often linked to old Dos-based programmes.
3 BIOS settings
Every motherboard is supplied with a range of chipset settings that are decided in the factory. A common way to access these settings is to press the F2 or delete button during the first few seconds of a boot-up.
Once inside the BIOS, great care should be taken. It is a good idea to write down on a piece of paper all the settings that appear on the screen. That way, if you change something and the computer becomes more unstable, you will know what settings to revert to.
A common BIOS error concerns the CAS latency. This refers to the Ram. Older EDO (extended data out) Ram has a CAS latency of 3. Newer SDRam has a CAS latency of 2. Setting the wrong figure can cause the Ram to lock up and freeze the computer's display.
Mcft Windows is better at allocating IRQ numbers than any BIOS. If possible set the IRQ numbers to Auto in the BIOS. This will allow Windows to allocate the IRQ numbers (make sure the BIOS setting for Plug and Play OS is switched to 'yes' to allow Windows to do this.).
4 Hard disk drives
After a few weeks, the information on a hard disk drive starts to become piecemeal or fragmented. It is a good idea to defragment the hard disk every week or so, to prevent the disk from causing a screen freeze. Go to
* Start-Programs-Accessories-System Tools-Disk Defragmenter
This will start the procedure. You will be unable to write data to the hard drive (to save it) while the disk is defragmenting, so it is a good idea to schedule the procedure for a period of inactivity using the Task Scheduler.
The Task Scheduler should be one of the small icons on the bottom right of the Windows opening page (the desktop).
Some lockups and screen freezes caused by hard disk problems can be solved by reducing the read-ahead optimisation. This can be adjusted by going to
* Start-Settings-Control Panel-System Icon-Performance-File System-Hard Disk.
Hard disks will slow down and crash if they are too full. Do some housekeeping on your hard drive every few months and free some space on it. Open the Windows folder on the C drive and find the Temporary Internet Files folder. Deleting the contents (not the folder) can free a lot of space.
Empty the Recycle Bin every week to free more space. Hard disk drives should be scanned every week for errors or bad sectors. Go to
* Start-Programs-Accessories-System Tools-ScanDisk
Otherwise assign the Task Scheduler to perform this operation at night when the computer is not in use.
5 Fatal OE exceptions and VXD errors
Fatal OE exception errors and VXD errors are often caused by video card problems.
These can often be resolved easily by reducing the resolution of the video display. Go to
* Start-Settings-Control Panel-Display-Settings
Here you should slide the screen area bar to the left. Take a look at the colour settings on the left of that window. For most desktops, high colour 16-bit depth is adequate.
If the screen freezes or you experience system lockups it might be due to the video card. Make sure it does not have a hardware conflict. Go to
* Start-Settings-Control Panel-System-Device Manager
Here, select the + beside Display Adapter. A line of text describing your video card should appear. Select it (make it blue) and press properties. Then select Resources and select each line in the window. Look for a message that says No Conflicts.
If you have video card hardware conflict, you will see it here. Be careful at this point and make a note of everything you do in case you make things worse.
The way to resolve a hardware conflict is to uncheck the Use Automatic Settings box and hit the Change Settings button. You are searching for a setting that will display a No Conflicts message.
Another useful way to resolve video problems is to go to
* Start-Settings-Control Panel-System-Performance-Graphics
Here you should move the Hardware Acceleration slider to the left. As ever, the most common cause of problems relating to graphics cards is old or faulty drivers (a driver is a small piece of software used by a computer to communicate with a device).
Look up your video card's manufacturer on the internet and search for the most recent drivers for it.
6 Viruses
Often the first sign of a virus infection is instability. Some viruses erase the boot sector of a hard drive, making it impossible to start. This is why it is a good idea to create a Windows start-up disk. Go to
* Start-Settings-Control Panel-Add/Remove Programs
Here, look for the Start Up Disk tab. Virus protection requires constant vigilance.
A virus scanner requires a list of virus signatures in order to be able to identify viruses. These signatures are stored in a DAT file. DAT files should be updated weekly from the website of your antivirus software manufacturer.
An excellent antivirus programme is McAfee VirusScan by Network Associates ( www.nai.com). Another is Norton AntiVirus 2000, made by Symantec ( www.symantec.com).
7 Printers
The action of sending a document to print creates a bigger file, often called a postscript file.
Printers have only a small amount of memory, called a buffer. This can be easily overloaded. Printing a document also uses a considerable amount of CPU power. This will also slow down the computer's performance.
If the printer is trying to print unusual characters, these might not be recognised, and can crash the computer. Sometimes printers will not recover from a crash because of confusion in the buffer. A good way to clear the buffer is to unplug the printer for ten seconds. Booting up from a powerless state, also called a cold boot, will restore the printer's default settings and you may be able to carry on.
8 Software
A common cause of computer crash is faulty or badly-installed software. Often the problem can be cured by uninstalling the software and then reinstalling it. Use Norton Uninstall or Uninstall Shield to remove an application from your system properly. This will also remove references to the programme in the System Registry and leaves the way clear for a completely fresh copy.
The System Registry can be corrupted by old references to obsolete software that you thought was uninstalled. Use Reg Cleaner by Jouni Vuorio to clean up the System Registry and remove obsolete entries. It works on Windows 95, Windows 98, Windows 98 SE (Second Edition), Windows Millennium Edition (ME), NT4 and Windows 2000.
Read the instructions and use it carefully so you don't do permanent damage to the Registry. If the Registry is damaged you will have to reinstall your operating system. Reg Cleaner can be obtained from www.jv16.org
Often a Windows problem can be resolved by entering Safe Mode. This can be done during start-up. When you see the message "Starting Windows" press F4. This should take you into Safe Mode.
Safe Mode loads a minimum of drivers. It allows you to find and fix problems that prevent Windows from loading properly.
Sometimes installing Windows is difficult because of unsuitable BIOS settings. If you keep getting SUWIN error messages (Windows setup) during the Windows installation, then try entering the BIOS and disabling the CPU internal cache. Try to disable the Level 2 (L2) cache if that doesn't work.
Remember to restore all the BIOS settings back to their former settings following installation.
9 Overheating
Central processing units (CPUs) are usually equipped with fans to keep them cool. If the fan fails or if the CPU gets old it may start to overheat and generate a particular kind of error called a kernel error. This is a common problem in chips that have been overclocked to operate at higher speeds than they are supposed to.
One remedy is to get a bigger better fan and install it on top of the CPU. Specialist cooling fans/heatsinks are available from www.computernerd.com or www.coolit.com
CPU problems can often be fixed by disabling the CPU internal cache in the BIOS. This will make the machine run more slowly, but it should also be more stable.
10 Power supply problems
With all the new construction going on around the country the steady supply of electricity has become disrupted. A power surge or spike can crash a computer as easily as a power cut.
If this has become a nuisance for you then consider buying a uninterrupted power supply (UPS). This will give you a clean power supply when there is electricity, and it will give you a few minutes to perform a controlled shutdown in case of a power cut.
It is a good investment if your data are critical, because a power cut will cause any unsaved data to be lost.
0 notes
Photo


Montana: Editing Process and Evaluation
To start with, I opened the image that I had chosen as the final in camera raw. While it was in camera raw, I increased the exposure to +0.65 so that the highlights would become more visible. After that, I changed the contrast to +16 because it helped increase the brightness of the colours. Once I had done this, I wanted to lighten the image slightly so I changed the shadows to +32. I also increased the blacks and saturation to +8. I then went to the ‘Detail’ section of the camera raw and increased the sharpness of the image to +45 to make the image slightly clearer. Once I had finished editing in camera raw, I opened the image in Photoshop to continue editing it and clean it up. The first thing I did to changed the photo in Photoshop was duplicate the layer so that I wouldn’t be editing destructively. Then I began to take away the wire that was attached to the frame on the right side. I removed the wire by using the patch tool. I selected the patch tool, drew around the white wire and moved it across until the wire and it’s shadow was gone and the frame was level. Once I had done this, I selected the spot heal tool and used it to remove the holes in the boards and the noticeable pieces of dust. While doing this, I pressed and held space to move around the image while I did this so that I didn’t need to keep zooming in and out. After I had finished cleaning the image, I added the Montana logo and slogan. The first thing I did was go to File and Place Embedded which allowed me to open the logo into the same document as the image. Once it was opened, I right clicked and pressed ‘Rasterize Layer’. Doing this meant I could do more to the layer. After that, I turned off the visibility of the photos and selected the magic wand tool. I clicked on the white area of the logo to select it, pressed Shift and clicked to add the areas in between the letters that weren’t selected. Then I deleted the white area so that it isn’t there when I place it onto the coloured boards that are in the photo. Once I had done this, I held CTRL over the layer window and clicked to select all of the information on that layer. I then, made a solid colour adjustment layer so I could change the colour of the logo. After a while of experimenting with different positions, I decided to place the logo inside the frame that is on the blue wall. I then added in the slogan ‘Paint & Create’ to the left side. I wanted to keep the design simple as I thought it would suit the rest of the photo. The photo has a minimalist look to it so I wanted to keep to that theme when adding text. To add the text to the image, I selected the text tool and typed ‘Paint’, ‘&’ and ‘Create’ and positioned them in a place where I was happy with how it looked. Then I held CTRL over the layer window and click to select the text. When I selected the text, I added a solid colour adjustment layer so I could change the colour of it. I used the eye dropper to choose the shade of blue from the board in the photo. I repeated this for the rest of the text so they would match.
I think our final image reflects the desired style well as we have create a minimalist look using only two colours. We have created a subtle theme with the objects as they relate to technology and we have kept them all one colour like in the example images. We have also positioned some the objects in a similar way to the images in the brief as some are being hung on the wall which we have replicated with the phone. Another similarity of the images is that they both have a corner in them which I think helps create depth. The main difference between our image and the ones in the brief is that we have included one blue wall instead of keeping everything pink. Another difference is that the images in the brief often use a lot more objects because they were able to create a larger set.
I believe that the logo looks good inside the frame as when you’re looking at the photo, you think that there should be something in it. The logo ended up looking better in the frame because the slogan is what needs to be seen first in an advert. This is why I placed the slogan on the left side in the empty space. It means that it is the first thing you see. I selected this specific typeface for the slogan because I wanted it to be bold yet not too harsh to look at. I think having it the same colour as the blue wall helps tie the image together as if it was a darker shade, it would have looked out of place. I also wanted to keep the slogan looking flat and simple so that it didn’t overpower the rest of the image. I am very happy with the way that the final outcome of the image’s text as it every aspect of it keeps within a simple and minimalist aesthetic which I personally like as well as follows the look of the example images in the brief. If I were to try to improve upon the text, I would experiment with different typefaces and maybe try to find one that looks like it has been spray painted onto the wall to link it to the company itself.
0 notes
Text
Combine Cells and Columns in Excel with Merging
Excel, unfortunately doesn’t have a button to push to Merge two columns and still maintain the data. However, there are three different ways to combine columns. The easiest is to use the Merge Cells Add-In, you can use formulas to merge two columns into a third column, and lastly utilizing the notepad to combine two adjacent columns.
Let’s start with the most time-consuming method, merging two columns using formulas.
Click to enlarge
To create a new column right click on the column immediately to the right of where you want the new column to appear and select Insert. For this example we are going to combine Column A “Last Name” and Column B “First Name” into the newly inserted Column C “Full Name”.
The formula to combine the two Columns is
=CONCATENATE(B2,“ ”,A2)
Click to enlarge
It is found in the Formulas Tab of the Ribbon, select MORE FUNCTIONS, click Compatibility and select CONCATENATE. This formula is used to combine several cells into one cell. Using the formula listed we are telling Excel to enter the first name (B2) followed by a space (“ “) and then the last name (A2). If you wanted the full name to be listed as Last Name, First Name enter =CONCATENATE(A2,”,”B2). A quick way to copy the formula all the way down Column C is to double-click the bottom right corner of the cell with the formula in it or click once and drag it down the column. Now you have the two columns combined in a third column. If you aren’t going to delete the information from the first two columns you are done. However, if you want to delete Column A or Column B the formula in Column C will need to be converted into a value, otherwise all data will be lost once you delete the two Columns.
asterisk
Select all cells from Column C by clicking and highlighting the entire column or select C2 and hit (Control + Shift + Down Arrow) at once to select all cells within the column.
asterisk
Copy to the clipboard using (Control + C)
asterisk
Right click into any cell within Column C and select Paste Special and Values.
asterisk
Column C cells are now value cells and are no longer linked to Columns A or B so those columns may now be deleted by clicking the Column Title and hitting Delete.
Click to enlarge
Though this method requires several steps and can be time intensive depending upon the amount of data you are dealing with it does provide a few benefits. The first being the columns you are combining do not have to be next to each other and the ability to add the space, comma or any other separator between the two pieces of data. The second method for combining two columns is a bit faster.
Using the Notepad to merge two cells
In this example, we are going to combine the City and State Columns. Using the Notepad you can only combine columns that are next to each other.
1. Select D1 and highlight it along with E1 then hit (Control + Shift + Down Arrow) to select every cell within the two columns and (Control + C) to copy the cells.
Click to enlarge
2. Open Notepad from your Start menu and paste the contents inside.
Click to enlarge
3. For proper formatting, locate the TAB in between City and State and hit (Control + C) to copy it. Open the Find and Replace box using (Control H) and copy the Tab into Find. In the Replace box include a common and a space then select Replace All. This should eliminate the Tab in between the City and State and change the formatting to become “City, State”.
4. Highlight all the data within the Notepad by typing (Control + A) and (Control +C) to Copy all of the data. Switch back to Excel and (Control + V) paste the copied data into a new column or into one of the merged columns. If you create a new column you can keep the originals or delete the unused columns.
Click to enlarge
Using the Merge Cells Add-In
The third and easiest way to Merge two columns is by getting the Add-in for Merge Cells. In the Ribbon select Add-ins if you have already downloaded the Merge Cells Add-in it will be found under My Add-ins, however, if you have not you will need to select Store and search for it.
Click to enlarge
star-half-empty
Select the two columns you wish to Merge and under the Add-Ins Tab in the Ribbon select the Merge Cells Add-in to open it.
star-half-empty
Select whether you would like to Merge by Row (this is what we want to merge the Last Name and First Name), Merge by Column or Merge all selected into one cell.
star-half-empty
Separate values by a line break, a space, or Other. Place a comma within the other box to separate the data by Last Name, First Name.
star-half-empty
The Options are to clear the processed cells or Delete Empty cells. We will clear the processed cells.
star-half-empty
The last option is where you would like the data placed, to the left or to the right of the selected data.
star-half-empty
Click Merge Cells and the warning (below) will pop up making sure you understand that any formulas will be turned into values. Select YES and the cells will be merged.
Click to enlarge
Using Add-ins for Merging Cells is by far the fastest and easiest method to merge two columns within Excel.
Merging Titles and Headers
Merging cells is frequently used each time a title is to be centered over a certain section of a spreadsheet. You are able to combine several cells to be able to combine data or improve the appearance of the spreadsheet. It is also called concatenating cells or columns. In the next example below, I’m using the “Merge & Center” icon to the merged cell. Please browse the article.
To merge a group of cells using Merge & Centre Button, follow these 2 easy steps:
Step 1: On your new spreadsheet, select the text cells you want to combine. Here in this example, I have selected the title—Monthly Expenses (range of cells C5 to G5) to merge and align center.
Click to enlarge
Step 2: Now click the “Merge & Center” icon placed on the toolbar and you’ll have the output like this.
Click to enlarge
Unmerge your Merged Cells
You can even split merged cells. Find the cell which was previously merged. Go back to the toolbar. Select “Merge & Centre” icon. Remember, You cannot split cells that were previously unmerged.
Auto Flash Fill in the Merged Column
When you have a lot of rows of data wherever you wish to combine text, there isn’t to replicate the above steps of every row. Like, if Column C includes peoples’ first names and Column D has each of their last names, and you wish to load order F with each of their first and last names combined, you can simply begin writing the combined text in order F and Excel 2010 may complete the remainder for you. Here get easy steps again…
share-square-o
Press the cell wherever you wish to set the initial set of combined text.
share-square-o
Type the combined text.
share-square-o
Press ENTER
share-square-o
Type another set of combined text. Excel can tell you a preview of the remaining portion of the column stuffed in along with your combined text.
share-square-o
To accept the preview, press ENTER.
Before you go, get my report ‘10 things I did with Excel that increased my salary from £27K to £100K’
LET’S GO!
The post Combine Cells and Columns in Excel with Merging appeared first on Earn and Excel.
Combine Cells and Columns in Excel with Merging published first on http://www.earnandexcel.com/ Combine Cells and Columns in Excel with Merging published first on http://www.earnandexcel.com/
0 notes
Text
Combine Cells and Columns in Excel with Merging
Excel, unfortunately doesn’t have a button to push to Merge two columns and still maintain the data. However, there are three different ways to combine columns. The easiest is to use the Merge Cells Add-In, you can use formulas to merge two columns into a third column, and lastly utilizing the notepad to combine two adjacent columns.
Let’s start with the most time-consuming method, merging two columns using formulas.
Click to enlarge
To create a new column right click on the column immediately to the right of where you want the new column to appear and select Insert. For this example we are going to combine Column A “Last Name” and Column B “First Name” into the newly inserted Column C “Full Name”.
The formula to combine the two Columns is
=CONCATENATE(B2," ",A2)
Click to enlarge
It is found in the Formulas Tab of the Ribbon, select MORE FUNCTIONS, click Compatibility and select CONCATENATE. This formula is used to combine several cells into one cell. Using the formula listed we are telling Excel to enter the first name (B2) followed by a space (“ “) and then the last name (A2). If you wanted the full name to be listed as Last Name, First Name enter =CONCATENATE(A2,”,”B2). A quick way to copy the formula all the way down Column C is to double-click the bottom right corner of the cell with the formula in it or click once and drag it down the column. Now you have the two columns combined in a third column. If you aren’t going to delete the information from the first two columns you are done. However, if you want to delete Column A or Column B the formula in Column C will need to be converted into a value, otherwise all data will be lost once you delete the two Columns.
asterisk
Select all cells from Column C by clicking and highlighting the entire column or select C2 and hit (Control + Shift + Down Arrow) at once to select all cells within the column.
asterisk
Copy to the clipboard using (Control + C)
asterisk
Right click into any cell within Column C and select Paste Special and Values.
asterisk
Column C cells are now value cells and are no longer linked to Columns A or B so those columns may now be deleted by clicking the Column Title and hitting Delete.
Click to enlarge
Though this method requires several steps and can be time intensive depending upon the amount of data you are dealing with it does provide a few benefits. The first being the columns you are combining do not have to be next to each other and the ability to add the space, comma or any other separator between the two pieces of data. The second method for combining two columns is a bit faster.
Using the Notepad to merge two cells
In this example, we are going to combine the City and State Columns. Using the Notepad you can only combine columns that are next to each other.
1. Select D1 and highlight it along with E1 then hit (Control + Shift + Down Arrow) to select every cell within the two columns and (Control + C) to copy the cells.
Click to enlarge
2. Open Notepad from your Start menu and paste the contents inside.
Click to enlarge
3. For proper formatting, locate the TAB in between City and State and hit (Control + C) to copy it. Open the Find and Replace box using (Control H) and copy the Tab into Find. In the Replace box include a common and a space then select Replace All. This should eliminate the Tab in between the City and State and change the formatting to become “City, State”.
4. Highlight all the data within the Notepad by typing (Control + A) and (Control +C) to Copy all of the data. Switch back to Excel and (Control + V) paste the copied data into a new column or into one of the merged columns. If you create a new column you can keep the originals or delete the unused columns.
Click to enlarge
Using the Merge Cells Add-In
The third and easiest way to Merge two columns is by getting the Add-in for Merge Cells. In the Ribbon select Add-ins if you have already downloaded the Merge Cells Add-in it will be found under My Add-ins, however, if you have not you will need to select Store and search for it.
Click to enlarge
star-half-empty
Select the two columns you wish to Merge and under the Add-Ins Tab in the Ribbon select the Merge Cells Add-in to open it.
star-half-empty
Select whether you would like to Merge by Row (this is what we want to merge the Last Name and First Name), Merge by Column or Merge all selected into one cell.
star-half-empty
Separate values by a line break, a space, or Other. Place a comma within the other box to separate the data by Last Name, First Name.
star-half-empty
The Options are to clear the processed cells or Delete Empty cells. We will clear the processed cells.
star-half-empty
The last option is where you would like the data placed, to the left or to the right of the selected data.
star-half-empty
Click Merge Cells and the warning (below) will pop up making sure you understand that any formulas will be turned into values. Select YES and the cells will be merged.
Click to enlarge
Using Add-ins for Merging Cells is by far the fastest and easiest method to merge two columns within Excel.
Merging Titles and Headers
Merging cells is frequently used each time a title is to be centered over a certain section of a spreadsheet. You are able to combine several cells to be able to combine data or improve the appearance of the spreadsheet. It is also called concatenating cells or columns. In the next example below, I'm using the “Merge & Center” icon to the merged cell. Please browse the article.
To merge a group of cells using Merge & Centre Button, follow these 2 easy steps:
Step 1: On your new spreadsheet, select the text cells you want to combine. Here in this example, I have selected the title—Monthly Expenses (range of cells C5 to G5) to merge and align center.
Click to enlarge
Step 2: Now click the “Merge & Center” icon placed on the toolbar and you’ll have the output like this.
Click to enlarge
Unmerge your Merged Cells
You can even split merged cells. Find the cell which was previously merged. Go back to the toolbar. Select "Merge & Centre" icon. Remember, You cannot split cells that were previously unmerged.
Auto Flash Fill in the Merged Column
When you have a lot of rows of data wherever you wish to combine text, there isn't to replicate the above steps of every row. Like, if Column C includes peoples' first names and Column D has each of their last names, and you wish to load order F with each of their first and last names combined, you can simply begin writing the combined text in order F and Excel 2010 may complete the remainder for you. Here get easy steps again…
share-square-o
Press the cell wherever you wish to set the initial set of combined text.
share-square-o
Type the combined text.
share-square-o
Press ENTER
share-square-o
Type another set of combined text. Excel can tell you a preview of the remaining portion of the column stuffed in along with your combined text.
share-square-o
To accept the preview, press ENTER.
Before you go, get my report '10 things I did with Excel that increased my salary from £27K to £100K'
LET'S GO!
The post Combine Cells and Columns in Excel with Merging appeared first on Earn and Excel.
0 notes