#secondnumber
Explore tagged Tumblr posts
Visit Tumblr Blog
Explore Tumblr blogs with no restrictions, modern design and the best experience.
Last Seen Tumblr Blogs


Fun Fact
Users from the US are the majority of Tumblr visitors.
Link
0 notes
Photo

I've saved a ton this past year after switching over to @OneSuite. See here why:⠀ $1/mo unlimited incoming fax to email. | Fax on the go for $2.95/mo+: sending & unlimited receiving!⠀ ⠀ #OneSuite #Fax #Faxing #Unlimited #UnlimitedFaxing #Calling #CallForwarding #InternetFax #Voip #InternationalCalling #WebFax #CheapInternationalCalls #MidwestMarketingAgency @MidwestMarketingAgency #SecondNumber #SecondPhoneLine #GlobalPresense #LocalReach #LocalRates #InternationalCallForwarding #WorldwideCalling⠀ https://buff.ly/2PHjkTx https://www.instagram.com/p/B9RsnijjJDH/?igshid=x73voyekppyk
#onesuite#fax#faxing#unlimited#unlimitedfaxing#calling#callforwarding#internetfax#voip#internationalcalling#webfax#cheapinternationalcalls#midwestmarketingagency#secondnumber#secondphoneline#globalpresense#localreach#localrates#internationalcallforwarding#worldwidecalling
0 notes
Text
ААА или зачем кричать на тестирование?
AAA - это аббревиатура, означающая Arrange-Act-Assert. Это паттерн (последовательность действий) для создания тестов.
Arrange - Упорядочить. Первым делом создаются необходимые объекты для проведения теста. Например, если вы тестируете разницу двух чисел, то сначала их надо указать.
Act - Действовать. Название говорит само за себя, здесь совершается тестируемое действие. Если продолжать говорить про разницу двух чисел, то на этом этапе они отнимаются друг от друга
Assert - Утверждать. Теперь результат действий проверяется и делаются выводы: пройден тест успешно или нет.
Пример теста:
//Arrange int firstNumber = 5; int secondNumber = 2; int result = 3; //Act int actResult = firstNumber - secondNumber; //Assert assertEqual(result, actResult);
Ну, вроде понятно
3 notes
·
View notes
Text
Tuscom Aula F805 RGB Lighting Ergonomic Wired Gaming Mouse, 6 Adjustable DPI Up to 6400, Ergonomic Gamer Laptop PC Mouse with 10 Programmable Buttons for Windows 7/8/10/XP Vista Linux
Tuscom Aula F805 RGB Lighting Ergonomic Wired Gaming Mouse, 6 Adjustable DPI Up to 6400, Ergonomic Gamer Laptop PC Mouse with 10 Programmable Buttons for Windows 7/8/10/XP Vista Linux
Price: (as of – Details) AULA F805 RGB Wired Programmable Gaming Mouse Can adjust 6400 DPI, ergonomicSpecification:Type: RGB gaming mouseSensor: SPCP199DPI: 800-1600-2400-3200-4800-6400Speed: 32 inches per secondNumber of buttons: 7 programmable buttonsConnection: Wired USB cableWeight: 154gSize: length * width * height 135 * 72 * 42MMContain:1X Mouse➤【AULA RGB backlight provides the ultimate…

View On WordPress
0 notes
Text
Basic - 3
//Add two numbers
#include<iostream> using namespace std;
int main() { int firstNumber, secondNumber, sum; cin>>firstNumber>>secondNumber;
sum = firstNumber + secondNumber;
cout<<firstNumber<<" + "<<secondNumber<<" = "<<sum<<endl; return 0; }
0 notes
Text
Variables In JavaScript By Sagar Jaybhay
New Post has been published on https://is.gd/dKZPmX
Variables In JavaScript By Sagar Jaybhay

2 Types of Variables In JavaScript
Local Variable
Global Variable
In JavaScript, there are 2 types of variables. Local variables and global variables.
Local Variable In JavaScript
This variables mean the variables which are declared within a function. These variables have a local scope it means it will accessible only inside the function.
The variable is created when function starts and deleted when function executed completely.
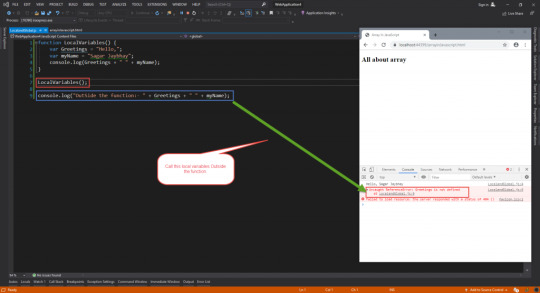
Local Variables In JavaScript
function LocalVariables() var Greetings = "Hello,"; var myName = "Sagar Jaybhay"; console.log(Greetings + " " + myName); LocalVariables(); console.log("OutSide the function:- " + Greetings + " " + myName);
If you see above code when we call function it will print the variable values on console, but for second-line it throws an exception which is
LocalandGlobal.js:9 Uncaught ReferenceError: Greetings is not defined at LocalandGlobal.js:9
Global Variables in JavaScript
Global variables are those variables that are declared outside a function. These Variables have global scope it means all functions, scripts can access these variables.
The lifetime of global variable is until page is open in browser when it is close global variables are removed from memory.

Global Variables In JavaScript
var Greetings = "Hello,"; var myName = "Sagar Jaybhay"; function LocalVariables() console.log(Greetings + " " + myName); LocalVariables(); console.log("OutSide the function:- " + Greetings + " " + myName);
In this above example variables are declared outside of this function and it is accessible inside the function and outside of function also.
Points To Remember about Variables in JavaScript
If you assign value to a variable which is not been declared it also becomes a global variable.
function GlobalVariables() Greetings = "Hello,"; myName = "Sagar Jaybhay"; console.log(Greetings + " " + myName); GlobalVariables(); console.log("OutSide the function:- " + Greetings + " " + myName);
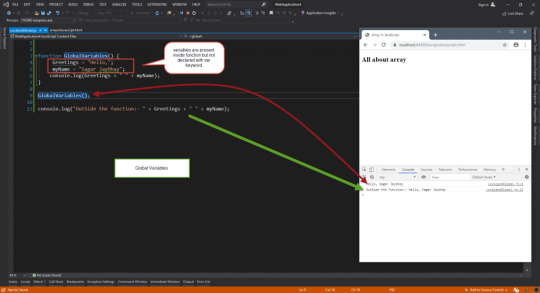
Global and Local Variable in JavaScript
In the above code, we have variables inside that function but we not used var keyword before this variable names and we assign the value for them.
Now, these variables worked as global variables and we can access this outside of this function even though they present inside of that function.
Local variables can have the same name as the global variable. If you change the value of one variable is not affect on the other variable. If you changed local variable value and access inside that function you will get local copy of that variable but when you access this variable outside of function you will get global value.
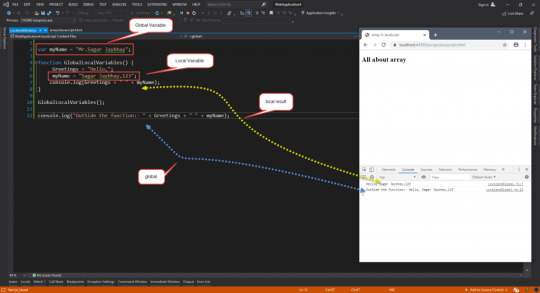
Local Variables and Global Variables In JavaScript
var myName = "Mr.Sagar Jaybhay"; function GlobalLocalVariables() Greetings = "Hello,"; myName = "Sagar Jaybhay,123"; console.log(Greetings + " " + myName); GlobalLocalVariables(); console.log("OutSide the function:- " + Greetings + " " + myName);
Braces: In JavaScript braces not creates the scope for variable like C#, java.
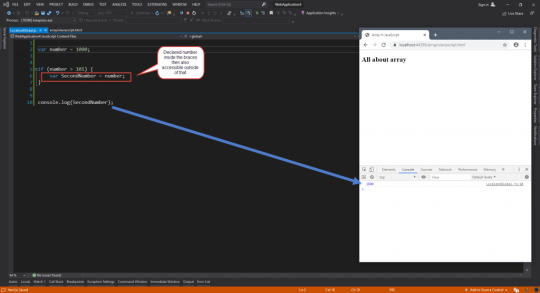
Braces In JavaScript
var number = 1000; if (number > 101) var SecondNumber = number; console.log(SecondNumber);
In this code we defined SecondNumber inside braces of if condition then also it is accessible outside of that braces it means Javascript braces doesn’t create scope for variables. Whatever the variables are declared inside the braces are treated as a global variable.
0 notes
Text
Simple Calculator program in C
Simple Calculator program in C
This is a simple calculator program written in C Language. It Performs addition, subtraction, multiplication or division depending the input from user. This usage switch case statement. simple-calculator Let see the C Program # include int main() { char operator; double firstNumber,secondNumber; printf("Enter an operator (+, -, *,): "); scanf("%c", &operator); printf("Enter two operands: ");…
View On WordPress
#c calculator#c language#c program#c project#C#calculator in c#example c program#learn c#learn c language#project in c language#simple calculator in c#Simple Calculator program in C#Write a C Program
0 notes
Text
Basic calculator in C++
Basic calculator in C++
In this basic C++ program, we will have a look at how to code a basic calculator in C++.
C++ Program to Make a Simple Calculator to Add, Subtract, Multiply or Divide Using switch…case
# include using namespace std; int main() { char operator; float firstnumber, secondnumber; cout > operator; cout > firstnumber>> secondnumber; switch(operator) { case '+': cout
View On WordPress
0 notes
Text
SwiftUI Calculator Tutorial
SwiftUI makes it easy to create user interfaces fast. In this tutorial a calculator is created. For simplicity only whole numbers can be substracted or added . SwiftUI requires Xcode 11 and MacOS Catalina, which can be download at the Apple developer portal.
Open Xcode and either click Create a new Xcode project in Xcode’s startup window, or choose File > New > Project. In the template selector, select iOS as the platform, select the Single View App template, and then click Next. Enter SwiftUICalculatorTutorial as the Product Name, select SwiftUI as the User Interface and click Next. Choose a location to save the project on your Mac.
In the canvas, click Resume to display the preview. If the canvas isn’t visible, select Editor > Editor and Canvas to show it.
In the Project navigator, click to select ContentView.swift. Declare the following variables inside the ContentView struct.
@State private var firstNumber = 0 @State private var secondNumber = 0 @State private var operand = "" @State private var calculatorText = "0" @State private var isTypingNumber = false
firstNumber: the first number in the calculation
secondNumber: the second number in the calculation
operand: the operand in the calculation. Here the minus and plus operands are used.
calculatorText: the current value inside the textfield
isTypingNumber: a boolean which determines if the user is entering a number with multiple digits.
Enter the following code inside the body property to create the User Interface of the calculator
var body: some View { VStack(spacing: 30) { // 1. TextField("0", text: $calculatorText) .border(Color.gray, width: 2) .padding() .multilineTextAlignment(.trailing) HStack { // 2. createCalcDigit("1") Spacer() createCalcDigit("2") Spacer() createCalcDigit("3") }.padding() HStack { createCalcDigit("4") Spacer() createCalcDigit("5") Spacer() createCalcDigit("6") }.padding() HStack { createCalcDigit("7") Spacer() createCalcDigit("8") Spacer() createCalcDigit("9") }.padding() HStack { // 3. Button(action: { self.operandTapped("-") }) { (Text("-")) } Spacer() createCalcDigit("0") Spacer() Button(action: { self.operandTapped("+") }) { (Text("+")) } }.padding() HStack { Spacer() // 4. Button(action: { self.calculate() }) { (Text("=")) } Spacer() } } .font(.largeTitle) }
A text field is displayed containg the current calculator value.
every digit is displayed using the createCalcDigit(_: ) method
When an operand is tapped, the operandTapped(_:) method is called.
When the equal-digit is tapped, the calculate() methof is called
Next, add the methods inside the ContentView struct.
// 1. private func createCalcDigit(_ number: String) -> Button<Text> { return Button(action: { self.digitTapped(number) }) { (Text(number)) } } // 2. private func digitTapped(_ number: String) -> Void { if isTypingNumber { calculatorText += number } else { calculatorText = number isTypingNumber = true } } // 3. private func operandTapped(_ operand: String) { isTypingNumber = false firstNumber = Int(calculatorText)! self.operand = operand calculatorText = operand } // 4. private func calculate() { isTypingNumber = false var result = 0 secondNumber = Int(calculatorText)! if operand == "+" { result = firstNumber + secondNumber } else if operand == "-" { result = firstNumber - secondNumber } calculatorText = "\(result)" }
The createCalcDigit(:) method return a button with the specified number as the text. Every button calls the digitTapped(:) method as its action when tapped.
When the digit is tapped a check is made if this a new number entry. The digits will be displayed in the caluclator text field.
When an operand is tapped the number of the textfield is assigned to the firstNubmer property and the operand is printed to the calculator text field.
The calculate method calculates the 2 numbers with the chosen operand and prints the result to the calculator text field.
Go to the preview canvas and select the Live Preview button. Enter a calculation and see the result displayed.
The source code of the SwiftUICalculatorTutorial can be downloaded at the ioscreator repository on Github.
0 notes
Text
Лямбда-вирази у C++
Лямбда — анонімна функція, яка підтримує стан між викликами і може отримати доступ до змінних зі своєї області видимості. Використовуючи лямбда-вирази, можна оголошувати функції в будь-якому місці коду. Термін "лямбда" походить від назви цієї концепції у мові LISP, де вони з’явились вперше в історії програмування, а там їх у свою чергу назвали на честь прийнятого математичного позначення функціонального виразу.
У C++ підтримка лямбд прийшла разом з рядом інших нововведень стандарту C++0x. Перші тестові реалізації з’явились десь у 2008-2009, а на сьогоднішній день їх за помовчанням мають підтримувати усі компілятори.
До того, як з’явились лямбди
Перш ніж переходити до лямбд, хотілося б сказати пару слів про інші механізми, які забезпечували схожу функціональність у базовому стандарті. Таких можна назвати два: вказівники на фунцію та функтори.
Уявімо завдання: треба обчислити якусь величину двома способами. В одному випадку це буде просте додавання двох чисел, в іншому — додавання та збільшення результату на 20%. Ну, може це ціна якась, або щось таке. Тобто, є дві функції, які обчислюють величину і ще одна, яка власне ініціює обчислення, отримавши вказівник на реалізацію алгоритму обчислення.
int addNumbers(int a, int b) { return (a+b); } int addNumbersExtra20(int a, int b) { int sum = a+b; return std::lround(sum*1.2); } int calclulate(int a, int b, int (*calcFunc)(int, int)) { int result = calcFunc(a,b); return result; }
Використ��ння приблизно таке:
int firstNumber = 10; int secondNumber = 20; int sum = calclulate(firstNumber, secondNumber, &addNumbers); int sumX = calclulate(firstNumber, secondNumber, &addNumbersExtra20);
В принципі, вказівники на функцію виглядають досить нормально, але деяким недоліком є те, що доводиться створювати зайвий ідентифікатор та виносити частину коду за межі основного методу. Код, який намагається використовувати функтори, у C++98 виглядав значно гірше.
Інше завдання: припустимо, ми хочемо "красиво" роздрукувати елементи масиву, додавши до кожного числа рамку з дужок. Для поелементного обходу масиву можна використати конструкцію for_each, але для цього треба створити клас-функтор
struct NicePrinter { void operator()(int n) const { // adds nice brackets to printed value cout << "-=<( " << n << " )>=-"; cout << endl ; } };
Він дуже просто використовується
vector<int> v = {10, 15, 20, 25}; for_each(v.begin(), v.end(), NicePrinter());
Простий приклад лямбди
За допомогою лямбд останній приклад можна було б записати простіше:
vector<int> v = {10, 15, 20, 25}; for_each(v.begin(), v.end(), [](int elem) { cout << "-=< " << elem << " >=-" ; cout << endl; })
Весь код в одному місці, без зайвих конструкцій. Сподіваюсь, він інтуїтивно зрозумілий, якщо ні — переходьте до наступного розділу.
Теорія, визначення.
Синтаксис лямбда-виразу виглядає наступним чином:
[ список захоплення ] ( список параметрів функції ) -> тип значення, що повертається { тіло функції }
Тобто:
список захоплення (англ. capture list) — це перелік змінних з поточної області видимості, до яких матиме доступ лямбда. Детальніше про нього буде у наступному розділі, а поки що у попередньому прикладі його залишили пустим
список параметрів функції — це, очевидно, ті параметри, які отримає функція. Відомо, що for_each викликатиме лямбду, передаючи їй лише один параметр: поточний елемент масиву, власне int elem
тип значення, що повертається (англ. return-type) можна не вказувати, якщо компілятор зможе визначити його автоматично. У нашому випадку теоретично це void, але воно не важливо. Вказувати тип після списку параметрів незвично для C++, однак вийшло саме так, бо опис лямбди має однозначно починатись з квадратних дужок, інакше компілятор її не розпізнає.
тіло функції йде у фігурних дужках. Тут воно таке само, як і у прикладі з функтором.
Цікаво, що найкоротшим, але цілком легітимним для C++0x лямбда-виразом є
[](){}();
Тут лямбда з пустим списком захоплення (квадратні дужки), пустим списком параметрів (перші круглі дужки) та пустим тілом (фігурні дужки) викликається одразу після створення (останні круглі дужки).
Список захоплення
До списку захоплення входять ті змінні, до яких матиме доступ код у тілі лямбди. Є два типи доступу:
за копією (capture by value) — створюється окрема копія змінної з зовнішньої області видимості і далі робота йде з нею. Ім’я кожної змінної вказується, як є.
за посиланням (capture by reference) — доступ здійснюється до самої зовнішньої змінної, її можна модифікувати. Попереду імен таких змінних ставиться &.
Очевидно, це дуже схоже на способи передачі змінних у звичайну функцію, однак при використанні у лямбдах виникають деякі особливості.
Уявіть наступне завдання: треба знайти суму елементів масиву; якщо елемент масиву більший за порогове значення, до суми додається бонус +1.
vector<int> v2 = {1, 15, 20, 5}; int sum=0; int bonusThreshold = 8; for_each(v2.begin(), v2.end(), [&sum, bonusThreshold](int elem) { sum += elem ; //накопичення суми if (elem>=bonusThreshold) { sum += 1; // нарахування бонусу } });
Тобто для даного масиву кінцева сума обчислюється по формулі 1+(15+1)+(20+1)+5 (якщо ви раптом будете запускати цей код, маєте отримати 43)
У цьому прикладі список захоплення [&sum, bonusThreshold] складається з двох змінних:
&sum передається by reference й змінюється кодом лямбди
bonusThreshold передається як копія (хоча міг би і як значення, для даного випадку не важливо)
Важливо розуміти, що змінні, передані "by copy" не схожі на змінні, що переходять у звичайну функцію. Про них краще думати, як про члени класу такого собі функтору, який міг би бути неявно створений компілятором (докладніше тут).
Розглянемо наступний приклад:
int tfValue = 42; auto f1 = [tfValue]() { cout << "F1 prints " << tfValue; }; tfValue = 314; auto f2 = [tfValue]() { cout << "F2 prints " << tfValue; }; f1(); f2();
Результат буде таким:
F1 prints 42 F2 prints 314
Ми бачимо, що значення tfValue змінилось, але функція f1 все одно друкує старий варіант — той, який був, коли її створили і змінну було захоплено.
Якби змінна передавалась by reference, ситуація була б іншою:
int tfrValue = 42; auto fr1 = [&tfrValue]() { cout << "F1 prints " << tfrValue << "(passed by ref)"; }; fr1(); // call before value was changed tfrValue = 314; auto fr2 = [&tfrValue]() { cout << "F2 prints " << tfrValue << "(passed by ref)"; }; fr1(); // now we call this function after value was changed fr2();
Тепер друкується поточне значення tfrValue
Two functions (by ref): F1 prints 42 (passed by ref) F1 prints 314 (passed by ref) F2 prints 314 (passed by ref)
mutable лямбди
Це відносно рідкісний випадок, але його треба відмітити. Змінні, що захоплюються by value, неявно мають специфікатор const, тобто їх не можна змінювати всередині лямбди.
Ось такий код не скомпілюється:
auto f1 = [tfValue]() { cout << "F1 prints " << tfValue; // following line causes compiler error tfValue = 44; // error, assigning value to passed by value };
Але, якщо додати mutable, все скомпілюється:
int mfValue = 42; auto mf1 = [mfValue](QString message) mutable { qDebug() << message << ": " << mfValue; mfValue = mfValue +5; // no compile error };
При цьому захоплені змінні у кожній з лямбд живуть своїм життям:
int mfValue = 42; auto mf1 = [mfValue](QString message) mutable { qDebug() << message << ": " << mfValue; mfValue = mfValue +5; // no compile error }; mf1("mf1 first call"); auto mf2 = mf1; mf1("mf1 second call"); mf1("mf1 third call"); mf2("mf2 first call");
Видасть
"mf1 first call" : 42 "mf1 second call" : 47 "mf1 third call" : 52 "mf2 first call" : 47
Доступ до полів класу
Ще один нюанс виникає, коли лямбді потрібно використати значення з поля об’єкту.
Наприклад, маємо такий клас:
class SimpleArr { public: SimpleArr() ; // returns the number of ints greater than limit int getCountOverInternalLimit(); protected: std::vector<int> arr; int limit; };
Можна було б написати таку реалізацію методу getCountOverInternalLimit:
int SimpleArr::getCountOverInternalLimit() { int result = 0; for_each(arr.begin(), arr.end(), [&result](int elem) { if (elem>limit) { result++; } }); return result; }
Але отримаємо помилку компіляції типу
src\LambdasWithObjects.cpp: In lambda function: src\LambdasWithObjects.cpp:24:14: error: 'this' was not captured for this lambda function if (elem>limit) { ^ src\LambdasWithObjects.cpp:24:14: error: invalid use of non-static data member 'SimpleArr::limit' In file included from src\LambdasWithObjects.cpp:8:0: src\LambdasWithObjects.h:13:9: note: declared here int limit; ^
Проблема в тому, що лямбда, оголошена всередині методу, не має доступу до полів класу. Щоб це сталось, треба зазначити this у списку захоплення, ось так:
int SimpleArr::getCountOverInternalLimit() { int result = 0; for_each(arr.begin(), arr.end(), [this, &result](int elem) { if (elem>limit) { result++; } }); return result; }
Захоплення всієї області видимості
Стандарт C++0x передбачає спеціальні механізми для захоплення усіх змінних в області видимості, відповідно
[=] для захоплення by value
[&] для захоплення by reference
Також можливо робити окремі винятки:
[=, &out1, &out2] : захоплює усі можливі змінні за значенням, крім out1 та out2, які пішли за посиланням.
[&, x, &y] : захоплення всіх змінних за посиланням, крім х
Цікаво, що при цьому захоплюється і сама лямбда, тому можна писати рекурсивні лямбди
std::function<int (int)> factorial = [&] (int i) { return (i == 1) ? 1 : i * factorial(i - 1); };
Лямбди і вказівники
Повернемось до прикладу з обчисленням значення, що був на початку статті. Функція, що ініціює додавання, майже не зміниться
int calclulate(int a, int b, std::function<int(int,int)> calcFunc) { int result = calcFunc(a,b); return result; }
А функції, які реалізують обчислення, стануть лямбдами і перейдуть до основного коду:
int firstNumber = 10; int secondNumber = 20; int sum = calclulate(firstNumber, secondNumber, [](int a, int b) { return (a+b); }); int sumX = calclulate(firstNumber, secondNumber, [](int a, int b)->int { int sum = a+b; return std::lround(sum*1.2); } );
Зверніть увагу на другий приклад — там явно вказано тип значення, що повертає лямбда. Не впевнений, наскільки це обов’язково, але lround повертає значення типу long, а у коді повсюду йде int, тому краще перестрахуватись. Тим більше, це чи не єдина нагода у статті явно вказати тип значення, що повертається
Код використовує std::function, однак це необов’язково: лямбда може бути приведена до std::function, але існують також інші способи передачі.
Можна було б залишити старий добрий вказівник на функцію, як воно і було з самого початку:
int calclulateUsual(int a, int b, int (*calcFunc)(int, int)) { int result = calcFunc(a,b); return result; }
А можна було б використати конструкцію з шаблоном:
template <typename CalcFunction> int calclulateTemplated(int a, int b, CalcFunction && calcFunc) { int result = calcFunc(a,b); return result; }
Кожний з трьох способів має свої переваги та недоліки (наприклад, до простого вказівника на функцію можна привести лише лямбди з пустим списком захоплення), детальніше про них можна дізнатись у цьому або цьому обговореннях.
Генерування лямбд
Нарешті, щоб об’єднати усе перелічене у статті, спробуємо написати функцію, яка генерує лямбди в залежності від певних умов.
Наприклад, так:
std::function<int(int,int)> //this is the type of return value generator(int processingId) { if (processingId==1) { return [](int a, int b) ->int { return (a+b); }; } int bonus = 20; if (processingId == 2) { return [&bonus](int a, int b) ->int { //this causes error !!! bonus++; return (a+b+bonus); }; } return [bonus](int a, int b) ->int { return (a+b+bonus); }; }
Функція повертає лямбду. Якщо processingId рівний 1, вона просто додає числа, інакше до суми чисел ще додається бонусне значення.
Випадок для processingId == 2 містить помилку: зміння bonus передається за посиланням (і модифікується з кожним викликом), однак вона перестає існувати після виходу за межі функції generator.
auto f1 = generator(1); // simple adding without bonus int s1 = f1(1,2); qDebug() << "Added 1+2, got "<< s1 ; auto f0 = generator(0); // adding with bonus qDebug() << "Added 1+2, got "<< f0(1,2) << "(with bonus)" ; qDebug() << "Added 6+2, got "<< f0(6,2) << "(with bonus)" ; auto f2 = generator(2); // this could case a segfault qDebug() << "Added 1+2, got "<< f2(1,2) ;
Я отримав результат
Added 1+2, got 3 Added 1+2, got 23 (with bonus) Added 6+2, got 28 (with bonus) Added 1+2, got 1756625386
Останній рядок — типовий undefined behavior, в принципі програма могла б і просто впасти.
Статті, варті уваги
http://umich.edu/~eecs381/handouts/Lambda.pdf
http://shaharmike.com/cpp/lambdas-and-functions/
https://habrahabr.ru/post/66021/
http://www.drdobbs.com/cpp/lambdas-in-c11/240168241
Лямбда-вирази, auto та static_assert: C++0x можливості в VC10
0 notes