#techniquesandprocesses
Explore tagged Tumblr posts
Visit Tumblr Blog
Explore Tumblr blogs with no restrictions, modern design and the best experience.
Last Seen Tumblr Blogs


Fun Fact
In 2020, Tumblr had 29.4 million users in the US.
Text
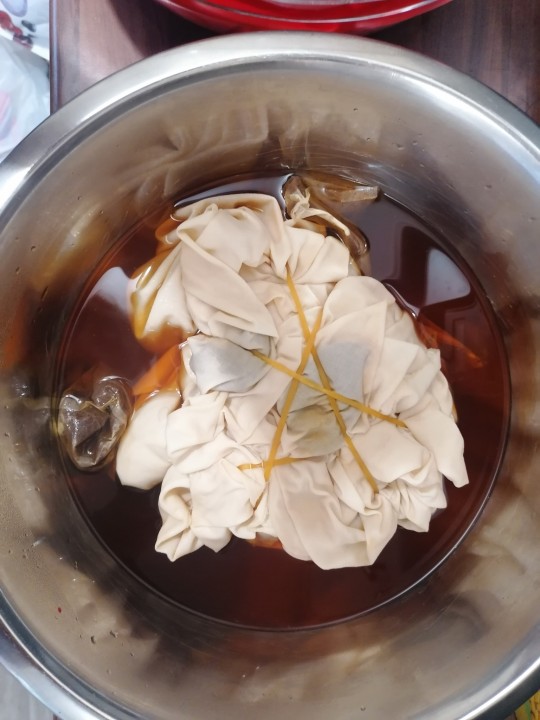
Started with avocado dye, turned into tea bag the dye.
1 note
·
View note
Photo
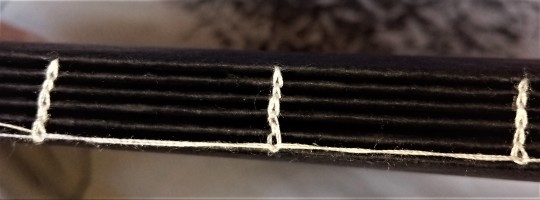


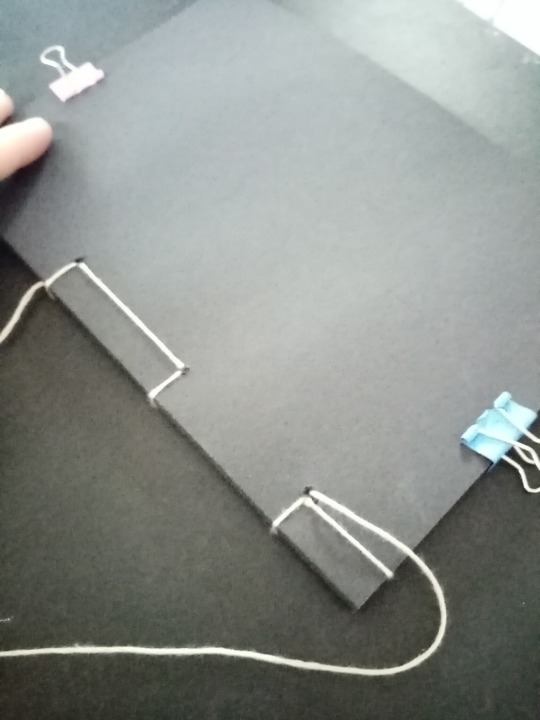
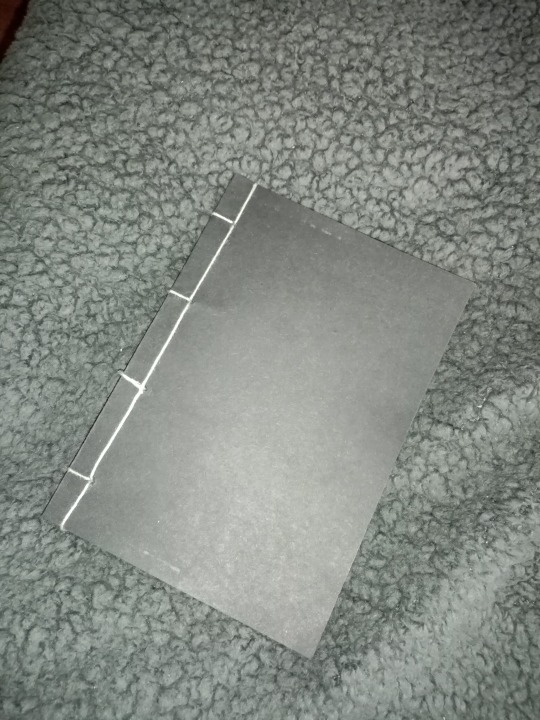
Bookmaking
I was unable to attend the Bookmaking workshop, so I have looked online for some methods surrounding book making and tried my own at home. I didn’t have many of the correct tools such as a bone folder, cutting board or waxed thread but I created one without these, It will be less sturdy this way but I’d just like to follow the process. I followed a video of someone talking through the process of making a simple book using a Kettle stitch bind. This was a good method as it allows the pages to move easily and each page can open flat. I really enjoyed this process, although it was quite confusing at first, the method became more repetitive and simple. I believe what I have made here is a text block, as it doesn’t have a case, but I will look into further developing my bookbinding skills, using different stitch methods and possibly adding a case.
The fifth picture I included here is showing some notes and diagrams that I will add to my technical journal when I retrieve it from University. It explains the steps of how to create a kettle stitch. I was really happy with the final outcome, however, I ran into some issues later on as I hadn’t pulled the thread tight enough, I fixed this by taping it down, as seen in the fourth photo but I am aware this damaged the look of the book and would improve on this next time. I’m not able to produce a hardback cover at home but I would definitely like to try this when I have access to the materials.
5 notes
·
View notes
Text
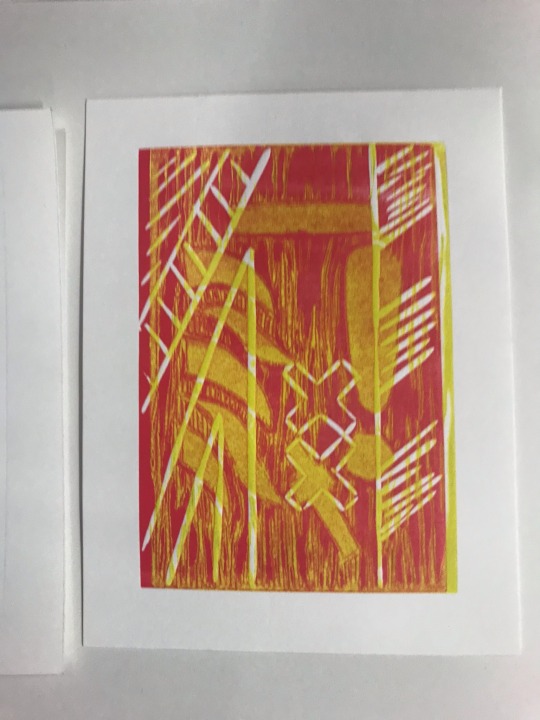

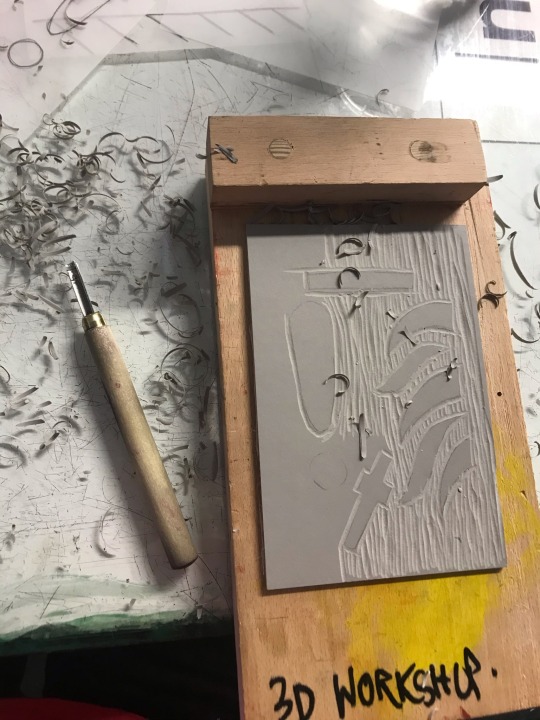

These were from the Lino printing workshop the other week. I’ve done Lino printing before at A Level so I knew the process very clearly and understood how to create them. Although it was nice to have gone over it again.
Overall I really enjoy this process however it is quite time consuming so if I was going to do this again I would have to dedicate a few hours to do it so I can carve the lino piece. I also really liked the outcome of these, mainly how the colours blended together. My favourite was the yellow and the pink one, even if they were slightly off and didn’t overlap completely.
2 notes
·
View notes
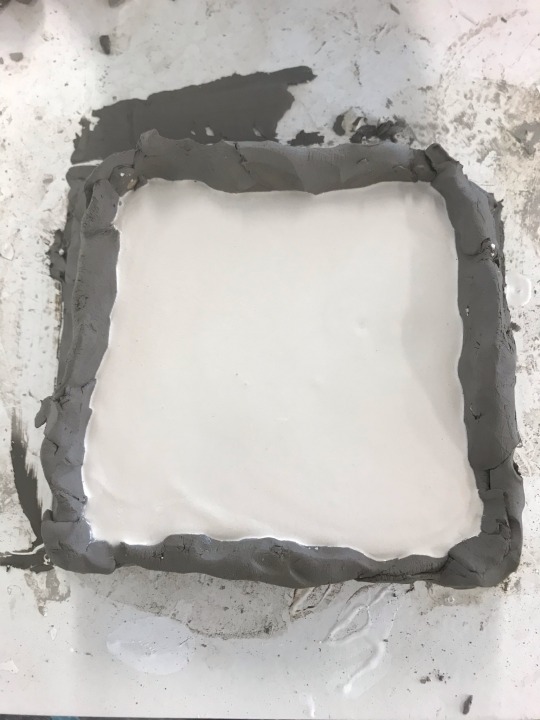
Text


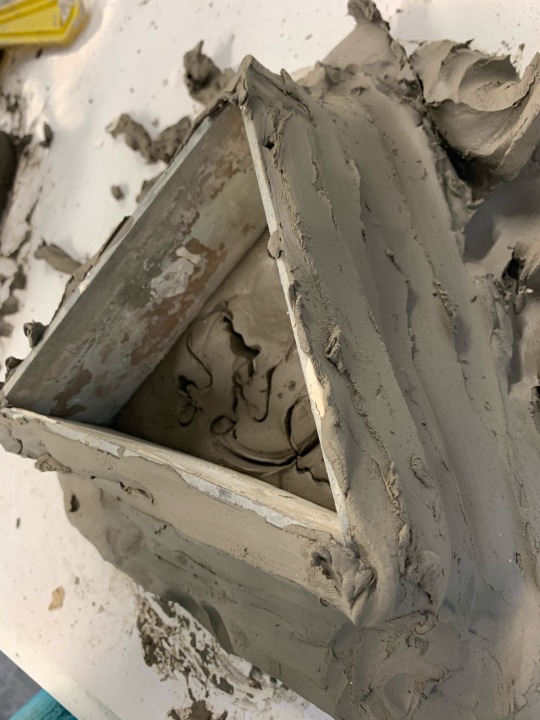


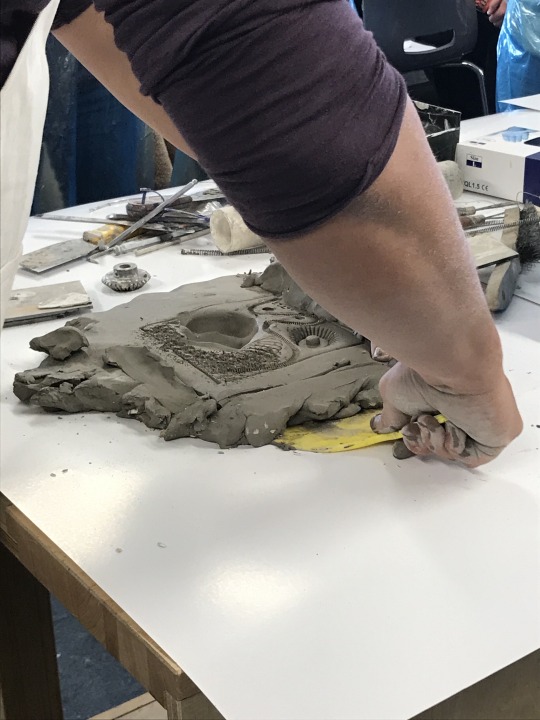
Casting and Mould-making workshop.
We created clay moulds using and imprinted objects such as bolts, wire, shapes etc into the clay. This created a 3D type effect to be produced onto the mould. This technique is really useful to capture the shape and manipulate its form.
2 notes
·
View notes
Text

Monoprints done by me at the monoprint workshop we had given by Michelle. I created a mixed colour monoprint and I’m really pleased with the outcome. This technique is in my technical diary for reference in detail. I feel like monoprint is not one of my strong points within art but I feel that with persistence and practise I will find I will grow more fond of this technique over time. Sometimes it’s hard to know what your pieces are going to come out like with monoprint as it is reversed. But it’s a great way to give an illustrated look almost to a drawing and the surprising results once you have finished drawing onto the paper is a good way to work as you may even surprise yourself. It’s good to work out of your comfort zone and see what else you can produce in art.
3 notes
·
View notes
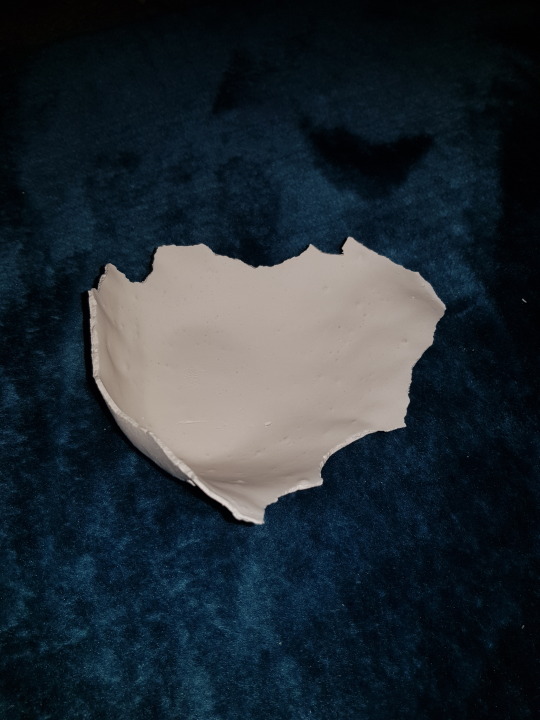
Photo
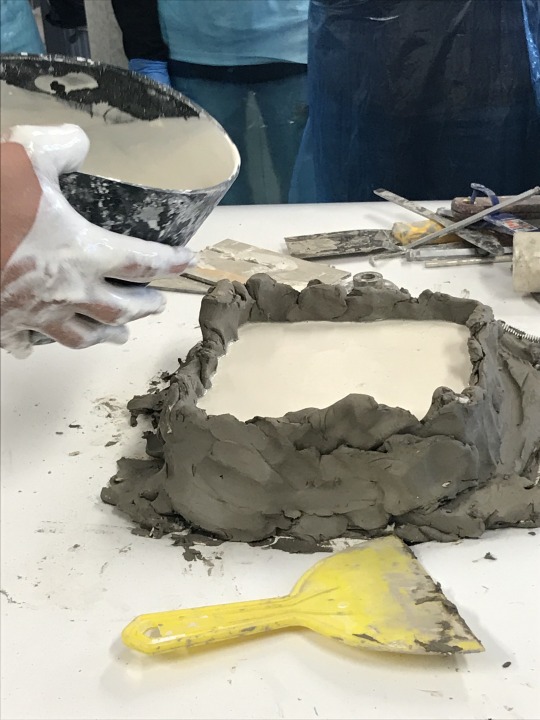


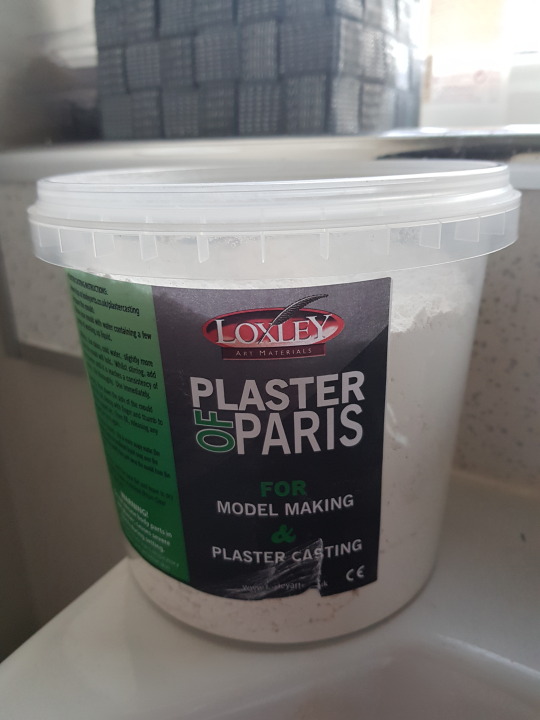
Introuction to cast and mould making workshop
This workshop explained the various materials that can be used for mould making, detailing the different properties and uses for each. We then were able to create our own casts using Plaster Of Paris. It is a cheap material that reacts with water and hardens. It produces a cast which is lightweight and hard, though can be broken easily if dropped. Marks are made in clay before the plaster is poured onto it, a release agent of fairy liquid and water is applied to the clay beforehand to it easy to remove from the plaster once it has dried. Further details of this process can be found in the technical journal.
Many artists use plaster for sculpture due to its versatility. Artist Alexsander Archipenko used plaster to produce geometric forms reflecting motion of the body. Rachael Whiteread uses plaster and resins to capture the negative spaces of everyday objects and structures. One of her untitled works is a cast of the negative space within the bookshelves of a library. I enjoyed looking further into the work she creates as it gives a physical form to something that we can’t actually see.
More information about Whiteread’s work can be found here: https://www.tate.org.uk/art/artists/rachel-whiteread-2319/five-things-know-rachel-whiteread
I liked the process of plaster casting as it was quick whilst still producing effective work. It could be a good way for me to convey my space as a 3D form, possibly exploring the idea of negative spaces.
1 note
·
View note
Text
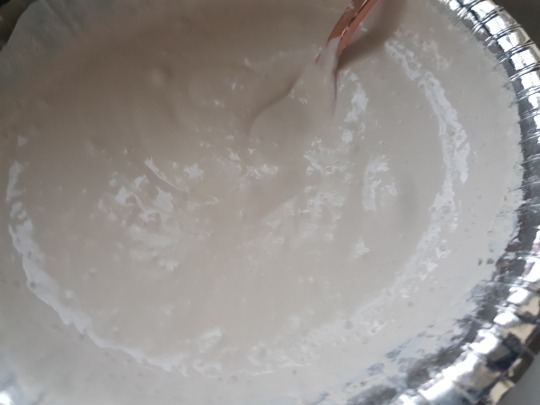
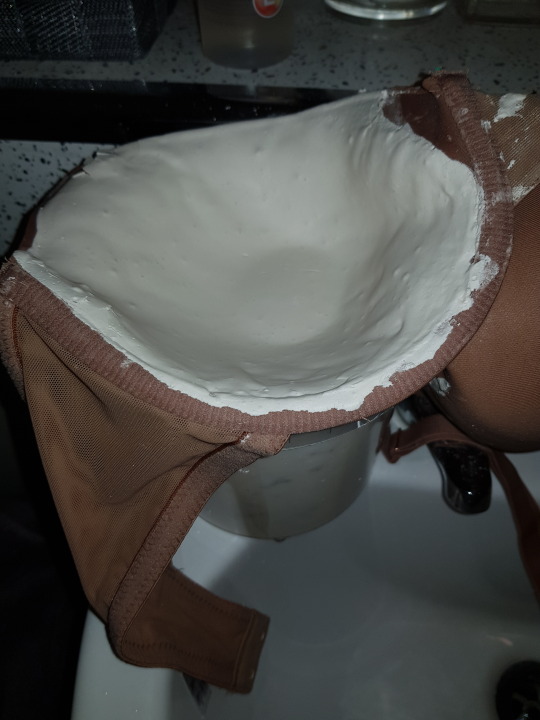
Plaster of paris
A tutor brought to my attention an artist who created casts from bras. Although I couldnt find this artist online, I was intrigued by the idea of using a bra to cast to bring my paintings into 3d form.
I participated in a workshop on level 4 which taught me how to work with plaster of paris. I mixed 2 part plaster to 1 part water to achieve a cream like consistency which I then poured into a bra mould.
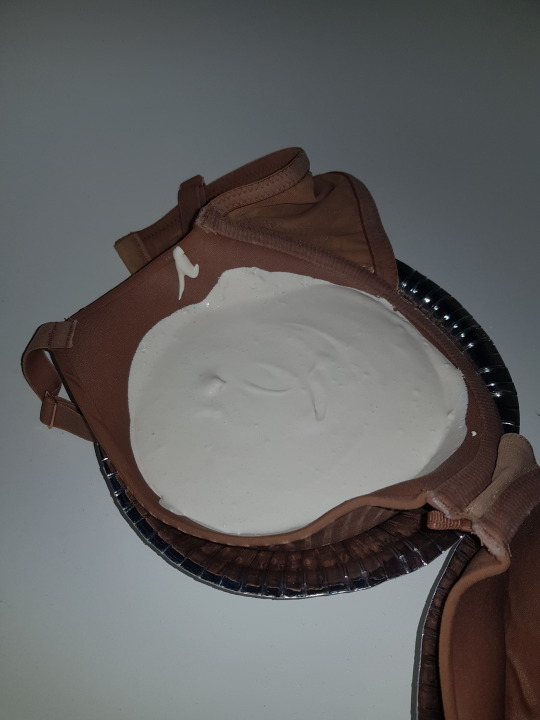
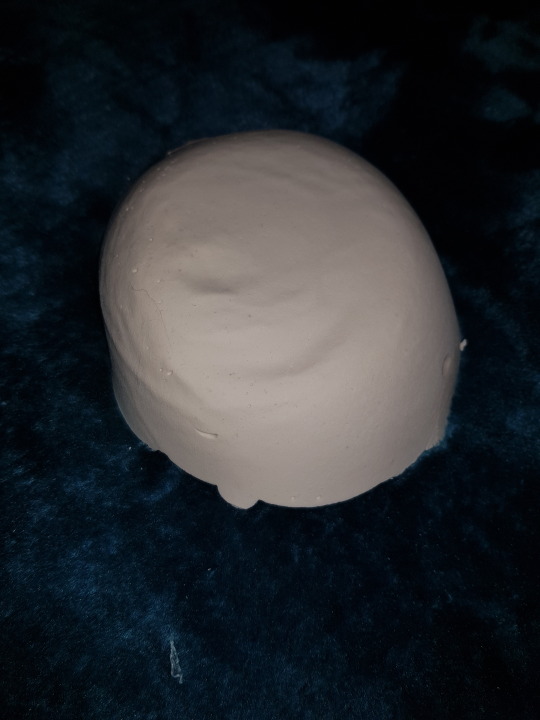
My first attempt was somewhat unsuccessful. The weight of the plaster in the bra on a flat surface caused the liquid plaster to spread out giving me a flat outcome.
For my second attempt, I chose to hold the mould so that it wasnt pressed up against a flat surface. This was successful in forming a rounded cast. However, the pressure from my hands squeezing the mould caused the plaster to set in a less boob like shape.
Based on the success of my second attempt, I tried hanging the bra. This was instantly unsuccessful as the weight of the plaster caused the bra cup to flip over tipping the plaster out.
Following this, I thought to place the bra in a bowl to keep the rounded shape. Again, this was unsuccessful when the weight of the plaster caused the bra cup to tip over again.
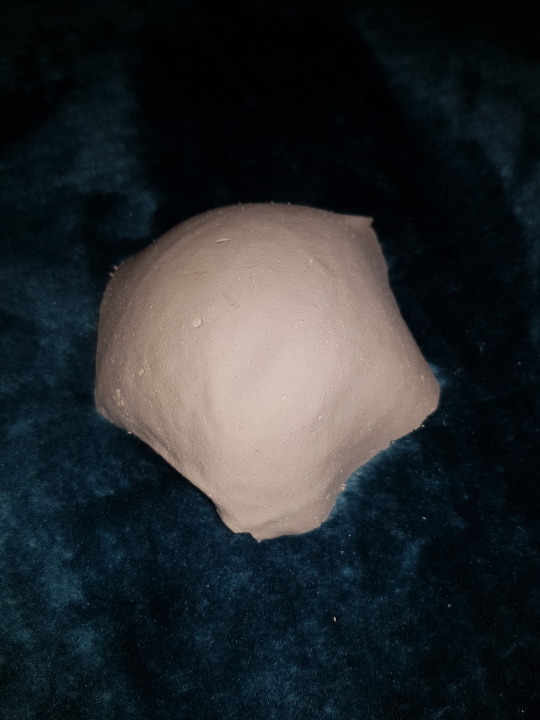
Although, this was a happy accident. In order to remove the wet plaster from the bra, I chose to allow the plaster set as it would be easier to peel off than try to wash off. The hollow form set faster than the filled ones.


Once dry, I attempted to gently peel the plaster away from the mould. This proved quite difficult as the thin layer meant that the edges cracked easily. In relation to my project, I thought this well represents words which are often associated with women: delicate, fragile.
The outcome was the most success of my experience as the shape of the form is most simmilar to a breast. And the connotations of the cracked edges give it more relevance to my project.
I also find it quite interesting that the pieces is much lighter than my other samples due to the fact that it is hollow - could this represent anything?
I rather enjoyed working with the plaster of paris and look forward to experimenting with how different paints react to the surface. Throughout the project I want to continue casting, maybe using other body parts.
1 note
·
View note
Photo


Book Making
I wasn’t expecting the book making workshop to be as easy as it was, using our cyanotypes that we had previously made to incorporate this into the book was really interesting. I think the colours go really well together.
1 note
·
View note
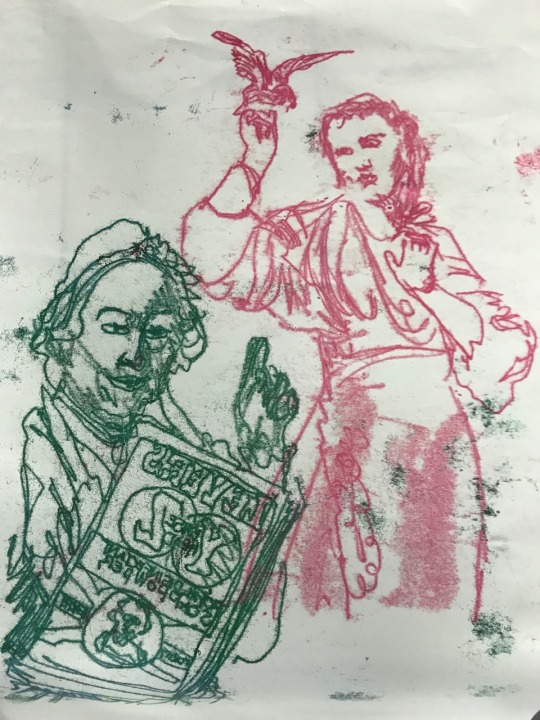
Text
In last week's etching workshop I had the opportunity to approach the technique in a very different way, involving many more steps compared to how I have etched in the past. However the complex process produced a print that I am very happy with, making it link into my painting.

3 notes
·
View notes
Text


Etching
2 notes
·
View notes
Text
My little sketchbook is starting to fill with things I've found inspiring and little sketches, this is the first time I've used a sketchbook this small and I have instantly become a huge fan! I'm able to keep it with me at all times for when I get a burst of inspiration whilst out or at home.
Taking notes, word association and collecting things is proving to be a great method of generating ideas, I don't usually allow much of my thoughts to be shown in my sketchbooks but doing this is wonderful for me to develop and grow ideas that I otherwise would have loved and forgotten
#inspiration#personal#art#studioculture#studio#fineart#techniquesandprocesses#abstractionandmateriality
2 notes
·
View notes
Photo
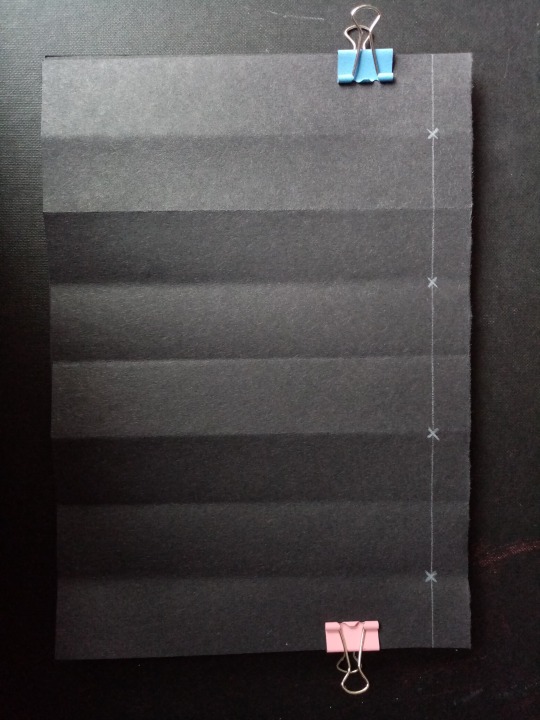
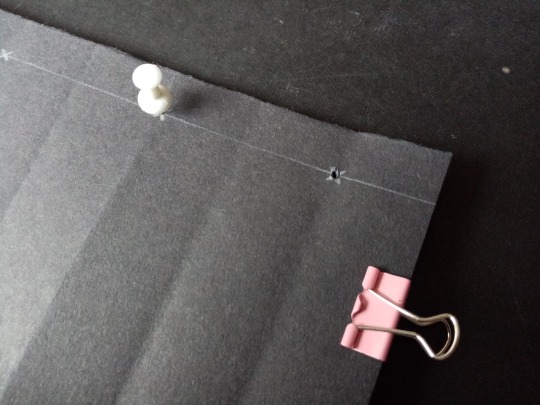

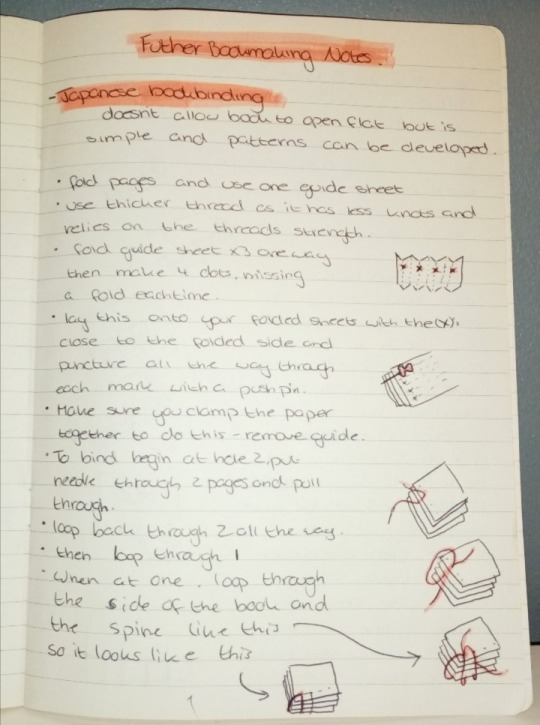


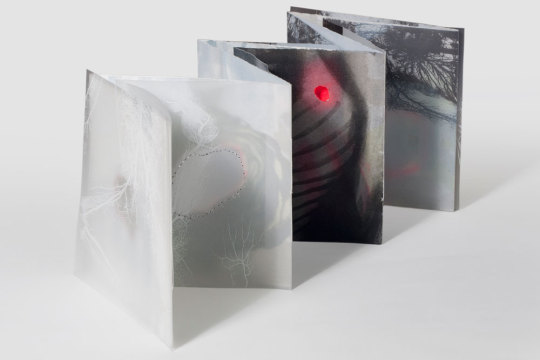
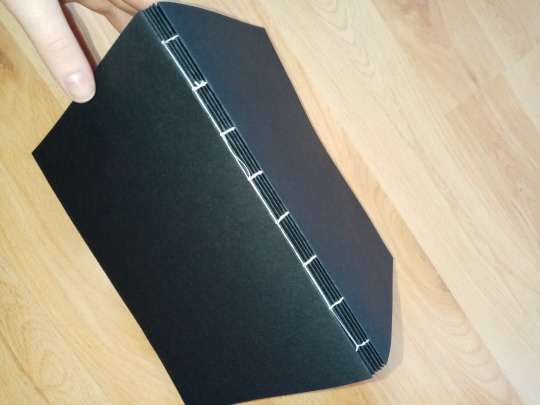
More Bookbinding
I really enjoyed making the previous book using a kettle stitch method and so I tried another method of bookbinding. This is a method I found online called the Japanese stitch.
I began by folding paper to allow me to make markings of even increments across the paper. I then placed this on top of my folded paper, which would be ideally folded using a bone folder but I didn’t have access to this, the pages, and pushed a push pin through each marked hole and through each sheet on the folded end. Then I removed the guide paper and help the sheets together using crocodile clips, and began the sewing process, which would usually be done with waxed thread but I had embroidery thread.
I found this method quite a lot easier than the kettle stitch, however, it was less effective in my opinion. With the kettle stitch, each page in the book could open up flat with ease, allowing the full page spread to be seen, with this method you had to fold the book on the seam to allow the page to be flat and the stitching took up a lot of page space. Despite this, I prefer the look of the stitching in the Japanese style. I don’t have my technical journal with me as is it still at University, but I made some notes on the process to later transfer to my technical journal.
The artist I have included in the last two posts in called Susie Wilson, her work usually surrounds the idea of the fragility of the body. She often uses transparent layers, much like skin, allowing partial vision through the pages, seeing different layers of the body, which I thought related to my topic well. She initially stood out to be because of her adventurous style. When I think about bookbinding, my mind goes to a practical object that can be used to store information, but her work pushes these boundaries and allows bookbinding to have a sculptural essence. Still storing information, and telling a story, but through more than a simple practical method.
1 note
·
View note
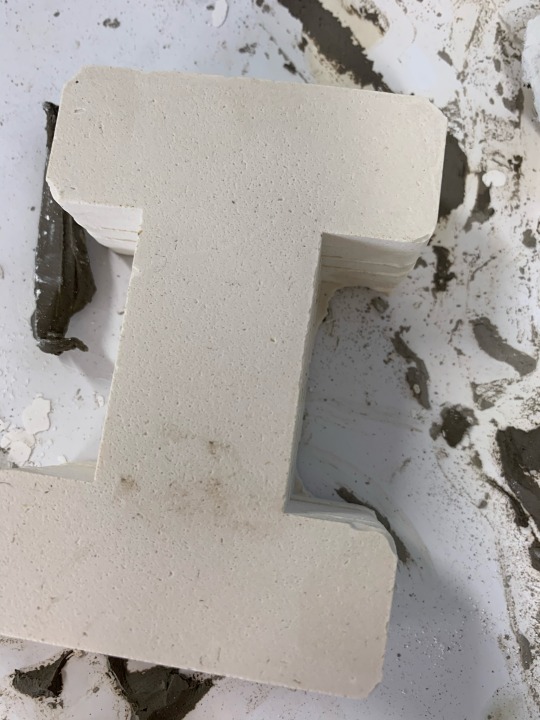
Text

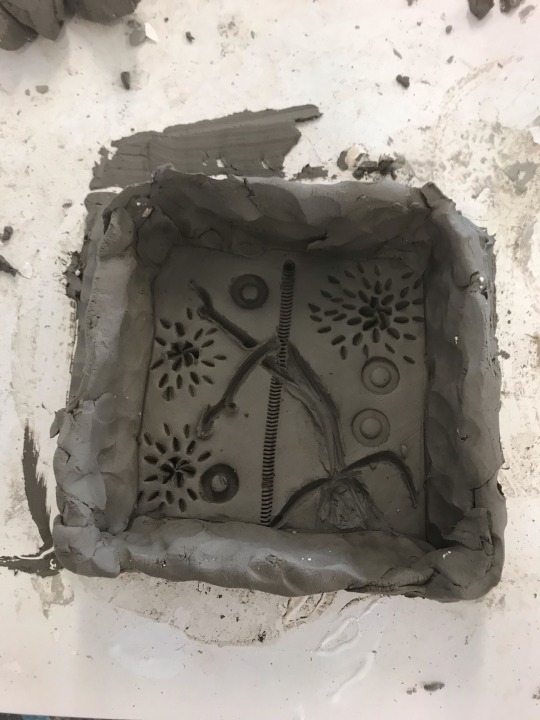
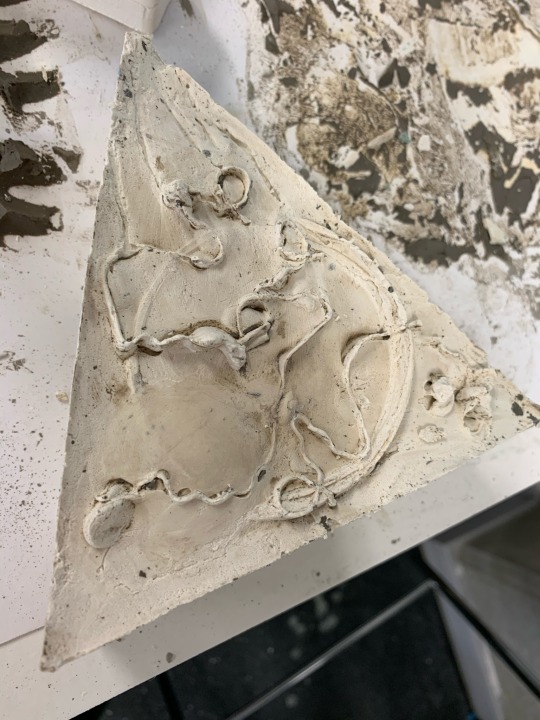
Today I had the Cast and Mould making workshop today using clay and plaster. I was excited to get started with this because I haven’t worked with cast making previously so it was a first for me. I wanted to create a piece that linked to my theme so I decided to use a pole pose as inspiration. I used different tools to create the carved marks like the end of a paint brush, a spring and various sized screws.

(Photo for reference to above paragraph).
Obviously my mould is not a realistic copy of the photograph 😂. But I wanted to get the general feel of the move and create a slight likeness, not to be realistic but much more abstract in a way.
I didn’t massively enjoy the process of creating it, mainly because of the texture of the clay and how drying it was on my hands however the outcome was worth it. I like how the plaster got into the grooves that were formed in the clay to create the 3D effect.

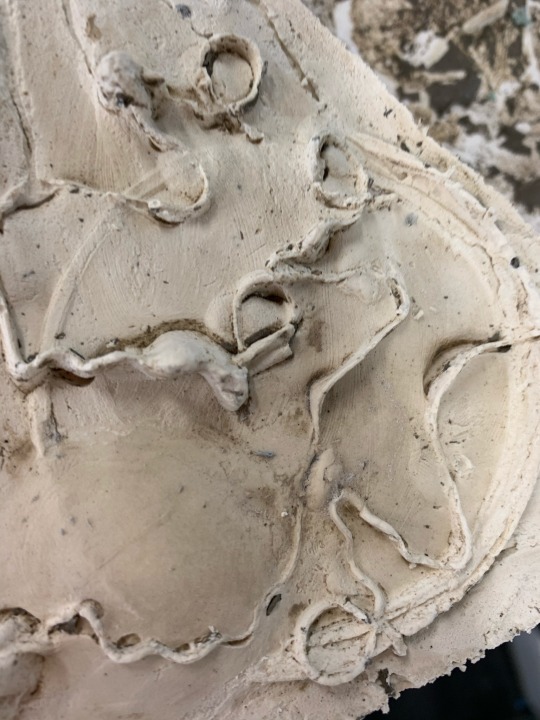
This was the outcome once the plaster had dried, I separated it from the clay and it left the imprinted pattern I had originally made. I plan on painting on top of this using bright colours to make it stand out a bit more because at the moment it seems quite plain and minimalistic - whereas pole dancing is the opposite.
2 notes
·
View notes
Text

Ephemeral Sculpture Workshop
1 note
·
View note
Text

My painting piece from the painting workshop with Brendan. This workshop was enjoyable for me after realising how to create tones in layers. Starting with the dark colours first, then introducing colour then the lightest tones lastly. This allowed me to work out of my comfort zone but also paint in the traditional way. I actually found that I ended up using less paint by painting in this structure in order to create my piece. This has taught me a lot about my practice within painting and something I use in my practice to date.
3 notes
·
View notes
Text


I think the laser cutting workshop has possibly been one of my favourite from this semester, I believe this to be because I had no prior knowledge of the process before the workshop and was amazed and how simple it is to create such complex things that can then be took further to create prints from etc. I intend to use this technique in my work as I feel as though it really fits, I have printed a landscape onto a log that I cut up myself, I also intend to laser cut 3 or possibly 4 pieces of log where the sun is gradually setting from each one to the next. I will then use them to create prints. The first artist I found when research this process in more detail was Mike Gould, I found him really interesting as he doesn't use the lasers to create cuttings as such, but instead more of a show this being something I wouldn't have previously considered as art and its always refreshing to develop new mediums to work in. Another artist I found was Jen Liddiard I found her really inspirational as she has her own shop and has gone on to make a successful business from the skill, she also mostly works in the medium wood which I think links well to my current practise so I am hoping to get some inspiration from some of her stuff.
1 note
·
View note