#techniquesandprocesses2
Explore tagged Tumblr posts
Visit Tumblr Blog
Explore Tumblr blogs with no restrictions, modern design and the best experience.
Last Seen Tumblr Blogs


Fun Fact
In Q3 of 2020, 31% of US users access the Tumblr app daily.
Photo


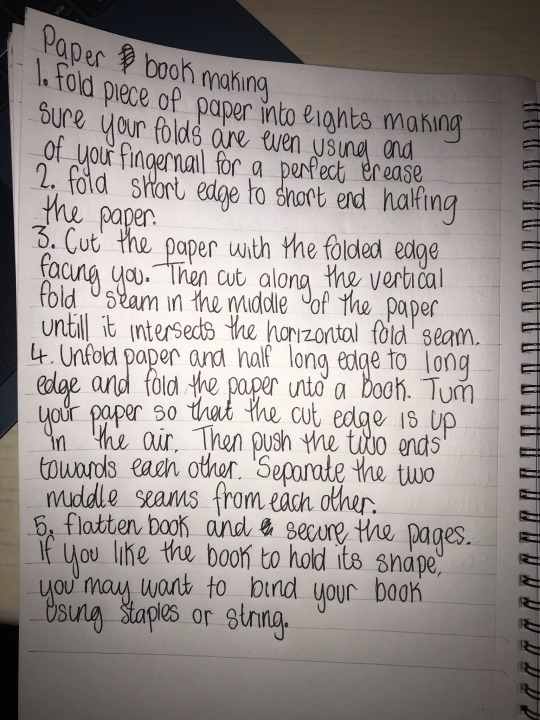
Bookmaking
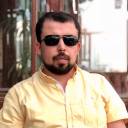
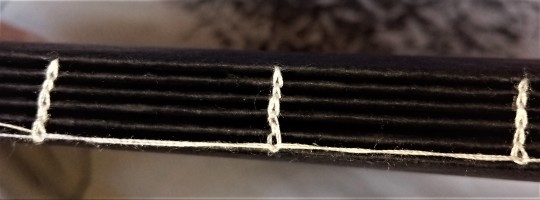
I was unable to attend the Bookmaking workshop, so I have looked online for some methods surrounding book making and tried my own at home. I didn’t have many of the correct tools such as a bone folder, cutting board or waxed thread but I created one without these, It will be less sturdy this way but I’d just like to follow the process. I followed a video of someone talking through the process of making a simple book using a Kettle stitch bind. This was a good method as it allows the pages to move easily and each page can open flat. I really enjoyed this process, although it was quite confusing at first, the method became more repetitive and simple. I believe what I have made here is a text block, as it doesn’t have a case, but I will look into further developing my bookbinding skills, using different stitch methods and possibly adding a case.
The fifth picture I included here is showing some notes and diagrams that I will add to my technical journal when I retrieve it from University. It explains the steps of how to create a kettle stitch. I was really happy with the final outcome, however, I ran into some issues later on as I hadn’t pulled the thread tight enough, I fixed this by taping it down, as seen in the fourth photo but I am aware this damaged the look of the book and would improve on this next time. I’m not able to produce a hardback cover at home but I would definitely like to try this when I have access to the materials.
5 notes
·
View notes
Text
BOOKMAKING
When you are creating your book in the workshop the items that you are going to need are:
Craft knife
Metal ruler
Bone folder
Paste brush
Book binding needle
Wax thread
Paper
Grey board
Book club
Cutting mat
3 HOLE PAMPHLET STITCH
Fold each folio in half to create A5 pages
Insert them into each other and create your signature
Fold the soft cover and place around your signature
Measure the registration sheet and measure the height of the book and find the centre
The divide by 2 to get 10.5cm the mark the unfolded edge of the registration sheet
Then measure and mark 4cm ABOVE the mark and 4cm BELOW
Then cut the thread roughly 1 and a half the height of the book
Thread the needle and stitch the book together by using the Japanese stop stitch
JAPANESE STOP STITCH
Measure 1cm line vertically from the edge
This will be the spine of the book and the line to see along.
Measure 1cm down from the head of the book and mark it
Measure in between these 1cm marks and divide the measurements and these will create 2 more sewing holes along the line
HOW TO CREATE A HARDBACK COVER
Cut the grey board the same size as your pages
Remember to check the grain of direction
Cut the cloth a couple of inches around the boarder
Paste and glue the board to the cloth and trim the cloth a ruler width.
Mark and cut a 45 degree angle where the corners are and then paste them down.
1 note
·
View note
Text
Pop Workshops
The second workshop with Laura that we attended was based around storytelling. This was a completely different form of art from everything I had already experienced. The workshop allowed me to be imaginative, making something from nothing and learning about description, vision and aesthetics. I felt there were no limits and it reminded me that's what art is all about. I wrote a story about a man called Gerald, who lived his life dressed in a baked bean suit and smelled of disaronno and Coke. This was something entirely different to everything I had already experienced at university and I loved it. Laura made us think outside the box and imagine a character who lived in the world based on a piece of art. This forced us all to think individually, creating crazy, insane, interesting worlds that were the products of our own minds. The idea of writing a narrative to go along with the piece of art is something that I feel deeply connects to my own work, as almost everything I create comes from a memory or story of my own life. this workshop was suddenly beneficial to me as I felt that it aided me in creating more of my own narrative based work as the semester went on.
1 note
·
View note
Text
Digital Media Sessions
In our digital media sessions we were introduced to new software and computer applications that can help us to grow our skills and techniques to use in our practices.
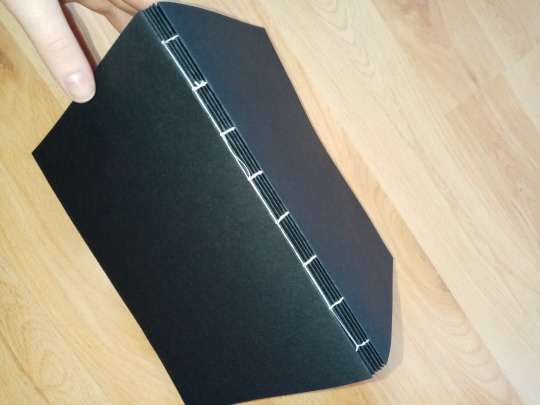
In the sessions we were introduced to Adobe PremierPro, at first I didn’t take much of an interest as we were working with film and I had completely disregarded using this in my practice. We were shown how to edit clips that had been provided and collage them together, we then further learnt how to arrange/change the positioning of a video clip on the screen.

Going into the second session, we were asked to bring our own video footage to edit. Still disregarding the potential use of film in my practice, I lazily only captures cars/traffic the night before and morning if the session.
However, in the session we learnt more about chroma key, colour balances and layering video. After using all this information and my own footage, I really liked the eventual outcome.
Although I did like the outcome, I don’t think that it is something that I will be using in my work in the near future. I would like to carry on learning and understanding the software by experimenting with different clips before I thought about using this as I am not too confident with the outcomes right now. However the option of using this is not a fully closed door.
1 note
·
View note
Text
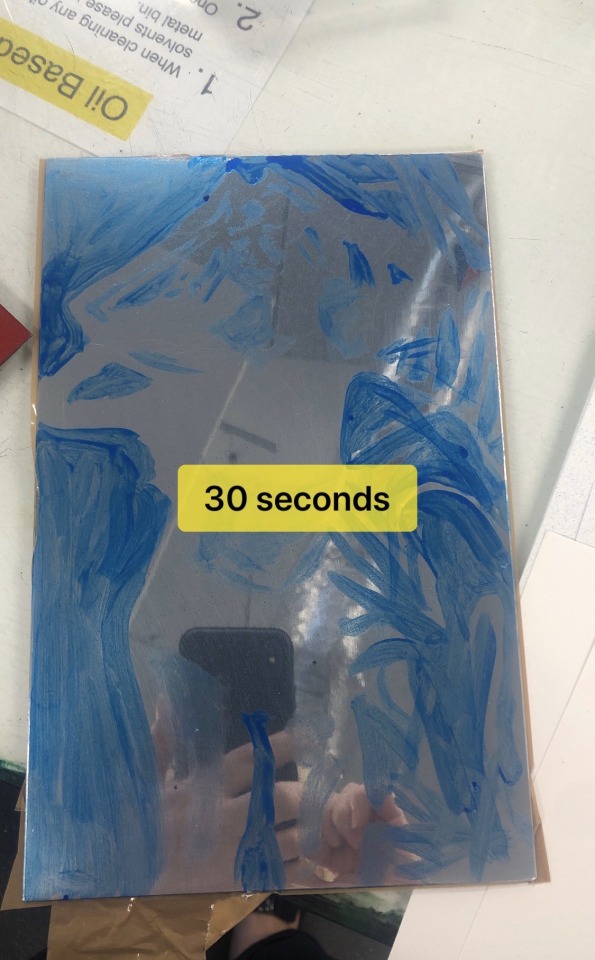
Cyanotype
Cyanotypes are printing process using UV rays and chemicals that can produce hyper accurate and sharp prints of your subject. The process dates back to the Victorian times, where it was used by botanists to document flower species.
The UV-sensitive solution is made by mixing two very fancy sounding chemicals together, ferric ammonium-citrate and potassium ferricyanide. The solution turns a shade of dark cyan, hence the name. To start your printing process you should coat your paper with this solution. You can do this in any way you want depending on desired effect, the solution can be used almost like watercolour. For an even coat, a sponge brush should do the job well. If there are parts you’d like to leave blank, like a border for example, masking tape is a good way to blank out these parts.
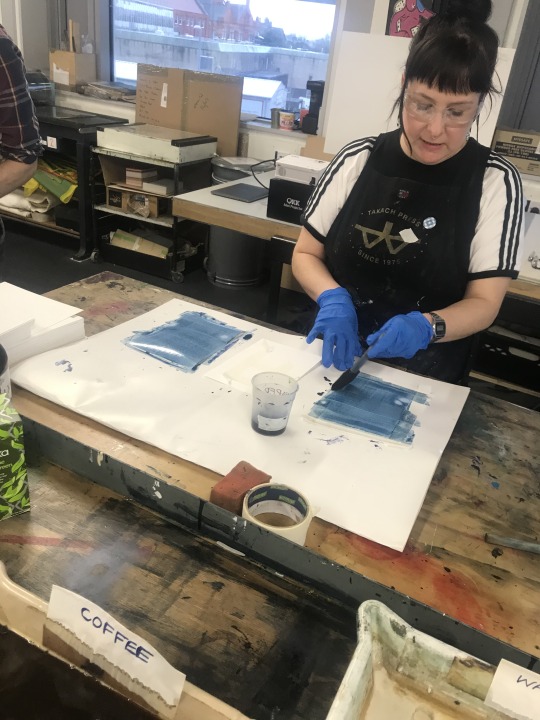
Now you will need to have on hand the subject of the print. If this is a photograph, you will need a negative of the image on acetate, like in screen-printing. Place the paper on the UV lamp and put the photograph/ object over the top, and allow 12 minutes in the UV box to expose the image.
After you have your print, there are a few processes you can utilise to add effect to your print;

Making sure to wash your prints in between, you can dip the prints into tannic acid, coffee, and sodium carbonate. Tannic acid dyes the print a plummy colour, coffee browns and sodium bicarbonate bleaches the print.
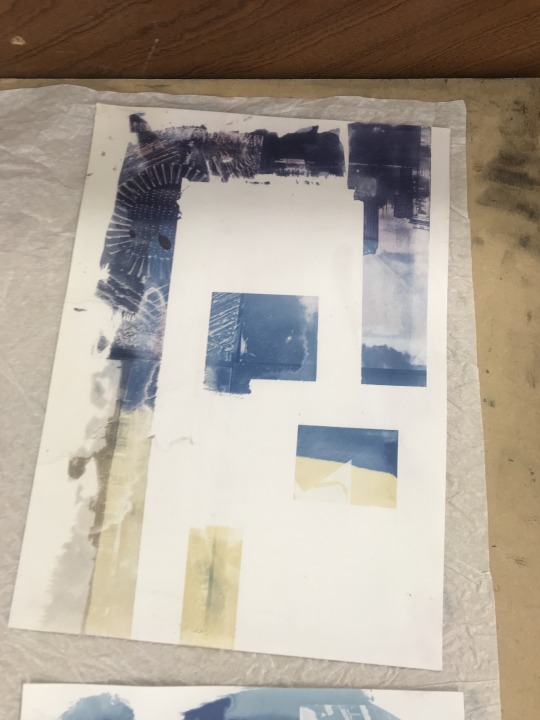
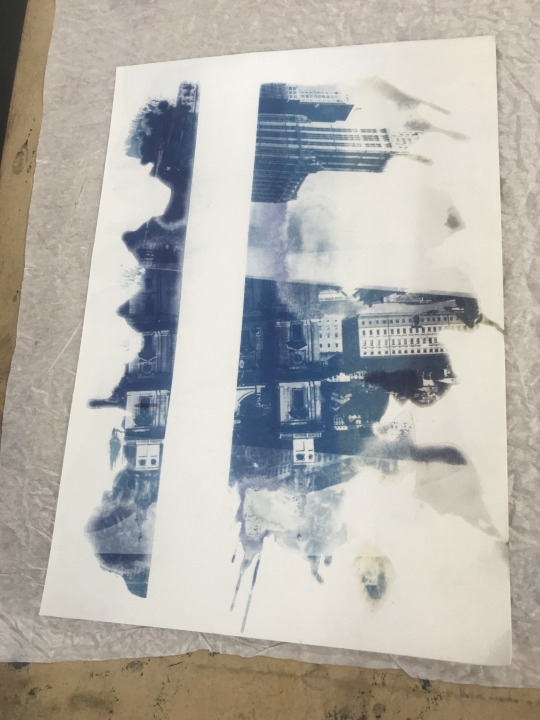
Overall, I am very happy with my prints. The main thing I got from this process was the focus on composition. I actually made more prints that I don’t have documented where I focused solely on arrangement of the small pieces of invert photographs in my own time. I also tried to hone in on simplifying my arrangements to focus more on minimalism. I felt I needed to do this because I have a tendency to add more on top of my works in an attempt to make it better, yet my best most effective works are also the most simple. I really enjoyed the more calm compositions I came out with the second time, and it really helped me.
1 note
·
View note
Text
Contextual Research - Diedrick Brackens
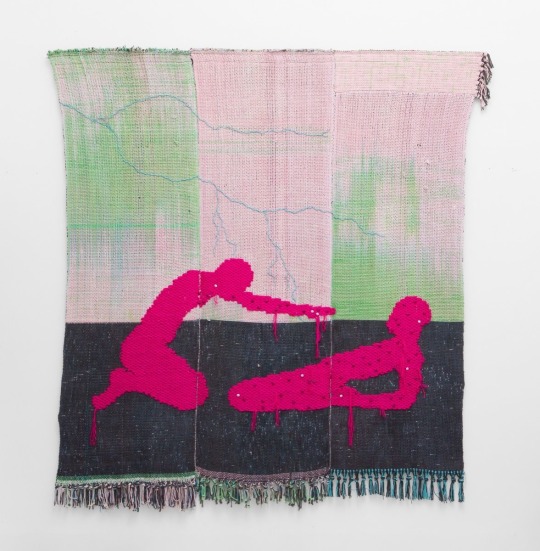

Diedrick Brackens is an American artist who specialises in creating large scale weaving using what looks like a varied choice of coloured thread or yarn. It is probably less likely to be yarn as yarn has a chunkier appearance and looks softer. Brackens created his work from his own perspective and his own experiences from his life growing up as a black, homosexual male. The way he does this in his work is so simplistic but also so striking at the same time, I think this is due to the message and the aura which exudes from his work.
Like many of his creations, the first weave is so simplistic yet it still leaves me wondering the possible meanings behind it. My initial reaction was that it seems one figure is bowing down to the other, like recognition for something. Although after looking at this more intently, I realised it could have been the polar opposite. Maybe the figure kneeling is trying to reach out to the figure on the floor but he is pulling away and is not interested? This makes me think that his work is personal to himself but at the same time, it can be relatable to the viewer in some way however they interpret the piece of artwork.
The second weave in comparison to the first one shown above, holds a lot more detail, which is shown in the tree, where there are branches which come outwards. My first thought when looking at this image was that the figure was
1 note
·
View note
Text
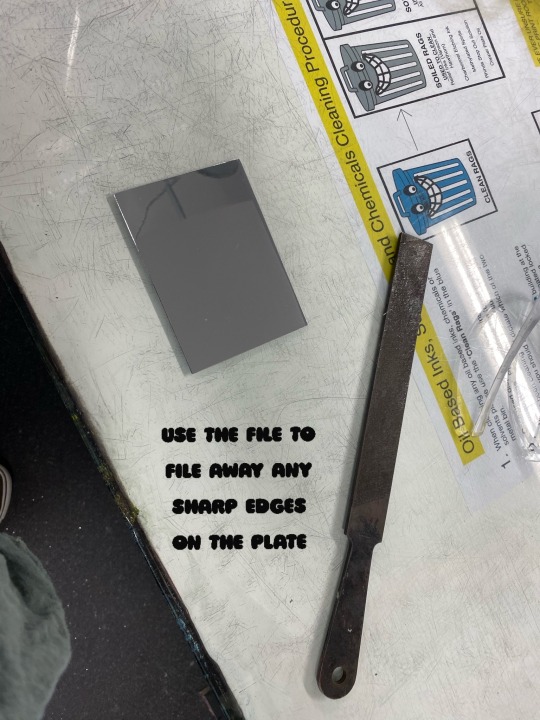

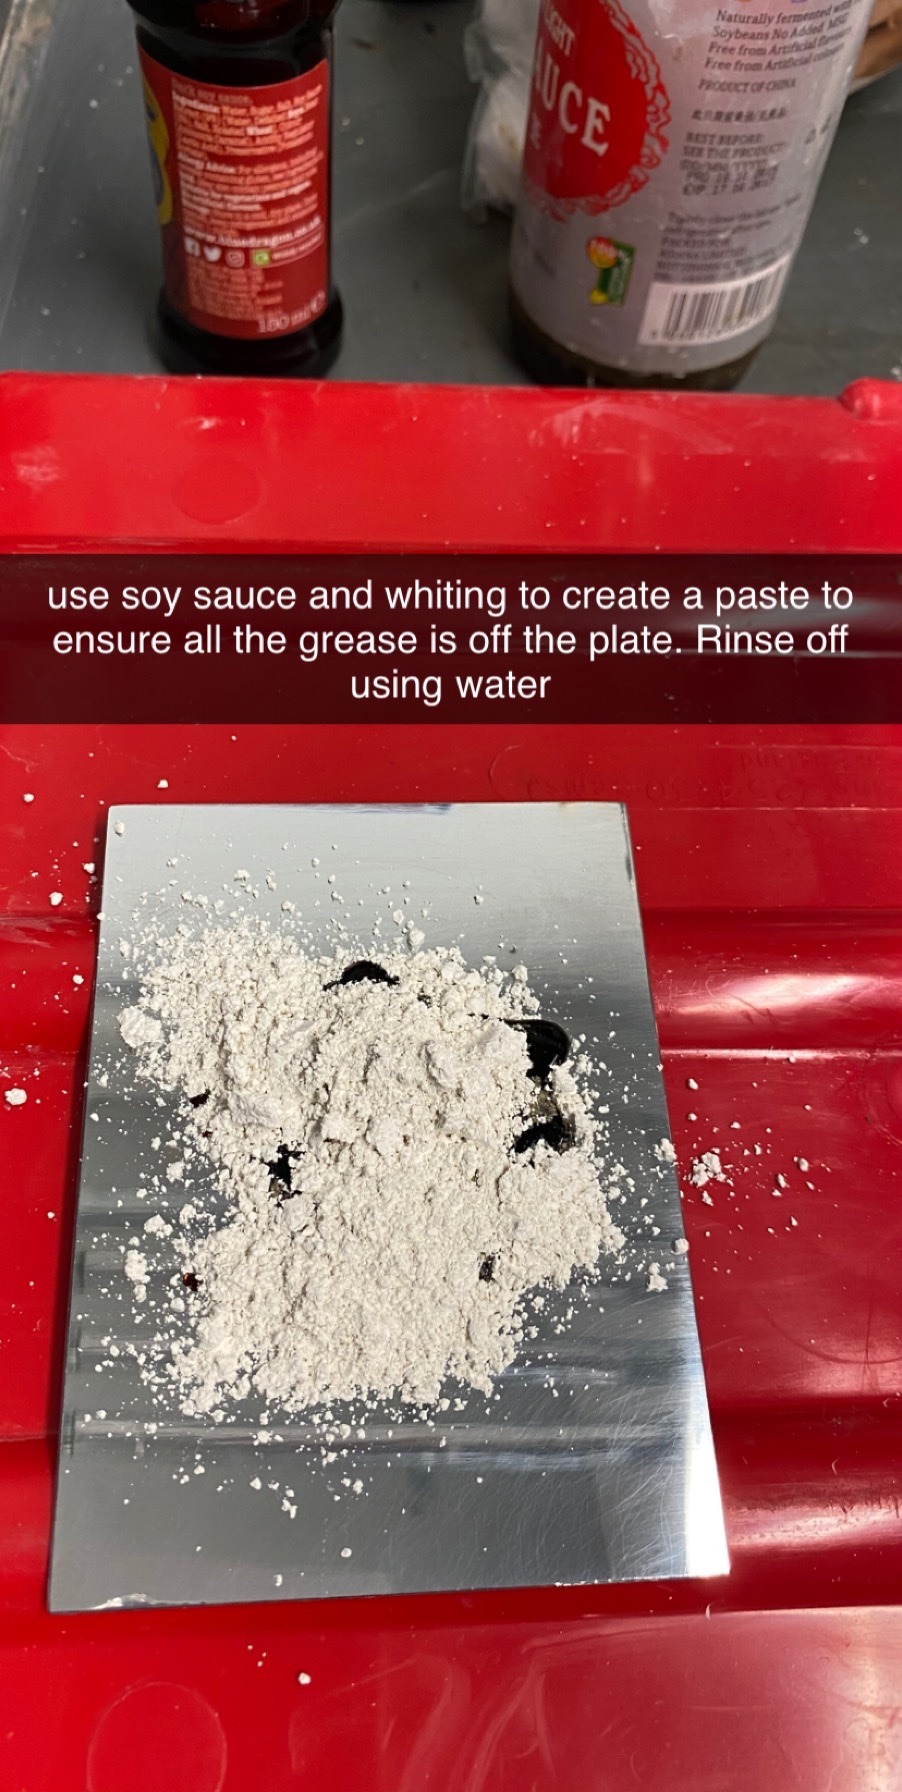


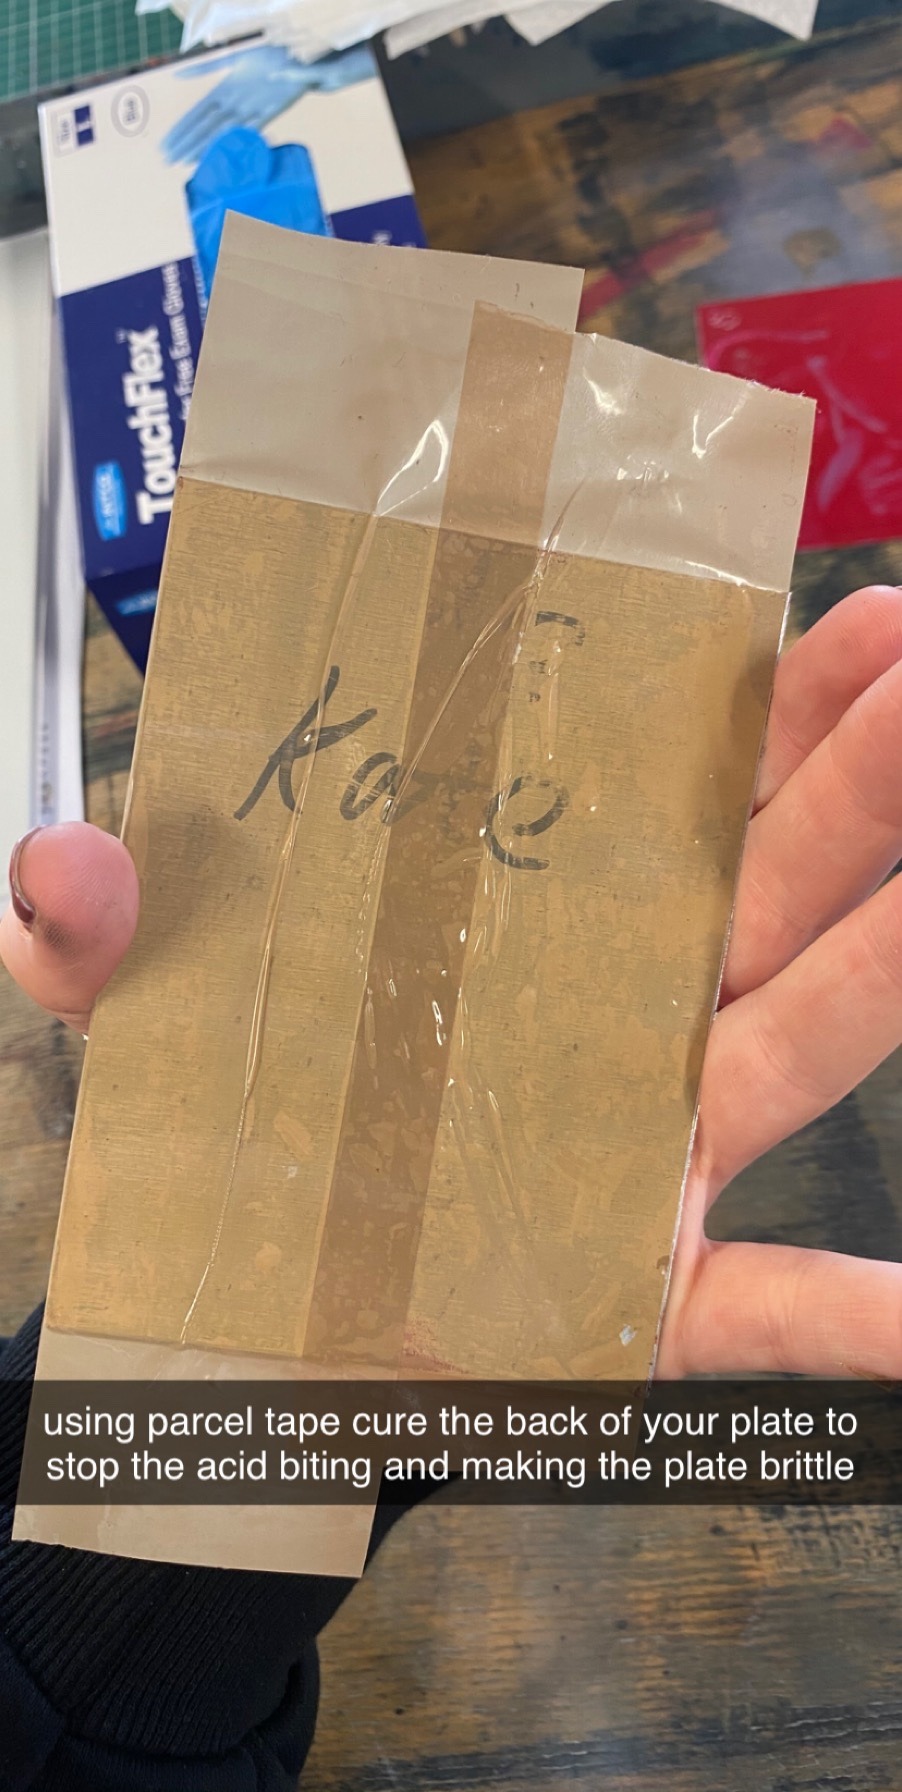

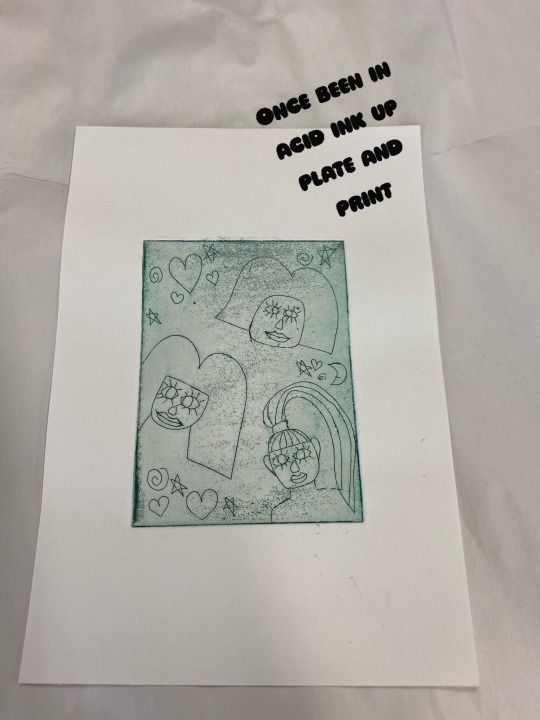

Etching: Hard ground
I attended the etching workshop. In this workshop we were using hard ground meaning that we cured the plate before the etch. I really enjoyed using this as a technique as i felt it was very therapeutic as we almost carved out our designs. We then soaked the plate in copper sulphate for about 7-8 minutes and rinsed it with water this removed any residue. This technique i feel is a very long process but i actually really enjoyed the etching procedure and i hope to use it again in my work!
1 note
·
View note
Photo


Thomas Mailaender (cyanotype research):
I wanted to research Mailaender’s work because I feel like his use of photography captured within his cyanotypes are very interesting and he is able to explore a range of themes due to combining photography with cyanotype. This is inspiring to me because it produces a different aesthetic to just using photography on its own and makes it look more varied alongside the rest of your work. I’m strongly influenced by Mailaender’s work because this is a technique I want to use for when I next create cyanotypes.
2 notes
·
View notes
Text


Here I research the steps and steps for illustrator, weaving, paper bookmaking and papermaking. I have researched the workshops I can learn at home and understand well whereas some workshops I haven’t researched for example lasercutting as it’s impossible to learn how to use a certain laser cutter without the laser cutter.  I am very glad I have researched about these workshops at home as working independently takes pressure off learning and experimenting.
0 notes
Text
Stop frame animation
Stop frame animation is also known as stop motion. It is an animation film making technique where real life object on a screen are manipulated to make an illusion of movement using the technique of taking photographs. This is done by playing back the sequences of images which are played back rapidly which created the illusion.
When a film camera takes photos, it takes a serial of individual pictures, on average it is usually between 24 and 30 per second. When you play back the images with fast speed one after the other, it gives the illusion of continuous movement as the human eye cannot keep up with the speed of the images. To create a stop motion movie, you start with a photo. After photographing the object, you slightly change the position of what the object was in and take another photo. You repeat this process and once all the images are played back together, the images will look like a movie. This process does take a lot of time as you need a large number of images to create a short film.
Process
1. Planning. When starting it is important to have a clear mind set and a plan of what you want to shoot and achieve. You can animate a few objects or you can capture a live time lapse depending on what you want your final outcome to be.
2. Managing time. Always be considerate about how long you want your video to be as these shoots can take up to hours of taking photographs with frames and the video will be very short. An hour shoot with over 1000 shots can produce under 30 second short film.
3. Setting up. For shooting you will need a camera that is capable of taking images with full manual control over the settings. Manual mode is one of the main setting you will find on most cameras which allows you to manually control shutter speed, aperture, and ISO. These three settings work together to control the how bright or dark your photo is, as well as change the overall look of the image. DSLR’s are good with the manual setting. To set your first position, set up your camera’s expose and focus directly on your subject and make sure you spend your time setting up exactly how you want it so you don’t have to reshoot.
4. Creating. To start off take one or two shots of your first frame so you can alter the position to your liking. Depending on your preference of how many frames you want per second, the size will determine the affect of smoothness and speed of the movement. The shorted the distance the smoother the video.
5. Editing. Once you have shot all the frames and are happy with the amount you have got, you will need to edit your video. When you have edited the video, remember to set the timeline to 25fps known as frames per second. You can use whatever frame rate that suits your work best. Set your image length to 1 frame and adjust to your preference.
0 notes
Text
WORKING WITH PREMIERE PRO
In the workshop with Steve I was working with the programme premier pro. Last week in the session I learnt how to use the programme to create edits with clips that we were given in the workshop lesson, however in this session we were to come in with our own videos that we could use to edit and work with. As I have been influenced in my work with the Natural world, I decided to film the outside world which included bushes and moss growing on a stone wall.
Reflection
Working with computers isn’t what I’m used to and I find it difficult, however I have enjoyed working with Premier Pro more than other programmes that I have been introduced to in past technique and processes workshops. I also enjoyed using my own video clips in this workshop rather than using ones that we were given, because I felt like it gave a more personal feel to the workshop.
1 note
·
View note
Text
Pop Workshops
The first pop workshop that we had was centred around collaging, you're introduced us to artist Richard Hamilton, I loved his work and found collaging incredibly therapeutic. The idea of making something out of what you have to hand is something that I used frequently in lockdown to experiment and manipulate my available materials. I was then able to take my collages to Photoshop to further experiment and distort them. Here are some of the images of what I made in the first collaging workshop, and how I manipulated them further.


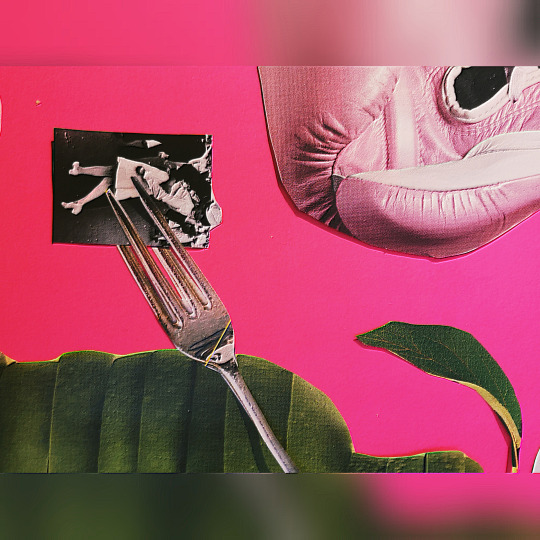
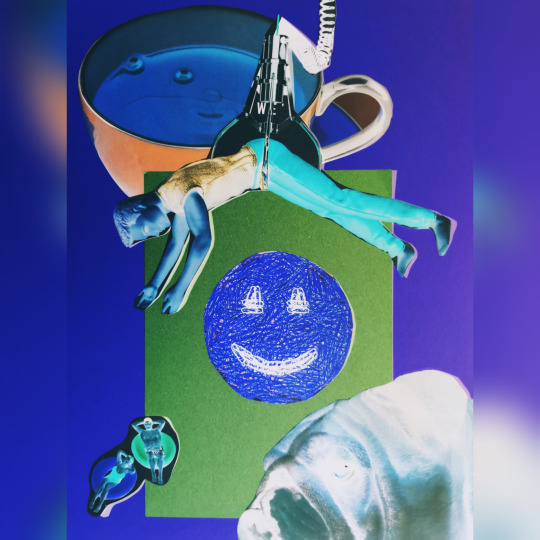

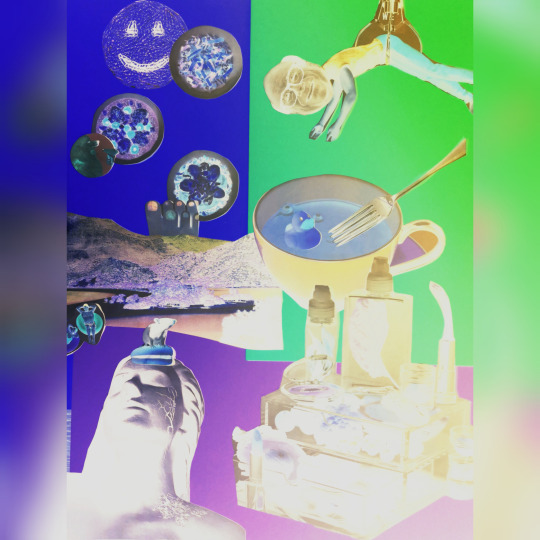
As you can see, collaging is something that I feel I thrive in. Not only do I love the original collages, but the edits that I go on to make from them. I find that by manipulating and distorting an original image, you often find yourself creating something you never even thought you could.
1 note
·
View note
Photo
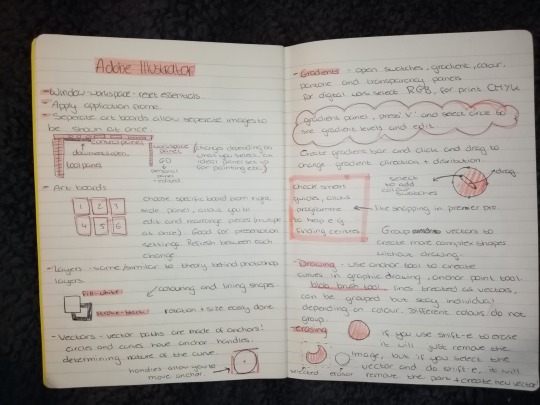


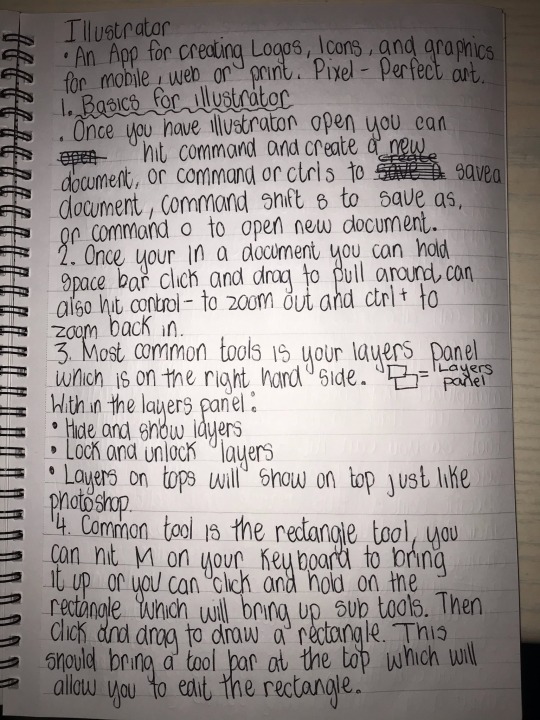
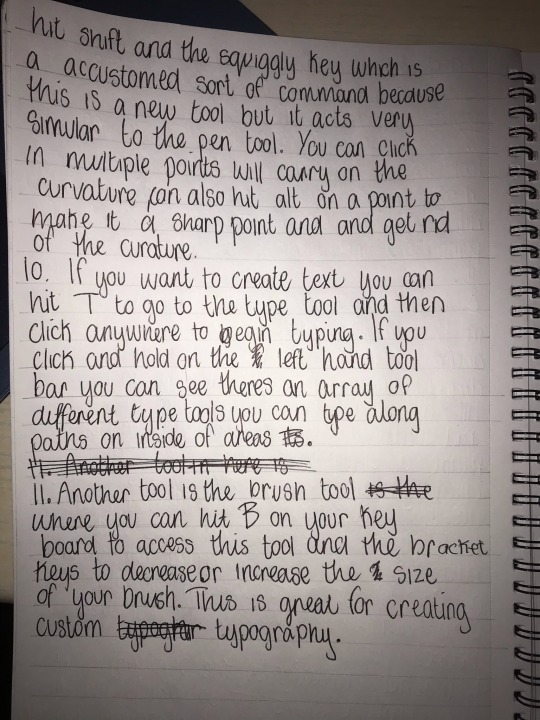
Adobe Illustrator
https://www.pgsd.org/cms/lib07/PA01916597/Centricity/Domain/202/illustrator_for_beginners_tastytuts.pdf
This is a file containing links to all the videos I have watched and made notes on surrounding Illustrator. I haven’t had a lot of experience on this programme so I decided to start from the basics and after looking through many guides, I found this one to be the easiest to follow and went into the most depth. It ranges from opening a document and saving, to drawing and colouring and customising your own design. I did enjoy following this and my confidence in using the programme has definitely been raised by following his guide, but I think I could improve my skills on this in a physical session as I am quite unfamiliar with digital art making. As I do not have my technical journal I have made notes and steps on how to use the programme and will transfer these to my journal when I can. I enjoyed using this programme the more I got used to it and I also think that being taught how to use Photoshop previously had really helped in using the tools and the format of everything. Some parts I particularly enjoyed in this process was learning how to create and custom brush stroke, moving and dragging anchor points, and learning to accurately trace a physical drawing to a high quality.
In the PDF was this chart which shows common shortcuts to some of the actions that are used most so I found this really helpful.
#techniquesandprocesses#techniquesandprocesses2#adobeillustrator#illustrator#digitalimages#digitalediting
0 notes
Text


Here some examples of equating process, I became interested in the aquatint process; mainly because I saw the work of Paula Rego, paintings and engravings by famous artists, she manages to combine the fury of tenderness, these forms of poisoning with stories of aquatint convey an image of several levels of depth, as with screams and excruciating torments. With this in mind, I began to study how to take a fundamental step, even in the etching process. Given my minimum knowledge of etching, I would like to practice further and try to include etching elements on a plate next time. Unfortunately, I can’t provide photographs of the finished image in the view of not having it. Printing technique in which a metal plate is first covered with an acid-resistant material, then worked with an etching needle to create an intaglio image. The exposed metal is eaten away in an acid bath, creating depressed lines that are later inked for printing.
”As the latest of the engraving techniques to be discovered, it was not until the turn of the century that it came into vogue, and only then imported into England. It was then used most extensively for books, especially for the topographical books which became so popular. Along with etching, this is the engraving technique most favoured by painters from Goya onwards. The artists using this technique work on a grained ground produced by powdered resin. The result is a faintly dotted texture much less insistent than stipple, and much more successful in producing tone. Aquatint plates were often touched up or colored by hand.”http://www.umich.edu/~ece/student_projects/pamela_illustrated/techniques.htm
0 notes
Text
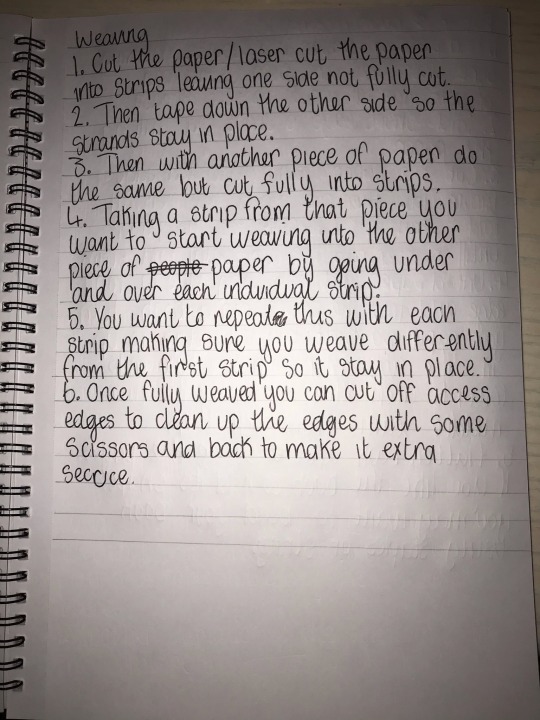
Weaving Workshop

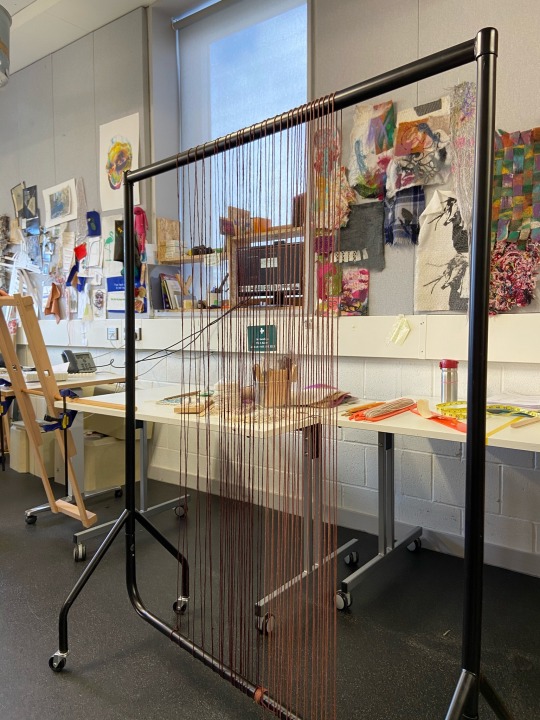
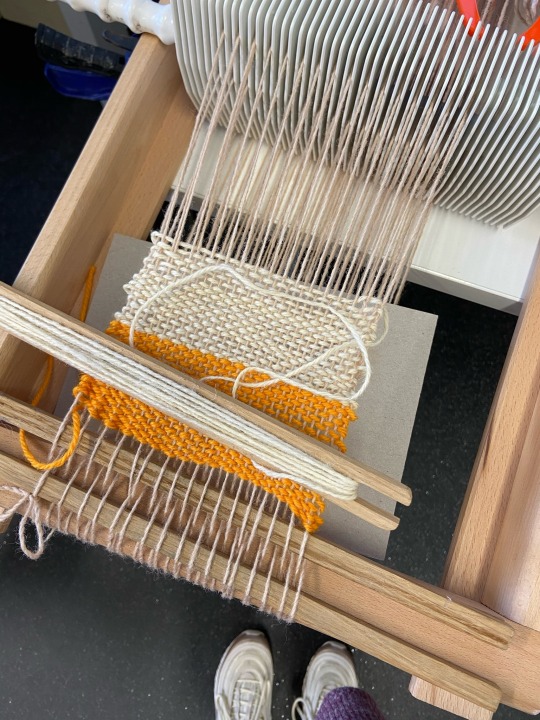


These are from the weaving workshop which I attended on the 25/02/2020 with Sue. Sue showed us the basics of how to actually set up the weft and warp ready for the actual weave which at first, I found quite difficult to get my head around but after a few attempts practising it became quite straight forward. The weave that I found the easiest to actually set up was on the clothing rail because it was just a figure of eight movement in comparison to the vertical tapestry frame where we had to go around a middle pole.
I really enjoyed learning how to weave and creating the frame for it, I feel as if this has opened up my ideas for my studio work because I felt as I was a bit stuck on what to do next after making my wraps. I now want to explore the experimentation with weaving further, probably smaller scale pieces first to get the hang of weaving and trying different techniques like the plain weave and maybe even the basket weave when I build my confidence.
1 note
·
View note


