#teddii's discourse
Explore tagged Tumblr posts
Visit Tumblr Blog
Explore Tumblr blogs with no restrictions, modern design and the best experience.
Last Seen Tumblr Blogs


Fun Fact
If you dial 1-866-584-6757, you can leave an audio post for your followers.
Photo

(unofficially titled: how to change the grey wall)
As a thank you for reaching 2.5k followers, I thought it was about time to stop being lazy and do a gif tutorial as it has been frequently requested. Hopefully, this will help anyone who wants to start making gifs as well as anyone who wants to understand how to create colourings!
What You Will Need: - Photoshop (I use CC) - A source video
What Will Be Covered: - How to get the video - Timing, Resizing & Cropping - Sharpening - Colouring (and how to achieve extra af colours) - Subtitles - Saving your gif
This is going to be very thorough and informative (to the best of my ability) so all the information on how to make gifs is below the cut! As a disclaimer, you can use any version of photoshop for this.
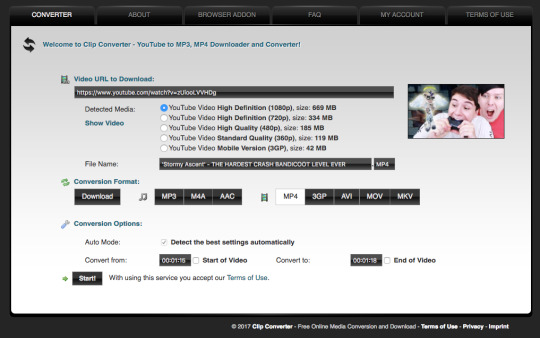
1. Getting the Video.
For this tutorial, I’ll be using a random clip from Dan & Phil’s crash bandicoot video. There are a lot of different methods to download a youtube video but I prefer using clipconverter. When downloading a video, you want to get the highest quality available (always try to get at least 720p). I used the download settings shown below:
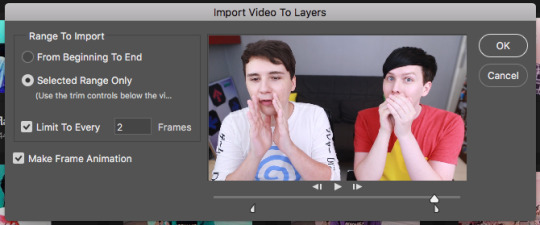
Once it’s downloaded, open up photoshop and import the video. To do this, go to File > Import > Video frames to layers. I use the settings shown below. (I had to trim the video slightly to only include the part I wanted)
Now that your video is imported, make sure your workspace looks similar to mine (the timeline section is the most important thing for gif making. you can add it from the window menu).

2. Timing, Resizing & Cropping.
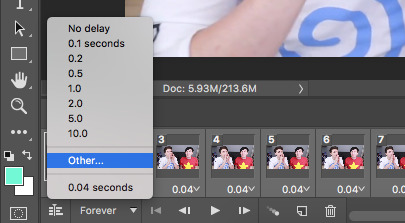
Timing is super important in making sure your gifs aren’t too fast or too slow. To alter the frame rate, select all your frames (shown at the bottom of your workspace) and then click on where it says 0.04 change the speed to 0.09.
After that, we have to change the image size since it’s currently way too big for tumblr. To do this, go to Image > Image size and change it to the settings shown below. 540px is the current optimised sizing for tumblr although 268px is used when making gifs that will be displayed in two columns like this.

Cropping is an optional step that I sometimes do as a way to make the file size smaller/for the aesthetic. Youtube videos have a default ratio of 16:9 and to alter the ratio you just use the crop tool and change it to what you desire. side note: I often use the cinematic ratio of 2.35:1 (i used it in this tutorial’s header).
3. Sharpening.
Sharpening your gifs is essential to making them look clean and crisp. Below is the difference between what our current gif looks like with and without it:
Without:
With:

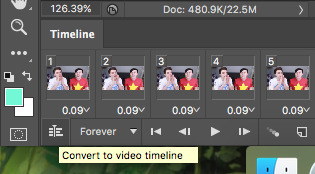
As you can see, the second gif is way more crisp and defined. I use this action to sharpen my gifs (Full details on how to use it can be found in the link.) Once the action is finished, I then convert the frames into a video timeline by pressing the button in the bottom left:
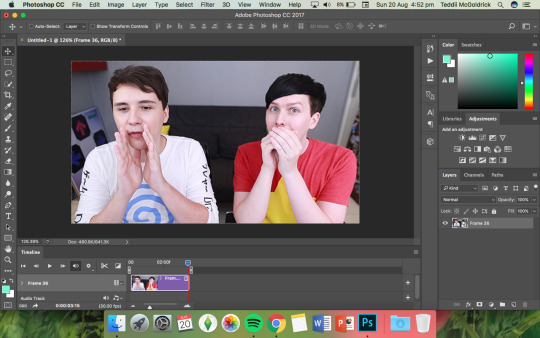
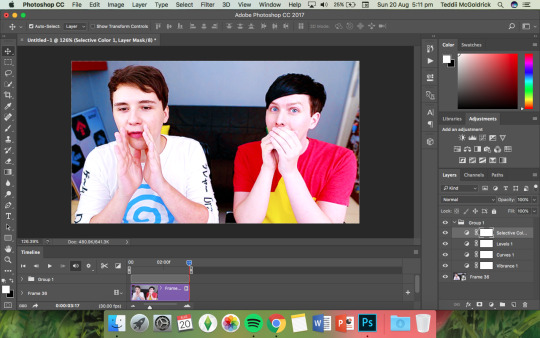
I then select all the layers, right click, and convert to smart object. Now your workspace should look like this:
4. Colouring.
Colouring is by far my favourite part about gifmaking and the reason why I made this tute (questions about colour have always filled up my inbox so I hope this answers some of them). I’m going to show you how to make the same bright blue colouring that I used for the header!
I’d like to start by saying that I never took art or design classes so my knowledge on why adjustment layers do what they do is very minimal. I pretty much learnt how to colour by playing around in Photoshop so this is just a disclaimer about how there is probably an easier/proper/more informative way to do this.
I didn’t particularly know how to explain half the settings so some will be accompanied by screenshots while others will just have descriptions (I really hope it makes sense because heck, my colouring method is chaotic).
Firstly, we want to make a new group to put the adjustments in so to do this you go to Layers > New Group... and make sure the mode is set to pass through.
To create colourings, I use the following adjustments: - Vibrance - Curve - Levels - Brightness/Contrast - Selective Colour - Hue/Saturation - Colour Balance (occasionally)
Vibrance: I almost always make the vibrance +100 (I don’t alter saturation)
Curves: how you make a curve will differ with every video but for this gif I set my curves to this

Levels: it does a similar job to curves tbh
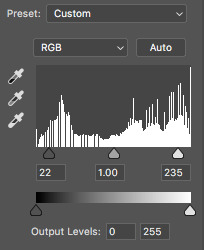
Brightness/Contrast: I chose not to alter it for this tute.
Selective Colour: now this is where A LOT of adjustment is going to happen. I found this section the hardest to explain so I apologise in advance. I tend to heavily alter cyan and blue.
Since we have the ability to alter red, yellow, green, cyan, blue, magenta, white, neutral, and black, I’ll write the specific adjustments I used instead of adding a lot of pictures to this already massive post. But this is what selective colour looks like:
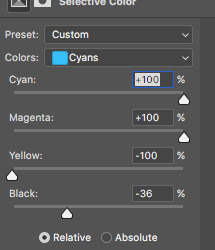
Reds: Cyan -34, Magenta +5, Yellow +8, Black - 7 Yellows: Cyan - 37, Magenta -31, Yellow +35, Black +14 Cyans: Cyan +100, Magenta +100, Yellow -100, Black -36 Blues: Cyan +100, Magenta -65, Yellow -100, Black -26
Now this is what it should look like after adding all those adjustments:
Yes, it is slightly blue but not THAT blue. We then have to add a second selective colour layer with these settings:
Cyans: Cyan +100, Magenta +15, Yellow -100, Black - 8 Blues: Cyan +100, Magenta -21, Yellow -100, Black +15 Blacks: Cyan 0, Magenta 0, Yellow 0, Black +20
(more selective colours will be added later because I’m extra)
Hue/Saturation: This a neat adjustment where you can turn one colour into a completely different colour. For this gif, I chose only to adjust the colour blue with these settings:
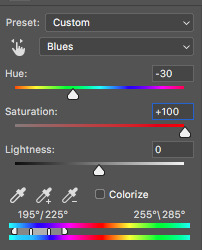
Now you’re probably confused at why it looks so noisy but don’t worry! We’re going to fix that (this is where it gets kinda tedious. Feel free not to use the hue/sat adjustment if you want to make your gifs quickly. I wanted to make this tutorial super in depth hence why it’s about to get problematic)
Selective Colour (Again): You now have to create a 3rd selective colour layer and place it under the hue/sat layer before using these settings:
Magentas: Cyan +100, Magenta -100, Yellow +100, Black +79 Cyans: Cyan +100, Magenta +100, Yellow +5, Black 0 Blues: Cyan +100, Magenta -16, Yellow +100, Black -47
Your gif should now look like this:

Some noise will still remain and we’re going to fix that by erasing some of the adjustment layers! You may notice that the far right behind Phil looks messy so, with the erasure tool, erase that area on the hue/sat layer.
There is also some noise/unwanted colour on the lounge and Phil’s hair so I did the following:
I erased the area of the lounge on selective colour 1, 3 and hue/sat and I erased Phil’s hair on selective colour 1,2,3 and hue/saturation.
Now your layers should look something like this:

And that’s it for the colouring! Erasing the messy bits isn’t always necessary although in this particular case I had to. Protip: If you don’t want to make a colouring from scratch you could always use a pre-made psd!
5. Subtitles.
This gif doesn’t require subtitles but for the purpose of this tutorial, I’ll teach you how to do them since they’re an essential aspect of gifmaking! Every gifmaker has an individual preference on how to make their subtitles so this will be just an insight on how I do mine.
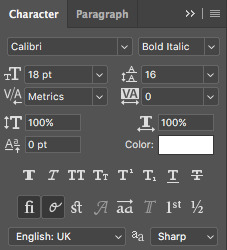
To make subs, select the text tool and create a textbox in the bottom part of the gif. I use the font Calibri (download it here if you’re a mac user) in bold italic size 18pt. If text takes up two lines use the settings shown below:
The main colour used for subtitles is pure white and the alternative/2nd speaker colour is yellow (I use the hex code #ffff00).
Now that we have the text you may notice how it doesn’t stand out. To fix this, right click on the text layer, select Blending options... and use these settings for stroke and drop shadow:


Now your gif should look like this:

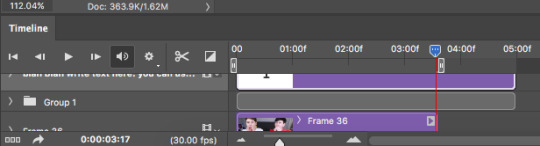
You may notice that your text layer lasts longer in the video timeline than the actual frames. To fix this, make sure you drag the text layer to the start of the timeline and adjust the grey things above the text layer (I’m stumped at the proper word for them) so that the video ends at the last frame (shown below):
6. Saving your Gif.
Now that we are done with making a gif, it’s time to save!
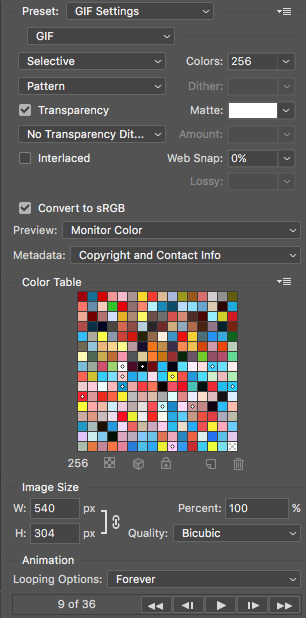
To do so I use the shortcut command + option + shift + s (for mac) or you can go File > Export > Save for Web (Legacy) (for CC) or File > Save for Web (other versions)
My #1 tip for saving a gif is to make sure it’s under 3mb! Tumblr only supports gifs under 3mb so as long as it’s 2.999mb or less you’re fine. Fortunately, our gif ends up at 2.721mb but if you ever do go over, I suggest deleting a few frames or cropping it to a smaller ratio.
Copy my settings when saving:
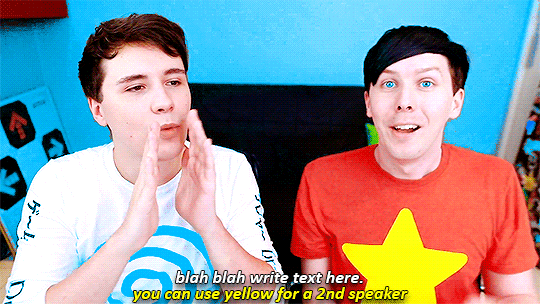
And we’re done! You should now have a gif that looks like this:
Final Notes:
I hope this tutorial has made some kind of sense and helped you understand the basics of gifmaking and colouring. If you did find this useful and made some hella bright dnp gifs, feel free to tag me in them. I track #scifiphan and will be delighted to reblog them! If you have any questions feel free to send me an ask or a private message (I’ll always respond).
Please like/reblog this tutorial if you found this helpful!
#i actually really like this colouring heck#i created it as i was making it and now i wanna make gifs using this psd#i hope this makes sense#i suck sm at explaining things#this is super long#and the colouring part probs confuses u all#but enjoy#teddii's discourse#gif tutorial#phandom#gifmaking#photoshop#photoshop tutorials#chaoticresources#itsphotoshop#this took me ages to write rip#idk what else to tag it as#validate me lmao
381 notes
·
View notes
Note
There was a small applause discourse on my blog today and yesterday, a baguette and dick discourses on zayan's blog, zayan and teddii (instarbuckswithdan and scifiphan) are furries and thats about it
wow okay so basically we continued to talk about dicks and furries honestly bless love me some yiff dicc 😩😩😩
2 notes
·
View notes
Photo

My friend gets it
#but please someone give me phan prompts I'm in the writing mood#phan#dnp#phandom#Teddii's discourse
56 notes
·
View notes
Text
seeing pictures and videos from vidcon makes me really want to go to the australian vidcon in september (but I don't really know many of the creators/am poor) ://///
#also a plane ticket to Melbourne will be like $100#but tbh if dan and phil say they will attend then I will sell my soul#aka my credit card#current mood#Teddii's discourse
2 notes
·
View notes
Text
new discourse bc i’m eating nutella and am genuinely curious: reblog this and in the tags tell me where you’re from and if you say nutella or newtella. i’m from australia and say nutella.
#language discourse#i'm actually curious bc i've heard ppl say the other way and like wtf#ur not pingu#teddii talks
23 notes
·
View notes
Text
get to know me meme aka spending 3 hours trying to find eight 3 second clips within dozens of episodes
#i pretty sure i just speed watched all of Orphan black trying to find the scenes#and they arent even all the ones i wanted#rip#teddii's discourse
0 notes
Note
teddii i'm dying at all these kink asks omg 😂
last night the discourse was weed and tonight it is kinks. wow my blog is going great in 2018
12 notes
·
View notes
Note
hi teddii!! i saw you were accepting asks and I was trying to think of something cool to say or something dnp related to ask (i feel like you would have good discourse l) but i got stumped. but i did see in your about page that you love traveling so i was wondering if you have visited any countries this year/what were they? - from an anon that loves you and ur blog
(any ask is a good ask, anon! also tysm for loving my blog it makes me blush :)))) )
so far in 2017 i’ve been to austria, czech republic, germany, the netherlands, drove through belgium, the uk and also malaysia. i don’t think i have enough money to do another trip this year so that sums up 2017 :’)
0 notes