#tutorial/ usefull
Explore tagged Tumblr posts
Visit Tumblr Blog
Explore Tumblr blogs with no restrictions, modern design and the best experience.
Last Seen Tumblr Blogs


Fun Fact
Average visit duration of Tumblr.com is 10 mins and 25 secs.
Text
Editing occlusion shadows on objects
This is a tutorial aimed at creators and converters who want to understand, at least a little, how to improve the appearance of their objects in the game. Yes, it’s a bit exhausting, just like creating an object from scratch, mapping it and texturing it, but the result is worth it. The shadow dynamics of TS3 are different from TS4. In TS4, the game itself creates these shadows when the object approaches a wall. In TS3 it is necessary for these shadows to be created using “lights” in TSRW. Of course, the occlusion is not perfect, but it gives the game a more realistic aspect by creating this idea of depth.
The icing on the cake: keep these shadows if they are large objects, like cabinets, sofas, beds, tables, chairs… Small decorative objects, like clutter, you can just delete these shadows. But if you are crazy about perfection and details, and really want even an ant to create its shadow when approaching a wall, my tip is that you clone using a small object as a base as this will make editing the shadows easier.
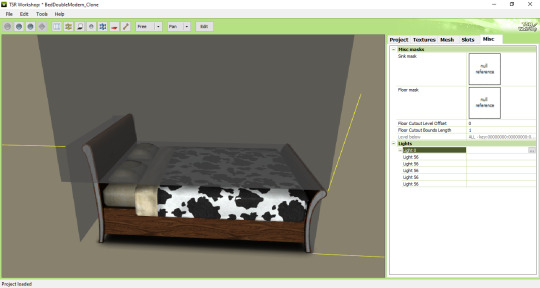
I will use as an example this armoire that I edited a while ago. The shadows have been edited and look like this when you open them in TSRW:
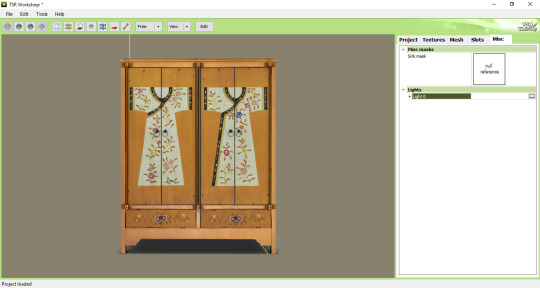
In the game, this is how the shadows appear when we position the object close to a wall:

To edit the shadows, you must click on the "MISC" tab in TSRW. These shadows are right below, where "LIGHTS" is written. Note that there is a + sign next to it and when you click it, a drop-down list appears with all the shadows separated. In this example there are 3 of these shadows. The names are the same, but let's say we have shadow 1 (front), shadow 2 (top) and shadow 3 (side). Edits must be made in the order they appear.
Click on the three dots to the right of lights. A window as shown in the image below will appear:
The lights that must be edited are found in the part where it says "OCCLUDERS". In this case, "Entry 1" corresponds to our "SHADOW 1" (front)...
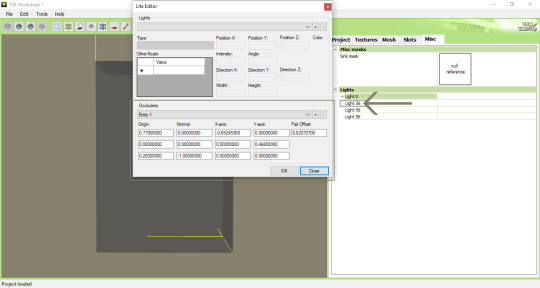
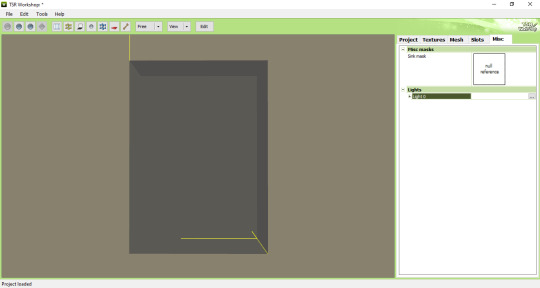
For the front shadow, we will start by changing these two parameters that correspond to the width and position of the shadow. My tip is that you copy the original value, change this value to 1 and then click on "OK" to see what happens (that is, to see what changes when changing the value, so you will know if you need to change it to a higher value or smaller...). If it's not what you need, just paste the original value copied previously into the corresponding field and change it little by little until you reach the correct size of the object.
Front shadow height:

For the distance the shadow is from the object, this field must be edited - remembering that we are still editing the front shadow (which corresponds to the shadow that will replicate the width of the object on the wall):

For the other shadows, you must follow the same path: changing the values until it is proportional to the size of the object.
Bonus tip: Open various base game objects in TSRW and see how shadows are created. For example, select a chair and study each shade individually. With practice, you will realize that all you have to do is create a shadow on all sides of the object. For example: on a bed, you should have a shade for the headboard, another for the footboard, another for the side and another for the top, which would be the mattress. Therefore, it is important to study each type of object separately.
Now you might be asking yourself: Oh, yes, thank you very much... But where do I start? How will I know how to create a shadow from scratch? OMG! Help me!
Don't worry, it's very simple: when cloning an object, like a bed for example, it's obvious that you will use a bed from the game as a clone... So just edit the original shadows that correspond to the clone, so that they are the size of the bed you are creating for the game. Only that.
I say again: each object is a specific case. This tutorial is just a simple way to show you the way to understand how these shadows work and how they are generated for the game.
Yes, creating a beautiful object is hard work and requires dedication, time and effort. Therefore, value the creators who strive to deliver you a quality object ♥.
If you feel like helping me, here is a link for donations. Thank you very much ♥.
Tutorial inspired by: @bioniczombie and @sideshowsnob
#tutorial/ usefull#sims 3 tutorial#ts3 tutorial#ts3 creation tutorial#sims 3 creation tutorial#sims 3 meshing#sims 3 object tutorial#sims 3 occlusion shadows#sims 3 occluders#ts3 meshing tutorial#sims 3 TSRW
46 notes
·
View notes
Note
LOVE how you draw tears, is there a tutorial for how you do it? :O
I quickly made this, so I hope it's usefull ( sorry in advance, I'm bad at explaining xD)

31 notes
·
View notes
Text
Unironically I think Drawfee played a HUGE part in my art journey- and not teaching me how to draw [though their drawclass streams are also incredibly useful!] But just the fact that they're professional artists with like so much knowlege just instead doing silly and shitty drawings and aren't afraid to talk about artist struggles [procrastination, burn out, etc] I probably would be way more nervous about trying to get into professional artist spaces and would would crumble from burn out and self doubt of my own skills.
I think one of the most important things I learned (from I think Karina?) Was that if I want art to be a *job* and not just a hobby I need to get other hobbies because your work being your only hobby is not healthy when you're burnt out from work.
Like THOSE are the kinds of lessons that you cant just look up a tutorial for but in a random drawfee video they'll just randomly drop while drawing a cat shitting itself and it will change my life- Those kinds of skills actually are actually just as usefull if not moreso than actual art technique & talent, and since I don't have any connections to professional artists who could teach me those kinds of things, drawfee ended up being that teacher for me while also being super fun and entertaining.
It also often makes me inspired to do art- and not inspired in the way I get inspired by media I consume to draw characters I like from it, but inspired in a way where I just feel like I can draw *anything* in *any* style because each host has their own very distinct art style and draw so many different things and just get *fun* with it.
299 notes
·
View notes
Text

made my own fire drawing tutorial based on (c)kurero & (c)onlyou118 tutorials hope it'll be usefull for y'all<3 timelapse under the spoiler
13 notes
·
View notes
Note
Okay player, this is your first battle in the wonderful world of ROBLOX! What cards do you have on hand? If you have any powerful projectiles, use them on the big guy (his name is Noobador, don't ask what 'noob' means)
At the same time, make sure you look out for Red and Blue. Those two just got out from another fight and may be the equivalent of Goombas, but their Revenge mechanic if one of them goes down shouldn't be underestimated...
If your feeling skittish, try and take Blue down first. It's clear you care about the Kid a lot, alternate versions non-withstanding.
Oh, and if you do happen to die in this fight (hard to imagine), you won't loop back. Here, it's called "respawning"

• (World of Roblox? Sounds of an awful lot like Robloxia...)
• (... This may really be an alternate reality, huh...)
• (...)
• (... Focus, Player, focus! You're in a battle! You don't have time for this!)
• (Cards? Oh card!)
• (Of course those... things.)

• (even their pockets are different?!)
• (That's... Really weird.)
• (They have all the cards they used to have before. Memory: Defeat, Perfection, time, loop, blood, snack, and sadness.)
• (None of these seem very usefull right now)
• (They could maybe use their secondary weapon, their dagger, as a projectile if need be. But... They don't wanna. That blade is sentimental! Too many of their puns rely on its existence!)
• (Also, They know what a Noob is!)
• (... But, um... what's a goomba–?)

[Red noob uses Stab on #y####.]
[####u# blocks Red noob's attack]
• (Not a question for now it appears. They're wasting time.)
• (...)
• (... They'll have to fight The Kid.)
• (...)
• (While it's clearly not their kid...)

• (... It's still a version of her.)

• (...)
[Noobador is preparing and attack]
• (But... They'll have to do something.)
• (They have heard lots of about their Kid's loved ones. The kid has spouted a lot of things about her family during conversations. So they know that they won't give up the fight easily.)
• (They unsheath their sword and hold it in front of it. Their grip on it strong. the blade reaches far above their head. It's a ghostly transparent white. They feel lighter and swifter while holding it.)
• (They will just need to knock them out.)
• (and hold back like in the tutorial their party did in the first room of that Blinding Treehouse.)
• (Stars, How many loops ago was it since they were in there–)

[bonk.]
• "..."
• "... ow???"
• (Hey! They were preparing an attack! Not preparing to play Dodgeball!!)
• (Time to give him a taste of his own medicine– with a little holding back, of course.),
• (Their hand form the gesture of a pair of scissors around the handle of their sword.)
[Siffrin used Knife to meet you! on noobador]

[Noobador took 50 damage]

[Noobador is K̵n̷o̶c̸k̵e̸d̶ ̵o̶u̶t̵]
▪ "..."
▪ "..."
• (Red and Blue turn to look at them.)

• (They're a monster.)

First | << previous | next >>
//OOC: why do these take so long to makeee!!
That was a tonal shift and a half, right?
Don't worry! The traveller has a heal spel!!
Also, this Traveller didn't get to do any grinding :3. They just didn't have the feature. They only have beaten the Cruel King once.
#ask blog#block tales#block tales au#in swords and time au#traveller!player#anon ask#block tales player#player block tales#isat au#roblox#sasasaap traveller!player#tw: violence#tw: blood#?#tw: implied gore#tw: death#blue noob#red noob#noobador#blue noob block tales#red noob block tales#noobador block tales
10 notes
·
View notes
Note
How do you make your posts so aesthetic im on mobile and literally can't figure this app out😭
with lots of screen time and scrolling through pinterest! all pictures ive ever posted are from there. i love and live for pinterest.
✿ a little tumblr guide :
for formatting your text, just select it and go from there. for the small text, select it and tap the “<s>” button.
for the collages / banners i've included in some of my posts, i go through pinterest, look for pictures that have similar colour palettes, download them and go to this website to make the collage. i don't recommend changing the size of it while on the page because it can ruin your pictures, just work with the predetermined size and once you're done, download your collage and resize it by cutting it with your gallery app.
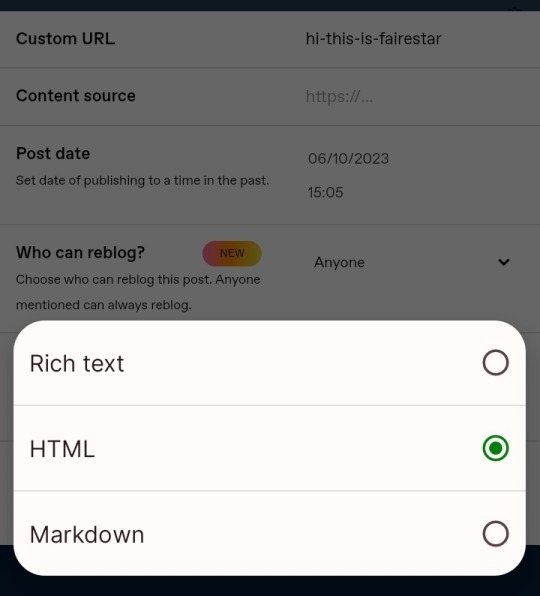
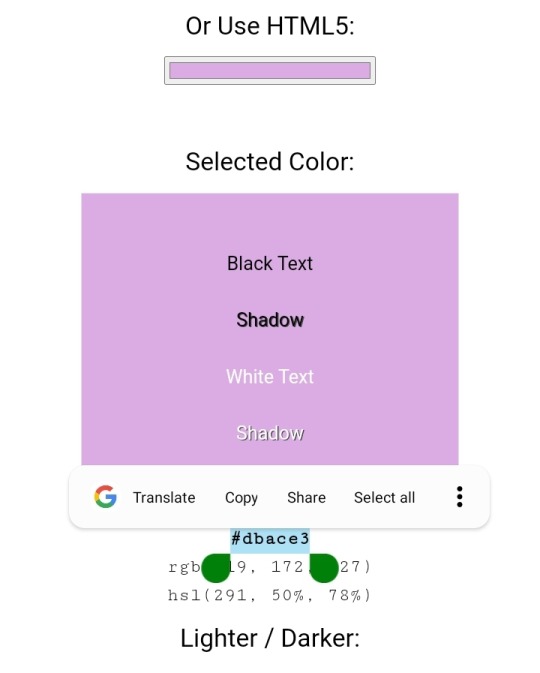
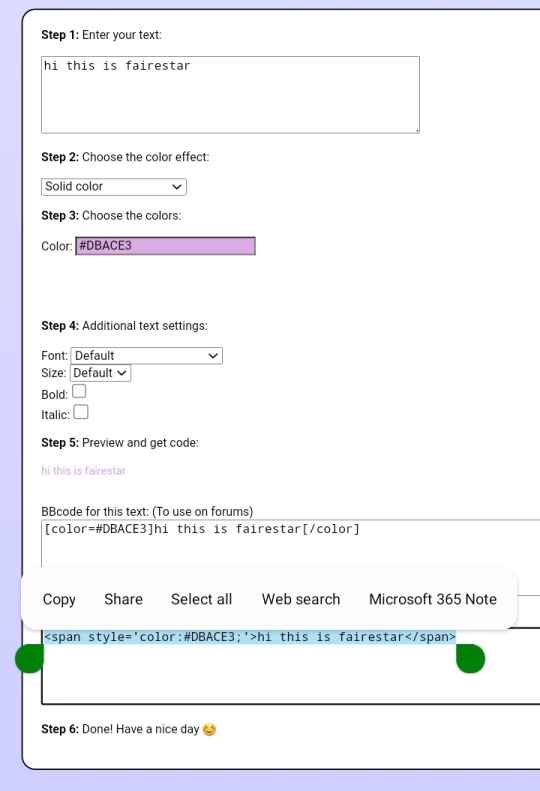
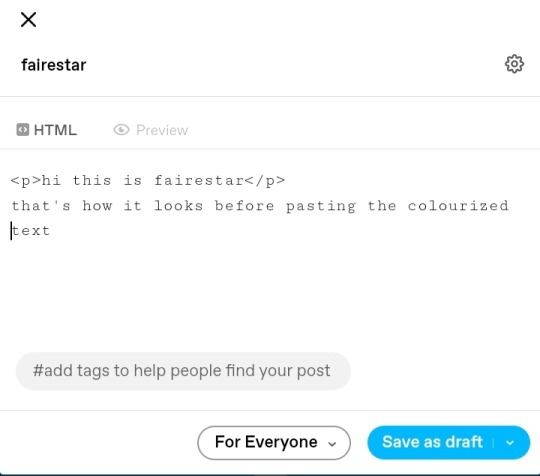
for coloured text, you can select it and choose one of the fixed options; but if you want a specific colour, you can only do it from the tumblr website. first make a draft of your post, then go to this page to choose the hex code for the text you want to edit (the hex code is the one that's six characters long and made of numbers 0-9 and letters A-F, ex.: #A77BF9), once you have your code, go to this page, write whatever it is you want, select the “solid text” option (if you want a degradé one, you'll need more than one colour code), put your hex code and copy the text at the bottom of the website. now, back to your draft (remember, you can only do this from the website, not the app), click on the little settings wheel at the top right, at the end you'll see something that says “rich text”, open that menu and choose “html”. now, if you don't know about programming, your draft will look crazy, don't worry, that's just the html version of it. go through it until you find the text you want to modify, select it (only the text, not any other thing around it, if you see something like a <h1> or <b> anything with the < > symbols, do not touch those because you'll either delete everything or lose the formatting you might have already applied —if you accidentally delete those when changing the colour, don't worry, once you're done with the colour you can apply the formatting again just as you always do—), and in its place paste the long text you copied from the website. if you want to know if you did it right, at the top of the post there's a “preview” option, choose it and see if your text is good to go. now that you're done changing the colours, go back to the settings wheel and choose the option “rich text” again, so you can continue working on your post. it's kind of a mess, yes. but your posts will be a hundred times prettier. and you will learn the basics of html coding too.
little side note: if you've modified the html code of your post, always go back to the app before posting it and check if it looks okay because changing the html code makes you lose some formatting you might have already done, like organising pictures or adding a “keep reading” button. also, check the attached screenshots for a more visual tutorial!
hope this is usefull ♡ feel free to reach out again if you need help with anything else!


38 notes
·
View notes
Note
Tutorial on how to draw noses ??
that is a good question IODHGJWLUAJKH i still don't know a "formula" to draw good noses, its something i cant deal with so easly but somehow i'm more happy with the noses i draw now a tip i give for ya is SEARCH FOR OTHERS ARTISTS NOSES (like the styles), like analyze the structure and try to add it to your artstyle. I recomend you to draw noses a little more simple, think about shapes! It helps a lot, and then, if you want to make it more "realistic", add some details and use references for that!

Idk if i said something usefull but HOPE I HELPED!
7 notes
·
View notes
Note
hi! what method do you use for the photos such as in this post of yours /775660273333895168/the-photo-corner-of-this-house-is-still-one-of-my ? i'd love to do have something similar in my game! sorry if you've answered this before
Hi anon! No worries, I am always open for questions and this one has not been asked before.
The photos in this post are recolors of the It will last longer frames by Thread and Sandpaper. Poppet has made a really good tutorial on how to recolor these frames including some usefull templates. The pictures inside were taken in game and I edited them afterwards with Photoshop. I did some cropping, resizing and I made them brighter than the picturs I normally share on Tumblr because I feel that that looks better in game.
I hope this answered your question! I was wondering if you were maybe asking for the poses used so please leave another message in my inbox if you were looking for a specific pose.
3 notes
·
View notes
Text

No livestream for today!Managed to finish the game selection page where the builds,tutorials etc will be displayed on my website and i'm working on other builds in Diablo 4 (have to level the characters,get some relaitvely usefull gear etc).
0 notes
Text
Actually making the dungeon crawler
Ok so I first started by creating the Unity project (default 3d, built in render pipeline, etc...) and imported Probuilder. Probuilder basically lets you do 3D modeling directly inside of Unity, which is usefull for prototyping stuff and, in my case, I could probably even get away with using it in the final product. Here's the test environment I made:

Anyway I next worked on the input.
Input in Unity is really easy, like you can just do Input.GetAxis("Horizontal"); and it will get you the AD and ←→ input. However, I need to make things overcomplicated so I decided to use Unity's new input system. All you really need to know about it is that it lets you get any input imaginable and do what you want with it. Here's what I ended up with for now:

I then created a new script called "Player Input Manager" to control all of the input that happens, rather than calculating it for everything separately. It might look a bit confusing, but it works:

the "_" is the context, I just couldn't be bothered to write context or ctx like 7 times.
The movement is actually quite simple. Usually I would just use the Character Controller built into unity, but this time I'll be using the Rigidbody because I'm gonna be using a lot of physics.
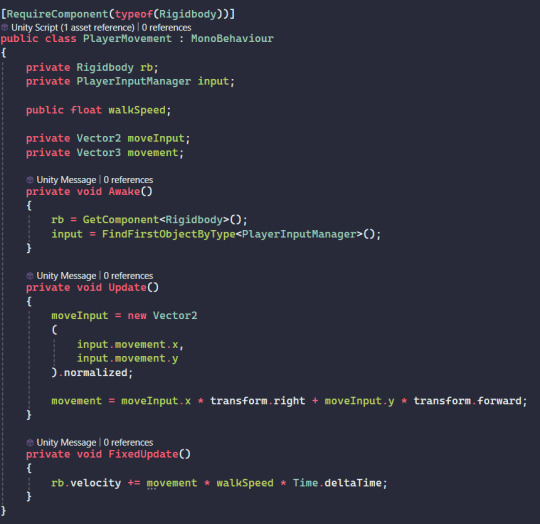
the whole "moveInput.x * transform.right + moveInput.y * transform.forward" might look a little strange, but that's just because the camera controller script will be rotating the player itself, and this just makes sure the player is moving in the correct direction.
Speaking of the camera controller, this is what I came up with:

I say I came up with it, its actually from Brackeys' first person tutorial, I just don't have any other method. There are a few problems with it, first off its really jittery because I'm using Rigidbodies, but its also using the old input system. ill definitely fix this later, but I wanna get onto the actual main source of movement: the shotgun.
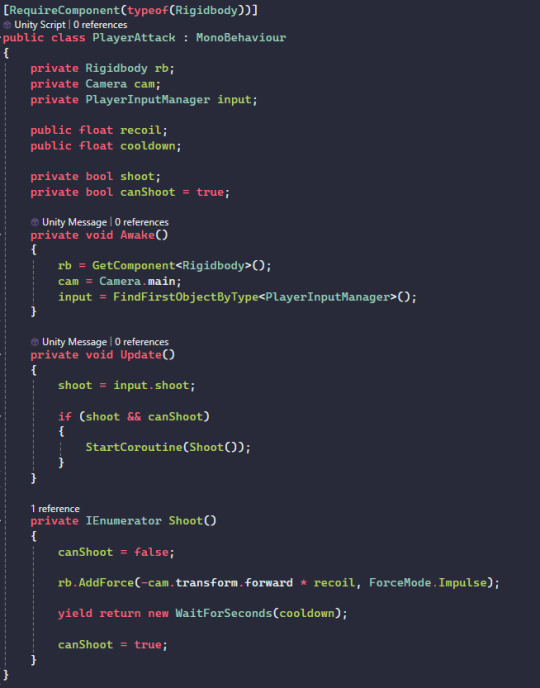
the recoil basically works by adding a force opposite to where the camera's looking whenever you shoot. The way I add a cooldown is also pretty standard. Rather than putting the shooting logic in another function (void), I put it in a Coroutine, this then allows me to add a delay. The basic layout of the Coroutine is something I've done hundreds of times and all of the logic just goes between the "canShoot = false;" and "yield return new WaitForSeconds(...);"
It already feels pretty nice to use, but it also feels a bit too floaty. One thing I could try is resetting the player's velocity every time they shoot, meaning they aren't fighting against themselves and the physics all the time. Here's how it looks:
Unfortunately Tumblr doesn't like me directly uploading videos so idk
Overall, its pretty good for now, but still needs a bit of work.
0 notes
Text
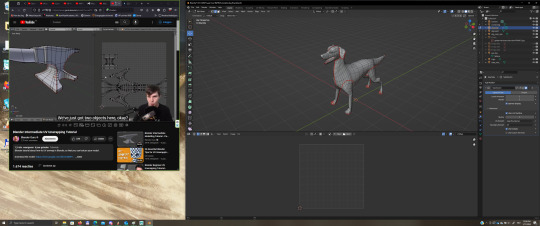
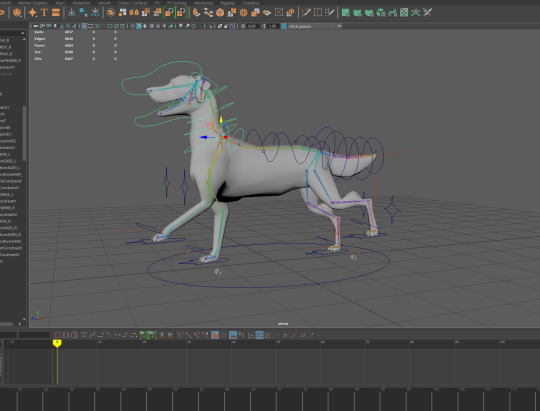
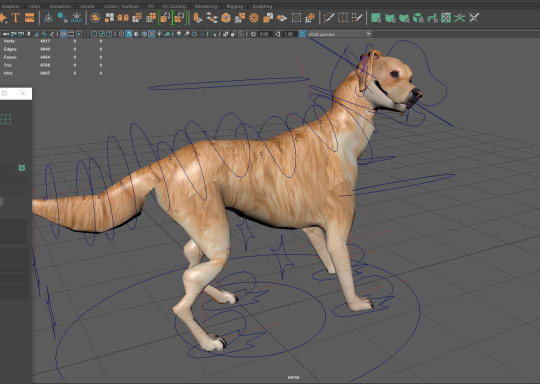
week
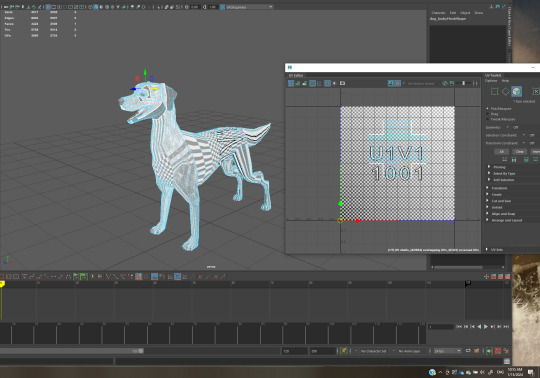
uv unwrapping the finished dog model, used these videos to figure out how to do so: https://www.youtube.com/watch?v=GdAGPtW7Q_I&t=37s https://www.youtube.com/watch?v=t5Co6SuzoQw
ran into issues with"non manifold", used these sources to figure out what the issue is and how to fix it: https://www.youtube.com/watch?v=iGHpIb3kYa0 https://help.autodesk.com/view/MAYAUL/2023/ENU/?guid=GUID-16CEC87A-F927-4AED-9B60-A772481F8FD4
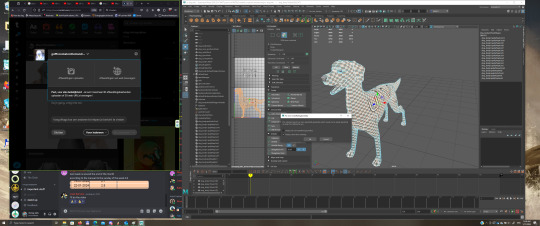
I none of these methods are good fixes or just dont work. i cannot seem to attach these forms to the head in maya, im going back to blender to blender to unwarp the dog there instead
never uvd in blender for what that information is worth to you here are the videos i used to figure out how to do so: https://www.youtube.com/watch?v=Y7M-B6xnaEM https://www.youtube.com/watch?v=scPSP_U858k
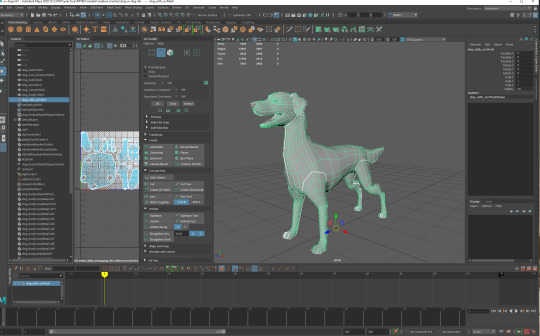
didnt run into any issues in blender, very straigforward very happy with this. importing it back to maya mainted the uv map. moving on to uv mapping the rest of the objects, will be doing that in maya because i dont expect to run into issues with them.
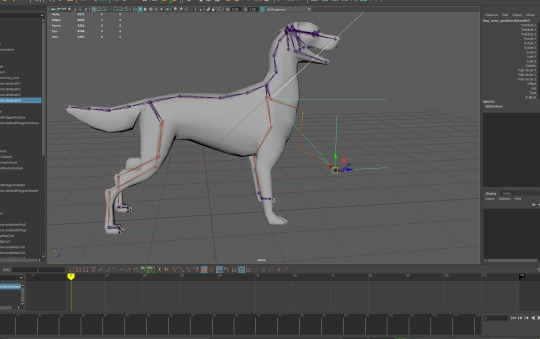
did not run into any issues. moving on to rigging. using these videos: https://www.youtube.com/watch?v=HaTpXxG5OJg for wireframe, the video is old but after clikcing through two videos that didnt help this one was the most clear and helpfull.
https://www.youtube.com/watch?v=Qunol1EYdd8 the video is older but its very clear and straight forward
https://www.youtube.com/watch?v=urC_TBQQA7o this video was great for basics of maya, ive used his tutorials before and he makes and sells his own plugins.
and a refrence for the bone placement

none of the videos omwatching are willing to tell me how to put my joints infront of my mesh, a little annoying https://www.youtube.com/watch?v=lHRqG5OCFuw found it. this video shows me the icon for joints in front but im still unable to select my joint it keeps grabbing faces on the mesh. https://www.youtube.com/watch?v=5kiRB1pSU3M never mind i was in UV mode instead of object mode.
select D key to move a single point on your rig :-) didnt know how to do that: https://forums.autodesk.com/t5/maya-forum/repositioning-only-one-joint-without-any-effect-on-the-other/td-p/6705384
I implemened IK handles on both the front and hind legs(follwoing mainly the dashund video) and I'm not running into any issues, I'm on an adreneline high right now, last time I worked on a project this was hell on earth
Most videos for setting up the spline were using paid plug ins liekthis one. https://www.youtube.com/watch?v=KiqpzKUJKt0 its still a very usefull series and its very easy to follow but this part isnt very usefull for me rigth now.
and this one was very useful: https://www.youtube.com/watch?v=UaUDLHAfed8 another very old video but there werent a lot of options because maya isnt open source and it is a paid program. Had we been working with blender I think it would have been a lot easier to find free plugins and tutorials but I digress. It worked great, over the moon for it.
never successfully set up a spline IK, I ran into a major issue BUT following this specific tutorial was great. desipte the rig flipping upside down the spine was actually deforming correctly after a couple or attempts!
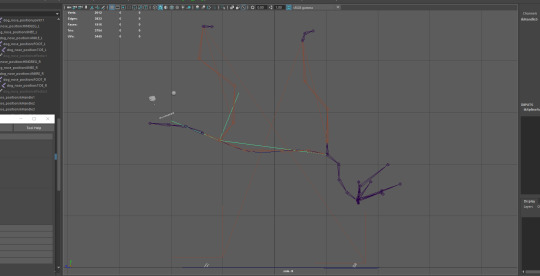
after detaching the spines that needed the spline IKs everything went smoothly! wow!!

While wathcing rigging tutorials i found these really cool plugins. they are paid and i dont have time to figure them out right now but Im saving these because they would fantasic to speed up animation on future projects. https://www.youtube.com/watch?v=2iz_g8rij-k https://www.youtube.com/watch?v=vtF7wwvuBkk

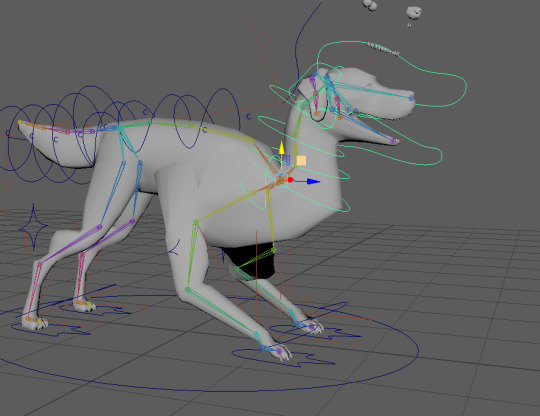
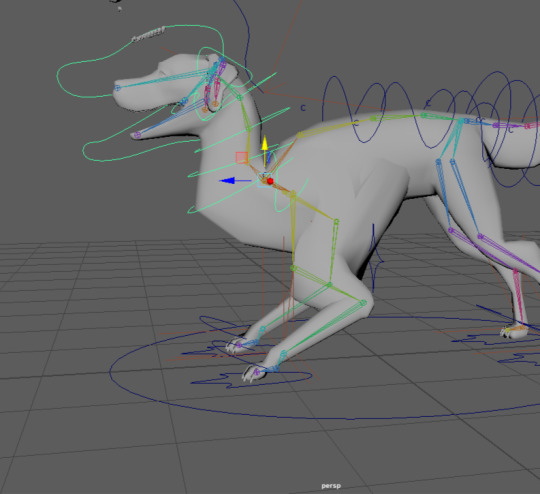
had to adjust the IKs in the front legs a couple of times to get the bend to work better/be more natual
finished weightpainting. i remebered how to do that, didnt run into any issues.
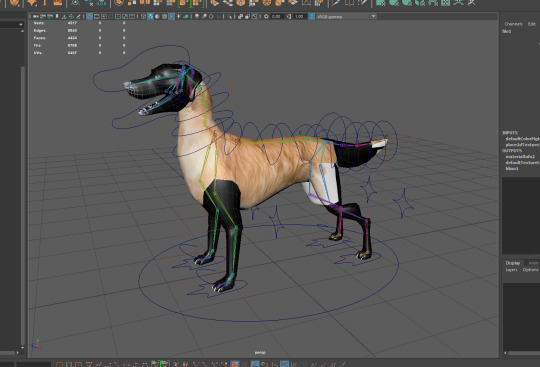
(i rembered how to do that from a year or so ago) onto texturing. didnt know how export a UV map as a png: https://help.autodesk.com/view/MAYAUL/2024/ENU/?guid=GUID-26F3DFAB-A6D9-4F9E-A11A-2BD9EF1C3DF1 now i do.
didnt know how to apply said png to the model: https://www.youtube.com/watch?v=8oT6Xt4HX5E
now i do. gonna continue editing dog pictures for the fur coat because i do not have time for drawing all those hairs, it should get covered by fur, itll be relatively low light, i did ask team if they had time, one said no, the other said maybe, i decided id do it anyway as that wasnt a very solid yes.
i looked for videos on photobashing textures for 3d models and couldnt fidn anything. i didnt have time to install 3d substanc painter and learn to use the new program so i opted to just photobash in my regular art program.
these are the finished textures applied to the model, it doesnt line up perfectly and i messed up the uv map on the dog snout a little which made the end of the snout very very low res but it works pretty good in the final scene as it is far away and in low light, im pretty happy with the result! it also took a lot longer than expected, getting the cut up images to line up and blend together and color adjusting it to work well enough was a lot more tricky then i thought it would be.
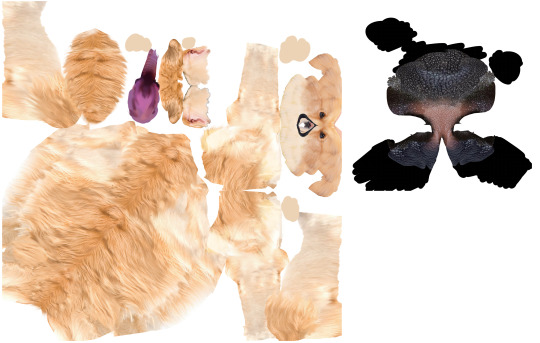
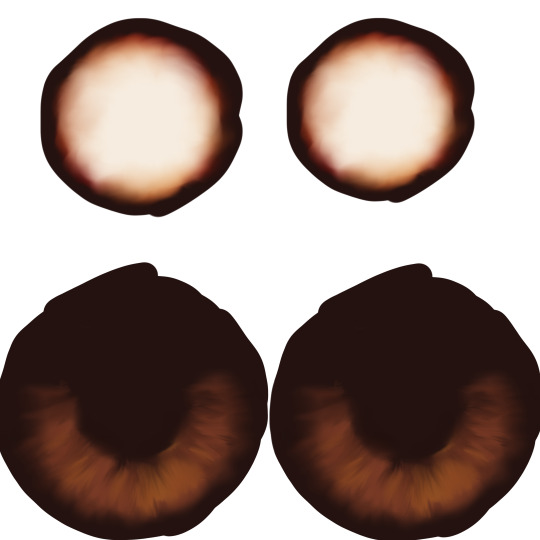
the other textures like the eyes and teeth i decided to paint as they didnt need a lot of detail and that was faster
0 notes
Text
I relate so hard to this.
I found out that it's usefull to add "minimalistic" or "quick/5 minute set up" when your searching for tutorials.
If you don't you will end up only with those super detailed artsy ones. I don't have the time, the talent or the need to do them. Also I don't want to.
Fortunately I found out a simple set up that works super well for me and is highly customisable, I can share it if someone wants.
The bullet journal great and customizable and can be used for a variety of purposes be it functional or artistic but damn do I hate almost every "how to bullet journal"* or "plan with me" or "monthly setup" video I watch on YouTube I think I've gotten thru like maybe three in the two and a half years I've been consistently bullet journaling like they're all so goddamn annoying
*not you Ryder Carroll ily Ryder Carroll
#I'm sure op knows this#This addition is more 4 the ppl who want to start bujo#But find the most popular videos and trends annoying#Also I almost shortened bullet journal to bj#bullet journal#bujo#tutorial#art
10 notes
·
View notes
Note
Hi milla! I was wondering if you don't mind sharing how you make collection files.
Reply:
Hi! :)
Of course I do not mind sharing. I hope you can figure out how I do it because I’m bad at explaining lol.
But let’s go! It’s not something difficult to do … :)
- In the game, click the object you want to add to the collection (buy / build mode). Then click on this sign to add it to a collection:

- It will open a small window like this one below. Click on this circled sign in red (create new collection).

- In the small window that opens:1 - Enter a name for your collection;2 - Choose an image;3 - click on the signal to confirm.

- Your collection has just been created. :)
- Add all the objects you want in this collection by following the first image above: click on the sign to add the collection and choose the collection you created.

- When you finish adding all the objects you want in this collection, enter the simulation mode. Then click on the game menu button and choose ‘Save and Exit’.Note: The collection will only be saved when you save and quit the game.


- After you completely exit the game, enter the folder of The Sims 3 (mine is in the path Documents / Electronic Arts / The Sims 3).


- Open the folder named Collections.

- Inside it will have another folder named User (your collection file is inside this folder).

- All game collection files (the ones you create, the expansions, and the object collections) are inside this folder. Look for the file that has the date and time you saved the game.

- Cut out this file and paste it into a place you can easily find. Rename as you wish. Whenever you want to use your collection in game, just paste it back into the USER folder.
Ready! I was able to do my first tutorial and you it’s first collection! Lmao

Let me know if anything is missing.
Have a beautiful week! ♥♥♥
133 notes
·
View notes
Note
Where did you learn to do your grayscale paintings, they look awesome and I’m trying to practice in grayscale to so but all my picture look naff 😬. I there any tutorials you advise??
Lol well I've already rage quit the grayscale practice myself but that absolutely doesn't mean it isn't valuable.
I've seen a lot on the topic and just for how light works I can recommend ctrl paint's "Basic Rendering 2: Imaginary Light & Shadow"
These days I'm more into the whole color and light for compostion/storytelling thing and I've been devouring Bill Perkins' courses on New Masters Academy. I did the one called Visual Storytelling which was great and am currently doing this one:
youtube
Also I mentioned Hans Bacher's Visions before and it is an insanely usefull book for imagemaking in general.
I hope this is of some use, none of these are free unfortunately. I tried finding some free stuff but couldn't really find anything truly usefull. I used to see great long posts on forums for this stuff but most of those forums are dead now and discord is too confusing for my tired old brain.
48 notes
·
View notes
Text

A little tutorial on how to quickly preview your texture for a TS2 object (or any other mesh) using Blender 2.79b - very usefull when you're working on recolours. Contains a few other tips.
Texture preview in Blender 2.79b is much more convenient than Milkshape, as you can load many textures and quickly switch from one to another. It's also much easier to figure out a UV layout.
Download (SFS)
* PDF file format
Tutorial under the cut:
(I assume you already know how to export the .obj from GMDC resource in SimPE, that's not covered here)
Notes:
This tutorial might work for older Blender versions. It will not work for Blender 2.80 and above. IMO, if all you want to do in Blender is recolour previews, UV-editing and very basic meshing, 2.79b is more than enough. There's even a GMDC plugin for it, that seems to work well for the chosen ones some people 🙃 Blender can read .psd files and other texture formats. GIMP's .xcf file format is not supported though, and I don't think there are any plugins for it (?) so if you're working on a file with layers, it has to be exported as PSD.
1.
If you've just installed Blender, take some time to read the button names and such.

If you create too many new windows and want to merge some, you grab that tiny triangle and drag it back to the right (or up), and drop when an arrow shows up.
2.

Please note that UV islands are not inside the texture area. It can make it harder for you to figure out the UV layout. In the last pic I'll show you how to move it without messing up the position.
3.

When using hotkeys / shortcuts, remember that mouse arrow has to be inside the viewport that you're working in.
4.

5.
And here's how to move UVs to the texture area without shifting it by accident. Of course you don't have to do it if you're able to figure out what's what ! ;)
You can also export the UVmap as texture file. While in Edit mode, click UVs in the UV Editor menu bar, and pick „Export UV layout”.

* I guess I should correct the UV selection part: you press [B] key and then you select UVs with mouse. If you keep pressing [B], then you have to click again to change to normal mouse cursor.
* You need to hover the mouse over the menu bar, to be able to scroll it.
126 notes
·
View notes
Photo
🙏🏽🙏🏽🙏🏽🙏🏽
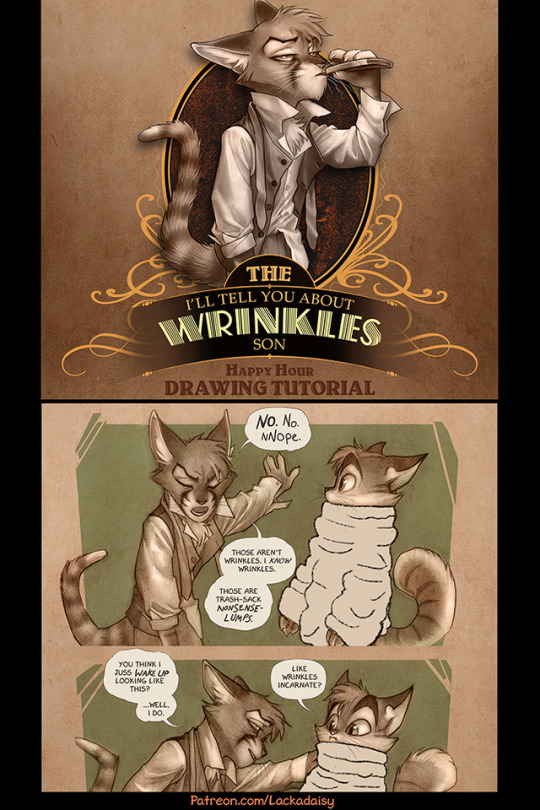
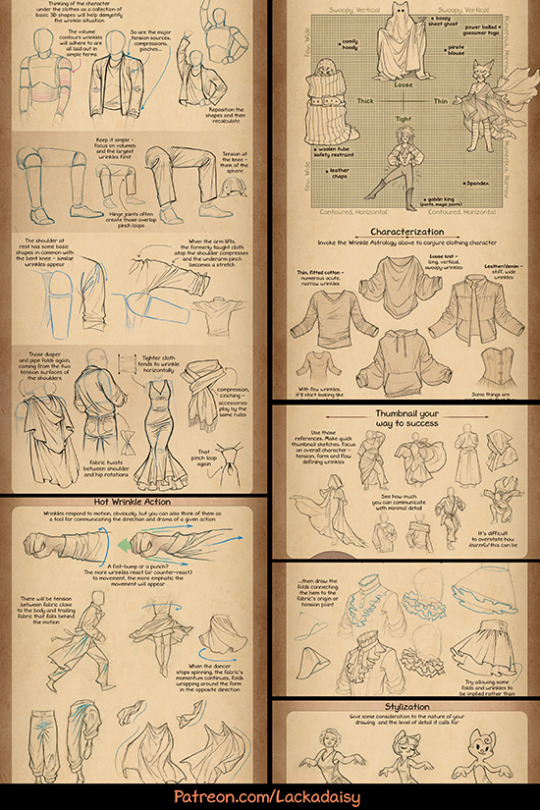
Drawing Wrinkles
I made a tutorial-thing about drawing clothing wrinkles - something I’ve had a few requests for. For all the banality of wrinkles, they’re an expansive topic. Anyway, these are some previews. The full tutorial is available to all $1+ Patreon supporters. You can find it here!
25K notes
·
View notes