#ts3 creation tutorial
Explore tagged Tumblr posts
Visit Tumblr Blog
Explore Tumblr blogs with no restrictions, modern design and the best experience.
Last Seen Tumblr Blogs


Fun Fact
Tumblr has been banned in Indonesia for providing people with access to pornographic content.
Text
Editing occlusion shadows on objects
This is a tutorial aimed at creators and converters who want to understand, at least a little, how to improve the appearance of their objects in the game. Yes, it’s a bit exhausting, just like creating an object from scratch, mapping it and texturing it, but the result is worth it. The shadow dynamics of TS3 are different from TS4. In TS4, the game itself creates these shadows when the object approaches a wall. In TS3 it is necessary for these shadows to be created using “lights” in TSRW. Of course, the occlusion is not perfect, but it gives the game a more realistic aspect by creating this idea of depth.
The icing on the cake: keep these shadows if they are large objects, like cabinets, sofas, beds, tables, chairs… Small decorative objects, like clutter, you can just delete these shadows. But if you are crazy about perfection and details, and really want even an ant to create its shadow when approaching a wall, my tip is that you clone using a small object as a base as this will make editing the shadows easier.
I will use as an example this armoire that I edited a while ago. The shadows have been edited and look like this when you open them in TSRW:
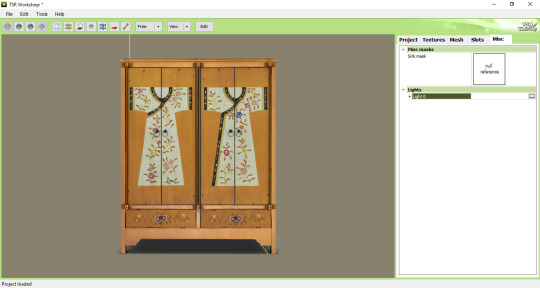
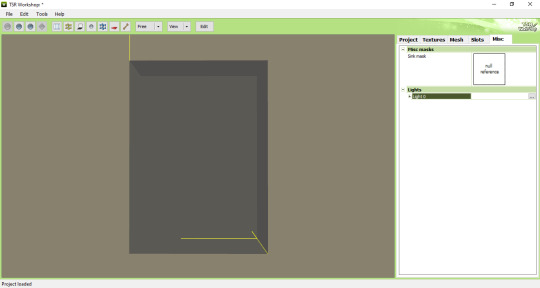
In the game, this is how the shadows appear when we position the object close to a wall:

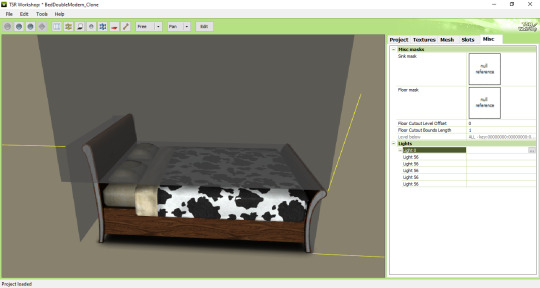
To edit the shadows, you must click on the "MISC" tab in TSRW. These shadows are right below, where "LIGHTS" is written. Note that there is a + sign next to it and when you click it, a drop-down list appears with all the shadows separated. In this example there are 3 of these shadows. The names are the same, but let's say we have shadow 1 (front), shadow 2 (top) and shadow 3 (side). Edits must be made in the order they appear.
Click on the three dots to the right of lights. A window as shown in the image below will appear:
The lights that must be edited are found in the part where it says "OCCLUDERS". In this case, "Entry 1" corresponds to our "SHADOW 1" (front)...
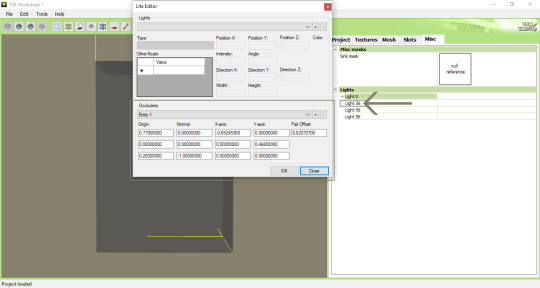
For the front shadow, we will start by changing these two parameters that correspond to the width and position of the shadow. My tip is that you copy the original value, change this value to 1 and then click on "OK" to see what happens (that is, to see what changes when changing the value, so you will know if you need to change it to a higher value or smaller...). If it's not what you need, just paste the original value copied previously into the corresponding field and change it little by little until you reach the correct size of the object.
Front shadow height:

For the distance the shadow is from the object, this field must be edited - remembering that we are still editing the front shadow (which corresponds to the shadow that will replicate the width of the object on the wall):

For the other shadows, you must follow the same path: changing the values until it is proportional to the size of the object.
Bonus tip: Open various base game objects in TSRW and see how shadows are created. For example, select a chair and study each shade individually. With practice, you will realize that all you have to do is create a shadow on all sides of the object. For example: on a bed, you should have a shade for the headboard, another for the footboard, another for the side and another for the top, which would be the mattress. Therefore, it is important to study each type of object separately.
Now you might be asking yourself: Oh, yes, thank you very much... But where do I start? How will I know how to create a shadow from scratch? OMG! Help me!
Don't worry, it's very simple: when cloning an object, like a bed for example, it's obvious that you will use a bed from the game as a clone... So just edit the original shadows that correspond to the clone, so that they are the size of the bed you are creating for the game. Only that.
I say again: each object is a specific case. This tutorial is just a simple way to show you the way to understand how these shadows work and how they are generated for the game.
Yes, creating a beautiful object is hard work and requires dedication, time and effort. Therefore, value the creators who strive to deliver you a quality object ♥.
If you feel like helping me, here is a link for donations. Thank you very much ♥.
Tutorial inspired by: @bioniczombie and @sideshowsnob
#tutorial/ usefull#sims 3 tutorial#ts3 tutorial#ts3 creation tutorial#sims 3 creation tutorial#sims 3 meshing#sims 3 object tutorial#sims 3 occlusion shadows#sims 3 occluders#ts3 meshing tutorial#sims 3 TSRW
46 notes
·
View notes
Note
Hi hey gurl! I've been trying to understand something... when it comes to performance, is it vertices or polycount that really matters? I’m trying to get a clearer picture of how they affect gameplay. Hope this isn’t too random tho 😂
Hey nonny, thanks for the great question! I'm not sure if you are looking for a non-creator answer or if you maybe have some experience with meshing, but I try to cover some technical aspects that hopefully will make you understand vertices and polygons better! It's a bit of a longer journey, so grab some snacks and settle in!
Disclaimer: This is my opinion and the definitions are how I came to understand them. I believe what I say to be correct, but I am also human and may have misunderstood something, and making mistakes can happen. Thanks for understanding! TL;DR There will be calculations made on every vertex and every face present in a mesh. So the more you have of either, the worse it is for performance, but if the vertex count is much higher than the poly count, the mesh is especially unoptimized and may impact performance more than it would in an optimized state. Vertex and polygons are actually connected, literally. To understand, we need to start with the basics.
Vertices are points in a 3d space that provide the foundations of a grid-like 3d structure, known as a mesh. Connected through lines known as edges, they form a 3d shape. Three edges form a triangle, or tri for short, also known as a face or polygon. These terms can be used interchangeably, but a tri always has three vertices, whereas faces and polygons can have more than three vertices.
A polygon with 4 vertices (known as a quad) is very commonly used in 3D-modelling, because it can be used to create very neat and well-structured meshes (it is easy to make grids using rectangular shapes). A mesh that is made in a grid-like way may have the same overall shape as one made out of triangles, but the flow of the edges is different, and this plays a role during animation. Having these grid-like lines is usually better for moving and animating characters and avoiding shading issues.

Most meshes for games are thus initially made with 4-sided polygons. These quads are usually further broken down into tris if they aren't already, and three is the least amount of vertices needed to form a coplanar surface.
When the quads of the left sphere are turned into triangles, the grid structure will remain intact:

We can further break down the elements of a polygon. Let's take a simple cube. It has 6 sides, or faces, and each face has 4 vertices that make up the corners. But if we count all the vertices, we will notice that each face shares vertices with other faces. So on a simple cube, we have 6 faces and 8 vertices.

Depending on how a mesh is made though, it may have a lot of edges. You can think of those like cuts in the mesh. If we wanted to cut up the cube, we would separate each face from each other. Now we still have the same number of faces (6), but the vertices are suddenly much higher, because now, every face has its own set of 4 vertices, meaning that we have a total of 24 vertices.

In video games, polygons are usually rendered as triangles. So for our cube, that would mean that every face would be diagonally cut in half, giving us a total number of 12 faces/polygons/tris.

If we take it to the next level and separate all of these triangles from each other, the vertex count would be 36! To recount, on a mesh that is not split, it's only 8. Having these cuts (or split edges, as they are commonly called) in strategic places in the mesh where vertices are split can be important for the final look of the mesh in the Sims games.
You may have already encountered some meshes that have dark spots or shading in some parts, often at the hems. That can happen if the mesh is not split correctly in these areas. It has to do with how the normals work (they are important to how light gets reflected off the mesh).
To not go too off-topic, I won't get into detail about that here.
Ideally, a mesh is only split where it needs to be so it will look right. If there are unnecessary cuts, then the vertex count (and with it, the polygon count) goes up when it doesn't really have to be. If a mesh has a lot of these areas where a lot of faces have their own vertices, then the vertex count is much higher than on a mesh with fewer split edges. This can be a sign that a mesh is not well-optimized. So if you see a mesh that has much more vertices than polys, you may want to question it in regards to performance. CC converters will probably know that Sims 4 meshes come with a lot of these cuts that are needed for Sims 4 because of the way the CC is made (for example, pants have such a split edge cut to allow boots to look tucked-in), but those are superfluous for TS3. So I encourage every Sims 3 CC creator to remove those to save on both vertices and polygons when they are converting! The thing is, in the game, the mesh will be processed and there will be calculations made on every vertex and every face present. Each vertex is indexed, and triangles need to be drawn from the information. Other processes will need to also use the vertices for their calculations. There is more going on during rendering than simply drawing the polygons. The shaders have to calculate their effects, the textures need to be rendered and applied accordingly, filtering such as anti-aliasing will be applied, etc. So the more geometry you have in a mesh, the worse it gets in terms of performance. More geometry means that the polygons are smaller and more numerous, which will in turn affect the vertex count too.
As CC creators, we cannot address all the factors that impact performance, as we can only influence a small part, but we can try to adhere to the game's standards to minimize the performance impact as best as we can. If we wish our meshes to be more detailed than what the game's standards are, then we impact the performance more.
Instead of just cranking up detail like crazy, it is good to see if we really need it. And ask questions such as how often will the player view the item closely? If the player is usually far away from the item or it is a very small item, making it super detailed will not really do much, since the item looks the same as a low-poly item from a certain distance. We can also make compromises and maybe make an item 50% more detailed instead of 200% more detailed, providing a more detailed item while minimizing the performance impact.
This is a bit off-topic, but since I'm here already, we may refrain from using a bigger texture for a very plain piece without any notable intricate detail (like a basic T-shirt, for example), since it already looks fine with a smaller texture, but it may pay off for a highly detailed texture which looks visibly better with a bigger texture, warranting the performance impact (like a lace blouse with an intricate pattern, stitching, and small buttons).
On that note, using the texture space efficiently can also do wonders to increase detail. Use all the real estate you have on that UV map (that is a 2d representation of your 3d mesh and used to apply the texture to the mesh). Have you tried upscaling the texture yet? Okay okay, I'll stop now and get...
Back on topic: The number of polygons also matters, not just the vertex count. When a mesh has lots of smaller polygons, a lot of them are necessary to form the entire mesh. Bigger polys will not provide as much fine details, but will have less impact on hardware because fewer calculations to be made. A good mesh uses only as much detail as needed while using as few polygons as possible to still maintain functionality.
Sims clothing meshes need to animate and move well, so they need to be able to flex at the joints, and the shape must also be able to change to accommodate body sizes, thus the mesh needs the minimum amount of geometry to achieve this and still look decent, which is a sweet spot the developers have to find to craft meshes that perform well while looking reasonably good.
A good habit for creators looking to make meshes for the Sims games is to look at similar meshes in the game and study them (so for TS3, check the original TS3 game meshes, for TS4, check the original TS4 game meshes). Check how many polys they use and how good the topology (structure) of the mesh is.
For example, how many rows of edges do they usually have, and what sizes are the polys usually? How many vertices are in one round of edge loops, for example for the arms? How are the different mesh parts connected to each other, where are split edges used? Then imitate that.
The professionals who made these original meshes knew what they were doing, and they optimized them to be gameplay-friendly, so if in doubt, copy what they do.
Game meshes are usually especially optimized and it is very much game-dependent how they are structured, so a mesh from a different game can look totally different. CC Creators looking to optimize performance in their meshes should try to match the original game's mesh in terms of structure and polycounts. This will also ensure they animate well!
If you made it this far: well done, thanks for bearing with me! I hope you feel more knowledgeable and ready to apply what you've learned to your own meshes or when selecting CC for your favorite Sims game.
#sims 3#reply#sims 4#sims meshing resource#ts3 meshing#sims polycounts#Sims CC creation#meshing theory#tutorial#ts3 tutorial#ts4 tutorial#my best tutorials are always based on asks#why do I always forget which tags I use for tutorials
37 notes
·
View notes
Text

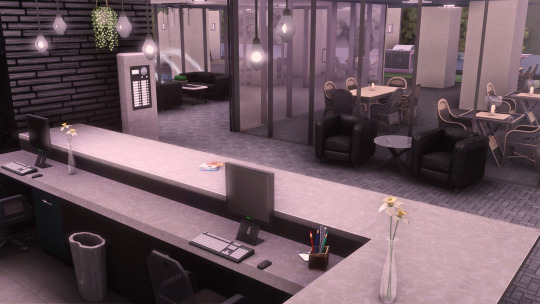


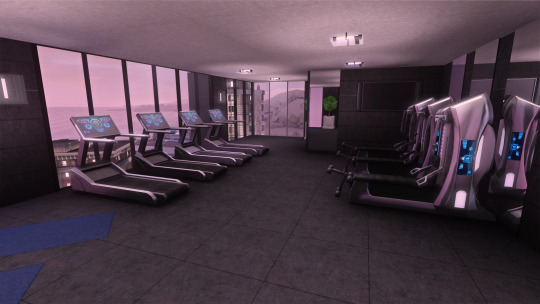


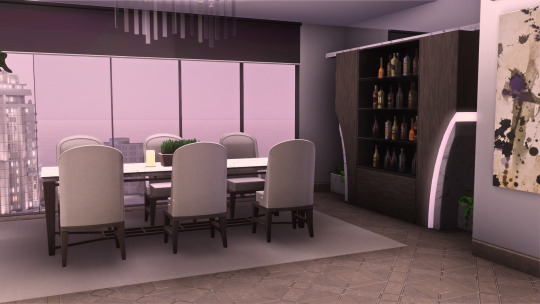
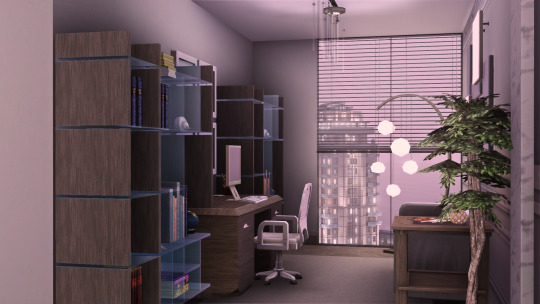
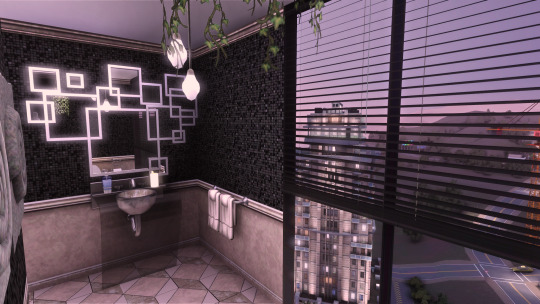

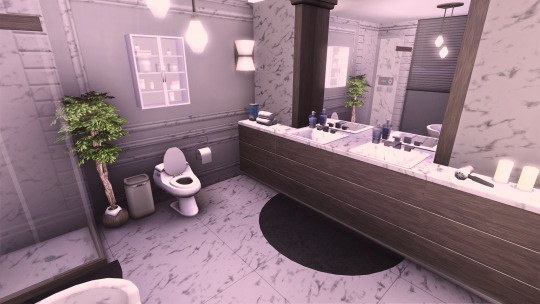

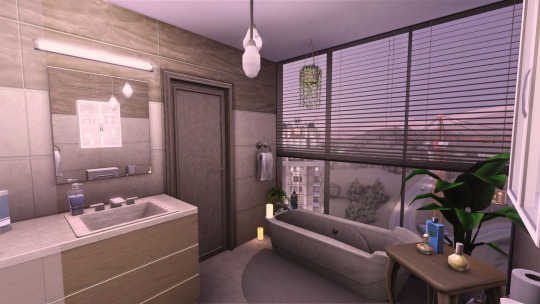
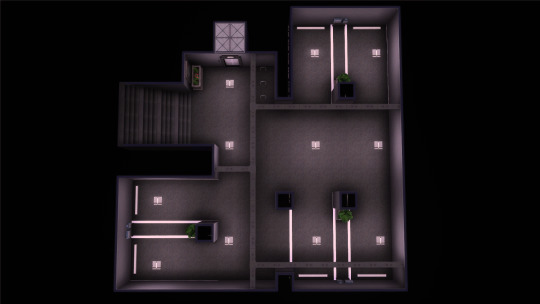

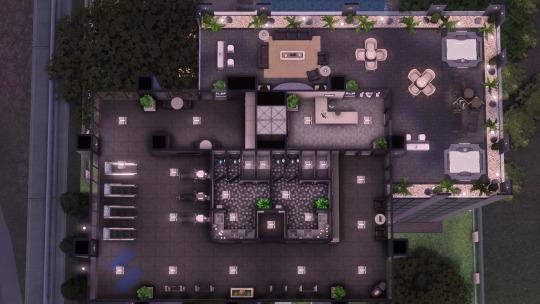

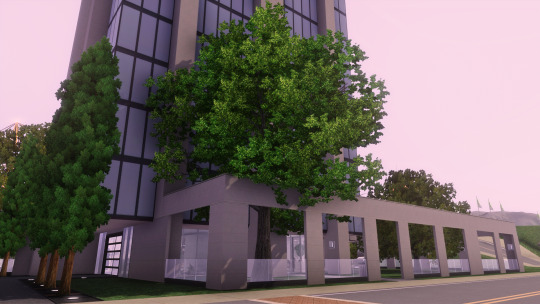
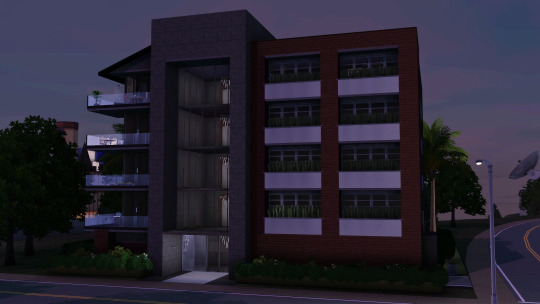
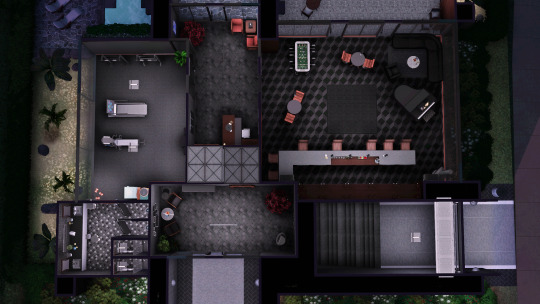
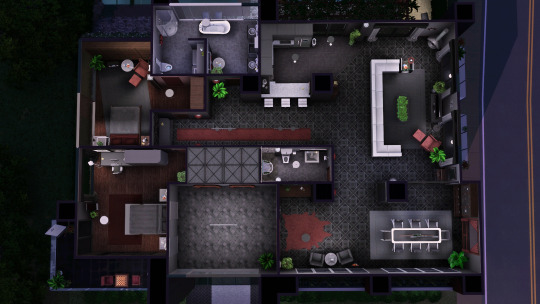
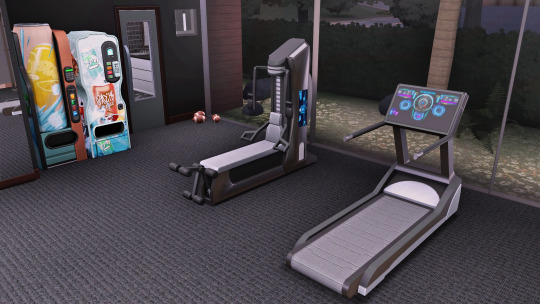
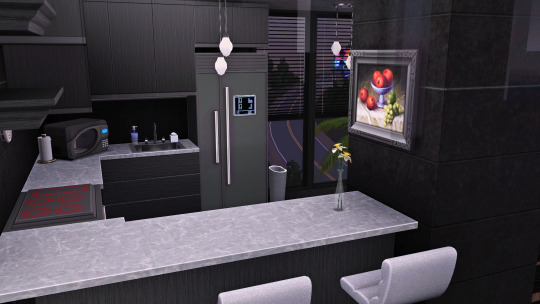
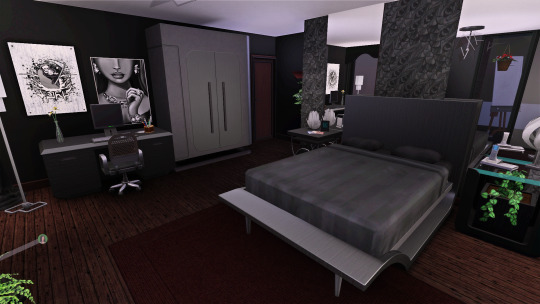
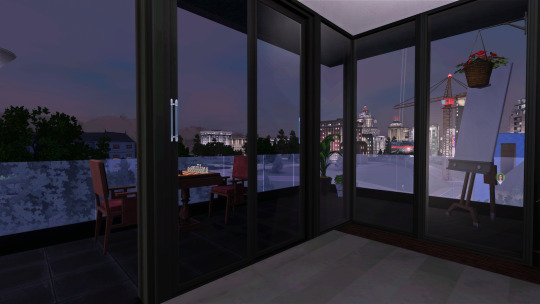
TS3 - LS3SR09 (No CC)
ENG:
When I took on this challenge from @joshttew, the first thing that came to mind was a towering building with glass everywhere. But the game’s height limit made it incredibly challenging. So much so that I gave up—at least for a while—because nothing I tried fully solved the problem or matched the vision I had in my head.
This week, though, I decided to give it another go, and… LOOK AT THIS BEAUTY! Isn’t it absolutely stunning?! I’m beyond proud of how this build turned out. 😭
For those curious about the technical details, here’s how I made it work: the building actually has only 5 floors (not counting the garage), but thanks to this amazing tutorial, I was able to make it look much taller. Since windows can’t be placed on walls altered this way, I picked a wallpaper that mimics the appearance of windows. In other words, the whole thing is just an illusion!
This game can be incredibly frustrating at times, but with a little creativity and a lot of patience, you can achieve some truly amazing results.
I hope you like it!
Features:
Lot type: Residential
Lot size: 40x40
Location: Bridgeport
Furnished lot value: 138.252 §
Unfurnished lot value: 9.865 §
Bedrooms: 2
Bathrooms: 3
Packs used in this build: EP01, EP02, EP03, EP06, EP07, EP08, EP09, EP10, EP11
Terms and conditions:
DO NOT claim my creations as your own.
If you want to use any of my builds in your custom world or save file, you are allowed to do so, BUT make sure to credit me as the original creator.
DO NOT re-upload my content under any circumstances; share it with your friends using my own links.
If you experience any issues, let me know and I’ll try to fix it as soon as possible.
Download it here. 🤍

SPA:
Cuando acepté este reto de @joshttew, lo primero que me vino a la mente fue esto: un edificio súper alto con cristal por todas partes. Pero el límite de altura del juego me lo puso increíblemente difícil. Tanto, que terminé rindiéndome… al menos por un tiempo, porque nada de lo que probaba solucionaba el problema por completo o encajaba con la visión que tenía en mi cabeza.
Sin embargo, esta semana decidí intentarlo de nuevo y… ¡MIRAD ESTA MARAVILLA! ¿No es absolutamente increíble? Ay, estoy muy orgullosa de esta construcción. 😭
Para aquellos que tengan curiosidad por los detalles técnicos, os cuento cómo lo hice: el edificio en realidad solo tiene 5 pisos (sin contar el garaje), pero gracias a este maravilloso tutorial, conseguí que pareciera mucho más alto. Como no se pueden colocar ventanas en las paredes que se alteran de esta manera, usé un papel de pared que las imita bastante bien. En resumen: ¡todo es una ilusión!
Este juego puede llegar a ser jodidamente frustrante a veces, pero con un poco de creatividad y mucha paciencia, se pueden lograr cosas realmente impresionantes.
¡Espero que os guste!
Características:
Tipo de solar: Residencial
Tamaño del solar: 40x40
Ubicación: Bridgeport
Valor del solar amueblado: 138.252 §
Valor del solar sin amueblar: 9.865 §
Habitaciones: 2
Baños: 3
Packs utilizados en esta construcción: EP01, EP02, EP03, EP06, EP07, EP08, EP09, EP10, EP11
Términos y condiciones:
NO proclames mis creaciones como tuyas.
Si quieres usar alguna de mis construcciones en tu mundo personalizado o save file, tienes permitido hacerlo, PERO deja claro que yo soy su creadora original.
NO resubas mi contenido bajo ninguna excepción; compártelo con tus conocidos usando mis propios enlaces.
Si experimentas algún problema, házmelo saber e intentaré solucionarlo lo antes posible.
Descárgalo aquí. 🤍
#the sims 3#ts3#sims 3 build#no cc build#sims 3 builds#sims 3 download#ts3 build#s3house#sims 3#sims 3 lots#40x40#apartamentos#s3cc#ts3 cc
617 notes
·
View notes
Text
Sorry, this may cause some drama, but I just had to let it be known. I just found out that scodee yodee blocked me LOL😝 I guess people don't appreciate being called out for stealing other people's content and putting them behind paywalls😬 I'm not sure when he blocked me, but does it really matter? I'm just surprised he didn't do it when I called him out under the comments of one of his posts, where he put up a download for a custom cities skylines building by modocero and other cs creators, which he deleted by the way (the comment, not the post). Yes, I checked to see if he had replied and when I did, my comment was gone. I wouldn't have said anything about him if he were converting the stuff, giving credit, and you know, not putting them behind paywalls, but because he essentially claims the stuff he converts as his own by not giving credit and making it known that his stuff are simply conversions, I did. So yeah...Honestly, I was hoping that my comment to him would make him own up and stop doing it, but this has shown me that he doesn't plan to stop on doing what he's doing...
Anyways, I've decided to put up a tutorial on how to add deco buildings/other deco objects to both TS3 and TS4. I was already planning on doing this, but this really has just motivated me to do it ASAP. Hopefully putting out these tutorials will encourage people to convert stuff themselves or make their own custom buildings. That being said, I wouldn't be surprised if there are some who decide to do the same scodee yodee is doing. I'm just saying this now, but if that happens, I will not hesitate to call anyone out. Please, just be a decent person, give credit where credit is due and don't put other people's creations behind a paywall. I know times are hard and people want to make easy money, but this is not the way to do it. I personally don't have a problem with paywalls as long as they aren't permanent or more than 3 weeks - 1 month long. However, if you want to do that, make your own stuff, please!
There are a lot of bad apples in this community and I feel like they should be called out for their actions. This does not mean that anyone should send hate or anything like that, btw. I do not condone bullying, sending threats or anything similar. This goes towards me as well. I know there are people who are fans of certain creators that will harass anyone who goes after their favs, but if this happens to me, I will make you known and block you.
Sorry for the rant, but I wanted to make this known. Thanks for taking the time to read this.
52 notes
·
View notes
Text
TSR CC Recommendations: TS2 Lot Builders
Nobody asked for this but I have a little time on my hands and I said I might do it, so here is a list of some TSR lot builders who I recommend checking out. A few notes under the cut before we get started (all details under the cut, as well, in case you aren't interested in my preamble):
This is not meant to be paid promotion for TSR. I believe TSR asking users to pay for their CC is ridiculous, especially for a 19 year old game they haven't supported in 7 years. But I spent many years uploading there during the peak-TS2 / pre-TS3 era and know there is great CC in their archives that newer players may not know about. And unlike TheSims2.com, which has sadly shuffled off this mortal coil, TSR's content is still available to freely download (assuming you can stomach the pop-ups and wait times)
This post will only be about lot builders because that was what I was primarily uploading and downloading in this era. I was friendly with some of the creators I am about to list, but none of them are still active members of the TS2 community.
The preview pics might be a little rough and the architecture styles will likely feel very dated compared to the most popular styles these days, which are more colorful, cluttered, and use 3t2 and 4t2 conversions. Re: the previews: too many of us were using free trials of PaintShopPro back then, and TSR limited us to 2 previews, so we did our best. Re: the styles: unlike pre-2010's CAS CC, which was full of hand painted and "realistic" textures (LOL), these are the same objects you can find in the game today, just being used in different ways! Sometimes for the first time! And, yes, while some of these creators used CC, it was mostly Homecrafter walls and floors, as you'll see below.
This was also the hey-day of CFE lot building, which has certainly fallen out of favor to more traditional builds (in part because graphics cards have improved and these types of builds don't look as good in 2024, and also because the great CFE experimenters, builders, and tutorial writers are no longer part of the community and their original discoveries are gone as well - I am happy to go down a massive rabbit hole on this piece of TS2 history if anyone else cares, but trust me, you don't have to care).
Alright that is enough caveating, here are some recs! (Links are in the creator's names and they take you to their Lots, though many of them have other creations, too).
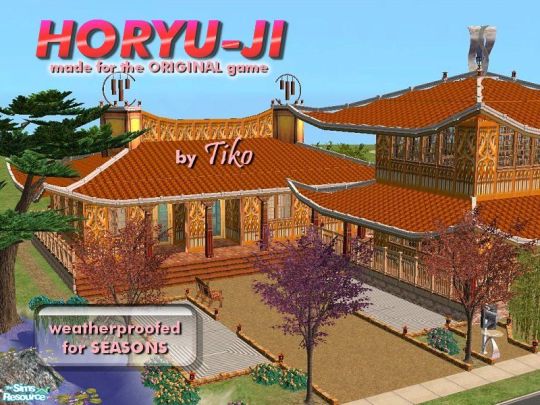
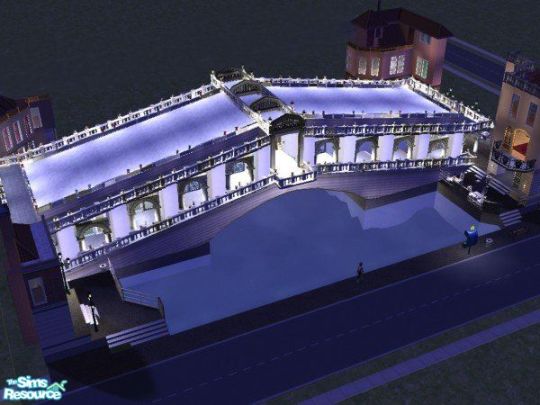
Lord Tiko Speaking of great CFE builders! Lord Tiko built spaceships, boats, pagodas, domes, windmills and bridges, oh so many bridges before retiring mid-TS2 because of health issues. He was one of the first builders to take Daihtnaoz7's single and double bridge tutorials and apply them to really big lots. I'm still not sure how he built the Venice Rialto Bridge, or his other European water lots. Overall, a massive inspiration to me when I was prioritizing CFE builds.
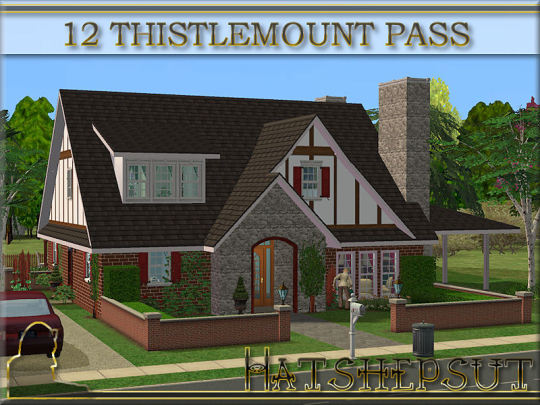
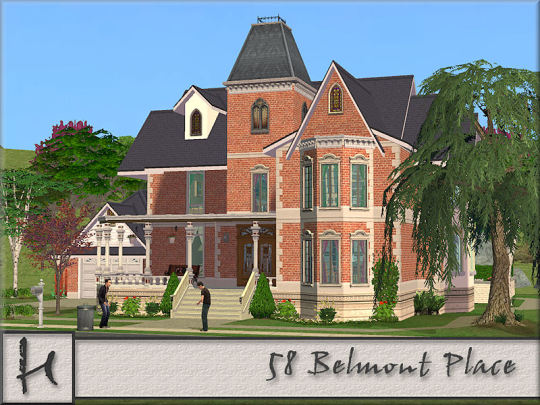
Hatshepsut My favorite "traditional" home builder, and someone I considered a friend. She specialized in English and American builds, and I had many of Hat's houses in my old saves and was impressed by her range and decorating style which was (for the time) more varied than many of her peers. Knew how to take great preview pics of her houses, too.
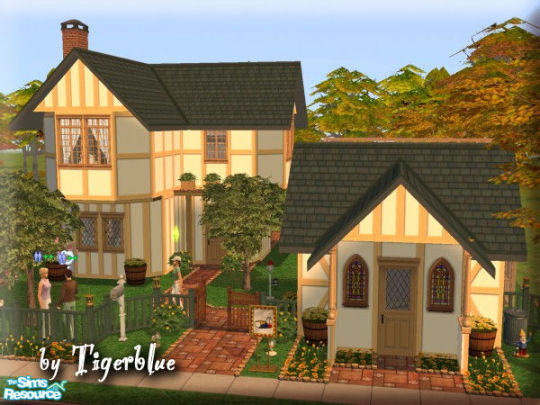
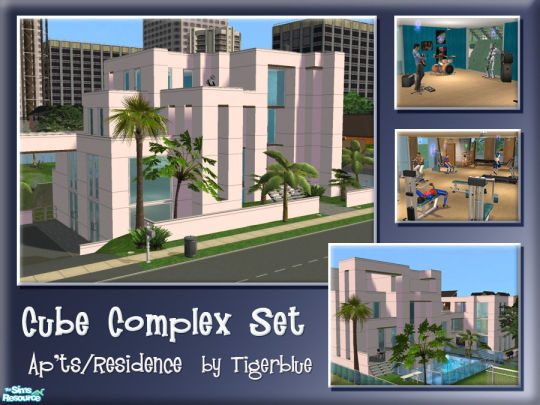
Tigerblue Another builder I corresponded with, Tigerblue was probably the least prolific uploader on this list for sheer number of uploads, but she also crossed a range of styles. Her builds leaned way into specific styles (see the previews, these were all part of consistent sets of 3,4, or even 10 lots), but this was also what happened when a new EP dropped and everyone raced to uploaded builds using as many of the new objects and styles as possible. Tigerblue just happened to be better at it than most of us.
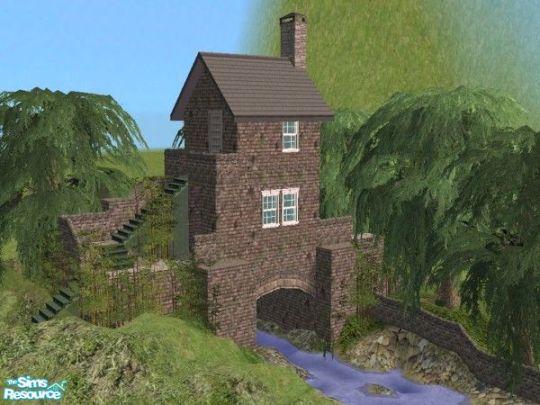
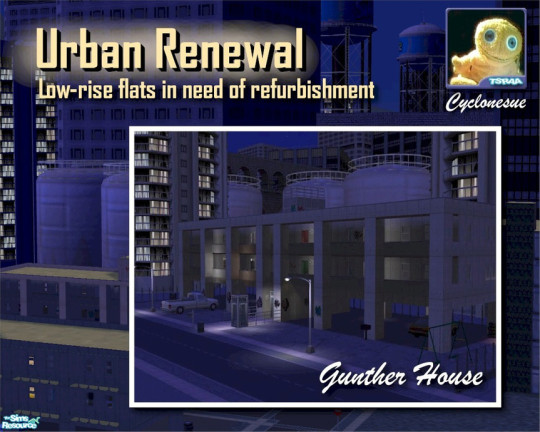
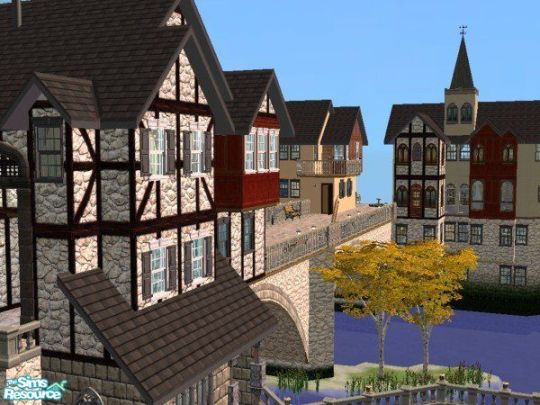
Cyclonesue Do current TS2 players know Cyclonesue? Because it's hard to think of someone who had a bigger impact on building and decorating of the era, first with her English and Tudor builds and later with her extremely distinct grunge creations. Seriously, check out her Urban Renewal series and the corresponding objects. Iconic stuff that surely now feels frozen in time. I probably only played 20% of her lots that I downloaded, but they still make for great hood decor. Like Tiko, someone who happily experimented with CFE.
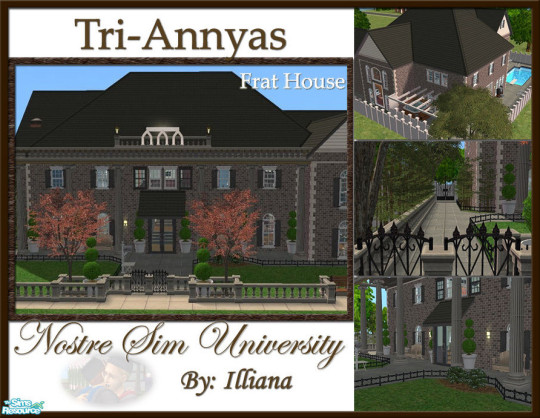
Illiana The creator who inspired me to make this list is, ironically, the one on it who I know the least about (she is a Featured Artist but not in the Hall of Fame, whatever that means). I just started playing her Tri-Annyas fraternity house and have a few other lots floating around my game. She built in a range of styles, from classical to modern to Twikki Island to grunge. Revisiting some of them in-game, the TSR previews do not do them justice.
*EXHALES* If you made it to this point, kudos to you. I'm sure there are creators I've forgotten, and houses I haven't linked to, but this is a good starting point for digging into some of the eclectic builds the TSR(chives) have to offer (I just coined that, is it clever? It is not). Maybe I'll do a Part 2 if people like this.
If you have any favorites of your own, let me know what I missed! And as I do with my old Exchange re-uploads, I am tagging @sims2packrat and @oldasscustomcontent for general TS2 history awareness!
#the sims 2#ts2#sims2cc#not mine#the sims 2 archive#thesimsresource#tsr#tsr lots#lord tiko#hatshepsut#tigerblue#cyclonesue#illiana
191 notes
·
View notes
Text
Some resources to understand DXT compression:
DXT Compression Explained
Why games use DDS
S3 Texture Compression Depending on the DirectX version, different DDS formats are supported. For DirectX 9, which Sims 3 uses, only the compressed formats ranging from DXT 1-5 are available. For Sims 3, mostly DXT1 (BC1), and DXT5 (BC3) are used, sometimes also DXT3 (BC2) if you do not need many transitional grey colors in the alpha. With DirectX 10 and 11, new and improved formats (BC4 to BC7) have been added that offer much better quality, but TS3 sadly cannot make use of them due to being a DirectX 9 game.
You can use different texture sizes in one project!
You can mix and match texture sizes, I tried that for clothing CC. For example, if you want to have a specular to create a shiny button or something like that, you can often get away with making it half the size of your multiplier. This is especially good if your multiplier is 2048px which is a lot (and should be avoided when possible), and to have smaller specular and mask files will help a lot to reduce the load on the memory. You can always try it out on a case-by-case basis if it works well or not. I usually have the normal map in the same size as the multiplier just because they often need that extra detail (this is for when you actually have detail in the normal map), but you can also experiment with making those smaller as well if you want.
Edit your UV maps!
IMO, one of the best skills a converter can learn is to edit UV maps. Look, we are playing The Sims 3 for a reason. If we want Sims 4 clothes that work like Sims 4 clothes, we could just play Sims 4. Sims 3 has this awesome pattern system, so let's try to properly support it because that is a huge strength of the game and such a wasted opportunity to not at least try to make the CC work with it as best as it can. This also means paying attention to potential UV stretching and disruptions of the pattern that can be fixed by rotating and stitching some UV pieces together.
To avoid having to use 2048px textures for those tiny squished Sims 4 UV maps, you can scale them up and then scale the textures up too. if they are just a little bigger there is usually not much quality loss, but you can also use an image upscaler like Gigapixel AI that will enhance the quality while making the texture bigger. I usually upscale the textures 2x or 4x and then reduce the size to what I need. This makes the textures appear nice and crisp.
Create original CC
Back when TS4 was not yet released, most people who wanted to make CC actually learned how to make meshes using different Sims 3 meshes and editing them and creating mashups known as frankenmeshes, then eventually meshed portions of it themselves or used Marvelous Designer to create the clothes. Blender has come a long way since then and it is packed full of super helpful features. And there are loads of tutorials for Blender now (15 years ago, you were lucky to find anything decent). Also, we can now use Sims 4's meshes along with Sims 3's meshes to create new mashup, and use Blender to customize everything from the base mesh itself to bones and morphs. The possibilities are endless. I really wish we had more original creators in our community. It is such a great feeling to make something that you dreamed up yourself. Maybe just try it?
Ask for help/share what you are struggling with
I've been known to help out whenever I can if you have specific questions about a project. If you feel like you cannot find the resources you need to learn or feel stuck, let the community know! Maybe someone knows a tutorial, or someone with knowledge can write one knowing there is a gap there. Since more experienced creators have not been in your shoes for a while, we may not know of all current beginner tutorials or if there is a lack of them. But if we know what areas need work, we may be able to help! And we can also help with specific issues. I recommend joining the TS3 Creator's Cave Discord to find resources, help, and advice.
Keep up with Software
Also, software changes and tutorials have to change too. It is still possible to mesh using the old ways, but a lot of tasks are easier with newer strategies. It is a good idea to keep yourself informed about tool updates and to go with the updates if possible to keep up with the newest developments. Especially Blender has added tons of new features these last few years and it is vastly different than a few years ago. A lot of changes are more convenient than sticking to the old ways in the long run!
tips for 4t3 converters/CAS clothing creators
3 main things:
non-recolorable presets
DDS. settings
Adult to Teen conversions
disclaimer: i'm not a CC expert, but these are things i've noticed and learned these last couple months converting cc. special thanks to thornowl and the other converters in the TS3 Creators Cave discord.
Non-recolorable presets:
we obviously know that ts4 lacks a CASt tool, so ts4 creators rely on recolors. In my conversions, I do include a couple of the item's recolors. these usually are patterns that CASt does not have.
one thing I've noticed more and more converters doing is putting such item recolors in the 'Overlay' tab in TSRW.
let me show you what that looks like for a non-recolorable preset:
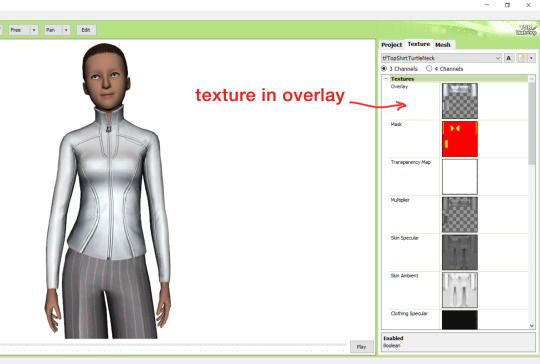
it looks over-saturated, and almost crunchy. but there's another place you can import the recolor into: stencils.
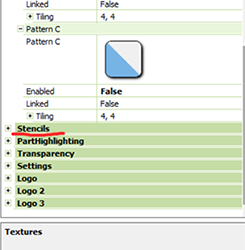
stencils will be found at the bottom, under patterns. hit the plus sign next to stencils to open it.
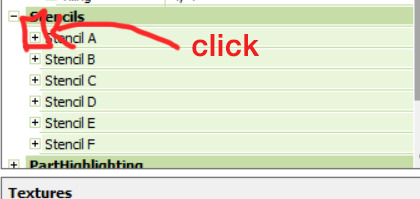
opening it will show you this:
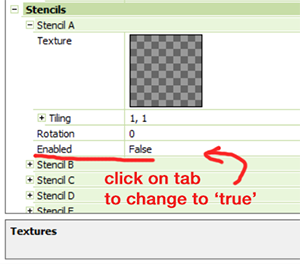
by default, it will be enabled as false. import your recolor into the texture tab as you would do for any other texture tab. make sure you tick the 'false' to 'true.' stencils override overlays, so if you want to use an overlay, enable stencils back to 'false.'
here's what the recolor imported into stencils looks like:

here's the two side by side:
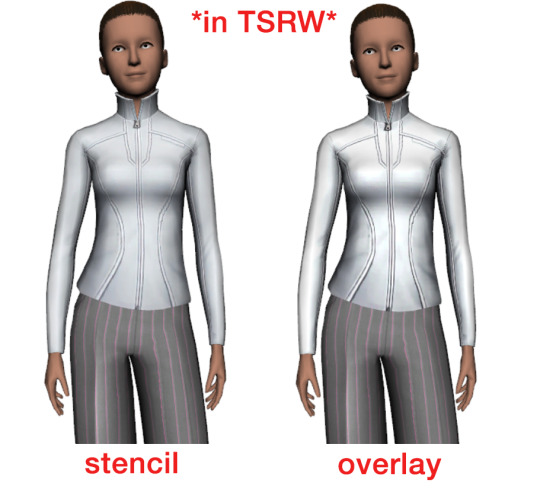
see how different they are? let's see how they are in game:
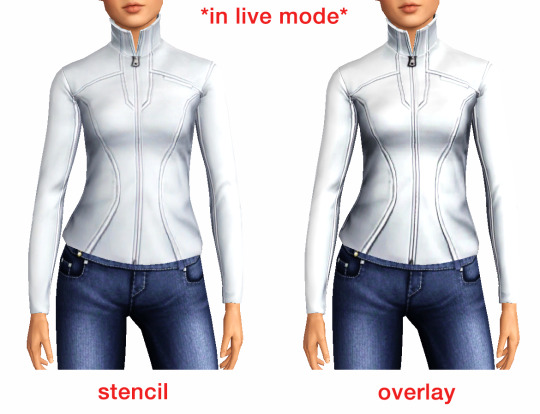
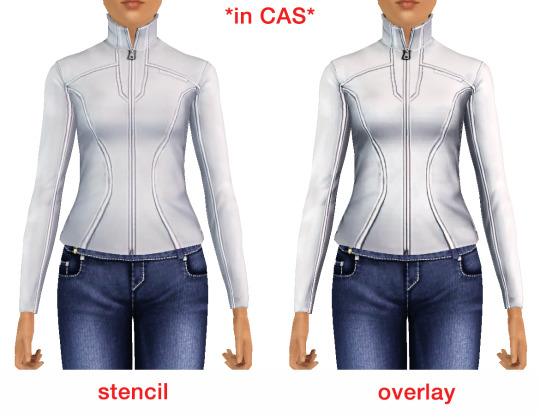
click on the pictures to really see the difference in quality. since TS3 uses DDS. format, it compresses the texture, which results in the crunchy texture. importing the recolor into the overlay tab makes the DDS. compression more noticeable. it ultimately is up to you and whichever one you prefer, but do keep it in mind.
the overlay tab is good for small details that you want to maintain on all recolorable presets, like zippers, buttons, tags, etc. just look at EA clothes for reference, especially their shoes and male clothes.
another thing you can see from the images are the bumps on the mesh. doing normal maps can help you keep those same details on the recolorable presets without importing the recolors.
-----------------
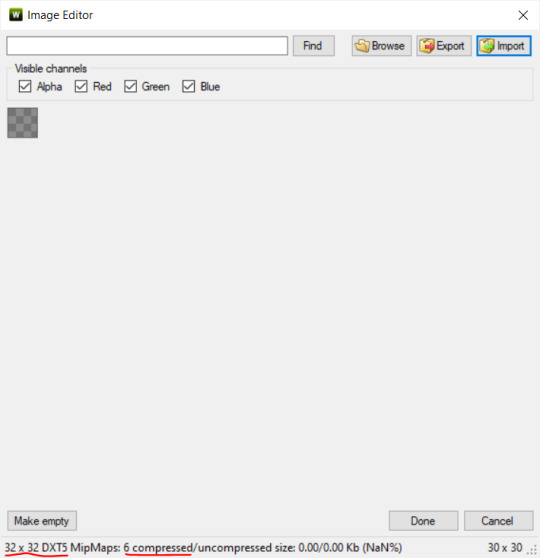
DDS. settings:
something I also see and used to do myself is bloat package files with large file sizes, specifically normal and specular maps, as well as masks. the Sims 3 Tutorial Hub provides a link to plain maps, but the file sizes are unnecessarily big.
let's look at some of EA's maps in TSRW:
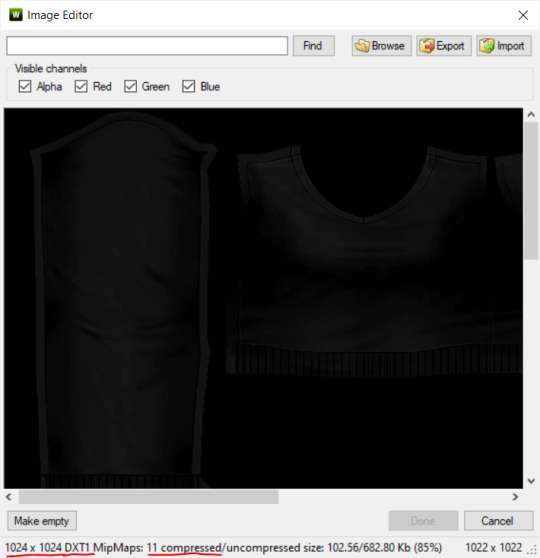
here's the specular from one of the basegame sweaters. notice the image size, DXT format, and compression size.
a lot of converters don't want the shine on regular clothes, so we use a plain, black specular map. but ask yourself, why do you need a 1024 x 1024 purely black specular map with no details?
let's try sizing it down:
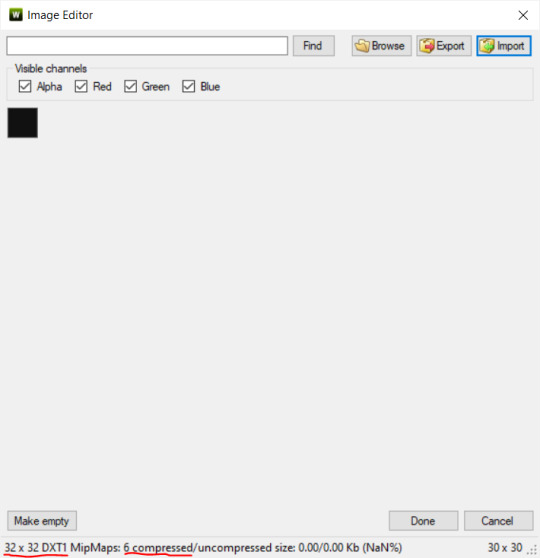
notice the difference between the image and compression size. instead of bloating the package file, we can keep it down by using a 32x32 plain black specular map instead, since there aren't details we want from the specular map.
same goes for normal maps:
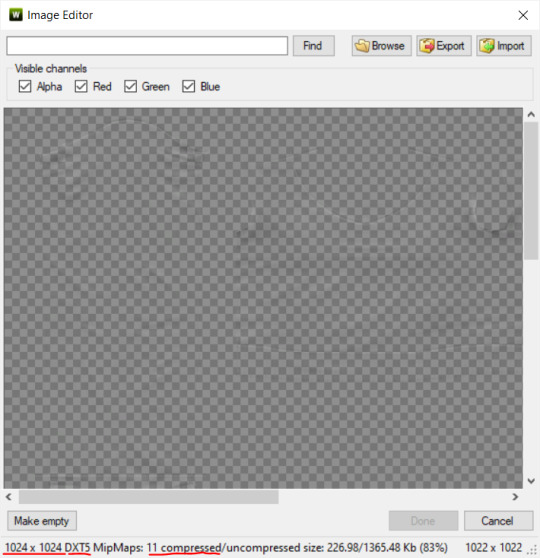
and masks (meant for 1 channel only):

now, notice how I underlined the info about DXT MipMaps. see how the normal map has a different number there compared to the specular map and mask.
the reason these textures use different DXT is because of the colors and alpha channel.
here's how my DDS. settings appear when saving:
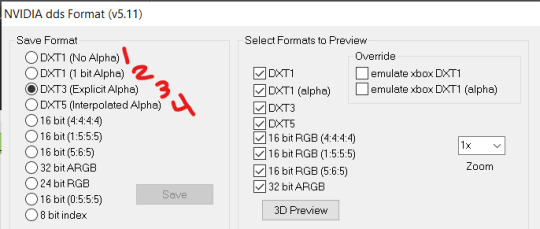
DXT1 (no alpha): this keeps only the 3 color channels and has the strongest compression. it results in half the file size as DXT3/5. 3 channel masks should be saved with this, as they don't need an alpha channel.
DXT1 (1 bit alpha): this includes an alpha, but only black or white. it also results in half the file size as DXT3/5.
DXT3: this one is rarely used for TS3 textures. it really is only used for overlays. it compresses the same as DXT5, but may not be the best for images with smooth-blended alpha regions (Neely).
DXT5: multipliers and normal (bump) maps should only EVER be saved with this. it's best for colors but has a larger file size. this is why it's important to reduce the multiplier and normal map image size, especially if you don't make a normal map.
if you DO decide to do a specular and normal map, they should be regular image size, 1024x1024, and saved in the right format.
here is more information on which textures should use which compression.
-----------------
Adult to Teen Conversions:
the default for converters is obviously AF and AM. a lot of people want the items for teens too. I've seen several converters just enable it in TSRW:
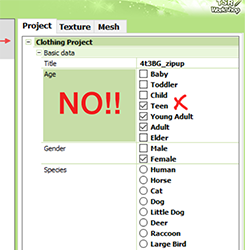
please don't do this. it's honestly the lazy route. you can hardly ever get away this, specifically because of the body differences between adult and teen.
some major issues with this include gaps, seams, and unnatural body characteristics:
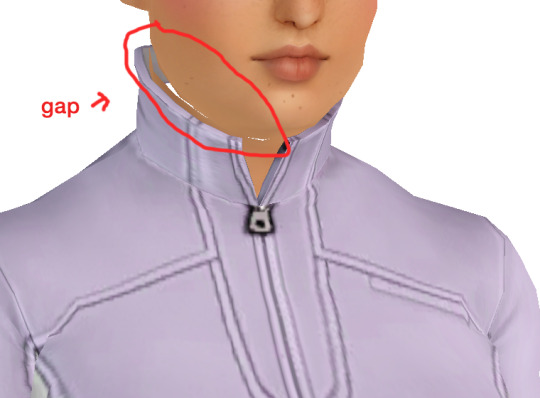
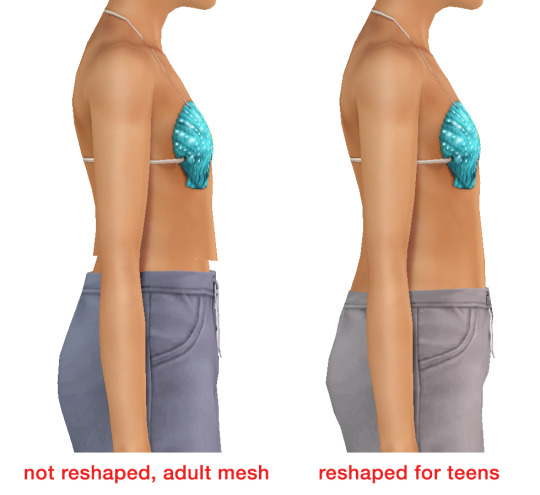
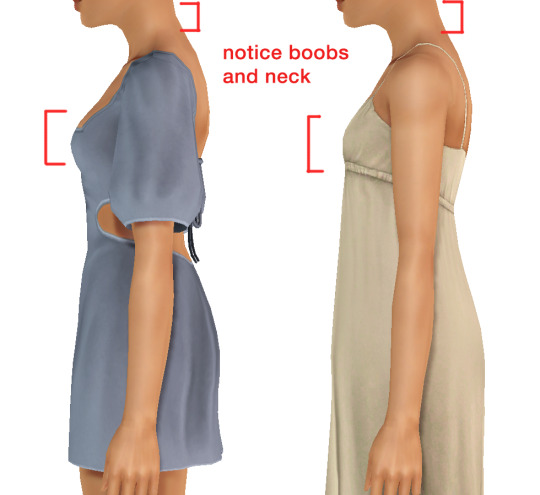
so please, either skip the teen mesh entirely or spend the time reshaping the mesh. @/sweetdevil-sims has a great tutorial on converting meshes from AF to TF here. the inevitable seams on TF meshes are also now fixed, thanks to @/thornowl with their new version of mesh toolkit.
@pis3update
---------------
here are reduced file sizes and corrected settings of the plain mask, specular, and normal:
download
Sources:
Neely, G. ‘Buckaroo’. Working with DDS/DXT Files. Available at: https://www.buckarooshangar.com/flightgear/tut_dds.html (Accessed: 28 May 2024).
#ts3#tutorial#cc tutorial#ts3 meshing knowledge#TS3 CC tips#learn how to create CC#ts3 resource#sims 3 modding#sims 3 CC creation
214 notes
·
View notes
Note
Hello😊 I'm just re-doing my default replacements folder and firstly want to thank you for all the gorgeous things you've made🥰 Also, I'm interested in using your urn default replacement (as well as tombstones) but for the urns I think I'd prefer it if the moderate urn used the base TS3 mesh, all aspirations who died in platinum used the wealthy one rather than just fortune and none using the poor one, could you please guide me on how I could do that? Thanks!
Hi! Well, the cleanest option would be making a new default replacement, my quick guide for that is here. You'd need to edit the meshes a bit to get them aligned with the original ones, but that's just importing both the original and the new mesh into Milkshape and moving the new one up/down, I assume most general object creation tutorials cover as much.
Or then you can use my default replacement as a base and simply use GMDCs export/import options to export the TS3 urn mesh you want to use and import it over the mesh you don't want to use. You can change the textures linked to meshes in SHPEs and delete the ones you don't need.
Not sure how useful this is, writing a step-by-step guide with images would take me a long time with this many meshes involved, but I hope it helps you forward.
Oh and I always recommend Echo's scenegraph tutorial to everyone who works with objects and with object default replacements especially. If you understand and can read the scenegraph, you can basically do anything with them.
13 notes
·
View notes
Note
Hey, hey, guess what I stumbled upon, or what I've managed to figure out: Boroughsburg has payphones!, and they've been there since the beginning, duh! Any clue on how to make them work? I've tried to get them functional with your mod's script, but it seems like they need more than that, but I'm clueless, honestly haha!

Hey there Josh, Apologies for it being a while since you originally sent this...I've been caught up in a flurry of work for the last long while. This turned out to be a novel 📝, so I'll hide it under here:
So the payphones in Boroughsburg are likely deco items, so they are there for visual appeal but do not have a function! The ones that I posted were the same, they were originally deco items. What I did to make them work was even more simple than a mod, but honestly so tedious! Wall phones already exist in TS3 (can you believe my surprise that they don't have those in TS4??), so I cloned a wall phone to start. Then I imported the mesh for the payphone I wanted to overwrite the old one, as well as the textures. The next thing to do for items like this is to add geostates. These seem to be at least somewhat unique to TS3 and sims game creation-spaces in general, so it was hard to learn how to do this or what in the world a geostate is. They're present in a lot of TS3 objects, starting from the base game. For example, the bookcase getting more or less full based on how many books are in it, food plates getting slowly more empty until they are completely clean when the sim is done eating, pizza slices disappearing, drink glasses becoming empty when the sim is done (some of these are geostates, some are effects), the phone handset disappearing from the phone when the sim "picks it up" etc...there are so many more but these are just some examples. How these work, at least from a CC creating standpoint, is modification of the mesh in TSR Workshop. When you set the geostates, you are telling the game to remove certain polygons/parts of the mesh when needed. So the entire mesh is there, but parts of it disappear and reappear when told to. So the handset on the payphone when not in use stays, but when a sim interacts, that piece of the mesh disappears. The handset sims actually use is another default object called from somewhere else, like the mop sims use to clean puddles that they carry around in their pocket everywhere XD Setting geostates is a painful clicking activity. You need to de-select each individual triangle that you want to disappear for a geostate. Some objects have more than one (like bookshelves). With certain meshes, it is enough to drive one up a wall. Simple enough but definitely one of the most annoying CC creation tasks! This is also something important to keep in mind that with objects that have geostates, they will be invisible in-game if you don't make sure to set up their geostates. Even if you don't plan to make them dynamic (eg, a bookcase that never gets empty or full, just stays the same no matter how many or little books are added), they need to have all faces selected for their geostates or else they will be invisible in-game. This is luckily easy, there's a shortcut to select all at once (the exact shortcut fails me, but I'm pretty sure TSRW tells you when you're in the editor). This was a long winded half-rant about geostates but I hope this (and maybe this tutorial here) helps give you an idea of how these work @joshttewloves!
📝
#ask#ts3#geostates bad#ok they're not bad but they are not fun and tsrw is a mean app#i alternate between two versions of tsrw bc sometimes it doesn't even work#i call them tsrw and blurry tsrw bc the icon of one is blurry#ironically blurry tsrw works better 80% of the time
11 notes
·
View notes
Text
Get to know you - Sims Style
Thank your for tagging me, @daniel-fortesque & @bast-sims
What’s your favorite Sims death?
None (hate it when it happens); the most frequent one in my gameplays is the old age one.
Alpha CC or Maxis Match? A mix between the two, it depends how well the CC matches the game's art style.
Do you cheat your sims weight? Not really; what I cheat is how muscular my female sims are as I play a lot the Acrobat career in TS3 Showtime and my girls bulk up too fast and too much.
Do you move objects? Ever since I learned about this particular (and very useful) cheat, yes.
Favorite Mod? Most of the Nraas mods, all of @thesweetsimmer111 fabulous baby/toddler mods and also small ones to correct some stuff in the game (like No Mascot Camera Zoom, No Autonomous Gaming, Autonomous Wash Hands After Toilet Use, Zoom-In CaS Camera, etc)
First Expansion/Game Pack/Stuff Pack? World Adventures.
Do you pronounce live mode like aLIVE or LIVing? aLIVE
Who’s your favorite sim that you’ve made? A lot of them, for different reasons.
Selena Noble - a ballerina (now an acrobat) with no moral compass. But I think she's cute so she's my muse for the balletcore collection.
Lin Young - my fearless adventurer.
Riley Preston - my talented artist.
Hope London - my dedicated gardener.
These three: Mel Hada, Ren Akiba & Jace White (aka Yasu Sato). They are the MCs from "Uncertainty".
I don't have pics of them right now, but I also have to mention: Sasha Azarov, Daichi & Rei Sato, Ayanna Sato, Sebastian DeLuca.
Have you made a simself? The first sim I ever made was a simself. It did not go well.
Which is your favorite EA hair color? None; since it's TS3 I mix them according to my characters.
Favorite EA hair? Not really using the EA hairs usually, but I'd choose the Playful Updo from Late Night.
Favorite life stage? I play a lot the YA & A life stages, but also enjoy all the other ones.
Are you a builder or are you in it for the gameplay? I'm in for everything the game has to offer: gameplay, building, CAW, CC creation.
Are you a CC creator? Yup.
Do you have any Simblr friends or a Sim Squad? I wouldn't say a squad, but I do have people here that I admire and like to interact with.
Do you have any sims merch? Nope.
Do you have a YouTube for sims? Yes (as I'm an ex-machinima creator), but these days I'm only using it when I have animations to share.
How has your “Sims style” changed throughout your years of playing? In every possible way. I put a lot more thought into my builds (and worlds), my sims no longer look like aliens (I used to make them have these big anime eyes) and my gameplays are more wish-based than ever.
Who’s your favorite CC creator? So many of them since I'm a big CC hoarder. As Daniel said, everyone who brings something to this game is a champion and deserves accolades.
But to mention only a few, I'd say @simtanico for their high quality items, @enable--llamas for the awesome furniture, ArtVitalex & Onyxium over at TSR who both still create furniture for TS3, Bill-Sims also at TSR, @sim-songs here on Tumblr for their conversions, @technicallyswagpizza for their amazing plants (and tutorials that taught me a lot), @yorithesims and @bmit04 for poses; @maryjanesims3 & @agnelid for hair default replacements, and so many more. Sorry, I can't remember everyone right now.
How long have you had Simblr? Since January 2019.
How do you edit your pictures? For more aesthetic pics I use Reshade and PS (although I don't remember ever posting these types of pics), but I usually just slightly adjust the brightness, contrast, saturation and exposure in PS as I love the TS3's default art style (I'm just spicing it up a little).
What expansion/ gamepack is your favorite? Kinda all of the expansion packs?! Mainly Seasons, World Adventures, Late Night, Island Paradise, Generations. Also love all the functional store content and worlds.
Tagging: @technicallyswagpizza @chojrak-making-things @agnelid @murfeelee @simtanico @puffkins2000 @yorithesims @enable–llamas @solori @pudding-parade @faerielandsims @jazzysimlife @tiaamorosa @lordressdragoonbear @thesweetsimmer111 @bmit04 @maryjanesims3 @nornities
Feel free to ignore if not interested or have done this before! 😁😘
28 notes
·
View notes
Text

After hours of effing around, my WIP conversion TS4 to TS3 that I need since it's one of my favorite doors in TS4.
Still need some work but I learnt many things: if you got no joints in Milkshape, trying to import different .obj references won't help since they might not have any too. So if, like me, you had to redo your whole computer, you might want to install things properly and use TSRW pluggins for Milkshape (oopsie). So .wso it is then...
And if TSRW won't import you mesh because of the "import failed could not update swiffle information for mlod entry" or wrong number of vertices/faces, you need an older version of TSRW you'll find on the best tutorial hub for Sims creation.
I don't think I will be able to share the result of this WIP conversion because of its creator's TOU (even tho I agree with this post).
But I'd like to thank the whole community, the people behind every damn tutorial and my cat for walking in front of my screen half the time I do anything on my pc (like right now, I'm writing without seeing the screen, rascal of a Moon-moon). And every converter who inspired me to do it myself💕
7 notes
·
View notes
Note
I love love love your mods and content! Such a huge fan 🩷 do you have any tutorials on how to change the mesh of existing store content? For example I want to change the car on the fixer upper item from Roaring Heights.
Again all love for you, appreciate any info!!
Thank you! 🤗
Changing the mesh of store content items works the same as changing the mesh of an in-game object. But make sure your store item is in .package format, otherwise it can be tricky to get it open in TSRW.
The Sims 3 Tutorial Hub has a whole host of tutorials for creating TS3 custom content, but here are a few I picked out that should help you get started with your project:
How to Make Functional Objects
How to Separate Objects Into Parts
How to Work With Object Groups
They're also great about answering creation questions you may have, so definitely check them out! I learned a lot from their page when I started converting/creating.
14 notes
·
View notes
Text
Let's show that TS3 core feature called Create-a-Style some love 💜
The CaSt feature is one of the most unique and defining features of the Sims 3. Let's use it to our advantage!
As a pattern creator, I am counting on the ability to recolor CC so that my patterns can be widely used. Making patterns is a pretty lonely road these days (it's more of an overgrown path, hardly anyone travels it anymore). While most likely not the only culprit, the rise of non-recolorable CC (read: patterns cannot be applied or look terrible) definitely plays a role in this development. I admit that I sometimes worry about my place among fellow creators, should this trend continue to gain momentum. Patterns are at the heart of the Sims 3 and there are only a few pattern creators left. It would be sad to see the numbers dwindle even more. It would mean that a lot of creative potential in our games will vanish. Inside the Sims 3, patterns are an important asset to make our creative visions come true, as they can completely transform the look of most objects (and clothes, accessories, walls, you name it). As part of a community, creators have the opportunity to lift each other up, and object/clothing creators can help fellow pattern creators feel valued by including a recolorable swatch (and tidying up that UV mask so they will look good, too 🤪). Furthermore, creators have the opportunity to work hand in hand to enhance the value/usability of their CC for all fellow simmers. So let's do this! If you are a CC creator and have not made your creations recolorable, but are interested in doing so, or in improving your skills, why don't we have a conversation about it? Let's get behind the mystery of recolorable CC. We can put our heads together as a community and share resources, tips, tutorials, and workflows to teach each other how to make RGB masks, edit multipliers, bake AO maps, and straighten those UVs. If you are an experienced creator and are open to sharing your process on how to make CC recolorable, or simply know some great tutorials, please feel free to share in the comments or reblog with info! Feel free to post your questions or concerns too so we may find common ground and appreciate each other's efforts.
Let's make a positive change together 🙏
#ts3#show patterns some love#recolorable CC - let's do it#simblr community spirit#Sims 3 CC Creation#S3CC tips
110 notes
·
View notes
Text


TS3 - LS3SR03 (No CC)
ENG:
I never say no to a good challenge, so when @joshttew challenged me to build a modern-style apartment building on a small lot, the only viable answer was YES. And, well, @joshttew, I hope the result meets your expectations.
I'm not entirely satisfied, but that's pretty typical for me. I would have liked to make a taller building, and I tried using several tutorials and tricks, but the lot kept bugging out, the game would crash, or it just didn’t feel right or fit what I had in mind. Because, even though it's possible to bypass the height limit (or at least make it look like you did), the "floors" added above that limit are really limited in too many ways. Well, EA making things tough for us... What a surprise, right?
Initially, my idea was to make a building with many floors (10-15), with the livable apartment on the top floor, and everything on the outside made of glass. Literally everything. But I ran into two problems: following this tutorial, the livable apartment couldn’t be at the very top, and this method, although it would let me do it, wouldn’t let me make it entirely glass, mainly because you can’t place windows on the levels altered this way.
So I gave up and decided to build something simpler to start with. And when I say start, I mean this isn't finished yet. I’m pretty stubborn, and I still don’t know how I’m going to make that idea a reality, but it will happen.
(If any of you know a way, I’d be very grateful if you could share it with me.)
I hope you like this build, and most of all, I hope @joshttew thinks I’ve completed the challenge. It would be a relief to know that all the rage, anxiety, and frustration I went through in the process were worth it HAHAHAHA.
Enjoy. 💙
Features:
Lot type: Residential
Lot size: 30x30
Location: Bridgeport
Furnished lot value: 90.885 §
Unfurnished lot value: 8.357 §
Bedrooms: 2
Bathrooms: 2
Packs used in this build: EP02, EP03, EP06, EP07, EP08, EP09, EP10, EP11
Terms and conditions:
DO NOT claim my creations as your own.
If you want to use any of my builds in your custom world or save file, you are allowed to do so, BUT make sure to credit me as the original creator.
DO NOT re-upload my content under any circumstances; share it with your friends using my own links.
If you experience any issues, let me know and I’ll try to fix it as soon as possible.
Download it here. 🤍

SPA:
Yo nunca digo que no a un buen reto, por lo que, cuando @joshttew me desafió a construir un edificio de apartamentos de estilo moderno en un solar pequeño, la única respuesta viable era SÍ. Y, bueno, @joshttew, espero que el resultado esté a la altura de tus expectativas.
Yo no estoy del todo conforme, pero muy pocas veces lo estoy. Me habría gustado hacer un edificio más alto, y lo intenté por medio de varios tutoriales y trucos, pero se me bugueaba el solar, me crasheaba el juego, o simplemente, no me convencía o no cuadraba con lo que tenía en mente, porque aunque es posible evadir el límite de altura (o al menos que así lo parezca), la verdad es que los "pisos" que añadas sobre ese límite estarán muy limitados en demasiados aspectos. Vaya, EA poniéndonos las cosas muy difíciles... Qué sorpresa, ¿eh?
En un primer lugar, mi idea era hacer un edificio de muchas plantas (10-15), que el apartamento habitable estuviese en la planta superior, y que, además, todo su exterior fuese de vidrio. Literalmente todo. Pero me encontré con dos problemas: siguiendo este tutorial, el apartamento habitable no podría ser el de arriba del todo, y este método, aunque sí me lo permitiría, no me dejaría hacerlo enteramente de vidrio, básicamente porque no se podrían poner ventanas en los niveles que se alteraran de esa manera.
Así que me rendí y decidí construir algo más sencillo para empezar. Y digo para empezar porque esto no se ha terminado. Soy muy cabezota, y aun no sé cómo voy a conseguir que esa idea pase a ser una realidad, pero así va a ser.
(Si alguno de vosotros conoce algún modo, le estaría muy agradecida si lo comparte conmigo)
Espero que os guste esta construcción y, sobre todo, que @joshttew considere que he cumplido el reto. Sería un alivio para mí saber que toda la ira, ansiedad y frustración que me ha generado en el proceso han servido para algo JAJAJAJAJAJA.
Disfrutadlo. 💙
Características:
Tipo de solar: Residencial
Tamaño del solar: 30x30
Ubicación: Bridgeport
Valor del solar amueblado: 90.885 §
Valor del solar sin amueblar: 8.357 §
Habitaciones: 2
Baños: 2
Packs utilizados en esta construcción: EP02, EP03, EP06, EP07, EP08, EP09, EP10, EP11
Términos y condiciones:
NO proclames mis creaciones como tuyas.
Si quieres usar alguna de mis construcciones en tu mundo personalizado o save file, tienes permitido hacerlo, PERO deja claro que yo soy su creadora original.
NO resubas mi contenido bajo ninguna excepción; compártelo con tus conocidos usando mis propios enlaces.
Si experimentas algún problema, házmelo saber e intentaré solucionarlo lo antes posible.
Descárgalo aquí. 🤍

#no cc build#sims 3 build#sims 3 builds#sims 3 download#ts3#the sims 3#ts3 build#s3house#sims 3#sims 3 lots#ts3 house#ts3 dl#ts3 cc#ts3 download#s3cc#apartamentos#30x30
167 notes
·
View notes
Text

Balasan komentar buat banyak orang. Kita orang Asia semua.

@yorithesims
どうもありがとうございます yori さん!I don't know if you play The Sims 4 too, glad you like my creation and I hope you like Indonesian food as well. You can try there are many restaurants that sell Soto Betawi and other Indonesian food in Japan.
List of Indonesian restaurants in Japan based on TripAdvisor
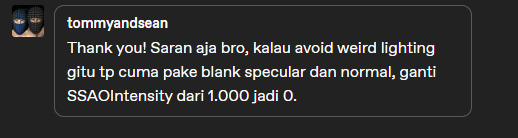
@tommyandsean
Iya, bro. Jaman gua dulu convert ke TS4 settingan SSAO intensity-nya di edit dari 1 jadi 0 gara-gara ada garis item nembus di CC nya. Lama-lama capek jadinya bolak balik klik klik material... phong... material... material lagi... terus save... cuma buat edit settingan SSAO intensity nya.
Karena gua pake metode yang diajarin tutorial yang tinggal import specular dari export-an TS3 TSR Workshop dimasukin ke semua DST image, ternyata malah jadinya ada muncul bayangan gelap. Harusnya yang diimport ke s4studio itu DST paling bawah dijadiin normal map ngikutin format alpha dari .dds original EA, bukan specular semua. Sekarang udah gak ada bayangan gelap nembus ke CC jadi settingan SSAO intensity gak perlu diedit lagi.
Dulu:
DST image atas bawah semuanya sama Spec dari export-an dari TSR Workshop tanpa diedit lagi. Makanya alphanya beda sendiri dan ngaco.
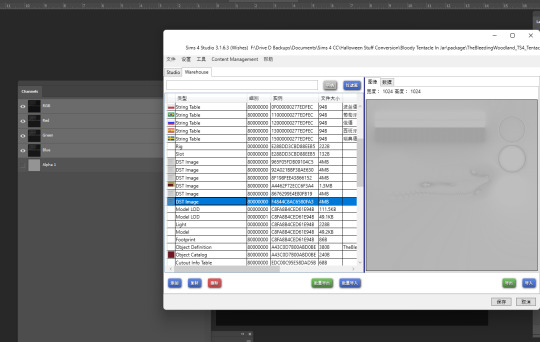
Sekarang:
DST image bawah: Normal Map
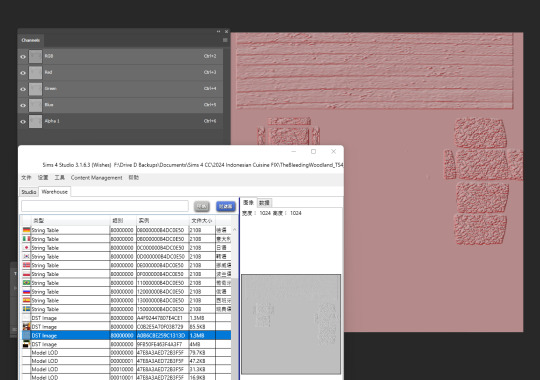
DST image atas: Specular

EA original
DST image bawah & atas


@fantashit
Apanya yang cantik nih, tempat sumpitnya atau model Sim yang ceweknya... hahaha. Kalo maksudnya tempat sumpitnya... Makasih, bro! Model ceweknya gua download dari gallery bukan gua yang bikin... cantik juga doi
Sekalian mau ngasih tau ada Sims player dari Malaysia yang request ke Sandy aroundthesims buatin CC kamar mandi khas Indonesia & Malaysia yang ada bak mandi, ember, gayung, toilet jongkok, semprotan buat cebok. Silahkan di-klik LINK nya.

@nerogreen Hahaha terima kasih ^_^ Moga-moga CC buatanku berkat buat kamu ya.

@moonxstr Terima kasih banyak atas pujiannya ^_^ Mesh-nya bukan asli buatanku, tapi senang lah CC-ku sudah membawa kesenangan dan representasi yang baik buat Sims player dari Malaysia. Aku juga suka makan Nasi Lemak, terakhir aku makan Nasi Lemak 10 tahun yang lalu di Kopitiam (warung kopi Malaysia).
#reply#balasan#the sims 4#the sims#thebleedingwoodland#ayo semua sims player dari Asia kumpul semuanya di sini#huifu
6 notes
·
View notes
Text
i wish there were more ts3 sim creation tutorials that had more like. general tips. and less "download this custom content. download that custom content". someone can download a heckton of custom content and have their sims still look bad because there are no guides on how to use said custom content (or create-a-sim) in a pleasing way
3 notes
·
View notes
Note
Hi! When coming across your recent additions for mersims, I was just thinking if you had tutorials to recommend, which help making mermaid tails fitted for walking on land. Because I've been looking for ways to make cc tails move just like in the Sims 2, when the tail just follow the right leg vertice, so the tail texture doesn't "shred" when sims are walking. Anyway, no worries--if you don't know about what I'm talking about. Your creations are awesome by the way!
Sorry, i don't know how to fix this problem😭.. but maybe chatgpt can be of some help tho? Im not sure if it will help but i can paste it here:
🛠 Tools You’ll Need:
S3PE (to extract CAS parts)
TSR Workshop or Sims 3 Package Editor
Blender or Milkshape 3D (most use Milkshape because of its plugin support)
Delphy's Sims 3 Dashboard Tool (optional, for cleaning conflicts)
✅Recommended Approach:
1. Clone a Bottom Mesh (Like Tights or a Long Skirt)
Use TSR Workshop or Sims 3 Package Editor to clone a tight-fitting bottom, like:
Leggings
Skintight pants
Long skirts (for a base to stretch into a tail shape)
Avoid flared skirts because they’re weighted differently.
2. Modify the Mesh into a Tail Shape
Import into Milkshape or Blender.
Sculpt the bottom into a tail shape—closed at the feet.
Add tail fins at the ankle area, but keep the overall structure compact so the legs don’t separate while walking.
3. Reassign Bone Weights
This is key!
Assign most of the tail to the right leg bones (e.g., R_Thigh, R_Calf, R_Foot).
You can include slight influence from the pelvis or left leg to keep balance, but lean mostly on the right leg.
If you're using Milkshape, this will look similar to the Sims 2 trick.
🎯 Goal: The entire tail moves as one solid structure with the leg, like a tight pencil skirt.
4. Handle Foot Rigging Carefully
You may need to hide or merge the feet inside the tail mesh.
Or just stretch the tail past them and leave feet unrigged, so they don’t pop out during animation.
5. Avoid Morph Breaks
TS3 uses morph states (fat, fit, pregnant, etc.). Be sure to generate these using MorphMaker or manually sculpt them.
If not, the tail might “break” when a sim changes weight.
🔁 Optional: Add Texture Flow Fix
If you're noticing stretching or warping of the tail texture when the sim walks:
Use tight UV mapping like tights.
Keep seams hidden on the back side or in creases of the tail.
📹 Animation Tip:
You can optionally override walk styles using XML or scripting mods, but that’s advanced.
Most creators skip that and just rig the tail tightly enough to look good with regular walk cycles.
1 note
·
View note