#useragent
Explore tagged Tumblr posts
Visit Tumblr Blog
Explore Tumblr blogs with no restrictions, modern design and the best experience.
Last Seen Tumblr Blogs


Fun Fact
In February 2021, Tumblr had 518.6 million blog accounts.
Text
How User-Agent Strings Leak Browser Information?

VMLogin Antidetect Browser, which can modify UA information such as OS and version, language, browser name/version/engine, and device type (tablet or cell phone) to form a new User-Agent, which prevents leakage of real UA information. If you need to run multiple businesses or accounts on a single device, then changing the UA is critical.
VMLogin generates a fingerprint that matches the real device and provides a unique environment for different accounts, which keeps them private and secure.
New users can try it for three days!
#software#protection#virtualbrowser#dataprotection#virtualplatform#browser#vmlogin#searchsafely#userinterface#useragent
0 notes
Text
2024 tech support experience: user: hello yes when i sign in it gives me a wordpress error support: what os and browser are you on user: linux and firefox support: we don't support firefox :3 user: your wordpress application is giving me callstack traces when i attempt to sign in support: we don't support linux :3
#i've just started saying i use Winblows 11 and Google Cuckrome now because wowee do support centers not want to bother#also there's a shit ton of useragent related plugins that let you set your useragent and i just set it to the latest useragent from#useragents.me which is as of this moment#windows and chrome
3 notes
·
View notes
Text
How can you be more productive while coding?
Here are five steps to help beginners become more productive in writing code:
1. Plan Before You Code
Define the Problem: Clearly understand what needs to be done.
Break It Down: Split the task into smaller, manageable parts.
Outline a Solution: Sketch out how you’ll solve each part.
Example: Write a list of steps in plain language before starting to code.
2. Write Clean and Readable Code
Use Meaningful Names: Variables and functions should have descriptive names.
Follow Conventions: Stick to coding standards and style guides.
Keep It Simple: Avoid complex solutions when a simpler one will do.
Example: Instead of x, use userAge if it stores a user's age.
3. Utilize Version Control
Learn Git: Basic commands like commit, push, and pull are essential.
Commit Often: Save your progress regularly with meaningful messages.
Branching: Use branches to manage different features or bug fixes.
Example: Create a new branch for a feature, work on it, then merge it back.

4. Leverage Debugging Tools
Use Print Statements: Start simple with print for quick checks.
Learn Debugger: Tools like those in IDEs (e.g., VSCode, PyCharm) can help step through code.
Check Error Messages: Read and understand them; they often tell you what’s wrong.
Example: Use breakpoints to pause execution and inspect variables.
5. Practice Regularly
Solve Problems: Use platforms like LeetCode, HackerRank, or Codewars.
Build Projects: Create small projects to apply what you’ve learned.
Read Code: Look at other people’s code on GitHub to learn different approaches.
Example: Set a goal to solve one coding problem daily.
2 notes
·
View notes
Text

many websites that "only work on chrome" actually just didn't want to pay someone to test that their website works on both browsers. if you change your useragent string (you can do it manually but there are tons of extensions that provide a nice GUI) you can lie and say you're using chrome. if there is an actual functional issue, I'd recommend brave browser or de-googled Chromium over just using regular chrome
"oh boy I sure wish there were a fast, free and private alternative to google chrome"
the humble mozilla firefox:

55K notes
·
View notes
Text
Hàm lấy dữ liệu bằng curl get_content1 mà không sử dụng cookies
Để viết lại hàm get_content1 mà không sử dụng cookie, bạn chỉ cần loại bỏ các tùy chọn liên quan đến cookies trong cấu hình curl. Dưới đây là phiên bản sửa lại của hàm này: function get_content1($url) { // Khởi tạo cURL $ch = curl_init(); // Đặt User-Agent $userAgent = 'Mozilla/5.0 (Windows NT 6.2; WOW64) AppleWebKit/537.31 (KHTML, like Gecko) Chrome/26.0.1410.64 Safari/537.31'; // Cấu hình các…
0 notes
Text
蜘蛛池原理源码解析
在互联网世界中,搜索引擎优化(SEO)是一个至关重要的领域。为了更好地理解搜索引擎的工作机制,许多SEO从业者和开发者会深入研究蜘蛛池的原理及其源码。本文将带你深入了解蜘蛛池的基本概念、工作原理以及如何通过源码实现。
什么是蜘蛛池?
蜘蛛池是一种模拟搜索引擎爬虫行为的技术工具。它主要用于帮助网站提高被搜索引擎抓取的概率,从而提升网站的排名。蜘蛛池通过模拟多个搜索引擎爬虫的行为,向目标网站发送大量的访问请求,以增加网站的活跃度,进而吸引真正的搜索引擎蜘蛛来抓取页面。
蜘蛛池的工作原理
蜘蛛池的核心在于模拟真实的搜索引擎爬虫行为。具体来说,它通过以下步骤实现:
1. 创建虚拟爬虫:首先,蜘蛛池会创建一系列虚拟���爬虫,这些虚拟爬虫会模仿真实搜索引擎爬虫的行为。
2. 生成请求:这些虚拟爬虫会不断地向目标网站发送访问请求,模拟用户浏览行为。
3. 数据收集与分析:通过收集并分析这些虚拟爬虫的数据,可以了解哪些页面更受搜索引擎欢迎,从而优化网站结构和内容。
4. 提高收录率:通过频繁地访问网站,蜘蛛池可以帮助网站更快地被搜索引擎发现和收录。这有助于提高网站的权重和排名。
5. 优化用户体验:除了对搜索引擎友好外,蜘蛛池还可以帮助网站管理员了解哪些页面更受欢迎,从而进行针对性的优化。
源码解析
要实现一个简单的蜘蛛池,我们可以使用Python等编程语言编写脚本。下面是一个基础的Python示例代码片段,用于模拟爬虫行为:
```python
import requests
from fake_useragent import UserAgent
ua = UserAgent()
headers = {'User-Agent': ua.random}
def spider_pool(url):
response = requests.get(url, headers=headers)
if response.status_code == 200:
print("成功访问")
else:
print("访问失败")
示例URL
url = "http://example.com"
spider_pool(url)
```
这段代码展示了如何使用Python中的`requests`库来模拟爬虫行为。这里我们使用了`fake_useragent`库来随机选择不同的User-Agent,以避免被服务器识别为恶意爬虫。
```python
import requests
from fake_useragent import UserAgent
def spider_pool(url):
ua = UserAgent()
headers = {'User-Agent': str(ua.chrome)}
response = requests.get(url, headers=headers)
return response.text
if __name__ == "__main__":
url = "http://example.com"
print(spider_pool(url))
```
结合实际应用
虽然上述代码只是一个简化的示例,但在实际应用中,蜘蛛池通常会更加复杂,包括但不限于:
- 更加复杂的请求头设置
- 动态调整访问频率,防止被封禁
- 分析返回的数据,进一步优化网站结构
结语
蜘蛛池技术在SEO领域有着广泛的应用,但需要注意的是,不当使用可能会违反网站的服务条款或导致IP被封禁。因此,在使用蜘蛛池时,务必确保遵守相关法律法规,并且不违反任何服务条款。
引发讨论的问题
你认为蜘蛛池技术是否应该受到严格的监管?这种技术对于SEO优化是利大于弊还是弊大于利?请在评论区分享你的看法!
以上就是关于蜘蛛池原理及其实现方法的介绍。希望这篇文���能为你提供一些启示。如果你有任何疑问或想要了解更多细节,请在评论区留言!
加飞机@yuantou2048

王腾SEO
谷歌留痕
0 notes
Text
Writing Clean Code: Best Practices for Developers
Clean code is an essential part of writing software that is maintainable, readable, and scalable. It helps in reducing complexity, improving collaboration, and making debugging and testing easier. In this article, we'll explore the best practices for writing clean code and how developers can implement these practices to improve their workflow and create better software.
What is Clean Code?
Clean code refers to code that is easy to read, understand, and maintain. It's code that follows a set of principles that prioritize simplicity, clarity, and efficiency. Clean code reduces the likelihood of bugs and allows developers to easily modify, extend, and refactor code without introducing new issues.
The Key Characteristics of Clean Code
Readability: Clean code should be self-explanatory. A developer should be able to read and understand the code without extensive documentation.
Simplicity: Avoid unnecessary complexity. The simpler the code, the easier it is to debug and extend.
Maintainability: Clean code is designed with future changes in mind. It should be easy to update and modify as requirements evolve.
Efficiency: While the code should be simple and clean, it should not sacrifice performance unnecessarily.
Best Practices for Writing Clean Code
1. Follow Consistent Naming Conventions
One of the most important aspects of clean code is choosing meaningful names for variables, functions, and classes. Names should describe the role and purpose of the entity without being overly verbose.
Variables: Use descriptive names that indicate what the variable holds (e.g., userAge instead of ua).
Functions: Function names should represent the action they perform (e.g., calculateTotal() instead of calc()).
Classes: Classes should represent entities or concepts in the system (e.g., Invoice or UserProfile).
Consistency is key. Stick to a naming convention and apply it across your project.
2. Keep Functions Small and Focused
Functions should perform one task and do it well. Avoid writing large, complex functions that perform multiple tasks. A good rule of thumb is to ensure that each function fits within a single screen of code and can be easily understood without much context.
Single Responsibility Principle (SRP): Each function should have only one reason to change. This makes functions more reusable and testable.
3. Avoid Repetition (DRY Principle)
Don’t Repeat Yourself (DRY) is a fundamental principle of clean code. Duplication increases the risk of bugs and makes code harder to maintain. If you find yourself writing the same logic in multiple places, refactor it into a single function or module.
4. Use Comments Wisely
While clean code should be self-explanatory, there are times when comments can be useful to explain why certain decisions were made or clarify complex logic. However, avoid excessive comments that explain obvious code or restate what the code does.
What to Comment: Explain why the code exists, how it works in special cases, or document complex algorithms.
What Not to Comment: Avoid comments like “increment counter by 1” or “return the result.” These are redundant and add clutter.
5. Refactor Regularly
Refactoring is an ongoing process where developers revisit existing code to improve its structure without changing its functionality. Regular refactoring ensures that your codebase remains clean and manageable over time.
Refactoring should be done in small increments to avoid introducing bugs. Also, write unit tests to ensure that the behavior of the code remains consistent after refactoring.
6. Prioritize Readability Over Cleverness
Sometimes, developers may be tempted to use advanced tricks or clever solutions to make the code more "interesting" or shorter. However, this often leads to code that is difficult to understand.
Write code that your colleagues can easily read and modify. If a solution requires a lot of explanation or is overly complex, it’s usually a sign that it should be refactored.
7. Avoid Hard-Coding Values
Hard-coding values in your code makes it inflexible and difficult to maintain. Instead of using fixed values directly in your code, use constants or configuration files to make values configurable.
Example: Instead of writing if (status == 1), use if (status == STATUS_ACTIVE) where STATUS_ACTIVE is a constant representing the active state.
8. Handle Errors Gracefully
Error handling is a critical part of writing robust, clean code. Avoid using vague error messages and ensure that the application can handle unexpected situations gracefully without crashing.
Use exceptions: Throw exceptions when necessary, but always handle them in a way that doesn’t expose sensitive data to the end user.
Custom error messages: Provide meaningful error messages that help diagnose the issue.
Error logging: Use proper logging techniques to track errors for debugging and monitoring purposes.
9. Make Code Modular and Reusable
Clean code is modular, meaning it is broken down into smaller, reusable components. This makes your code easier to maintain and test.
Modular functions: Functions should be small and focused on a single responsibility.
Modular classes: Classes should represent a specific concept or domain and should not be overly complex.
10. Follow the SOLID Principles
The SOLID principles are a set of five object-oriented design principles that help make code more understandable, flexible, and maintainable:
Single Responsibility Principle (SRP): A class should have only one reason to change.
Open/Closed Principle (OCP): Software entities should be open for extension but closed for modification.
Liskov Substitution Principle (LSP): Objects should be replaceable by instances of their subtypes without altering the correctness of the program.
Interface Segregation Principle (ISP): Clients should not be forced to depend on interfaces they do not use.
Dependency Inversion Principle (DIP): High-level modules should not depend on low-level modules; both should depend on abstractions.
Following SOLID principles helps ensure that your code is scalable, flexible, and easy to maintain.
11. Write Unit Tests
Unit tests are an essential part of writing clean code. They help ensure that your code works as expected and allows you to catch bugs early. Additionally, unit tests make it easier to refactor code without fear of breaking existing functionality.
Test coverage: Ensure that your tests cover all possible edge cases and important paths in the code.
Continuous integration: Set up a CI/CD pipeline to run tests automatically whenever code is pushed to the repository.
12. Keep Code Formatting Consistent
Consistent formatting makes the code more readable and easier to follow. Use proper indentation, spacing, and alignment to structure your code.
Automated formatting: Use tools like Prettier or ESLint for JavaScript, or Black for Python, to automatically format your code according to best practices.
13. Limit the Use of Global Variables
Global variables can lead to confusion and unexpected behavior because they can be modified by any part of the code. Minimize their use and scope to avoid side effects and reduce coupling.
14. Optimize After You Have a Working Solution
Optimization should not be your first priority when writing code. Focus on getting a working solution first, then optimize later. Premature optimization can lead to unnecessary complexity and hard-to-understand code.
Conclusion
Writing clean code is a practice that every developer should embrace. It leads to maintainable, scalable, and bug-free software that is easier to work with and understand. By following the best practices discussed in this article—such as adhering to naming conventions, keeping functions small, avoiding duplication, and regularly refactoring—you can write code that is both efficient and readable.
Remember that clean code isn’t just about making your code work—it's about making it better for yourself and your team in the long run. So, aim for clarity, simplicity, and maintainability, and your code will continue to improve with each iteration.
0 notes
Text
Reblogging in case anyone else is experiencing this even though I'm not (something about my browser extension cocktail means I haven't seen any of the adblock wars for myself).
It's also worth reading through the replies because some people are reporting no useragent identifiers have been found, but this is just in case you're getting weird load times.
Either way, switch to Firefox
I haven't personally verified this as I'm not at a computer, but multiple people in multiple places are saying the same thing. This is fucking insane. First the endless war on UBlock, then the Chromium changes to shut out some blocker functionalities entirely next year, now this?
Something is deeply rotten in recent Google/YouTube policy. I can't imagine that this is legal - how is this not anticompetitive? Google needs to get mega fucked in the press and the courts sooner rather than later.
And I need to switch to Firefox as soon as I get home.
91K notes
·
View notes
Text
How to stop JS script in certain user agents in Magento 2?
In Magento 2, you may want to prevent a specific JavaScript from running on certain user agents, older browsers, or certain bots for performance reasons or to prevent compatibility issues. This is possible when you change the code in your theme and use conditions and dynamic scripting accordingly.
Steps to Stop JS for Certain User Agents in Magento 2:
Understand User Agents User agents are strings sent by browsers or devices to identify themselves. For example, Chrome sends Mozilla/5.0 (Windows NT 10.0; Win64; x64) AppleWebKit/537.36 (KHTML, like Gecko) Chrome/91.0.4472.124 Safari/537.36. Use this to determine which scripts to block for specific user agents.
Edit the default_head_blocks.xml or requirejs-config.js Locate these files in your theme. These control how JavaScript is loaded.
Add a Conditional Script Loader To target specific user agents, inject a condition into your JavaScript loader. For example:
Html Code: <script type="text/javascript">
var userAgent = navigator.userAgent;
if (!userAgent.includes('YourTargetUserAgent')) {
// Load your script dynamically
var script = document.createElement('script');
script.src = 'path/to/your/script.js';
document.head.appendChild(script);
}
</script>
Replace 'YourTargetUserAgent' with the string you want to target, like 'Trident' for older Internet Explorer versions.
4. Use a Custom JavaScript File Create a custom JavaScript file (e.g., block-script.js) in your theme's web/js folder and include the above logic there. Update your requirejs-config.js to include this file:
Javascript code: var config = {
map: {
'*': {
blockScript: 'js/block-script'
}
}
};
5. Exclude Using Server-Side Logic (Optional) Use Magento's PHP server-side logic to conditionally inject the script only for certain user agents. Modify the default.xml file in your theme:
Xml Code:
<block class="Magento\Framework\View\Element\Template" name="conditional.script" after="-" template="Magento_Theme::html/conditional-script.phtml" />
6. Test Thoroughly Test the targeted browser or user agent after implementation to ensure the script is blocked as expected. The user agent can be checked using the browser developer tools or online at whatismybrowser.com.

Benefits of Stopping JS for Certain User Agents
Improved Performance: This saves your site from unnecessary script execution for irrelevant or outdated user agents, and it loads faster with fewer resources.
Enhanced Compatibility: Avoid potential problems with unsupported browsers by stopping scripts that may not work, making it easier to use across platforms.
Better User Experience: Optimizing scripts for modern browsers pays off in performance and cleanliness for most users, aligning with their expectations.
By implementing this strategy, you can enhance the functionality and performance of your Magento 2 store as well as effectively serve most of your audience. It is a smart way to balance compatibility and performance on your eCommerce platform.
1 note
·
View note
Text
1 note
·
View note
Text
Web Scraping 103 : Scrape Amazon Product Reviews With Python –

Amazon is a well-known e-commerce platform with a large amount of data available in various formats on the web. This data can be invaluable for gaining business insights, particularly by analyzing product reviews to understand the quality of products provided by different vendors.
In this guide we will look into web scraping steps to extract amazon reviews of a particular product and save it in excel or csv format. Since manually copying information online can be tedious, in this guide we’ll focus on scraping reviews from Amazon. This hands-on experience will enhance our practical understanding of web scraping techniques.
Before we start, make sure you have Python installed in your system, you can do that from this link: python.org. The process is very simple, just install it like you would install any other application.
Now that everything is set let’s proceed:
How to Scrape Amazon Reviews Using Python
Install Anaconda using this link: https://www.anaconda.com/download . Be sure to follow the default settings during installation. For more guidance, please click here.
We can use various IDEs, but to keep it beginner-friendly, let’s start with Jupyter Notebook in Anaconda. You can watch the video linked above to understand and get familiar with the software.
Steps for Web Scraping Amazon Reviews:
Create New Notebook and Save it. Step 1: Let’s start importing all the necessary modules using the following code:
import requests from bs4 import BeautifulSoup import pandas as pd
Step 2: Define Headers to avoid getting your IP blocked. Note that you can search my user agent on google to get your user agent details and replace it below “User-agent”: “here goes your useragent below”.
custom_headers = { "Accept-language": "en-GB,en;q=0.9", "User-agent": "Mozilla/5.0 (Macintosh; Intel Mac OS X 10_15_7) AppleWebKit/605.1.15 (KHTML, like Gecko) Version/17.1 Safari/605.1.15", }
Step 3: Create a python function, to fetch the webpage, check for errors and return a BeautifulSoup object for further processing.
# Function to fetch the webpage and return a BeautifulSoup object def fetch_webpage(url): response = requests.get(url, headers=headers) if response.status_code != 200: print("Error in fetching webpage") exit(-1) page_soup = BeautifulSoup(response.text, "lxml") return page_soup
Step 4: Inspect Element to find the element and attribute from which we want to extract data, Lets Create another function to select the div and attribute and set it to variable , extract_reviews identifies review-related elements on a webpage, but it doesn’t yet extract the actual review content. You would need to add code to extract the relevant information from these elements (e.g., review text, ratings, etc.).
Function to extract reviews from the webpage def extract_reviews(page_soup): review_blocks = page_soup.select('div[data-hook="review"]') reviews_list = []
Step 5: Below code processes each review element and extracts the customer’s name (if available), and stores it in the customer variable. If no customer information is found, customer remains none.
#for review in review_blocks: author_element = review.select_one('span.a-profile-name') customer = author_element.text if author_element else None rating_element = review.select_one('i.review-rating') customer_rating = rating_element.text.replace("out of 5 stars", "") if rating_element else None title_element = review.select_one('a[data-hook="review-title"]') review_title = title_element.text.split('stars\n', 1)[-1].strip() if title_element else None content_element = review.select_one('span[data-hook="review-body"]') review_content = content_element.text.strip() if content_element else None date_element = review.select_one('span[data-hook="review-date"]') review_date = date_element.text.replace("Reviewed in the United States on ", "").strip() if date_element else None image_element = review.select_one('img.review-image-tile') image_url = image_element.attrs["src"] if image_element else None
Step 6: The purpose of this function is to process scraped reviews. It takes various parameters related to a review (such as customer, customer_rating, review_title, review_content, review_date, and image URL), and the function returns the list of processed reviews.
review_data = { "customer": customer, "customer_rating": customer_rating, "review_title": review_title, "review_content": review_content, "review_date": review_date, "image_url": image_url } reviews_list.append(review_data) return reviews_list
Step 7: Now, Let’s initialize a search_url variable with an Amazon product review page URL
def main(): review_page_url = "https://www.amazon.com/BERIBES-Cancelling-Transparent-Soft-Earpads-Charging-Black/product- reviews/B0CDC4X65Q/ref=cm_cr_dp_d_show_all_btm?ie=UTF8&reviewerType=all_reviews" page_soup = fetch_webpage(review_page_url) scraped_reviews = extract_reviews(page_soup)
Step 8: Now let’s print(“Scraped Data:”, data) scraped review data (stored in the data variable) to the console for verification purposes.
# Print the scraped data to verify print("Scraped Data:", scraped_reviews)
Step 9: Next, Create a dataframe from the data which will help organize data into tabular form.
# create a DataFrame and export it to a CSV file reviews_df = pd.DataFrame(data=scraped_reviews)
Step 10: Now exports the DataFrame to a CSV file in current working directory
reviews_df.to_csv("reviews.csv", index=False) print("CSV file has been created.")
Step 11: below code construct acts as a protective measure. It ensures that certain code runs only when the script is directly executed as a standalone program, rather than being imported as a module by another script.
# Ensuring the script runs only when executed directly if __name__ == '__main__': main()
Result:

Why Scrape Amazon Product Reviews?
Scraping Amazon product reviews can provide valuable insights for businesses. Here’s why you should consider it:
● Feedback Collection: Every business needs feedback to understand customer requirements and implement changes to improve product quality. Scraping reviews allows businesses to gather large volumes of customer feedback quickly and efficiently.
● Sentiment Analysis: Analyzing the sentiments expressed in reviews can help identify positive and negative aspects of products, leading to informed business decisions.
● Competitor Analysis: Scraping allows businesses to monitor competitors’ pricing and product features, helping to stay competitive in the market.
● Business Expansion Opportunities: By understanding customer needs and preferences, businesses can identify opportunities for expanding their product lines or entering new markets.
Manually copying and pasting content is time-consuming and error-prone. This is where web scraping comes in. Using Python to scrape Amazon reviews can automate the process, reduce manual errors, and provide accurate data.
Benefits of Scraping Amazon Reviews
● Efficiency: Automate data extraction to save time and resources.
● Accuracy: Reduce human errors with automated scripts.
● Large Data Volume: Collect extensive data for comprehensive analysis.
● Informed Decision Making: Use customer feedback to make data-driven business decisions.
I found an amazing, cost-effective service provider that makes scraping easy. Follow this link to learn more.
Conclusion
Now that we’ve covered how to scrape Amazon reviews using Python, you can apply the same techniques to other websites by inspecting their elements. Here are some key points to remember:
● Understanding HTML: Familiarize yourself with HTML structure. Knowing how elements are nested and how to navigate the Document Object Model (DOM) is crucial for finding the data you want to scrape.
● CSS Selectors: Learn how to use CSS selectors to accurately target and extract specific elements from a webpage.
● Python Basics: Understand Python programming, especially how to use libraries like requests for making HTTP requests and BeautifulSoup for parsing HTML content.
● Inspecting Elements: Practice using browser developer tools (right-click on a webpage and select “Inspect” or press Ctrl+Shift+I) to examine the HTML structure. This helps you find the tags and attributes that hold the data you want to scrape.
● Error Handling: Add error handling to your code to deal with possible issues, like network errors or changes in the webpage structure.
● Legal and Ethical Considerations: Always check a website’s robots.txt file and terms of service to ensure compliance with legal and ethical rules of web scraping.
By mastering these areas, you’ll be able to confidently scrape data from various websites, allowing you to gather valuable insights and perform detailed analyses.
1 note
·
View note
Text
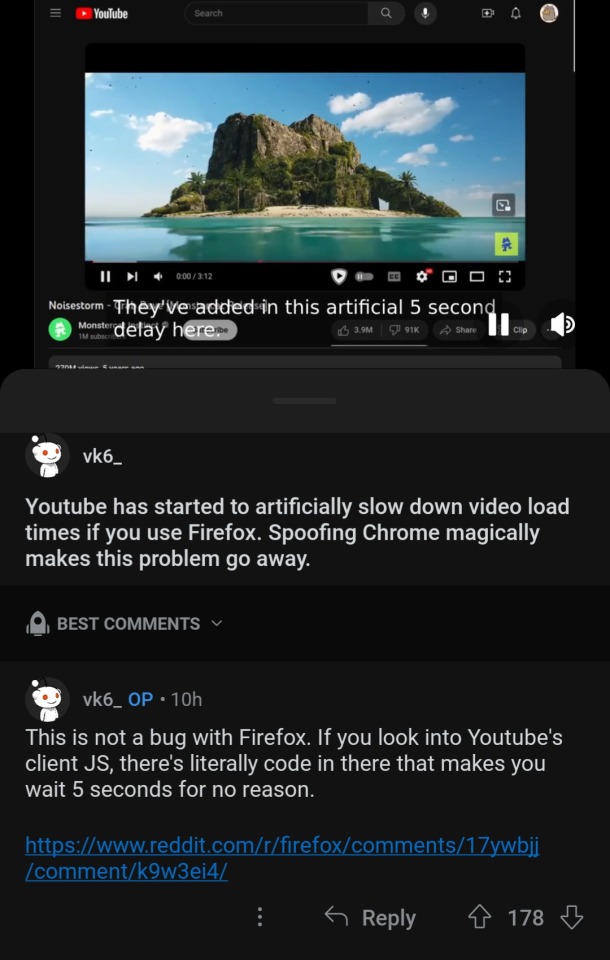
Surely switching to Firefox would make no difference? The court decision says
When a user visits a website, the user’s browser sends a “GET” request to the website to retrieve it. (Id.) This GET request contains the following information: the Request URL, or the URL of the specific webpage the user is trying to access; the user’s IP address; the Useragent, which identifies the user’s device platform and browser; user’s geolocation, if available; the Referer, which is the URL of the page on which the user clicked a link to access a new page; event data, which describes how users interact with a website, for example, whether they saw an ad or played a video; and the actual search queries on the site.
I'd expect Firefox to send the same data. I just checked and Firefox sends the same Useragent string in normal and Private Browsing mode. Both Firefox and Chrome shows a message "website wants to known your location Block/Allow" when a website requests geolocation. The only difference I can see is that maybe Firefox trims the referrer string more aggressively when in Private Browsing mode.
The lawsuit says that Google ought to give Chrome users more privacy than users of other webbrowsers, because the Chrome Incognito Mode is mentioned in the Google Privacy Policy.
Now I can say it (because before this my NDA was still holding me back): Chrome’s incognito mode still tracks you, just at a slightly broader level with some data anonymization. It has been this way for years, and building the feature this way was a deliberate business decision to deceive users into thinking their browsing was private in order to make more money from advertising.
Stop using Chrome. Switch to Firefox.
17K notes
·
View notes
Text
JavaScript Best Practices
JavaScript is a powerful language that powers the interactive web experiences we use daily. However, with great power comes great responsibility—writing JavaScript code that is clean, efficient, and maintainable can greatly enhance the quality of your projects and ease future development efforts. Here are some best practices for writing high-quality JavaScript code:
1. Follow a Consistent Coding Style
Consistency in coding style enhances readability and maintainability. Choose a style guide, such as the Airbnb JavaScript Style Guide or Google JavaScript Style Guide, and adhere to it throughout your codebase. This includes consistent naming conventions, indentation, and formatting. Using tools like ESLint can help enforce these style rules automatically.
Example:// Consistent variable naming let userAge = 25; let userName = "John Doe"; // Consistent indentation function greetUser(name) { console.log(`Hello, ${name}!`); }
2. Use Let and Const Instead of Var
The var keyword is function-scoped and can lead to unexpected behavior due to its hoisting properties. Prefer let for variables that need to be reassigned and const for variables that remain constant. This improves code clarity and reduces the risk of accidental reassignments.
Example:const pi = 3.14; // Constant value, cannot be reassigned let count = 0; // Variable that can be reassigned
3. Avoid Global Variables
Global variables can lead to naming collisions and make code harder to manage. Instead, encapsulate your code within functions, modules, or classes to limit the scope of variables and functions. This practice helps prevent unintended interactions and side effects.
Example:// Encapsulated code within a function function calculateArea(radius) { const pi = 3.14; return pi * radius * radius; }
4. Write Modular and Reusable Code
Break your code into small, reusable functions or modules. This approach promotes code reusability, easier testing, and better maintainability. Use JavaScript modules (import and export statements) to organize related functionalities into separate files.
Example:// mathUtils.js export function add(a, b) { return a + b; } // app.js import { add } from './mathUtils'; console.log(add(2, 3));
5. Use Asynchronous Code Wisely
Asynchronous programming is essential for handling tasks like network requests. Use Promises and async/await syntax to manage asynchronous operations. This helps avoid callback hell and makes your code more readable and maintainable.
Example:// Using async/await async function fetchData() { try { let response = await fetch('https://api.example.com/data'); let data = await response.json(); console.log(data); } catch (error) { console.error('Error fetching data:', error); } }
6. Implement Error Handling
Graceful error handling improves the robustness of your code. Use try/catch blocks for synchronous code and handle errors in asynchronous code with .catch() or try/catch in async/await. Providing meaningful error messages helps with debugging and enhances the user experience.
Example:try { let result = performRiskyOperation(); } catch (error) { console.error('Operation failed:', error.message); }
7. Optimize Performance
Optimize your code for performance to ensure it runs efficiently. Avoid excessive DOM manipulations, minimize the use of global variables, and utilize efficient algorithms and data structures. Use tools like Chrome DevTools for performance profiling and optimization.
Example:// Minimize DOM manipulations const list = document.getElementById('list'); const fragment = document.createDocumentFragment(); for (let i = 0; i < 100; i++) { const li = document.createElement('li'); li.textContent = `Item ${i}`; fragment.appendChild(li); } list.appendChild(fragment);
8. Write Unit Tests
Writing unit tests ensures that your code works as expected and helps catch bugs early. Use testing frameworks like Jest, Mocha, or Jasmine to create and run tests. Tests should cover different scenarios and edge cases to validate the functionality of your code.
Example:// Using Jest for testing import { add } from './mathUtils'; test('adds 1 + 2 to equal 3', () => { expect(add(1, 2)).toBe(3); });
9. Document Your Code
Good documentation helps others (and yourself) understand and maintain your code. Use comments to explain complex logic, document functions with meaningful descriptions, and maintain updated README files for your project. This practice improves collaboration and code quality.
Example:/** * Calculates the area of a circle. * @param {number} radius - The radius of the circle. * @returns {number} The area of the circle. */ function calculateArea(radius) { const pi = 3.14; return pi * radius * radius; }
10. Keep Learning and Adapting
JavaScript is a rapidly evolving language with new features and best practices emerging regularly. Stay updated with the latest developments, tools, and techniques by following industry news, participating in communities, and exploring new JavaScript features.
Conclusion
By following these best practices, you can write JavaScript code that is clean, efficient, and maintainable. Emphasizing consistent style, modularity, performance, and proper error handling will not only improve the quality of your code but also make your development process more enjoyable and effective. As you continue to learn and adapt, your coding practices will evolve, leading to even better and more robust JavaScript applications.
0 notes
Photo

The Varieties of Agency in Human–Smart Device Relationships: The Four Agency Profiles
This is a short preview of the article: As the interest of intelligent/smart devices in growing in society, this paper explores the concept of agency in human-smart device relationships, focusing on two key aspects: User agency: The self-perceived abilities of users to operate and control their devices. Device agency: The
If you like it consider checking out the full version of the post at: The Varieties of Agency in Human–Smart Device Relationships: The Four Agency Profiles
If you are looking for ideas for tweet or re-blog this post you may want to consider the following hashtags:
Hashtags: #Agency, #DeviceAgency, #IoT, #SmartDevice, #UserAgency
The Hashtags of the Categories are: #HCI, #InternetofThings, #more, #Publication, #Research
The Varieties of Agency in Human–Smart Device Relationships: The Four Agency Profiles is available at the following link: https://francescolelli.info/hci/the-varieties-of-agency-in-human-smart-device-relationships-the-four-agency-profiles/ You will find more information, stories, examples, data, opinions and scientific papers as part of a collection of articles about Information Management, Computer Science, Economics, Finance and More.
The title of the full article is: The Varieties of Agency in Human–Smart Device Relationships: The Four Agency Profiles
It belong to the following categories: HCI, Internet of Things, more, Publication, Research
The most relevant keywords are: Agency, device agency, IoT, smart device, user agency
It has been published by Francesco Lelli at Francesco Lelli a blog about Information Management, Computer Science, Finance, Economics and nearby ideas and opinions
As the interest of intelligent/smart devices in growing in society, this paper explores the concept of agency in human-smart device relationships, focusing on two key aspects: User agency: The self-perceived abilities of users to operate and control their devices. Device agency: The
Hope you will find it interesting and that it will help you in your journey
As the interest of intelligent/smart devices in growing in society, this paper explores the concept of agency in human-smart device relationships, focusing on two key aspects: The study introduces four agency profiles that characterize different types of human-smart device relationships: Figure below presents an intuitive idea of the research: The researcher is validated by conducting…
0 notes
Text
AWS CloudTrail Monitors S3 Express One Zone Data Events

AWS CloudTrail
AWS CloudTrail is used to keep track of data events that occur in the Amazon S3 Express One Zone.
AWS introduced you to Amazon S3 Express One Zone, a single-Availability Zone (AZ) storage class designed to provide constant single-digit millisecond data access for your most frequently accessed data and latency-sensitive applications. It is intended to provide up to ten times higher performance than S3 Standard and is ideally suited for demanding applications. S3 directory buckets are used by S3 Express One Zone to store items in a single AZ.
In addition to bucket-level activities like CreateBucket and DeleteBucket that were previously supported, S3 Express One Zone now supports AWS CloudTrail data event logging, enabling you to monitor all object-level operations like PutObject, GetObject, and DeleteObject. In addition to allowing you to benefit from S3 Express One Zone’s 50% cheaper request costs than the S3 Standard storage class, this also enables auditing for governance and compliance.
This new feature allows you to easily identify the source of the API calls and immediately ascertain which S3 Express One Zone items were created, read, updated, or removed. You can immediately take steps to block access if you find evidence of unauthorised S3 Express One Zone object access. Moreover, rule-based processes that are activated by data events can be created using the CloudTrail connection with Amazon EventBridge.
S3 Express One Zone data events logging with CloudTrail
You open the Amazon S3 console first. You will make an S3 bucket by following the instructions for creating a directory bucket, selecting Directory as the bucket type and apne1-az4 as the availability zone. You can type s3express-one-zone-cloudtrail in the Base Name field, and the Availability Zone ID of the Availability Zone is automatically appended as a suffix to produce the final name. Lastly, you click Create bucket and tick the box indicating that data is kept in a single availability zone.
Now you open the CloudTrail console and enable data event tracking for S3 Express One Zone. You put in the name and start the CloudTrail trail that monitors my S3 directory bucket’s activities.
You can choose Data events with Advanced event pickers enabled under Step 2: Choose log events.
S3 Express is the data event type you have selected. To manage data events for every S3 directory bucket, you can select Log all events as my log selector template.
But you just want events for my S3 directory bucket, s3express-one-zone-cloudtrail–apne1-az4–x-s3, to be logged by the event data store. Here, you specify the ARN of my directory bucket and pick Custom as the log selection template.
Complete Step 3 by reviewing and creating. You currently have CloudTrail configured for logging.
S3 Express One Zone data event tracking with CloudTrail in action
You retrieve and upload files to my S3 directory bucket using the S3 interface
Log files are published by CloudTrail to an S3 bucket in a gzip archive, where they are arranged in a hierarchical structure according to the bucket name, account ID, region, and date. You list the bucket connected to my Trail and get the log files for the test date using the AWS CLI.
Let’s look over these files for the PutObject event. You can see the PutObject event type when you open the first file. As you remember, you only uploaded twice: once through the CLI and once through the S3 console in a web browser. This event relates to my upload using the S3 console because the userAgent property, which indicates the type of source that made the API call, points to a browser.
Upon examining the third file pertaining to the event that corresponds to the PutObject command issued through the AWS CLI, I have noticed a slight variation in the userAgent attribute. It alludes to the AWS CLI in this instance.
Let’s now examine the GetObject event found in file number two. This event appears to be related to my download via the S3 console, as you can see that the event type is GetObject and the userAgent relates to a browser.
Let me now demonstrate the event in the fourth file, including specifics about the GetObject command you issued using the AWS CLI. The eventName and userAgent appear to be as intended.
Important information
Starting out The CloudTrail console, CLI, or SDKs can be used to setup CloudTrail data event tracking for S3 Express One Zone.
Regions: All AWS Regions with current availability for S3 Express One Zone can use CloudTrail data event logging.
Activity tracking: You may record object-level actions like Put, Get, and Delete objects as well as bucket-level actions like CreateBucket and DeleteBucket using CloudTrail data event logging for S3 Express One Zone.
CloudTrail pricing
Cost: Just like other S3 storage classes, the amount you pay for S3 Express One Zone data event logging in CloudTrail is determined by how many events you log and how long you keep the logs. Visit the AWS CloudTrail Pricing page to learn more.
For S3 Express One Zone, you may activate CloudTrail data event logging to streamline governance and compliance for your high-performance storage.
Read more on Govindhtech.com
#dataevents#awscloudtrail#AmazonS3#availabilityzone#createbucket#deletebucket#API#AWSCLI#NEWS#technology#technologynews#technologytrends#govindhtech
0 notes