#wehearttutorials
Explore tagged Tumblr posts
Visit Tumblr Blog
Explore Tumblr blogs with no restrictions, modern design and the best experience.
Last Seen Tumblr Blogs


Fun Fact
Tumblr is available in 18 languages.
Photo

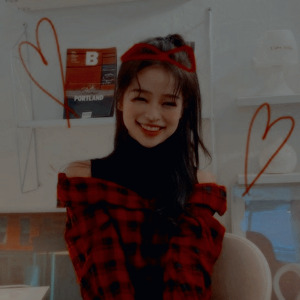
PSD #004 - Unjust Enrichment
POC-Friendly, Works with both light & dark backgrounds
Please do not repost or claim as your own.
Feel free to adjust the layers as you want.
Please like/reblog this post if you download. [Download HERE]
61 notes
·
View notes
Text
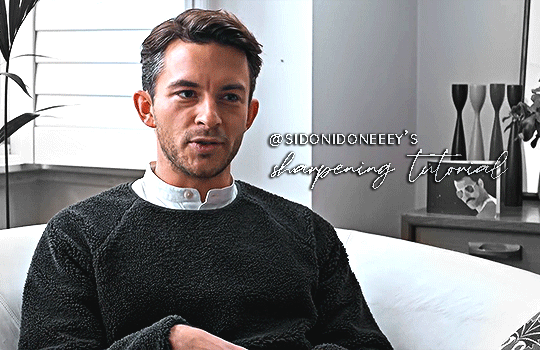
a really nice anon requested a gif sharpening tutorial (referring to this gifset) and I’m only too happy to oblige! First off, I’d like to credit this tutorial for the base sharpen settings and PiXimperfect on YouTube for this sharpening tutorial and action - I can’t explain the principles as well as he does, so please do watch the video! For more gifsets from me, see my sideblog here.
You’ll need:
Any version of Photoshop with Timeline - I’m using CC 2018 (I’m currently exploring the version without timeline, send me an ask if you’re interested and I can update you).
Basic giffing knowledge. I currently use the load files into stack method, but most gifmakers I know use the video timeline method. Here’s a good giffing tutorial by @marysberry and another good giffing and coloring tutorial by @bestmistake.
As an aside, the best thing I’ve discovered through this is that you can make gifs out of higher-end 480p quality gifs. See this set from a bootl*g I got online. They won’t be as amazing as 4k or 1080p gifs, but they’re great for stuff where you really cannot get the best quality. This point clarifies that you do not need a 2160p or memory-heavy 1080p video in order to use this sharpening method.
Difficulty: ★ ★ ★ ☆ ☆ if doing manually, ★ ☆ ☆ ☆ ☆ if using the actions. This works best with portrait shots, i.e. a gif focusing on about one to three people as this sharpening tool really benefits the outline of the subjects more than anything else.
The rest of the tutorial is (very screenshot heavy and) under the cut!
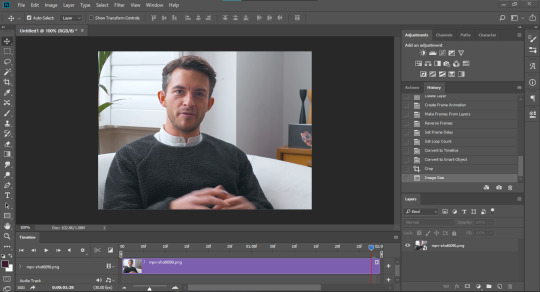
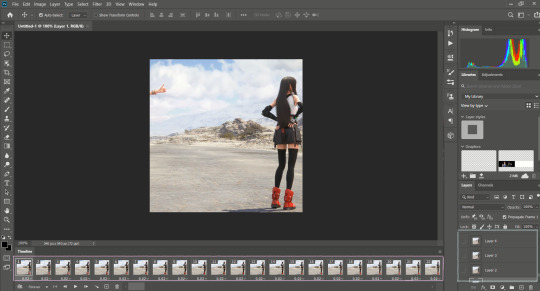
[1] Making your GIF (ft. Jonathan Bailey)
Make your gif through whatever method gets you to the video timeline. Just your usual - and if you have a regular sharpening that works relatively fine, you can use it here and skip [2]. Here’s what your layers tab, timeline tab, and working GIF may look like without any other edits:
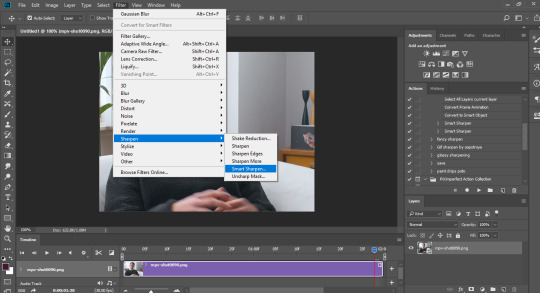
[2] OPTIONAL: Smart Sharpen your GIF
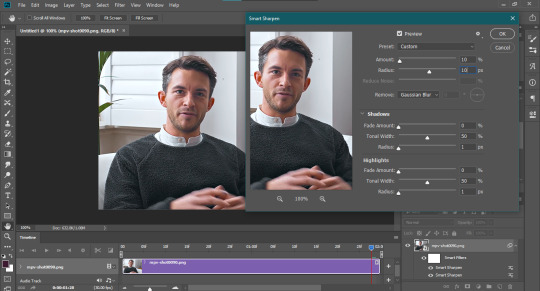
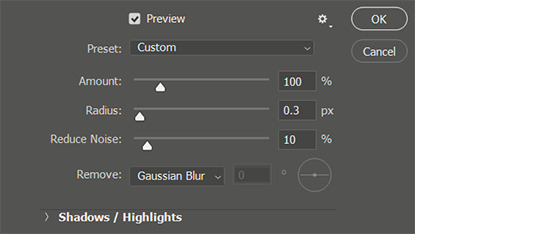
For those who don’t have a regular sharpening... routine, this is how I do my basic sharpening. I will be using two different sharpens in this portion. Click on ‘Filter’ and find Sharpen. Hover your mouse on it and look for Smart Sharpen (shown below):
Click on it, and the window below should open. The first one I use is 500%, 0.3px, and Remove Gaussian Blur, but feel free to experiment as you wish:
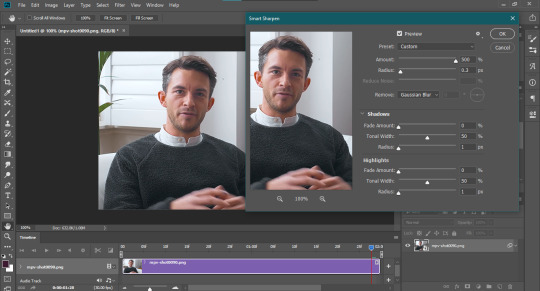
the second smart sharpen I use is 10%, 10px, and Remove Gaussian Blur. Again, feel free to experiment. The ending GIF should be shown with the label “Smart Sharpen x2″ towards the end of this tutorial:
[3] Use what I call the “Vivid Sharpen” to further sharpen your GIFS
Normally you’d stop at [2] and be ready to post or do whatever else with your GIF. I do this extra sharpen because not all GIFs look great when posted here (particularly those downloaded off YT, bilibili, dailymotion, what have you, or bootl*gs as mentioned above). I got a relatively nice-looking video, but this will still help make the gif look sharper.
First off, duplicate your GIF layer twice. I use the Right Click on Layer and Click Duplicate Layer method because it works best for my timeline, but a good old Ctrl+J on Windows (Cmd+J on Mac if I’m not mistaken) should work. Just make sure all three layers are aligned like so:
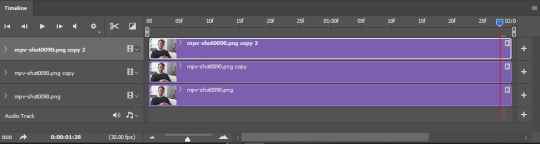
Turn off the visibility of the uppermost layer (mpv-shot0090.png copy 2 here; see below) Click on the second layer (mpv-shot0090.png copy in this case) and change its blending mode to Overlay. This is what the layer should look like:
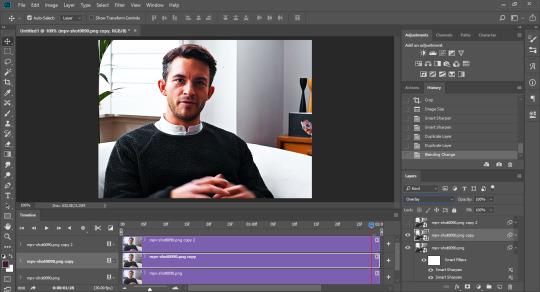
Now turn the topmost layer (mpv-shot0090.png copy 2) back on. Invert the layer by clicking Ctrl+I (that’s I, not L). This is what it should look like:
Now change the blending mode of this layer to Vivid Light. See results below:
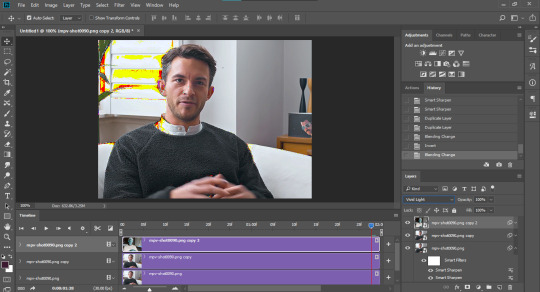
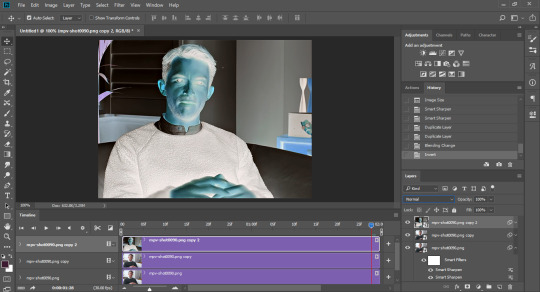
Now click on Filter > Blur > Gaussian Blur above. A window opens asking for the pixel amount. I usually enter in 3.0px but again, feel free to experiment. The GIF may now look overly sharpened, like so:
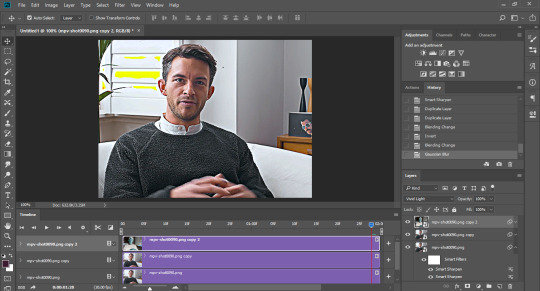
Group together the topmost layer and the layer just below that. This is important. I usually just highlight both layers and click on the folder icon at the bottom right corner. Once both layers are grouped together, set the group’s blending mode to overlay. This will remove the yellow spots you see above.
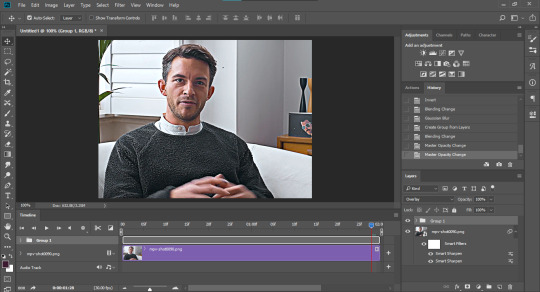
This is the last step for this version of sharpening. Set the opacity level of your sharpening group to what you think looks good. For 1080p source videos, I usually go for between 30-40% (I’m using 40% in the one below) opacity, but feel free to adjust according to what you like! For the 480p gifset I linked above, I used around 70%, give or take.
Here are the different results based on the sharpenings I did!
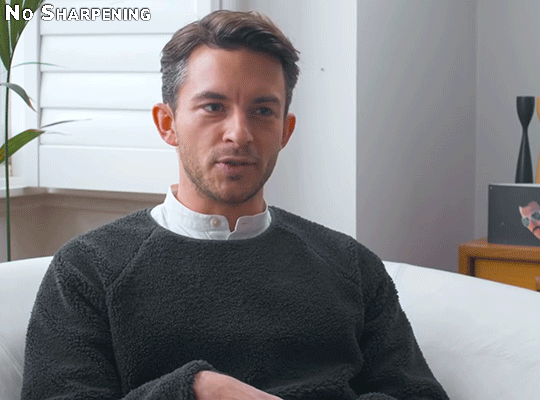


The only thing this last gif would require, in my opinion, is some coloring brighten everything up, but other than that, Jonny Bailey looks pretty crisp! This marks the end of a very long tutorial, which only takes a few seconds using the two sources I credited above (smart sharpens and vivid sharpening). Do let me know if you have other gif-related questions; send them either to me or @vaganov, my edits sideblog. Thank you!
#tutorial#sharpening tutorial#gif tutorial#midniter#usershreyu#usercardigan#useryoshi#tuserchar#usersmia#usernobie#usersanggu#usernums#allresources#completeresources#itsphotoshop#resourcemarket#yeahps#chaoticresources#wehearttutorials#quirkyresources#*mine
366 notes
·
View notes
Photo
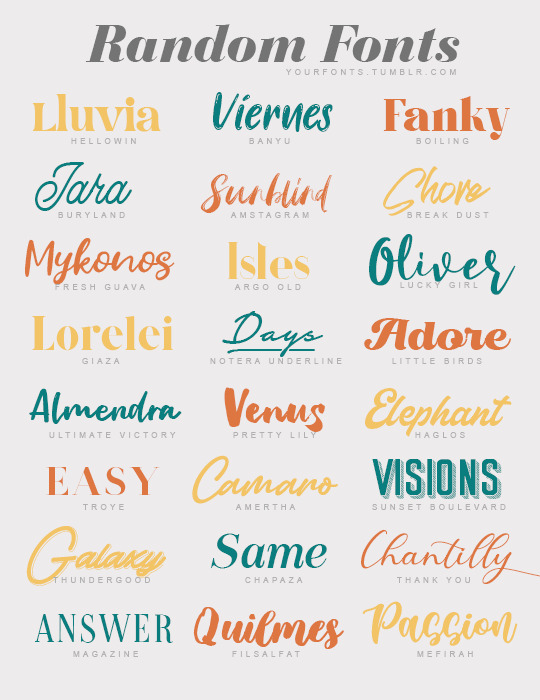
Random fonts
Please like or reblog if you download it
Hellowin - Banyu - Boiling
Buryland - Amstagram - Break dust
Fresh guava - Argo old - Lucky girl
Giaza - Notera underline - Little birds
Ultimate victory - Pretty Lily - Haglos
Troye - Amertha - Sunset Boulevard
Thundergood - Chapaza - Thank you
Magazine - Filsalfat - Mefirah
4K notes
·
View notes
Text
hi everyone! i've decided to make a tutorial on how i make gifs. it came about as i'm teaching my dear friend @ellesgreenaway the bases of gif making. as a reminder, everyone has a different way to gif, this is just how i personally gif. i'll be giving a fully detailed tutorial, from downloading the video files to saving the gif. if you find this useful, please like/reblog :)
software: photoshop (any version with timeline feature)
difficulty: easy
full tutorial undercut
getting high-quality videos
1080p is the best quality if you want clean and crisp gifs. you can get away with 720p,
i use different websites to t*rrent tv show episodes and movies. be careful when searching through these websites as they could affect your device with a virus. it's best to use a vpn to protect your device.
some links:
‣ tvshows.today
‣ filmxy.tv
‣ pahe.ph
for music videos, i use 4k download to parse the music video or any other youtube video in 1080p (if available). to directly download video files directly from websites such as soap2day, i use video download helper (it's a chrome extension).
*before you import your video into photoshop, make sure your version of photoshop has the timeline feature. to make sure it is on, open photoshop, go to windows, and near the bottom, there's the timeline option
this is the example gif i will be showing:
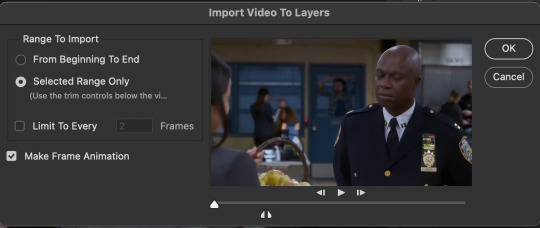
importing to photoshop
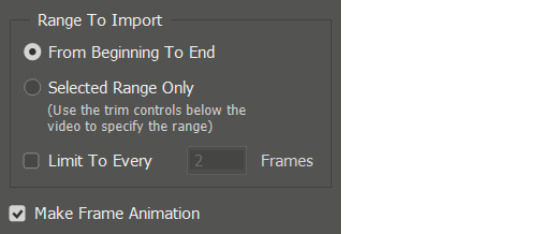
open photoshop and go to files > import > video frames to layers. a dialogue box will appear. make sure to select "selected range only" and to deselect the limit to every 2 frames option. use the arrows under the video to drag them to the moment you want to gif. make sure to have frame animation selected!
deleting unnecessary frames, set frame delay, crop, image resize
with the timeline on, you will see your gif having some frames that aren't needed. using the trash can button at the bottom, only delete the frames you don't want in your gif. in case you accidentally deleted a frame, you can always go back by clicking on the history panel.
now, click on the first frame and go all to the end, and press on the shift button while clicking the last frame to select all the frames in your timeline. optionally, you can click on the little button, in the upper right corner of the timeline panel, that has a bunch of straight lines. once you click on that, you can select the "select all frames" option. from there, go over to one of the frames and click on the number and go to other. this will pop up a dialogue box for setting the frame delay. personally, i set the delay to 0.06.

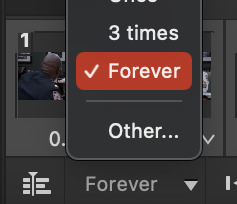
the larger the frame delay, the slower the gif will be. from there, with all the frames selected, go to the bottom left corner of the timeline panel to convert all the frames to video timeline. *make sure the forever option is selected. this will allow for your gif to loop infinitely.
then, going to the layers panel, press the shift button and select all the layers and right-click. you should see the option "convert to smart object". this will condense all the layers and make it into one singular object.
on the toolboard to the left, click the crop tool option. crop according to the different dimensions. with this example, i'm cropping this gif 540px by 300 px.
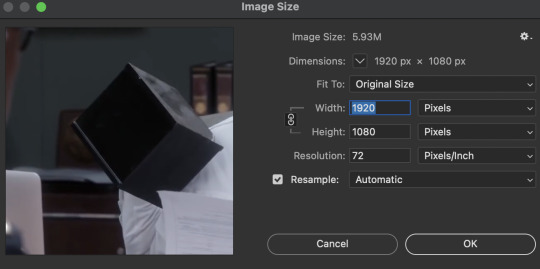
now to resize, go to image > image size. a dialogue box will appear.
make sure to change inches to pixels. on width type, change your gif width accordingly. for this example gif, i'm going to change the width from 1920 to 540. the height will adjust accordingly.
sharpening
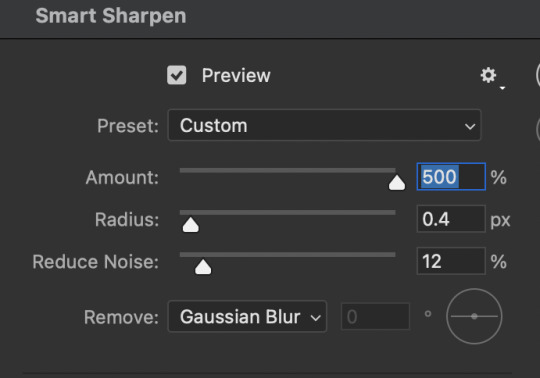
now it's time for some sharpening!. these smart filters help with making your gif(s) clean and crisp. go to filter > sharpen >smart sharpen. these are the settings i use for all the gifs i make.
after you’ve sharpened your gif, you can color your gif. this basically means brightening, adjusting, adding contrast, bringing out or muting certain colors, et cetera. since this is a basic gif tutorial, i'll only show the layers that i use to create vibrant gifs.
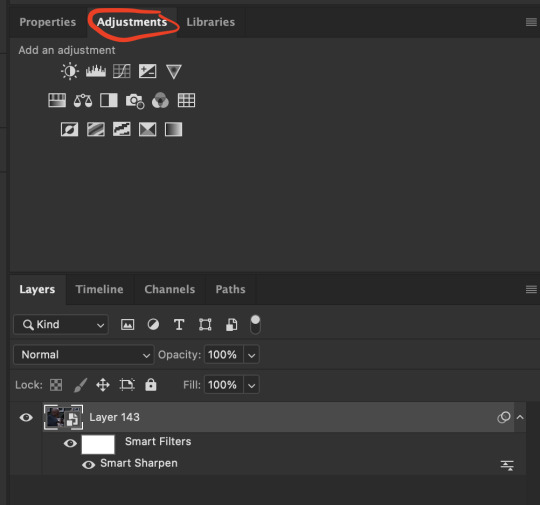
adjustment layers
to add adjustment layers, hover over to the panel right above the layers tab. right next to the properties tab, click on the adjustment tab (circled in red). this tab will show the different options for adding adjustments that will make your gif look better!
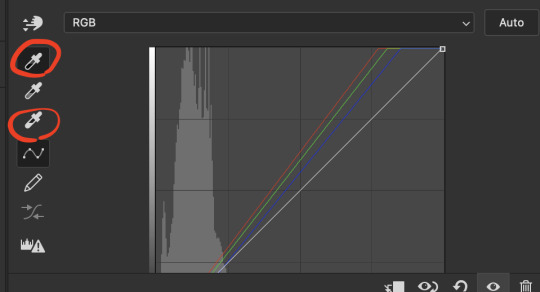
i. brightening
the first adjustment layer i add is the curves layer (the top third to the left in the first row of the adjustments tab). using the little eyedroppers to the left, i set both a white point (by clicking the lightest area of the gif) and a black point (by clicking the darkest point of the gif), both are circled in re. by using these, these points instantly brighten the gif.
ii. coloring
with this example gif, there isn't much to color besides adding more color. by adding a vibrance adjustment layer (two over from the curves layer), you adjust according to how you would like your gif to appear. for this example, i'll show you a before and after.
and since i want it to be a bit more brighter, i use the brightness/contrast layer. i use this to give the gif an overall brightening lift and add some contrast. here's what the gif would look like at this point. i try not to add too many adjustment layers as it may add any unnecessary grain.
saving your gif
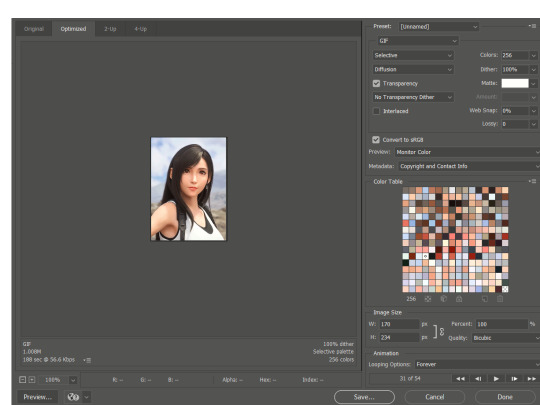
and finally, it's time to save the gif! go to file > export > save for web (legacy). most gifmakers, if not all, use this method to save their gif(s). use the most optimal save for web settings. what i mean by optimal is what save settings are best suited for you and your gifs specifically. here are my save settings. most of the time i use selective + pattern, but then again, it depends on the gif itself. for quality, i use bicubic. personally, i feel like it keeps the gif clean and crisp. remember to keep the looping option as forever.
and that's it! here's the final product:
with anything, practice practice practice!
#*yash.tutorials#allresources#chaoticresources#completeresources#itsphotoshop#wehearttutorials#yeahps#tusernav#userbabbie#usermartian#usershreyu#userpavi#usercardigan#useramara#userizzie#userssid
136 notes
·
View notes
Text
gif tutorial ♡ by @tifaa
Lately I’ve had a few questions about how I make my gifs, so under the cut is a small tutorial about how I make them! If I forgot something or you have any questions, please just send a message or an ask. It’s also best to view this on desktop because mobile with mess with the quality ; - ; ♡
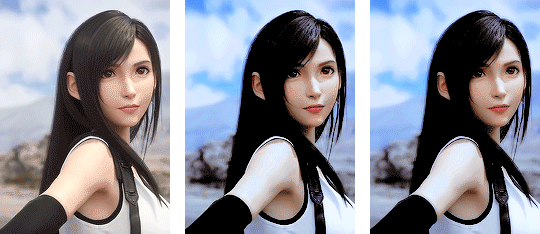
I’m going to show you the process of how I turned the gif on the left into the one on the right. (Please ignore the middle one for now!) Basically, turning a gif with absolutely no editing into a coloured, sharpened, and smooth gif!
1. Downloading Videos
I use 4k Video Downloader to get videos from YouTube.
☆ The most important thing is to download videos in the highest quality possible (I personally never gif a video that is below 1080p)
2. Preprocessing
This is optional, but I do see a big difference between gifs that I have preprocessed and ones that I used to make using only photoshop. It doesn’t take that long and you get a really smooth result, so I definitely recommend it!
Vapoursynth download + tutorial (make sure you download the one that’s titled ‘VapourSynth64Portable(200616).zip’). Since it’s quite complicated to download for Mac, I recommend trying Avisynth instead. I may do a seperate turotial on VS, but since the one I linked is in a video format rather than text, I found it really easy to follow compared to other written tutorials I had found!
These are my VS settings:
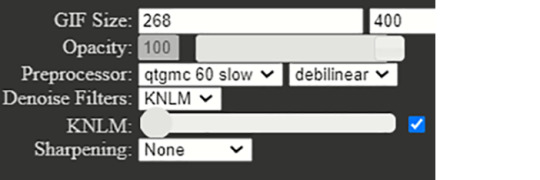
☆ GIF Size will change depending on how many gifs you want to make per row:
1 gif per row: 540px
2 gifs per row: 268px
3 gifs per row: 177px
You can change the height to whatever size you want, but I wouldn’t recommend going over 540px.
☆ Preprocesser is how many frames per second you want your gif to be. qtgmc 60 slow gets you the smoothest possible gif. As for the second setting, I always use debilinear. You can find more information on these here!
☆ KNLM is a denoising filter that basically smoothens your gif and makes it less grainy! You can also choose to utilize the sharpening setting here, but I prefer to do that in Photoshop!
Once you have chosen your desired settings, you can paste the output script that’s on the right-hand side into the VS Editor resizer.html window. (Please refer to the video tutorial〜)
3. Importing into Photoshop
To open the video in PS, go to file > import > video frames to layers (the preprocessed clip will be located in the ‘output’ folder). These are my import settings:
Your workspace will now look something like this: ( I’ve highlighted the frames in pink and the layers in blue, so you can remember!)
Now, delete any excess frames from the timeline if you have any (eg. frames that include a different scene). Then, select all of your remaining frames and click on this little button on the top right-hand side of the timeline:

From this menu, go to > convert to video timeline. Now, look at the layers on the right-hand side of the screen. If you deleted excess frames at the beginning, you should now delete the corresponding layers (that is, all of the layers without the eye symbol next to them).
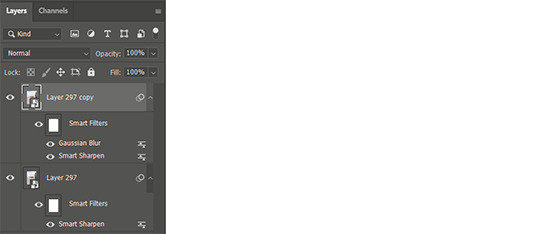
To be able to colour and sharpen the gif, we have to convert it into a Smart Object. To do this select all of your layers and go to > filter > convert for smart filters.
4. Colouring Now, you can colour your gif however you’d like! There isn’t necessarily a right or wrong way to do this, but some settings I’d recommend trying out to begin with are colour balance, selective colour, levels, hue/saturation. To apply these settings go to > layer > new adjustment layer.
☆ Below is are some examples of this lovely scene of Tifa ♡ The first one is a base gif (no colouring at all), and the second one is what it looks like once I’ve coloured it. We’ll get to the third one soon, don’t worry!
5. Sharpening
Click on your Smart Object in the layers tab and go to > filter > smart sharpen. These are my settings:
☆ The next step is optional, but it’s just a preference for how I like my gifs (it just makes them really smooth and removes a lot of the noise)!
Once I have sharpened my gif, I duplicate the sharpened later (right-click on the layer and select ‘duplicate layer’ from the menu). Then I add a gaussian blur filter to the duplicate layer (filter > blur > gaussian blur) and set the radius to 1.3.Your layers should now look something like this:
You can see the result is the third gif from the above step. Nice and smooth, right〜?
6. Saving your gif
To save our gif, we have to convert it back into a frame animation.
To do this, select all of your layers and press the little bars icon above the timeline (the one we used to convert our frames into the video timeline from before!), and select convert frames > flatten frames into clips. Now, select all of the visible layers (the ones with the eye symbol shown), and from the same menu as last time, convert frames > make frames from clips. Again, from the same menu, go to convert to frame animation.
To set the speed of your gif, select all of your frames and click on the little number icon below it (it should say something like 0.03), then click ‘other’. Here you can set the speed. I usually put it somewhere between 0.02 - 0.04 depending on the scene, so just try out which speed you prefer.
Now, we can finally save the gif: file > export > save for web (legacy)! These are my output settings.
☆ To make sure that your gif plays more than once, you must have looping options (near the ‘save’ button’) set to ‘forever’ ! ! !
Again, this is just the way I make gifs, so there are many other tutorials out there that may be more suited to your preferences! You can find some examples of my gifs here.
☆ I’ve never made a tutorial before, so I really hope that it helps you even a little bit! Please please do ask if you have any questions, either by dm or inbox! ♡
#gif tutorial#yeahps#itsphotoshop#wehearttutorials#completeresources#anon who requested please let me know if you see this!#i hope it's OK!#♡♡♡#daily gaming#videogamewomen#videogameedit#gamingedit#gamingnetwork
71 notes
·
View notes
Photo
✶ Before/After ✶ Psd file - 120 (Sweater weather) ✶ You can adjust the layers if you need to ✶ If you do not have photoshop cc, you will not be able to use it. This psd will work best in photoshop cc 2020 ✶ Please, don’t claim as your own ✶ Download from Devinantart: Follow me + like or reblog + ask (logged) “120 (Sweater weather)” with a message of thanks or help us by buying our filters! Message without thanks will be ignored!
This is our work, done with effort and time spent. Please do not copy, do not violate, and do not sell it as if it were yours. The preview was made by me, being my own. Please, if your photo is here, talk to me. It is not my intention to violate the copyright rules.
#psd#psds#all psds#color: blue#color: red#completeresources#wehearttutorials#birdysources#whoaps#allresources#for icons#for edits#120
343 notes
·
View notes
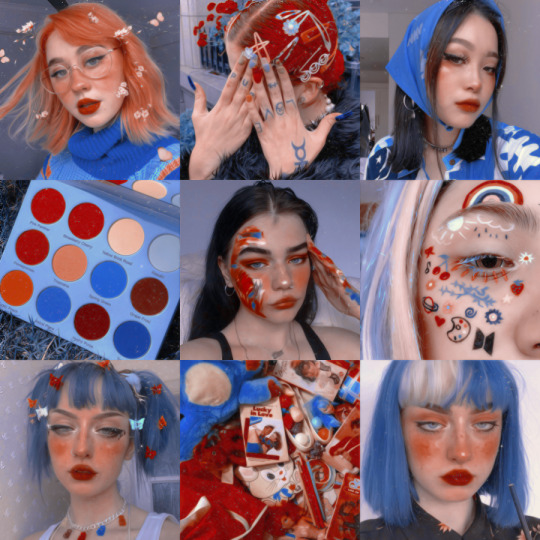
Photo

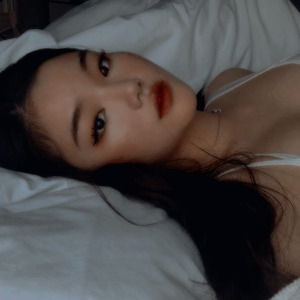
[수집] psd collection - it looks asian 아시아 같아
{.psd 289} by opulenceps // • download •
That’s made by me, what means… don’t copy dude. You can change the layers if you want to. I’m not taking requests, cause I like to keep my creativity and do what I want to do. I do not reproduce any effect. Like or share if you download it. (before/after)
The pictures used to made the previews are not made by me and had no intention to violate copyright rules. I pick up pictures in public sites, if there’s any picture on the preview that belongs to you and it’s been shared without your consent, please contact me.The colors of the previews may not match the psd colors. Unfortunately Tumblr is changing them.
#itsphotoshop#completeresources#chaoticresources#whoaps#wehearttutorials#psd#psds#it looks asian#289#red#orange#blue#demis
212 notes
·
View notes
Photo
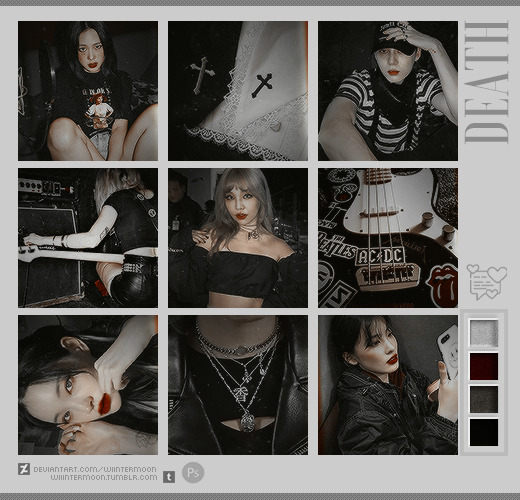
🌙 Death : PSD ® @wiiintermoon
PSD PREMIUM
Not available free !
Buy by : DEVIANTART or PAYHIP
Any problems or questions, contact me by ask or chat

#kpop psd#download psd#psd#colorize#coloring#colorized#effect#psd dark#ihaveresources#quirkyresources#finesources#dailypsd#tusermelissa#hisources#onlyresources#vannilapsds#wehearttutorials#wealphotoshop#allresources#completeresources#chaoticresources
245 notes
·
View notes
Photo
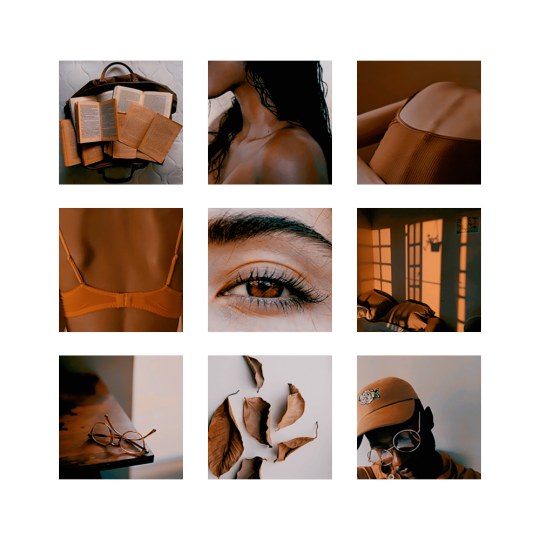
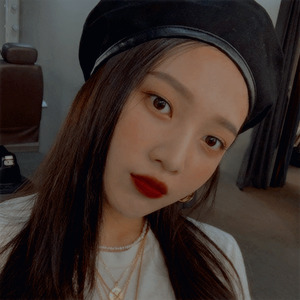
010. you're so golden..
— don’t repost or claim as your own. — add or delete layers if necessary. — please like or reblog this post if you download. — this psd contains ’color lookup’ and will work better in photoshop cc.
#wasirauhlpsds#yeahps#dailypsd#allresources#birdysources#wehearttutorials#wealphotoshop#**#psd#psds#psd coloring
251 notes
·
View notes
Photo
Random Fonts
Please Like or reblog if you download it
Amazing Books
Guld script color
Mikhaella
Baby boomer
Aliva Brush
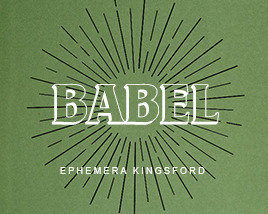
Ephemera Kingsford
#chaoticresources#yeahps#completeresources#itsphotoshop#wehearttutorials#font#fonts#random#brush#handwritten
2K notes
·
View notes
Photo
cassie__by_dearcolouring
If you make the download, please give the like or reblog. You can adjust the layers if you need, this resource is for your own personal use only. Don’t redistribute, reupload or put on pack, don’t claim as your own.
download | | more
The pictures used to made the previews are not made by me and had no intention to violate copyright rules. If there’s any picture on the preview that belongs to you and it’s been shared without your consent, please contact me.
#psd#psds#psd for icons#psd for icon#color: red#laz#psds for icons#psds for icon#download#resources#resources psd#psds resources#psd resources#resources photoshop#photoshop resources#allresources#chaoticresources#completeresources#wehearttutorials#sibylresources#dailypsds#wealphotoshop#vannilapsds#justresources#l-agallerrie#quirkyresources#wasirauhlpsds#favereblog#biresources#hisources
75 notes
·
View notes
Photo
wooyaresources. psd #002 - 80s love.
- please, do not claim as your own. - this psd contains color lookup and will work better on photoshop cc. - hit the heart/reblog if you like it. - adjust layers if necessary.
thank you!
#wasirauhlpsds#dailypsd#yeahps#wehearttutorials#rresources#allresources#birdyresources#wealphotoshop#itsphotoshop#psd#psds#pale psd#pastel psd#coloring psd#sunmi#kpop resources
115 notes
·
View notes
Text
psd 34 by milliepsds | Heather ©
Like or reblog if you use
Give me credits
Use #milliepsds or @milliepsds in your post
You can modify some things of the PSD, but you still have to leave credits.
⠀⠀⠀⠀⠀⠀
Made on Photopea | Download
⠀⠀⠀⠀⠀⠀
#psd#psd*#psds*#psd download#yellow#Red#Blue#wealphotoshop#wehearttutorials#photoshot resources#resources#milliepsds#colorize#colorized#coloring#colors#psd coloring#colour#34#Heather#photopea#photoshop#photoshop psd#download psd#free psd#psd for edits#psd for icon#all psds#image psd#orange
110 notes
·
View notes
Photo
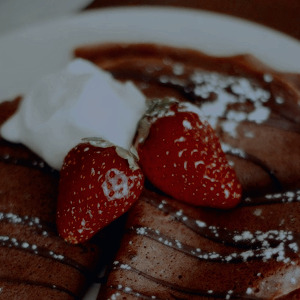
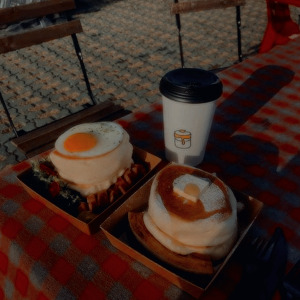

‹ °• SHIYUL — Pancake 🍫 || psd coloring
download: follow me + like or reblog (xx)
don’t repost or claim as your own
you can adjust the layers if you need to
#dailypsd#hisources#allresources#completeresources#itsphotoshop#yeahps#wehearttutorials#psd#psds#shiyulpsds#psd download#psd coloring#psd colorize#psd for icons#psd for edits#dark psd#psd*#psds*#joy icons#kiko mizuhara
194 notes
·
View notes
Photo
✶ Before/After ✶ Psd file - 125 (Grumpy fairy) ✶ You can adjust the layers if you need to ✶ This psd contains ‘color lookup’. If you do not have photoshop cc, you will not be able to use it. This psd will work best in photoshop cc 2020 ✶ Please, don’t claim as your own ✶ Download: Follow me + like or reblog + ask (logged) “125 - Grumpy fairy ” with a message of thanks or help us by buying our filters! Message without thanks will be ignored.
This is our work, done with effort and time spent. Please do not copy, do not violate, and do not sell it as if it were yours. The preview was made by me, being my own. Please, if your photo is here, talk to me. It is not my intention to violate the copyright rules.
#psd#psds#all psds#all psd#color: pink#color: soft#itsphotoshop#wehearttutorials#vannilapsds#peachcoloring#125#for icons#for edits#coloring#resource#resources psd#pink psd
218 notes
·
View notes
