#wordpress featured image double
Explore tagged Tumblr posts
Visit Tumblr Blog
Explore Tumblr blogs with no restrictions, modern design and the best experience.
Last Seen Tumblr Blogs


Fun Fact
Women make up for the other 50% of Tumblr’s audience.
Text
AI Color Store OTO
AI Color Store OTO: Ultimate Guide, In-Depth Analysis & Honest Review
Introduction
In a world where visual impact and seamless web experiences drive conversions, color and design tools have become essential for marketers, designers, and business owners.
==>>All OTOs' Links here to the direct sales pages Click here
==>>The front-End link Click here
==>> OTO1 Edition here
==>> OTO2 Edition here
==>> OTO3 Edition Here
==>> OTO4 Edition here
==>> OTO5 Edition here
==>> OTO6 Edition Here
==>> OTO7 Edition here
==>> OTO8 Edition here
==>> OTO9 Edition Here
Enter AI Color Store—a revolutionary solution leveraging AI to create stunning color palettes, templates, and store designs in mere minutes. But like most robust SaaS tools, AI Color Store isn’t a one-size-fits-all deal. Its unique OTO funnel (One Time Offers/upgrades) presents a variety of advanced features and expansions that users can choose from.
If you’re searching for AI Color Store OTO insights, you’re probably wondering: Which upgrades are genuinely valuable? What’s the real user experience with each OTO? How does it compare to other tools? You’re in the right place! After testing all the OTOs myself, I’m giving you a comprehensive, human-centered review.
What is AI Color Store?
AI Color Store is an AI-powered SaaS application that generates high-converting website/store color palettes, design templates, and visual assets. In plain English? It’s a smart design assistant for anyone who wants to make their brand, website, or digital products look jaw-droppingly good without the need for complex design tools or a big learning curve.
Overview: The 10 AI Color Store OTO Funnels
Upgrades (also known as OTOs or "One Time Offers") expand the platform. Here’s an at-a-glance look at the full suite:
OTO 1: Pro Upgrade – Unlocks advanced palettes, additional AI design modes, and export options.
OTO 2: Template Club – Massive library of premium templates, updated monthly.
OTO 3: Agency License – Sell design services, manage clients, white-label.
OTO 4: Commercial Rights – Full commercial usage for unlimited projects.
OTO 5: DFY Store Setups – Ready-made e-commerce store layouts and branding kits.
OTO 6: Graphics Mastery – AI-powered icons, stock photos, illustrations.
OTO 7: Reseller License – Resell AI Color Store under your brand.
OTO 8: Automation Suite – Workflow automation, bulk generation and scheduling.
OTO 9: Stock Media Vault – Huge library of stock images/videos.
OTO 10: Training & Community – Live coaching, resource vault, mentorship.
Detailed Analysis: Pros & Cons for Each AI Color Store OTO
OTO 1: Pro Upgrade
Pros:
Unlocks entire color algorithm for next-level palettes
Advanced export options (SVG, PNG, CSS, JSON)
Exclusive design modes (gradient generator, contrast checker)
Doubles the generation speed
Cons:
May be unnecessary for very basic use
A bit overwhelming at first for non-designers
My Testing Experience: Pro is the bread-and-butter of the platform. If you need serious design power, start here. However, it can feel overkill if you only need a couple of palettes.
OTO 2: Template Club
Pros:
1000+ premium, AI-generated modern templates
Fresh templates delivered monthly
Plug-and-play for multiple platforms (Shopify, WordPress)
Cons:
Some templates look too similar
Requires monthly/annual subscription
My Testing Experience: Template Club saves hours—especially for marketers or agencies. Variety can be hit or miss, but updates keep things fresh.
OTO 3: Agency License
Pros:
Manage unlimited clients and projects
White-label dashboard
Client billing and reporting features
Cons:
Pricier than personal plans
Overkill for individuals/hobbyists
My Testing Experience: Agency License is powerful if you’re running a design business. The white-label branding impresses clients but isn’t necessary for solopreneurs.
OTO 4: Commercial Rights
Pros:
Freedom to sell generated assets
Unlimited commercial projects
Royalty-free for clients
Cons:
Needs to be purchased for even basic client work
Manual license activation
My Testing Experience: If you’re monetizing your design output in any way, this is a must. Licensing is quick, but could be streamlined more.
OTO 5: DFY Store Setups
Pros:
Plug-and-play e-commerce stores ready in minutes
Includes branding kits, logos, color palettes
Optimized for conversions
Cons:
Limited customization compared to ground-up design
Not all niches are represented
My Testing Experience: A lifesaver for launching quick stores. Best for side-hustlers and new store owners, but designers may want more flexibility.
OTO 6: Graphics Mastery
Pros:
Access to AI-generated icons, illustrations, mockups
Royalty-free assets
Integrates seamlessly with other OTOs
Cons:
Not as deep as specialized graphic tools (e.g. Canva, Figma)
Asset variety depends on ongoing updates
My Testing Experience: Good for rapid content, ads, and web assets. Enthusiast designers will still want heavier tools occasionally.
OTO 7: Reseller License
Pros:
Complete reseller rights
Set your own pricing
Done-for-you sales pages and promo materials
Cons:
Requires you to handle customer support unless you opt for higher tiers
Income depends on your own marketing
My Testing Experience: Ideal if you want a side business in SaaS. Works best with an existing list or audience.
OTO 8: Automation Suite
Pros:
Automate palette creation, template generation, and delivery
Bulk processing – huge timesaver
Schedule content drops/updates
Cons:
Interface has a learning curve
Automation only as good as input prompts
My Testing Experience: A definitive productivity booster! Agencies and large teams will benefit most.
OTO 9: Stock Media Vault
Pros:
20,000+ high-res stock images and videos
AI tagging, easy search
All assets royalty-free
Cons:
Not all content categories are equally populated
Image curation quality varies
My Testing Experience: Vast library for blogs, ads, and social media. Acceptable overall, with some gems and some filler.
OTO 10: Training & Community
Pros:
Live workshops and Q&As
Direct access to experts
Active user community, tips, premium resources
Cons:
Best perks come with higher-tier plans
Some trainings can be basic for experienced users
My Testing Experience: Great for networking and getting the most from the tool. Absolute beginners gain the most.
OTO 1 vs All OTOs: Which One Delivers the Real Value?
OTO 1 (“Pro Upgrade”) stands as the cornerstone—without it, you’re missing the best of what AI Color Store offers (speed, advanced options, creative power). But if you want ready-made assets, added business potential, or agency capabilities, pairing OTO 1 with at least one or two other OTOs (especially Template Club or Commercial Rights) multiplies your workflow.
Bottom Line:
Individuals: Start with Pro
Side-Hustlers: Pro + Template Club or DFY Stores
Agencies: Pro + Agency + Automation + Training
Aspiring resellers: Add Reseller License
Pricing Table (Estimated, for 2025)
OTOEstimated Price (One-Time / Recurring)Pro Upgrade$67 (one-time)Template Club$27/month or $197/yearAgency License$127 (one-time)Commercial Rights$67 (one-time)DFY Store Setups$97 (one-time)Graphics Mastery$77 (one-time)Reseller License$297 (one-time)Automation Suite$97 (one-time)Stock Media Vault$67 (one-time)Training & Community$47/month or $297/year
Actual prices may fluctuate due to promotions or seasonal sales.
User Experience: My Journey After Testing All OTOs
After spending two weeks using every OTO:
Ease of Onboarding: The multipage dashboard felt intimidating at first, but helpful tours and guides smoothed the learning curve.
Palette/Template Quality: The AI genuinely offered creative, on-brand color schemes and design elements. Even as a picky designer, I found the outputs professional.
Speed: Generations are fast, and bulk tools turbocharge content creation.
Integration: Smooth with Shopify, WooCommerce, WordPress (especially with the Template Club).
Support/Community: Fast responses and a lively Slack community.
Drawbacks:
The full OTO funnel can get expensive
Occasionally, a template or palette misses the mark and needs tweaking
Some features (Automation, Reseller) require serious intent to unlock their real value
AI Color Store vs Other Tools
Canva
Pros: More granular graphic design, huge asset library
Cons: Fewer AI-driven color/design automations
Coolors
Pros: Dedicated palette tool, instant results
Cons: Lacks broad asset creation, store/brand focus
Figma
Pros: Power for pro designers, real-time collaboration
Cons: Steep learning curve, no AI asset generation, expensive for teams
AI Color Store wins for:
AI-driven palette AND template generation
E-commerce/store focus
Rapid, one-click brand-building workflows
Reselling and agency features
7 Real-World Case Studies
1. Solopreneur Boutique Launch
Jane was launching an Etsy store and needed a fast, cohesive brand look. With OTO 1 & DFY Store Setups, her store was live (with logo, palettes, and all) in a weekend.
2. Agency Rapid Turnaround
Mark’s agency used the Automation Suite to generate palettes/templates for a client’s 10 franchises overnight. Client dazzled, markup saved hours.
3. E-Commerce Rebranding
An aging Shopify fashion brand got new life from fresh palettes/templates in Template Club, with the AI helping select color combos that increased conversions by 15%.
4. Course Creator Promo Materials
Laura, an online coach, leveraged Graphics Mastery to whip up unique social media graphics in minutes, standing out from others who only use Canva.
5. Local Business Marketing
A restaurant owner subscribed to Commercial Rights and Stock Media Vault, using them to build a new digital menu and promo materials.
6. Freelance Reseller Side Hustle
Tim invested in Reseller License, branded the platform under his agency, and now sells bespoke palette/template services on Fiverr and Upwork.
7. Community Scaling
Using Training & Community, a non-profit collaborated with global volunteers to easily roll out branded campaigns across different countries.
My Honest Recommendation
Start with OTO 1 (Pro Upgrade)—it’s the gateway to real creative power. For most users, pairing Pro with Template Club or DFY Store Setups delivers the best time-value ratio. Agencies or serial creators should strongly consider Agency License and Automation Suite. Only add Reseller if you’re committed to selling SaaS services.
The suite isn’t the cheapest, but the time you save and flexibility you gain justifies investment—especially if your business runs on branding and first impressions.
Frequently Asked Questions (FAQ)
Q1: Do I need all 10 OTOs? A: No. Most users are best served picking the core OTO 1 with 1-2 targeted expansions that fit their goals.
Q2: Is there a free trial? A: Generally, AI Color Store offers a demo, but premium OTOs need upgrade purchases.
Q3: Is it suitable for non-designers? A: Absolutely—AI does most of the heavy lifting. Basic color theory helps, but isn’t necessary.
Q4: Can I use outputs for client projects? A: Only if you have the Commercial Rights (OTO 4).
Q5: What if I want to resell the tool? A: The Reseller License (OTO 7) is for you—but you’ll need to promote and support your customers.
Q6: How do updates work? A: Updates are included for most one-time purchases; ongoing content drops happen monthly for Template Club & Training/Community.
Q7: What support is available? A: Support is fast via chat and email. Premium OTOs get priority.
Conclusion: Is AI Color Store OTO Worth It?
AI Color Store, with its deep OTOs, has matured into a powerhouse for entrepreneurs, freelancers, and agencies. For anyone who values fast, professional, and conversion-optimized designs, it’s a huge step up from generic palette generators or template tools.
I highly recommend starting with OTO 1 and expanding as your business grows. If design, branding, or e-commerce is your bread and butter, this is one platform that gives you back your most valuable asset: time.
Ready to see for yourself what AI-powered color and design can do?
(Content written after extensive testing and real-world use—not a generic review. Human-tested, AI-approved!)
0 notes
Text
Pebblebee’s AirTag alternative now doubles as a panic alarm
Pebblebee is turning its Clip tracker into a personal safety alarm for free. | Image: Pebblebee Pebblebee has announced a new personal safety feature for its Clip location tracker that’s compatible with both Apple’s Find My and Google’s Find Hub network. Alert is being introduced as a free update to the Pebblebee app today, and the company says it will work with current and future versions of the…

View On WordPress
0 notes
Text
The best WordPress plugins for handling images… 16 free and paid plugins

If you’re developing and optimizing your website, you should focus on page loading speed and how they appear to visitors. Images can be the main reason your website slows down! But the solution isn’t to abandon images completely, but rather to leave the matter to the plugins that handle them. So what are these free and paid plugins that can make your website’s images better, of higher quality, and smaller in size? What are the features of each one? Check them all out below.
16 – Optimole Plugin – Free

Optimole is considered one of the best WordPress plugins for image compression, as it allows you to compress 80% of the image size while maintaining the highest quality. This, in turn, maintains the speed of the website and avoids its weight. The following are the features of the Optimole plugin: - The Optimole plugin supports and works on all devices, as it does not matter which device the visitors are using, as the plugin will compress the images and speed up the site anyway. - CDN support, through which the images will work on more than 200 servers. - The Optimole plugin can handle slow network connections, as the quality is automatically reduced to match the amount of data used by the visitor’s device. - The ability to add watermarks to your images to prevent them from being stolen.
15 – Optimole plugin – Paid
In general, the Optimole plugin enables you to compress the size of images, which makes page loading faster and more efficient. It has a paid version that features the following: - The size of old or new images is updated automatically - The Lazy-Loading feature is available - You can customize the appropriate size parameters as you wish - 12/24 hour support from the specialized team
14 – Imagify add-on – Free

And we come with the second add-on, which is the Imagify add-on, which also compresses the images as much as possible to be included in the article without causing the site to be heavy or slow down its performance. Some of its most important features are the following: - The ability to convert images to many formats such as JPEG, PNG, GIFs and other common formats - The ability to download many uncompressed images and compress them with the click of a button without wasting your time downloading each image separately - It allows you to reduce 48% of the original image size while maintaining the quality as much as possible - The ability to also improve WebP images
13 – Imagify Add-on – Paid

Now it is the turn of the features of the paid version that push many to choose the paid version and pay for it. The most prominent of these features are: - The ability to compress 500 MB of the total images on the site, equivalent to 5000 images, for $4.99 - The ability to compress an unlimited number of images for $9.99 - Providing many advanced settings in the plugin - Providing a version that can compress 50 GB for $69.99
12 – WP Smush plugin – Free

WP Smush is the most famous plugin in the field of image compression among WordPress users, as it is characterized by a beautiful user interface, and it also gives you information about the images that have been optimized and how much size has been compressed. And many more great features as follows: - Compress size for old and new images as well - Ability to optimize 50 images at once - Ability to compress an unlimited number of images - Ability to compress an image with a maximum size of 1 MB
11 – WP Smush plugin – Paid

We saw that Smush is the most popular image compression plugin in WordPress, and we saw many features of the free version. But now let’s see the features of the paid version which are: - Lossy compression - WPMUDEV development kit included - Automatic compression - Double compression quality - Compress more than 32MB - Unlimited number of images to compress at once - Advanced CDN feature
10 – Optimus plugin – Free

This plugin is highly reputable in the field of image compression, as it enables you to automatically compress the size of selected images, and with this compression the plugin maintains the stability of the site’s speed and performance quality. Not to mention many other features such as: - Ability to compress 70% of the original image sizes - Ability to convert images to JPEG and PNG formats - Compress an unlimited number of images - Compress images up to 100 KB
9 – Optimus plugin – Paid
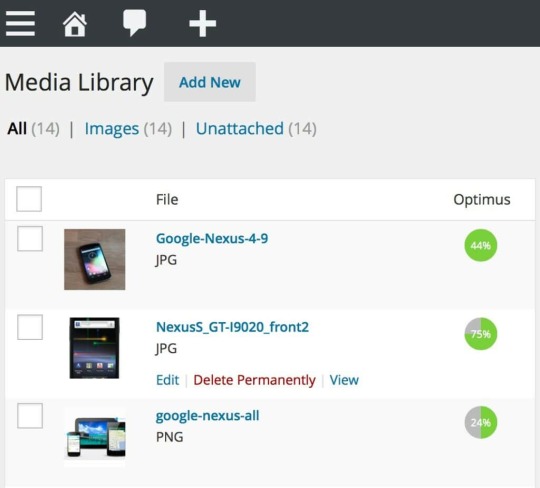
As we mentioned before, Optimus plugin is specialized in compressing the size of images to be included appropriately with the content. Aside from the many features in the free version, there are more advanced features in the paid version such as: - Support for PNG and JPEG formats - Use 10MB as a maximum image size - HTTPS connection support - WebP support - API support
8 – EWW Image Optimizer plugin – Free

This plugin is based on a simple and easy-to-use user interface, as it features infinite image compression, in addition to optimizations for your server. And other features such as: - Optimize multiple formats such as JPEG, PNG, GIF and PDF - Provide lossy and lossless compression options - Optimize your web server - Suitable server optimizations for privacy-focused sites
7 – EWWW Image Optimizer – Paid

which compresses images with many features that have been developed in the paid version. Some of the most important features are: - Advanced image compression - WebP support - One-click automatic compression - Fast performance - Advanced optimization of your server speed - Saving compressed images on multiple servers
6 – Compress JPEG & PNG Images by TinyPNG – Free

This plugin also features an easy-to-access control panel, where you can access basic image compression settings and activate automatic optimization. Some of its most prominent features: - Automatic image compression and resizing - Unlimited file sizes during compression - WooCommerce support - Ability to compress 500 images per month
5 – TinyPNG – Paid

The paid version of TinyPNG has a huge number of features within the scope of image compression, namely: - Ability to drag and drop 20 images at once - The compressed size limit is up to 75 MB - Show all compression-related information after the image compression process - Support from the specialized team
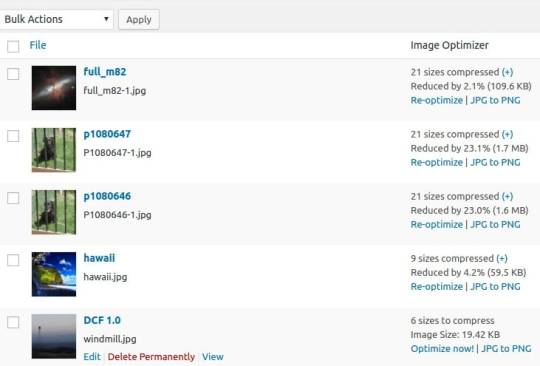
4 – ShortPixel Image Optimizer – Free
If you’re looking for an image compression plugin with a sleek interface, ShortPixel is undoubtedly your best choice. With its simple settings that allow you to customize how you compress images. Its features are: - Provides multiple modes such as lossy, glossy, and lossless - Provides information about the compressed size of images - Support for WebP images - PDF optimization
3 – ShortPixel – Paid
The paid version of ShortPixel provides you with a set of great features related to image compression such as: - Advanced support - No limit on the size of images to be compressed - Provides a single API for multiple sites - Support for all compression modes (Lossless, Glossy, Lossy) - Advanced PHP compression tools
2 – Imsanity – Free

Automatically compress multiple images - Ability to customize the size to which the image is compressed - Convert images to PNG, JPEG, and BMP formats - Select images only once without uploading them again - 1 – WP Compress plugin – Free
1 – WP Compress plugin – Free

Easy plugin settings - Easy-to-use control panel - Lossy mode support - WebP support - More about plugins and images: The most important WordPress plugins that guarantee the success of your site… 25 plugins that must be installed - Best plugin WordPress for photography websites Read the full article
0 notes
Text
You’re Blogging Wrong! Fix It with These WordPress Tips
Blogging should be simple. But many WordPress blogs are hard to read, slow to load, and tough to find.

If you're not getting clicks or readers aren't staying, your setup might be the problem. Let’s fix it.
Clean Up Your Blog Structure
Start with your categories and tags. Keep them clear and few. Don’t create a new tag for every post. It clutters your site.
Use simple URLs. A good one looks like this:
yourdomain.com/blog-title
Use H1 for your title, H2s for sections, and H3s for points inside sections.
A friend once asked why no one found her post. Her blog had five H1s and a messy slug. We fixed it. Rankings improved.
Plan Your Posts
Random posts confuse readers and hurt traffic. Use a tool like Trello or Notion to plan. Aim to publish weekly or biweekly. Stick to the same day.
I set up a basic content board for a client—traffic doubled in 2 months.
Pick the Right Layout
Use a featured image. It grabs attention. Add a sidebar with recent posts, categories, and maybe a search bar. Use clear fonts. Avoid more than two styles.
White space is not empty. It helps people read.
Fix SEO Settings
Use plugins like Yoast or RankMath. They’re simple and free. Write meta titles and descriptions for each post.
Use a focus keyword in the title, first paragraph, and a few headers. Add links to your other posts. Google likes it, and users stay longer.
Make It Easy to Read
Use short sentences. Break up long thoughts.
One idea per paragraph. Two lines max.
Use bullet points when listing things.
Add images to break up the text.
I once rewrote a client's 1500-word wall of text into blocks. Bounce rate dropped by 40%.
Speed Up Your Blog
Use a caching plugin like WP Rocket or W3 Total Cache.
Compress images with ShortPixel or TinyPNG.
Pick a lightweight theme. Avoid ones packed with extras you don’t need.
Faster blogs get more views and better rankings.
Enable Comments the Smart Way
Engage readers, but don’t invite spam. Use Akismet for spam control. Or limit comments to recent posts. You can use Disqus or native WordPress development company comments.
Reply when people comment. It builds trust.
Add Share Buttons
Make it easy to share your post.
Use plugins like Sassy Social or AddToAny.
Place buttons at the top, bottom, or both.
Ask readers to share. A simple line like "Found this useful? Share it!" works.
Check What’s Working
Install Google Analytics and Search Console.
See what posts get the most clicks.
Check bounce rate and time on page.
Use what you learn to plan your next post.
I had a blog stuck at 300 monthly views. One analytics check showed two posts drove 80% of traffic. I wrote more like them. Now that blog gets over 2,000 visits a month.
Bonus: Extra Easy Wins
Add an author bio at the bottom.
Include a call to action like "Join our newsletter."
Use categories as your blog menu.
Final Thoughts
Your blog doesn’t need to be perfect. But it must be clean, fast, and useful. Fix what makes reading or finding posts hard. Use plugins that help, not bloat.
Pick three tips from this list. Apply them today.
Watch your traffic and time-on-site grow. One fix at a time.
0 notes
Text
From Old to Bold: Transform Your Website by Changing Your WordPress Theme
Introduction
Your website is more than just an online presence it’s your digital storefront, your personal brand, and often your first handshake with potential customers. If your site still uses the same old WordPress theme from years ago, it's time to consider a major upgrade.
In this blog, you’ll learn how changing your theme can transform your website, boost your credibility, and prepare your business for long-term success.
Before You Change: Ask These Questions
Does my site reflect my brand identity?
Is my current theme slowing things down?
Is the layout user-friendly?
Am I using all the features I need (or stuck with limitations)?
Is it easy to update and customize content?
If you answered no to any of the above you’re ready for a change.
Real Benefits of a Fresh Theme
Enhanced Brand Identity
Modern themes offer full color and typography customization, letting your personality shine.
Improved User Experience
Simplified navigation, faster loading, and responsive design lead to happier visitors.
SEO and Performance Optimization
New themes are designed with Core Web Vitals and mobile-first indexing in mind.
Access to Modern Features
Elementor compatibility, one-click demo import, WooCommerce support, dark mode, sticky headers these are standard in modern themes.
How to Migrate Like a Pro: Step-by-Step
Backup Everything First Use a reliable tool to save your content, images, and databases.
Choose a Trusted, Lightweight Theme WPElemento offers fast, SEO-optimized themes that are easy to customize.
Install on a Staging Site Don’t go live until you test. Tools like WP Staging help you do this safely.
Customize the New Theme Rebuild pages using Elementor or your theme’s built-in options.
Reassign Menus, Sidebars, and Widgets Themes store these differently double check placements.
Optimize for Speed & Mobile Use caching and image optimization plugins to keep performance top-notch.
Avoid These Common Theme Change Mistakes
Changing themes on a live site without backups
Ignoring how plugins interact with the new theme
Forgetting to check forms, popups, and sliders
Losing custom CSS or custom post types
Not updating SEO metadata
Top Picks: WPElemento Themes for a Bold New Start
Modern Business Theme Great for agencies, startups, and consultants
Creative Portfolio Theme Built for artists, designers, and freelancers
eCommerce Pro Theme Ready for online stores with product filters, payment support, and review sections
Tech Blog or SaaS Theme Optimized for blogging, digital products, and speed
Conclusion
You don’t need a complete website overhaul to transform your business online sometimes, a simple theme change makes all the difference. Whether you're aiming for a sleek new look, better performance, or advanced functionality, changing your WordPress theme is your first step to success.
Need help finding the right theme? Visit WPElemento and explore expertly crafted, Elementor-compatible WordPress themes built for 2025 and beyond.
0 notes
Text
Premium Animated Background Bundle - Particle & Star Effects (Background + Transparent Versions)
LIVE DEMO - Premium Animated (Background)
LIVE DEMO - Premium Animated (Transparent)
BUY NOW
Elevate your website's visual appeal with our Premium Animated Background Bundle - a collection of professionally crafted particle and star effects designed to create immersive user experiences. This versatile package includes two distinct versions for maximum flexibility:
Gradient Background Version: Features a stunning cosmic-themed gradient background with:
150+ twinkling stars with randomized glow effects
100+ dynamic floating particles
Smooth parallax movement
Modern dark-blue/purple color scheme
Transparent Background Version: Perfect for seamless integration:
Fully transparent canvas
120+ semi-transparent glowing stars
80+ ethereal particles with opacity control
Works over ANY background color/image

Key Features:
✅ Double Value: Two complete versions in one package ✅ Zero Dependencies: Pure vanilla JavaScript + CSS ✅ Lightweight: Only 4KB minified (CSS+JS combined) ✅ Fully Responsive: Auto-adapts to all screen sizes ✅ Cross-Browser: Works on Chrome, Firefox, Safari, Edge ✅ Easy Customization: Change colors/size/speed in 2 lines of code
Perfect For:
Website hero sections
SaaS product backgrounds
Portfolio showcases
Landing page decorations
Presentation visuals
Digital product showcases
Technical Specifications:
Format: HTML5/CSS3/JavaScript
Total Files: 8 (4 HTML, 2 CSS, 2 JS)
Documentation: Detailed README included
License: Commercial Use (MIT)
Why Choose Our Bundle?
Performance Optimized: CPU-friendly animations with intelligent element recycling ensure buttery-smooth performance even on mobile devices.
Professional Aesthetics: Carefully calibrated timing functions and randomized parameters create organic, natural-looking motion that stands out from amateur effects.
Developer Friendly: Clean, commented code with modular architecture makes customization effortless. No jQuery or bloated libraries!
Instant Integration: Includes ready-to-use HTML files - just drag & drop into your project. Works with React/Vue/WordPress via simple wrapper.
Sample Customer Use Cases:
Web Designer: "Used the transparent version over client's photography portfolio - created magical hover effects!"
SaaS Developer: "Background version made our analytics dashboard feel premium and high-tech"
Marketer: "Increased conversion rate by 17% with animated hero section"
Agency Owner: "Our go-to solution for client projects needing wow-factor backgrounds"
Commercial License Includes:
Use in unlimited projects
Client work authorization
Resell in compiled products
Lifetime updates
#animated background#javascript background#css animation#parallax background#particles js#star background#vanilla js effect#cosmic animation#html5 animation#website hero effect#responsive animation#transparent canvas#gradient animation#animated stars#twinkling background#floating particles#pure css#no dependency#lightweight js#modern website effect#immersive ui#digital product design#animated hero section#landing page animation#portfolio background#saas ui background#interactive background#canvas animation#background bundle#particle effect
1 note
·
View note
Text
How to Improve Website Conversions with Better WordPress Design

Your website isn’t just a digital business card—it’s your best salesperson. But what if you're getting traffic and still not getting leads, signups, or sales? The problem often lies in poor website design and user experience.
If your site is built on WordPress, good news: it's one of the most flexible platforms for improving conversions. In this blog, we’ll show you how to design your WordPress site to not just look good—but convert visitors into customers.
Why Website Conversion Matters More Than Ever
A "conversion" can mean many things:
Filling out a contact form
Signing up for a newsletter
Buying a product
Booking a consultation
Downloading an eBook
The average website conversion rate is just 2–3%. But with the right design tactics, you can double or triple that. WordPress offers the tools—if you use them correctly.
1. Simplify Navigation to Reduce Drop-offs
Users don’t stay long on confusing sites. Your menu should be clear, concise, and structured based on user intent.
Best Practices:
Keep top menu to 5–7 items
Use logical labels (e.g., “Services” not “Solutions”)
Include CTAs in the header or sticky nav
Add breadcrumbs on internal pages for navigation clarity
A web design company in Udaipur can help you map the most intuitive layout based on visitor behavior.
2. Improve Page Load Speed for Better UX
Speed directly affects user satisfaction and SEO. A 1-second delay in page load time can reduce conversions by 7%.
Quick Speed Tips for WordPress:
Use a caching plugin like WP Rocket
Compress images with tools like ShortPixel or Smush
Host on a fast server with SSD storage
Remove unused plugins and scripts
Use a lightweight, optimized theme
Speed isn’t just technical—it’s psychological. A fast site feels more trustworthy and professional.
3. Use Visual Hierarchy to Guide Attention
Don’t overwhelm users with scattered content. Arrange elements based on importance using a clear visual hierarchy.
Visual Strategy:
Place the main CTA (Call to Action) above the fold
Use larger fonts and buttons for primary actions
Apply color contrast to guide attention
Use whitespace to break up sections
Bold your value proposition in the hero area
A good first impression can cut bounce rates significantly.
4. Optimize Your WordPress Forms
Your contact or lead form is the final step in the conversion path. If it's confusing or too long, users will abandon it.
Form Optimization Tips:
Ask only for essential info (name, email, message)
Use inline validation for real-time error checking
Add trust elements (privacy note, testimonials)
Make buttons action-oriented: “Get My Quote” vs “Submit”
Use mobile-friendly form layouts
Tools like WPForms or Gravity Forms help create beautiful and responsive forms without coding.
5. Make Your CTAs Impossible to Ignore
Your call-to-action (CTA) is what drives results. If it's weak or hard to find, you're missing out.
Effective CTA Tactics:
Use active language: “Get Started,” “Book Now,” “Claim Offer”
Use buttons with high-contrast colors
Place CTAs at strategic points (top, middle, bottom of the page)
Test pop-ups and sticky bars for lead magnets
Align CTA text with the offer’s value
Use A/B testing to discover what CTA text, color, or position works best for your audience.
6. Add Trust Signals to Boost Confidence
Visitors are more likely to convert when they trust your business. WordPress makes it easy to add trust-building features.
Trust Elements You Should Include:
Customer reviews and star ratings
Client logos or “As Featured In” badges
Secure SSL badge (https and padlock)
Clear contact info with map
Certifications, memberships, or awards
Social proof works—especially in industries like hospitality, healthcare, education, and services.
7. Use Conversion-Focused WordPress Themes
Not all WordPress themes are designed for business growth. Some focus too much on design and forget functionality.
What to Look For:
Mobile-responsive layout
Optimized for fast load times
Easy integration with marketing plugins
Customizable header, footer, and CTA areas
SEO-friendly markup
A custom-coded theme from a WordPress Development Company in Udaipur can give you both performance and pixel-perfect design.
8. Add Live Chat or WhatsApp Integration
Modern users want immediate responses. Adding live chat or WhatsApp can dramatically increase inquiries and reduce bounce.
Recommended Plugins:
Tidio
WP-Chatbot
WhatsApp Chat Button by Cresta
HubSpot Live Chat (also integrates with CRM)
Just make sure someone’s actively managing it—or use chatbots for off-hours.
9. Track & Analyze User Behavior
WordPress easily integrates with tracking tools to help you understand how users behave—and where they drop off.
Top Tools:
Google Analytics
Microsoft Clarity (heatmaps and session recordings)
MonsterInsights (WordPress plugin for analytics)
Hotjar
Data-driven design decisions help you focus on what actually increases conversions—not just what looks good.
10. Update Your Content & Offers Regularly
Stale websites drive users away. Keep your WordPress site fresh with:
Seasonal offers or time-limited deals
New blog posts or success stories
Updated FAQs
Changed pricing, testimonials, or CTAs
Your homepage should evolve as your business does.
Final Thoughts
Great WordPress design isn’t about flashy visuals—it’s about clarity, speed, trust, and action. Every design element, layout decision, and plugin you use should serve one purpose: driving conversions.
0 notes
Text
Psychology Meets Technology The Bakery That Changed Everything
One of our most educational projects involved a local bakery that was losing customers to larger competitors despite having superior products. Their website was a relic from 2010, slow, unresponsive, and practically invisible on search engines. More importantly, the few visitors who did find the site were leaving within seconds.
I completely rebuilt their website using WordPress, implementing advanced caching mechanisms, optimizing images without losing quality, and integrating Google Analytics to track user behavior. The data revealed a sobering truth: users were abandoning the site after less than ten seconds, primarily due to slow loading times and confusing navigation.
Working closely with my co-founder, we redesigned the entire user experience. The homepage now featured vibrant, professional photos of their artisanal cakes and pastries, with a prominent "Order Now" button that couldn't be missed. We simplified the menu structure and added customer testimonials to build trust. Meanwhile, the SEO strategy focused on local search terms like "fresh pastries near me" and "custom birthday cakes." We captured the entire transformation process through stunning visuals on Instagram, showing how thoughtful design and technical optimization can revitalize a struggling business.
The transformation was remarkable. Within three months, website traffic had doubled, average session duration increased by 200%, and most importantly, online orders were pouring in. But the real victory was seeing the bakery owner's face light up when she showed us her first busy Saturday in months, with customers mentioning they had found her through her website. We shared this success story across our platforms, from detailed case studies on LinkedIn to celebration posts on Facebook, inspiring other small business owners with what's possible through strategic digital transformation.
This project was a masterclass in understanding that successful digital strategy isn't just about technical implementation or keyword rankings. It's about creating experiences that resonate with human behavior and psychology. A page's loading speed, the placement of a call to action button, the emotional impact of visual elements, all these factors influence user decisions in ways that pure technical metrics can't capture.
1 note
·
View note
Text
Here are the top five plugins for converting PDFs into interactive flipbooks:
1. Flipbook
Flipbook is a powerful and widely-used WordPress plugin to create stunning interactive flipbooks from PDFs or images.
Key Features:
Converts PDFs into realistic flipbooks with page-flipping effects.
Supports responsive designs for mobile, tablet, and desktop devices.
Customizable themes and interactive elements like zoom, navigation, and annotations.
Easy integration via shortcodes.
Why Flipbook?: Its simplicity, rich feature set, and seamless integration make it a top choice for creating engaging flipbooks.
2. Real3D Flipbook
Real3D Flipbook is a versatile plugin that creates interactive 3D flipbooks.
Key Features:
Converts PDFs and images into realistic 3D flipbooks.
Fully responsive and works on all devices.
Supports lightbox and fullscreen modes.
Customizable design options for branding.
Best For: Users who want an immersive, 3D flipbook experience.
3. dFlip
dFlip is a lightweight plugin that focuses on creating simple yet visually appealing flipbooks.
Key Features:
Realistic 3D flipbook effects.
Easy-to-use shortcode generator for embedding flipbooks.
Mobile-friendly and responsive.
Supports single and double-page views.
Best For: Quick and easy PDF-to-flipbook conversion.
4. Flip PDF Pro
Flip PDF Pro is a feature-rich plugin designed for advanced flipbook creation.
Key Features:
Converts PDFs into flipbooks with multimedia elements like videos and links.
Supports both HTML5 and Flash formats.
Customizable templates and themes.
Integration with e-commerce platforms for digital product sales.
Best For: E-commerce and marketing-focused flipbooks.
5. Issuu Embed Plugin
Issuu Embed Plugin connects your WordPress site with the Issuu platform to showcase flipbooks.
Key Features:
Embeds flipbooks hosted on Issuu directly into WordPress posts or pages.
Customizable viewer options, including fullscreen mode.
Provides analytics for flipbook engagement.
Best For: Publishing professionals with existing Issuu accounts.
Conclusion
For the best overall experience, Flipbook is the top choice due to its balance of ease of use, responsive design, and customization options. For users seeking advanced features like 3D effects or e-commerce integration, Real3D Flipbook and Flip PDF Pro are excellent alternatives.
0 notes
Text
Victoria Justice Just Doubled Down On Her Famous “I Think We ALL Sing” Comment, And It’s Too Good
I think we’ve ALL seen that famous Victoria Justice meme that went viral in 2017. Gilbert Flores / Variety via Getty Images The video in question features then-teenage Victoria being interviewed outdoors with her fellow Victorious cast members, including Ariana Grande, Liz Gillies, and Daniella Monet. When the group were asked which cast member sings the most outside of filming, and largely…

View On WordPress
0 notes
Text
Is Ele IceCream the Ideal Dessert Shop WordPress Theme for Growing Your Sweet Brand?
From handcrafted gelato to gourmet frozen treats, your dessert brand deserves a website that’s as delightful as your creations. The Ele IceCream theme is purpose-built to meet the needs of ice cream shops, sweet parlors, and dessert entrepreneurs who want to thrive online.
Designed with Dessert Businesses in Mind
This theme isn’t just another template—it’s a carefully crafted digital solution for businesses that serve happiness by the scoop. Its homepage features eye-catching sliders, bold CTAs, and colorful product sections that highlight your most popular items.
The overall layout of this ice cream store WordPress template is intuitive, helping you guide visitors from browsing to ordering without friction.
Showcase Products with Visual Impact
Product photography is a powerful sales tool for food and dessert businesses. With Ele IceCream, you can add high-resolution galleries, hover effects, and image carousels to show off:
Specialty sundaes
Ice cream cakes
Popsicles and frozen yogurt
Seasonal or artisanal products
The layout supports beautiful visual storytelling that can increase appetite and conversions.
Ideal for Both Local and Online Sales
Whether you operate a brick-and-mortar store or want to reach customers online, Ele IceCream adapts. Integrate delivery options, in-store pickup, or booking features. With WooCommerce compatibility, you can transform your site into a full-fledged ice cream delivery WordPress theme.
Your customers can:
Browse your catalog
Choose flavors and add-ons
Place orders directly
Make secure payments
Track delivery status (via plugins)
This seamless ordering experience gives your brand a competitive edge.
Highlight Events, Workshops, or Blogs
Want to share recipes or tips? Ele IceCream includes a blog module where you can publish engaging content. Whether it’s seasonal recipes, behind-the-scenes scoops, or frozen dessert trends, this doubles as an ice cream recipe blog template for content marketing.
You can also promote events like sundae-making classes, community ice cream festivals, or brand launches to build local engagement.
Easy to Maintain, Even for Beginners
Managing a website shouldn’t feel like a full-time job. Ele IceCream simplifies everything with:
One-click demo import
Easy theme customizer
Drag-and-drop page building
Documentation and support
Even if you’re just starting out, setting up and managing your website is quick and painless.
Final Thoughts
If you're searching for a professional and playful website to represent your dessert business, Ele IceCream is the answer. It’s packed with features that help you connect with customers, sell more products, and grow your brand in a fun, flavorful way.
Build your dream dessert site with this feature-rich ice cream brand WordPress theme and start scooping success today!
#ice cream WordPress theme#ice cream parlor website theme#gelato shop WordPress template#dessert shop WordPress theme#ice cream truck website template#frozen treats WordPress theme#ice cream store WordPress template#sweet shop website theme#ice cream brand WordPress theme#ice cream product showcase#ice cream blog WordPress theme#sundae shop WordPress template#frozen dessert business theme#popsicle store WordPress website#ice cream delivery WordPress theme#creamy delights WordPress template#ice cream factory website#artisanal ice cream WordPress theme#ice cream recipe blog template#ice cream ecommerce theme
0 notes
Text
Step-by-Step SEO Guide for Migrating a WordPress Website
WordPress Migrations are critical moments. Done right, they can set you up for a new level of growth. Done wrong, they can tank your hard-earned SEO rankings overnight.
If you're planning to migrate your WordPress site — whether changing your domain, hosting, design, or CMS — it's vital to approach it carefully, with SEO top of mind. In this comprehensive guide, we'll walk you through each step to ensure a seamless migration that preserves your search engine rankings and user experience.

Why SEO Matters During Migration
Site migrations often involve changes in URLs, structure, design, or platform — all things that search engines heavily rely on to index and rank your content. Without careful handling, you risk:
Losing organic traffic
Breaking backlinks
Decreasing search engine visibility
Poor user experience
The good news? With the right SEO checklist, you can migrate your WordPress site confidently without sacrificing your rankings.
Pre-Migration SEO Checklist
Preparation is everything. Here’s what you must do before migrating your WordPress site.
1. Set Clear Objectives
Define the purpose of the migration. Are you moving to a new domain? Switching hosts? Redesigning your website? Your objectives will influence your strategy and SEO precautions.
2. Conduct a Complete SEO Audit
Before moving anything, understand your current SEO performance. Use tools like:
Google Search Console — for indexing and search performance
Google Analytics — for traffic patterns
Screaming Frog SEO Spider — for a full crawl of your existing website
Record key SEO metrics:
Top-performing pages
Keywords driving traffic
Backlinks profile
Current URL structure
3. Backup Everything
Always have a full backup — both your website files and database. You can use plugins like UpdraftPlus or services offered by your hosting provider.
4. Create a URL Mapping Plan
List out all your existing URLs and plan where they will point on the new site. This ensures that you can set up 301 redirects properly and preserve link equity.
Use a spreadsheet for this mapping — old URLs in one column, new URLs in another.
5. Build a Staging Site
Never migrate on your live site. Set up a staging environment where you can make changes safely without affecting users or search engines.
You can use services like WP Staging or your hosting provider’s staging features.
During Migration SEO Checklist
The move is happening. Stay sharp during this phase!
6. Keep the Same URL Structure (If Possible)
Unless absolutely necessary, keep your URL structure the same. Changes to slugs (the part of the URL after the domain) can cause SEO disruption.
If you must change URLs, ensure proper redirects are in place.
7. Implement 301 Redirects
This is critical. Set up 301 redirects from your old URLs to the corresponding new URLs. This tells search engines the page has permanently moved, and transfers SEO authority.
Plugins like Redirection can help, or you can do this manually via your .htaccess file.
Example:
Redirect 301 /old-page/ https://www.newdomain.com/new-page/
8. Update Internal Links
If any internal links on your site point to old URLs, update them to point to the new URLs. This helps users and search engines navigate smoothly.
Tools like Better Search Replace can make bulk updates easier.
9. Preserve On-Page SEO Elements
Ensure all your critical SEO elements are migrated:
Meta titles and descriptions
Header tags (H1, H2, etc.)
Alt text for images
Canonical tags
Structured data (Schema)
If you're switching themes or redesigning, double-check that these SEO elements are properly transferred.
10. Noindex the Staging Site
You don't want search engines to index your staging environment! Add a noindex directive to your staging site either via your robots.txt or SEO plugin settings.
Example in robots.txt:
User-agent: *
Disallow: /
Post-Migration SEO Checklist
You’ve launched — congrats! But you're not done yet. Now it's time to verify everything.
11. Test 301 Redirects
Use tools like Redirect Checker or Screaming Frog to make sure all your 301 redirects are working correctly.
Fix any redirect loops, broken redirects, or missing redirects immediately.
12. Submit a New XML Sitemap
Generate a new sitemap (most SEO plugins like Yoast SEO do this automatically) and submit it to:
Google Search Console
Bing Webmaster Tools
This helps search engines quickly discover your new URLs.
13. Update Your Robots.txt and Canonical Tags
Ensure your robots.txt file is clean and allows crawling of the important parts of your site.
Double-check that canonical tags point to the correct versions of each URL — especially if you changed your domain or structure.
14. Monitor Performance Closely
For at least 2–3 months post-migration, closely watch:
Organic traffic
Search rankings
Crawl errors
Indexed pages
Use Google Search Console for issues and Google Analytics to track traffic shifts.
Some temporary drops in traffic are normal — but prolonged drops need investigation.
15. Update External Links
Where possible, reach out to partners, directories, or sites that link to your old URLs and ask them to update the links to your new URLs. This isn’t always possible, but even a few major updates can boost SEO.
Common WordPress Migration Mistakes to Avoid
Skipping the SEO audit — You must know what you’re migrating.
Missing redirects — Losing backlinks because of missing 301s kills SEO.
Not testing before launch — Always dry-run the migration.
Forgetting internal links — Broken internal links hurt user experience and SEO.
Ignoring speed and mobile-friendliness — New designs must still be fast and mobile-optimized.
Conclusion
Migrating a WordPress website is a major project, but with a solid SEO plan, you can come out stronger than ever. Preparation, precision, and monitoring are the keys to a smooth move.
Follow this step-by-step SEO guide carefully, and you’ll not only retain your rankings — you might even improve them.
Remember: Migrations are an opportunity for growth, not just a risk. Treat it with care, and your website will thank you.
0 notes
Text
Learn How to Create Campaigns, Pixel Setup, Facebook Retargeting, Custom Audience Targeting, A/B Testing
Running successful Facebook ad campaigns requires mastering various strategies that optimize ad performance and reach the right audience. Whether you're an experienced marketer or just getting started, understanding Facebook's ad platform features like campaign creation, pixel setup, retargeting, custom audience targeting, and A/B testing can greatly enhance your ability to generate results. This guide will walk you through these key strategies step-by-step, helping you achieve better campaign performance and ultimately increase your ROI.
1. Introduction: The Importance of Facebook Ads
Facebook Ads are one of the most powerful tools for digital marketing. With over 2.8 billion monthly active users, Facebook offers businesses unparalleled access to target specific audiences based on interests, behaviors, and demographics. To get the most out of Facebook Ads, you need to understand how to properly set up campaigns, track results, and optimize your approach.
2. How to Create Facebook Ad Campaigns
Creating a Facebook ad campaign involves several steps. Let’s break them down.
Step 1: Choose Your Campaign Objective
When creating a campaign, the first thing you need to do is define your objective. Facebook offers various campaign objectives, each serving different goals. These include:
Awareness: Reach a broad audience to create awareness for your product or service.
Consideration: Engage users and encourage them to learn more, download, or visit your website.
Conversion: Drive sales, leads, or specific actions on your website or app.
Step 2: Set Your Budget and Bidding Strategy
Decide on a daily budget or a lifetime budget for your campaign. A daily budget limits how much you spend each day, while a lifetime budget allows Facebook to optimize your budget across the duration of your campaign. You’ll also need to choose a bidding strategy that aligns with your campaign objective (e.g., cost per click or cost per impression).
Step 3: Define Your Audience
Targeting the right audience is critical for the success of your campaign. Facebook allows you to target based on:
Demographics: Age, gender, education, job title, etc.
Interests: Hobbies, lifestyle choices, and pages people follow.
Behaviors: Purchase behavior, device usage, etc.
Step 4: Create Your Ad
Choose your ad format—carousel, single image, video, collection, etc.—and add engaging visuals, compelling text, and a strong call to action (CTA). The CTA should align with your campaign objective (e.g., "Shop Now" for a conversion campaign).
Step 5: Review and Launch
Before launching, double-check your ad creative, budget settings, and audience to ensure everything is in order. Once you're satisfied, launch your campaign.
3. Facebook Pixel Setup: Tracking and Optimizing Conversions
The Facebook Pixel is a small piece of code that you add to your website. It tracks user interactions on your website, providing valuable insights into how visitors are engaging with your content.
Step 1: Create a Facebook Pixel
To create a pixel, go to the Events Manager in Facebook Ads Manager. Select Pixels under Data Sources, then click Create a Pixel. Give it a name and link it to your ad account.
Step 2: Add the Pixel Code to Your Website
You can install the pixel code on your website manually, or use a tag manager if you're using platforms like Shopify or WordPress. If you're using WordPress, there are plugins like PixelYourSite that simplify the process.
Step 3: Verify Pixel Installation
Once installed, test your pixel to ensure it’s working properly using Facebook's Pixel Helper Chrome extension. This tool will notify you if the pixel is firing correctly.
Step 4: Use the Pixel for Retargeting
The pixel allows you to track specific actions such as page views, add-to-carts, and purchases. This information is essential for retargeting users who have already interacted with your website or product.
4. Facebook Retargeting: Re-engage Interested Users
Retargeting is one of the most effective strategies for boosting conversion rates. By showing ads to people who have already interacted with your website, you increase the chances of them completing the desired action.
How to Set Up Retargeting Campaigns:
Create a Custom Audience: Use your pixel data to create a Custom Audience based on actions people have taken on your website. For example, you could retarget users who visited a product page but didn’t make a purchase.
Design Retargeting Ads: Create ads specifically aimed at people who have already interacted with your website. For instance, show an ad offering a discount for users who added items to their cart but didn’t check out.
Set Frequency Caps: Avoid bombarding users with the same ad repeatedly. Facebook allows you to set frequency caps, limiting the number of times a person sees your ad.
5. Custom Audience Targeting: Reaching the Right People
Custom Audiences allow you to target users based on their specific actions or demographics.
Types of Custom Audiences:
Website Traffic: Retarget users who have visited your website or specific pages.
Engagement: Target people who have interacted with your Facebook or Instagram posts, videos, or ads.
Customer List: Upload your email list to Facebook and target users who have already shown interest in your product or service.
How to Create Custom Audiences:
Go to Audiences in Ads Manager.
Click on Create Audience and select Custom Audience.
Choose your audience source (e.g., website traffic, customer list, engagement, etc.).
Define your audience’s parameters (e.g., people who visited your website in the past 30 days).
Save and use this audience in your ad campaign targeting.
6. A/B Testing: Optimize Your Ads for Better Results
A/B testing, also known as split testing, allows you to test different versions of your ad to see which one performs best.
How to Set Up A/B Testing:
Create Multiple Ad Variants: Create two or more versions of an ad. You can test different headlines, images, CTA buttons, or audience segments.
Set Up the Test in Ads Manager: When creating your ad, select the A/B Test option. Facebook will automatically split your audience and show different ad variations.
Analyze the Results: After the test has run for a few days, check the results to determine which ad variant performed the best. You can then scale the winning version for better results.
Best Practices for A/B Testing:
Test one variable at a time (e.g., only test the headline or only the image) to get clear insights.
Run tests for a sufficient duration to gather enough data.
Continuously optimize based on test results to improve campaign performance over time.
7. Conclusion: Mastering Facebook Ads for Consistent Results
Creating effective Facebook ad campaigns involves multiple layers of strategy and optimization. By mastering key elements like campaign creation, pixel setup, retargeting, custom audience targeting, and A/B testing, you can significantly improve your ad performance and generate a consistent return on investment. Keep experimenting, analyze your results, and refine your approach as you gain more experience.
FAQs
What is the Facebook Pixel and why is it important?
The Facebook Pixel is a tool that helps track website activity, enabling retargeting and better ad optimization based on user actions.
How do I know which audience to target in my Facebook ad campaigns?
Use Facebook’s audience targeting options such as demographics, interests, behaviors, or even Custom Audiences based on website visits or engagement.
How long should I run A/B tests for Facebook Ads?
Run A/B tests for at least 3–5 days to gather enough data for meaningful results, depending on your ad spend and audience size.
What is the difference between a Custom Audience and a Lookalike Audience?
A Custom Audience targets people who have interacted with your brand, while a Lookalike Audience targets new users who resemble your existing customers.
Can I retarget users who have abandoned their cart?
Yes, you can set up retargeting ads for people who visited your cart page but didn’t complete the purchase.
0 notes
Text
9 Best Practices to Create a Seamless Online Food Ordering Experience
Today, when smartphones have become our constant companions, restaurants should embrace online food ordering methods to offer customers quick and easy ways to order their favorite meals from their smartphones. Therefore, using an efficient food ordering process is no longer a trend for restaurants. It’s a must.
In this blog, we will explore ten best practices to help you create a smooth online food ordering experience. If you can elevate customers’ online order journey, keeping them coming back for more will be an easy breeze for you.

Practices to Create a Seamless Online Food Ordering Experience
01. Create a Website for Your Food Business
Build a well-designed website to showcase your menu, accept orders, and manage payments. You can consider WordPress for creating your website as it doesn’t require any technical knowledge. Make sure your website aligns with your brand and looks professional.
If you need any restaurant theme for your website, we recommend checking out WP Food Manager’s wide range of themes, designed for different types of food businesses.
With a user-friendly and eye-catching website, you can instill trust in your customers and add to your brand’s credibility.
02. Adopt Technology to Accept Orders
Embrace technology to thrive in the digital age of dining. Integrate an online food ordering plugin into your WordPress website to streamline the ordering process of your restaurant and generate more sales. This innovative restaurant ordering system will allow your customers to place orders with just a few clicks. Not only will it offer convenience for your customers but will also help you manage multiple orders simultaneously. Additionally, you don’t have to manually calculate the number of orders placed at the end of the day. All these jobs can be done by your plugin accurately.
During food delivery, pay attention to the delivery instructions your customers have mentioned. If they have mentioned extra cheese for their ordered pizza, you should give them that. Double-check before packing the food to prevent dissatisfaction of customers.
However, to avail the benefits of providing online food ordering service to your customers, you should use the best plugin available in the market.
You can consider the Online Order plugin of WP Food Manager.
Why?
Our Online Order plugin includes the following features:
Easy food ordering process.
Order confirmation notification.
WooCommerce integration.
Topping options.
Using our online food ordering process is easy. But, you need WooCommerce on your website along with our two plugins namely WP Food Manager and Restaurant Manager to use the plugin efficiently.
03. Communicate Clearly
Clarity is crucial when it concerns online ordering for restaurants. Make sure your customers are clearly understanding the process of placing orders online. Whether you’re using a third-party delivery service or an online food ordering plugin, you can provide easy-to-find buttons to guide the customers. Sometimes, customers fail to explain their orders properly over the phone, or the staff can’t write down the orders correctly. In such a situation, you will deliver the wrong order, hampering your restaurant’s reputation. Hence, assign only well-trained staff to take orders.
04. Build a Striking Online Menu
Creating a stellar online menu is more than just listing dishes. Rather, your menu should be like a graphic novel to captivate the hungry eyes. It should be easy to read and should have a clear CTA. Organize the food items logically to help customers find the food they crave.
Upload delicious images of your food and write descriptions to evoke their essence. Highlight special dishes to raise curiosity. Incorporate interactive elements to engage your customers more.
A striking online menu reflects your brand’s personality, calling customers to indulge in a wonderful dining experience.
If you’re not sure how to display your food menu stylishly, you can use the WP Food Manager plugin. Using it, you can create the menu the way you have desired.
You may want to know what’s the benefit of using the WP Food Manager plugin. So, here’s the answer.
Benefits:
Some of the benefits of using WP Food Manager are:
Attract more audience.
Enable customers to find their food items quickly through filtering option.
Showcase your food menu in a stylish way.
Update menu anytime.
Show food stock status.
All the above-mentioned benefits enable restaurateurs to turn their food listing website into a blessing for foodies.
Visit here to redefine food listings with our plugin.
If you need some menu design ideas, read this blog.
05. Ensure Efficient Delivery Tracking

In today’s fast-paced world, delivering food from restaurants to customer doorsteps has remained important. No doubt, it has become one of the fastest-growing markets today. And, the credit goes to the super-fast delivery it gives.
Restaurants using reliable food delivery plugins keep track of their deliveries to ensure that they are on time, thus making more customers happy. Tracking and tracing orders in real time helps restaurateurshave a clear knowledge about their deliveries. Consequently, they can inform their customers.
Finding a reliable food delivery WordPress plugin is like finding a needle in a haystack.
Don’t worry! We’re here to help.
Use our Food Delivery plugin to manage the food delivery process seamlessly. When you improve your food delivery service, you’re likely to get more online orders.
But, the question is why you should invest in our plugin when there’s no dearth of options. Scroll down to get the answer.
Reasons:
Delivery availability checker.
Real-time delivery tracking.
Display food delivery time.
Showing delivery status to update customers.
Dashboard to track and manage orders.
However, you need WP Food Manager and Online Order plugins to use our Food Delivery plugin without any hassle.
06. Offer Discounts and Promotions
Give enticing discounts and promotions to drive in more online orders. Any restaurant offering online food ordering considers its business needs and plans promotions to reach its targeted audience. If you have a dish that isn’t very popular among your customers, create a combo including that dish with a popular one, and reduce the dish’s overall price. Offering early-bird discounts during holidays and downtimes also increases online order profitability.
Highlight the deals prominently on your website. Track the performance of your promotions to refine the strategy, if needed.
07. Start Loyalty Programs
Implement loyalty programs to accelerate sales by leaps and bounds. Encourage repeat business by offering rewards for each online order. Consider customer preferences and give them rewards like freebies, discounts, etc. Leverage your social media channels and other platforms to promote your loyalty programs. Highlight the benefits the audience can enjoy joining the programs. Collect data from customers to make the promotions more alluring.
08. Offer Multiple and Secure Payment Options
Give your customers multiple and secure payment options to build trust and gain more customers. Therefore, we advise you to look for WooCommerce-integrated plugins. WooCommerce protects customer’s personal and banking details providing a reliable platform for online transactions.
The Online Order addon of WP Food Manager has WooCommerce integration to ensure secure transactions.
Further, provide your customers with a wide range of payment options like online banking, digital wallets, etc, so that they can choose the suitable one.
09. Gather Reviews/ restaurant review addon
Encourage customers to give reviews for your online food ordering and delivery services. Whether positive or negative, respond to their reviews to make them feel valued. Get an in-depth insight from their reviews to find loopholes in your services and find ways to resolve them fast.
You can use a plugin like Restaurant Review from WP Food Manager to add the restaurant review feature to your website. Discover the plugin now!
Wrapping Up
In conclusion, implementing these practices can boost your sales by increasing customer satisfaction and reducing abandoned carts. Leverage technology and customer data to tap into the online food ordering trend and grow your revenue. Consider data analytics and feedback to make effective decisions and stay ahead of your competitors. All the tips, if practiced together, will surely increase your sales.
#online food ordering experience#food order#food ordering app#plugin#restaurant#food business#food business management plugin#food management#wordpress#restaurant growth#restaurants plugin#restaurant manager#restaurant business#food ordering website wordpress#wp food manager#food menu plugin wordpress#woocommerce
0 notes
Text
How WordPress Helps You Create SEO-Friendly Blogs for Business Growth

Blogging is one of the most effective tools for boosting online visibility, building brand authority, and driving organic traffic. Whether you're running a service business, e-commerce store, or startup, maintaining an SEO-optimized blog helps you attract the right audience and rank on search engines consistently.
WordPress, known for its flexibility and content-focused features, is the ideal platform for creating and managing SEO-friendly blogs. From metadata customization to plugin support and mobile optimization, WordPress empowers businesses to execute strong content strategies with ease.
In this blog, we’ll explore how WordPress helps businesses create blogs that rank and convert—and how working with a professional Web Design Company in Udaipur can take your blogging efforts to the next level.
Why Blogging Matters for Businesses
Here’s why consistent blogging is a vital part of any digital marketing strategy:
Improves website’s search engine visibility
Drives targeted traffic through long-tail keywords
Builds authority in your niche
Keeps your website content fresh
Supports internal linking and SEO structure
Engages and educates your audience
Generates leads through calls-to-action and offers
With a properly managed blog, your website becomes a lead generation machine.
How WordPress Supports SEO Blogging
Built-in Blogging Architecture
WordPress began as a blogging platform, so it naturally supports structured content creation. Posts, categories, tags, and custom fields are already integrated for organizing and managing your blog efficiently.
SEO Plugin Integration
Plugins like Yoast SEO and Rank Math offer keyword suggestions, meta tag editing, readability analysis, and sitemap generation—all from your dashboard.
Custom Permalinks
WordPress lets you create SEO-friendly URLs with clean, keyword-focused structures. This helps both users and search engines understand your content hierarchy.
Media and Alt Text Management
Easily upload and manage images, videos, and audio files. Add alt tags and captions for better accessibility and SEO.
Internal Linking Capabilities
Add hyperlinks between blog posts and core pages to distribute authority and help users navigate more effectively.
Content Optimization Features That Boost SEO
Customizable meta titles and descriptions for each post
Heading tags (H1–H6) to organize content and improve readability
Canonical URLs to avoid duplicate content issues
Schema markup support for enhanced search listings
Mobile responsiveness with adaptive themes
Lazy loading for improved page speed and user experience
WordPress brings both technical SEO and content flexibility under one roof.
Role of Developers in Scaling Your Blog Strategy
As your blog grows, managing speed, SEO, and layout becomes more complex. A skilled WordPress Development Company in Udaipur helps you optimize blog performance while aligning it with your brand.
What Developers Handle:
Creating custom blog templates for better UX
Speed optimization through caching and image compression
SEO audits and plugin configuration
Designing category and author archive pages
Building lead capture forms and pop-ups for content offers
Ensuring mobile-first design for readers on all devices
They make sure your content doesn’t just exist—but performs exceptionally.
Use Case: A Consulting Firm Using Blog-Driven Growth
A local consulting agency started publishing weekly blogs using keyword research and WordPress SEO tools. With the right internal linking and CTA placements, they began receiving inbound leads within 90 days. Website traffic doubled, and their domain authority saw measurable improvement—all with a consistent WordPress blog strategy and professional maintenance.
Final Thoughts
WordPress remains the best platform for SEO-friendly blogging because of its simplicity, extensibility, and content-focused architecture. When used strategically, it allows you to create content that not only attracts but also converts.
To make the most of your blogging investment, work with a reliable web design company in Udaipur. And when combined with the ongoing support of a WordPress Development Company in Udaipur, your blog becomes a long-term digital asset—bringing you traffic, authority, and business growth month after month
0 notes
Text
Figma to HTML Conversion: Simple Guide To Convert Figma To HTML
Introduction: In the modern web development landscape, designers and developers often collaborate using tools that bridge the gap between design and code. Figma, a popular design tool, is widely used for creating stunning web interfaces. However, turning those designs into functional websites requires converting Figma to HTML. This process might seem complex, but with the right approach, you can efficiently convert Figma to HTML, ensuring that your designs come to life on the web.
Why Convert Figma to HTML? Figma is an excellent tool for crafting visual designs, but to bring those designs to the web, you need HTML, CSS, and JavaScript. Converting Figma to HTML allows you to take a static design and transform it into a responsive, interactive website. This conversion is essential whether you're creating a standalone website or integrating your design into a content management system like WordPress.
Step-by-Step Guide to Convert Figma to HTML:
Prepare Your Figma Design Before diving into the conversion, ensure your Figma design is well-organized. Use consistent naming conventions for layers, group similar elements, and double-check that your design is pixel-perfect. This preparation will make the conversion process smoother and more efficient.
Export Figma Assets The first step in Figma to HTML conversion is exporting the necessary assets. Figma allows you to export images, icons, and other elements in various formats such as PNG, SVG, or JPG. Select the elements you want to export, right-click, and choose the export option. These assets will be used in your HTML and CSS files.
Convert Figma to HTML/CSS
Manual Coding: Start by setting up a basic HTML structure using semantic elements like <header>, <section>, and <footer>. Write CSS to style these elements according to the design specifications in Figma. Pay attention to typography, color schemes, and spacing.
Using Figma Plugins: There are Figma plugins like "Figma to Code" that can help automate parts of the conversion. These plugins generate HTML and CSS code based on your design. While not perfect, they can significantly speed up the process and provide a good starting point for further customization.
Responsive Design Ensure your converted design is responsive. Use media queries in your CSS to adjust the layout for different screen sizes. Figma allows you to design for multiple screen resolutions, and your HTML/CSS should reflect this adaptability.
Integrate with WordPress (Optional) If you're working on a WordPress project, you can convert Figma to WordPress by creating custom templates. Export your Figma design elements, then integrate them into a WordPress theme using PHP. This step requires a bit more technical knowledge, but it allows for seamless content management and dynamic features.
Test and Optimize After converting Figma to HTML, thoroughly test your website across different browsers and devices. Optimize images and code to ensure fast loading times. Validation tools can help you check for any HTML or CSS errors that might affect the user experience.
Conclusion Converting Figma to HTML is a crucial step in turning your design ideas into a functional website. Whether you choose to manually code or leverage tools and plugins, following a structured approach will help you achieve a pixel-perfect result. As web design continues to evolve, mastering the Figma to HTML conversion process will enhance your ability to create responsive, interactive, and visually appealing websites.
#Figma to HTML#Convert Figma to HTML#Export Figma to HTML#Figma to HTML Conversion#Figma to Code#Figma to Wordpress#Figma to HTML Conversion Services
0 notes