
Last Seen Blogs

moonwalker-kenni
moonwalker-kenni

linglingsstuff
Untitled

roargifs
ROARGIFS

tomakebeautifulmakeup
Boston's Best Bridal BeautyAdvanced Esthetics

frumlkwd12-blog
Untitled
Text
Assignment 2 - Final Submission
1. In the Character Development stream, I chose to do Option 2 - the high quality animated performance. I did the best that I could and the final rendered video is below.
vimeo
2. If I could go back and redo this assessment, I would have picked another rig. I did like working with the mannequin, but it was very simple and didn’t have a lot of joint controls. It made it a bit hard for me to make a really high quality and smooth animation, but as I said I did the best I could with what I had. Maybe I could’ve looked into adding more joints or something. I also think it would’ve been cool to do the building and rigging option of the character development stream.
If I could redo this, I would’ve liked to finish the animation part sooner so I could work in Unreal Engine 4 a bit more. Then I could’ve done something a bit fancier other than just a simple animated camera and directional light. I’m happy with the scene, I think it looks cool but if I had more time I’d add more detail.
3. Additional Materials
Because in my final animation you basically only see the character front on, I’ve made playblasts of a couple of other angles from the workspace in Maya.
vimeo
vimeo
I also made a time lapse video of my workspace in UE4.
vimeo
One issue that I had was that the shadow appears to be on the wrong side of the arm. It looks normal up until the 581st frame, then the shadow is on the front side of the arm instead of the back. I couldn’t figure out how to fix it.


0 notes
Text
Online Progress Update 3
1. Remaining work to be completed over the next few weeks:
Week 11: Finish up Character Animation Polish
Week 12: Unreal Engine 4
Week 13: Unreal Engine 4
2. I’m still in the process of polishing the animation, making the movements smoother and a bit more realistic etc. This is it so far.
vimeo
It’s not yet finished but I have put the animation into Unreal Engine 4 just to demonstrate that it will work. I just recorded the screen and played through a bit of the animation because Unreal crashed a few times when trying to render out a video.
vimeo
3. I didn’t really encounter any obstacles this week, only that Maya and UE4 crashed unexpectedly quite a few times so I’d lose a bit of work.
4. I think I’ll cut frames 0-299 and maybe 1046-1200 if I’m not done in Maya by the end of this week.
0 notes
Text
Online Progress Update 2
1. Work I will need to complete over the remainder of the semester.
Week 10: Character Animation
Week 11: Character Animation
Week 12: Character Animation / Unreal Engine 4
Week 13: Unreal Engine 4
2. I haven’t really made much progress since Milestone 2A; I’ll be going back to try and make the animation look nicer / smoother by editing and adding extra keyframes and stuff. Below is a speedy recording of my screen when I was animating, and a playblast of the animation as of Tuesday 3rd October.
vimeo
vimeo
One obstacle that I had was that Maya kept crashing when I’d be trying to animate. Now I try and save as often as I can (or when I remember) and I was also recording my screen so it was incredibly frustrating when Maya became unresponsive and I had to turn off the recording and restart the program. I would lose some of the animation, and part of the screen recording would be obsolete. Also, and I don’t know if this is an obstacle or not, but the rig that I chose to animate is quite basic. It doesn’t have a lot of joint controls, so I just think it makes it a bit more difficult to animate because I can’t go into as much detail when there are only a few joints to manipulate, as opposed to having many different joint controls.
0 notes
Link
Above is my Milestone 2A animation for Assignment 2. As stated in previous posts I had difficulty picking a character rig that worked/performed the way I wanted it to. I first had a play around with a Ninja Turtle rig, but it wouldn’t transfer properly from Maya to Unreal Engine 4 without serious modification. So I thought I’d save myself some time by going with the second rig I had my eye on, Spiderman. There were three Spiderman rigs available for download on Highend 3D, and there was even a Spider Gwen rig. I downloaded and had a look at all of them. But they all didn’t work the way I wanted them to; the knee joints just weren’t right to make Spiderman crouch in his iconic position, and I just wasn’t happy with Gwen. So I changed my mind again and picked a simple wooden mannequin. Now, this isn’t a very complex rig, but I’m pretty happy with how I’ve animated it so far. It currently isn’t textured, but I can add that later in UE4. There were two textures that came with the Maya file and I’m not sure which one I’ll use yet.


I spent about six hours in Maya animating the character. I recorded my screen with OBS Studio every time I was working. I used Wondershare Filmora to stitch all the separate videos together and I would’ve included it in this post but it was just going to take too long to export. I will upload that video in a progress update or something. I also had trouble uploading my playblasts to Vimeo because they were super big. I tried different settings but I just couldn’t get the files any smaller. I did a few playblasts from different angles and they were each about 40 seconds long and 900mb. It was going to take upwards of eight hours to upload a single video; maybe it was the Wi-Fi, I’m not sure. First I went back into Filmora and imported a playblast into a project and exported it and the video size was much smaller and I was going to upload that, but I found an online video compressor so I used that and managed to upload to Vimeo. The quality isn’t the best but it should be fine. As I said I had a few videos with different angles but I didn’t expect uploading to be such an issue, but I know for next time.
It was helpful for me that I have a pretty decent understanding of how Maya works and it’s software I’m quite comfortable working with. So once I started animating I was fine. I also have a decent understanding of UE4, so when I get to importing my animation into there I shouldn’t have too many issues. I know that I left this to the last minute and I do it every time. It didn’t help that I kept changing my mind about rigs, so for the next few weeks of this assignment, I’d like my main goal - aside from creating a high-quality animation - to be to manage my time better. Something I guess I’d like to have done differently would be to take time to learn more about fixing the joints and stuff in rigs. I got help in the tutorials but I wish I’d gone away and cemented that knowledge and expanded upon it.
I haven’t really done any experimentation as of yet (except experimenting with different rigs). I think once I get the animation into UE4, I can have a look at different camera angles and lighting setups. If I have time, I might even bring the animation into After Effects once I’m done in UE4.
vimeo
Another blocking animation.
0 notes
Photo

So I changed my mind about which rig I’m going to use (again). The Spiderman rig just wasn’t working the way I wanted it to. The knee joints weren’t bending right (image below) so I couldn’t get Spiderman into the crouching pose I wanted and it was making me frustrated.

So I went back to Highend 3D and picked another rig. The one I’ve chosen is a wooden mannequin; I always loved playing with these as a kid so I thought I’d have a go at animating one. The rig was made by sankarakumar1984.

0 notes
Video
undefined
tumblr
The character rig that I originally chose to animate for Assignment 2 didn’t work very well. I spent most of the tutorial on Wednesday 06/09/2017 (probably should’ve written this post sooner, whoops) trying to export a test animation from Maya into Unreal Engine 4. At first, the mesh wasn’t properly showing up in UE4, so I had to go back into Maya and reverse the normals to get the mesh to display properly. Then I had trouble with the eyes. I don’t remember what the issue was exactly but they weren’t connected so they wouldn’t animate with the rest of the character (video above). Also, there were a few faces with 5 vertices so I would’ve had to go back into Maya to find and fix those.

I just thought it would be easier to pick another rig to work with. So the rig I’m hopefully going to use now is Spiderman. I found it on Highend 3D and it was created by Animation is my life.

I’d like to animate Spiderman just hanging around, swinging and jumping off walls and stuff. Below are some example pictures of poses I could make Spiderman do.


I could maybe start the animation with Spiderman in a pose like this, surveying the city or something, then swing around and stuff.

I think it’d be cool to have him crawling down a wall at some stage in the animation, not just swinging around the whole time.

0 notes
Text
Online Progress Update 1
1. The stream that I’ve chosen is Character Development and I would like to take on the second brief - Using an existing character rig, focus on integrating a high quality animated performance into Unreal Engine 4. Demonstrate the use of Unreal Engine 4 and any other required tools to deliver a lit and polished shot.
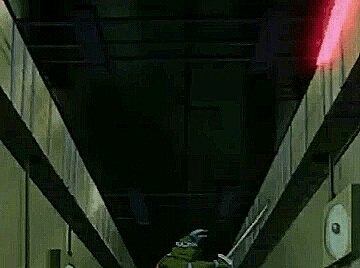
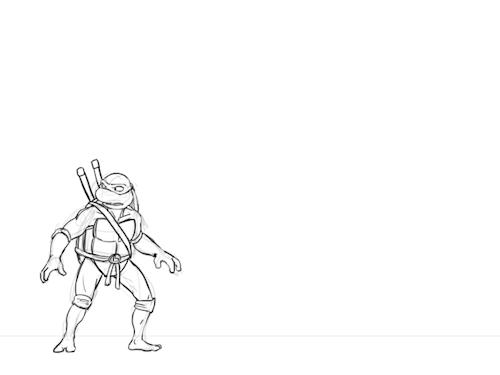
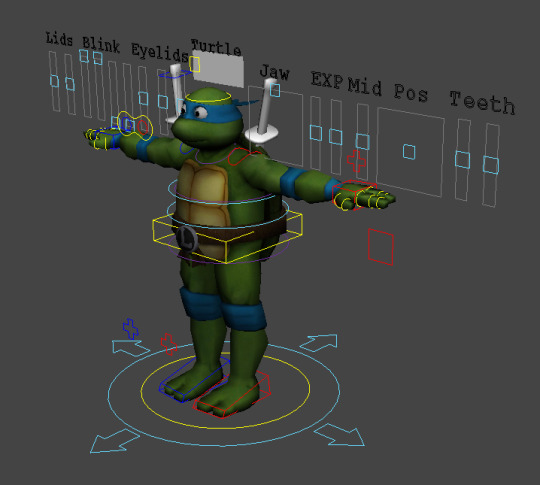
2. The rig I’ve chosen to animate is the Free TMNT Classic Remake Rig for Maya 1.1.1, made by TheBlueBear. I found this rig on Highend3D and I think it will be really cool to work with. I’d like to animate him doing some simple combat moves. Below are some ideas of combat poses/sequences that I could try or take inspiration from.

The rig has lots of facial controls so I can animate a bunch of different facial expressions to make my final animation more interesting.
3. Work to be completed each week:
Week 7: Blocking character animation in Maya
Week 8: Blocking character animation in Maya
Week 9: Character animation in Maya
Week 10: Character animation in Maya
Week 11: Polish character animation in Maya
Week 12: Unreal Engine 4
Week 13: Unreal Engine 4
4. I haven’t done any work towards the brief as of yet.
0 notes
Text
Wrap Up
I started this semester having never looked at or used Unreal Engine 4, so I had no idea how it worked or what kinds of things could be achieved. I have progressed from knowing nothing to being able to set up and render a complete scene. I learned the difference between basic shapes and BSP geometry and that BSP geometry is handy for creating more advanced environments because of its ability to be either additive or subtractive. I also learned how to import an animated character rig and set up a simple camera and lighting, and then how to render the complete scene out as a video or custom render passes. I had prior Maya knowledge, but I didn’t know about the ART v1 plugin, which allowed me to create my own proxy character rig for animation, which I thought was really cool.
I now have a greater understanding of the pipeline for an animated shot and I feel I've developed my knowledge a little bit in all aspects. I'm probably most confident with animating because I have had some experience animating in Maya and Blender before starting this unit. I would like to improve in all aspects, but if I had to choose one area that needs the most improvement it would probably be the visual effects stuff, like lighting and special effects.

I would like to do the Character Development stream for Assignment 2. As I mentioned previously, animation is the aspect of the pipeline which I am most confident working with so I feel that it's the obvious choice for me. I'm not sure yet which brief I'd like to choose but I'm leaning towards the second one: using an existing character rig, focus on integrating a high quality animated performance into UE4. I need to touch on skills from all responsibilities - character, cinematic, asset and visual effects development. I think the most important activities for me to focus on are character development and cinematics development, and if I stick with the second brief I think my main priorities will be things like character animation and materials, sequencer and rendering. If I wanted to do the first brief, my priorities would be proxy geometry modelling, character rigging, texturing and materials. To do well in the character development stream, I need to make sure I have a solid level of knowledge about how to create and animate character rigs and understand how they work, or how to import character models from an external source into Maya or whatever for animation. I would like to finish this assessment with a greater level of understanding of the pipeline.

I had a look at a few of the example job adverts on Blackboard, and the notice that CD Projekt Red put out for an animator interested me. It's relevant to the character development stream because the job responsibilities are all about animating characters and in-game objects. The daily responsibilities are all to do with character creation which lines up with the activities for the character development stream.
I already have experience with animation, so I want to keep learning and creating until my work is of high quality. I've basically only animated bipedal characters, but if I want to meet the requirements for this job I need to do more work with quadrupedal and other forms of character movement. I have knowledge of Maya so that is one requirement met, but a lot of the requirements are about work experience so I would need to probably do some work elsewhere before I'd meet these job requirements.

Some resources to help me in further developing my knowledge are Lynda tutorials, YouTube videos and the program documentation (Unreal Engine, Maya etc). I'm more of a visual learner; I pickup things more effectively by watching rather than reading. These resources will be beneficial because they're all resources which use visuals to help people learn more about the topic. Lynda will be especially helpful because tutorials have downloadable files which you can complete while the person does it in the video.
0 notes
Text
Experimentation and Reflection
For Milestone 1A I had a play around with the camera crane, so I thought for this Milestone I'd look at using the camera rig rail. While I was animating in Maya one of the only things I knew I wanted to do was have the camera start on the ground and pan up around the character so I'm really happy with that aspect. Originally I was only going to have two walls for my environment, but I rethought that and used a hollow geometric cube with subtractive geometry as windows, like in the Blackboard video.

Obviously, I experimented with different lighting setups, but within that, I looked at the different kinds of lights I could use. I found that I liked the directional lights more than the spot lights, especially when I was experimenting with different colours. I wanted to have two directional lights going with different colours but it didn’t really work.

I had a go at manipulating the sky sphere to create a dusk lighting effect. It was pretty, but I liked the night time lighting better.

The majority of knowledge required to complete this task was stuff I had already learned from previous milestones. I have now learned briefly about simple lighting techniques and know the basics of creating a complete shot in Unreal Engine 4. I spent 1-2 hours watching the supplied videos on Blackboard and other tutorials where necessary. I probably found doing the lighting in UE4 the most difficult because it was a new topic for me. I also found it difficult in Maya at the start because I didn’t have a clear idea of what I wanted my animation to look like. I spent about 2-3 hours in Maya animating the character rig. I used the same rig that I created in Milestone 1B because I just really liked the character. I have a solid understanding of how Maya works, but it was just time-consuming figuring out something clever to do with the character for when I put the image sequence into After Effects and added motion graphics. I spent about 1-2 hours playing around in After Effects, just figuring out what I wanted the text to say, how I wanted it to be displayed and setting up keyframes and stuff. I spent 2-3 hours in UE4, playing around with the environment setup and trying different things. I spent the most time in UE4 because I had to learn about lighting and needed to familiarise myself with the different types. As I only have a basic understanding of lighting in UE4, I'd like to learn more about the lighting settings to achieve a more advanced scene. I guess I'd just like to broaden my knowledge of everything that I've learned in UE4 so far; it seems like we've just skimmed the surface of what's possible to create. If I had more time, I would’ve had a look at the joint mover in Photoshop and “decorated” (for lack of better word) the character to make it look more interesting. I wanted to use it but I just completely forgot about it.
0 notes
Text
Lighting Experiment 2

I wanted to see what the scene would look like at night. I edited the star brightness, horizon fall off and cloud opacity to make the night sky nice and clear. I placed a point light in front of the character to make it look like she's standing in front of a lamp on a side table. I changed the intensity from 5000 to 2500 to make the scene a bit more dimly lit. Below is a screen shot of my workspace in Unreal Engine 4.

0 notes
Link
My first lighting experiment


I know we were meant to submit still shots, but a video was the best way to showcase the experimentation I looked into. Above are the video and a couple of images. I used a directional light and keyframed different red, green and blue values to make the light change colour to make it look like a party light. Below is a screen shot of what my workspace looked like in Unreal Engine 4.

0 notes
Link
My final rendered video for Milestone 1C.
#milestone1c#knb221#cgtoolkit#basic lighting#coloured greybox#sequencing#proxy character implementation
0 notes
Link
This is my Milestone 1B character animation rendered out of Unreal Engine 4.
0 notes
Text
Experimentation and Reflections
This week I experimented a bit with the custom body proportions in the A.R.T. character rig creator. I wanted to make a character that still had a fairly realistic body shape but was also a bit different from the example body presented.

I put two animations together for the final rendered video, and I wanted to emphasise the second animation, so I inserted a play rate track to slow down the second animation. I looked at a few different play rates; 0.75 was too fast and didn’t really stand out from the first animation, and 0.25 was just a bit too slow so I went in the middle with 0.5.
vimeo
vimeo

I came into this week with a basic understanding of Maya and Unreal Engine 4. I spent maybe 30 minutes to an hour in total looking up tutorials or whatnot if I had an issue or needed a refresher of what's already been covered. I hadn't heard of the Epic A.R.T. plugin so I had to learn how to use it. I can now create basic character rigs in Maya and I found it pretty simple once I figured out what I was doing. I spent probably an hour or two total in Maya just working through the character rig creator; getting familiar with features and creating and animating the rig. Maya crashed a few times when trying to export the fbx file and it was time-consuming to have to restart Maya, but it wasn’t really an issue.

I spent probably an hour in Unreal Engine 4. I had knowledge from last week which helped me this week because I had a base understanding to work off instead of nothing. I have now learned how to import skeletons and animations as fbx files from Maya. I spent the most time in Maya because I was working with a plugin I’d never used before so I needed to take the time to understand it. If I'd had more time (or used the time I had more efficiently) I would have liked to have looked at Alembic animation, and maybe explore more of the camera options in Unreal Engine 4.
0 notes