
Don't wanna be here? Send us removal request.
Statistics
We looked inside some of the posts by 3d-fps-research and here's what we found interesting.
Average Info
Notes Per Post
1
Likes Per Post
1
Reblog Per Post
0
Reply Per Post
0
Time Between Posts
11 hours
Number of Posts By Type
Text
17
Last Seen Tumblr Blogs


Fun Fact
Tumblr was acquired by Yahoo for $1.1B in 2013.
Text
What is an Exposed Variable in The Unreal Engine?
An exposed variable in the unreal engine is a useful counterpart to just a regular variable, with an example of one being used being having 10 enemies with machine guns, but wanting one to have a rocket launcher instead. If all of these enemies have the same code, which is smart if they are all meant to behave similarly, then trying to change the code for just one of them will change the code for all of them. An exposed variable allows the coder to avoid this, by making that one enemy they want changed to be the only one that’s changed while still keeping the “core” code of the other 9 enemies movement and attack patterns.
0 notes

Text
What are the Marquee, Magic Wand and Lasso Tools in Photoshop?
The Marquee Tool - The marquee tools creates a selection in the shape of 4 resizable things, a rectangle, an eclipse, a horizontal line of pixels that’s a single pixel high and a vertical that a single pixel high. One way to use this tool is to use it to draw over a specific area without making mistakes, as anything outside of the lines won’t be affected even if the user draws over an area outside of the marquee tool.
The Magic Wand Tool - The magic wand tool will select all connected pixels that are the same colour and then allow the user to move the highlighted box around, which can be used to colour over a specific area in a certain shape or can be used to colour part of a 1 coloured area with another colour without colouring all of it.
The Lasso Tool - The lasso tool allows the user to “lasso” a particular area they want before then being able to change either what’s inside the “lasso” or what’s outside of it. This can include changing the colour of an area or cropping out certain parts of an bigger image.
0 notes
Text
Voxel Games
Crossy Road -

Crossy Road is effectively endless Frogger, with the player needing to direct a chicken, or one of the other 272ish characters the player can unlock, across many roads, train tracks and rivers to attempt to achieve a new high score or to earn enough coins to unlock a new character.
Minecraft -

Minecraft is a 3D survival game with a blocky aesthetic that has sold 200 millions copies as of 2020. The aim of the game is up for the player to decide, they can create massive structures and bases, they can explore as much of the world as they want to, they can try to get to a kill the ender dragon, they can play with or against friends and other players and just overall do what they want.
Fugl -

Fugl is, as described on it’s own website, “a meditative bird flying game” where the player can just explore voxel made worlds and meet other voxel animals inside those worlds. The game features an “endless and ever changing world” where the player has no set rules to follow and if the player wants they can make their own world in the level creator and make their own custom bird with an avatar editor.
0 notes
Text
Sir Carma
Sir Carma is a French voxel artist and is the art director for “Industries of Titan” from Brace Yourself Games. He grew up in the eighties and nineties and was inspired heavily by the pixel art of the 8 and 16 bit Zelda games among other games from those years, and he describes himself as “Seeing life in Voxels.”. Below is some of his work:


0 notes
Text
The level design of Subnautica and GTA 5
The level design of both Subnautica and GTA 5 is open world and set, meaning that the world is always going to spawn in 1 way, with the encounters that the player will have being different because of different A.I. spawns. GTA 5 is set in the fictional Los Santos, based on real life Los Angeles, and the surrounding island it’s a part of. While the island itself rarely changes, aside from new locations of interest added in updates, the thing that makes the game unique is the amount of things the player can do in different ways. The player can approach many situations however they want to, and even then the situations can just be something the player wants to do. Subnautica on the other hand is based on a world nearly entirely made of water, and the explorable world itself is set in the shallow crater of an under water dormant volcano, with the player being able to find holes in the sandy covering of the volcano that they can slip through in various vehicles that can resist the extreme heat of the volcano’s lava and magma, with a wide variety of fish like creatures that the player needs to be smart, creative and somewhat brave to hunt, avoid, slow or run from in any given circumstance. Alongside this the game has features seen in other games such as Minecraft and Terraria where they start with basically nothing before collecting resources to make themselves stronger and safer, with the ability to build things like a makeshift base with supplies.
0 notes
Text
My Favourite Game Environment and My Top 3 Game Worlds
My favourite game environment has to be the world of Jak and Daxter: The Precursor Legacy.

Jak and Daxter was one of the first ever open world games, maybe even the first, and it really immersed the player into the world with a near absence of loading screens, with the only examples being a black screen lasting at most 10 seconds when fast travelling or respawning after dying. The player can complete the game in around 5 hours, but that’s because the game doesn’t need to waste the players time with useless side quests or feature bloating for the sake of feature bloating. Everything the player does rewards the player with a means of progression, whether it be a power cell, a means of transporting to a new “level” or a trail/cluster of precursor orbs which can be used to buy more power cells. The world feels open, with the player being able to see Geyser Rock and Misty Island from Sandover Village, Sentinal Beach, Snowy Mountain and even Gol and Maia’s Citadel if the player looks closely enough. The reason this mechanic works so well is it uses an updated feature from the original Spyro games with distant objects having a much lower polygon count that will gain the polygons to make them look nicer when the player gets closer to them, but with the more powerful PS2 having a much higher polygon count allowing for a much more impressive display of this idea. The reason I prefer this game world over the games sequels, Jak 2 and 3, is because the world feels alive. There are lush jungles, ancient precursor artifacts and buildings that are still running off of magical energy, there are structures in nearly every environment that either work as houses or a basic need such as a windmill for kinetic energy, and even dangerous Boggy Swamp and Spider Cave have structures stopping dangerous liquids from flooding safe areas or acting as walkways for explorers. In Jak 2 the main area the player explores is an walled city they need to traverse to receive missions to then leave the city for a reason and Jak 3 the majority of the new explorable world is a desert. The games are still fun, but something about Jak and Daxter’s world is special in it’s diversity.
My favourite game world’s (or rather galaxies) are the ones of Ratchet & Clank 1, 2 and 3.
Ratchet & Clank 1′s Galactic Map:

Ratchet & Clank 2′s Galactic Map:

Ratchet & Clank 3′s Galactic Map:

Why Ratchet & Clank’s World’s Are My Favourite-
R&C’s world’s, or rather galaxies, are some of the most interesting because of the sheer amount of stuff to do and see. Alongside Jak and Daxter, R&C was made to show off the power of the system and just how much it could do, alongside making a fun game that felt like the player was exploring the galaxy. Very few worlds the player explores feel similar to each other, and even if they have similar settings they switch it up with the environment. 2 cities in the first game are Metropolis on Planet Kerwan and Blackwater City on Planet Rilgar, and while they are both cities they are very different in aesthetics, gameplay and exploration. Metropolis is a semi-futuristic city built high into the sky from the ground of the planet, maybe even being built above the clouds, with flying cars and trains, floating rocks with vegetation and pillars of rocks being used as platforms, shops for robot upgrades and gadget repairs, moss and vines growing from the roofs and sides of the many skyscrapers in the city. Blackwater City on the other hand is built on a city nearly entirely made out of black water, with only a few rocks rising above the water level of the planet, one of which being the place Blackwater City was built on. The water itself is dangerous as it contains an immense amount of Sharkigators, who will eat the player if they remain in the water for too long. The city itself is a lot more metallic than Metropolis, with the only signs of flying vehicles (aside from the player’s ship) being the flying taxis that will fly the player from the rock outside of the city that they land into the city itself. The city has an immense sewer system and is under constant threat from the ameboids that dwell in them, with the cities extermibots that are meant to deal with them being incapable of differentiating the difference between them and regular citizens. The city is also renowned for it’s hoverboard races, which is what makes it such a popular city despite it’s many dangers. Alongside that the city has a downtown area with restaurants and apartments, and the shady salesman, who is hiding in the back streets of the remote city who is able to sell you the best weapon in the game for a very high price of 150,000 bolts. This is just 2 examples of 19 overall planets in the first game alone, not even including the 22 planets in R&C 2 and the 19 of R&C 3, which included some unique remakes of planets from the first game. The games worlds all feel like they are part of one bigger universe and no 2 levels feel the same, even if they are on the same planet.
1 note
·
View note
Text
How to setup OBS and post videos to YouTube
To set up OBS you need to start by opening up the app and when your met with this screen:

You need to click the circled + and select “Display Capture”:


This should then bring up a pop up asking you to “Create/Select Source”, where you should just type in “Screen 1″ where the words “Display Capture” currently are, then click “OK” and then ok again on the next pop up, which should lead to your screen looking something like this:

Currently the screen isn’t properly fitted into the preview area, which can easily be fixed by dragging the red squares on the sides and corners to change it’s shape and dragging on the lines between the squares to move the overall rectangle around, which should be done until it’s locations looks similar to the below image:
Now you can click “Start Recording” and the screen will record whatever happens on screen until you click “Stop Recording”. Another thing to keep in mind is where the recordings are saved to, which when in the college should be a hard drive or a USB stick because the college’s safety systems can save the recordings to an area inaccessible to students.
To then upload it to YouTube you need to have a google account and the video file you want to post ready. When you’re ready go to “Your Channel” from the drop down menu in YouTube when clicking on your avatar:

From here you need to select “Manage Videos” and then “CREATE” in the top left:


From there you’ll be able to drag the video file into the upload “tray” and then edit settings about the video such as it’s name, description and who can view it, with the only left to do is to upload the video.
0 notes


Text
Original Slide Plan
Overview of all plans:

Shape of the slide plan:

Locations of targets plan:

Locations of coins, bonuses and spike wall plans:

0 notes
Text
What is Arnold?
Arnold is a rendering tool in Maya that allows the user to take multiple images of the models they’ve made to put into other software such as Photoshop for uses such as displaying them for business situations or a portfolio of completed projects among other things. The best way to use it is to include a source of light to make the model’s details easier to see, with the best option for most cases being the “SkyDomeLight”. Arnold also allows multiple different sizes for the images to be rendered onto for different sized displays. The best way to save the images is as a JPG, as that kind of file works with software like Photoshop, unlike the default file type “Alias PIX”, which doesn’t work with Photoshop. To access the the render viewer you need to click this button:

It towards the top of the app, just below “Cache”.
0 notes
Text
Evaluation of my FPS project
What went well:
I finished my slide with 4 out of the 6 models made for the level being successfully imported and coded to work. The score system works properly and respawning coins and targets mean the player is always focused on something each time they go down the slide. The widget functions correctly and there is a key coded in correctly to escape the game without pressing Alt+F4. Alongside that I successfully changed the bullets from projectile balls to invisible lasers so the targets could both be hit and were useful. I also now know how to use the landscaping tools properly and effectively. Finally I think every part of the map looks nice, with the textures of the slides and rectangles the player stands on reflecting nicely off of the simulated sun, the Maya models are colourful and pleasant to look at, and the jump pad has a cute little detail to show it’s used for launching the player, which I’ll be able to reuse in any future projects that may include it and the dash pad I transformed it from.
What could’ve been better:
The slide was a nightmare to make, with the landscaping tools being one of the biggest hinderances, with the tools either being too powerful or too weak, making an awkward limbo where things were either too flat, too steep, too low, or a ditch. The 2 models that didn’t make it in were the spike wall and the janky double points powerup. The problems with them were the spike wall was the last to be thought about when positioning, coding and using, and the janky double points powerup’s model was, as the name I refer to it as says, very janky looking, and I didn’t know how to code in a double points feature. 3 out of the 4 models that I imported had to be redone multiple times due to texture errors and part errors meaning they either didn’t have the right colours or they were broken into pieces. Alongside that the end result looked very little like the original plan I made, and the coin placements on the current slide are messy, uneven and either clip through the floors and walls or float too high up in the air. Another problem was the near impossibility of play testing due to Covid-19, meaning only I could test my slide to see if it worked and I couldn’t really get help from other students or the teachers/tutors.
What I can change for next time:
To start with, I need to know the tools I’m using better before planning something that is very taxing on both the tools and me. I also need to be less ambitious, because if I am it means if things are more complex than I originally thought it won’t be as hard to work around the setbacks and it’ll make me beat myself up less over it if it’s not as I planned. I also need to think more in advance, because that was the main reason I didn’t include my spike walls in the end, there was no place for them with all the coins I littered along the slide.
Overall thoughts:
I am both surprised and impressed with what I was able to achieve, but that was after the disappointment and sadness of realizing I couldn’t make the slide like how I first drew it up. I was able to get a functioning slide with a few places that the player can get stuck in, slowed down greatly in or places they can start walking on that I don’t know how to fix without either creating more problems or just messing up the flow of the slide, I have a functioning point system with animated, if messily place collectables, pleasant looking and stationary shootables but no avoidables that risk causing the player a point and slide reset and no double points powerup in front of them with a reward for the players to play riskily to gain, and a jump pad that works as semi-intended but can also be used to fly off of the map. Although I wish I could’ve made the slide like how I drew it, I am more than happy with the end result.
0 notes
Text
My slide now vs it’s beginning plans
My current slide, which is both completable and 99% functionable, is very different to my initial plans. In my initial plan I intended for a single but spacious path leading to a set of 3 split paths, then splitting into 2 more split paths each, before rejoining again leading towards the end of the slide. Now instead I have 1 relatively straight but thin path leading to 2 split paths that open up into 2 massive areas with collectable coins and targets before reaching the end of the slide. Obviously that’s a major difference in terms of both shape and complexity and I personally prefer the way I originally drew it up as it was much more impressive and ambitious, but unfortunately it was too ambitious for both Unreal and my attention span. Luckily most of the models I planned to be on the original slide still made it in without too many problems. I made bouncing coins, targets, spike walls, finish lines, a janky double points power up and a jump pad, and while there were some issues with importing the models from Maya to Unreal it went smoothly overall. Currently on my slide there is:
1,104 coins
44 targets
3 finish lines
1 jump pad
On paper that doesn’t sound like too much, but it didn’t stop me from spending 12+ hours making them, coding them and placing them everywhere, and even then that 12+ hours is an estimate, I both stopped counting and lost track after the 15th hour. Unfortunately I couldn’t get everything I wanted into the map, with the spike wall and janky double points models not being used, even though I did import the spike wall model into Unreal. After spending around 5 hours placing the 1,104 coins around the slide I realized that there was no space to put any spike walls on the slide without causing problems with the previously placed coins, so I decided to save myself both time and a headache and scrapped them. This means that unless the player falls off the map by steering themselves off of the maps edge when using the jump pad there’s no way for them to die and get reset. I also initially planned to have all of the objects collected or destroyed when going down the slide to be reset upon reaching the bottom of the slide, but after realizing an easier way to do it is to set “respawn” timers on the objects I plan to add that instead.
With how my slide is now, which is basically finished in all ways except for coding, I am happy my idea did successfully work, although I am disappointed that i couldn’t make it like how I initially planned. The map and the coins on it are messy and there are a couple of spots where the player can either get stuck or will start walking instead of sliding, but I expected it to be worse than what it ended up being, so I’m happy with what I’ve made.
0 notes
Text
Making a .exe in The Unreal Engine
I started by going into the project I wanted to turn into a .exe, in this case my Slide level, and went to “File”, then “Package Project”, and then I chose “Windows (64-bit)”. I then needed to choose a place to save it, which I decided to be a new folder called “Slide.exe” in my Unreal Engine folder on my hardrive. Unfortunately this is where I have to stop while at college because of the restrictions and safety precautions that prevent people from uploading viruses to the PCs also stop a lot of other things that we could use, such as making .exe files.
0 notes
Text
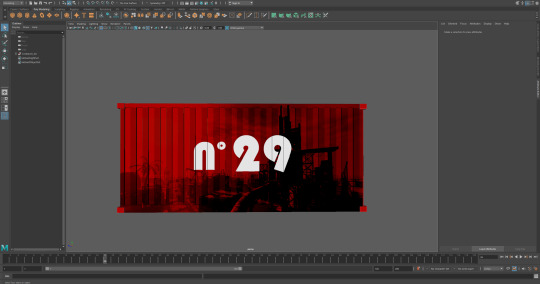
Giving a shipping container a UV
This post is not going to be the most in depth post I’ve made because I still don’t really understand Maya or Photoshop and how they all work, but I am going to explain the parts I know.

I started by using the select all tool in the “Maya classic” menu before switching to the “UV editing” mode to import my UV. I then right clicked on the shipping container and chose “Assign New Material” and then “Lambert”, where I then found it on the right side menu.

From there I clicked the black and white checkered button next to “Colour” and chose “File” in the menu above. I then imported the UV I had made in Photoshop into Maya and ended up with my finished shipping container below.

I finally made my rust-y shipping container.
0 notes