
we at 5 Core have consistently strived to pioneer the creation of top-notch electronic products. As an award-winning company, we have proudly stood as innovators in the industry, specializing in wired and wireless microphones, drum thrones, keyboard & piano bench, guitar stand & rack, active party speakers, replacement speakers, pro audio DJ gear, megaphones, PA systems, and many more.
Don't wanna be here? Send us removal request.
Statistics
We looked inside some of the posts by 5-core and here's what we found interesting.
Average Info
Notes Per Post
1
Likes Per Post
1
Reblog Per Post
0
Reply Per Post
0
Time Between Posts
13 hours
Number of Posts By Type
Text
6
Last Seen Tumblr Blogs


Fun Fact
Tumblr Inc. is using 66 technologies for its website.
Text
The Best Ring Light Stand for Professional Photographers

Good lighting? Non-negotiable. You could have the latest camera and the sharpest lens, but without solid lighting, your photos will fall flat. Shadows creeping in from the wrong angles, dull colors — the whole vibe goes down the drain.
That’s why ring lights are a staple for photographers. They soften shadows, bring out natural skin tones, and add that subtle glow that makes people go, “Wow, what lighting are you using?” And the best part? You don’t need a massive setup or a Hollywood budget.
I’ve got two solid picks from 5 Core that professional photographers (and let’s be honest, even us regular creators) will love. Let’s break it down.
5 Core 6-Inch Ring Light — Small But Mighty
Check it out here
Okay, so this one’s not massive. But trust me, size isn’t everything. The 6-inch ring light is a workhorse for photographers who need quick, controlled lighting for detail shots or portraits.

Ever tried capturing makeup details for a beauty shoot? Without the right light, good luck getting those fine textures and subtle tones to show up. With this light, you get soft, even lighting that makes every detail pop. It’s perfect for close-up work — jewelry, cosmetics, even small product photography.
And the adjustable brightness? Lifesaver. Some days, you’ll need that ultra-bright glow to eliminate shadows. Other times, a gentler, dimmed setting gives you that natural vibe. Flexibility matters.
Plus, it’s got a built-in phone holder. So, if you’re juggling behind-the-scenes content or snapping a few test shots with your phone, it’s got you covered.
Who’s it for?
Product photographers
Beauty and portrait photographers
Content creators who want clean, bright lighting
2. 5 Core 12-Inch LED Ring Light with Adjustable Tripod — The Big Player
Now, if you’re taking on bigger projects or shooting multiple angles, you’ll want something like this 12-inch model. It’s the sweet spot between portability and pro-level performance.

I’m talking about even lighting, no harsh shadows, and color temperature control. You can shift between cooler daylight tones and warm, golden hues. Perfect when the natural light keeps changing, and you’re racing against time.
The tripod? Solid. Unlike those flimsy stands that collapse mid-shoot, this one holds steady — even when you’re angling for that perfect top-down shot. And if you’re adjusting heights for standing portraits or flat lays? No problem.
Also, the catchlight effect is worth mentioning. Ever notice that ring-shaped sparkle in a subject’s eyes? That’s the signature of a ring light. It adds depth and makes your portraits look alive.
Who’s it for?
Portrait and fashion photographers
Studio owners and creators
Vloggers and live streamers who want top-tier lighting
Why Ring Lights Work So Well for Photographers
Here’s the thing — not all lighting is created equal. Overhead lights cast unflattering shadows. Natural light? Great when it cooperates, but it’s unpredictable. Ring lights solve both problems.

Even Lighting: No more harsh shadows or distracting glares. Everything is soft and balanced.
Catchlights: That signature gleam in the eyes? Instant depth, instant professionalism.
Portability: Need to shoot on location? No sweat. They’re easy to pack and set up.
Adjustability: Whether you’re photographing people or products, you control the brightness and warmth.
Honestly, once you use a ring light, going back feels impossible. It’s like discovering how coffee tastes with the right amount of cream — you’ll never settle for less.
Final Thoughts
For quick portraits, close-ups, or adding extra polish to product shots, the 5 Core 6-Inch Ring Light is a solid choice. It’s small, easy to adjust, and does the job without fuss.
But if you’re stepping up your game — think client sessions, in-depth shoots, or even livestreaming your editing process — the 5 Core 12-Inch LED Ring Light is the move. It’s stable, versatile, and gives you full creative control.
Whichever way you go, remember this — lighting isn’t just a technical choice. It’s how you set the mood, tell your story, and capture that moment. Get it right, and your photos will speak for themselves.
Happy shooting!
1 note
·
View note
Text
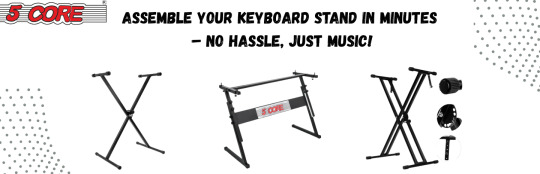
How to Assemble a Keyboard Stand in Minutes
Let's be honest - nothing kills your playing vibe faster than a wobbly keyboard stand. That subtle shake when you lean into a passionate solo, the slow sink of an improperly locked stand, or worse - that heart-stopping moment when your entire rig threatens to collapse mid-performance.
A proper stand setup isn't just about convenience; it's about creating a foundation that disappears beneath your playing, letting you focus entirely on the music without distractions.
The difference between a good setup and a bad one comes down to understanding your stand type and following a few key steps. Whether you're using a lightweight X-stand for gigs, a sturdy Z-stand for studio work, or a compact tabletop version for small spaces, the principles remain the same: stability, proper height, and secure locking.
Understanding Your Keyboard Stand
Not all keyboard stands are the same, and knowing which type you have makes assembly much easier. Each design serves a different purpose, offering varying levels of stability and adjustability.
X-Style Stand
For X-style stands, start by unfolding the legs evenly until they click into place. These collapsible designs are perfect for musicians on the move, but that convenience means you need to be extra careful about locking mechanisms. The center adjustment is your best friend - twist it tight, then give it an extra quarter turn for good measure.
Check out our 5 core X style keyboard stand here.
Z-Style Stand
Z-style stands offer more stability for heavier keyboards, but require more careful assembly. When connecting the side frames, hand-tighten all bolts first before reaching for tools. This lets you make micro-adjustments to ensure everything lines up perfectly before final tightening. The multiple height adjustment points are worth taking time with - find your ideal playing position before locking everything down.
Check out our collection of 5 core Z style keyboard stands here.
Tabletop Stand
Tabletop stands keep things simple, but don't skip the basics. Check that rubber grips are clean and properly positioned before placing your keyboard. Even this minimalist setup benefits from a quick stability test - press down firmly on the keys to check for any unwanted movement.
Tools and Parts Checklist
A smooth setup starts with the right tools and parts. Most keyboard stands come with everything needed, but a quick check ensures you won’t be missing anything mid-assembly.

Included parts:
Frame components (legs, crossbars, or base)
Adjustment knobs or locking pins
Rubber feet for grip and stability
Tools you may need:
Screwdriver or Allen wrench (depending on the stand type)
Extra padding if your keyboard requires additional support
Before assembling, lay out all the parts and confirm they match the instruction manual. This prevents unnecessary adjustments later.
Step-by-Step Guide to Building the Mic Stand
Let’s get this stand built properly—because nobody wants their beloved keyboard faceplanting mid-solo.
1. Base Setup: Don’t Skip This
X-stand? Unfold the legs like a pro—not like you’re wrestling an angry octopus. Lock them at a comfortable width (not too wide, not too narrow—Goldilocks rules apply).
Z-stand? Attach the side frames and actually tighten those screws/pins. This isn’t IKEA furniture—your keyboard’s life depends on it.
PRO TIP: Put it on a flat surface first. If it wobbles now, it’ll be a disaster later. Fix it before your keyboard’s on it.
2. Height & Width: Don’t Just Wing It
Adjust the height so your arms sit naturally—no hunching, no reaching.
Width should fit your keyboard snugly. Too wide? It’ll wobble. Too narrow? Your keys will hang off like a bad overhang.
LOCK IT DOWN. Tighten every knob/pin like you mean it. If it feels loose now, imagine it mid-gig. Not pretty.
3. Locking Mechanism: The Make-or-Break Step
X-stand? That center knob isn’t decorative. Crank it until it stops moving. If it has preset slots, make sure the pin clicks in—no half-assing.
Z-stand? Check every bolt. Shake it (gently). If it jiggles, tighten again. Your future self will thank you when your stand doesn’t collapse during your big moment.
Final Test: Give it a gentle shake. If it moves, fix it. If it doesn’t? Congrats—you’ve just saved yourself from a future disaster. Now go play something.

Common Mistakes to Avoid
Even a well-designed keyboard stand can feel unstable if not assembled correctly. Avoid these common mistakes to ensure a solid setup.
Locking Mechanism Laziness
That center knob isn’t a suggestion – it’s the only thing standing between you and disaster. Cranking it halfway is like fastening half your seatbelt. Give it that extra quarter turn until you feel real resistance. Your future self will thank you when you’re not catching your keyboard mid-solo.
The Wobbly Leg Dilemma
If your stand rocks like a porch chair, you messed up the leg positioning. Here’s the trick: set it up on the actual surface you’ll be playing on (not your perfectly level kitchen floor), then adjust each leg until the wobble disappears. Those rubber feet should be glued to the ground – if they’re not, find the culprit leg.
Height Horror Stories
Too high? Hello, shoulder tension. Too low? Say hello to wrist pain. The sweet spot? When your forearms run parallel to the floor with elbows slightly above keyboard level. And for God’s sake – adjust it with your keyboard ON the stand, not before.
The Overzealous Wrench Problem
Yes, tighten everything. No, don’t strip the screws like you’re trying to win a Strongman competition. Hand-tighten first, then use a tool for the final 10% of tightening. If you’re sweating, you’ve gone too far.
Final Tips for Durability and Maintenance
A well-maintained keyboard stand lasts longer and performs better over time. Follow these simple maintenance tips:

Store properly – Fold or disassemble the stand when not in use to prevent unnecessary wear.
Check for loose parts – Regularly inspect knobs, screws, and rubber feet to ensure everything stays secure.
Keep it clean – Dust and dirt can affect locking mechanisms. Wipe down metal parts and joints periodically.
Avoid overloading – Using a stand beyond its weight capacity can strain the frame, leading to instability.
With these tips, your keyboard stand will stay reliable for years to come.
Conclusion
A well-assembled keyboard stand is the foundation of a stable and comfortable playing experience. With the right approach, setup takes just a few minutes—no frustration, no second-guessing.
Understanding your stand’s design, securing each lock, and checking for stability ensures a rock-solid setup. Simple habits like regular maintenance and proper storage extend its lifespan, keeping it reliable for every practice or performance.
Now that your stand is ready, place your keyboard, adjust your seat, and start playing with confidence. A stable setup means fewer distractions and more focus on your music.
0 notes
Text
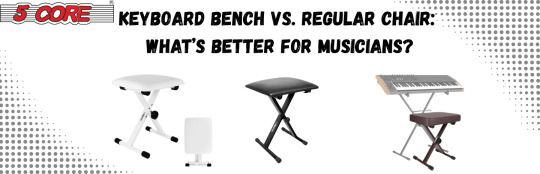
Keyboard Bench vs. Regular Chair: What’s Better for Musicians?
That wobbly kitchen chair you're using? It's the silent killer of your practice sessions. Every stiff back, every aching wrist, every time you quit early because you're uncomfortable - that's not you being weak. That's your terrible seat winning.
A proper keyboard bench isn't fancy - it's basic survival gear for musicians. The right height keeps your wrists happy. The sturdy base stops that annoying mid-song wobble. No armrests means no blocked elbow when you're nailing that solo.
Regular chairs? They're like trying to run a marathon in flip-flops. Sure, you can do it... but why torture yourself? You wouldn't play a grand piano with oven mitts, so why settle for seating that fights your playing?
Good news: The fix takes 30 seconds and under $100. Your future self - with better posture, longer practice sessions, and cleaner technique - is begging you to upgrade. Your music deserves this.
Why Seating Matters for Musicians
The right seating can make or break a musician’s performance. Long practice hours demand not just skill but also physical endurance. A poorly chosen seat can lead to discomfort, bad posture, and even long-term injuries.
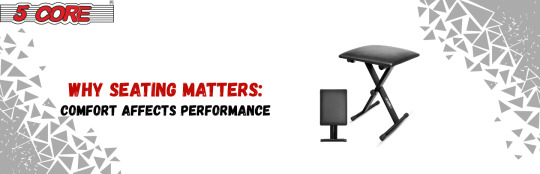
Proper support allows musicians to maintain focus, reduce strain, and improve technique. Whether playing at home, in a studio, or on stage, the right seat ensures better control over movements and sustained performance.
A keyboard bench isn’t just a place to sit—it’s your command center. Unlike that random chair you dragged in from the dining room, it’s built for actual playing. Adjustable height means no more hunching. No armrests = no blocked elbows when you’re shredding. Sturdy construction? Goodbye, mid-song wobbles.
Regular chairs, meanwhile, are like wearing dress shoes to run a marathon. Sure, they’ll work—if you enjoy sore wrists, stiff shoulders, and constantly shifting around. Fixed heights force awkward angles. Armrests (if they exist) get in the way. And let’s not talk about that subtle tilt that makes you feel like you’re playing downhill.
The choice is simple:
Casual player? A firm, armless chair might get you by.
Serious about music? A bench isn’t an upgrade—it’s basic survival gear.
Your back will thank you. Your playing will improve. And you’ll never again waste practice time fighting your furniture.
Stability and Durability
A musician's seat should be stable enough to support dynamic movements and durable enough to withstand daily use. Wobbling or wear can disrupt focus and affect performance.

Keyboard Bench:
Built like a tank with metal/wood frames that laugh at daily abuse
Rubber feet that grip harder than your stage fright
Stays put like a loyal roadie, even when you're hammering those keys
Regular Chair:
Wobbles more than a freshman at their first gig
Padding flattens faster than a bad mix
Might collapse right when you nail that solo (talk about bad timing)
Portability: Because Musicians Never Stay Put
Keyboard Bench:
Folds up quicker than a punk band's equipment after a show
Light enough to carry with one hand (leaving the other free for your beer)
Fits in tight spaces - perfect for that closet-sized "home studio"
Regular Chair:
About as portable as a grand piano
Takes up more space than your guitarist's ego
Always in the way when you're loading gear
The Money Talk (Let's Get Uncomfortable)
Keyboard Bench:
Costs more than a chair but less than chiropractor visits
Actually designed for playing (what a concept!)
Won't need replacing every year like cheap chairs
Regular Chair:
Seems cheaper until you're buying your third one
The "budget option" that costs you in back pain
Basically paying to make your playing worse
The Verdict: Which One is Better?
Choosing between a keyboard bench and a regular chair depends on playing habits, comfort needs, and performance goals.

Keyboard benches offer superior ergonomics, stability, and adjustability.
Regular chairs provide casual seating but lack musician-specific features.
For long practice hours, a keyboard bench minimizes strain and improves technique.
A regular chair works for short sessions but may cause discomfort over time.
For those committed to music, a keyboard bench is the clear winner in terms of long-term comfort and performance support.
If you liked this article, find more interesting ones here:
Storing and transporting mic stands safely
Adjusting mic stand heights for different applications
0 notes
Text
Best Budget Bluetooth Earbuds with Long Battery Life

Staying connected without interruptions is non-negotiable. Whether it's jamming to your playlist, hopping on a call, or tuning into your favorite podcast, your earbuds should last as long as you do.
But finding budget-friendly Bluetooth earbuds with impressive battery life? That’s a challenge.
Some promise hours of playback but fall short, while others compromise on sound or comfort. Don’t worry — we’ve done the heavy lifting for you.
This guide will walk you through the best affordable options, ensuring you get the most playtime without emptying your wallet. Let’s find the perfect pair for your needs.
What to Look for in Budget Bluetooth Earbuds
Choosing budget Bluetooth earbuds requires more than just checking the price tag. While affordability is key, understanding the features that impact your listening experience is essential. From battery performance to sound quality, here’s what you should keep in mind.
Battery Life & Charging
Battery life is one of the most crucial factors. Budget earbuds often offer 20-30 hours of playtime with the charging case. Some models include quick charge features, giving you hours of use in just minutes of charging.
Playback Time: Look for earbuds offering 5-8 hours per charge.
Case Battery Support: A case with an additional 15-20 hours is ideal.
Fast Charging: Opt for models that offer at least an hour of use from a 10-minute charge.
Sound Quality
Affordable doesn’t mean compromising on sound. Many budget-friendly earbuds are equipped with dynamic drivers to deliver balanced audio.
Bass and Treble: Ensure a clear balance without overpowering bass.
Noise Isolation: Passive noise isolation from a snug fit enhances sound clarity.
Codec Support: AAC and SBC codecs provide better audio quality on most devices.
Top Budget Bluetooth Earbuds with Long Battery Life
When it comes to budget Bluetooth earbuds that deliver exceptional battery life, the 5 Core EP01 is a standout choice. Combining impressive features with an affordable price, it’s designed to keep up with your day without frequent recharging.

5 Core EP01 Bluetooth Earbuds: The Ideal Choice
The 5 Core EP01 offers everything you need for a seamless listening experience. Whether you’re working, exercising, or simply enjoying your favorite tunes, these earbuds ensure you stay connected without interruption.
Long Battery Life: Enjoy up to 30 hours of total playback with the charging case. Perfect for extended use without worrying about running out of power.
Quick Charging: A 10-minute charge provides hours of listening, keeping you ready on the go.
Superior Sound Quality: Experience clear highs, deep bass, and immersive audio with minimal distortion.
Comfortable Fit: Designed ergonomically for all-day wear with secure, soft ear tips.
Waterproof Build: With an IPX5 rating, these earbuds are resistant to sweat and splashes, making them ideal for workouts or outdoor use.
Magnetic Design: Prevents tangling and keeps the earbuds secure when not in use.
Crystal Clear Calls: Equipped with a built-in microphone, ensuring sharp call quality without background noise.
The 5 Core EP01 earbuds are the perfect companion for anyone seeking durability, comfort, and long-lasting performance without breaking the bank. Up next, let’s explore how to get the most out of your earbuds by maximizing their battery life.
How to Maximize Earbud Battery Life
Even with a long battery life like the 5 Core EP01, a few smart practices can ensure your earbuds last even longer. Proper usage and care can prevent unnecessary battery drain and extend their lifespan.

1. Charge Smartly
Avoid overcharging your earbuds. Unplug once they reach 100% to prevent battery degradation.
Use the original charging cable and case for optimal performance.
If you’re in a rush, take advantage of the quick charge feature for instant power.
2. Store Them Properly
Always store your earbuds in their charging case when not in use. This keeps them charged and protected.
Keep the case clean and avoid exposure to extreme temperatures.
3. Adjust Volume Levels
Listening at high volumes drains the battery faster. Maintain a moderate volume to extend playtime.
Lowering volume also protects your hearing and provides a better listening experience.
4. Disable Unused Features
Turn off Bluetooth when not in use to prevent unnecessary power consumption.
Some earbuds come with extra features like voice assistants or sensors — disable these when not needed.
Conclusion
Choosing the right budget Bluetooth earbuds doesn’t mean compromising on quality or battery life. The 5 Core EP01 stands out with its impressive 30-hour battery backup, clear audio performance, and comfortable fit — all at an affordable price.
Whether you’re heading to the gym, commuting, or working from home, these earbuds ensure uninterrupted listening. Plus, features like quick charging, water resistance, and a magnetic design make them a reliable everyday companion.
For anyone seeking long-lasting performance without breaking the bank, the 5 Core EP01 is an excellent choice. Experience the difference and enjoy your favorite tunes worry-free.
Check out the 5 Core EP01 Bluetooth Earbuds here!
0 notes
Text
How to Maximize Battery Life in Your Wireless Headphones
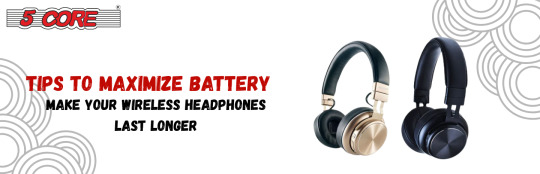
Ever found yourself rushing out the door, only to realize your wireless earphones are dead? It's frustrating, especially when you depend on them for calls, workouts, or simply zoning out. While battery life is a key selling point, it often deteriorates faster than expected.
But here's the good news — with the right habits, you can significantly extend their lifespan. From smarter charging to simple tweaks in usage, small changes make a big difference. Whether you’re a music lover or someone who lives on conference calls, these tips will help you get the most out of every charge.
Let’s dive into how you can keep your earphones powered longer.
Optimize Charging Habits
How you charge your wireless earphones plays a significant role in their battery lifespan. Poor charging practices can lead to faster battery degradation, reducing overall performance. Follow these tips to ensure your earphones stay powered longer.
Avoid Overcharging
Overcharging can strain the battery, leading to long-term damage.
Remove your earphones from the charger once they reach 100%.
Many cases come with built-in protection, but it’s best not to rely solely on that.
Use the Right Charger
Not all chargers are created equal. Using incompatible chargers may lead to overheating and battery damage.
Stick to the manufacturer-recommended charger or certified alternatives.
Avoid fast chargers unless specified, as they can accelerate wear over time.
Follow Proper Charging Cycles
Lithium-ion batteries, commonly used in wireless earphones, degrade faster with extreme charging cycles.
Instead of draining the battery to 0%, try to keep it between 20% to 80%.
Charging your earphones in short, frequent bursts can be more beneficial than a full cycle every time.
Our 5 core Bluetooth headphones come with 30 hours of extended battery life, making listening fu7n for you!
Manage Usage to Reduce Battery Drain
Your day-to-day usage habits directly impact how long your earphones last on a single charge. Adjusting a few settings and being mindful of certain features can help maximize battery life.
Lower the Volume
Higher volume levels consume more power, draining the battery faster.
Listening at moderate levels is not only battery-friendly but also safer for your ears.
Turn Off When Not in Use
Keeping your earphones powered on when idle is a major battery drainer.
Place them back in their case to ensure they automatically turn off and recharge.
Use One Earbud at a Time (If Possible)
Many wireless earphones offer mono-mode, allowing you to use a single earbud.
Ideal for calls or casual listening, this can effectively double your listening time.
Disable Extra Features When Not Needed
Noise cancellation, transparency mode, and spatial audio are battery-intensive.
Turn them off when unnecessary, especially in quiet environments.
Optimize Connectivity Settings
Wireless earphones rely on Bluetooth connectivity, which can significantly impact battery life. Optimizing these settings can reduce unnecessary drain and keep your earphones running longer.
Limit Unnecessary Bluetooth Usage
Disconnect your earphones when not in use. Staying connected consumes battery even when no audio is playing.
Avoid keeping Bluetooth active on your device when it’s unnecessary.
Update Firmware Regularly
Manufacturers often release firmware updates that enhance battery management.
Check the official app or website for updates to ensure your earphones are running on the latest version.
Avoid Long-Distance Connections
The farther your earphones are from the connected device, the harder they work to maintain the connection.
Stay within the recommended Bluetooth range for stable performance and improved battery life.
Proper Storage and Maintenance
Storing and maintaining your wireless earphones the right way can prevent battery degradation and ensure they perform efficiently. Neglecting this can lead to reduced battery capacity over time.

Store in a Cool, Dry Place
Extreme temperatures damage lithium-ion batteries.
Keep your earphones away from direct sunlight, heaters, or cold environments.
Clean Charging Contacts
Dirt and debris on charging ports can interrupt the charging process.
Wipe the charging contacts gently using a dry or slightly damp cloth to ensure proper conductivity.
Use a Protective Case
Physical damage from drops or impacts can affect the internal battery.
Always store your earphones in their case when not in use to prevent accidental damage.
Recognizing When to Replace the Battery
Even with the best care, all batteries degrade over time. Knowing when your earphones’ battery is nearing the end of its life can help you decide whether a replacement or upgrade is necessary. Watch out for these signs.
Signs of Battery Deterioration
Faster Battery Drain: If your earphones lose charge significantly faster than when they were new, it’s a clear sign of battery wear.
Slow Charging: Batteries that take longer to charge or don’t reach full capacity may be nearing the end of their lifecycle.
Unexpected Shutdowns: Sudden power-offs, even with sufficient battery remaining, indicate poor battery health.
Consider Battery Replacement or Upgrade
Some premium wireless earphones offer battery replacement services — check with the manufacturer.
If replacements aren’t possible, upgrading to a newer model with better battery management might be more cost-effective.
Conclusion
Maximizing your wireless earphones' battery life doesn’t require complicated steps. Simple adjustments like avoiding overcharging, reducing unnecessary Bluetooth use, and maintaining proper storage can significantly enhance longevity.
By staying mindful of how you use and care for your earphones, you can enjoy longer listening sessions and reduce the frequency of replacements. Implement these tips today and experience a noticeable improvement in battery performance.
Need further insights or device-specific tips? Stay tuned for more helpful guides!
0 notes
Text
Troubleshooting Common Desktop Mic Stand Issues

A wobbly mic stand, constant slipping, or a mic that won’t stay in position — frustrating, right? These common issues can ruin your recording or streaming experience. But before you consider a replacement, most problems are easier to fix than you might think.
This guide will walk you through practical solutions for the most common desktop mic stand problems. Whether it’s a loose boom arm, shaky base, or unwanted vibrations, we’ve got you covered. Stay with us, and you’ll have your mic stand stable and reliable in no time.
Let’s dive into the fixes.
Mic Stand Keeps Falling Over
A mic stand that topples mid-session is a common frustration. It not only interrupts your recording but also risks damaging your microphone. The culprit is usually poor weight distribution or an unstable base. Let’s explore why this happens and how you can fix it.
Causes
Uneven Weight Distribution: Heavier microphones can easily tip over if the stand’s base isn’t designed to support the load.
Weak or Small Base: Compact or lightweight bases struggle to provide adequate stability.
Uneven Surfaces: Placing the stand on an unstable desk or uneven floor increases the risk of it falling over.
Fixes
Upgrade the Base: Consider a heavier, weighted base or invest in a stand with better balance.
Adjust the Mic Arm: Position the mic directly above the base for even weight distribution.
Stabilize the Surface: Ensure your desk or platform is level. Add anti-slip mats or pads for extra grip.
Add Counterweights: For boom arm stands, attaching a counterweight to the opposite end can improve stability.
Loose or Wobbly Boom Arm
A boom arm that refuses to stay in place is often caused by worn-out components or improperly tightened joints. Ignoring this issue can lead to further wear and may even compromise your microphone’s safety. Here’s how to identify the problem and fix it.
Causes
Loose Adjustment Knobs: Over time, the knobs that hold the arm in place can loosen, causing instability.
Worn-Out Joints: Frequent adjustments wear down internal components, making the arm wobbly.
Incorrect Installation: Improperly assembling the boom arm can lead to imbalanced movement.
Fixes
Tighten the Knobs: Ensure all adjustment points are securely tightened without overtightening.
Lubricate the Joints: Apply a small amount of silicone lubricant to reduce friction and ensure smooth movement.
Replace Damaged Parts: If joints are excessively worn, consider replacing them or upgrading the stand.
Reinstall the Arm: Double-check assembly instructions to ensure the arm is securely attached to its base or clamp.
Mic Stand Joint Won’t Stay in Position

Struggling with a mic stand joint that refuses to hold its position? This issue is common with adjustable stands, especially after frequent use. It usually points to faulty tightening mechanisms or poor-quality materials. Here’s how to get your stand back to working order.
Causes
Over-Tightened or Under-Tightened Joints: Excess force can strip screws, while loose joints can’t hold weight.
Thread Wear and Tear: Continuous adjustments can erode threading, reducing grip strength.
Low-Quality Build: Budget mic stands often use plastic or weak metals that degrade quickly.
Fixes
Adjust with Care: Tighten screws and knobs firmly but avoid over-tightening. Listen for resistance as a sign to stop.
Replace Stripped Screws: Swap damaged screws with higher-quality replacements designed for mic stands.
Use a Thread-Locking Solution: A light application of thread-locking adhesive can prevent screws from loosening.
Upgrade When Necessary: If the stand is beyond repair, consider investing in a sturdier, professional-grade option.
Desk Clamp Won’t Stay Secure
A mic stand clamp that constantly loosens or shifts can disrupt your workflow. Whether it’s due to an incompatible desk or a worn-out clamp, a loose attachment undermines the stability of your entire setup.
Causes
Improper Desk Fit: Clamps have size limitations and may not grip thick or thin desks properly.
Worn Clamp Pads: Over time, the rubber or foam pads on the clamp can degrade, reducing friction.
Uneven Pressure: Unequal tightening on both sides can result in a wobbly connection.
Fixes
Check Compatibility: Ensure your desk thickness matches the clamp’s recommended range. Adjustable clamps are ideal for versatility.
Add Padding: Place a rubber mat or additional padding between the clamp and desk for better grip.
Tighten Evenly: Adjust both sides of the clamp uniformly to ensure balanced pressure.
Replace the Clamp: If the clamp is damaged or low-quality, upgrading to a sturdy, metal clamp will enhance stability.
Vibrations or Unwanted Noise Through the Mic
If your recordings are plagued with low-frequency rumbles or unexpected noise, your mic stand could be the culprit. Vibrations often travel from your desk or surrounding environment, compromising audio clarity. Addressing these disruptions is essential for professional-quality sound.

Causes
Desk Vibrations: Typing, tapping, or even slight desk movements can transfer noise through the mic stand.
Lack of Shock Absorption: Without proper shock mounts or isolation pads, vibrations directly impact your microphone.
Poor Mic Stand Build: Thin metal frames and hollow designs are more prone to transmitting noise.
Fixes
Use a Shock Mount: A shock mount suspends the microphone, reducing vibrations and isolating sound.
Add Isolation Pads: Place rubber or foam pads under the mic stand base or clamp to absorb vibrations.
Minimize Desk Movement: Keep your workspace stable and avoid sudden movements during recording.
Upgrade to a Heavy Base Stand: Heavier stands absorb more vibrations, providing better noise isolation.
Mic Stand Won’t Hold the Microphone Securely
A microphone slipping from its clip or mount is not just frustrating — it’s dangerous. Mic damage can occur from even minor falls. If your mic stand fails to secure your microphone, it’s time to inspect the connection points.
Causes
Incorrect Mic Holder Size: A mic that’s too large or small for the holder won’t stay secure.
Weak Mic Clip: Low-quality or worn-out clips lose their grip over time.
Threading Issues: Faulty threading between the mic holder and stand can cause loosening.
Fixes
Ensure Compatibility: Use the correct mic clip or shock mount designed for your microphone's size and weight.
Tighten the Clip Securely: Make sure the mic clip is fastened properly to the stand without overtightening.
Replace the Clip: If the clip shows visible signs of wear, swap it out for a sturdier one.
Check Threading: If the stand’s threading is stripped, consider using an adapter or replacing the threaded section.
If you’re looking for a stable desktop mic stand, our experts recommend 5 core desktop mic stand and On stage desktop mic stand as affordable options for budget buyers.
Difficulty Adjusting Mic Stand Height
A mic stand that won’t adjust to your preferred height can throw off your entire setup. Whether it's for recording vocals, podcasts, or streaming, height adjustability is essential for optimal audio capture. When adjustments become stiff or impossible, it's often due to mechanical wear or lack of maintenance.
Causes
Stiff Adjustment Mechanism: Dust buildup or lack of lubrication can make height adjustment difficult.
Rust or Corrosion: Metal stands are prone to rust, especially in humid environments.
Worn Locking System: Repeated adjustments can weaken the internal components.
Fixes
Clean and Lubricate: Apply a silicone-based lubricant to the adjustment areas for smoother movement.
Check for Rust: Remove minor rust with a rust remover or vinegar solution, then wipe it clean.
Inspect Locking Mechanisms: If the locks are damaged or worn out, replace them with manufacturer-approved parts.
Avoid Over-Tightening: Secure the stand at your desired height with moderate pressure to prevent further wear.
Final Tips for Maintaining Your Mic Stand
Preventing mic stand issues starts with regular maintenance and proper usage. Simple care routines can extend the life of your stand and ensure a reliable recording setup.

Inspect Regularly: Check for loose screws, worn parts, and rust buildup. Address issues immediately to prevent further damage.
Clean Frequently: Wipe down the stand with a soft cloth to remove dust and moisture. Avoid using abrasive cleaners.
Store Properly: When not in use, store the stand in a dry, clean space to prevent corrosion.
Use Quality Accessories: Invest in reliable shock mounts, clamps, and mic clips for enhanced stability and durability.
With these troubleshooting steps and maintenance tips, your desktop mic stand will stay sturdy and reliable. Now that you're equipped with the know-how, recording frustration-free is just a mic check away!
If you liked this article, find more interesting ones here:
Storing and transporting mic stands safely
Adjusting mic stand heights for different applications
0 notes