
777cyb3rkitty
☆ cyb3rkitty ☆
/ᐢ⑅ᐢ\ ♡ ₊˚ I'll probably just post sims 4 cc and art related stuff ♡
꒰ ˶• ༝ •˶꒱ ♡‧₊˚ ♡
./づ~ :¨·.·¨: ₊˚
`·..·‘ ₊˚ ♡
62 posts
Don't wanna be here? Send us removal request.
Last Seen Blogs

nevinaughty
nevi

biology-muse
Biology....it grows on you

kkkwiatnik
oh, hello again ana

personalinstantloan
Untitled

your-gummi-partner
𓃗 Gummigoo 𓃗
Text
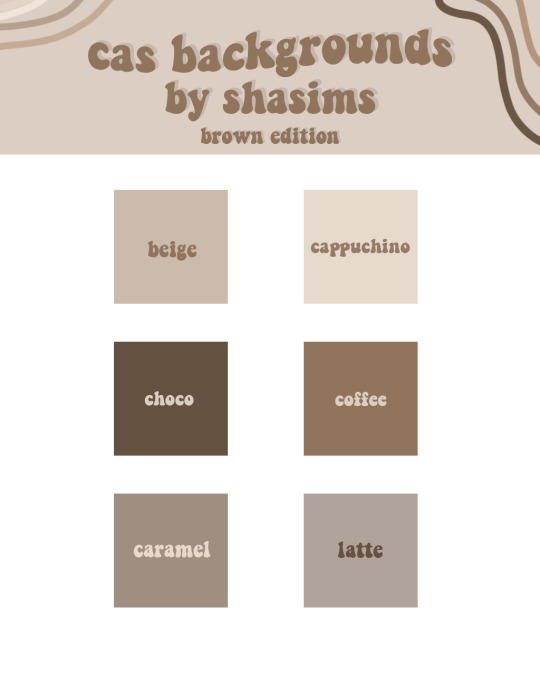
*:・゚✧*:・゚✧ || hi!! here's my own brown edition cas backgrounds!! you can download them down below, and do not claim as your own please, thanks!!<3
*:・゚✧*:・゚✧*:・゚✧*:・゚✧*:・゚✧*:・゚✧
beige cas background : ☕
cappuchino cas background : ☕
choco cas background : ☕
coffee cas background : ☕
caramel cas background : ☕
latte cas background : ☕
have a great game, hope you like it!! <33
@maxismatchccworld
2K notes
·
View notes
Text

[Ozii]Posepack N1
💖10 female poses
👻 just in-game
🐱“all in one” included
[DL]
684 notes
·
View notes
Text


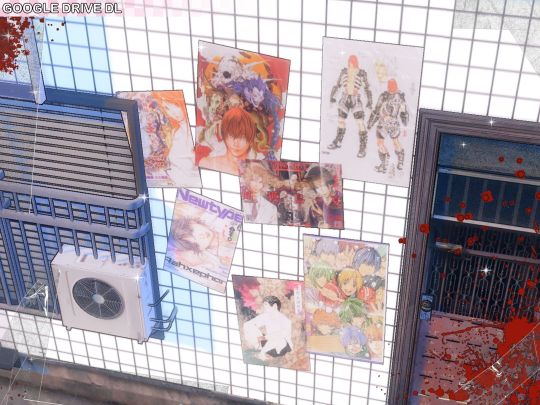
RMB POSTERS #2 ⋆ ˚。⋆
first piece of cc i made was a poster set, but i wanted to make a mesh-less version!!
★35 swatches (30 stand alone) (5 cluster)
★base game conpatable
★free patreon dl (i lied in the third image!!! I LIED TO ALL OF YOU!!
FREE PATREON DL (HERE)
2K notes
·
View notes
Text
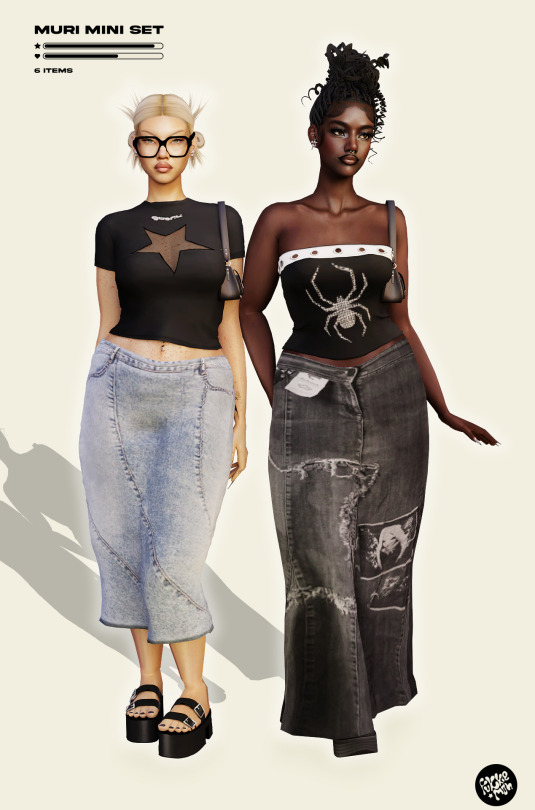

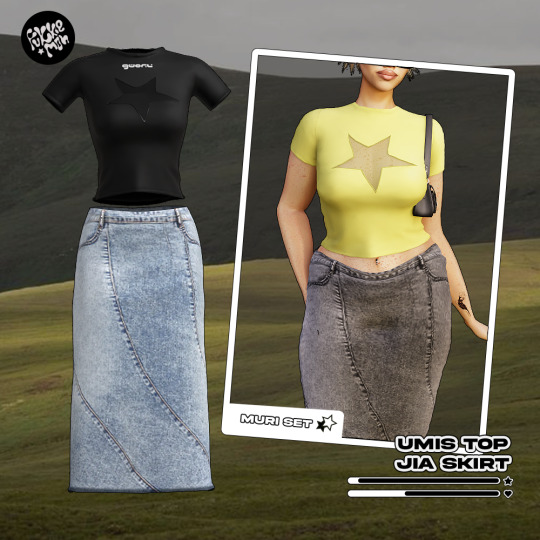
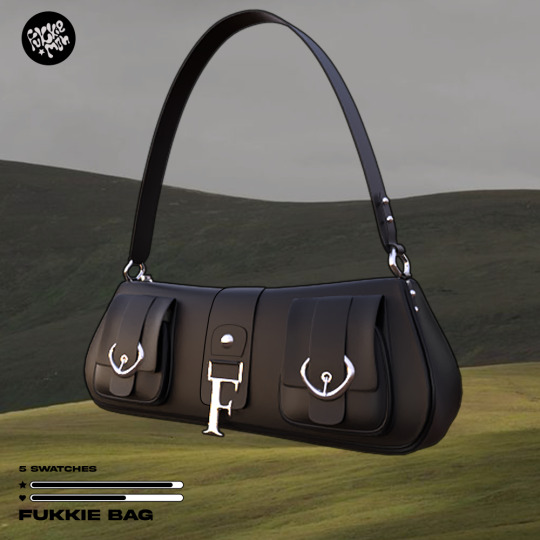
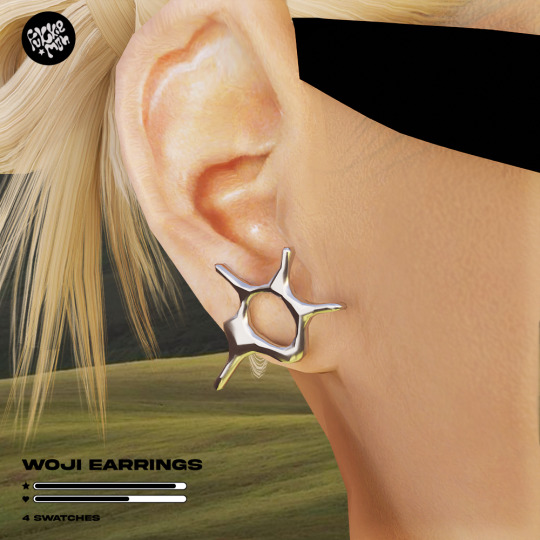
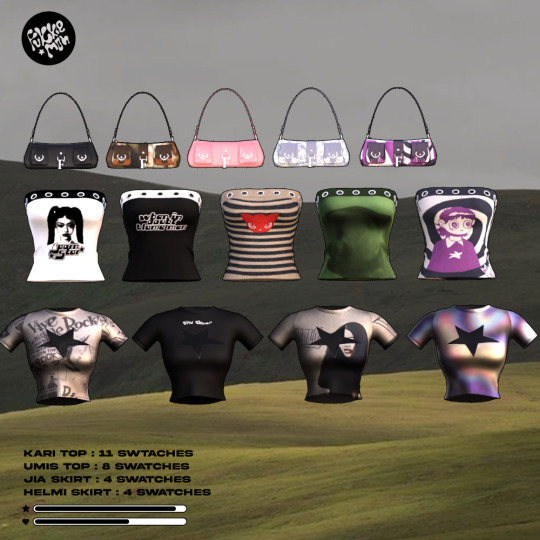
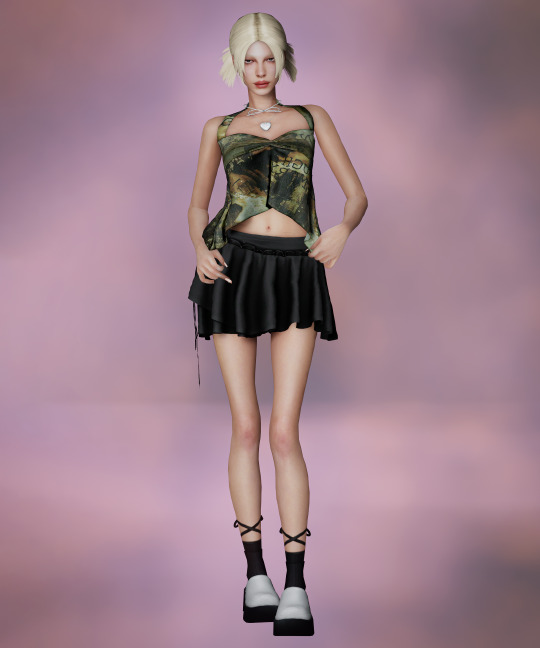
Muri Set (6 items)
Hii y’all hope you like this set, let me know if you run into any issues. Also, Helmi skirt is a base game mesh recolor. As always inspo taken from pinterest pics, credit to the irl designers. ❤
✿ base game compatible
✿ custom thumbnail
✿ Polygon details
✿ socials
Where to find them in game
✿ bags in hat /ring category
DOWNLOAD (patreon free)
4K notes
·
View notes

Photo
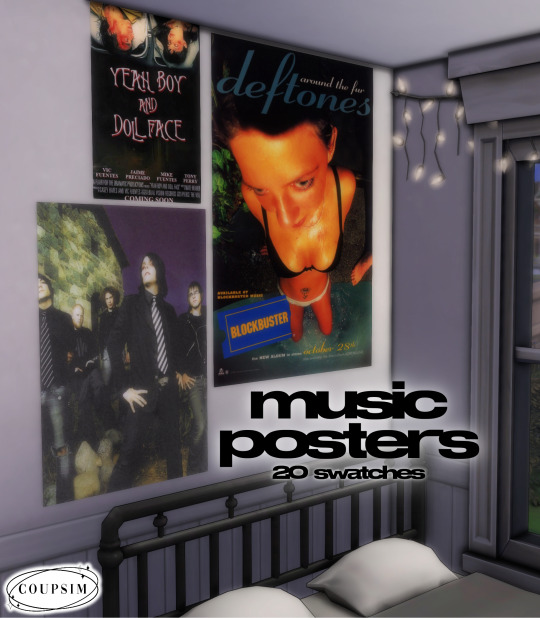
MUSIC POSTERS ✰
my first build cc woopwoop !
20 swatches with various artists (have a nice life, slowdive, fiona apple, slipknot, etc)
download here !! [simfileshare]
5K notes
·
View notes
Text

heyy so i couldn't find a reshade preset i liked for the sims 4, so i made my own! (✿ᴗˬᴗ͈)
this shader preset is called v1rtual fairy! it stays true to the game's original colour but has a vibrant and cartoony effect 🌼
here are some unedited before and afters -


these are literally just screenshots so they look exactly the same in game! i also had my resolution at 3840 x 2160 and graphics at ultra for these and it ran pretty smooth! (especially since my pc isn't the best)
but i usually play at 1920 x 1080 because the UI is bigger with my graphics set at high and it runs butter smooth ‧₊˚ ⋅* ‧₊
here's how it looks in CAS -


the world maps have also become a lot softer and brighter!


i think the effect is so pretty i love, feel free to download here!!! ˚⊹🧚♀️♡
enjoy "" (ꈍᴗꈍ)♡
(also i made this with reshade 5.8.0 and have my shader toggle set to ins and screenshot hotkey set to print screen) ♡
#reshade 5.8.0#reshade#ts4 reshade#ts4 reshade preset#the sims 4 reshade preset#sims reshade preset#reshade preset#ts4#the sims 4#sims 4#my reshade preset
27 notes
·
View notes
Text


[TINA-SIMS] Draped Strap Top ♪
New mesh
12 swatches
ALL LODS
Custom thumbnail
HQ mod compatible
DOWNLOAD (free)
Please tag me if you use my cc! Enjoy it~
2K notes
·
View notes
Text
this is so gyaru


Balman Boutique - Tropical Collections
Burgers
Coconut drink
Guava drink
Lobster
Spicy pastries
Strawberry drink
Watermelon ice cream
Scene in blender
Download
&
Download - Gift
T.O.U.
Don’t Re-Upload It
Don’t Re-Edit It
Recolors are allowed but don’t include the mesh
Follow me on instagram for more updates: @jadebalman / @balmanboutique
192 notes
·
View notes
Photo


[TINA-SIMS] Vintage Necktie ♪
New mesh
12 swatches
Necklaces category
Custom thumbnail
DOWNLOAD (no ads)
Please tag me if you use my cc! Enjoy it~
2K notes
·
View notes
Text
【 Ikuyuk's Botanic Collection 】 ~ flower texture pack
Ikuyuk's Botanic Collection is a resource pack that changes the Minecraft poppy and a few other flowers into new or modified varieties. (https://youtu.be/XYwzlhcYIa8)


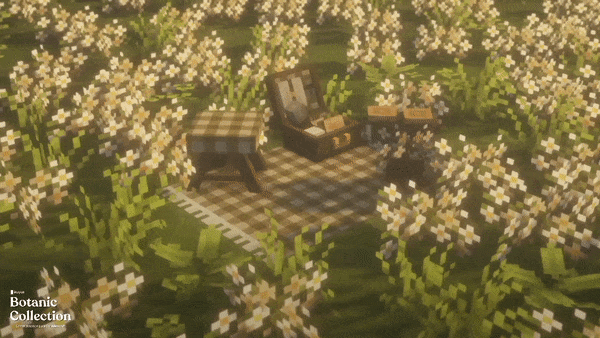
For more information visit the official website:
https://botaniccollection.carrd.co
⇡ The download links are also available here!
Hope you enjoy using this simple flower pack ~
(づ ᴗ _ᴗ)づ 💐💕
346 notes
·
View notes
Text
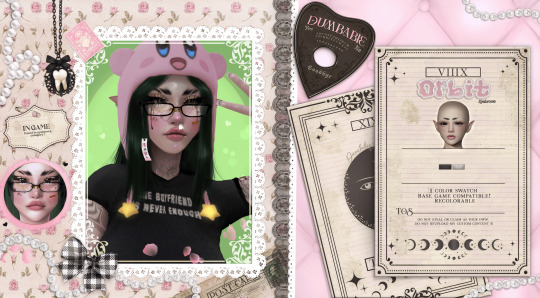
𝐎𝐫𝐛𝐢𝐭 𝐄𝐲𝐞𝐛𝐫𝐨𝐰𝐬 ✦
◦ ♡ Early Access till July/15
◦ ♡ Found in Eyebrows
◦ ♡ Download Here
◦ ♡ [1] Color Swatch
◦ ♡ [5] Versions


1K notes
·
View notes
Text
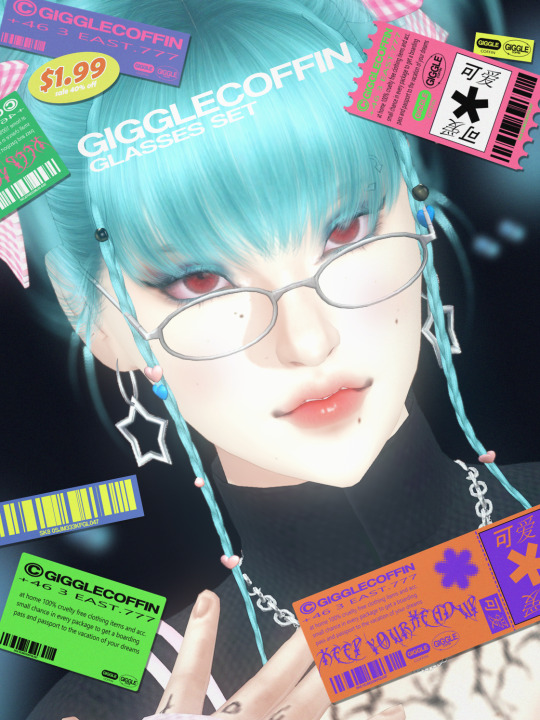
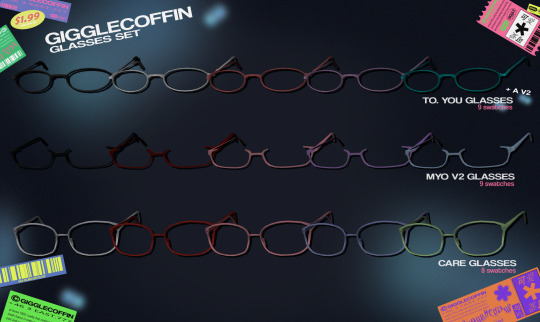
(GIGGLECOFFIN) GLASSES SET 2
really tried to get this out as fast as a could bc im going away for two weeks tomorrow morning (o ̄∇ ̄) buy anyways, i put together 4 glasses, "to. you glasses" short round glasses in 2 versions, one full rims and one with cut rims. a seconded version of "myo glasses" with cut rims, and "care glasses" taller square glasses.
INFO
TO. YOU (V1&V2)
9 swatches
t-e
bg compatible
m/f frames
MYO V2
9 swatches
t-e
bg compatible
m/f frames
CARE
9 swatches
t-e
bg compatible
m/f frames
DOWNLOAD
googledrive / patreon
2K notes
·
View notes
Photo


kawaii pillows (mesh needed)
in clutter and misc decorations
has swatches including lucky star, madoka magica, my little pony and more!
14 swatches
get the mesh here
download
335 notes
·
View notes
Text
♡ how to make mob skins into resource packs minecraft java ♡
here's a super easy tutorial on how to add mob skins to ur game just like any other texture pack! (for java) (❀❛ ֊ ❛„)
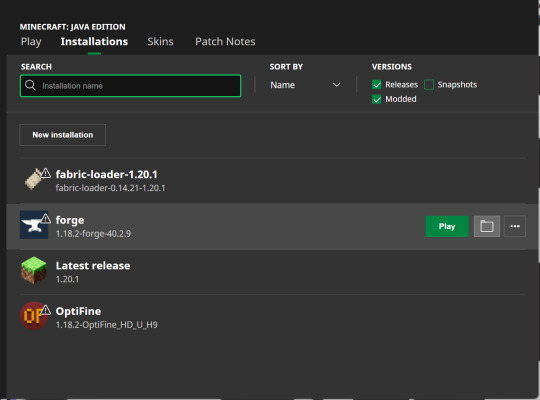
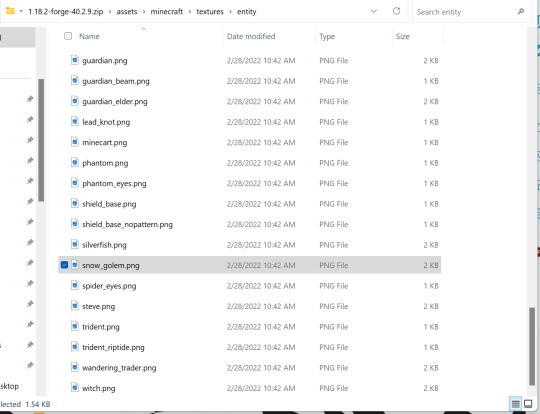
first, open ur minecraft launcher. press on installations and find the game version you're using, (for example I'm using forge 1.18.2-forge-40.2.9). if you hover over it, next to the green play button should be a folder icon.
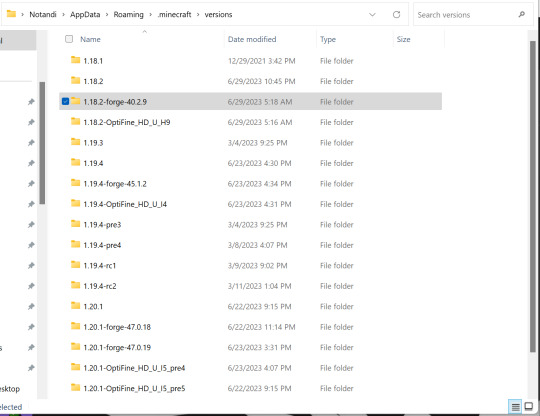
click the icon and find the folder titled 'versions'. click on your version of minecraft, (for example mine would say forge 1.18.2-forge-40.2.9). and click on it! inside should be a .jar file with your minecraft version.
while keeping this tab open, create a folder on your desktop called minecraft mob skins and COPY and paste the .jar file inside. rename and change the .jar to .zip (you can now close the versions window).

open the zip file, it'll be easier in a new window (right click and press open in new window) and type pack in the search bar, find the file named pack.png (keep the tab open).
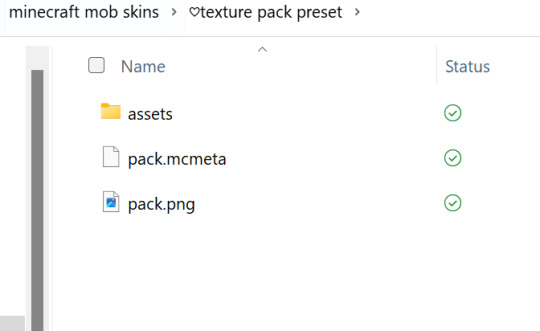
now going back to the minecraft mob skins folder we made, create a new folder called texture pack preset, open this folder and copy and paste the pack.png file inside.
we now have our resource pack icon that will show up in game ! ♡₊˚ 🦢・₊✧
next we need the pack.mcmeta file with our minecraft version so download that here!
once downloaded, drag and drop into your texture pack preset folder.
now, still inside the texture pack preset folder, create a folder called assets. inside that make a folder called minecraft then inside that textures and inside that entity. like this, assets > minecraft > textures > entity
YAYY we now have a preset folder that can be used for every mob!! *:・゚
now back out of that and create another folder inside minecraft mob skins. name it after the mob you want to re-skin. (for example, cow, enderman, axolotl etc…)
inside of that create a folder and name it whatever you want. i always name mine the same name as the skin i want to use. for example 'toasted marshmallow golem'. (this is a super cute skin for your snow golems btw!) to make things easier I'll refer to this folder as the skin folder.
leaving the skin folder we just created open, go back to your desktop and click on minecraft mob skins. open up the texture pack preset folder and copy all the files inside, (assets, pack.mcmeta and pack.png should be highlighted). go back to the folder you have open and paste. (you can now close texture pack preset but keep still keep the skins folder open).
go back to your desktop and open minecraft mob skins again. click on the zip folder we pasted earlier with your game version, (open as a new window), and press on assets > minecraft > textures > entity, and find the mob you want.
at the top you'll notice the file path is exactly the same as our assets folder! that's because literally all you're doing is copying the exact file path so that minecraft can read it!
this means that if your mob has a folder with it's name on it, (for example assets > minecraft > textures > entity > goat) you'd create another folder named goat inside the entity folder YOU created
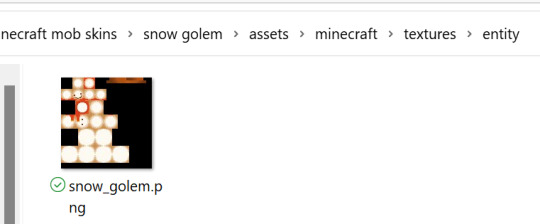
once you've found your mob or mob folder you should see one or multiple .png files.
if you only have one .png file (for example goat.png), then all you're going to do is rename the skin you want to use to goat.png and move it into the entity or mob folder YOU created.
(you can also keep a copy of the skin and keep it in your skins folder).
if you have two or more .png files (for example strider.png, strider_cold and strider_saddle or skeleton.png, stray.png, stray_overlay.png and wither_skeleton.png) then it's very simple.
with the strider example, strider.png would be your default strider when it's in lava. the strider_cold would be when it's on land and as the name implies 'cold', (which gives it a paler complexion). and strider_saddle.png is where a saddle has literally been pixel painted onto it.
if the skin you wanted to use only had one default .png file available yet you want for example the strider_saddle version, then you could open up the skin image in planetminecraft's PMCSkin3D or novaskin (which are both on browser) and to make it yourself!
if the skins resolution isnt too high it shouldn't take long, just search on google images, for example 'minecraft strider saddle' and try to copy it!
on the other hand, the skeleton example shows the different types of skeletons found, with stray_overlay refrencing the armour/apparel it wears.
if you come across a folder like rabbit which has black.png and brown.png etc… then all you have to do is name the skin you want to use as one of those file names, (for example black.png or brown.png), and it will replace that colour rabbit.
once you've renamed your skin to the file or files shown and made sure you've used the correct file path you're 80% done!!!
you can close the zip and back out of entity/your mob name folder till you can see assets, packmcmeta and pack.png
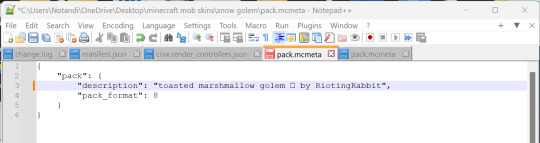
you'll need to download Notepad++ so you can edit the code in pack.mcmeta
once that's downloaded right click on pack.mcmeta and press edit with Notepad++
where it says description in quotation marks, type whatever description you want, (for example, "mossy axolotl by MeNylo"), and make sure pack_format is correct for your version. the pack_format for my version 1.18.2 is 8. it should be correct but just in case!
check here!
now press file and save!
if you'd like the resource pack to have a different icon I'd recommend downloading paint.net
click where it says, Get it now (free download):paint.net 5.0.7or whatever version it says.
now right click pack.png and press open with paint.net
to make a quick icon I use the snipping tool to cut an image of the mob, remove the background with
and paste that image to
where i made the pic cuter.
then going back to pack.png, open it up in paint.net and press on file then open the image you made. this will put it in a new tab which you then press edit and copy onto your pack.png image. make sure to paste into new layer and press keep canvas size!!!
zoom out a little as pack.png is quite small and scale the image you made so it lines up with the pack.png image.
now press save as and save to your skin folder. make sure it's .png!!!, (when it asks you if you want to replace the previous pack.png file say yes).
press OK and it will ask if you want to flatten which you say yes to. and your folder is all done!!!!!!!!!
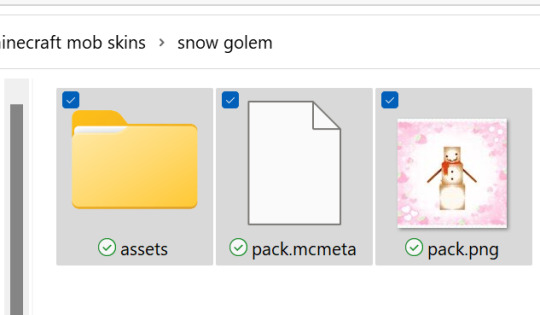
the resource pack now has a custom image.
finally you just highlight all three files, assets, pack.mcmeta, pack.png, right click and press send to compressed zip folder. (i usually name it the name of the skin).
if you can't see the zip option just press show more options and it'll be there. ˶ᵔ ᵕ ᵔ˶
LAST STEP, copy and paste the zip folder into your minecraft resource pack folder (don't unzip) and load up your game!!! now just do the usual, open your game world > esc > options > resource packs and if it worked you should see the resource pack with the description and icon you set. add it and you're all done!<3 if this was helpful please save this for reference ♡

/ᐢ⑅ᐢ\ ♡ ₊˚
꒰ ˶• ༝ •˶꒱ ♡‧₊˚ ♡
./づ~ :¨·.·¨: ₊˚
`·..·‘ ₊˚ ♡ also i use
& for my snow golem/pumpkins
♡‧₊˚🍓
♡‧₊˚🍓thanks for reading!! good luck 🍵 ⋅* ‧₊
#minecraft#modded minecraft#minecraft skin#minecraft java#minecraft mobs#minecraft tutorial#minecraft texture pack#minecraft resource pack#tutorial#guide#cute
21 notes
·
View notes
Text
hey!! as the skin looked weird on planetminecraft I decided to do a lil showcase so u can see how it looks in game! this is a bedrock only hatsune miku skin of the 2nd spring ver miku figure ˖⁺‧₊˚♡˚₊‧⁺˖
you can download it for free here - https://www.planetminecraft.com/skin/hatsune-miku-spring-skin/
I've also included instructions but it's very simple! ( ๑ ˃̵ᴗ˂̵)و ♡
1 note
·
View note
Photo


★ RECOLOR DUMP ★ by magbay
AAAAAAAH after lots and lots of wips share i’m finally releasing these!! now that i have free time i’m sharing these and much more with y’all!! ok, enough talking, it’s already a long post lol + You NEED all the meshes linked or else it looks broken / ALSO new previews inspired by @gigglecoffin
Keep reading
3K notes
·
View notes