
Clover's Cosplay Blog Blog contains Cosplay plans, progress, tutorials, and photos
Don't wanna be here? Send us removal request.
Statistics
We looked inside some of the posts by 888xiicos and here's what we found interesting.
Average Info
Notes Per Post
169
Likes Per Post
121
Reblog Per Post
47
Reply Per Post
1
Time Between Posts
2 months
Number of Posts By Type
Text
12
Last Seen Tumblr Blogs


Fun Fact
Forty percent of Tumblr users are between the ages of 18 to 25.
Text
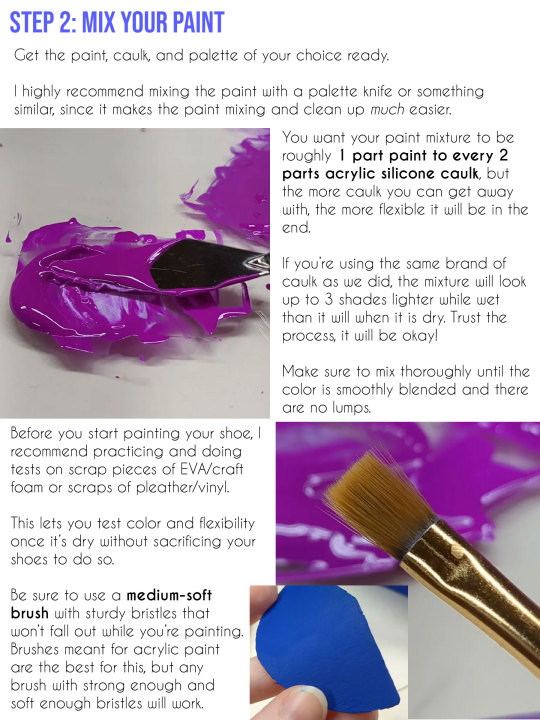
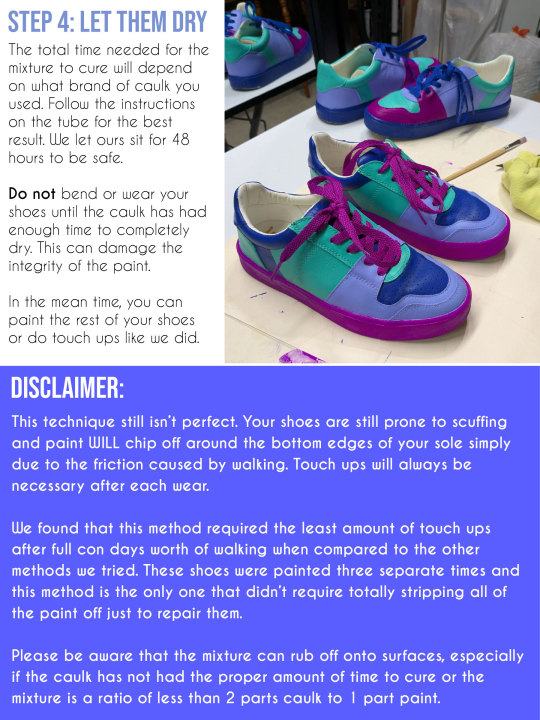
How to Paint Rubber Shoe Soles
Are you a cosplayer? Are you painfully stubborn and tired of every video and tutorial out there about painting shoes telling you not to paint the rubber soles? Me too! So I did it anyway.
Here's a full break down of how I did it complete with suggested materials and pictures!
Apologies to those that use screen readers, Tumblr is NOT letting me add alt text on desktop, so I would greatly appreciate anyone who wants to add an image description in a reblog. I'll try to write one up and add it to the end of this post later, but you are free to beat me to it!


120 notes
·
View notes
Text
Cozmez (Paradox Live) Build Book
This build book won me and my partner the Best in Show title at EvilleCon 2025, so I wanted to share it for other people to easily reference and use as inspiration for their own!
Long post, lots of pages, so beware!


More in depth process posts coming soon!
#Nayuta#Cozmez#Paradox Live#Paradox Live Cosplay#Nayuta Yatonokami#Kanata Yatonokami#Build Book#Cosplay Build Book#buildbook
33 notes
·
View notes
Text
EvilleCon 2025 Recap
This weekend could not have been any more insane.

More thoughts below the cut, but this was truly such an incredible weekend.
Me and my partner had work on Friday and couldn't attend the first day, but made it for Saturday and Sunday. We entered the Cosplay Masquerade in the Novice Craftsmanship category and even arrived late for prejudging because we couldn't find the Con entrance. We left that day with the Best in Show award and certificate. I'm still processing how we managed to win such an award. We're on the far right in the photo below.

Our Cozmez cosplays have been a labor of love, grief and healing that took about 14-15 months to complete due to the passing of four of my family members and multiple illnesses throughout the creation process of these cosplays. We tried to compete three times in these cosplays before EvilleCon, but had to withdraw due to a new emergency happening the week before every single con we applied to the contest for causing me to repeatedly pause working on these builds.
Each time we had to withdraw from a competition due to not finishing our cosplays plunged me deeper and deeper into an awful mental space that was already in tatters due to the traumatizing year I had.
Within twenty-four hours of the EvilleCon Cosplay Masquerade, we had four moments where we thought we weren't going to be able to compete.
Since we don't live together, I wasn't able to test fit my Partner's pants, the waistband did not fit them at 11pm the night before the con. I stayed awake until 5am that morning making the repairs. We got out of bed to get ready at 6am.
My partner had left our printed build book at their work desk, which we had to pick up before our pre-judging slot.
We arrived at the prejudging booth late because we couldn't find the door, and without our shoes on because we were afraid to scuff the paint on the way in.
When it was time to line up in the room the Cosplay Masquerade was held in, we didn't have the orange stickers on our badges that served as our proof of being a contestant. The kind staff at the cosplay booth couldn't find our names.
Despite all of that, we were able to walk across the stage and then step onto it a second time to receive the highest honor of the night.
I can't think of a better reward for making it through to the end of this build despite all the set backs that occurred, the frustration I felt, the blood, sweat and tears that were spilled in the process. It feels like it was all worth it and my efforts were seen and appreciated. I feel like I was given the closure I so desperately needed for everything I went through when the only thing holding me together was this build.

I can't believe this was given to me.

The entire time the judges were hyping up the best in show winner, me and my partner were discussing how we needed to approach this group for tips on how WE could improve for next time. And then our cosplay names were called? And I started sobbing, my partner screamed at the top of their lungs. I was crying the entire time I was on stage.
The judges for this competition were some of the sweetest and most excited I have seen in a while. I am so thankful for their feedback, their compliments, their encouragement and support.
We were told that our build book was one of the best they had ever seen. It told them everything they needed to know about our characters, answered every question they had about our process, and even provided a digital download link in the form of a QR code I added just in case. They told me they were going to steal that idea from me for their own build books. I can't think of a higher compliment.
Thank you so much to SorasStyle, Cosplay_Cam, RivalSkies, and ScissorWizardCos for this opportunity and all of your hard work and passion.
Thank you EvilleCon for the opportunity and the award. I couldn't stop crying for the rest of that night. I'm so honored and thankful.
Got to walk around on Sunday with my build book in tow in my new lolita coord I've been dying to wear for months. Ended the day filled with so much love and so many little girls begging for a picture with me in this coord. I haven't been this happy in so long. I'm so thankful and feel rejuvenated.

I'll have more photos of the finished cosplays coming soon! I'll also be sharing our build book and a couple tutorial write up posts about the process, so please stay tuned for them!
2 notes
·
View notes
Text
Teeny Tiny Update:
Main points:
Updated Cosplans post for Evillecon (formerly Anime Crossroads cosplan)
Write up on how I painted the shoes for my Nayuta Yatonokami Cosplay and tips for painting rubber shoe soles
Cosplan post for Otakon 2025 (Started ordering supplies for one of my cosplans, so I want to try and document my process as I go for this one)
1 note
·
View note
Text

Clover's Anime Crossroads Evillecon 2025 Cosplans
(pretend the graphic says Evillecon, there's been a change of plans)
Friday: Zacharie (Fan Design)
Franchise: OFF (game) Complexity: Simple Project Tag Change of plans, won't be there Friday, unfortunately!
Saturday: Nayuta Yatonokami (Default Outfit)
Franchise: Paradox Live Complexity: Moderate Purpose: Competition Project Tag
Sunday: Casual/Lolita Coord
Franchise: None Complexity: Moderate Project Tag
I already have pieces for Zacharie since I've been planning cosplaying him for ... wow. Well over 10 years. Thankfully all that needs to be made is his mask and any props I want to have.
Me and my partner weren't able to compete in Cozmez at either of the cons we'd planned to compete at in 2024, so this is our redemption arc. I'll probably post our build book after the con, so stay tuned! I also want to write up a tutorial for how we painted our shoes.
If you are also attending the con and see me on Friday or Saturday, I may have freebies to hand out (if I have the time before hand to get them done). Feel free to say hi!
#Cosplans#Zacharie#OFF (game)#OFF Cosplay#Nayuta#Nayuta Yatonokami#Paradox Live#Paradox Live Cosplay#Cozmez#Evillecon 2025
2 notes
·
View notes
Text
Wigs for Nayuta (and my partner's Kanata cosplay) have been purchased!


The Wig for Nayuta is Epic Cosplay's Chronos in Ice Purple, and Katat will be made up of Epic Cosplay's Theia in Ice Purple and a ponytail clip I'll be straightening and cannibalizing for wefts in Mint Green.
I'll write up a styling process post for both, much like I did for Tomimi. Any part of the process not photographed will have a drawn up diagram to explain the steps.
Fabric and supplies for the jackets have been purchased as well as leather paint for the shoes (even though I'm still searching for shoes to modify..). Saved almost $70 thanks to Memorial Day sales, so yippee!
Hoping to debut this cosplay at Otakon 2024, but I'll be wearing it again for Popcon Louisville 2024. If you attend either con and see me, please feel free to say hi!
0 notes
Text
Tomimi Ideal City Wig Process

As usual, I forgot to document most of this process, but I can at least draw out steps I didn't photograph.
This is probably one of the more complex wigs I've styled, tying for first place with Tsumiki Mikan, solely for the amount of wefts and chopping that wig took. This wig is the first wig I've used pigtail/ponytail clips for and the first time I've done an ahoge! I'm incredibly proud of how it turned out so I can't wait to show how it started and pieces of the progress.
This has been in my drafts for almost a year now, so I may as well post it.
Pics, process, and final photo can all be found under the cut!
The humble beginnings..
I grabbed the basic supplies I figured I'd need and laid them out in easy to reach places.
[Supplies in image: Sewing thread, pin cushion, sewing needles, sewing pins with colorful round heads, wide tooth/wet hair comb, 1 hair claw clip, craft scissors, thread snips, pen, reference images, wig(s), Styrofoam head.]

[Supplies not shown in image: Hair cutting scissors, Got2B hairspray, hair crimper/flat iron, 2 smaller hair claw clips, 3 alligator hair clips, , permanent marker, wire, clear packing tape, glue gun, Elmer's glue (white craft glue), and a make shift wig stand]
_
To start, I ordered one Clair Classic in Silver (CL082) and a single Short Clip Classic in Silver (CL-082) from Arda Wigs. The Silver colorway is a little more gray and subdued than the Pure White (CL-083) color way. I like it because it looks a bit more natural. Stark white and heavily saturated colors wash me out pretty bad, so I try to go for a more natural color option whenever possible.

I chose this specific wig because it had plenty of hair and plenty of layers near the front, which meant I had plenty to work with for Tomimi's bangs.
Arda Wigs, though a little pricey, has really thick wigs that feel like butter in your hands. I've worked with cheap Amazon wigs and other brands before, but Arda is still my favorite wig seller (even if it's by process of elimination since Match Wigs vanished into the void never to be seen again..... Match Wigs I miss you.....).
Because the wigs are so thick and have so many wefts, I knew I'd only need one Short Clip to use for both of Tomimi's pigtails. However, this is my first time using any form of wig clip, so it was a very new and puzzling experience for me! I'll explain more about wig clips further into the process below.
_
When I start styling wigs, the first step is always to give it a good brush through with the wide tooth come to detangle it and get out any loose hair fibers. Once it's soft and tangle free, I strap it onto my foam head and pin it with colorful sewing pens that are impossible to lose in the wig (so I don't stab myself with them later on).
These styrofoam heads are usually smaller than an actual human head, so I don't recommend doing any head circumference reliant styling on them without adding padding to it! I mostly use mine when brushing it out, cutting the long parts of the wig, or fixing the part.
For this wig, I decided to try crimping for the first time. Arda wigs are great for crimping and the technique adds even more volume and makes the fibers more manageable in my opinion. Arda wig fibers are super silky and soft, so it makes holding them or maneuvering them sort of difficult. Crimping gave them more texture and allowed me to move the hair where I wanted it to go.
I crimped the bottom layers of the whole wig (bangs too!) and left the top layers un-crimped to retain a nice smooth texture on top.
Now, it's time to start trimming. Before I even thought about doing any cutting, I sat down and figured out the different sections of hair that make up the bangs. For anyone not familiar with sectioning off hair, drawing over the sections in different colors like this can really help!

Marking out the sections also helped me figure out where the part would go! Tomimi has one layer of a heavy sweeping bang and then a layer of hair that sort of fold over on top of them. One section of the lower layer actually tucks behind her ear, so I planned to leave that longer so I could easily pin it back under another layer of hair.
I also took this time to section off parts of her hair to pull back under the pigtail clips layer to make it look more natural. I've drawn over it in bright pink below to show what I mean.

Once things were held back with clips and sectioned off, I pulled that bad boy off the stand and put it on so I could start trimming the bangs. I did not realize they were as long as they were, but it was for the best in case I messed up. I gave a rough chop at around the bottom of my chin and slowly trimmed the lower bang layer up above my nose. I curled the hair with my flat iron as I went too avoid cutting off too much.
Sloppy before and after pic featuring the tendons in my bony little hand STRUGGLING to hold up this heavy monster of a wig. I admit, I'm not too skilled with teasing wigs, so I wasn't able to get the upper layer of the bangs to stick up like they do in the art, but I left the fibers loose enough that I could go back later and do it once I learned the Technique™. Silly anime hair vents will one day be possible for me.

As you can see, this wig is all silver, no black anywhere. I used the simplest method out there and flat out just added that black stripe with a permanent marker. Since it was in an area I didn't have to worry about coming in contact with my face or any bodily fluids like sweat, I did not seal it. If you use this method anywhere that may come in regular and frequent contact with your skin, fabric, or liquids, seal it or just use a weft to avoid staining anything.
I sectioned off a thin strip of hair from the upper layer of the bangs and pinned the rest of the hair back so the roots were visible. Then I just moved the marker up and down over thin layers of the hair until it was a solid black. You can also use alcohol markers, diluted acrylic paint, or acrylic ink for this, but a Sharpie easily does the trick for a section as small as this.

_
Now it's ahoge time. Here's how I did it (Step by step diagram is under written instructions):
Step 1 This wig has a thick but soft top to it that allows things to be pinned or pushed through the top, so I used some thin jewelry wire to make the outline of the ahoge. Twist the bottom closed and curve it to the right shape. Don't trim off the excess wire at the bottom just yet, because you'll want it for stabilizing purposes later.
Step 2 Once you've made the outline and have it bent, you'll want to cover it in something clear you can attach hair to. I used clear packing tape, but it was honestly a little too stiff and sort of fussy to work with. You can probably use regular clear tape or even sticky plastic wrap. Whatever you use, be sure to trim the excess so you retain the same shape.
Step 3 Cover one side with hot glue and start adding your base layer of hair. I used the extra hair I trimmed off my bangs. They were closer to the length I needed and let me waste less hair! Once the first side is dry, do the same to the other. The hot glue sticks to plastic-y surfaces well enough to give you a base to build up off of. Be sure to pull/brush off any stray hairs.
Once you've finished your base layer, grab your white craft glue, a cup of water, and a brush you don't cherish too much to put glue on. What you're gonna do now is slowly build up the hair until you can't see the tape or the wire. The best way to do this is to put a thin coat of glue then a thin coat of hair and repeat until you get the result you like. Between layers, I recommend blasting it with a hair dryer to speed up the drying process. I sat mine a safe distance away in front of a small space heater while I worked on the pigtails to save time.
Step 4 Once you've built up as much hair as you want, it's time to stick the extra wire through the top of the wig. I stuck mine right into the middle of the center part. If your wig does not have a thick top or a skin top, you may want to sew in a thin piece of fabric to the inside of your wig before you do this step.
Step 5 Once you've stabbed your wire through the top of the wig, it's time to bend it! I like to make a little three-leaf clover shape since it's easy to tuck the ends of the wire back into the lace/fabric on the inside of the wig so it doesn't stab you while wearing it. I bend it to stat one leaf is pointing toward my forehead and the other two are pointing towards the back of my head.
To add extra stability, add a couple stitches at the very tips of the "leaves" with thread that matches your wig.

Here's the few pictures I remembered to take of this little guy, plus a bonus of him drying in front of the heater, just for fun.


_
At this point, all that's left to do is curling the long part of the hair and adding the pigtails.
For anyone unfamiliar with wig clips, they're basically mini wigs wrapped around hair claw clips. The "claws" of the clips go through netting the wig wefts are attached to and then an elastic string sewn into the outer edge of that netting is tightened to hide the clip. I was dumb and did not take a pic of the pigtail before removing the clip b because it was a struggle to get it out. But I have pics of the finished versions below with the clip's inserted, so check further down for what it looks like finished.
For now, here's how I separated the pigtail into two:
First, I counted the wefts to ensure I'd have an even number in both halves (Spoiler alert, I counted right, but still marked and cut the wrong spot lmao). I decided to cut it horizontally (side to side) so the wefts wouldn't fray. From there, I pulled the elastic through so that I could find the middle of it and place it over where I marked the halfway point of the netting. I cut through the elastic strings first and clipped them out of the way before carefully cutting the netting.
I used my thread snips to cut the net since it allows for more precise cuts and helps me not make so many mistakes. The picture below shows the cut elastics and then the two separated halves.
What you can't see here, is that the bottom half of the pigtail's wefts were sewn the same direction as the top half, but I need to flip the bottom half upside down, meaning the hair is going up instead of down. For this reason, I wouldn't suggest this method, but also don't have a better one. Just know I struggled to get it looking close to the other one with lots of time spent flat ironing individual wefts and adding wefts.

I ended up folding over the bottom wefts to add to the tube the elastic was fed through around the edge of the netting so it would hold more tightly to the clip once I put them back in. I had two smaller clips from a long time ago I that fit perfectly into these smaller pigtails!
This is how they looked after I finished them:

_
Now for the long part of the wig! All I'm going to do for this part is gently curl the ends inward. For this, I combed through in small sections and curled it with the flat iron. Because the wig fibers are plastic, they only hold their shape if they are in the desired shape when the plastic cools after being heated. Think of it like heating metal until it's flexible and it keeping the shape once it's cool.
To do this, I put the wig back on the head and attached it to my makeshift wig stand (I used a wreath stand you can buy in the floral section of a craft store because it's the best thing I had on hand, I don't recommend this, it's so wobbly...).

_
The last step is to attach the pigtails!
I didn't photograph my progress, so please accept my diagram instead!

I didn't trim the part I pulled back simply out of fear of it coming undone and being unable to clip the pigtails back. Not shown here, but I used a thick weaving needle I've had for years to thread the black ribbon through the pigtails as the final touch.
_
Aaaaaaaand here's the finished wig!

I'm super happy with how it turned out and can't wait to wear it. If I don't get good pics of me in this cosplay during the next con I wear it to I will cry.
9 notes
·
View notes
Text

Clover's 2024 Con Season Cosplans
Tomimi (Ideal City NPC Version)
Franchise: Arknights Complexity: Simple/Moderate Event: TBD Project Tag
Young Couple (Omega Ruby & Alpha Sapphire)
Franchise: Pokemon Complexity: Simple Event: TBD Project Tag
Nayuta Yatonokami (Cozmez)
Franchise: Paradox Live Complexity: Moderate Event: Otakon 2024, Popcon Louisville 2024 Project Tag
Tomimi was about 75% done by Summer 2023 for Louisville Popcon, but I didn't have time to make the tail or her armband. So that will be done in time for Summer con season this year! Wig tutorial/rundown post coming soon, I just hit the image and word limit in my original attempt at the post and have to rethink how I go about it. Might need to make multiple parts.... But please look forward to Tomimi wig posting soon!
Young Couple is going to be a comfy cosplay for me and my partner on days we don't feel like dressing up completely, so I'm excited for that one. I'll include a template for the Luvdisc design here once it's done for anyone else who wants to make this cosplay!
Nayuta is possibly going to be a competition cosplay and I'll be making as much by hand as possible. I'll even be painting shoes for the first time! Hope to thoroughly document the process and make a build book for it, which I will post here once completed along with tutorials and process posts. I've also got a surprise alternate of this cosplay planned... gonna say Two Crowns as a small hint.
Happy New Year!
#Cosplans#Tomimi Ideal City#Arknights#Arknights Cosplay#Young Couple#Pokemon#Pokemon Cosplay#Nayuta#Nayuta Yatonokami#Paradox Live#Paradox Live Cosplay#Cozmez
0 notes
Text

Tomimi Cosplan
Layers have been broken down and materials have been decided.
Wig has been delivered and needs styling.
2 notes
·
View notes
Text

Clover's 2023 Con Season Cosplans
Tomimi (Ideal City NPC Version)
Franchise: Arknights Complexity: Simple/Moderate Event: Popcon Louisville 2023 Project Tag
Domma (NPC)
Franchise: Arknights Complexity: Moderate Event: TBD Project Tag
First cosplans since I last cosplayed in 2015! Let's gooooo!
I'll be recording my planning, progress, and finished photos of these using the designated tags for each project linked above. Hope you enjoy the journey with me!
0 notes
Text
Mobile Navigation
Content Tags:
Cosplay Plans - #Cosplans
Cosplay Progress - #Cosprogress
Cosplay Tutorial - #Costutorial
Cosplay Photos - #Cosphotos
Project Tags: All projects are tagged by character name, outfit (if it’s not the default), and franchise. For updates on each project, use the links below to be taken to the project tags.
Completed Projects:
Rui Ninomiya (Gatchaman Crowds)
Tsumiki Mikan (Super Danganronpa 2)
Current Projects:
Nayuta Yatonokami (Paradox Live)
Young Couple (Pokemon Omega Ruby & Alpha Sapphire)
Tomimi Ideal City NPC Outfit (Arknights)
Mitsuba Sousuke Chara Shop Collab Art (Toilet Bound Hanako-Kun)
Tentative Projects:
Domma (Arknights)
Zacharie Fan Design (OFF)
Mitsuba Sousuke School Mystery Number Three (Toilet Bound Hanako-Kun)
Tomimi E1 Outfit (Arknights)
Ebenholz E1 Outfit (Arknights)
Asbestos E1 Outfit (Arknights)
Sucrose (Genshin Impact)
Penance Ambience Synesthesia 2023 Outfit (Arknights)
Hardgore Alice (Magical Girl Raising Project)
Apollo (Olympos)
Gumi Megpoid Luvorrrrratory Outift (Vocaloid)
Cheshire (Pandora Hearts)
0 notes
Text
Pinned Post
Info
Clover | 28 | they/them Fanartist, Zine Formatter, and Hobbyist Cosplayer
(Follows from @antilogist)
Links
Other Blogs: Art Blog
Socials: Bluesky - Instagram
Shop: RedBubble - Itch.io
Navigation: Mobile Navigation - Desktop Navigation
⊘ NO NFT, REPOST, or AI ⊘
Do not use my works for role play accounts, face claims, AI learning, NFTs, unauthorized commercial use or even for inspiration for your own works (without explicitly communicating with me and getting my permission first).
0 notes