¿Los algoritmos te llevaron hasta aquí? Siéntate y vive la experiencia de ver cosas fresas, pasteles, flores y un mix de pendejitas que disfruto. Suelo rebloguear herramientas de edición (photoshop, illustrator), tablillas rpg, posteo mis creaciones, y tengo como hobby escribir un tantito. Buenas vibras desde este pequeño espacio ʚĭɞೃ
Don't wanna be here? Send us removal request.
Statistics
We looked inside some of the posts by aautumnfalling and here's what we found interesting.
Average Info
Notes Per Post
2K
Likes Per Post
1K
Reblog Per Post
526
Reply Per Post
7
Time Between Posts
6 days
Number of Posts By Type
Text
17
Last Seen Tumblr Blogs


Fun Fact
Users from the US are the majority of Tumblr visitors.
Text


Codember2024 - Cradle
Buenas a todos, para este desafío del codember2024 organizado por @elalmacen-rp he creado un set de fichas que permite el cambio de todos los colores a gusto, además de tener modo dependiendo la orientación que se desee para los elementos.
Ninguno de los gifs utilizados es de mi autoría.
Os dejo los códigos comentados con notas para mejor edición, agradezco like/reblog si van a utilizar los mismos.
Ante cualquier duda, mis ask están abiertos.
Código + Live Preview
48 notes
·
View notes
Text


Este código está inspirado en la funcionalidad del diario con contraseña y en el tutorial contraseñas en tablillas del usuario Eine Krone en el foro Dixinmortal.
✦ Uso libre. ✦ No retirar créditos, ni usar como base para otro código. ✦ Si desean preguntar sobre cómo está hecho con mucho gusto los puedo guiar, con una pequeña mención en sus futuros diseños.
✦ Código Chat Mensajería con contraseña. ✦ Medidas 350 x 600. ✦ Las imágenes se redimensionan. ✦ Iconos de Fontawesome editables. ✦ La contraseña se encuentra en: pattern=“1234” solo deben cambiar el “1234” si la contraseña es correcta saldrá el borde verde, si es incorrecta será rojo. ✦ Si van a usar el código en el mismo post deben buscar en el código el input con el id="check" y los dos label con el for="check" y cambiar la palabra check por cada código (la misma palabra) así funcionaran de forma independiente. ✦ La caja de chat tiene scroll, puedes agregar cuanta conversación quieran y para que se diferencien deben cambiar su clase:
Uno: Burbuja Izquierda.
Dos: Burbuja derecha.
✦ Tiene Siete variables:
–accent1: Color blanco.
–accent2: Color medio.
–accent3: Color claro.
–accent4: Color oscuro.
–trnsp: Transparencia, ideal rgba (dejo por aquí el conversor de hex a rgba)
–ico-fond: Icono fondo inferior.
–ico-prin: Icono superior entre las dos imágenes.
✦ Si necesitan ayuda para usarlo con mucho gusto les puedo ayudar.
✦ Físico: Columbina | Genshin Impact. ✦ Cualquier duda, pregunta, sugerencia estoy a un ask de distancia. ✦ Disponible para crear todas sus ideas y volverás realidad; ¡Comisiones abiertas! ¡Pregúntame!
✦ Si te gusta mi trabajo el like y reblog me ayudan a crecer.
[Code] @elalmacen-rp XOX Luxury Poison
49 notes
·
View notes
Text


✦ Uso libre. ✦ No retirar créditos, ni usar como base para otro código. ✦ Si desean preguntar sobre cómo está hecho con mucho gusto los puedo guiar, con una pequeña mención en sus futuros diseños.
✦ Códigos para post rol. ✦ Medidas 400x650 ✦ Las imágenes se redimensionan. ✦ Icono de fontawesome editable. ✦ El texto tiene scroll automático. ✦ Tiene cuatro variables:
–accent1: color de la letra.
–accent2: color claro.
–accent3: color oscuro.
–bckgrnd1: color de fondo.
✦ Personaje: Shorekeeper | Wuthering Waves ✦ Cualquier duda, pregunta, sugerencia estoy a un ask de distancia. ✦ Disponible para crear todas sus ideas y volverás realidad; ¡Comisiones abiertas! ¡Pregúntame!
✦ Si te gusta mi trabajo el like y reblog me ayudan a crecer.
[Code]
@elalmacen-rp
XOX Luxury Poison
39 notes
·
View notes
Text

Codember 2024: Fragments of Sappho
Bueno, pues al final me animé a participar este año en el codember, no sé si llegaré a hacer todos los prompts pero voy a intentarlo. Para el primero, como voy un poco tarde y además tenía ganas de una firma, pues me salió algo sencillito pero me inspiró el hecho de ponerle varias partes (fragmentos) y que no sea solo la imagen.
Características:
El color de acento y letra se puede cambiar en la variables --fragaccent1, --fragaccent2, --fragb.
La imagen se redimensiona a la firma.
El tamaño de la firma es de 400x200px.
Reglas:
No quitar los créditos.
Prohibido copiar/redistribuir o reclamar como propio. Se puede usar como guía o base para otro código, siempre y cuando se respeten los créditos.
Like/reblog si vas a utilizarlo.
Créditos:
Imagen de @memorycardviii
Gracias a @necromancercoding por sus códigos de efectos básicos de hover (me estaba liando yo sola y me salvaste la vida).
Prompt 01 del codember 2024 organizado por @elalmacen-rp
Espero que os guste 💕
62 notes
·
View notes
Text

17. take my hand.
— don’t repost or claim as your own.
— add or delete layers if necessary.
— please like or reblog this post if you download.
— this psd contains ’color lookup’ and will work better in photoshop cc.
48 notes
·
View notes
Text

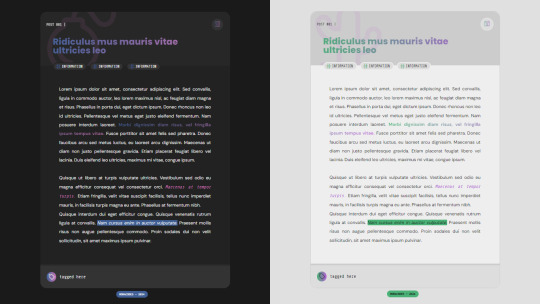
Codember2024 - Whisper
Buenas a todos, para este challenge del codember2024 organizado por @elalmacen-rp e inspirándome en los susurros, he creado este código para que los administradores puedan publicar las noticias del foro por sus tramas o novedades de los personajes.
El mismo cuenta con tres partes de código: el CSS, el JS (el cual cuenta las páginas e indica la página actual y además permite el cambio de página) y el HTML (donde se encuentra toda la información).
Dentro del HTML encontrarán mucha información, pero lo más importante es que cada sección es una página y cada artículo hace referencia a las notas que se ven en el html.
Os dejo los códigos comentados con notas para mejor edición, agradezco like/reblog si van a utilizar los mismos.
Ante cualquier duda, mis ask están abiertos.
Códigos
Nota: en codepen no se puede apreciar el cambio de página, además de que he agregado los iconos de flaticons en vez de los de fontawesome.
97 notes
·
View notes


Text

Welcome new adventure
Esta es una de mis primeras tablillas (fuera de pack) destinadas a fichas/expediente. Fue hecha con los típicos campos usados normalmente
Como todos mis otros códigos, el paquete tiene una versión clara y otra oscura, así como variables fáciles de cambiar para tamaños y colores.
Para su uso, respete las normas…
No elimine los créditos;
No utilizar como base para otras tablillas;
Si tiene alguna pregunta, póngase en contacto a través de DM o discord;
Recuerda compartir y dar like;
Encuentre los códigos aquí.
@elalmacen-rp
72 notes
·
View notes
Text


Ficha Personaje del CC de @dixinmortal Imagen de fondo del banner de Dixinmortal.
✦ Uso libre. ✦ No retirar créditos, ni usar como base para otro código. ✦ Si desean preguntar sobre cómo está hecho con mucho gusto los puedo guiar, con una pequeña mención en sus futuros diseños.
✦ Código para Ficha de personaje. ✦ Medidas 750x750 ✦ Las imagenes se redimensionan. ✦ Iconos de Saturnicons completamente editables. ✦ Texto de frase y contenido de pestañas se acomoda según lo extenso, el de las pestañas contiene scroll automático. ✦ Cinco variables:
--accent: Color blanco (letra, iconos chequeados, titulo, scroll)
--accent2: Color claro (Fondo y creditos)
--accent3: Color medio (degradado de imagen grande, sombra del título y fondo de contenido)
--accent4: Color oscuro (Fondo de datos, frase, contenido y borde de imágenes)
--ico: Icono decorativo inferior de la frase.
✦ Personaje: Mavuika | Genshin Impact ✦ Cualquier duda, pregunta, sugerencia estoy a un ask de distancia. ✦ Disponible para crear todas sus ideas y volverás realidad.
✦ Si te gusta mi trabajo el like y reblog me ayudan a crecer.
[Code]
@elalmacen-rp
XOX Luxury Poison
49 notes
·
View notes
Text
Subtly gradient
Atención, atención, el coder está loca! ¡Una tablilla nueva cada día! Os traigo otro post, pero esta vez apuesto por la belleza de las "curvas" Ésta también tiene una versión clara/oscura y un mecanismo variable que facilita el cambio de colores y tamaños.
Para su uso, respete las normas…
No elimine los créditos;
No utilizar como base para otras tablillas;
Si tiene alguna pregunta, póngase en contacto a través de DM o discord;
Recuerda compartir y dar like;
Encuentre los códigos aquí.
@elalmacen-rp
58 notes
·
View notes
Text

Light and shadows
Siguiendo con nuestro enfoque "minimalista" de las tablillas, hoy tengo el placer de traerte otra bonita de post. Ésta también tiene una versión clara/oscura y un mecanismo variable que facilita el cambio de colores y tamaños.
Para su uso, respete las normas…
No elimine los créditos;
No utilizar como base para otras tablillas;
Si tiene alguna pregunta, póngase en contacto a través de DM o discord;
Recuerda compartir y dar like;
Encuentre los códigos aquí.
@elalmacen-rp
52 notes
·
View notes
Text
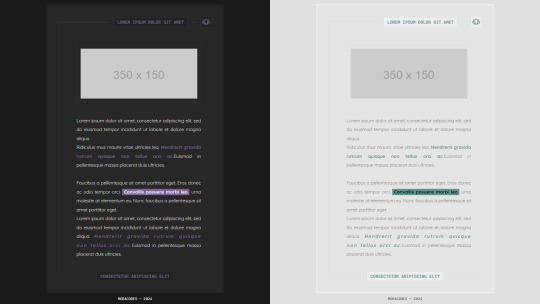
The least is more
Hoy os traigo una tablilla de post minimalista. Tiene dos versiones (claro/oscuro) y se puede usar con imagen o sin ella. Puede cambiar fácilmente los colores modificando las variables, así como la anchura y el tamaño de las fuentes
Para su uso, respete las normas…
No elimine los créditos;
No utilizar como base para otras tablillas;
Si tiene alguna pregunta, póngase en contacto a través de DM o discord;
Recuerda compartir y dar like;
Encuentre los códigos aquí.
@elalmacen-rp
71 notes
·
View notes
Text

[Firma] Playlist
Creatated by: Balam.
Link Pastebin: Link.
Prohibido retirar los créditos, no estorban y ni se notan (?).
Un favorito y/o un retweet nos ayuda.
Firma hecha para el reto de Dix Inmortal "El Gran Reto de Códigos".
Es una firma sumamente sencilla con colores modificables.
La imagen se modifican al tamaño elegido, automáticamente.
Fuente principal: Dalmais & Share Tech Mono.
Iconos de Remix Icon.
Cualquier duda no tengan miedo de mandar un ask con Hermes que ya no está de vacaciones, juramos encerrar a Cerberus en su respectiva casita para que no les muerda.
--r0y: color predominante en los degradados (principal arriba y cuadros abajo), color de los bordes y del link. --r0x: color texto, íconos y degradado bajo principal. --r0vv: fondo íconos y degradado superior cuadros texto.
Los colores se pueden usar en forma hexadecimal o rgba sin problema.
Otra firma sencilla, pensada como algo lindo para los "Idols" ya que parece un cambio de canción o álbum en 3D (esa era mi idea).
¡Nos vemos para el siguiente código!
.
@elalmacen-rp
18 notes
·
View notes
Text
ANGELIC PSD COLORING by @loviestudio
This coloring was made in Photoshop CC, and it will work better on it!
CONTENT
1 Photoshop file (PSD) with the coloring.
TERMS
Like and/or reblog to help a creator.
Don’t repost, re-upload or put it on packs and/or google drive. Don’t claim my resources as your own.
Don’t use my resources as a base or copy them.
Credits are not mandatory, although I’d love to see your edits!
My resources are free for personal/non-commercial use only. For commercial use, you must pay for the download. If you paid for the download, you are authorized to use it commercially. Reach out to me for more info or if you have questions about my resources license.
Follow me for more resources! ♡
This is a free resource, but you can buy it with points on DeviantArt to help out a creator or download it for free on Ko-Fi. Thank you!
I don’t own any of the pictures used to make the preview and I have no intention to violate the copyright rules. If any picture in the preview belongs to you and you want me to remove it, please, contact me!
158 notes
·
View notes
Text
(158. charlene).psd coloring made by harupsds ©
This effect was made by me in photoshop cc and it works better on it. Before downloading read all the rules and follow them, be honest. Don't forget to leave your feedback or suggestion.
Like or reblog if you download and follow me for more content.
Don’t repost, reupload or put on pack/google drive.
Don’t claim as your own.
Don’t recreate, use as base or steal layers.
Adjust the layers or add new ones if needed.
Give me credit if you use it.
Free for personal/non-commercial use. For commercial use pay the download.
Before/After.
▸ Download: deviantart.
This is our work done with effort and time spent. Please do not copy do not violate, and do not sell it as if it were yours. The Preview was made by me, being my own. Please, if your photo is here, talk to me. It is not my intention to violate the copyright rules.
57 notes
·
View notes
Text

Please like or reblog if you use
Do not repost
Download
469 notes
·
View notes
Text
i always get questions when i do a split gifset, and it's a deceptively simple process so i thought i'd try to show how i do it! i don't know if these types of gifsets have a more universally recognized name, but that's what i call them so that's what i'm going with.
i'm going to write this assuming you have a solid familiarity with photoshop and making gifs, but please feel free to send me an ask if anything is unclear. i use video timeline/smart objects so will be showing that (here's a great general tutorial on giffing with timeline). i will also be talking A LOT about gif dimensions, so first let's briefly go over the limits and theory a little bit.
a 1 column gifset can accommodate gifs 540 pixels wide
2 columns = 268 pixels each with a 4 pixel gutter between
3 columns = 177, 178, 177 pixels with 4 pixel gutters
i'm mostly going to talk about 2 column split gifs here (what i will refer to as 2x1 from now on - 2 across and 1 high), but the process is the same for 3 column (3x1) and so on (1x2, 2x2, etc).
so, why would you even want to make a gifset like this? i mean, let’s face it, generally, bigger is better for gifs on tumblr, and there are obvious incentives to 540 width gifs over 268 or 177/8 width, especially since the upload limit went to 10MB. but even 10MB isn’t much when you’re talking about high quality footage. gif making is a constant balance between quality (whatever that means to you: frame dimensions, sharpening, coloring, etc) and file size. split gifs are a cheat to that limitation >:)
i personally believe an untapped frontier of tumblr gifmaking is playing with dimensions and time. that sentence makes me sound like an old-timey sci-fi villain, but you get the idea: gifmaking is an art and there are many fun and interesting ways of exploring the medium. you can do a lot with 268 pixels! longer frame loops to gif longer scenes unbroken, bolder coloring on a wide shot you don’t want to pare down. and, a shorter x axis means the y axis’s bang goes a lot further on a buck. also just if you have a 2 column set but only 5 gifs so you need to make one take up 2 slots. there's a lot of reasons but the most important one is it's fun :) here are some examples of other split gifs i've made: x, x, x
this isn't so much a limitation, more of a shift in how you think about gifs, but it's important to remember that each gif should ideally be doing something still. when making split gifs, it’s easy to pick a wide scene without thinking about how it’ll be split down the middle, and then you’re left with a lot of something on one side and a lot of incongruous nothing on the other - or you're left with a person cut in half awkwardly in the middle. so while a split gif can still be a whole scene, you shouldn’t ignore the break and what it means to the bigger picture. now this is personal preference, but i like to play with the break and make it a part of the gifset. mirrored movement, subjects trapped on either side but still talking to each other, a bird flying from one side to the other. fun with frames! it can be another way of drawing attention to specific images/moments/feelings happening within the same shot.
SIMPLE SPLIT GIFS
to more narrowly define what i’m calling “simple split gifs,” it’s one set of frames split down the middle into two separate gifs that are meant to play concurrently, side by side.
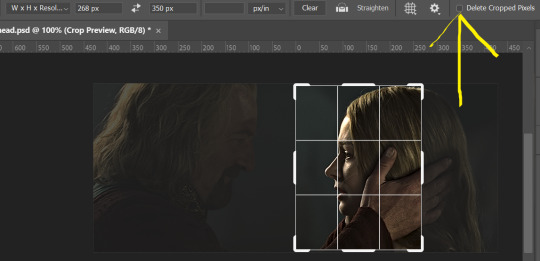
first thing's first, crop your gif and uncheck delete cropped pixels if it is not already (very important). i'm cropping it to the 1x1 size, in this case 268x350. if you need to see how the full size will look, you can try it out with 536 first. but this one is pretty easy, this is the exact center of the frame (the left boundary of this crop is the center line) and both their heads fit within their respective 1x1 crop.
then color as you normally would. if your scene is very different one side to the other, it might be easier for you to color on a wider crop and then either crop again or copy paste your coloring to the smaller crop version. i do that with the 2x6s, but it's usually not that big a deal to color the 2x1s with just the small crop on your canvas at the time. this scene is very symmetrical, both in movement and colors, so i'm good.
now the fun part! once you've got one side how you want it, save/export as you normally would. at this point i also like to make a mental note of how many frames there are.

so i have 49 frames and it's still only ~3MB! this is just an example that i picked from my rotk fancy set, otherwise i probably would have made this gif longer.
then onto the other side, so i ctrl + z my way back to my smart object video timeline. to get to theoden i just drag and drop the smart object 268 pixels over. since this one is in the exact center of the image, it even helpfully guides me (this can get annoying if you are NOT giffing the center of the image fyi, but you can always manually go pixel by pixel too if you need to with your <- -> keyboard buttons. just always remember where you started and count accurately). i can never move around my smart object without hiding the adjustment layers on top of it, so you'll see me do that in this screen recording.
see how it corrected me when i dragged it a few pixels down by accident, and with all those pink guidelines? sometimes photoshop is good 😌
then make sure you still like the coloring, adjust whatever needs to be adjusted, but watch out! don't make any major changes because it still has to match the other side. and export again.

what we perceive as 1 series of frames chopped down the middle is just 2 separate gifs with the same frame rate. when tumblr loads the images, it will run concurrently in the post (even though it never does in the draft post 🙄). and that's it!
COMPLEX SPLIT GIFS
again i'm making up terms, but i call anything with more than 2 components a complex split gifset. i've tweaked some things in the process as i went along, but this is generally how i did the lotr series. these sets are basically just many split gifs with transitions. and here's where endurance becomes a factor :) there's a lot of prep done blind. but if set up well, it will be fairly easy to pull together by the end.
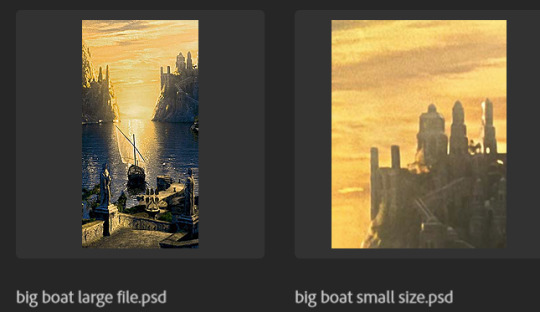
first i decide on my dimensions, using my upper bounds to determine how big i'm going to go. since lotr has very nice large file sizes, i can go pretty big without sacrificing much in quality. i decided on 3 rows of 350 pixel height gifs and it's worked well for me. that means my biggest gif will have a total height of 1050 pixels - fun! you could also do 8 rows, with two 2x2s or just a series of 2x1s that transition to 1x1s. there really is no limit to this except your imagination and source material.
i cap everything i'm going to use before i even open photoshop, then do all of them at once. uncheck delete cropped pixels, then i make my gifs! this is where i spend 90% of the time on this set. every gif should be the size of the smallest 1x1 gif (268x350 for me). i make all 10 into a fully colored, separate psd. (and then i usually go back through all of them a few times to get the colors to match better 😅) for the bigger ones (2x1: 536x350 and 2x6: 536x1050), i just crop them as if they were 1x1 but always thinking about how they will look when big. this gets tricky when i do the big one :) my lazy workaround for that is to basically make it twice: one cropped as it will be and one full size for me to color. then i copy and paste all the coloring layers onto the small one and voila, i know that the coloring in the upper right slice will also look good on the bottom left slice 1050 pixels away because i saw it on the full size version.
coloring is probably the biggest thing i'm thinking about with this kind of set. the whole idea is that these gifs are using the same colors, more or less, throughout each phase. even with the 1x1s, they're still part of a larger color concept, and they should (🤞) work with each other.
in a pinch, i like to eyedrop a color from one gif and add it as an accent to another. one of my 1x1s had a much more muted color palette originally, but i wanted it to have deeper blues and yellows to complement the 1x1 that would go next to it, so i added some gradients on lower opacity over it, color picked from other gifs i already colored.
i keep my coloring and the smart object in separate folders to help me in the final step of combining everything, and then i trim everything down to my lowest common denominator of frames. you might think you need to keep frames pretty minimal if you're doing 3 phases with transitions like this, but there's more room to work with on a small gif, in terms of file size. i usually do 30-50 frames for each phase, with the assumption that i'll be adding a transition on each side of each gif that will eat up some frames (i usually do 4-6 frame fade transitions). for the rotk set my final frame count was 129 and i never went over 8MB on a gif, so there's plenty of space play around with things :)
and then, combine! whatever order you start with, you are stuck with (unless you're getting even more complicated, but we won't go into that lol). for these sets i go small 1x1 -> medium 2x1 -> big 2x6. i like to think of it in phases from this point on. small is the first phase, then medium, then big. then i put in the fade transitions, chopping up the first phase gif so the last one will fade into it, restarting the whole cycle seamlessly. i'm just doing a quick and dirty fade here, but here's a tutorial if you want more explanation on transitions.
at this point i save this psd as its position, "top left" or whatever (usually it's a psb by this point too 🥲), just in case i need to go back to it. then i export this first gif and move on to the rest.
it's the same concept as a simple split gif: drag and drop the smart object to the new position, but now there are multiple phases to keep track of. folder organization has been key for me to keep everything straight. i move through the gifs in a backwards S, starting with the top left. but you could go any direction, just gotta stick with it and remember your counts. in my case, i'm always thinking of 268 pixels over and, for the 2x6, 350 up/down. it's a tedious process, but it goes quick (apart from waiting for photoshop to load each time you export).
i did this series as a color concept aesthetic kind of thing, so my theory was by using the same-ish colors throughout, that would save me in the end when it came time to export. there's only 256 colors max to work with on a gif, and that's usually what gets me over the 10MB limit. but as i said, i have never even gotten close to the size limit on this series. it's pretty hard to reach the limit on 268 pixels, but not impossible. (i did run into that on the emma set i did, and that was hell. but also not an impossible fix in the end.)
and that's it! if you try any of this and have trouble, i'm happy to help if i can but mostly this is a "click around and see what works for you" kind of process. and feel free to tag me on your split gifsets :) i love seeing them <3
336 notes
·
View notes