
Statistics
We looked inside some of the posts by alecbicheno and here's what we found interesting.
Average Info
Notes Per Post
0
Likes Per Post
0
Reblog Per Post
0
Reply Per Post
0
Time Between Posts
2 days
Number of Posts By Type
Text
17
Last Seen Tumblr Blogs


Fun Fact
Premium Tumblr themes are available from anywhere between $9 to $49.
Text
FMP blog
19/08/2024
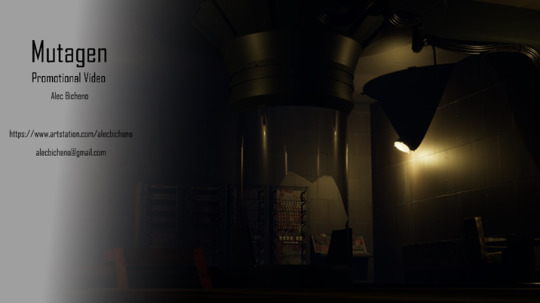
Over the weekend it was just working on the final parts required for the submission presentation. Such as the presentation, where I worked on it using the advice provided by Ian during a symposium. This included working on the promotional video for the environments I made in the project. This simply required me to go into Unreal Engine and create new shots in the sequencer and cerate camera shots showing off the environments, where I then recorded a voice over and put it all together in Premier Pro. I also went into Photoshop to create an end image after the video was done playing and then found a free music track from the website “pixabay” to play quietly in the background throughout the video.
I also worked on the blog post which I had missed from a previous week.
Now I simply have to wait for my timeslot to give my presentation, in the meantime I’ll be going over my blogs, and compiling all the necessary files into a folder ready for submission before the deadline on Wednesday.
Time for one final evaluation of the project. Overall, I’m very proud of myself and the group. We have worked together to produce a cinematic which I’m very happy with, and we have met our goals of producing a high quality cinematic which fit into the horror videogame genre alongside bigger series and smaller indie titles. We all stuck to the group deadline of 30th July so we could get to work making the cinematic, and there were no major changes with the project, just some small changes of how the scene looks compared to the story board, but no big changes to the story beats.
I have also met some of my own goals for this project during the time frame. Some of which include working to improve my skills as an environment artist where I made environments of a good quality for my first proper go at making environments. I also worked on my own time management, which is far better than it’s ever been, despite a few discrepancies with not accounting for family events etc. Also, most importantly, I have learned new skills in software, and will continue to improve beyond this course and work to continually improve my knowledge and skills as I enter industry, aiming to be the best I can possibly be.
This will be my last post on this blog for my final major project, thank you for reading.
References
MomotMusic, 2024. Corporate Motivational. [Online] Available at: https://pixabay.com/music/corporate-corporate-motivational-224382/ [Accessed 17 August 2024].
0 notes
Text
Forefront post: Prop modelling and texturing breakdown
18/08/2024
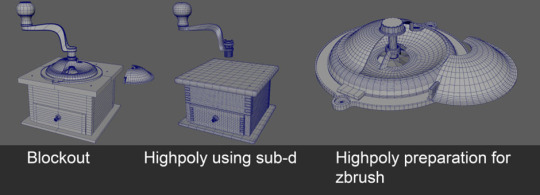
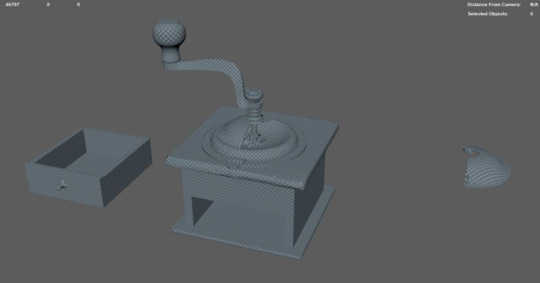
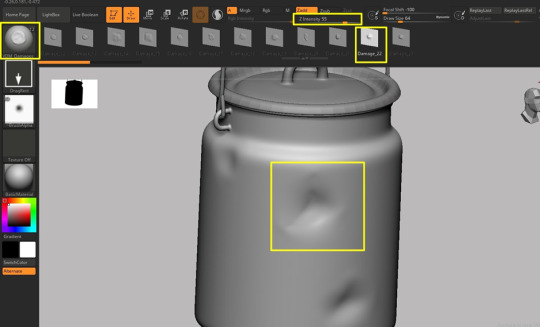
This prop was made by Georg Shao, a Junior Prop Artist at PUBG Studio. He wanted to work on his wood sculpting and texturing, and to make something old, so he decided on this old coffee bean grinder.
He started as standard, by gathering references, though he did something I haven’t really tried, which was to write a quick note on what was good about the reference, then organise each one using this method. He also had a useful tip on where to search for references. “One tip about gathering references is to search for pictures at online markets such as eBay or Etsy. Since people sell second-hand products, they tend to take close-up photos of them. This way, you can have great references of the surface details and study what the wear and tear of this particular object looks like.” (Levine & Shao, 2024) He also made a mention of using the search by image function on Google or Bing to find similar references.

For the modelling he used Maya, and began by looking for the actual dimensions online, then modelled the block out it in the same way it would be assembled in real life with the interlocking joins on the corners etc. He had trouble with the creating the metal handle on the top without having too many subdivisions and linked a tutorial which helped him to get the curviness but keep it low poly.
For the high poly it was simply subdivision, then export to ZBrush for damage and details, except for the round metal disc. “Only the high poly of the big round shapes was made using the DynaMesh Workflow in ZBrush. It is faster this way than making them SubD ready.” (Levine & Shao, 2024)
He talks about his process in ZBrush, going over what brushes he uses and why, then what he uses them for and also his reasoning for the differing levels of detail across the model. He also links another helpful tutorial on sculpting wood in ZBrush.
“In comparison to the top part, the rest of the wood pieces don’t have that many damaged areas.” (Levine & Shao, 2024)
He goes over how he made the metal part on top, talking about creating the letters and patterns on it, then how he finishes by sharpening some details.
I’m not very familiar with ZBrush but I found this quite insightful on how to achieve a wood texture and learning methods of detailing or lettering on an object, especially with the videos linked in the article and the recommended tutorials.
Next, it was the low poly. “I decimated the top wood part in ZBrush to create my low poly because I wanted to maintain its irregular shape. As for the rest of the model, I deleted the supporting edges of the high poly and optimized them.” (Levine & Shao, 2024)
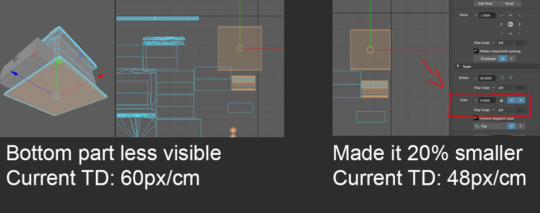
For the UV unwrapping, he had a helpful bit of advice to free up space in the UV map, where if a part is less visible you can scale down the UVs up to 20%.
He talked about his baking process using Marmoset Toolbag, which I personally haven’t seen anyone do so it was interesting to read. “For preparation, I shifted the movable parts for baking. If I kept the drawer inside the wood part, its AO would have been mostly black.” (Levine & Shao, 2024)
Afterwards he talked about his texturing process, where he usually has two steps, making a base material and adding details. After picking a wood to use as a base he “added color, height, and roughness variations using Fill Layers with different kinds of Directional Grunge Maps as masks.” (Levine & Shao, 2024)
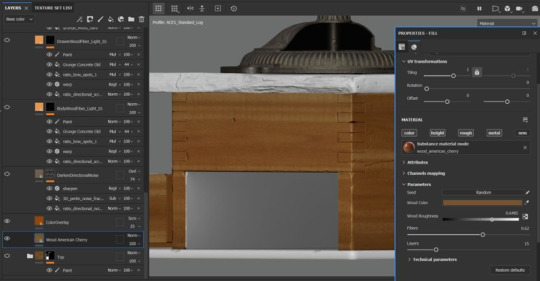
He mentions details like how the fact wood had a bumpy surface usually, meaning there’s going to be less paint in a cavity but more on a bumpy part. So, to account for this, he makes an anchor point for the base wood folder for the varnish effect. The anchor point “is a single Fill Layer with the Color blending mode being set to overlay, low roughness value, and a little bit of height because the paint is going to have some thickness on top of the wood.” (Levine & Shao, 2024)
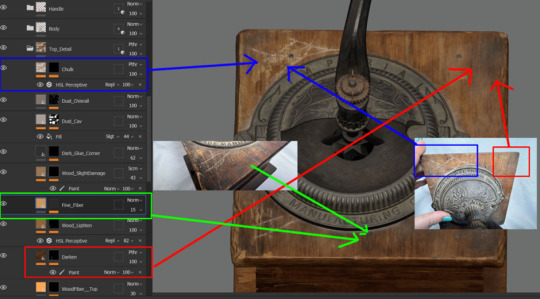
From here he created a mask which would deal with the damaged part and how they would be missing paint, and also set up a way using the base wood folder from, earlier to manually add or take away the varnish. He then began to paint on damage by copying the base wood folder again and using a black mask. After this it was simply a lot of observing the references and bringing those details into the textures. To do the metal on top, it was the same process of a base material then adding details, but the most important part was to add dust to give the vintage look. He also recommended another tutorial, this time on ArtStation which covers texturing.

His texturing process makes sense and I will definitely aim to be able to achieve this level of detail when texturing in future. Though in all honesty it was very complex and I don’t understand all of it due to my limited knowledge of Substance Painter. So, I’m going to start by looking at the recommended tutorials linked in the article, and go from there to gain a better understanding.
For his rendering setup, he sets up a diorama and a simple scene with neutral lighting. He used Pinterest to get inspiration for the diorama then worked in Unreal Engine 5, using the references as inspiration and Quixel Megascan models to set up said diorama. There were a few bits of advice for setting up a scene like this, such as ensuring the supporting assets don’t take away the focus, and setting up the camera angle first “so you can assemble the scene based only on what can be seen instead of working on unnoticeable details.” (Levine & Shao, 2024)

The lighting was simple, making use of the directional light, skylight, volumetric cloud, and sky atmosphere, all with the light mixer, which I haven’t actually used yet in Unreal Engine, so the next rendering I do in it I’ll be sure to use it. For the simple scene it was just a directional light and using a HDRI in skylight. He also adds shadows from things like plants to get a more interesting composition.
He went over a workflow involving go from Unreal to Davinci Resolve. I have never heard of this software before, but after a quick look I may give the free version a go.


Keeping the theme of this article going, he finishes off this article offering advice and reassurance, especially to newer artists. He explains how he’s spent over a year working on this model, encouraging you to not feel bad if a project takes a while to complete. He also says to not get lost in working on the details, as long as the details are logical, they’re fine and don’t need to be exactly like any references. Just remember the bigger picture.
He also says that “the most appealing props are the simplest but well-executed ones” (Levine & Shao, 2024) So basically presentation is key to ensuring your model is well received. Having a good-looking prop but with poor presentation won’t make it appealing, so try to make a scene perhaps with some other assets in the background and play with the depth of field, or anything which helps to make your model feel real.
“A single wood chair that has a nice balance of wear and tear and a good presentation can be a very nice portfolio piece.” (Levine & Shao, 2024)
To conclude, this article showcases his wonderful prop but also does a great job at explaining the process, despite me not understanding some of what he did. It was basically a very comprehensive guide to making a prop, with constant advice to the reader and linking useful resources for learning.
Throughout it I learned of all kinds of new things whether it be something in Unreal Engine, Substance Painter, or ZBrush, or even making me aware of a new software entirely such as DaVinci Resolve. But most of all it inspires me, as this is the level of prop making which I aspire to be at.
References
Levine, G. & Shao, G., 2024. Texturing a Vintage Coffee Bean Grinder in Substance 3D Painter. [Online] Available at: https://80.lv/articles/texturing-a-vintage-coffee-bean-grinder-in-substance-3d-painter/ [Accessed 18 August 2024].
0 notes
Text
FMP blog
16/08/2024
Zoe and I worked on the shot in the test tube room, which would be the final one in the whole cinematic before cutting to the title. We chose this one next because it was important to get the final shot done to ensure we had the start, filler, and end shots. Also, the one we plan to do last has some trickier animations to work with, so we again wanted all the major shots done before having to spend a longer amount of time on the next one.
So, for the final scene we ended up reversing roles to what we did the previous day, where Zoe added the creature she had made for the project into the scene and then worked on creating the movement, blending the animations and other details.
From there, I then got to work, where my main focus was going through and sorting any minor adjustments that needed working on, such as blending the animations to look smoother, or matching the speed of the creature’s movement with the cycle of the running animation. I also changed a few parts of the shot, as some parts were too slow or lingered too long, and others needed have a bit more added to them in order to do some more effective storytelling. For example, having the character react faster to certain parts of the shot, and in other parts, such as the final frames, changing the positions and rotations of the camera and creature to keep the creature central, ensuring it’s the last thing the viewer sees while also showing off what it looks like.
Next, we worked on the scene where the character is attacked by the spider creature, which is the shot with the tricky to implement animations. Zoe was responsible for setting up the whole scene, this being all the of the movements and animations in the sequencer.
However, there was some difficulty with the frames after the character is bitten by the creature, the troubleshooting and fixing was where I became involved. Firstly, the arm and spider moved too quick for a viewer to really understand that the character had just thrown it off before running. A good amount of time was spent adjusting the speed until we were happy with it.
The major issue was that the spider kept changing scale after the bite animation was finished, except it would change in the one frame between the end of the animation and the start of moving the spider model out of the characters view, meaning the fix couldn’t be simply changing the scale in the next frame after the bite animation had finished.
After a lot of trial and error with timings, scaling and positioning, the solution was to make the animation last a few frames longer. The scale of the spider when it performs the bite animation is a different scale for the rest of the scene, so in order to keep the scale we want so it wouldn’t appear in the frame as huge, we had to extend the animation in the sequencer. This didn’t cause any other issues as the model has been “thrown” off of the arm, out of the camera before the animation starts over.
Zoe then stitched these shots together in Premier Pro, then over time added the music and sound effects. Over these days we also worked on the other parts of the submission our written sides of the submission were all in order.
The last things to do were to record some voice acting for the cinematic, and to add in some footsteps as we realised they were missing. For the voice acting, I was the voice of our character as they’re male. To do this, we worked up a rough script and it was simply a case of me talking in time with what was happening in the cinematic, where Zoe added the clips into Premiere Pro and added some distortion effects.
Zoe added the footsteps in Unreal Engine, which was done via adding a sound effect to the walking animation and was timed with the steps. From there the audio just needed to be rendered and put into Premier Pro.
Over this week I have been very impressed with the work achieved to finish the cinematic. We have learned a lot about Unreal Engine and overcome any problems thrown our way, even when they caused us a lot of trouble, we persevered and found a solution. I’m happy with the quality of the final product too. It conveys the atmosphere we were going for, and the whole aesthetic combined with the lighting only boost this in quality.
Now it’s time to work on my presentation and promo video for next week, and I also need to work on a forefront post, as it appears I've missed a Sunday at the start of August. This is likely slipped under the radar due to the creation of the cinematic taking priority, as well as other goings on in my life resulting in not enough time, so I'll catch up on this one I missed so I have the correct amount.
0 notes
Text
FMP blog
12/08/2024
Over the weekend I got to work on the next shot for the cinematic. I started working on the scene of inside entrance, which would directly follow the outside scene Zoe had just finished.
I started this on Saturday where I got most of the basic shot done, however it was more of a first draft in terms of quality. It established the route the camera would take and where it would look, and I had the camera switching between the idle and walk animations. But I had a family event to attend which took up the rest of day, so I had to leave it there.
So, on Sunday after I finished my shift at my job, I finished it that evening. There wasn’t too much to continue work on, it was more working on lots of the finer details, mostly lots of changing camera positions and rotations, adjusting assets in the scene, blending the animations to prevent any jarring camera movements, and simply trying to ensure that these camera movements are realistic. Such as the way it looks around the room, scanning it quickly, then focusing on the content in ore details like checking the corners. I paid particular attention to the way the human eye follows objects it looks at, hence later on in the shot I have the camera follow the assets I placed along the floor leading towards the hole, which the characters eye follows until it reaches the hole, which becomes the sole focus for the closing seconds of the shot.
Today me and Zoe created the tunnel shot, where I set up the basis of the movement and camera movements, from there Zoe implemented the movement animations of the spider-esque model which Lissa had made. Then, the both of us worked to adjust the camera movements accordingly. I also added to the scene by extending the corridor and adding a door from an asset pack down the end as this would give us a better and more interesting shot.

I had my final weekly Wayne meeting. This meeting consisted of him giving lots of advice, support and words of wisdom to help with this final push before the deadline next week.
There was of course talking about making sure that the blogs are up to date, ensuring that there won’t be a panic and rush to get them finished with the rest of the work. There was also emphasis on making sure they’re detailed, so it is clear what my contributions to this project were and the methods I used when working.
He also said about having to make big decisions on what is working with the project at this stage. For example, if there is a component which isn’t working, and is proving to be more trouble than it’s worth to implement or fix, it may just be worth cutting it out for the sake of the whole project.
So, the plan for this week is to finish the rest of the shots in the cinematic, ensuring to follow the advice Wayne has given, and to do so sooner rather than later so we can comfortably finish the rest of the written work for the assignment.
0 notes
Text
Forefront post: A great prop with a helpful texturing breakdown
11/08/2024
This prop was made by Muhammad Abduhalilov, a 3D artist who specialises in creating props and environment assets. He is a self-taught artist, which shows his skill and dedication, and also shows the success that can be achieved in this industry when you apply yourself and commit to learning and improving.
He says the purpose of this project was to challenge himself, which is something that I intend to do after the end of this course as I want to continue to move forward and develop my skills.
His process begins as standard. He grabs references, making sure to get plenty of them to help with proportions, details and fidelity. Next, he goes on to modelling, where he starts off with helpful advice on subdivision workflows and some words of encouragement, which is always a nice touch to readers such as myself. “keep it simple — start with basic shapes and gradually add details as needed. Avoid adding too many edge loops or vertices, as this can make the model difficult to work with and lead to a loss of control over the shape.” (McKenzie & Abduhalilov, 2024) “Practice and experiment! Subdivision modeling is a skill that takes time and practice to master. Experiment with different techniques, tools, and approaches to discover what works best for you and refine your skills over time.” (McKenzie & Abduhalilov, 2024)
Also, while he used Maya to create the model whereas I am more inclined to use Blender, though I plan to get back to working in Maya while I still have a student license, the advice he gives here was still very helpful and applicable.

After making the low poly model in Maya, he moved over to ZBrush to detail the high poly one, elaborating on his artistic choices and processes, such as the brushes used. “Damaging the surface was my personal decision and it was done for the purpose of adding some interest to the model. But in real life, it could be really difficult to damage the container” (McKenzie & Abduhalilov, 2024)
I am not well versed in ZBrush, but, like Maya, I’ll definitely try to incorporate it into my workflow more often, though this will be a more permanent addition as it’s more affordable than Maya. So, by incorporating it, it should help me produce better work and expand my knowledge and therefore my employability.

He mentions his UVs and baking, offering help by referencing his previous article which goes over his baking process and shows his settings for it.
Next, he went into detail about texturing where he makes custom stencils and masks using Photoshop and recommended a tutorial on how to convert texture images to into masks for Substance Painter.
He then recommended another tutorial from a channel on how to paint decals when going over how he painted on the flower decoration. After this it was a step by step of each addition to the model, such as the gradient of colours on the model, the colour variations in said gradient, the rust and wear on the pot which involved importing a rust material where he changed the intensity of the normal, and paired it with a scratch material to get the burned out look on the bottom. He adds various other painted on details with stencils and material masks he prepared in Photoshop. After which he adds further details all over such as more scratches and rust.
For the wooden handle it involved a smart material from a tutorial, and a few filters and generators. “I used different generators and filters (metal edge, curvature, sharpen, warp, dirt, and position). I broke them with grunge and used different layering methods like screen, overlay, and multiply.” (McKenzie & Abduhalilov, 2024)
This was a very in-depth explanation of his Substance Painter texturing process. I found it very helpful seeing what he did, especially with the linked tutorials, even though I didn’t quite understand all of it. Despite this, it was still very insightful and I would definitely refer to this along other tutorials online if I need to look up texturing assistance.

For rendering he made use of Marmoset Toolbag, another piece of software I’m unfamiliar with, as my renders are usually done in Blender or Substance Painter. He made use of Quixel for materials and assets then Marmoset for HDRIs.

For some finishing touches, he went into Photoshop. “To finish, I adjusted exposure, contrast, and clarity using the Camera Raw Filter in Photoshop.” (McKenzie & Abduhalilov, 2024)

To conclude, he shares more words of wisdom, encouraging us to consistently practice and to experiment with different tools and techniques, all in order to improve and maybe discover our unique styles.
In summary, this was a very insightful article. He clearly goes over his entire workflow, as well as recommending learning resources throughout the article to help readers learn. He also made good use of a variety of different software to produce the best possible end result, all while giving advice to us to try and helps us improve our own skills.
References
McKenzie, T. & Abduhalilov, M., 2024. Texturing Realistic Burnt Metal & Worn Wood in 3D For a Soviet-Era Bedon. [Online] Available at: https://80.lv/articles/texturing-realistic-burnt-metal-worn-wood-in-3d-for-a-soviet-era-bedon/ [Accessed 11 August 2024].
0 notes
Text
FMP blog
09/08/2024
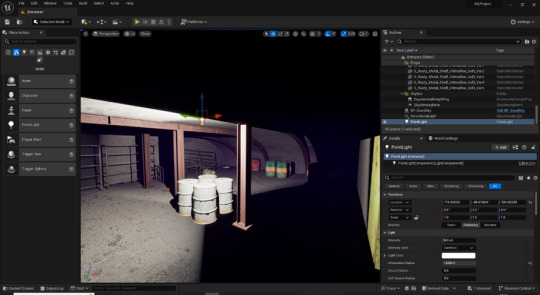
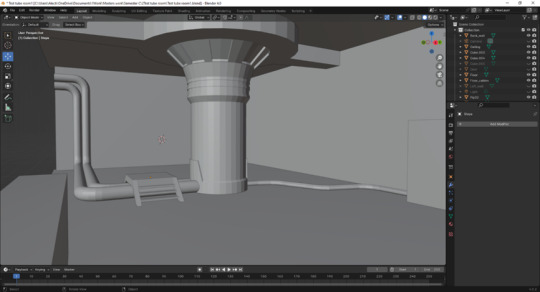
Over the week, I added the vault door to the scene after Lissa had finished texturing it, positioning it accordingly.
From there, we downloaded an asset pack which featured many textured models and other props which fit the theme and time period. I then went through the scene and used these assets to fill out said scene, making it look more like a lab complete with some machinery for the room and for the cables from the tube to connect to, as well as various desks and cabinets which the staff would have used.

I also began modelling a room just using the modelling mode in Unreal Engine, in which we would place a series of computers and other props, all of which are various assets we have found by themselves or in asset packs.
The block out is simply a tunnel with a room off to the side.

First, I used the Boolean tool in Unreal Engine’s modelling mode to cut out a shape the size of a doorframe asset from the pack that was downloaded. From there I proceeded to add various concrete textures throughout the scene. After which, I added in various machinery into the room, as the idea for this one was to be a computer room of sorts.

Next was to apply the rust textures that came with the asset pack, with all the models having their own material ready to go.


From there I also had the realisation that I hadn’t put anything in the entrance scene. Fortunately, I had compiled a whole range of assets ready to download and add to the scene, so it was just a matter of filling it out which didn’t take long.
Then there were a few struggles with the scenes and getting the cameras to work the way we wanted.
In the entrance level, there was issues with the collision in the scene, where the cameras couldn’t move in one area, but then were also floating when moved upwards. It eventually became clear that it was a collision issue, which turned out to be because of back when I imported the terrain, Unreal Engine made the collision mesh into a box, once this was changed it worked smoothly. I tested this on the FBX models of the room and had a similar issue, so I did the same fix to those while I was at it.
Then for the cameras themselves, we didn’t want any smooth camera movement as it was supposed to be filmed from a first-person perspective, so we wanted realistic camera effects to really sell the cinematic.
So to do this we tried to record using the take recorder with the fps camera that’s built in. This somewhat worked, however there were issues with the lighting, but more importantly, due to needing animations for characters for certain scenes, the sequencer was needed. But we couldn’t get the take recorder and sequencer to work together due to our unfamiliarity with it. So, it was decided to use just the sequencer and to find a tutorial which would provide the camera effects we wanted which would work in the sequencer.
Then on Friday Zoe found camera tutorial which both worked and gave us the effect we were looking for.
We also decided on having our character use a torch instead of having night vision on the camera. This was because of a few reasons; for one it was much easier to implement into the project that the night vision effect would have been. It also provided a clearer picture for the cinematic, with the torch allowing viewers an easier time of watching. Leading on from this, it means that the viewers can see our work in greater detail, most importantly our individual contributions which we want to show off. It also provides much more value for the work and effort it took to implement than the night vision would, making it an overall smarter decision in many categories.
But ultimately, it simply fits better. It matches the aesthetic better, and having a low light game with a torch is synonymous at this point with the game being part of the horror genre, where viewers are likely to understand the game would be a horror game from the night vision, they will almost certainly make that connection immediately from the torch shining into the darkness. It also fits with our established story better, of an urban explorer, who is much more likely to use a torch instead of having night vision equipment.
Then after Zoe had implemented the camera and torch, she was able make the first successful cinematic shot of the above ground entrance.
In summary, I’m pleased with the work accomplished this week. I’m particularly pleased with the way I’ve managed to quickly correct any mistakes I’ve made. For example, when I forgot to fill out environments with various props, which I managed to correct, but haven’t made the scene look rushed in the process. Leading on from this I believe I’ve made progress with my general environment design over the course of this project, as before I’d struggle with figuring out what to put in the scene, but now I properly think about what makes sense in a scene, and where different props belong.
As for my next steps, it is simply a case of working on the cinematic. So, over the weekend I will be working on the next shots with Zoe.
0 notes
Text
FMP blog
05/08/2024
Over the weekend I have looked for a night vision tutorial for Unreal Engine 5.
I have found this one which I think would be suitable for our project.
youtube
I will try making this in the Unreal Project to see how feasible it is, and if it doesn’t work out, I will look for other tutorials and if need be we may have to scrap the night vision altogether for perhaps a torch.
I had my weekly Wayne meeting. We discussed about getting all the content in the scene in order to be in a good position for deadline as we need to be working on shots. We also went over what is happening with the shots, and how to ensure we have plenty to work with, meaning that we will have lots on the cutting room floor but have a lot of backups in case something just isn’t working out.
He also mentioned about not doing anything groundbreaking and to stick to the simple shots as they often work best. This was a sentiment me and my group already shared anyway, as this is a student project, not the next incredible cinematic game coming out. But we will definitely take into account the advice about the extra shots. There was also a few other bits of advice such as ensuring the lighting was correct for the scene, for obvious reasons like making it look good, but also so we are actually able to show off the work we have created.
Then he said about how the music search will likely be quite tedious and annoying as there will be lots of songs that could fit, but it won’t feel right, but then suddenly one will just work and the whole project will come together and remove any feelings of the project being quite simply bad because it hasn’t come together just like that.
So in summary, over the week I will be trying out the night vision effect in Unreal Engine. Then, I will be working with the group to implement assets and asset packs into the project, where I will then use them to fill out the scene before we then begin working on shots.
References
Eremental Studios, 2023. Create a Realistic NightVision Effect in UE5. [Online] Available at: https://www.youtube.com/watch?v=DtQWqCP9lgQ&list=WL&index=134 [Accessed 4 August 2024].
0 notes
Text
FMP blog
02/08/2024
Over the past few days I have continued to work on the scene.
I began by adding more cables. I wanted one front and centre to attract the eye of the viewer and to generally add to the scene by plugging into further bits of machinery.
I tried a few variations of cables, with different positions and sizes, but settled on making a bundle of cables. This was simpler than I thought to make, where I follow the above process but then select edges along the length and duplicate them, then repeat the process of adding depth and converting it.
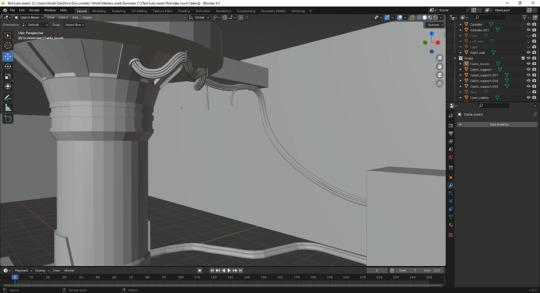
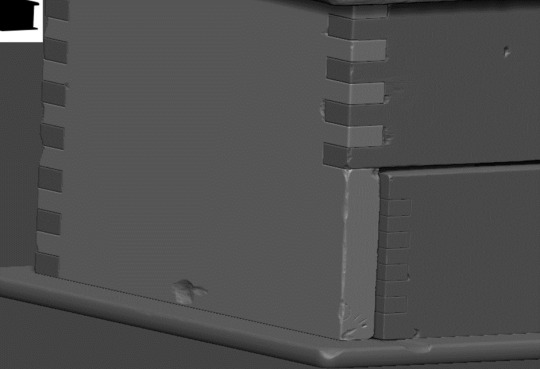
I also made the doorway for the vault door using Lissa’s door model and the Boolean modifier. It resulted in the topology being very messy but I went through and fixed it afterwards.
I then encountered an issue with the faces, where there was some odd shading. I initially thought it was to do with the normals, and it turns out there were a few flipped normals anyway, but after fixing this the issue still persisted.

I later down the line found a fix for the shading issues, which was to use the edge split modifier.
Scene so far.

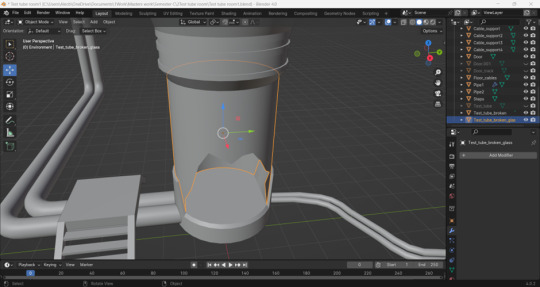
I cut a hole in the glass part of the tube using the knife tool as our creature would have had to escape from it.
From here it was just a matter of importing the models over to the Unreal Engine scene.
I’m very happy with the scene overall. I have used a variety of techniques throughout making it, and I’m particularly happy with how the cables have turned out and how they look in the scene. This is because I haven’t really done much modelling of cables, and the last time I did I struggled with making them but now they have turned out well and didn’t take up much time, so there’s a notable improvement there.
So my next steps are to import these models into Unreal Engine. From there I’ll be applying textures to them instead of using Substance Painter, like with previous parts, in the interest of time. I also will be searching for more assets to use to fill out this scene, as well as the others, and most importantly I will be searching for a way to create a night vision camera effect that a camcorder would have.
0 notes
Text
FMP blog
29/07/2024
I had my meeting with Wayne, it was more of a catchup where I just went over my progress with blogs and how I’m trying to ensure I’m keeping up to date with them in order to not be flooded with work towards the end of the project. I showed him the scenes I’ve been working on, such as my pretty much finished entrance level where in a previous post I covered that I added a skybox to the scene. He had no major concerns with my progress and was confident in the fact that I can be on track to finish on time, one criticism was to simply match the skybox lighting with the lighting in the Unreal Engine scene as it looked a little off.
Lissa has been working on vault door for the final scene. I got the FBX model from her, so I could use it as a reference to make the doorway into the room and the tracks it would roll across, while she textured it, then we would add it to the Unreal Engine scene later.
I moved onto making some pipes and cables to fill out the scene. I made the pipe by extruding a vertex in a rough shape, bevelling the corners, converting it to a curve and increasing the depth and resolution in the geometry section before converting back to a mesh. But for the wire I extruded into the rough shape and smoothed it before converting to a curve then mesh.
I also made steps for the same purpose and to add some simple environmental storytelling, such as some simple safety precautions the staff would have taken.
Reflecting on my work after making it, I could’ve used (Fallout, 1997) and its subsequent sequels as reference for a lot of the creation of this project. Not the aesthetic per se, but focusing on the architecture, as in that universe the bunkers were made in their equivalent Cold War era, like this bunker.
So, from this point on I will try to draw on them as reference if I need to make anything else or find any assets for the scenes. As for my next steps, I will just be focusing on getting this scene modelled and textured, ready to be implemented into Unreal Engine.
References
Fallout: A Post Nuclear Role Playing Game. (1997). PC [Game]. Los Angeles, CA: Interplay Productions
0 notes
Text
Forefront post: Moody sky environment
28/07/2024
This landscape in Unreal Engine was created by Gal Ravid-Tal, 3D/Unreal Generalist & Compositor. The environment consists of moody clouds, a mixture of grassy and rocky terrain, and a variety of smooth and sharp stones and cliffs.
They begin by explaining their choice to use Unreal Engine 5. “I chose Unreal Engine due to the incredibly fast and visually stunning results it enables. This speed allows me to create many more iterations, test new ideas, and do it all, without spending precious time waiting for renders. The ability to see my lighting, change material properties, and test new composition ideas in real-time is a huge game-changer for me.” (Levine & Ravid-Tal, 2024)
This is a sentiment that many people will share, as Unreal Engine is an excellent piece of software for the exact purpose Gal Ravid-Tal needed. I myself plan to render as much of my work as possible in Unreal Engine, unless I specifically need to use Blender’s render engine “Cycles”, after creating an asset in it.
They also go on to mention about how “Unreal Engine is gaining popularity in the VFX and Virtual Production industry, making it an essential tool for any artist's toolbox.” (Levine & Ravid-Tal, 2024) I agree with this statement and plan to keep developing my skills and knowledge with Unreal Engine in order to both improve my work and increase my employability, as I’m not opposed to going down this route with my career, not just staying in the games industry.
They go on to talk about the inspiration for the project, this being a mountain in England called Glaramara, in the Lake District. They go on to say about how they were inspired by the “dramatic clouds, varying hues of grass, the mix of both smooth and sharp stones, and cliffs” (Levine & Ravid-Tal, 2024) and that this project provided an “opportunity to practice environment creation, lighting, and look development.” (Levine & Ravid-Tal, 2024) They began as everyone should, by gathering plenty of reference images of the same or similar areas, but they focused on having images with different lighting conditions to help them understand the varying values over the landscape. This is something I haven’t really thought about before when gathering references, so from now on I’ll try to remember this as I’m sure it will prove useful in future should I be stuck on lighting or texturing within a project.

Next, they went over the composition of the shot where they “aimed to replicate a cinematic drone movement, which is commonly seen today”. (Levine & Ravid-Tal, 2024) Now the shots in the showreel look good, but I personally prefer using shots that resemble what a person would capture by themselves instead of using a drone. This is because, just like in moves and TV, I find there’s greater immersion if for example it looks like a person got a shot walking along the ground instead of having the camera fly through the air, though it definitely has its uses, especially if you’re trying to show off an environment
From there they went over the materials. They used the reference images to determine various properties of the environment in order to get consistency in different lighting conditions. But then they go on to talk about a material system they made, what it can do, and the goals for it. By the looks of things, it seems very useful but it isn’t out yet though they mention later on that it’s been in development for 6 months, there is a plan to create a demo and tutorial, and to sell it on various platforms.
For the actual terrain, Gaea was used, where multiple terrains were used I unison so they made a continuous terrain, with a focus on a hero mountain in the centre. I have yet to use Gaea, but the next time I need to make a terrain I’ll definitely give it a go. There was also a useful tip for emphasising the scale of the scene. “To emphasize the scale, I created slow camera movements to mimic a drone shot. Using closer foreground objects and distant mountains enhanced the parallax effect, adding depth and interest to the scene.” (Levine & Ravid-Tal, 2024) The lighting consists of the directional light, and a HDRI backdrop for the background and the indirect lighting. Then simply using height fog for the atmosphere.

The article is closed out with plans for working on the material system, some advice for aspiring developers also trying to make systems and two YouTube channel recommendations who cover topics relating to Unreal Engine.
In summary this project, as well as looking incredible, is an excellent example of the process one should take when creating a scene or asset. From references to execution every step is thought out and the software used effectively to create the best end result possible. The explanation of the process was clear too, and I’ll also be keeping a lookout for that Unreal Engine plugin.
References
Levine, G. & Ravid-Tal, G., 2024. How to Create a Photorealistic Grand Terrain in Unreal Engine. [Online] Available at: https://80.lv/articles/how-to-create-a-photorealistic-grand-terrain-in-unreal-engine/ [Accessed 28 July 2024].
0 notes
Text
FMP blog
26/07/2024
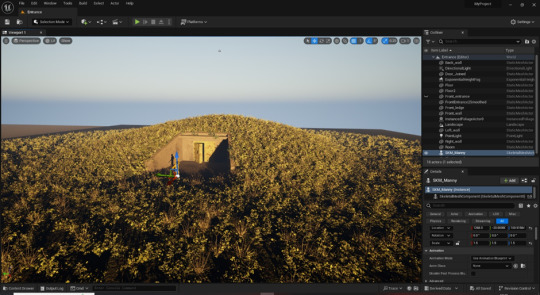
As per my last post, I went through and checked the scene for anything I missed, and sure enough I realised I forgot to change the skybox like I said I would.
I went onto the Unreal Marketplace to look for a free one, where I found GOOD SKY. This came with several adjustable settings which allowed me to changed the time of day, the weather settings and even change the settings of the sun and stars which were part of the skybox package. However, I used it to create a moody, overcast day which I think will blend well with the cinematic. There is an option for lighting in the sky, however I’ll have to discuss whether it’s worth it the time and effort of adding in, and if it fits too.
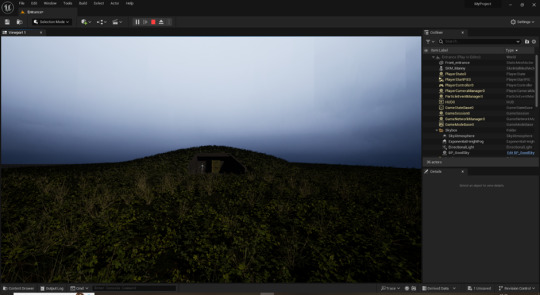
I did come across an issue with a black line across the horizon of the scene. I spent a while playing with different settings before I eventually found that adjusting settings in the exponential height fog instance was the way to fix it.
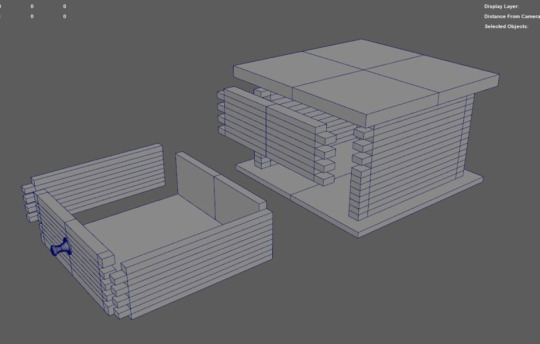
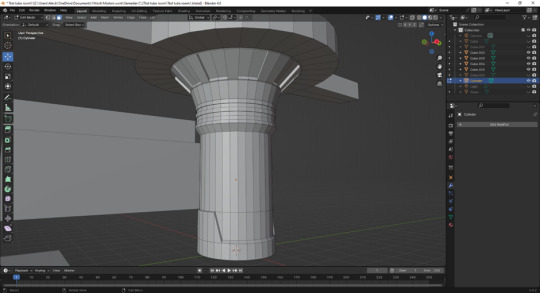
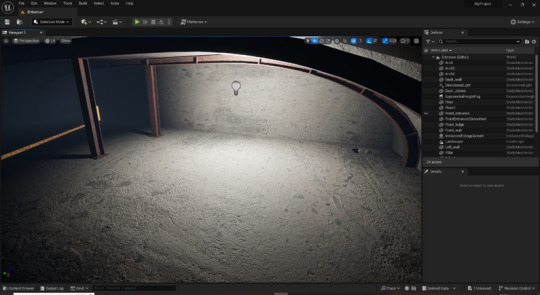
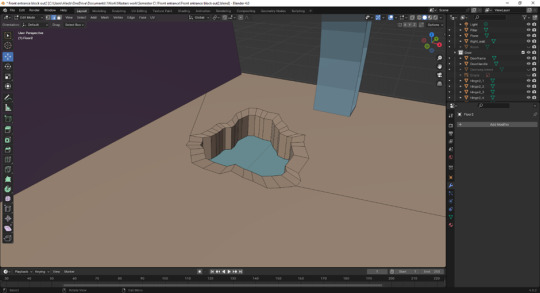
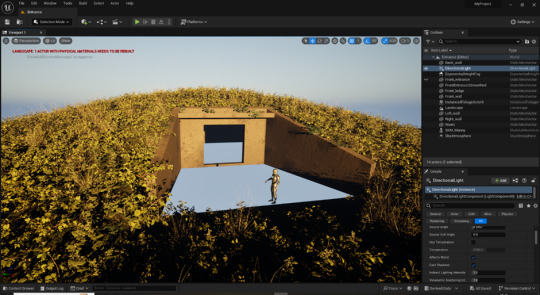
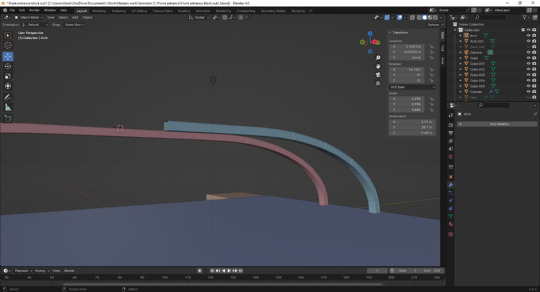
I have also begun work on the scene containing the test tube, keeping it similar to the block out I created earlier in the project.
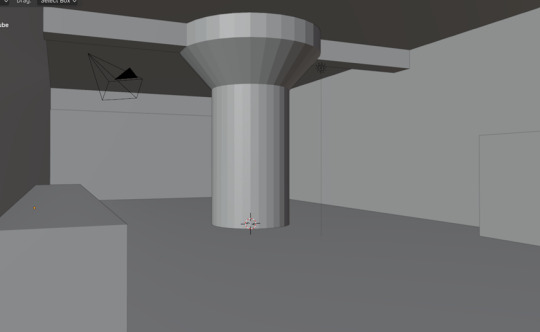
I started adding loops and extruding until I got a basic shape I liked, trying to make it look somewhat advanced, but still keeping a very blocky, Cold War aesthetic to it and not a futuristic looking sci fi one.

I continued adjusting the various parts until I had something I was happy with.
Evaluation
I’m very pleased with the scene overall, and I’m especially impressed with my learning of Unreal Engine functions such as the landscape and foliage modes, but I have a few things which I’m annoyed about.
The main thing that I’m annoyed about is that I keep missing things. As per my last few posts I claimed that I was done with the scene, however I kept realising I had more work to do. So basically to resolve this I need to keep better track of my processes, maybe by creating a proper written to do list of each scene, allowing me to clearly keep track of my progress.
My next steps are to continue on modelling the test tube scene and find the appropriate textures to use in the scene before our deadline to compile our work.
References
Uneasy Game Dev, 2018. GOOD SKY. [Online] Available at: https://www.unrealengine.com/marketplace/en-US/product/good-sky [Accessed 23 July 2024].
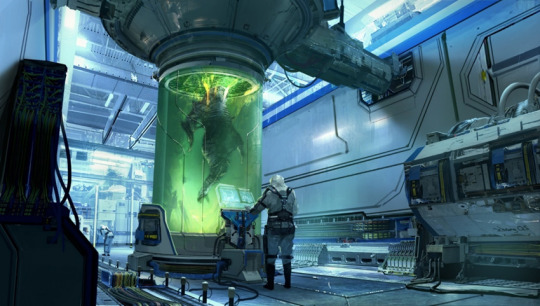
Zhang, Q., 2018. Practice:The Laboratory. [Online] Available at: https://www.artstation.com/artwork/mJY0E [Accessed 03 June 2024].
0 notes
Text
FMP blog
22/07/2024
It occurred to me that I’d managed to forget to import over the metal beams and pillars of the scene. So I did just that, and once they were in Unreal Engine I found a rust texture on Quixel which was suitable for them.

I had my weekly meeting with Wayne, I didn’t have much to go over other than showing him the scene I’ve worked on, and discussing finishing the project on time. We are aiming to all be finished with our individual work on the 31st July, so we can compile it into in Unreal Engine to create the cinematic. I also had some queries on how to go about referencing a large amount of assets.
From there I went ahead and downloaded several textures and some assets, also from Quixel, to expand my list of assets to use in the cinematic.
From here my next steps are to go over the scene again to catch anything I’ve missed, then to also work on the scene which contain the test tube that the creature was once contained in.
0 notes
Text
Forefront post: Incredible run-down environment
21/07/2024
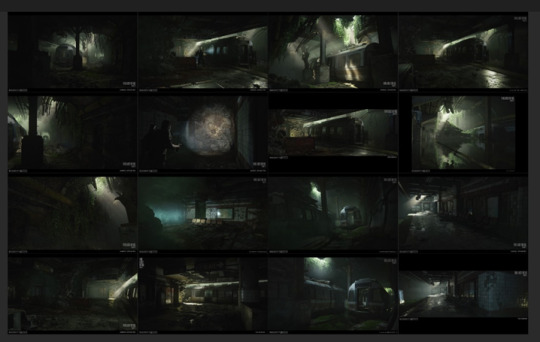
This run down environment is a great example of what I aim to achieve in my scenes. I have been looking at many environments online since I’m in that work mode as the environment artist for this project, and I really liked this one and felt I could use it for inspiration.
This environment was made by Jinkun Chen, an environment artist, who used a few bits of software to achieve the final result, and it only too him two weeks to do so.
He talks about his inspiration from the popular game (The Last of Us, 2013), specifically the subway level.
He talks about his modelling process and offers some helpful advice on making modular parts in Unreal Engine. “From my experience, the height of the walls and columns can be any amount you like, while the width of the modular should be an even number: 0.5m, 1m, 2m, 4m, etc.
This way, there will not be a seam on the tileable texture. The pivot of each modular part needs to be at the corner, not the center. This ensures that the modular parts align perfectly in the Unreal Engine.” (Chen, 2023)
I personally find this very helpful as I don’t really know the fundamentals of creating modular environments, and informs me on things I wouldn’t have thought of like having the pivot be in the corner of the modular parts.
He then talks about his texturing process; however, he used Substance Designer which I have never used. Though I may consider having a go at using it since the outcome of this project is of a very high quality and he offers helpful advice on using the software.
He goes over his set dressing, where he wasn’t focused on creating the assets but more so on the materials, so he found a variety of assets online, and any that didn’t match very well he imported into Substance Painter to adjust.
This is something I want to do in the future. If I want to make a scene or cinematic, whether it be for a portfolio piece or just for fun, I would like to focus on making the materials and the scene as I too often want to make absolutely everything myself and get too overwhelmed by the workload.
So, doing this allows me to work on my skillset, specifically my texturing and scene creation/ set dressing like I mentioned above, to really see what I can do. This is because ultimately, I want to become a 3D generalist, however at the moment my focus in on hard surface modelling and prop creation, and I’m relatively inexperienced with character and environment creation.

Lastly, he goes over the lighting process back in Unreal Engine.
“This project is fully lit with the Lumen system. I use a giant mesh light on the roof hole. Unlike the directional light, mesh light does not generate sharp shadows, giving the scene a soft bouncing light.” (Chen, 2023).
I know the fundamentals of lighting a scene, but I’m still an amateur at it, but reading this is intriguing me, so I’m going to find out how mesh lights work and attempt to use them in a scene at a later date.
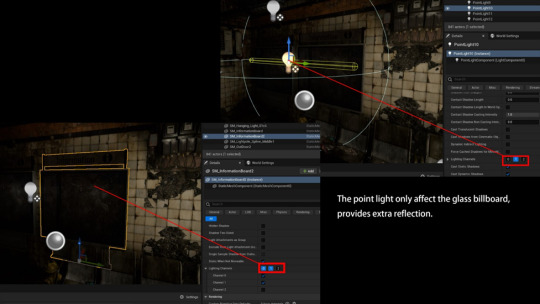
“For objects with strong reflections like water and glass, I put them into a separate light channel, so I can control the reflection individually.
Typically, the normal light cannot generate sufficient reflections, so these objects need additional fill light.” (Chen, 2023).
I still have more to learn about Unreal Engine functions as admittedly I haven’t used sperate light channels in a scene before, let alone using them to better control objects with different reflections. So, this will also be something I look up how to do.
To reiterate, lighting is something I’m also inexperienced with, so reading his processes was incredibly helpful, and searching for what it is and how to use them will be a must as lighting is extremely important, often being the make or break of a render or scene.
So, to summarise this environment is wonderful and is the level of quality I aim to achieve. The article detailing the process was incredibly helpful, informing me about helpful techniques, and helping me understand what specifically to research to improve my skills. This being said, I would have liked to see more detail when he discussed the set dressing and lighting sections of the article. Such as his process of how and why he placed assets where they were in the scene, and a bit more detail on how he did the lighting for less experienced readers like myself to understand what he did without needing further research, because even though I know what to research to help improve my scenes now, it would be more helpful educate less experienced readers then and there.
References
Chen, J., 2023. Apocalyptic Metro. [Online] Available at: https://gamesartist.co.uk/apocalyptic-metro/ [Accessed 21 July 2024].
The Last of Us. (2013). PlayStation 3 [Game]. San Mateo, CA: Sony Computer Entertainment.
0 notes
Text
FMP blog
19/07/2024
I cut hole in the floor using the knife tool and a reference image I downloaded to get a realistic looking hole in the floor, as I couldn’t get it to look good freehand.
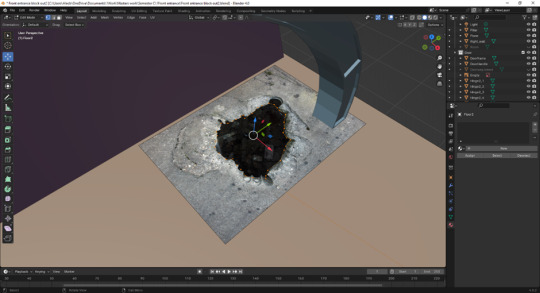
I then used the intersect option on the boolean modifier to extrude the hole down and cut it out on both faces of the floor.

I extruded it inwards to enable me to create slopes and varying heights to add more realism.
For the metal door I wanted to texture it in Substance Painter, however in the interest of time I chose to just use a rusted metal texture from Quixel. I had to play about with the parameters but I got it to look the way I envisioned. And while I was at it I downloaded several other textures and some assets, also from Quixel.
I also exported more of the room and made multiple instances of the same concrete material for different parts of room, each requiring their own parameters.
Final shot of this scene.
References
ramonr, n.d. Large dark hole in the concrete floor.. [Online] Available at: https://stock.adobe.com/images/large-dark-hole-in-the-concrete-floor/433814855 [Accessed 18 July 2024].
0 notes
Text
FMP blog
15/07/2024
I had my weekly meeting with Wayne. There wasn’t much to go over aside from my progress over the past week and there was only one matter I needed to talk to him about. This was about potentially having to cut out some things in the interest of time, for example whether or not I should texture some things myself or to just use downloaded ones like for the front door.
From the I UV unwrapped and exported walls from the front on the entrance, and ion Unreal Engine I added a concrete texture to them that I had downloaded.
0 notes
Text
Forefront post: Blender addon to help with damage
14/07/2024
youtube
This Blender addon by user “fffaaa12” on Blender Market and YouTube is focused on creating damage to models. It’s called Mix Damage and applies various different kinds of damage from a range of options and materials.
This addon allows you to apply destruction of different quality to objects, while you have full control over the process. You have the option to mix different destruction effects for some more realistic damage, and there is even the option to add internal damage to brickwork, stone walls and steel objects.
You’re also able to mix different qualities of destruction and can mix different geometries, which offers you various options for some internal destruction. It also comes with 16 of its own procedural materials. So, there is a wide variety of combinations you can achieve with this addon.
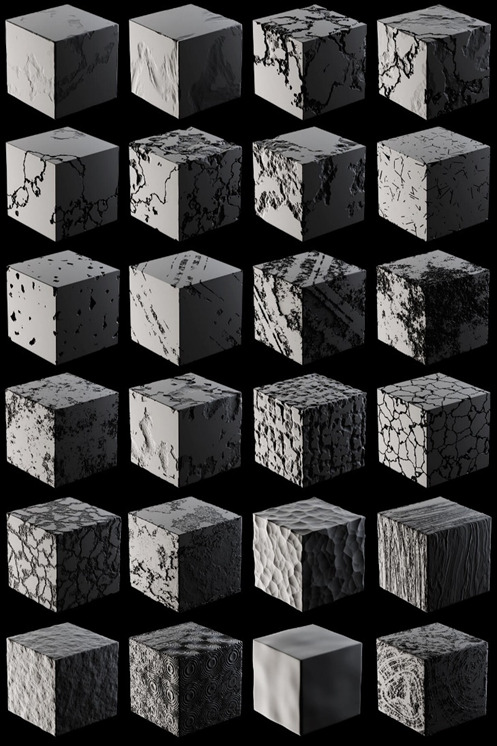
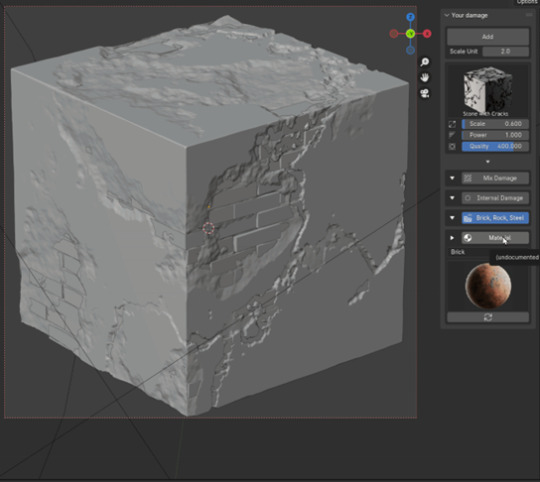

Judging from the website and promotional material, the settings and controls to use this addon also look relatively simple and easy to pick up. I for one am a big fan of when a product is easy to understand, particularly when it’s a piece of software as I hate having my productivity slowed by having to figure out the controls or settings to perform the next function.
Overall, I think this addon is a great addition to Blender. It allows for some very high quality and realistic looking bits of destruction which I can see being utilised within an environment to create some incredibly detailed and high-quality scenes, all for a relatively cheap price too. Though one query I have is if these assets would be game ready, as I imagine the geometry would contain a fair few quads and triangles. So it may be the case that this tool is best used for making objects for scenes and renders.
References
fffaaa12, 2024. Mix Damage - 24 Procedural Destructions, Materials. [Online] Available at: https://www.youtube.com/watch?v=vJ1ExMRFM9E [Accessed 14 July 2024].
fffaaa12, 2024. Mix Damage - 24 Procedural Destructions, Materials. [Online] Available at: https://blendermarket.com/products/mix-damage [Accessed 14 July 2024].
Rutherford, A., 2024. Mix 24 Procedural Destructions For All Surfaces In This Blender Add-on. [Online] Available at: https://80.lv/articles/mix-24-procedural-destructions-for-all-surfaces-in-this-blender-add-on/ [Accessed 14 July 2024].
0 notes
Text
FMP blog
12/07/2024
These past few days I did some more modelling.
A lot of it was more minor tweaks, but a bigger one is that I changed the scale of the beams. There was something that felt off about them since I made them which I deduced was their width etc, so I made them slimmer, with there just having to be more in the room than I previously had.
I then added hinges to the door for functional and aesthetic purposes, and also tidied up my scene collection as it had gotten very messy and disorganised.

From there I added a support pillar in the form of a steel beam which connects to the centre of the room. I did this because the shape I made the room was supposed to use as much space as possible under the hill, however a simple understanding of physics means that the centre of the room would cave in as it isn’t one continuous arc, but instead is flat in the centre, meaning load bearing pillars are needed.
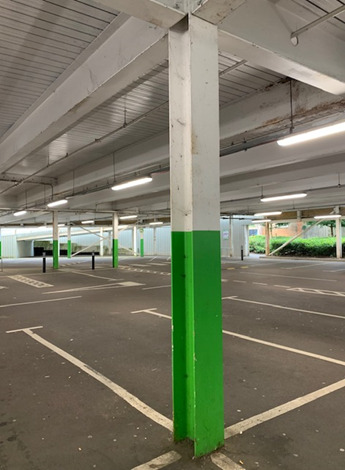
For reference I used an image of a supermarket carpark near me which happened to feature metal support beams just like what I was envisioning.


0 notes