
My tales of tinkering at home with the Raspberry Pi and other bits and bobs and my experiences using them with young people particualrly in Scouting.
Don't wanna be here? Send us removal request.
Statistics
We looked inside some of the posts by alternativepi and here's what we found interesting.
Average Info
Notes Per Post
0
Likes Per Post
0
Reblog Per Post
0
Reply Per Post
0
Time Between Posts
5 months
Number of Posts By Type
Text
4
Photo
1
Last Seen Tumblr Blogs


Fun Fact
If you dial 1-866-584-6757, you can leave an audio post for your followers.
Text
How to make the eWoggle
Note on costs: Some people have commented on the cost of this project. Please remember that this ‘eWoggle’ is based around a fully functioning computer called a Raspberry Pi, which costs from £4.65. As the woggle is a computer it can be used for all of the things a computer is used for: surfing the net, playing games, checking your email, building a robot, etc.
Okay, so while you are wearing it on your uniform you won’t be able to use it for some of these things but when you get home, plug in a keyboard and mouse and plug it into your TV and you’re away!
So don’t think of this as an expensive woggle, think of it as a very, very cheap computer!
INTRODUCTION
This ‘eWoggle’ is based around the Raspberry Pi computer. You may not have heard of it, but the Raspberry Pi is the third biggest selling type of computer in history!
You can find out more about what a Raspberry Pi is here:
https://www.raspberrypi.org/help/what-%20is-a-raspberry-pi/
Before we go any further I should explain that I am not a computing expert by any means. As a special needs teacher, I have had to teach some basic computing and to help me with this I did one of the early ‘Picademy’ courses run by the Raspberry Pi Foundation (an educational charity funded from sales of the computer). If you are a teacher and would like to use the Raspberry Pi in your teaching at any level (or any key stage) then I highly recommend this course:
https://www.raspberrypi.org/training/picademy/
As someone who has tinkered with the Raspberry Pi for a number of years, including helping to organise and run a Cubs District Digital Maker Camp (contact me on Twitter for more info), I tend to have lots of Pi-related bits and bobs lying around. From some of these, I decided to make a woggle.
For this project, you will need four main components, the Raspberry Pi computer itself (from £4.65), the ‘screen’ made of LEDs (called a scroll pHAT HD - £12.50), the actual woggle and a power-bank (£1) to run it on. As you read through the project you will see that there are other optional extras but these are the basics.
For ease, I have divided these instructions into three parts:
Setting up the Raspberry Pi and Scroll pHAT HD
Making the physical woggle
Coding the woggle
Please do feel free to contact me with any comments or suggestions about this page and I can make corrections improvements as needed. You can tweet me @mvnorwood
1: SETTING UP THE RASPBERRY PI AND THE SCROLL PHAT HD

The ‘screen’ that the writing appears on is an ‘add-on’ for the Raspberry Pi. These add-ons give extra functionality to the Raspberry Pi and are called HATs - Hardware Attached on Top - and the smaller sized ones are called pHATs.
There are many different HATs for all sorts of purposes from building robots to allowing you to control the computer by waving your hand in the air! This eWoggle uses the Pimoroni Scroll pHAT HD which comes in several colours and can be bought here:
https://shop.pimoroni.com/products/scroll-phat-hd?variant=2380803866634
Pimoroni are a fantastic company who are ever so helpful when you contact them.
You will notice that the Scroll pHAT HD comes with a ‘female header’ which needs to be soldered on. The female header is a kind of ‘socket’ that allows the Raspberry Pi to be plugged into the pHAT. People who know me will also know how cack-handed I am! There is no way I have the skills to solder something like this so I cheat and use this:
https://shop.pimoroni.com/products/gpio-hammer-header?variant=35643318026
This lets you use a hammer to attach the header rather than a soldering iron! Instructions for using the hammer header jig can be found here (or use a youtube video):
https://learn.pimoroni.com/tutorial/sandyj/fitting-hammer-headers
You also need to set up your Raspberry Pi. For this project, you need to use the ‘mini’ version of the Raspberry Pi called the Zero and you have three options, either:
The Raspberry Pi Zero £4.65 (basic model - no WiFi or Bluetooth) or
The Raspberry Pi Zero W £9.30 (has wifi and Bluetooth but no header) or
The Raspberry Pi Zero WH (WiFi and Bluetooth and a header already soldered in place) £13.00
If you are using the hammer header kit recommended above, then you already have a male hammer header ready to hammer on to the Pi, so I recommend that you buy the second option, the Raspberry Pi W which can be bought here:
https://thepihut.com/collections/raspberry-pi/products/raspberry-pi-zero-w
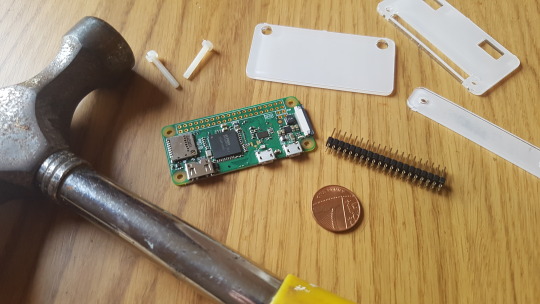
It looks like this (1p coin shown for reference):

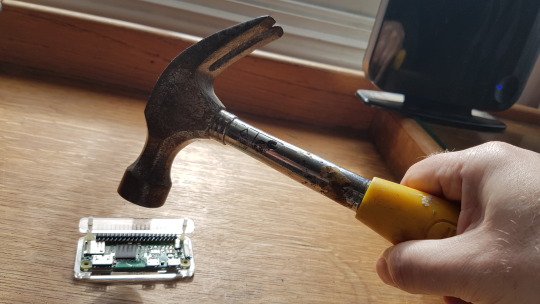
You now need to attach the hammer header. Hitting things with a hammer is fun, especially if you’re a Scout!
Using the special ‘jig’ is essential. This video shows that it makes attaching the header child’s play:
https://www.youtube.com/watch?v=9Sej_SHZpZI
Here is my jig set up ready to use:

Take great care and be gentle with the hammer. You don’t want to damage the Pi.
Okay, so you should now have a Pimoroni Scroll pHAT HD and a Raspberry Pi Zero W both with ‘headers’ (pins or sockets) attached.
An optional extra that I use is a ‘diffuser’. A diffuser is just a piece of plastic that is a little opaque. It makes the LEDs on the pHAT easier to look at and read. It is not essential but only costs £3 and can be found here:
https://shop.pimoroni.com/products/phat-diffuser
Take a careful look at the photos on that page to see how to attach the diffuser to the pHAT correctly using all of the nuts supplied.
When you use a computer you are probably used to using an ‘Operating System’ like Windows or OSX or even ChromeOS (like me). The Raspberry Pi can run many different operating systems (including a special version of Windows 10) but the most common system to run is Raspbian. Raspbian is based on Debian which is a version of the Linux Operating System that you may have heard of.
You may be used to your Operating System being stored and run from a Hard Drive (or sometimes an SSD).On a Raspberry Pi the Operating System and other files are stored and run from a microSD card just like the ones used to store music, video and photos on a mobile phone.
You will need to either buy a NOOBS microSD card with the Raspbian Operating System already on it or make your own following instructions on the Raspberry Pi website ( https://projects.raspberrypi.org/en/projects/raspberry-pi-setting-up/3 ).
To program the Pi with the code you will need to plug it into a TV, keyboard and mouse. Any TV with HDMI will do, and any mouse and keyboard with USB. Be aware that the Zero version of the Pi uses micro USB so you may need an adaptor.
All of the instructions needed for setting up your Raspberry Pi ready to use can be found here:
https://www.raspberrypi.org/products/raspberry-pi-zero/
2: MAKING THE PHYSICAL WOGGLE
Every Scout knows that there are many ways of making a woggle: leather, plastic, paracord, wood, tin cans, etc. This eWoggle is no different. This is part of the project where you can really experiment and make it your own.
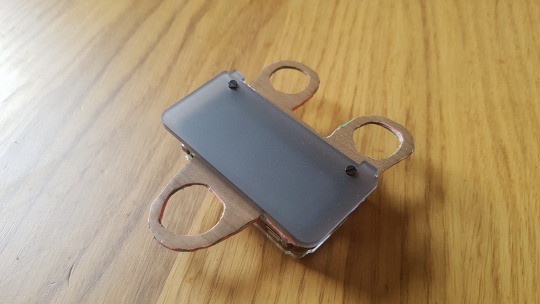
Here is my eWoggle with the Scroll pHAT HD attached:
...and here it is with the Scroll pHAT HD removed:
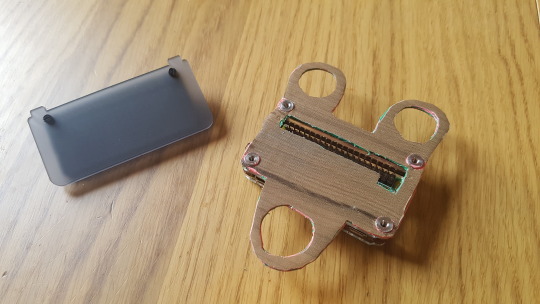
...and here it is turned over so you can see the Raspberry Pi computer attached to the back of it (rear of Scroll pHAT also shown):

There are two parts to the woggle: a case for the Pi and the woggle bit!
Raspberry Pi cases can be made from all sorts of things - I have used Lego and on another occasion coffee stirrers and masking tape! If you want to see some great examples of cases then look here:
https://www.makeuseof.com/tag/will-nvidia-jetson-nano-replace-raspberry-pi/
If you are making a case, keep it simple as it will be hidden behind the woggle.
As already explained, I am a bit cack-handed so I cheated and used a pre-made case instead of making one. This is optional. The case I used is the Zebra case as it can easily be adapted. It can be found here:
https://thepihut.com/collections/raspberry-pi-cases/products/zebra-zero-for-raspberry-pi-zero-wood
Another easily adaptable and excellent case is the PiBow Zero which can be found here:
https://shop.pimoroni.com/products/pibow-zero-w
The advantages of both of the cases above are that they are made up of layers. So to create your woggle you can either add a ‘woggle layer’ to the top (which I did) or replace the top layer with a ‘woggle layer’.
I looked around to find something to make my ‘woggle layer’ out of and found this:
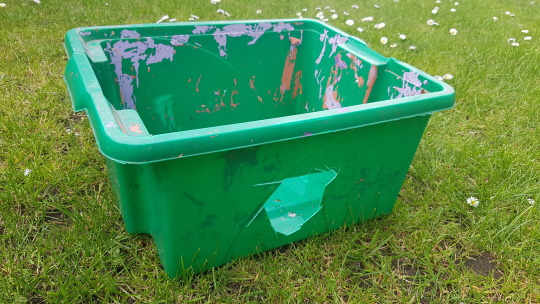
I cut out a piece of this box and used scissors and a drill to shape it into the woggle layer. Make sure you include a hole that allows you to push the Scroll pHAT onto the pins (these are properly called GPIO pins) of the Raspberry Pi.
However, once I screwed my woggle to the top of the case, I was unhappy with the way it looked. So I tried sanding it, but this only made it look worse. I then decided I should paint it. The only spray paint I had was pink. This resulted in a truly vomit-worthy woggle! So finally, I found a roll of wood-effect sticky back plastic I had knocking about (£1 from Poundland) and achieved the just acceptable result shown above (I did tell you I was cack-handed).
I am sure that you are far more creative than me and can create something that is more bling than boring. Maybe use stickers, sequins, fluffy bits, gems, googly eyes, etc.
The next time I make an eWoggle I think I will have a go at cutting it out of real wood.
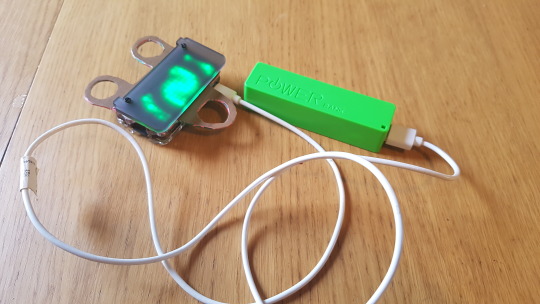
Finally, I added a power pack to run my woggle. The lead for this passes under my shirt to the pack in my trouser pocket. This power pack only costs £1 from Poundland. You may be sceptical but I have many of these pound-power-packs and they will run a Pi Zero for many, many hours. I have used them in many projects including robots and a TARDIS and find them pretty reliable.
The picture below was taken after five hours of testing the power-pack and, as you can see, it was still going strong!

3: CODING THE WOGGLE
First things first, get used to using your Raspberry Pi. If you have used Windows, Mac or Chromebook computers then it really isn’t that different (if you have used Linux then you probably don’t need this guide!) To get to grips with the Pi follow this great guide:
https://projects.raspberrypi.org/en/projects/raspberry-pi-using
You will find that the Pi Zero is very slow at intensive tasks like surfing the net. That is because this version of the Pi is designed more for building things like automated cameras or alarm systems or robot lawnmowers. If you want a Pi for playing games, surfing the net of running Office then use the Raspberry Pi 3 Model B+ (£34.00) which is excellent for these tasks.
Remember that the microSD card you have for the Pi Zero will work in any other Pi including the Raspberry Pi 3. You can swap microSD cards between Pi.
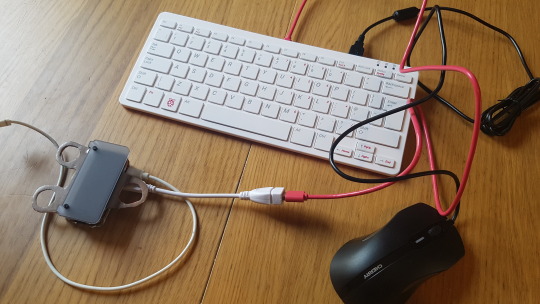
As you can see from the photo below, the Pi has a desktop much like any other computer with the taskbar at the top (like on a Mac):
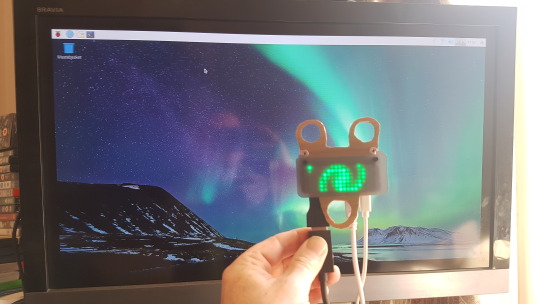
In the photo above the black cable is the HDMI cable that goes to the TV, the left-hand white cable goes to the keyboard which has a mouse plugged into it and the right-hand white cable is the micro USB power cable. The Pi in the picture is already coded - your one will not have any green LEDs lit yet.
Note: when I’m coding I obviously power my Pi from a phone charger plugged into the mains. I do not want a battery running out half way through!
The easiest way to code the Scroll pHAT HD is to use the Python programming language.
I am not a coder. I have a really basic understanding and use this to ‘cheat’ by mashing together and adapting code that has already been created by others. Anyone who is creative will tell you that this is not cheating but what all creatives do, they put together ideas, techniques and concepts that already exist but in new and original ways to create something new. I would really encourage you to do the same rather than just blindly copy my code (which isn’t really my code as I adapted it from other peoples’). By all means, start with my code and the other examples (see below) but then try to make something new by tweaking it.
A great starting point for coding the Scroll pHAT HD is to follow the beginners’ instructions on the Pimoroni website. However, I recommend doing the actual coding using Python 3 (IDLE) from the programming menu rather than typing straight into the terminal. The ‘Getting started’ guide can be found here:
https://learn.pimoroni.com/tutorial/sandyj/getting-started-with-scroll-phat-hd
Next, you should probably look at the GitHub page for the Scroll pHAT HD which can be found here:
https://github.com/pimoroni/scroll-phat-hd
You will find a ton of help on the GitHub page, possibly too much!
The next thing to do is to download the ‘examples’ folder from the GitHub page to your Raspberry Pi / eWoggle. You will need to sign into WiFi to do this. Note also that Chromium (a version of the Google Chrome web browser runs very slowly on the Pi Zero. This is normal - see the earlier note on this)
The examples folder is full of demo programmes. I suggest that you play about with these: use Python 3 (IDLE) to open some of them and run the code to see what happens. Read the code and see if you can work out what is going on.
I built my code from two of these example programmes:
simple-scrolling.py
swirl.py
This photo is for illustration, don’t try to copy the code from it!

You will notice that in the code for many of these programs (including mine) there are many lines that begin with the hashtag ‘#’. When a computer is interpreting code written in the Python programming language it ignores anything that begins with #.
Lines beginning with a hashtag are used for two purposes. The first is to write instructions and comments to help human users understand the code. These instructions and comments will be ignored by the computer which is useful as the computer wouldn’t understand them as they are not written in the Python programming language. The second use is to ‘switch off’ a piece of code or switch it ‘on’ by removing the hashtag. For example, in many of the example programs, there is the following line of code that will turn the writing on the Scroll pHAT upside-down.
# scrollphathd.rotate(degrees=180)
This line of code has a # before it. If you want the writing to appear upside down (because in your woggle design you are using the pHAT upside down) then all you need to do is remove the # before this line of code.
Another thing to note about using Python is the indents at the beginning of some lines of code. An indent is the empty space you get at the start of a line when you press the tab but. These indents are very important in Python code as they tell the computer which lines belong together. So don’t ignore these indents!
The code that I used for the eWoggle can be found here:
https://alternativepi.tumblr.com/post/184293088491/the-code-i-used-for-the-ewoggle
You will need to adapt this. Don’t try to type it all out! Copy and paste the code from the two example programs described above.
FINALLY
Now that you have some code that works with your eWoggle and you have some text scrolling nicely across it, you will want to lose the keyboard, mouse and TV!
This is sometimes referred to as running the Pi ‘headless’.
youtube
Basically, you want to set up your Pi so that when you plug it into a powerpack it will automatically load your code and start running it as part of the startup process.
There are many ways of doing this. One is to edit something called the rc.local file and a newer way is to use something called crontab. I’m nearly fifty so I opted for the older, tried and tested method of rc.local and the link below has excellent instructions for how to do this. Note: the ampersand (&) at the end of the line of code referred to in the instructions is absolutely essential. Without it, you will get into all kinds of bother and may even have to start all over again!
https://www.raspberrypi.org/documentation/linux/usage/rc-local.md
These instructions are fairly basic. You will need to go into ‘Terminal’ to use them and use the ‘nano’ text editor whilst in ‘Terminal’. If you need further instructions on this then Google is your friend :) (or DuckDuckGo)
As with everything to do with using a Raspberry Pi, if in doubt ask! There is a HUGE community of people out there who are very willing to help so long as you are prepared to put some effort in and do some learning yourself. the Pi was created originally with the intention of helping people to learn. The Pi community are out there waiting to help you to learn. They will answer your questions readily and quickly but don’t expect them to do it for you!
You can contact me on Twitter using @mvnorwood but don’t bother trying to contact me here on tumblr as I rarely use it.
You will find lots of lovely people willing to help you on the Raspberry Pi help forums that can be found here:
https://www.raspberrypi.org/forums/
You can find out more about the fantastic Raspberry Pi community here:
https://www.raspberrypi.org/community/
Consider going along to a local ‘Raspberry Jam’ where you can very quickly find out what it’s all about.
Pimoroni, who are the British company who make the Scroll pHAT HD, also have an excellent online community forum which can be found here:
https://forums.pimoroni.com/
FURTHER DEVELOPMENTS:
Your woggle is now a computer! It is merrily scrolling whatever text you have coded across its ‘screen’.
But why stop there?! There are literally a million other things your woggle could do with some different code or even by adding a little more hardware. Here are some ideas you might want to explore further:
Make your woggle ‘tweetable’. If it has access to WiFi it can be coded to display tweets with a particular hashtag or tweets to/from a specific Twitter user.
Add Bluetooth headphones or speaker and a couple of buttons and you can make an MP3 player woggle!
Turn your woggle into a clock that tells the current time.
Add a temperature sensor and get it to display the temperature.
Turn it into a ‘fart detector’. Whoever smelt it, dealt it? ( https://projects.raspberrypi.org/en/projects/fart-detector )
Add a button that turns the display on or off without turning off the Pi
There are so many things you can do with a Raspberry Pi. Some of my favourites can be found here:
https://www.pinterest.co.uk/mvnorwood/raspberry-pi/
Do you fancy making an easy robot spider, or Pi-der? Then here are my easy instructions for that:
https://alternativepi.tumblr.com/post/159197715941/building-mr-nancy-the-raspberry-pider-robot
Finally, have fun, don’t get stressed and ask for help.
Happy coding and Happy Scouting!
0 notes
Text
The code I used for the eWoggle
#The following code was mashed together and adapted from the examples provided on the Pimoroni GitHub page for their Scroll pHAT HD
#!/usr/bin/env python
import time import math import scrollphathd
print(""" The eWoggle scrolls messages on a woggle with some swirly effects in between. Use Crontab or similar to set it to run on reboot so you can run it headless from a battery pack.
Press Ctrl+C to exit. """)
scrollphathd.set_brightness(0.5) #sets the brightness
def swirl(x, y, step): x -= (scrollphathd.DISPLAY_WIDTH / 2.0) y -= (scrollphathd.DISPLAY_HEIGHT / 2.0)
dist = math.sqrt(pow(x, 2) + pow(y, 2))
angle = (step / 10.0) + dist / 1.5
s = math.sin(angle) c = math.cos(angle)
xs = x * c - y * s ys = x * s + y * c
r = abs(xs + ys)
return max(0.0, 0.7 - min(1.0, r / 8.0))
while True: #make everything that follows go on forever
#start of swirly bit
scrollphathd.clear() scrollphathd.show()
for x in range(0,100): #sets how long the swirl goes for timestep = math.sin(time.time() / 18) * 1500
for x in range(0, scrollphathd.DISPLAY_WIDTH): for y in range(0, scrollphathd.DISPLAY_HEIGHT): v = swirl(x, y, timestep) scrollphathd.pixel(x, y, v)
time.sleep(0.001) scrollphathd.show()
#end of swirly bit
#start of message
def scroll_message(message): scrollphathd.clear() # Clear the display and reset scrolling to (0, 0) length = scrollphathd.write_string(message) # Write out your message scrollphathd.show() # Show the result time.sleep(0.5) # Initial delay before scrolling
length -= scrollphathd.width
# Now for the scrolling loop... while length > 0: scrollphathd.scroll(1) # Scroll the buffer one place to the left scrollphathd.show() # Show the result length -= 1 time.sleep(0.03) # Delay for each scrolling step SMALLER MEANS FASTER
time.sleep(0.2) # Delay at the end of scrolling
scroll_message(" Hello, I'm Baloo. ")
def scroll_message(message): scrollphathd.clear() # Clear the display and reset scrolling to (0, 0) length = scrollphathd.write_string(message) # Write out your message scrollphathd.show() # Show the result time.sleep(0.5) # Initial delay before scrolling
length -= scrollphathd.width
# Now for the scrolling loop... while length > 0: scrollphathd.scroll(1) # Scroll the buffer one place to the left scrollphathd.show() # Show the result length -= 1 time.sleep(0.02) # Delay for each scrolling step SMALLER MEANS FASTER
time.sleep(0.2) # Delay at the end of scrolling
scroll_message(" :) ")
#end of message
#start of swirly bit
scrollphathd.clear() scrollphathd.show()
for x in range(0,100): #sets how long the swirl goes for timestep = math.sin(time.time() / 18) * 1500
for x in range(0, scrollphathd.DISPLAY_WIDTH): for y in range(0, scrollphathd.DISPLAY_HEIGHT): v = swirl(x, y, timestep) scrollphathd.pixel(x, y, v)
time.sleep(0.001) scrollphathd.show()
#end of swirly bit
#start of message
def scroll_message(message): scrollphathd.clear() # Clear the display and reset scrolling to (0, 0) length = scrollphathd.write_string(message) # Write out your message scrollphathd.show() # Show the result time.sleep(0.5) # Initial delay before scrolling
length -= scrollphathd.width
# Now for the scrolling loop... while length > 0: scrollphathd.scroll(1) # Scroll the buffer one place to the left scrollphathd.show() # Show the result length -= 1 time.sleep(0.01) # Delay for each scrolling step SMALLER MEANS FASTER
time.sleep(0.2) # Delay at the end of scrolling
scroll_message(" We are 1st Leighton Buzzard Scout Group ")
def scroll_message(message): scrollphathd.clear() # Clear the display and reset scrolling to (0, 0) length = scrollphathd.write_string(message) # Write out your message scrollphathd.show() # Show the result time.sleep(0.5) # Initial delay before scrolling
length -= scrollphathd.width
# Now for the scrolling loop... while length > 0: scrollphathd.scroll(1) # Scroll the buffer one place to the left scrollphathd.show() # Show the result length -= 1 time.sleep(0.01) # Delay for each scrolling step SMALLER MEANS FASTER
time.sleep(0.2) # Delay at the end of scrolling
scroll_message(" A.K.A. The Buzzards ")
def scroll_message(message): scrollphathd.clear() # Clear the display and reset scrolling to (0, 0) length = scrollphathd.write_string(message) # Write out your message scrollphathd.show() # Show the result time.sleep(0.5) # Initial delay before scrolling
length -= scrollphathd.width
# Now for the scrolling loop... while length > 0: scrollphathd.scroll(1) # Scroll the buffer one place to the left scrollphathd.show() # Show the result length -= 1 time.sleep(0.01) # Delay for each scrolling step SMALLER MEANS FASTER
time.sleep(0.2) # Delay at the end of scrolling
scroll_message(" This year is our 110th Birthday! ")
#end of message
#start of swirly bit
scrollphathd.clear() scrollphathd.show()
for x in range(0,100): #sets how long the swirl goes for timestep = math.sin(time.time() / 18) * 1500
for x in range(0, scrollphathd.DISPLAY_WIDTH): for y in range(0, scrollphathd.DISPLAY_HEIGHT): v = swirl(x, y, timestep) scrollphathd.pixel(x, y, v)
time.sleep(0.001) scrollphathd.show()
#end of swirly bit
#start of message
def scroll_message(message): scrollphathd.clear() # Clear the display and reset scrolling to (0, 0) length = scrollphathd.write_string(message) # Write out your message scrollphathd.show() # Show the result time.sleep(0.5) # Initial delay before scrolling
length -= scrollphathd.width
# Now for the scrolling loop... while length > 0: scrollphathd.scroll(1) # Scroll the buffer one place to the left scrollphathd.show() # Show the result length -= 1 time.sleep(0.01) # Delay for each scrolling step SMALLER MEANS FASTER
time.sleep(0.2) # Delay at the end of scrolling
scroll_message(" Happy St. George's Day Parade ")
def scroll_message(message): scrollphathd.clear() # Clear the display and reset scrolling to (0, 0) length = scrollphathd.write_string(message) # Write out your message scrollphathd.show() # Show the result time.sleep(0.5) # Initial delay before scrolling
length -= scrollphathd.width
# Now for the scrolling loop... while length > 0: scrollphathd.scroll(1) # Scroll the buffer one place to the left scrollphathd.show() # Show the result length -= 1 time.sleep(0.01) # Delay for each scrolling step SMALLER MEANS FASTER
time.sleep(0.2) # Delay at the end of scrolling
scroll_message(" Spring is in the air ")
#end of message
#start of swirly bit
scrollphathd.clear() scrollphathd.show()
for x in range(0,100): #sets how long the swirl goes for timestep = math.sin(time.time() / 18) * 1500
for x in range(0, scrollphathd.DISPLAY_WIDTH): for y in range(0, scrollphathd.DISPLAY_HEIGHT): v = swirl(x, y, timestep) scrollphathd.pixel(x, y, v)
time.sleep(0.001) scrollphathd.show()
#end of swirly bit
#start of message
def scroll_message(message): scrollphathd.clear() # Clear the display and reset scrolling to (0, 0) length = scrollphathd.write_string(message) # Write out your message scrollphathd.show() # Show the result time.sleep(0.5) # Initial delay before scrolling
length -= scrollphathd.width
# Now for the scrolling loop... while length > 0: scrollphathd.scroll(1) # Scroll the buffer one place to the left scrollphathd.show() # Show the result length -= 1 time.sleep(0.03) # Delay for each scrolling step SMALLER MEANS FASTER
time.sleep(0.2) # Delay at the end of scrolling
scroll_message(" Be prepared ")
#end of message
#start of swirly bit
scrollphathd.clear() scrollphathd.show()
for x in range(0,100): #sets how long the swirl goes for timestep = math.sin(time.time() / 18) * 1500
for x in range(0, scrollphathd.DISPLAY_WIDTH): for y in range(0, scrollphathd.DISPLAY_HEIGHT): v = swirl(x, y, timestep) scrollphathd.pixel(x, y, v)
time.sleep(0.001) scrollphathd.show()
#end of swirly bit
#start of message
def scroll_message(message): scrollphathd.clear() # Clear the display and reset scrolling to (0, 0) length = scrollphathd.write_string(message) # Write out your message scrollphathd.show() # Show the result time.sleep(0.5) # Initial delay before scrolling
length -= scrollphathd.width
# Now for the scrolling loop... while length > 0: scrollphathd.scroll(1) # Scroll the buffer one place to the left scrollphathd.show() # Show the result length -= 1 time.sleep(0.01) # Delay for each scrolling step SMALLER MEANS FASTER
time.sleep(0.2) # Delay at the end of scrolling
scroll_message(" Cub Scouts always do their best... ")
def scroll_message(message): scrollphathd.clear() # Clear the display and reset scrolling to (0, 0) length = scrollphathd.write_string(message) # Write out your message scrollphathd.show() # Show the result time.sleep(0.5) # Initial delay before scrolling
length -= scrollphathd.width
# Now for the scrolling loop... while length > 0: scrollphathd.scroll(1) # Scroll the buffer one place to the left scrollphathd.show() # Show the result length -= 1 time.sleep(0.01) # Delay for each scrolling step SMALLER MEANS FASTER
time.sleep(0.2) # Delay at the end of scrolling
scroll_message(" ...think of others before themselves... ")
def scroll_message(message): scrollphathd.clear() # Clear the display and reset scrolling to (0, 0) length = scrollphathd.write_string(message) # Write out your message scrollphathd.show() # Show the result time.sleep(0.5) # Initial delay before scrolling
length -= scrollphathd.width
# Now for the scrolling loop... while length > 0: scrollphathd.scroll(1) # Scroll the buffer one place to the left scrollphathd.show() # Show the result length -= 1 time.sleep(0.01) # Delay for each scrolling step SMALLER MEANS FASTER
time.sleep(0.2) # Delay at the end of scrolling
scroll_message(" ...and do a good turn every day. ")
#end of message #start of swirly bit
scrollphathd.clear() scrollphathd.show()
for x in range(0,100): #sets how long the swirl goes for timestep = math.sin(time.time() / 18) * 1500
for x in range(0, scrollphathd.DISPLAY_WIDTH): for y in range(0, scrollphathd.DISPLAY_HEIGHT): v = swirl(x, y, timestep) scrollphathd.pixel(x, y, v)
time.sleep(0.001) scrollphathd.show()
#end of swirly bit
#start of message
def scroll_message(message): scrollphathd.clear() # Clear the display and reset scrolling to (0, 0) length = scrollphathd.write_string(message) # Write out your message scrollphathd.show() # Show the result time.sleep(0.5) # Initial delay before scrolling
length -= scrollphathd.width
# Now for the scrolling loop... while length > 0: scrollphathd.scroll(1) # Scroll the buffer one place to the left scrollphathd.show() # Show the result length -= 1 time.sleep(0.01) # Delay for each scrolling step SMALLER MEANS FASTER
time.sleep(0.2) # Delay at the end of scrolling
scroll_message(" Consider becoming a volunteer ")
def scroll_message(message): scrollphathd.clear() # Clear the display and reset scrolling to (0, 0) length = scrollphathd.write_string(message) # Write out your message scrollphathd.show() # Show the result time.sleep(0.5) # Initial delay before scrolling
length -= scrollphathd.width
# Now for the scrolling loop... while length > 0: scrollphathd.scroll(1) # Scroll the buffer one place to the left scrollphathd.show() # Show the result length -= 1 time.sleep(0.01) # Delay for each scrolling step SMALLER MEANS FASTER
time.sleep(0.2) # Delay at the end of scrolling
scroll_message(" You don't have to be a leader ")
def scroll_message(message): scrollphathd.clear() # Clear the display and reset scrolling to (0, 0) length = scrollphathd.write_string(message) # Write out your message scrollphathd.show() # Show the result time.sleep(0.5) # Initial delay before scrolling
length -= scrollphathd.width
# Now for the scrolling loop... while length > 0: scrollphathd.scroll(1) # Scroll the buffer one place to the left scrollphathd.show() # Show the result length -= 1 time.sleep(0.01) # Delay for each scrolling step SMALLER MEANS FASTER
time.sleep(0.2) # Delay at the end of scrolling
scroll_message(" Find out more at scouts.org.uk or ask one of us :) ")
#end of message
0 notes

Text
Building Mr Nancy the Raspberry Pider robot
Before I start, I should explain that I am very, very much a beginner. I have only a little knowledge of robotics, coding or electronics. However since doing the (very, very excellent) free Picademy course run by the Raspberry Pi Foundation, I have gained the confidence to introduce the Special Needs students I teach to more and more physical computing, coding and electronics projects.
So what you are about to read is how to build a robot spider from a beginners perspective. It is, I feel, a great little project for a beginner or child but my instructions are by no means definitive. I am sure that more experienced makers will be able to give better tips and pointers. If you are one of these people then do please comment. Also, anyone is free to ask questions :)
Can I thank all of the people in the wonderful Raspberry Pi community on twitter and on the forums, who have been very patient giving me advice about the coding part of this project.
So I was shopping in Tiger and for £5 I saw this Build your own DIY spider toy. On a whim I bought it, thinking, ‘Mmmm possible future robot project. Will give me some practice ready for work’.

And a couple of weeks later, I used it to build a robot spider that follows lines (sort of), avoids obstacles (sort of) and can be operated by remote control (really). Below I will post the build photos I took so that I could remember how I did it if I wanted to do it again.

A couple of weeks after buying the kit, I went to the Raspberry Pi 5th Birthday Party in Cambridge. Whilst there I bought the latest version of the Pi the Zero W.
When I got the Zero W home I realised that the perfect use for it would be as the basis for a robot project, so out came the spider kit I had previously bought.
When I studied the picture and the instructions I quickly realised that the kit would make a simple toy that walked in one direction. I would be able to use the Raspberry Pi to remotely make it walk forwards and maybe backwards, but nothing else :)
I realised though that if I bought a second kit, chopped the legs off one side and added it to this kit with the legs chopped off the other side then I would have two independently controllable sides to a spider. This would allow manoeuvrability, line following, obstacle avoidance, etc.
So I bought another £5 kit.

To these two kits I added:
Zero W (£10)
CamJam Edukit #3 (£18 from PiHut but I didn’t use the motors or wheels from it)
Powerpack (£1 from Poundland)
Male Hammer Header (£2 from Pimoroni or £6 including jig and female)
Googly eyes
Lolly sticks
AA batteries

Below are the photos of the build. They are largely self-explanatory though here and there I have added notes (particularly when things went wrong).
I started with a Zero W (and a cup of tea of course)

I am not good at soldering.
Really not good.
The Zero W comes without a GPIO header (the pins used to control robots) so you have to solder one on. Fortunately, the wonderful Pimoroni chaps have recently introduced a product which dispenses with hours of swearing at a soldering iron. They sell ‘Hammer Headers’ which just require some gentle hammer action:


With the GPIO header in place on the Raspberry Pi Zero W it was time to move onto building the kits:

At this point, I should have sprayed WD 40 onto the gears and into the gearboxes as I built them but I didn’t. Instead, I had to try spraying it in at a later point which was rather messy.

Each kit comes with two sets of four legs making eight per kit or sixteen altogther.
Each kit has one motor which is designed to drive two sets of legs simultaneously. You need each motor to drive just one set of legs (four) so need to hacksaw off the spare drive shafts:


With the basic chassis built it is time to introduce the Zero W together with the motor controller HAT from the CamJam Edukit #3 (from The PiHut). Here it is plugged into the powerpack from Poundland

The motor board from the CamJam kit is a very simple H-bridge that allows each motor to be powered separately backwards or forwards with it own separate power supply (AA batteries)

Next I started connecting the motor board up using the instructions from the CamJam website.
I decided to solder the wires to the battery contacts in the spider chassis but they could be attached by trapping them in the little springs.


I was later to discover that two batteries are not enough to power this robot, so I added two more batteries in a battery box much later (see later photos). You will probably want to do this at this point.


Blu Tack is your friend!


You will need some really widdly screwdrivers to attach the wires to the motor board.


You can now make the Pider walk around by remote control but to do this you will need to be able to wirelessly access the Pi Zero W. I use Real VNC to do this over wifi. You activate the Real VNC Server on the Pi Zero then you need another device to be running Real VNC Viewer.
Real VNC runs on a range of different platforms, I have it installed on my Lapdock Raspberry PI, a Windows Laptop and on a Chromebook. By preference, I use the Chromebook to access the Zero in the robot.


Next I wanted to add the ability to follow a line.


NOTE: The wires included in the CamJam kit were all white. This makes the wiring VERY difficult. So I replaced them with coloured wires. This is something that the people at The PiHut who make these kits need to consider :)

Once you have tested that the sensor is working it can be attached.


NOTE: You’ll notice that the line above is rather wide. The reason for this is twofold. Firstly, the Pider rocks from left to right as it walks. This means that if the line is too thin the Pider will see black then white, black then white as it walks. Secondly I cheated on the code and used Scratch to tell the Pider to turn left if it sees black and right if it sees white. This does work, after a fashion.
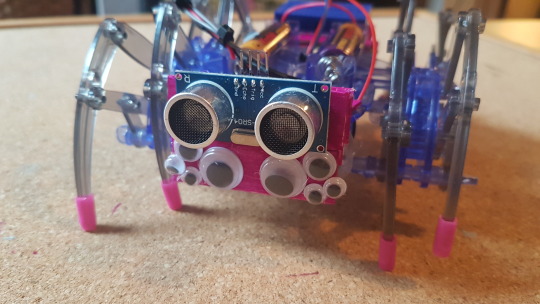
With Mr Nancy happily (just about) following a line course (after a certain amount of colourful language) it was time to add a distance sensor so that he could avoid obstructions.


To hook up the wiring and resistors for the distance sensor you have to add a breadboard to the robot. I did this by building a little platform on the back.


I also had to build a front for the sensor to be glued to.
NOTE: To begin with I used self-adhesive velcro to fix the distance sensor to the front of the motors. This fell off over night. Next I glued the sensor directly to the front of the motor not realising that this would completely gum up the motors and stop them from turning. that is when I opted (after using some choice words) to build a front piece raised forward from the motors.


Again, follow the wiring instructions from the CamJam website.


I had been increasingly concerned at how weedy the motors seemed to be. The Pider struggled to walk most of the time. I wondered if adding more batteries would help, so I added an extra battery compartment (more soldering, aarrgghh)

Success! The additional batteries transformed the Pider, so much so that there was too much power and Mr Nancy leapt all over the place. Then I had to learn how to control the power using something called pwm.
You will note that I haven’t really mentioned coding here. this is for two reasons. People have their own preferences and should really use whatever language they are most comfortable with. Also because I am so ins=experienced at coding I wouldn’t want anyone to copy my bad code.
I suggest checking out the code on the CamJam website though I used it more for inspiration. I used a combination of Scratch (for the line follower and remote control) and Python (for the distance sensor, obstacle avoidance) making use of Ben Nuttall’s excellent GPIOzero which specifically supports the CamJam Edukit #3.


Finally, you will find you have two spare sets of four legs. Each set of legs can be calibrated to take short or long steps. So I have two sets set to long and two sets set to short. You can then pull off and push on different sets of legs according to your needs :)

0 notes
Text
New to tumblr
So I have decided to try using tumblr as an alternative to wordpress in the naive belief that it might be quicker and easier especially when posting lots of media such as build photos.
0 notes