Statistics
We looked inside some of the posts by anemache and here's what we found interesting.
Average Info
Notes Per Post
10
Likes Per Post
10
Reblog Per Post
0
Reply Per Post
0
Time Between Posts
2 days
Number of Posts By Type
Photo
17
Last Seen Tumblr Blogs


Fun Fact
Tumblr was the first site to host the blog for President Barack Obama in 2011.
Photo

Happy Anniversary Shaker Card.
2 notes
·
View notes
Photo

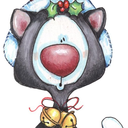
Clipart meets stamps. I’ll have to explain this one. My family is spread all over the place. Very rarely are we ever together to take pictures of one another let alone together. Bouncing off an idea from another crafter, I found these three characters in free clipart. They kind of exude the characteristics of my husband, myself, and my youngest son. This is my oldest son’s Birthday card. He has three dogs that are similar in nature. So, who needs family pictures??? Go find characters in free clipart. Have fun sending Love and Hugs.
0 notes
Photo


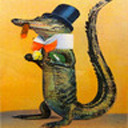
Ya know, every family has that one family member who is hard to buy for, figure out, or quess their real personality. Come on, admit it. Well, this card is intended for one of my sisters. She’s a School Principal and Coordinator of Services for a general area in her locale. She’s quippy, whitty, quick with comebacks, and snarky. To come up with something for HER birthday was extremely tiresome. But, thanks to a fellow Pinterester, Deena, I think I have come up with something. Deena re-posted a blog of hers from 2014 featuring a backpack card. That got my attention! I’ve had the basic card constructed for about a week now and finally decided how to finish t just this morning. I modified it from the tutorial to incorporate educational themed experiences. In the small outer pocket of the “Backpack” are two small inserts that contain a checklist of “To Do’s” and a ;list of books to carry. As seen in the second picture, the first page of the backpack has handwriting/alphabet recognition exercise sheets hung from string. Well, supposed to be student examples of excellent work for others hung from “whatever”. I found free clipart of handwriting/alphabet sheets ( each different), copied them onto a Word document, printed them out, and filled in the letters needed to complete “Happy Birthday”. I placed them back on the printer, scanned them to the computer and reduced them to the size I needed and made my own cut outs. The small brown pieces of paper are supposed to be small clothes pins attaching the worksheets to a line in the “room” for display. “Excellent work”, “Good Job”. On the last page is the Happy Birthday Greeting, which has been stamped to another clipart, affixed to card stock. It’s all held together by a small velcro dot. So if you are looking for a card for a teacher who isn’t into flowers, or the cutesy stuff, try a backpack card!!!! Modify to your heart's content. I just might do a video on this one????
2 notes
·
View notes
Photo


My son, a fan of Friends, loves Hugsy. If you are not familiar with Hugsy, he is the stuffed penguin companion of Joey. I searched high and low for a stuffed Hugsy for him last year for Christmas. Believe it or not, he was on backorder for three weeks. I had a hard time figuring out what do to do for his Birthday card this year and I came up with this. Everything on this card is a Stampin’Up! product except the penguins. The three misfit penguins are from Frantic Stamper. Hugsy, is completely homemade starting with two small circles and the help from the stampin’up! Owl maker punch. This is a slider card, so Hugsy hides behind the cake until you pull the tab upwards to bring him up. Surprise!!!
0 notes
Photo

This card will be sent to my mother and father for their anniversary. I have to give credit to another crafter f cards for the idea. I modified it slightly for the season of my parents anniversary in the fall so I used used darker colors. All materials used for this card are Stampin’Up! products.
1 note
·
View note
Photo

I had a ball putting this card together. It was tedious and time consuming but well worth it. I am so fortunate to have a Big Shot and dies for the trees and leaves. Each of the leaves are 1/8 in. wide and have been placed on the trees individually. Can you spot the Owl? (Trees and Owl are from Scribbling Cottage).The background behind the camper was done with torn paper and the ink was pushed off the paper onto the white card stock at various stages and angles. The clouds (Alt New) are die cuts with the back cloud being slightly modified so not to be exactly the same as the one up front, as two clouds never are the same. I modified another die cut cloud for the one over the mountain. The camper is a pattern for a quilt square. If it can work for material, it can work for paper. All I had to do was select the paper I wanted to use and how I wanted my camper to look. I think it looks kind of groovy. For the campfire, I found a free clipart of a campfire I liked, copied it into a word document, decreased the size I needed and printed it out. I took vellum paper and copied the clipart into the vellum, colored it to look like a campfire in two layers, cut out, and used dimensionals to put the campfire together. The greenery and the birds are Jim Holtz dies. The mountain, dock, and sign are cut from designer paper from Stampin’Up!. the name plaque was done with Microsoft word and the lantern is an icon found within Microsoft. And lastly, the lounge chairs are from Stampin’Up! stamp set Colorful Seasons. Although it took me three days work putting this one together, I am pleased to send this off to my sister and brother-in- law for their anniversary.
#camper card#anniversary campers#stamps#dies#fussy cut#camper#anniversary card#cbriggs#art#homemade cards
2 notes
·
View notes
Photo

Just wanted to throw out a quote today while I take pics of my new work. Be right back.
1 note
·
View note
Photo


Now this has got to be one of my favorite cards I have made so far. The base of the card is “Coastal Cabana” decorated with the leafy paper from the Natures Poem designer series paper. This is a Twist-n-Pop card. This card was made with a variety of stamps and thinlits from Colorful Seasons, Beautiful Bouquet, Waterfront, Timeless Textures, and Birds and Blooms. The greeting pieces on the cards front were embossed with the Woodland embossing folder. I used a variety of techniques on this card and it was time consuming, but well worth it.
#cbriggs#stampin'up!#colorfulseasons#beautifulbouquet#waterfront#timelesstextures#woodland#embossed#twist-n-pop
0 notes
Photo

I’m kinda pleased with this note card. Made out of funky sized scraps from other projects, I embossed the bottom layer with the “Woodlands” embossing folder by SU and the top is embossed with the “Softly Falling” embossing folder. The bird and branch are die cuts from the Petal Palette thinlet set.
0 notes
Photo

I am just thrilled with the way this one came out. This is one of my new embossing folders I just had to try. The card is all white and I used “Sahara Sand” ink. the stampe set is Petal Palette by Stampin’Up!. Just perfect for a wedding.
0 notes
Photo

This is the third card I did using the block ink watercoloring technique. You can see where the ink did not seep into the paper leaving this unique texture. I wasn’t sure what I was going to do this one. I almost threw it away. I did the same thing here, tore away the hard edges of the watercolor paper before the paper dried, giving it that vintage look. With the stamp set “Timeless Textures”, I ever so lightly stamped some grid marks random spots. The stampe set for the display is “Varied Vases” with a Navy blue vase and graduating flowers. The centerpiece is embossed in white crystals.
1 note
·
View note
Photo

This one was also done by adding the ink to the ink block and then turning it over onto the watercolor paper. After sponging off the excess ink, I dipped my finger in water and dabbed the paper which left the water marks. I used SU “Tranquil Tide” and before the watercolor paper dried, I tore away the hard edges. This card was embellished with the leftover pieces from December ‘17 Paper Pumpkin kit and set on a designer series paper from the “Tranquil Tide” collection. I finished it with a satin ribbon and caption.
0 notes
Photo

I had fun doing this card. tried a new watercolor technique where the ink was applied to the stamping block then turned over onto the damp watercolor paper. I used a heavy weight watercolor paper and inked the heavy textures side. You can see on the left side of the paper, the ink did not absorb leaving the splotchy white texture. That’s cool. I sponged up the excess ink with a tissue and around the edges I came in a little further to mellow out the right side of the paper. I really like that effect. the stems for the flowers are embossed in yellow and the flowers are SU “Berry Burst”. I embossed over the flowers with crystal embossing powder.
1 note
·
View note
Photo

anemache's corner turned 1 today!
0 notes
Photo


Father’s Day. Dad needed a chuckle.
0 notes
Photo


Mother’s Day. Don’t often get to see Mom-in-law from Arizona.
0 notes
Photo


Mother’s Day. I wasn’t the easiest kid to live with.
0 notes