I am a Michigan Cosplay that has been cosplaying for three years.
Don't wanna be here? Send us removal request.
Statistics
We looked inside some of the posts by angelshellfirecosplay and here's what we found interesting.
Average Info
Notes Per Post
54K
Likes Per Post
38K
Reblog Per Post
16K
Reply Per Post
29
Time Between Posts
19 days
Number of Posts By Type
Text
7
Video
1
Photo
9
Last Seen Tumblr Blogs


Fun Fact
Tumblr is available in 18 languages.
Text
Cosplay Tip #27
Keep your luggage smelling fresh and clean with scented sachets!
Step 1: Take a sachet!

Step 2: Hide that shit in the lining of your suitcase or an inner pocket of your duffle bag!

Step 3: Sniff sniff, binch!

35 notes
·
View notes
Text
Organization XIII Dress: Tutorial
A little bit ago I posted pictures of my Xion cosplay, and they got good reception, so here is a tutorial on what I did in case you want to recreate it yourself!
WARNING!!!! THIS IS NOT FOR BEGINNERS. I RECOMMEND YOU ONLY DO THIS IF YOU HAVE A GOOD GRASP ON CLOTHING CONSTRUCTION AND HAVE SEWN QUITE BIT.
If you have any questions as you are reading this or as you are making this, PLEASE ASK ME!!!!! I would be happy to help!!!
In truth, this was not that hard. However, fitting it is rather specific to your body type. Also, it was just rather touch and go for me because I was experimenting as I went. If you want to try this yourself, it may require a bit of experimentation as well.
So here is the initial design I did of the dress.
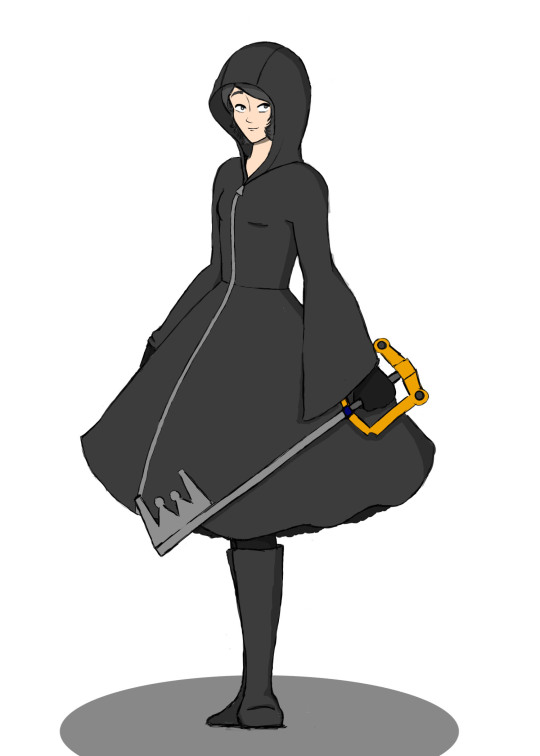
Now this isn’t a very good design, but it kinda communicates the cut of the dress at least.
And I won’t deny, the sleeves are kinda inspired by @kingdomsaurushearts Nyoomine….(which if you haven’t seen that look it up, it’s adorable.) And come to think of it, this dress can totally be a Nyoomine dress if you want. ANYWAYS…
Also, this is another useful tool I learned about in school:
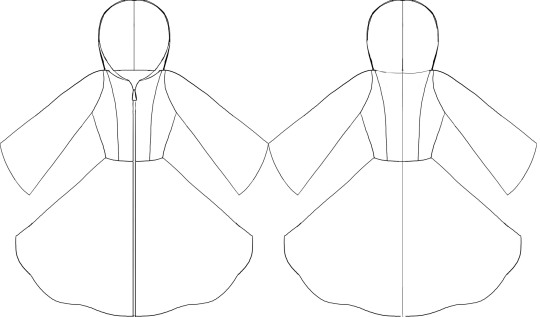
This is called a flat, and designers use it to show their stitchers how the garment is supposed to be made. I didn’t really use this while I was making the dress, because I was experimenting as I went, but you guys can use this as a guide when making your own version of this dress.
Keep reading
209 notes
·
View notes
Video
youtube
💚Loki Cosplay Construction tutorial💚 Or “watch me fail horribly at speaking english” XD Hope it will be of help!
119 notes
·
View notes
Photo

How to make custom lace appliques – the “Frankenlace” method
A lot of people asked for more info on how I made the appliques that decorate the bottom of Zelda’s gown. Here’s my tutorial for the whole process! This method can be used to make all kinds of applique shapes and designs if you get creative with it.
These lace appliques are made out of other lace – hence the nickname. To get started, you’ll need to collect a few lace trims to use as raw material. Look for styles that are similar or complement each other, because you’ll be combining them. This is some, but not all, of the trims I used. I bought these in the LA fabric district, but most are available at trimexpoonline.com.
Cut your lace down into smaller pieces that are more modular. Don’t cut up ALL your lace – this is just an experimentation stage, to practice rearranging the design.
Using a template of your desired shape (I made mine digitally, but you can hand draw one too) practice arranging your pieces until you find a design that suits your needs. This is not my final design in the picture – I went through several versions before I was totally happy with how it looked. You might discover that you need more lace, which is why planning and experimentation are so important. When you’re satisfied with how it looks, it’s time to start putting it all together.
You’ll need an embroidery hoop large enough to cover your whole template, plus some netting that is as close to transparent as you can find. Most generic tulle is NOT fine enough to do well with this technique – the holes are too large and the tulle stretches too much when handled. Look for netting that does not stretch or fray, if possible. Put some netting in your embroidery hoop, tightening the surface like a drum. I taped my template to a small sheet of masonite to give myself a portable work surface. I also ended up using clamps to hold the embroidery hoop to the masonite, but forgot to get a picture. This is optional, but really helps the design from shifting too much as you work.
Tools for the next step: fabric glue (other brands work too), a small paintbrush, and a water cup. I watered my glue down a little to make it easier to spread with the paintbrush. Be careful not to add TOO much water, or your glue will be too thin, not grip well, and take a long time to dry.
Working in small sections, begin gluing your lace pieces onto the netting. Start at the center and work outward, if possible. Continue until all your lace pieces are glued onto the netting.
Here’s what mine looked like with all the lace attached! At this point, I flipped the embroidery hoop over and applied a second coat of glue over the entire back of the work. The netting is so thin that you can continue to apply more glue from the backside to get a more secure grip.
Optional: add rhinestones to taste. I used E6000 for this step. Not every applique requires rhinestones, but in this case I wanted Zelda to sparkle as much as possible.
Repeat to create as many appliques as you need! Zelda has 8 along the bottom of her dress. Here’s part of my assembly line.
When you’re ready to attach the applique to your fashion fabric, trim away some of the netting along the outside, but leave any “interior” portions that help stabilize the design. I simply glued my appliques onto the silk, but I later went back and hand-stitched them down for a more secure hold. After they are properly attached to your fabric, you can VERY CAREFULLY trim away the “interior” pockets of plain netting using small scissors.
The final look of my gown, after all the appliques and trim were attached.
This method is very time consuming and requires a lot of patience and concentration – but I just love the results! I wanted to achieve the look of professionally-made applique, but without access to industrial equipment, this was the next best thing I could come up with.

The white-on-white effect is subtle, but matches the look I was going for. Photo by Vontography.
I hope this is helpful to some of you in your own costume projects. Let me know if you have any questions, and good luck!
6K notes
·
View notes
Photo

Design Your Own: How to Make Color-Blocking Patterns
Tutorial by: Beth Galvin Tutorial Link: https://www.craftsy.com/sewing/article/color-blocking-patterns/
293 notes
·
View notes
Text
How to curl a short wig
Please be nice this is my first tutorial !
I hope this helps you. I did this because I was searching around the Internet trying to find how to curl a short wig for my Bilbo cosplay. But I haven’t found much so here we are :)
First of all the things needed :
a curling iron
Various pins {large amount} (Bobby pins, large hairpins and some smaller pins to pin the hair up)
A comb
Hair ties ( I always use ripped ones bc they’re easier to use on wigs)
Scissors (I cut and styled it at the same time. It’s not really necessary to do it like this but I was short on time)
A lot of patience
And that’s it.
For the wig :

I used a cheap wig I found on ebay. Since bilbo has shorter hair than the wig, i cut the wig in various places.Pay attention to your head form and always always try the wig on after you cut to see if it fits. I have the luck to have the same measurements as a wig head but still, see if it looks good.
(sadly I didn’t make a pic of the cut version sorry). Depending on what character you want to cosplay you should cut the wig the way the character has his hair.
Tipp: It’s easier to cut it before hand because then you won’t have trouble later on.
Remember you still have to curl the wig ! So don’t cut too short !!
After you cut your wig it’s important to have a reference pic to use ! On how the curls should turn out and how to style it
My reference :

It shows you what the curls are supposed to look like on my cosplay ! And since bilbo has not really curly hair I decided to not make curly curls…
Divide the hair into small sections

As you can see in the picture I already begun curling but that’s not important.
To begin curling you need to divide the hair otherwise you will have a mess.I used hair ties to hold the hair up and pinned up the sections that were in the way with some smaller hairpins. I always devide the parts by the beginning of the tresses as you can see in the picture.
Beginning to curl

After you did all the dividing take a small part of the hair, comb it so they all go in the same direction and heat it with the curling iron. I go over it for two times to be sure the hair is hot enough.
Curl the hair
take the curling iron and curl it gently.

After i curled the section it didn’t really produce a perfect curl but remember it’s synthetic hair it does not bend like real hair.
So for the curl to stay in…
Take the section and twist it

After the hair is hot enough you twist the hair in a curl. I always made a small loop out of the hair because I didn’t want the curls to be too large. But you can also twist it in other ways :)
Pin it up
In the next step you pin the section you curled and twisted up so it will stay in place while it cools down

You have to wait for the curls to cool down befire removing the pins so after ca.10 minutes you can take the Bobby pins out.
Tipp : I always used all Bobby pins I had until taking out the pins I already used. So I could be a 100% sure that they had enough time to cool down.
Now you only have to repeat the steps ! Until your wig is done !!

(Sorry for the quality I had to hurry)
That’s how my wig looked like after I curled the first 3 devided sections. In the end this was a bit too curly in this area so I brushed the curls out a bit. I would also recommend to brush the wig gently and once with a wide comb to make the curls look more natural
Enjoy the wig
This is how my wig turned out :
Of course the front part is styled and the whole wig got sprayed with hair spray so it will stay in place.


Hope you enjoyed the tutorial and found it helpful
Made by : Dantalia.cosplay
696 notes
·
View notes
Photo


You get to play yet another powerful woman in this universe. What is it like to see woman after woman in battle?
171 notes
·
View notes
Text
Estimating Yardage

If you need a quick estimate of how much yardage is on a bolt do a quick count of how many times it’s folded around the bolts cardboard core. 2 folds is roughly 1yard.
748 notes
·
View notes
Photo


DIY Makeup Palettes For The Organised (or forgetful) Cosplayer
Got a character with unique or individual makeup requirements? Why not compile those in their own makeup palette case? Whether they require a lot or a little depotting makeup into a new individualised case could make it both easier to find, easier to travel and easier to organise!
Below you will find some tutorials and buying sources that may help you to make this a reality. Why not even customize or stylize the palette for that particular character? Or glue in notes if multiple characters or you yourself share the same eyeshadow, blusher or foundation?
TUTORIALS
Depotting: 1, 2, 3, 4, 5, 6, 7, 8, 9, 10, 11, 12, 13, 14
Palette Making: 1, 2, 3, 4, 5, 6, 7, 8, 9, 10, 11,
Storage: 1, 2, 3, 4, 5, 6, 7,
BUYING
Palettes: 1, 2, 3, 4, 5, 6, 7, 8, 9, 10, 11, 12, 13, 14, 15, 16.
Tins: 1, 2, 3, 4, 5, 6, 7, 8,
65 notes
·
View notes
Photo


COSTUME STORAGE TIPS, TRICKS AND IDEAS
Costumes just lying around looking for a home? Wigs crying out to be stored in a box? Makeup everywhere? Then this is for you! And anyone who needs it. Let’s be real. So you’ve got cosplays and they need to be stored where you can find them and they don’t suffer. Cool, here’s ideas on how to do it! For those with small spaces and big ones!
COSTUMES
Most likely the largest items in your collection, can usually be stored like regular clothes but you do have other options. Below you will find some examples or tutorials on storing your costumes wither individually or as one complete outfit.
LINKS
Tutorials/Ideas: 1, 2, 3, 4, 5, 6, 7, 8, 9, 10, 11, 12, 13, 14, 15, 16.
Buy: 1, 2, 3, 4, 5, 6, 7, 8, 9, 10,
WIGS
Whether heavily styled or not, wigs usually need to be kept somewhere safe so it’s all pretty and not tangled when needing to be used. Look below for links and ideas on how to store these beauties!
LINKS
Tutorials: 1, 2, 3, 4, 5, 6, 7, 8, 9, 10, 11, 12, 13, 14.
MAKEUP
SEE HERE! : X
And also these: 1, 2, 3, 4,
ACCESSORIES
Probably the smallest items and easiest to store. Below you will found some ideas!
LINKS
Ideas: 1, 2, 3, 4.
PROPS
Big or large, pointy or blocky, props gotta go somewhere too and can be the hardest to store. In fact it was super hard to find anything. But I tried!
LINKS
Ideas: 1, 2, 3, 4, 5, 6
EXTRA TIPS
Theatres and dancers have some great tips on extra ways to organize your costumes! You’ll find some below. Also consider small sets or drawers or filing cabinets!
LINKS
Ideas: 1, 2, 3, 4, 5, 6, 7, 8, 9, 10.
ENJOY!
240 notes
·
View notes
Photo


I’ve discovered some people are intimidated by zippers, so here’s a really basic tutorial for installing a zipper so that it’s hidden inside a seam.
2K notes
·
View notes
Text
How to Make Todoroki’s Wig

Base wig is Derek CLASSIC in Silver from @ardawigs. I decided to start off with splicing the wig into two pieces to dye them separately. This way, I will get a clean finish without the color bleeding onto the other half. I then flipped the wig inside out and marked the center area where I’m going to cut it down.

2. When cutting the wefts, be sure to keep the hair out of the way, so no shedding can occur. Here’s a demonstration of how I did it:
youtube
3. Once cut, it will look like this:

What applies to dying human hair doesn’t necessarily apply when it comes to synthetic wigs, meaning, you can’t lighten the color with bleach or use regular or semi-permanent hair dye like Manic Panic. Choosing the color of the base wig depends entirely on the kind of results you want. I usually go with light colors to have a blank canvas, but there are times where I also pick darker shades like Ash Black. There are two routes you could take, one would be to use disperse dyes to get vibrant colors like reds, blues and greens, and the second is to use acid dyes to darken the shade or give the wig an acrylic wash to get natural colors.
Here’s a mini-guide into dying synthetic fibers:

These are examples of some of the methods in action:

5. Going back to Todoroki’s wig, I used the stovetop method where you first fill a pot with enough water, place it on the stovetop and bring the water up to a boil. Next, pour half of the powder package of Idye Poly in Crimson (If I were to do it again, I’d add a bit of red) and the entire package of color intensifier into the water, and stir until evenly dissolved. Lastly, dunk the wig into the dye bath for about two minutes while stirring constantly.

6. It’s very important to rinse the wig until the water runs clear, otherwise the dye will bleed onto the white half of the wig, your face and your clothes too.

7. And now to stitching the skin top back together. Try to align the two pieces next to each other, instead of on top of one another without having any gap so that you can attach them with a ribbon.

8. The more time-consuming option would be hand sewing the two halves together, but you can sew it with a sewing machine just like what I did here. I also matched the thread color with each half.
youtube
9. Again, hand-sewing is a preferable option here, so you can sew the skin top while avoiding sewing the hair along, but what I did is pulling the hair out using the seam ripper then covered the thread.

10. As for the wefts, try to secure each weft with a corresponding weft just as demonstrated:
youtube
11. It will eventually look something like this:

12. Here are the final results after cutting and styling!

I hope you found this helpful. You can purchase the wig directly from my Etsy store:
Todoroki’s wig on Etsy
If you have any questions, feel free to ask!
Twitter
254 notes
·
View notes
Text
Boot Basics Tutorial
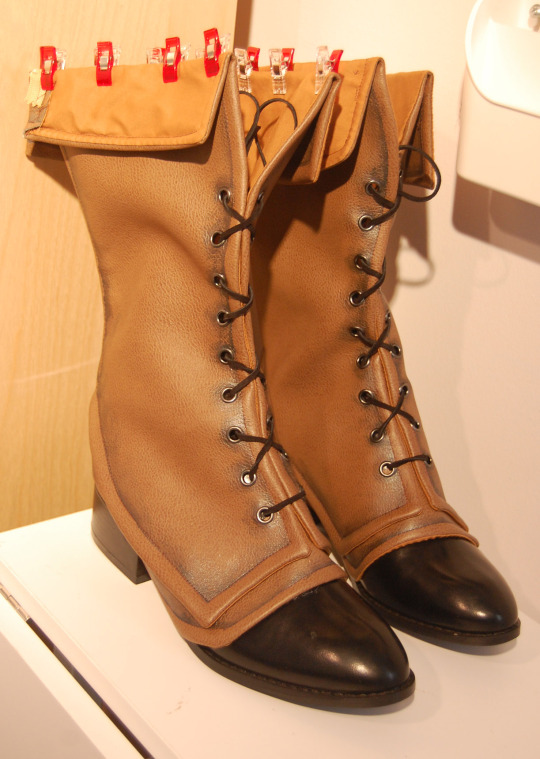
Recently, I wrapped up work on my boots for a cosplay (Lillet from Grim Grimoire) and I got a few questions about how I made them, after posting photos of the first of the pair. So, while making the second, I took pictures and notes along the way.
Keep reading
2K notes
·
View notes

Photo


Here it is, as I promised! So, my first tutorial I actually put some time into doing. I would be ever so happy if people would tell me what they like/don’t like about it so I know in the future how to adjust it. If there is anything you wish to know about it, just ask. I know the Pictures look kinda… bad, but I did what I could with what I had and I, atleast, loved the outcome. I have a new pair of “frillies” and I love them and I tried my best to do this tutorial as simple to follow as possible. When making this, I used a fabric with cotton/linen mix. Thats why it gets so wrinkly so fast, but its still a good fabric for undergarment since it breath and is very soft. This tutorial is a basic, so you can decorate your bloomers as much as you wish and in any way you wish. When following this tutorial, I used the pattern for mens torusers to make the bloomers a bit more casual. I also made the waistline lower, since I don’t really like when things are to tight around my waist. I guess I’m sensetive. Haha. Good luck with your sewing and don’t forget to comment and “follow”. :D
13K notes
·
View notes
Photo

Wig Styling: Working with Foam Part 1 of 3 - Planning Your Project
When sitting down to write a foam tutorial for you guys, I realized that this is a really complex topic that will take way more than a single tutorial! This will eventually become a big section in my wigworking guide, so I wanted to keep it pretty detailed. With that in mind, this overview slash planning portion will probably be the first out of three understructure and foam-related tutorials I’ll be posting here. I love using foam for most of my over the top wig structures, but how I use it will often depend on each individual wig:

Keep reading under the cut for more information!
Keep reading
808 notes
·
View notes
Text
[TUTORIAL] Morrigan Aensland’s Bat Wings (on the head)

Hello everyone! Today I’m posting a tutorial about how I made Morrigan Aensland’s bat wings (the little ones on the head). I did them as an experiment, because I won’t wear her classic outfit soon. The result quite satisfied me.
REMEMBER TO NOT REPOST WITHOUT PERMISSION.
IF YOU’LL USE MY TUTORIAL, PLEASE TAG ME OR QUOTE ME.
You can find me on Facebook as Hachi Cosplay or on Instagram as rebirthjourney
723 notes
·
View notes