
As an open source technology lover, I would like to share my experiences in the open source world. For more information, visit www.arpitram.com or www.arpitram.in
Don't wanna be here? Send us removal request.
Statistics
We looked inside some of the posts by arpitram and here's what we found interesting.
Average Info
Notes Per Post
1
Likes Per Post
1
Reblog Per Post
0
Reply Per Post
0
Time Between Posts
2 months
Number of Posts By Type
Text
10
Photo
1
Last Seen Tumblr Blogs


Fun Fact
69% of Tumblr users are millennials.
Text
JAMstack, Headless CMS vs Traditional CMS
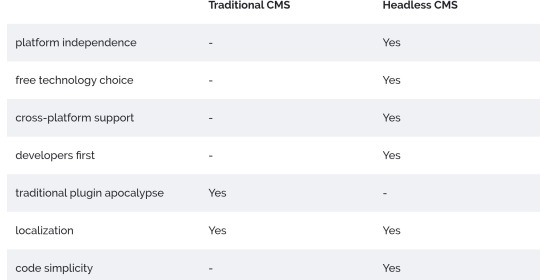
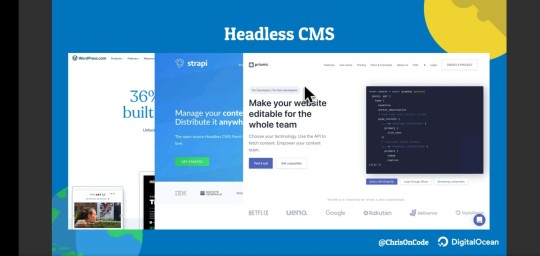
This article will cover the basics of what a headless CMS actually is. You will learn about the main differences between a headless CMS (eg. Storyblok, Contentful, Prismic, …) - and more traditional CMS like Adobe Experience Manager, Wordpress, and Sitecore.

What is a headless CMS?
A headless CMS is a back-end only content management system (CMS) built from the ground up as a content repository that makes content accessible via a RESTful API for display on any device.
The term “headless” comes from the concept of chopping the “head” (the front end, i.e. the website) off the “body” (the back end, i.e. the content repository). A headless CMS remains with an interface to add content and a RESTful API (JSON, XML) to deliver content wherever you need it. Due to this approach, a headless CMS does not care about how and where your content gets displayed. A headless CMS has only one focus: storing and delivering structured content.
The counterpart of a headless CMS is often called monolithic, regular or coupled CMS and we’re going to use those terms later on.

Let’s have a look at WordPress and their feature set:
A database for the content to read and write to.
An admin interface to let editors manage the content.
An integration of reading and writing.
The actual front-end that combines the data from the database with HTML.
To convert that into a headless CMS we simply remove the feature four from the stack. The head of that CMS - the actual website - was simply chopped off. What still stays is an application that allows content management (Admin UI) and reading (API: combined Integrations). Voila you now have got yourself a headless CMS.

Other than by using a regular/monolithic CMS, one website can’t be built only with a headless CMS. A headless CMS separated the head from its stack and therefore lacks this point by design. Therefore, the developer must craft the website by his- or herself and use the Content Delivery API of the headless CMS to load the content.
Creating the whole website on their own seems like a big task on the list, but by decoupling the CMS from the front-end a developer can choose any technology they are already familiar with and do not need to learn the technology for that specific CMS. Another big bonus is the fact that one developer can also focus on their own work without handling the bugs of an already existing stack of technology - therefore it is easier to optimize pages for googles pagespeed and even relaunch parts of the website without needing to care about the content.
Do I need a headless CMS?
The answer to this question is quite simple, but it won’t help you much: It depends on your requirements. There are use cases where one CMS outstands the other and vice versa. To help you decide, let’s have a look at the benefits really quick:
Use cases for Headless CMS
Build a website with a technology you are familiar with.
Websites, Web apps that use JavaScript frameworks (VueJs, React, Angular)
Websites created with static site generators (Jekyll, Middleman, …)
Native Mobile Apps (iOS, Android, Windows Phone)
Enrich product information on ecommerce sites.
Point is: It is not limited to websites
A headless CMS can deliver your content through an API directly to where you need it. Because of the headless approach the content can be used on an iOS app, Android app as well as any platform and technology you can think of (yes and even a Windows Phone App) and is therefore a powerful option for mobile and web developers.
Many believes JAMstack, PROGRESSIVE WEB APPS, Static Site Generators and Headless CMS are the future!
During the start of the age of the internet, static site were prevalent. You had to know how to write HTML to be called a Web Developer. Back then WordPress didn’t exist. All you had was HTML, CSS and JavaScript, eventually WordPress came and promised a clean interface, no coding skills need and a whole lot of themes/templates which you could edit by yourself through their interface. Since then wordpress has pretty much become an internet ruler along side Google. But now the tide is shifting, will you shift as well.
What is a JAMstack
You can also use JAMstack with headless CMS. The JAMstack allows people to create websites that are simpler, faster, and more secure than other web development methods. Sites created with the JAMstack are delivered by pre-rendering files that are served directly from a CDN, removing the requirement to manage or run web servers.
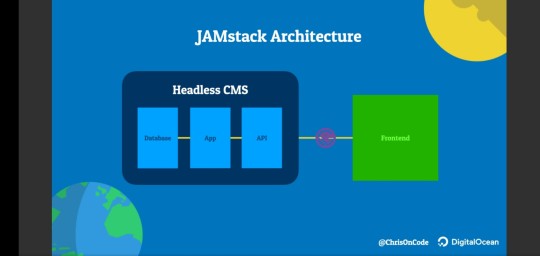
You may have already seen or worked on a JAMstack site! They do not have to include all attributes of JavaScript, APIs, and Markup. They might be built using by hand, or with Jekyll, Hugo, Nuxt, Next, Gatsby, or another static site generator…
The thing that they all have in common is that they don’t depend on a web server.
JAVASCRIPT
Any dynamic programming during the request/response cycle is handled by JavaScript, running entirely on the client. This could be any front end framework, library, or even vanilla JavaScript. eg Jekyll, Gatsby, Nuxtjs, Nextjs, Hugo, Hexo, Vuejs.
API
All server-side processes or database actions are abstracted into reusable APIs, accessed over HTTPS with JavaScript. These can be custom-built or leverage third-party services. eg GitHub API PI, Vero API, Google sheets API, YouTube API.
MARKUP
Templated markup should be pre-built at deploy time, usually using a site generator for content sites, or a build tool for web apps.
When is your site not built with the JAMstack?
Any project that relies on a tight coupling between client and server is not built with the JAMstack. This would include:
A single page app that uses isomorphic rendering to build views on the server at run time.
A monolithic server-run web app that relies on Ruby, Node, or another backend language.
A site built with a server-side CMS like WordPress, Drupal, Joomla, or Squarespace.
Why choose JAMstack?
Better performance – Why wait for pages to build on the fly when you can generate them at deploy time? When it comes to minimizing the time to first byte, nothing beats pre-built files served over a CDN.
Higher Security – With server-side processes abstracted into microservice APIs, surface areas for attacks are reduced. You can also leverage the domain expertise of specialist third-party services. And also with server side CMS you get a larger surface area prone to attack.
Affordable, Easier Scaling – When your deployment amounts to a stack of files that can be served anywhere, scaling is a matter of serving those files in more places. CDNs are perfect for this, and often include scaling in all of their plans.
Better Developer Experience – Loose coupling and separation of controls allow for more targeted development and debugging, and the expanding selection of CMS options for site generators remove the need to maintain a separate stack for content and marketing.
#references : StoryBlok https://www.storyblok.com/tp/headless-cms-explained?_ampify=1&__twitter_impression=true
1 note
·
View note
Text
JavaScript Clean Code — SOLID
Like any other programming language, JavaScript is also subject to the principles outlined in SOLID.
SOLID consists of 5 concepts that we can use to make our programs better. They are:
Single responsibility principle
Open / closed principles
Liskov Substitution principle
Interface segregation principle
Dependency inversion principle
In this article, we’ll look at each and see how we can apply them to JavaScript programs.
Single Responsibility Principle
The single responsibility principle says that each of our classes has to be only used for one purpose.
We need this so that we don’t have to change code as often when something changes. It’s also hard to understand what the class is doing if it’s doing many things.
Unrelated concepts in the same class also make comprehending the purpose of the code harder.
For example, we can write something like the following to follow the single responsibility principle:
class Rectangle {
constructor(length, width) {
this.length = length;
this.width = width;
}
get area() {
return this.length * this.width;
}
}
The Rectangle class above only has the length and width of a rectangle as members and lets us get the area from it.
It does nothing else, so it follows the single responsibility principle.
A bad example would be:
class Rectangle {
constructor(length, width) {
this.length = length;
this.width = width;
}
get area() {
return this.length * this.width;
}
createCircle() {
}
}
We should have a createCircle method in a Rectangle class since they’re unrelated concepts.
Open/Closed Principle
The open/closed principle states that a piece of software is open for extension but closed for modification.
This means that we should be able to add more functionality without changing existing code.
For example, if we have the following Rectangle class:
class Rectangle {
constructor(length, width) {
this.length = length;
this.width = width;
}
get area() {
return this.length * this.width;
}
}
Then if we want to add a function to for calculating its perimeter, we can do it by adding a method to do it as follows:
class Rectangle {
constructor(length, width) {
this.length = length;
this.width = width;
}
get area() {
return this.length * this.width;
}
get perimeter() {
return 2 * (this.length + this.width);
}
}
As we can see, we didn’t have to change existing code to add it, which satisfies the open/closed principle.
Liskov Substitution Principle
This principle states that if we have a parent class and a child class, then we can interchange the parent and child class without getting incorrect results.
This means that the child class must implement everything that’s in the parent class. The parent class serves the class has the base members that child classes extend from.
For example, if we want to implement classes for a bunch of shapes, we can have a parent Shape class, which are extended by all classes by implementing everything in the Shape class.
We can write the following to implement some shape classes and get the area of each instance:
class Shape {
get area() {
return 0;
}
}
class Rectangle extends Shape {
constructor(length, width) {
super();
this.length = length;
this.width = width;
}
get area() {
return this.length * this.width;
}
}
class Square extends Shape {
constructor(length) {
super();
this.length = length;
}
get area() {
return this.length ** 2;
}
}
class Circle extends Shape {
constructor(radius) {
super();
this.radius = radius;
}
get area() {
return Math.PI * (this.radius ** 2);
}
}
const shapes = [
new Rectangle(1, 2),
new Square(1, 2),
new Circle(2),
]
for (let s of shapes) {
console.log(s.area);
}
Since we override the area getter in each class that extends Shape , we get the right area for each shape since the correct code is run for each shape to get the area.
Interface Segregation Principle
The interface segregation principle states that “clients shouldn’t be forced to depend on interfaces that they don’t use.”
This means that we shouldn’t impose the implementation of something if it’s not needed.
JavaScript doesn’t have interfaces, so this principle doesn’t apply directly since it doesn’t enforce the implementation of anything via interfaces.
Dependency Inversion Principle
This principle states that high-level modules shouldn’t depend on low-level modules and they both should depend on abstractions, and abstractions shouldn't depend upon details. Details should depend upon abstractions.
This means that we shouldn’t have to know any implementation details of our dependencies. If we do, then we violated this principle.
We need this principle because if we do have to reference the code for the implementation details of a dependency to use it, then when the dependency changes, there’s going to be lots of breaking changes to our own code.
As software gets more complex, if we don’t follow this principle, then our code will break a lot.
One example of hiding implementation details from the code that we implement is the facade pattern. The pattern puts a facade class in front of the complex implementation underneath so we only have to depend on the facade to use the features underneath.
If the underlying classes change, then only the facade has to change and we don’t have to worry about making changes to our own code unless the facade has breaking changes.
For example, the following is a simple implementation of the facade pattern:
class ClassA {
}
class ClassB {
}
class ClassC {
}
class Facade {
constructor() {
this.a = new ClassA();
this.b = new ClassB();
this.c = new ClassC();
}
}
class Foo {
constructor() {
this.facade = new Facade();
}
}
We don’t have to worry about ClassA , ClassB and ClassC to implement the Foo class. As long as the Facade class doesn’t change, we don’t have to change our own code.
Conclusion
We should follow the SOLID principle to write code that’s easy to maintain.
To following SOLID, we have to write classes that only do one thing.
Our code has to open for extension but closed for modification. This reduces the chance of messing up the existing code.
Parent and child classes have to be interchangeable when we switch them. When we switch them, the result still has to be correct.
Finally, we should never have to depend on the implementation details of any piece of code that we reference so that we won’t end up with lots of breaking changes when something changes.
This lets us reduce the coupling between modules.
Source : https://levelup.gitconnected.com/javascript-clean-code-solid-9d135f824180
0 notes
Text
Ansible and Jenkins - automate your scripts

Best Practices that companies must follow :
Automate every action you’ve done more than once.
Don’t use Jenkins static groovy library.
Use Jenkins + Ansible + Python for automation.
The problem
Any developer in his work always faces a situation when some action needs to be repeated. Sometimes these actions are urgent and need to be done very quickly. F.e. your prod is down and you need to rebuild indexes on your database, or repopulate images on your dashboard, or re-elect new leader in your distributed back-end.
It is good to remember these 3 golden rules, which can make your life easier:
If you repeat an action more, than twice — it should be automated.
If there are several steps to be done — they should be put in one script.
When there is some complex set up before running these actions — everything should be documented.
Following these rules will decrease the time you usually spend on firefighting. It may seem unnecessary to spend time on such automation from business prospect, but in real life you free your time for development new features, as well as reduce the time needed to fix a problem.
Another problem is a bus factor. When you have manual actions — there will always be a person, who knows critical and unique information. If this person (dies) leaves your company — you won’t be able to fix the problem quickly, as knowledge would be lost. Documented scripts with actions are your friends here.
Custom scripts
At some point all developers come to the rules, mentioned above. They start to automate their actions by creating scripts. It is good, but here hides the danger — such scripts are usually written in different programming languages and are stored in many repositories.
It is hard to maintain such a zoo. And sometimes even hard to find a script for a particular problem. Maybe some scripts will be even re-implemented several times. Be ready for it.
Another problem is the environment. Such scripts are friendly to it’s creator’s environment. And now imagine you’ve found an old script, written in some language you don’t have installed in your system. What should you do to quickly run it and fix the problem?
Jenkins shared libraries
One solution here is to make Jenkins solve your problem. You have groovy shared libraries with scripts, which do fixes you need. And Jenkins jobs, each one for the problem you need to fix. Everything in one repository.
The approach is good, but not the implementation.
It is really hard to develop such scripts. I’ve faced a lot of problems with it, because there is no guarantee, that a code, you’ve tested locally will work in Jenkins. The main reason lies in different Groovy version.
Python scripts
To solve the versioning problem one can use Python + Conda/ venv. Python itself is very good for scripting and quite widespread. There is a higher chance somebody in your team knows Python, than Groovy.
With the help of Conda you can use the same Python version everywhere.
I also highly recommend docopt for Python. Do you remember about the third rule of automation? It is much better when your documentation comes together with the code, because it reduces the maintenance difficulty.
Comments in script are not always able to explain you why and how this script should be run and what are the arguments value. The docopt will handle parameters and default values for you as well as printing the help message on every wrong argument provided or just by demand.
Ansible + Python
After previous stage you have self-documented version-independent script. A developer’s dream. What can be improved?
First of all they are still a bit coupled with python dependencies. If you are going to use these python scripts as a company standard — you have to force everybody to install conda in order to be able to run these scripts.
Second — you still need a central storage for such scripts. The unique source of truth, where fix for ideally any problem can be found.
To solve both issues you need to use Ansible and have single repository for it’s scripts (in huge companies you should prefer per-department repository).
Every problem, which can be solved with scripts turns into the role. Each role has it’s Readme, where problem and solution are described. Root’s readme points to each role’s readme with a small comment of a problem it solves.
It doesn’t replace your Python scripts, as plain ansible scripts are harder to debug and develop. Instead of it all python scripts go into files or templates inside the role and are called as a part of the play.
Jenkins + Ansible + Python
The problem with first line support is they are usually cheaper and less qualified than usual developers. They also may run Windows and have no idea about what Ansible is. The ideal solution for them is to provide a document with rules like “If you suspect this problem - push that button”. And you can do it with the help of Jenkins. First of all ensure you have ansible plugin installed.
Second - create credentials for ssh usage.
Third - write a pipeline for every role you wish to create a button for. You can place it in the role’s root directory in front of Readme and make repository root’s Jenkins pipeline scan for all pipelines in roles/ and create child Jenkins pipelines if necessary.
Summing up
Automated scripts allow you to fix problems much faster, but they also require some effort to make them easy to use and platform independent.
Self-documented scripts allow you to reduce bus factor and on boarding time for newcomers.
Centralized repository with standardized tools allows you to do a quick responsibility handover to another team in future.
Ansible + Jenkins allows you to fix problem by pressing a single Jenkins button (even when you are at vacation and have only your mobile phone with you) or running an ansible script, when your Jenkins is down.
Jenkins Buttons allows you to reduce the qualification requirements and the price of the first line support.
Reference Source : https://itnext.io/ansible-and-jenkins-automate-your-scritps-8dff99ef653
0 notes
Text
Building Devops pipelines with opensource tools
DevOps has become the default answer to fixing software development processes that are slow, siloed, or otherwise dysfunctional. But that doesn't mean very much when you're new to DevOps and aren't sure where to begin. This article explores what a DevOps pipeline is and offers a five-step process to create one. While this tutorial is not comprehensive, it should give you a foundation to start on and expand later.
A table at the back of the book shows how often different companies deploy to the release environment:
Company Deployment Frequency Amazon 23,000 per day Google 5,500 per day Netflix 500 per day Facebook 1 per day Twitter 3 per week Typical enterprise 1 every 9 months
How are the frequency rates of Amazon, Google, and Netflix even possible? It's because these companies have figured out how to make a nearly perfect DevOps pipeline.
A brief introduction to DevOps and the CI/CD pipeline
If you ask several people, "What is DevOps? you'll probably get several different answers. DevOps, like agile, has evolved to encompass many different disciplines, but most people will agree on a few things: DevOps is a software development practice or a software development lifecycle (SDLC) and its central tenet is cultural change, where developers and non-developers all breathe in an environment where formerly manual things are automated; everyone does what they are best at; the number of deployments per period increases; throughput increases; and flexibility improves.
While having the right software tools is not the only thing you need to achieve a DevOps environment, some tools are necessary. A key one is continuous integration and continuous deployment (CI/CD). This pipeline is where the environments have different stages (e.g., DEV, INT, TST, QA, UAT, STG, PROD), manual things are automated, and developers can achieve high-quality code, flexibility, and numerous deployments.
This article describes a five-step approach to creating a DevOps pipeline, like the one in the following diagram, using open source tools.

Without further ado, let's get started.
Step 1: CI/CD framework
The first thing you need is a CI/CD tool. Jenkins, an open source, Java-based CI/CD tool based on the MIT License, is the tool that popularized the DevOps movement and has become the de facto standard.
So, what is Jenkins? Imagine it as some sort of a magical universal remote control that can talk to many many different services and tools and orchestrate them. On its own, a CI/CD tool like Jenkins is useless, but it becomes more powerful as it plugs into different tools and services.
Jenkins is just one of many open source CI/CD tools that you can leverage to build a DevOps pipeline.
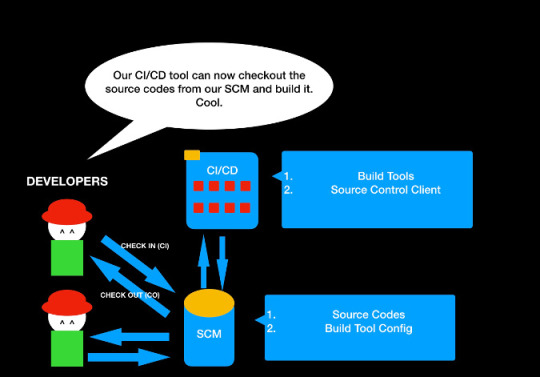
Here's what a DevOps process looks like with a CI/CD tool.

You have a CI/CD tool running in your localhost, but there is not much you can do at the moment. Let's follow the next step of DevOps journey.
Step 2: Source control management
The best (and probably the easiest) way to verify that your CI/CD tool can perform some magic is by integrating with a source control management (SCM) tool. Why do you need source control? Suppose you are developing an application. Whenever you build an application, you are programming—whether you are using Java, Python, C++, Go, Ruby, JavaScript, or any of the gazillion programming languages out there. The programming codes you write are called source codes. In the beginning, especially when you are working alone, it's probably OK to put everything in your local directory. But when the project gets bigger and you invite others to collaborate, you need a way to avoid merge conflicts while effectively sharing the code modifications. You also need a way to recover a previous version—and the process of making a backup and copying-and-pasting gets old. You (and your teammates) want something better.
This is where SCM becomes almost a necessity. A SCM tool helps by storing your code in repositories, versioning your code, and coordinating among project members.
Although there are many SCM tools out there, Git is the standard and rightly so. I highly recommend using Git, but there are other open source options if you prefer.

Here's what the DevOps pipeline looks like with the addition of SCM.

The CI/CD tool can automate the tasks of checking in and checking out source code and collaborating across members. Not bad? But how can you make this into a working application so billions of people can use and appreciate it?
Step 3: Build automation tool
Excellent! You can check out the code and commit your changes to the source control, and you can invite your friends to collaborate on the source control development. But you haven't yet built an application. To make it a web application, it has to be compiled and put into a deployable package format or run as an executable. (Note that an interpreted programming language like JavaScript or PHP doesn't need to be compiled.)
Enter the build automation tool. No matter which build tool you decide to use, all build automation tools have a shared goal: to build the source code into some desired format and to automate the task of cleaning, compiling, testing, and deploying to a certain location. The build tools will differ depending on your programming language, but here are some common open source options to consider.
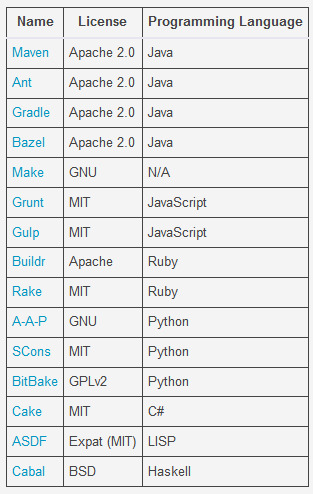
Awesome! You can put your build automation tool configuration files into your source control management and let your CI/CD tool build it.
Everything is good, right? But where can you deploy it?
Step 4: Web application server
So far, you have a packaged file that might be executable or deployable. For any application to be truly useful, it has to provide some kind of a service or an interface, but you need a vessel to host your application.
For a web application, a web application server is that vessel. An application server offers an environment where the programming logic inside the deployable package can be detected, render the interface, and offer the web services by opening sockets to the outside world. You need an HTTP server as well as some other environment (like a virtual machine) to install your application server. For now, let's assume you will learn about this along the way (although I will discuss containers below).
There are a number of open source web application servers available.
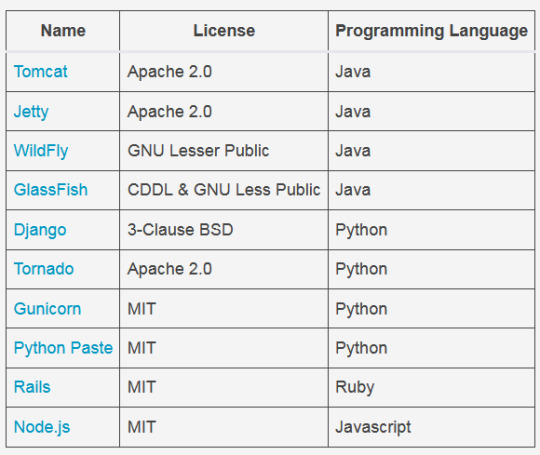
Now the DevOps pipeline is almost usable. Good job!

Although it's possible to stop here and integrate further on your own, code quality is an important thing for an application developer to be concerned about.
Step 5: Code testing coverage
Implementing code test pieces can be another cumbersome requirement, but developers need to catch any errors in an application early on and improve the code quality to ensure end users are satisfied. Luckily, there are many open source tools available to test your code and suggest ways to improve its quality. Even better, most CI/CD tools can plug into these tools and automate the process.
There are two parts to code testing: code testing frameworks that help write and run the tests, and code quality suggestion tools that help improve code quality.
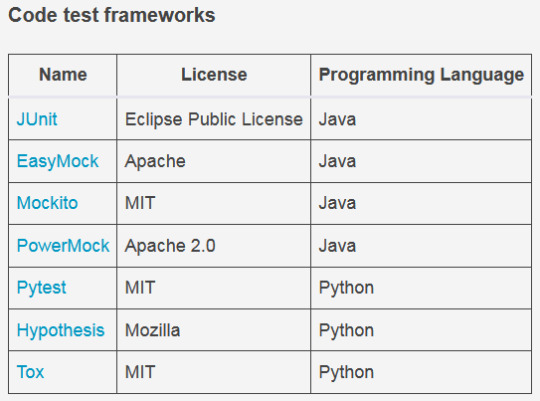

Note that most of the tools and frameworks mentioned above are written for Java, Python, and JavaScript, since C++ and C# are proprietary programming languages (although GCC is open source).
Now that you've implemented code testing coverage tools, your DevOps pipeline should resemble the DevOps pipeline diagram shown at the beginning of this tutorial.
Optional steps
Containers
As I mentioned above, you can host your application server on a virtual machine or a server, but containers are a popular solution.
What are containers? The short explanation is that a VM needs the huge footprint of an operating system, which overwhelms the application size, while a container just needs a few libraries and configurations to run the application. There are clearly still important uses for a VM, but a container is a lightweight solution for hosting an application, including an application server.
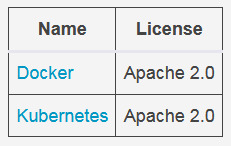
Although there are other options for containers, Docker and Kubernetes are the most popular.
Middleware automation tools
Our DevOps pipeline mostly focused on collaboratively building and deploying an application, but there are many other things you can do with DevOps tools. One of them is leveraging Infrastructure as Code (IaC) tools, which are also known as middleware automation tools. These tools help automate the installation, management, and other tasks for middleware software. For example, an automation tool can pull applications, like a web application server, database, and monitoring tool, with the right configurations and deploy them to the application server.
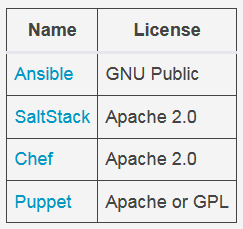
Here are several open source middleware automation tools to consider:
Source : https://opensource.com/article/19/4/devops-pipeline
0 notes
Text

4 Best reasons to start using VPN :
A VPN or virtual private network is service that allows you to create a secure and private connection from a device to the network. Just think of it as an online service you use to hide your digital footprints by masking your real IP address and encrypting your Internet traffic. Thanks to the regulation of internet by governments around the world and cyber-attacks by nefarious online elements, VPN has become the need of the hour. Just as you protect your personal information like your phone number and address, you now need to protect your online information. If you are still not convinced about the importance of VPN services, this article is just for you. Here we will talk about 4 important reasons as to why you should start using a VPN right now.
Reasons Why You Should be Using a VPN
While there are myriad of benefits of using a VPN, there are four important points that everyone should consider before giving up on VPN services.
A VPN Protects Your Traffic, Data, and Privacy
A VPN Lets You Unblock Any Content You Want
With a VPN, You Can Bypass Bandwidth Throttling
VPNs Offer a Better Gaming Experience
We will be talking about all these points in detail in the upcoming section. Feel free to jump to the section that you want to read.
1. A VPN Protects Your Traffic, Data, and Privacy
Have you ever experienced an online ad following you across websites? It might be for a product that you search for or already bought. Doesn't it feel creepy to be served ads for things you have searched in the past? Well, it happens because tracking pixels on websites track your searches and then tailor the ads for you.
The above situation that I described is just a fraction of problems that you as an internet user have to deal with while going online. I have not even mentioned the privacy problems that come with using internet. Just to give you a taste of what I am talking about, consider the fact that your internet service provider or ISP is probably selling your internet usage data to make money off you while you are already paying them for the service. In short, if you are going online without a VPN, you’re exposing yourself to the following risks:
- Giving hackers a free pass to eavesdrop on your online communications when you use public WiFi.
- Making it easy for cyber-criminals, government surveillance agencies, and ISPs to see what you type on unencrypted websites, what web page you search for, and what files you download (just to name a few examples).
- Letting your ISP sell your browsing data to advertisers.
- Ending up in legal trouble for torrenting files, and leaking your IP address to every member of the Swarm (total number of people downloading and uploading a torrent).
Using a VPN prevents all these horrible scenarios. VPN encrypts your connection using encryption technologies, such as IP security (IPSec), Secure Sockets Layer (SSL), Transport Layer Security (TLS) and more. When you use a VPN anyone snooping in on your connection, whether it's your ISP, online tracking pixels, or hackers, see gibberish data.
2. A VPN Lets You Unblock Any Content You Want
Few things are as annoying in life as hearing about a cool new TV series only to later find out you can’t watch it because it’s only available on streaming platforms that don’t work in your country. Sky Go, Hulu, HBO GO, BBC iPlayer – you name it. There are tons of websites that won’t let you enjoy their content simply because you’re from “the wrong” part of the world.
Yes, they have their reasons for doing that (copyright regulations and licensing fees), but that hardly makes it fair. Worst of all, you’re gonna deal with geo-restrictions even if you live in a country where you have access to all the content you want. After all, it’s no longer going to be available the moment you go abroad on vacation, or temporarily move outside the country for work.
geoblocking
And don’t forget about Internet censorship! If geo-blocks aren’t a concern, the government telling you what you can and can’t watch online should be. Many oppressive regimes force national ISPs to block various websites nation-wide. Take China for example. Due to its strict internet policies, its residents and visitors cannot access popular websites like Facebook (although, I am not crying for that), YouTube, Twitter, Netflix, and more. Oh, and then there are firewalls. You know - the kinds of restrictions you’ll deal with at work or school if the network admin has to block websites like Facebook or Instagram to comply with the workplace or school policies.
How does a VPN help you with all that, you ask? Simple – it masks your real IP address, which contains data that leaks your geo-location (info that geo-blocks need to be efficient), and which firewalls also use to enforce restrictions. You can even select which country you want your connection to seem to originate from. For example, you can select USA as your VPN connection country and then your connection will seem to originate from the US allowing you to access all the geo-restricted content.
3. With a VPN, You Can Bypass Bandwidth Throttling
Did you ever notice a sudden decrease in online speeds whenever you were downloading something, watching an online video, or Skyping with your friends? That’s basically bandwidth throttling in action. It’s when your ISP reduces some of your Internet speed because you’re using up “too much data.” ISPs are pretty clever and they hide the bandwidth throttling in fine prints so most users are not even aware of it. You might have a fast 50 Mbps internet connection. However, it won't be the same everywhere as ISPs generally throttle speed if you are torrenting or streaming 4K content.
Bandwidth Throttling
ISPs might claim they’re doing that to prevent network congestion, which is understandable. However, usually, ISPs use bandwidth throttling to pressure users into buying pricier subscriptions and data plans. They also get to save money that way by making sure they don’t need to buy more expensive equipment to process user data faster.
Using a VPN can alleviate this problem. A VPN encrypts your Internet traffic, making sure your ISP can’t see your Internet activity. Without that info, your ISP can no longer throttle your bandwidth since they won’t see what you’re doing online.
4. VPNs Offer a Better Gaming Experience
Playing online with your friends is extremely fun – at least until you have to deal with an annoying IP ban or geo-blocks preventing you from playing in the same region as your friends. That’s where a VPN comes into play.
It hides your IP address and encrypts your traffic, making sure you can evade IP bans from sore loser admins, prevent bandwidth throttling from ruining your fun, and join matches in any region you want no matter where you are in the world. If you play online multiplayer games, a VPN can help reduce ping time and lag if it has a solid server in that country. This is a huge gain if you compete in online gaming competitions as every millisecond matters at pro-level gaming tournaments.
Gaming
Besides that, you also get other additional perks:
You no longer have to worry about DoS/DDoS attacks from jealous players targeting you and ruining your killstreaks.
You get instant access to banned or uncensored video games (extremely useful if you live in or travel through Australia).
No longer having to wait a week or two until a new game gets released in your region since you can just “pretend” you’re from another region where the game is already available.
How to Choose the Right VPN Service
With nearly 1,000 (or more) VPN providers on the market, picking the right one can feel like trying to find a needle in a haystack. Also, since we are using multiple devices, it's not fun to choose a VPN service and find that it's not available on multiple platforms. After all, you don't want to use different VPN services for Windows, Android, iOS and other platforms. That's why, before you choose a VPN service, make sure that you focus on some key features to have a slightly easier time finding the ideal VPN for you:
- A no-log policy
- Powerful encryption
- Cross-platform compatible apps
- Kill Switch features
- P2P support
- Lots of speedy servers
Of course, that doesn’t narrow things down too much as many VPN services claim to offer all these features. Looking up dozens of VPN providers, and closely analyzing all their features is a huge time-sink – not to mention how it takes a lot of effort. That's why we took it on ourselves to test out all the major VPN service providers. If you want a shortcut, we recommend that you check out Private Internet Access (PIA). Their VPN service offers military-grade security, is user-friendly, and you can run it on up to 10 simultaneous devices. Overall, Private Internet Access is a great VPN. If you’d like to read an in-depth review of the service, just follow the link.
Source :
For more understanding and learning, you can connect me on www.arpitram.com or www.arpitram.in. See you all with more interesting thoughts on the world of IT world.
0 notes
Text
Ansible: Automating App Build and Deployment from a Github Repository

From Github to Deployment — Automatically
Ansible, an IT automation framework (and my automation framework of choice) opens the doors for automated deployment of applications, whether that be on a single VPS or throughout an entire datacenter.
The collection of features Ansible offers makes it suitable for a wide range of automated tasks, from provisioning, server configuration management, and of course, application deployment. The built-in modules Ansible offers, and overall requirements for Javascript based apps — React, Angular, and Webpack based apps that require a building (or bundling) processes — make Ansible an elegant solution for automating the entire process.
This article will walk through the process of writing an Ansible Playbook for fetching a repository (public or private) from Github, installing dependencies, and building it on your server with yarn build. From here the build will be moved to your live production directory, replacing the previous build in the process. A Playbook is a series of YAML formatted commands that will execute for each of the hosts the Playbook connects to. In our case we will connect to a singular host — a server that will host your production build.
The techniques talked about here will be applied to a Create React App project, but in reality they can be applied to any framework / build process. This process will serve as an introduction to Ansible and its capabilities, as well as how to use it in conjunction with Github. We will cover:
How to install Ansible on your local machine
How to set up Github SSH keys and switch from HTTPS to SSH repository URLs. Making the switch to SSH and SSH keys will allow Ansible to fetch your private repositories without being prompted with credentials
How to configure Ansible to support SSH agent forwarding, which is necessary to make authenticated Github SSH requests
How to store sensitive data (your SSH password for your VPS, for example) using an encryption mechanism called Ansible Vault
How to write a simple deployment Playbook (written in YAML), and how to use modules such as the git, yarn and command to make the deployment happen.
How to run a Playbook, with useful flags
We will firstly install Ansible within a Python virtual environment and set up a VS Code Workspace, before setting up Github SSH access and writing our Ansible playbook to automate deployment.
NOTE : Ansible is simple, agentless IT automation that anyone can use. It is simply based on SSH and YAML based Playbooks.
For more information, refer https://medium.com/@rossbulat/ansible-automating-app-build-and-deployment-from-a-github-repository-7d613985f686
0 notes
Text
What are Low, Middle, and High Level Programming Languages?
Programming languages can be divided into three broad categories. These are High-Level, Middle-Level and Low-Level languages. These three types of languages are different based on various characteristics.
High level refers to programming languages that are written in a way that can be understood by a human. They are independent and programmers don’t need to have any prior knowledge of the hardware in which the program will be used. Examples of high-level programming languages include C++, Java and Python.
Middle-level languages serve as a bridge between the hardware and programming layer of a computer They operate within the abstraction layer of a computer. C is called middle-level language because it is actually bind the gap between a machine level language and high-level languages. User can use c language to do System Programming (for writing operating system) as well as Application Programming (for generate menu driven customer billing system ).
On the other hand, low-level languages are written to meet the needs of particular computer architecture and hardware requirements. An assembly language, often abbreviated asm, is any low-level programming language in which there is a very strong correspondence between the program's statements and the architecture's machine code instructions. Each assembly language is specific to a particular computer architecture and operating system.
Below are the points to highlight key differences between high level, middle level, and low-level programming languages.
1. Speed
In terms of speed, programs written in low-level languages are faster than those written in middle and high-level languages. This is because these programs do not need to be interpreted or compiled. They interact directly with the registers and memory.
On the other hand, programs written in a high-level language are relatively slower. The main reason for this is they written in human language. This means that the computer is forced to translate and interpret them into human language before it executes them. All these processes are time-consuming.
The speed of the mid-level language is in between the high and low-level languages. It is neither too high nor too low.
2. Memory requirement
This is another parameter that we can use to differentiate these three types of languages. Low-level languages are very efficient in terms of memory. They consume less memory. This is very different to high-level languages which are known for being memory-intensive. They consume a lot of memory especially when we consider that the fact that these languages still run on a specific runtime environment. The memory-efficiency of medium level programming languages is not that high as compared to the ones of high-level languages.
3. Ease of use
Low-level languages are friendly to the machines but unfriendly to the human programmers. As a human programmer, it is quite hard to deal with binaries and mnemonics. The fact that each instruction is designed for a specific computer architecture makes the language more technical. In short, low-level languages are difficult to learn.
On the other hand, high-level languages are human-friendly. They consist of English statements which can be learned and memorized with ease. This explains why they are the most popular type of programming language.
4.Portability
In this context, the term portability refers to the ability of a language to be used in different computers. Low-level programming languages are less portable. This is because their instructions are machine-dependent. This simply means that each instruction is written for a particular machine. The codes for a particular machine cannot run in another computer architecture.
High-level languages are machine independent. One code can be used on a different machine and even on a different architecture without any difficulties. This means that high-level programming languages are highly portable. You can transfer a program written in a high-level language from one environment to another and it will still work.
5. Abstraction
In this context, abstraction refers to the relationship between the language with computer hardware. It is minimal or even zero abstraction between low-level languages with computer hardware. These languages interact seamlessly with the computer memory and register.
The gap between mid-level languages and hardware is quite significant. It is bigger than that of low-level languages but smaller than the one with high-level languages.
As expected, high-level languages have the maximum level of abstraction. This is because they operate from the topmost level of a computer where there is minimal interaction with hardware.
As you can see, there are clear differences between high level, mid-level, and low-level programming languages. We can also point out that each type of programming language is designed to serve its specific purpose. For this reason, we cannot recommend one type of programming over the other.
0 notes
Text
Many companies are thinking about Big Data Projects with the huge amount of business data they have. Technology here plays a very important role in building a full-fledged setup for big data applications. JVM languages (Java, Scala) & Python/R are the obvious choices for these purpose. So what will you choose for big data applications.
Here is some important points to consider :
https://diceus.com/python-vs-java-for-big-data/
0 notes
Photo

This is what Backend people has to manage. Being as a backend guy, one has to offer so much of skill sets in order to manage & maintain application development, deployment & debugging. In today's modern projects, there are so many requirements that one technology might not be enough to fulfill the requirements. So try to enhance your technical skills in programming along with good knowledge of OS, networking & troubleshooting skills. Try to understand the concepts & logic, only then you will be able to build a robust, bug free & secure application. Be Agile, move to automation world & artificial intelligence. Think conceptually & just keep it simple 💻🖥️
0 notes
Text
Open Source World
Impact of Open-Source Technologies on the growth of a start-ups - As a start-up company, all you want is to provide good quality product or services to the users/clients. The factors which are important for any start up are Investments in infrastructure, platforms, softwares, etc. With proper investments & usage of open source technologies, one can build a good software applications considering all the process cycle from architecture design to development to testing to deployment to release.
In every aspect of an IT technologies, you will use open-source components that will help you in achieving your desired goal. In open-source world, an IT profession has the liberty to muster the power of technologies. In my opinion, top three open-source projects based on asynchronous and event driven technologies are NginX, NodeJS & Redis. Foe synchronous & process driven likes of Apache, Java, Python, etc are widely used. Explore the world of open-source projects and dive into magic of implementation.
There are many good open source projects available which are very helpful. For building chatbots, RASA NLU & RASA Core are very useful. Redhat’s Ansible is another example which can be used for automation of tasks.
#TechnoGeek👨🏻💻 #TechnologyEvangelist

Currently, my programming technology stack is as follows :

0 notes