
HERE YOU'LL FIND TUTORIALS FOR PHOTOSHOP AND ROLEPLAY. FEEL FREE TO SEND IN A REQUEST! IF I CAN'T MAKE THE TUTORIAL MYSELF THEN I WILL FIND YOU A LINK TO ONE. run by effie.
Don't wanna be here? Send us removal request.
Statistics
We looked inside some of the posts by beauchampresources and here's what we found interesting.
Average Info
Notes Per Post
8K
Likes Per Post
6K
Reblog Per Post
3K
Reply Per Post
2
Time Between Posts
4 months
Number of Posts By Type
Text
1
Photo
6
Note
1
Last Seen Tumblr Blogs


Fun Fact
Forty percent of Tumblr users are between the ages of 18 to 25.
Text
Rounded border batch icons tutorial.
Under the read more you’ll find my step by step guide on how I make my rounded border icons in batches. There may be different ways to do it but this is how I do it and through this process I’m normally able to make a couple hundred icons within an hour. Just remember to never put more than 85-100 caps at one time. The border that I use can be found here.

OPEN PHOTOSHOP ↦ CTRL + N or click file ↦ NEW ↦ I always put 1080 x 780. Most original screencaps will fit in that. Make sure where it says background contents you have it set to transparent.

Next click CREATE VIDEO TIMELINE

click on the film strip then ADD NEW MEDIA

Select 85 to 100 screencaps that you want to use for icons.

after that CLICK ON THE THREE BOXES ON THE BOTTOM LEFT CORNER.

Everything should look something like this. Now you’re going to DRAG THE FIRST FRAME IN THE TIMELINE TO THE TRASH BIN TO DELETE IT.

CLICK ON THE CROP TOOL ↦ at the top left corner change W x H x Resolution to 1 : 1 ( SQUARE )


Once cropped everything should look like this.

Next hit ALT+CTRL+I or click on IMAGE ↦ then type in whatever size you want your icons. I always choose 75x75.


Next go to bridge and OPEN YOUR ICON PSD ↦ SELECT THE FIRST ICON IN YOUR LAYERS PANEL ↦ DROP THE PSD OVER THE ICONS.


Everything should look like this. In your layers panel CLICK ON VIDEO GROUP 1 to minimize that folder.

I cannot stress enough how important this next step is! Now that the video group 1 file is minimized CLICK ON THE FOUR LINES AT THE TOP RIGHT CORNER OF YOUR TIMELINE ↦ FLATTEN FRAMES INTO LAYERS.

SELECT THE VIDEO GROUP 1 FOLDER ↦ DELETE ↦ CLICK GROUP AND CONTENTS


IF YOU ARE NOT INTERESTED IN ROUNDED BORDER ICONS THEN SKIP TO THE EXPORTING SECTION BELOW.
Now for the border go back to BRIDGE ↦ OPEN YOUR BORDER PSD


GO BACK TO YOUR ICONS TAB

CLICK ON THE FOUR LINES ON THE TOP RIGHT CORNER OF YOUR TIMELINE ↦ SELECT ALL FRAMES ↦ COPY FRAMES


GO BACK TO YOUR BORDER TAB ↦ CLICK ON THE FOUR LINES ↦ PASTE FRAMES


Everything should look like this. SELECT THE BORDER LAYERS IN YOUR PANEL ↦ RIGHT CLICK ↦ DUPLICATE LAYERS


DRAG THE NEW SET OF BORDER LAYERS ABOVE ALL THE SCREENCAPS IN YOUR LAYERS PANEL

SELECT THE OLD SET AT THE BOTTOM ↦ DELETE THEM


DELETE THE FIRST FRAME IN YOUR TIMELINE.

Now everything should look like this.

ZOOM IN FROM 100% TO 600%


CLICK ON THE FOUR LINES ↦ SELECT ALL FRAMES ↦ HIGHLIGHT ALL OF THE SCREENCAPS IN YOUR LAYER PANEL ( leave the border files unselected )


SELECT THE MOVE TOOL ↦

DRAG THE CORNERS OF THE CAPS BEHIND THE BORDER ↦ CLICK ON THE CHECK

CHANGE FROM 600% BACK TO 100 %

At this point I normally change the frame delay from 5sec. to 0.2 then press play and let it run like a gif that way I can see which icons didn't look good and delete them. You don’t really have to do that though bc you can always go into the folder after you’ve finished all of the icons and filter out the bad ones then. Tbh the extra step just saves me time later on.

AGAIN THIS STEP IS SUPER IMPORTANT! CLICK ON THE FOUR LINES AT THE TOP RIGHT CORNER OF YOUR TIMELINE ↦ FLATTEN FRAMES INTO LAYERS.

GO TO YOUR LAYERS PANEL ↦ SELECT EVERYTHING UNDER FRAME 1 ↦ DELETE EVERYTHING SELECTED.

CONGRATS YOU’RE ALMOST FINISHED WE JUST HAVE THE EXPORTING SECTION LEFT.
CLICK FILE ↦ EXPORT ↦ LAYERS TO FILES

CLICK BROWSE AND SELECT WHATEVER FOLDER YOU WANT YOUR ICONS SAVED INTO

NAME YOUR ICON BATCH. Now you’re going to have to change the name for each batch otherwise it will just keep replacing the icons from the last batch with the icons from the new one. I always name my batches something like FCINITIALS_01_ that way when it comes to the next batch I just have to change it to FCINITIALS_02_ and so on.

MAKE SURE THE SETTING MATCH THE SCREENCAP BELOW THEN CLICK RUN

Once you click run you can’t touch photoshop until the icons are finished exporting. A batch of 85 - 100 icons normally takes about 3-5 minutes on my computer so I normally just go on tumblr and chill until the icons are finished exporting. When they are finished photshop will make a sound and then you just click okay.

Now you’re finished, you can go into the folder that you exported everything to and take a look at the icons if you want. If I’m making more than one batch after I hit okay I just go back to the tab that has the original screencaps click on history, then click on the first tab, and it should take you back the original 1080 x 780 transparent image.

#ps.resources#rp.resources#Rounded border tutorial#batch icons tutorial#ps resource#rp resource#ps tutorial#icons tutorial#indie rp
11 notes
·
View notes
Photo

theme thirteen by adrianivashkovs
preview / pastebin freetexthost
- lazy load
- 300-500px posts
- 4 custom links
- second title
let me know if there’s something wrong with the code!
5K notes
·
View notes
Photo

hello everyone, your friendly neighbor potato here to say thank you so much for the support you have given to this blog. even when it’s put under inactivity, there are still a few asks being sent, it’s wonderful ! but, after a lot of commotion in the tumblr rp community, i lost my passion to make anymore icon PSDs, and in exchange, i now seek to be an artist more. i will carry my known skills and improve more as i grow. and i would hope for all of you too ! i know i’m not the best source for this photoshop and coding stuff, but the support you’ve given really helped. so once again, thank you to everyone who has been with potatorecs since 2016. i hope 2017 brings you nothing but happiness and a great future. and for that, i went ahead and asked a few of my friends for my old PSDs that they had so i can give it back to you guys once again. - sincerely, potato
PSD PACKETS INCLUDED : VOLUMES 1-8 (except 4)
( NO CREDITED NEEDED, DON’T CLAIM AS YOURS, EDITING IS ALLOWED ) ;
[ DROP BOX ] [ MEGA.NZ ]
108 notes
·
View notes
Photo

Don’t panic! I will still be selectively offering icons for free but commissions will be opened for large sets (300+) and sets that are styled/personalised. I am making my prices very cheap, because I don’t want to isolate anyone with stupidly high prices and the end of the day I just want to help. All commissioned icons will be for you only, they wont be posted.
Prices + Info:
300 Plain/Base Icons for £1 ($1.24)
300 Styled Icons from £2 ($2.48)
50 Plain Gif Icons from £1
2 Promo Banners (or online/offline) for £1 ($1.24)
Promo banner examples: [x], [x], [x] & [x]
More Information!
STYLES
11 notes
·
View notes
Note
I hate to bother you ! but the download on your icon post isn't working ! c:

you’re not, love! i’m so sorry, dropbox can be awful, so i just decided to upload it with two more borders in a zip file to media fire. it can be found here. please like or reblog if you’re using. i hope i’ve helped! xx
624 notes
·
View notes
Photo


— PSD#1 BY XENARESOURCES —
b&w psd for gifs with optional brightness ▫ download ▫
80 notes
·
View notes
Photo
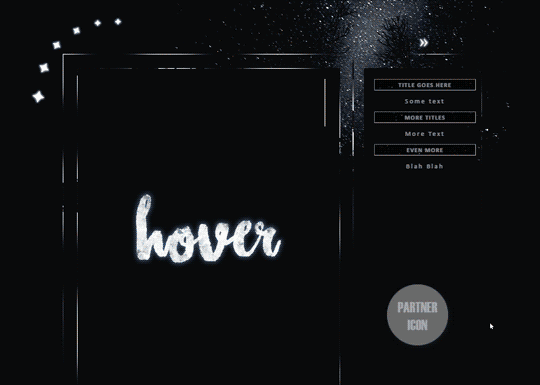

Base Code #01. Moondust
static preview | live preview (temporary)
( After days of tutorials and coding, my first roleplay theme is now finally complete and as requested, I decided to share it with every one of you. You are free to edit / change / use it to your heart’s content, however you please, as long as you do not remove my credit, sell, repost, or claim as your own in any way.
CODE 01
Includes popup pages
Custom verses page.
Customized pop up navigation & askbox.
Customizable post size & position.
All post types instantly adjust to designated post width.
Posts display on hover option.
Partner Icon option.
CODE 02
Editable from the basic tumblr theme editor, without needing to go into the html / coding area.
However, due to that it doesn’t include the pop up pages as they can’t be customized from the basic editor.
Includes everything else as mentioned above.
If you find any problems with either, please do not hesitate to let me know or if you find difficulties with installing it; as it’s my first theme, I am expecting some errors and room for improvement but am always willing to help everyone as much as I can. )
PSD.
And finally, last but not least, credit to @octomoosey for all the amazing tutorials and helpful tips which guided me through building this theme from scratch.
A like or reblog if using would be highly appreciated and please do not remove credit.
3K notes
·
View notes
Photo


RP icon PSD for season 2 of Witches of East End, As many of you know this season’s coloring was extremely difficult to work with however after a few hours I was able to put together this PSD in the hope that it will help anyone who uses members of the cast as their FC. P L E A S E Like/Reblog if you download. ( x )
16 notes
·
View notes