
Don't wanna be here? Send us removal request.
Statistics
We looked inside some of the posts by benchsmartphysio and here's what we found interesting.
Average Info
Notes Per Post
1
Likes Per Post
1
Reblog Per Post
0
Reply Per Post
0
Time Between Posts
17 days
Number of Posts By Type
Text
17
Last Seen Tumblr Blogs


Fun Fact
Mobile Tumblr US users spend an average of 4.04 minutes per session on the app.
Text
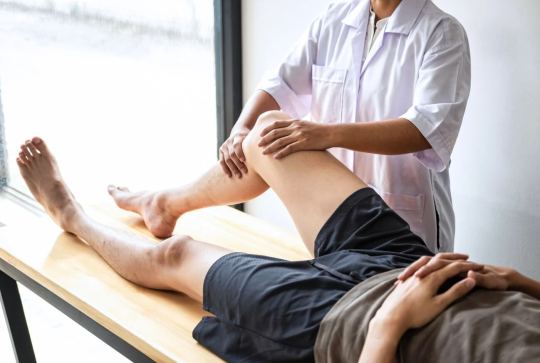
Effective Shoulder Impingement Exercises to Relieve Pain

Shoulder pain is one of the most common musculoskeletal complaints, and a frequent culprit behind this discomfort is shoulder impingement. This condition can significantly limit your mobility and daily function, particularly if left untreated. Fortunately, with the right guidance and rehabilitation plan—including targeted shoulder impingement exercises—you can recover strength, flexibility, and confidence in your shoulder’s movement.
At Benchmark Physio, our experienced physiotherapists understand that no two shoulders—and no two people—are the same. We use proven, safe, and effective treatment methods that don’t just ease your pain but address the underlying causes. Whether other approaches have fallen short or you want a solution that goes beyond rest and painkillers, we’re here to help.
What is Shoulder Impingement?
Shoulder impingement syndrome occurs when the tendons of the rotator cuff are compressed or “impinged” between the bones of the shoulder joint during movement. This often results in pain, weakness, and difficulty lifting the arm, especially overhead.
Common causes include:
Repetitive overhead activities (e.g., painting, swimming, weightlifting)
Poor posture
Muscle imbalances
Shoulder instability or previous injury
Left untreated, impingement can worsen and potentially lead to more severe rotator cuff injuries or even frozen shoulder.
The Role of Shoulder Impingement Exercises
Effective shoulder impingement exercises are designed to:
Reduce inflammation and pain
Strengthen the rotator cuff and stabilising muscles
Improve shoulder mobility and flexibility
Correct posture and movement patterns to prevent recurrence
However, it’s important that these exercises are done under the guidance of a qualified physiotherapist, especially if your symptoms are persistent or severe.
At Benchmark Physio, we tailor your exercise plan based on your condition’s severity, goals, and lifestyle demands—ensuring safe and sustainable recovery.
Recommended Shoulder Impingement Exercises
Here are several physiotherapist-approved shoulder impingement exercises that may be included in a rehabilitation plan:
1. Scapular Retractions
This exercise helps activate the postural muscles and improves shoulder blade stability.
Stand or sit upright.
Gently squeeze your shoulder blades together.
Hold for 5–10 seconds, repeat 10–15 times.
2. Pendulum Swings
A gentle mobility exercises great for early recovery stages.
Lean forward with your good arm supported on a table.
Let your affected arm hang down and swing in small circles.
Perform for 1–2 minutes in each direction.
3. Wall Angels
Promotes postural correction and improves shoulder flexibility.
Stand with your back against a wall.
Raise your arms like a goalpost and slide them up and down the wall.
Keep your elbows and wrists in contact with the wall.
4. External Rotations with Band
Strengthens rotator cuff muscles and improves shoulder joint control.
Attach a resistance band to a door handle.
Hold the band with your elbow bent at 90 degrees and rotate your arm outward.
Perform 2–3 sets of 10–12 repetitions.
5. Sleeper Stretch
Targets internal rotation and relieves tightness in the posterior capsule.
Lie on your side with the affected arm underneath.
Gently push the forearm down with the other hand until a stretch is felt.
Hold for 30 seconds and repeat.
Note: These exercises should only be performed under professional advice, especially if you are experiencing significant pain or limitation.
Why Choose Benchmark Physio?
At Benchmark Physio, we’re committed to going beyond short-term fixes. We understand that many people with shoulder pain are simply told to rest or rely on pain medication. While this may offer temporary relief, it doesn’t address the root cause of the problem.
Our approach is different:
✅ Comprehensive assessment to identify all contributing factors
✅ Tailored shoulder impingement exercise programs
✅ Hands-on manual therapy as needed
✅ Postural and ergonomic advice
✅ Ongoing education to empower long-term shoulder health
If you've tried other treatments without success or are simply tired of being told to "rest and wait," our team is here to provide practical, personalised solutions that restore movement and improve your quality of life.
Book Your Shoulder Assessment Today
Don’t let shoulder impingement limit your lifestyle or keep you from doing the activities you love. With the right combination of therapy and shoulder impingement exercises, recovery is not just possible—it’s likely.
Contact Benchmark Physio today and let our experienced team create a tailored treatment plan that gets your shoulder—and your life—back on track.
0 notes
Text
Understanding Forward Head Posture

In today’s digital age, forward head posture is becoming increasingly common, especially among individuals who spend hours hunched over screens. Also known as "tech neck," forward head posture occurs when the head juts forward, out of alignment with the spine. While it may seem like a minor issue, it can lead to long-term discomfort, chronic pain, and mobility issues if not addressed early.
At Benchmark Physio, we specialise in identifying and treating the root causes of postural problems like forward head posture. Our experienced team of physiotherapists use proven, safe, and effective treatment methods that not only alleviate pain but also improve function and prevent recurrence.
What Is Forward Head Posture?
Forward head posture is a condition where your head sits ahead of your body’s centre of gravity. Ideally, your ears should align with your shoulders when viewed from the side. In cases of forward head posture, the head extends forward, placing excess strain on the neck and upper back muscles.
What Causes Forward Head Posture?
There are several common causes of forward head posture, including:
Poor ergonomic setup at workstations or desks
Extended use of mobile devices (text neck)
Long periods of driving
Slouching or poor posture habits
Weak core and neck muscles
Past injuries such as whiplash
It’s especially common among office workers, students, and anyone spending long hours sitting without proper posture support.
Symptoms and Health Impacts
Forward head posture is not just an aesthetic concern. It can lead to a range of physical symptoms and long-term health consequences if left untreated, including:
Neck, shoulder, and upper back pain
Frequent headaches or migraines
Reduced range of motion
Tingling or numbness in the arms and hands
Jaw pain or TMJ issues
Breathing difficulties due to restricted chest expansion
Fatigue from muscle overuse
If you're experiencing any of these symptoms, it may be time to see a physiotherapist to assess whether forward head posture is the root cause.
How Benchmark Physio Can Help
At Benchmark Physio, we take a holistic approach to treating forward head posture. Rather than simply addressing the pain, our focus is on identifying and correcting the underlying biomechanical imbalances that are causing the issue.
1. Comprehensive Postural Assessment
Our initial consultation includes a detailed posture assessment, which helps us identify the severity of the misalignment and contributing factors.
2. Manual Therapy
Our physiotherapists use gentle, hands-on techniques to release tight muscles and mobilise stiff joints. This can provide immediate relief from pain and improve posture alignment.
3. Exercise Prescription
We design customised exercise programs that include:
Stretching tight muscles such as the chest and neck
Strengthening weak areas like the deep neck flexors and upper back muscles
Core stability exercises to support spinal alignment
Regular adherence to these exercises is key to correcting forward head posture and maintaining healthy biomechanics.
4. Ergonomic and Lifestyle Advice
Preventing recurrence is just as important as treatment. Our team provides expert advice on ergonomic improvements for your workstation, as well as practical strategies for maintaining proper posture throughout the day.
Why Choose Benchmark Physio?
At Benchmark Physio, we are passionate about improving lives through high-quality physiotherapy. Our team of experienced professionals takes the time to understand your unique needs and develop a personalised treatment plan. We don’t just ease your pain—we work to correct the cause and ensure lasting relief.
We’ve helped countless individuals in Sydney and beyond find relief from postural issues, return to their favourite activities, and regain confidence in their bodies.
Tips to Prevent Forward Head Posture
Even small daily changes can make a big difference. Here are some quick tips to reduce your risk of developing forward head posture:
Set your monitor at eye level
Use a chair with good lumbar support
Avoid looking down at your phone for extended periods
Take frequent breaks to stretch and move
Practice posture checks throughout the day
Strengthen your upper back and core regularly
Book Your Appointment with Benchmark Physio Today
If you suspect you have forward head posture or are experiencing chronic neck and back discomfort, don’t wait for it to worsen. Early intervention is the key to lasting relief and improved posture.
Contact Benchmark Physio today to schedule a comprehensive assessment and start your journey towards a pain-free, aligned, and healthier posture.
0 notes
Text
Glute Bridge Exercise: How to Do It Right

If you’re looking to build a stronger core, improve your posture, and activate your glutes effectively, the glute bridge exercise is one of the best bodyweight workouts you can do. Simple yet highly effective, this exercise targets your glutes, hamstrings, and lower back, making it a staple in both beginner and advanced fitness routines.
Whether your goal is to tone your glutes, improve your athletic performance, or alleviate lower back pain, understanding the glute bridge exercise and how to perform it correctly can make a significant difference in your fitness journey.
What Is the Glute Bridge Exercise?
The glute bridge exercise involves lying on your back, bending your knees, and lifting your hips toward the ceiling while engaging your glute muscles. It's a low-impact movement that can be done without any equipment, making it ideal for home workouts and gym settings alike.
This exercise is particularly beneficial for people who spend long hours sitting, as it helps counteract the effects of prolonged hip flexion and inactivity by activating the posterior chain.
Key Benefits of the Glute Bridge Exercise
1. Glute Activation and Strengthening
The primary focus of the glute bridge is to strengthen the gluteus maximus — the largest muscle in the body. Strong glutes are essential for movements like squats, lunges, and deadlifts, as well as everyday actions like walking, climbing stairs, and lifting.
2. Improved Posture and Core Stability
By engaging the glutes and core, the glute bridge helps stabilize the pelvis and spine. This can contribute to better posture and reduce the risk of lower back pain and injury.
3. Enhanced Athletic Performance
Stronger glutes can improve performance in running, jumping, and sports that require explosive power. Athletes often use glute bridges as part of their warm-up or strength training routine.
4. Reduced Lower Back and Knee Pain
Activating the right muscles can help alleviate compensatory strain on the lower back and knees, making the glute bridge exercise beneficial for rehabilitation and injury prevention.
5. Versatility
The glute bridge can be modified or progressed in various ways — from adding resistance bands to performing single-leg bridges — to increase intensity and effectiveness.
How to Perform the Glute Bridge Exercise Correctly?
Follow these steps for proper form:
Start Position: Lie on your back with your knees bent, feet flat on the floor, and arms by your sides. Keep your feet hip-width apart and heels close to your glutes.
Engage Core and Glutes: Tighten your core muscles and squeeze your glutes.
Lift Hips: Push through your heels to lift your hips toward the ceiling. Your body should form a straight line from your shoulders to your knees.
Hold the Position: Pause at the top for 1–2 seconds, continuing to squeeze your glutes.
Lower Down: Slowly lower your hips back to the floor with control. Repeat for 10–15 reps.
Tips for Maximum Effectiveness
Avoid overarching your lower back.
Do not push with your arms or shoulders.
Ensure the movement is coming from your hips, not your back.
Keep your chin slightly tucked to maintain neck alignment.
Popular Variations of the Glute Bridge Exercise
To add challenge and variety to your workouts, try these variations:
1. Single-Leg Glute Bridge
Lift one leg off the ground and perform the bridge using only one leg. This variation increases the load and improves balance and coordination.
2. Elevated Glute Bridge
Place your feet on a bench or stability ball to increase the range of motion and intensity.
3. Banded Glute Bridge
Add a resistance band around your thighs to activate your glute medius and improve lateral hip stability.
4. Weighted Glute Bridge
Rest a dumbbell or barbell across your hips to add resistance and build more strength.
5. Hip Thrust
Often confused with the glute bridge, the hip thrust is a more advanced movement done with your upper back elevated on a bench for increased range and resistance.
Incorporating Glute Bridges into Your Routine
The glute bridge exercise is versatile enough to be used in warm-ups, strength training sessions, or as part of rehabilitation programs. For best results:
Start with 2–3 sets of 10–15 reps.
Increase resistance or difficulty as your strength improves.
Pair with complementary exercises like squats, lunges, and deadlifts for a balanced lower-body workout.
Final Thoughts
The glute bridge exercise may look simple, but its impact on your fitness is powerful. Whether you're aiming to tone your glutes, recover from an injury, or simply maintain a healthy, active lifestyle, glute bridges deserve a place in your regular workout routine.
With minimal equipment and maximum benefit, there's no reason not to include this effective movement in your fitness plan. Ready to strengthen your glutes and improve your posture? Start incorporating glute bridges today!
0 notes
Text
Cat-Cow Exercise: Powerful Movement for Spinal Health

When it comes to simple, low-impact stretches that promote mobility and reduce stiffness, few movements are as beneficial as the cat-cow exercise. Often used in yoga, pilates, and rehabilitation routines, the cat-cow exercise improves flexibility, posture, and spinal alignment. Whether you’re a beginner or an experienced fitness enthusiast, incorporating cat-cow into your daily routine can yield long-lasting health benefits.
In this blog, we’ll explore what the cat-cow exercise is, how to perform it correctly, and the many physical and mental benefits it offers. If you're looking for a versatile movement that supports overall well-being, this one belongs at the top of your list.
What Is the Cat-Cow Exercise?
The cat-cow exercise is a gentle, flowing movement that transitions between two poses: “cat” (Marjaryasana) and “cow” (Bitilasana). It's a foundational movement in yoga that targets the spine, neck, shoulders, and core.
This dynamic stretch involves alternating between spinal flexion and extension, promoting both mobility and stability. It’s called “cat-cow” because the movement mimics the arching back of a cat and the swayed back of a cow.
How to Perform the Cat-Cow Exercise
Here’s a step-by-step guide to performing the cat-cow exercise correctly:
1. Start on All Fours: Begin in a tabletop position with your hands directly under your shoulders and knees under your hips. Keep your spine neutral and engage your core.
2. Cow Pose (Inhale):
Drop your belly toward the mat.
Lift your chin and chest while gazing upward.
Draw your shoulders away from your ears.
Tilt your pelvis back, creating an arch in your lower back.
3. Cat Pose (Exhale):
Round your spine toward the ceiling.
Tuck your tailbone and draw your belly button toward your spine.
Drop your head, tucking your chin toward your chest.
4. Repeat Slowly: Move fluidly between these two positions for 5–10 breath cycles or longer. Synchronise each movement with your inhale and exhale.
Pro Tip: Always move with control and avoid rushing. The goal is to gently massage the spine and warm up the body.
Benefits of the Cat-Cow Exercise
1. Improves Spinal Flexibility and Mobility
The cat-cow exercise mobilises each vertebra, improving range of motion and reducing stiffness. It’s especially useful for those with sedentary lifestyles or desk jobs.
2. Promotes Better Posture
By encouraging awareness of spinal alignment, this exercise helps correct poor posture over time. Regular practice can relieve postural back pain and promote a more upright stance.
3. Relieves Back and Neck Tension
The alternating movements help stretch and release tension in the neck, shoulders, and lower back. It’s an excellent warm-up for more intense workouts or a cool-down stretch after sitting for long periods.
4. Supports Core Engagement
While not a core workout per se, the cat-cow exercise encourages abdominal engagement and spinal stability, which are vital for core strength and injury prevention.
5. Encourages Mindful Breathing
Synchronising breath with movement cultivates mindfulness and relaxation. This makes it a great exercise not just for physical health but also for reducing anxiety and stress.
Who Should Do the Cat-Cow Exercise?
The beauty of the cat-cow exercise is its accessibility. It’s suitable for:
Office workers experiencing neck and back stiffness
Athletes needing a warm-up or cool-down stretch
Seniors looking for gentle mobility exercises
Pregnant women (with doctor’s approval)
People with chronic lower back discomfort
Always consult a healthcare professional before starting new exercises, especially if you have spinal conditions.
Tips for Getting the Most Out of Cat-Cow
Use a yoga mat for cushioning knees and wrists.
Start slowly, especially if you’re recovering from injury.
Focus on breath control, not speed or intensity.
Modify as needed: place a folded blanket under knees for support or perform the exercise seated if mobility is limited.
Final Thoughts
If you're looking for a simple yet highly effective stretch to add to your daily routine, the cat-cow exercise is a must. It boosts spinal mobility, improves posture, relieves tension, and supports mental well-being through mindful breathing.
Whether as part of your yoga practice or a daily self-care ritual, this versatile movement can help keep your body and mind in harmony.
0 notes
Text
Proven Tips to Speed Up Recovery After Workout

Whether you're an athlete, a weekend warrior, or just starting your fitness journey, how you recover after exercise is just as important as the workout itself. Knowing how to speed up recovery after workout sessions can help reduce soreness, prevent injuries, and keep your performance on track. This guide explores science-backed recovery tips to help you bounce back quicker and stronger.
Why Recovery Is Crucial
During a workout, your muscles experience tiny tears, especially after resistance training or intense cardio. Recovery is the body’s process of repairing those muscles, making them stronger over time. However, without proper recovery, you can suffer from fatigue, decreased performance, and even overtraining injuries.
That’s why understanding how to speed up recovery after workout routines is key to sustainable fitness progress.
1. Hydrate Immediately
One of the simplest ways to boost post-workout recovery is to rehydrate. Your body loses fluids through sweat, and dehydration can slow down muscle repair. Aim to drink water or an electrolyte-infused beverage after your workout to replenish fluids and minerals.
Pro tip: Add coconut water or a pinch of sea salt and lemon to your water for natural electrolyte support.
2. Refuel with Protein and Carbs
Consuming a balanced post-workout meal can speed up recovery after workout by giving your body the nutrients it needs to rebuild muscle and replenish energy stores. Protein provides amino acids for muscle repair, while carbohydrates restore glycogen levels.
Ideal post-workout snack ideas:
A protein shake with a banana
Chicken and sweet potato
Greek yogurt with berries and honey
3. Prioritise Sleep
Sleep is when your body does the majority of its repairing and healing. Aim for 7–9 hours of quality sleep each night to allow muscles and tissues time to recover. Deep sleep increases the release of growth hormone, which is essential for muscle growth and repair.
Quick tip: Avoid caffeine after 2 p.m. and establish a calming bedtime routine to enhance your sleep quality.
4. Use Active Recovery
Contrary to popular belief, total rest isn't always the best option. Light physical activity, also known as active recovery, can help improve blood flow, which in turn delivers oxygen and nutrients to tired muscles faster.
Active recovery activities:
Gentle yoga or stretching
Walking or cycling at a low pace
Swimming or foam rolling
5. Try Compression and Cold Therapy
Compression garments and cold therapy (like ice baths or cold showers) can help reduce inflammation and muscle soreness. These methods work by reducing swelling and flushing out metabolic waste from your muscles.
Bonus: Combining contrast showers (alternating hot and cold water) can further enhance circulation and recovery.
6. Incorporate Rest Days
Even the most dedicated athletes take rest days. Your muscles need time off from intense strain to rebuild and strengthen. Schedule at least one to two full rest days per week, or alternate high- and low-intensity workout days to avoid burnout.
7. Use Supplements Wisely
Supplements like BCAAs, magnesium, creatine, and omega-3 fatty acids may support faster recovery by reducing inflammation and promoting muscle synthesis. Always consult with a healthcare provider before adding new supplements to your routine.
8. Focus on Flexibility and Mobility
Stretching and mobility exercises help maintain joint health and muscle elasticity. Incorporating daily mobility work can speed up recovery after workout by preventing stiffness and improving your overall movement quality.
Speed Up Recovery After Workout the Smart Way
To speed up recovery after workout effectively, you need a holistic approach—one that includes proper nutrition, hydration, sleep, active rest, and smart recovery techniques. Listen to your body and give it the care it needs so you can return to your workouts stronger and more resilient.
By making recovery a priority in your fitness plan, you’ll not only feel better but also perform better in the long run. So, the next time you hit the gym, don’t forget to treat recovery with the same importance as your workout itself.
1 note
·
View note
Text
Unlock Core Strength with the Russian Twist Exercise

The Russian twist exercise is one of the most effective core workouts that targets the abdominal muscles, obliques, and lower back. Whether you're an athlete, a fitness enthusiast, or someone just starting their fitness journey, incorporating the Russian twist into your routine can significantly improve your core strength, balance, and overall body stability.
What is the Russian Twist Exercise?
The Russian twist exercise involves sitting on the floor with your knees bent and your feet either flat or lifted slightly off the ground. You lean back at about a 45-degree angle and clasp your hands together or hold a weight like a medicine ball. Then, you twist your torso from side to side, touching the weight or your hands to the floor beside you on each side.
This rotational movement activates the obliques—the muscles along the sides of your abdomen—while also engaging the rectus abdominis, or "six-pack" muscles. The deeper core stabilizers, like the transverse abdominis, also fire up to keep you balanced throughout the movement.
Benefits of the Russian Twist Exercise
1. Core Strength and Definition
The Russian twist is a compound core movement that works multiple abdominal muscles at once. By doing this exercise regularly, you can improve core strength and get closer to that toned, defined midsection many strive for.
2. Improved Balance and Stability
This exercise requires you to stabilize your torso while twisting, which engages the muscles in your back, hips, and lower abdomen. This contributes to better balance and coordination in both athletic performance and daily activities.
3. Enhanced Athletic Performance
Movements that involve rotation—such as throwing a ball, swinging a bat, or even changing direction while running—rely on strong obliques. The Russian twist exercise helps build rotational strength and power, making it ideal for athletes in sports like tennis, baseball, and soccer.
4. Low Equipment Requirement
One of the greatest things about the Russian twist is its simplicity. You can do it with no equipment at all, or use household items like a water bottle or backpack for resistance. For added intensity, you can use a medicine ball, dumbbell, or kettlebell.
How to Do the Russian Twist Exercise Correctly
To get the most out of the Russian twist exercise and avoid injury, follow these steps:
1. Start Position
Sit on the floor with your knees bent and feet flat. Lean back slightly to engage your core and lift your feet off the floor if you're comfortable doing so.
2. Hold a Weight (Optional)
If using a weight, hold it close to your chest with both hands. Otherwise, clasp your hands together.
3. Twist
Rotate your torso to the right and touch your hands or weight to the floor beside your hip. Then twist to the left. That’s one rep.
4. Maintain Form
Keep your core tight, spine straight, and chest lifted throughout the movement. Avoid rounding your back or letting your knees wobble.
5. Repetitions
Start with 2-3 sets of 10-15 reps per side and increase as you build strength.
Common Mistakes to Avoid
Using Momentum Instead of Muscle: Focus on controlled movements rather than swinging your arms.
Rounding the Back: This can lead to back pain. Always keep a neutral spine.
Not Engaging the Core: Your abdominal muscles should be tight throughout the movement for maximum benefit.
Variations of the Russian Twist Exercise
To keep your workouts interesting and challenging, try these variations:
Weighted Russian Twist: Use a medicine ball or dumbbell for added resistance.
Feet-Elevated Twist: Lift your feet a few inches off the ground to engage the lower abs more.
Decline Bench Twist: Perform the exercise on a decline bench for a greater range of motion and intensity.
Final Thoughts
The Russian twist exercise is a versatile, effective, and accessible workout that delivers serious results for your core. Whether you're training for a sport or simply want to enhance your overall fitness, adding this move to your regular workout routine can help you build a stronger, more functional core.
Make sure to perform the Russian twist with proper form and gradually increase difficulty to avoid injury and ensure progress. Your core will thank you!
0 notes
Text
Side Plank Exercise: Benefits and Variations for a Strong Core

The side plank exercise is a powerful core-strengthening movement that targets multiple muscle groups while improving balance, stability, and posture. Whether you're a beginner or a seasoned fitness enthusiast, side planks offer a low-impact yet highly effective way to build functional strength.
In this article, we'll explore the benefits of the side plank exercise, how to perform it correctly, common mistakes to avoid, and effective variations to challenge your body.
What Is the Side Plank Exercise?
The side plank exercise is a bodyweight movement performed by supporting your body on one arm and the side of one foot while maintaining a straight, aligned posture. It primarily targets the obliques (the muscles along the side of your core) but also engages your:
Transverse abdominis
Glutes
Shoulders
Legs
Lower back
Unlike traditional planks that focus on the front core, side planks isolate and strengthen your lateral core muscles, which play a critical role in spine stability and overall athletic performance.
Benefits of the Side Plank Exercise
1. Strengthens the Obliques
The side plank is one of the best exercises for working your oblique muscles. Strong obliques help with torso rotation, posture, and overall core stability.
2. Improves Balance and Stability
Holding your body in a side position challenges your balance and coordination, helping to build stability for everyday movements and sports.
3. Supports Better Posture
By strengthening your core, glutes, and shoulder stabilisers, side planks can help correct imbalances that contribute to poor posture and back pain.
4. Reduces Risk of Injury
A strong core provides a solid foundation for movement, reducing the risk of injuries—especially in the lower back and hips.
5. Low Impact, High Reward
The side plank is easy on the joints, making it an excellent choice for people recovering from injury or looking to avoid high-impact movements.
How to Do the Side Plank Exercise Correctly
Here’s how to perform a basic side plank:
Starting Position:
Lie on your side with your legs straight and stacked on top of each other.
Place your bottom elbow directly under your shoulder with your forearm flat on the floor.
Engage your core and lift your hips so your body forms a straight line from head to heels.
Keep your top hand on your hip or extend it toward the ceiling.
Hold the position for 20–30 seconds to start, gradually increasing duration as you build strength.
Key Form Tips:
Keep your body in a straight line—avoid letting your hips sag or lift too high.
Don’t shrug your shoulders. Keep your supporting shoulder down and away from your ear.
Engage your glutes and quads to maintain stability.
Common Mistakes to Avoid
Sagging Hips: This reduces core engagement and can strain your lower back. Keep your hips lifted and aligned.
Rotating Forward: Keep your body square to the side. Don’t let your chest or hips rotate forward.
Elbow Misalignment: Your supporting elbow should be directly under your shoulder to prevent strain.
Side Plank Exercise Variations
Once you've mastered the basic side plank, try these variations to add intensity or tailor it to your fitness level:
1. Side Plank with Leg Lift
Lift your top leg while holding the plank position. This increases activation in the glutes and hips.
2. Side Plank with Arm Reach
Extend your top arm under your torso and then reach toward the ceiling. This adds a rotational element and challenges your balance.
3. Knee Side Plank
For beginners, keep your bottom knee bent on the ground. This provides extra support while still targeting your obliques.
4. Side Plank Dips
Lower and raise your hips slightly while in side plank position. This dynamic movement works your core and glutes more intensely.
5. Weighted Side Plank
Hold a dumbbell in your top hand or wear a weighted vest to increase resistance and build more strength.
How Often Should You Do Side Planks?
Incorporate side planks into your workout routine 2–3 times per week for best results. Start with shorter holds (20–30 seconds) and gradually build up to 60 seconds or longer. You can add reps or sets as your endurance improves.
Final Thoughts
The side plank exercise is a versatile, low-impact move that delivers excellent results for core strength, posture, and injury prevention. Whether you're looking to enhance your athletic performance or simply build a stronger core, side planks should be a staple in your fitness routine. By mastering proper form and gradually progressing with variations, you’ll experience the full benefits of this highly effective exercise.
0 notes
Text
How to Fix Your Posture: Tips for Better Alignment and Health

Poor posture can lead to back pain, neck strain, headaches, and even reduced energy levels. Whether you spend long hours sitting at a desk, standing for work, or looking down at your phone, fixing your posture can improve your overall health and confidence.
In this guide, we’ll explore why posture matters, common posture mistakes, and practical ways to improve it.
Why Good Posture Matters
Maintaining proper posture helps to:
Reduce Back & Neck Pain – Poor alignment can cause muscle tension and joint strain.
Improve Breathing & Circulation – An upright posture allows better airflow and blood flow.
Enhance Confidence & Appearance – Standing tall projects confidence and improves body alignment.
Prevent Long-Term Health Issues – Poor posture can lead to chronic pain, spinal misalignment, and even digestive problems.
Common Posture Mistakes
Slouching in a Chair – Leads to rounded shoulders and weakens core muscles.
Tech Neck (Looking Down at Your Phone) – Puts excessive strain on the neck and spine.
Hunching Over a Desk – Causes tension in the back and shoulders.
Standing with Uneven Weight Distribution – Can create hip and lower back imbalances.
Sleeping in a Bad Position – Using an unsupportive mattress or pillow can misalign your spine.
How to Fix Your Posture?
1. Strengthen Core Muscles
A strong core helps maintain good spinal alignment. Try exercises like:
Planks – Strengthens abs and lower back.
Bird-Dog Exercise – Improves stability and posture control.
Bridges – Engages glutes and supports the lower back.
2. Improve Your Sitting Posture
Keep your back straight with shoulders relaxed.
Your feet should be flat on the floor, and knees at a 90-degree angle.
Use an ergonomic chair that supports the lower back.
3. Avoid “Tech Neck”
Hold your phone at eye level to reduce neck strain.
Adjust your computer screen height so your eyes are level with the top of the screen.
Take frequent breaks from screens and stretch your neck.
4. Stand Properly
Distribute your weight evenly on both feet.
Engage your core and keep your shoulders back.
Avoid locking your knees to prevent lower back strain.
5. Sleep with Proper Alignment
Use a supportive mattress and pillow that aligns your spine.
Sleep on your back or side rather than your stomach.
Place a pillow between your knees if you sleep on your side for better hip alignment.
6. Stretch & Mobilize Daily
Chest Opener Stretch – Counteracts forward-leaning shoulders.
Cat-Cow Stretch – Improves spinal flexibility.
Neck Stretches – Reduces tension from prolonged screen use.
Final Thoughts
Fixing your posture requires awareness, daily adjustments, and strengthening exercises. By making small, consistent changes, you’ll experience less pain, better movement, and improved confidence.
Start practicing these posture tips today and feel the difference!
0 notes
Text
What Do Physiotherapists Do?

Physiotherapists, also known as physical therapists, are healthcare professionals dedicated to helping people restore movement, improve physical function, and manage pain. They play a vital role in rehabilitation, injury prevention, and promoting overall health and well-being.
Whether you're recovering from an injury, managing a chronic condition, or looking to enhance physical performance, physiotherapists provide expert care tailored to your specific needs.
Key Roles of a Physiotherapist
Assess and Diagnose
Physiotherapists evaluate your condition by reviewing medical history, performing physical assessments, and diagnosing the root cause of pain or dysfunction.
Develop Treatment Plans
Based on their assessment, they create individualized treatment plans to address your goals, whether it's recovery, pain relief, or improved mobility.
Provide Therapy and Rehabilitation
Deliver hands-on therapy, exercises, and education to restore function, reduce pain, and promote recovery from injury or surgery.
Prevent Injuries
Physiotherapists offer strategies to prevent future injuries through posture correction, strength training, and movement education.
Educate and Empower Patients
Teach patients how to manage their conditions at home with exercises, ergonomic tips, and lifestyle adjustments.
Services Offered by Physiotherapists
Physiotherapists provide treatment for a wide range of conditions, including:
Musculoskeletal Conditions
Back pain, neck pain, arthritis, sports injuries, and joint disorders.
Neurological Conditions
Stroke rehabilitation, Parkinson’s disease, multiple sclerosis, and spinal cord injuries.
Cardiorespiratory Conditions
Chronic obstructive pulmonary disease (COPD), asthma, and post-surgical recovery.
Women’s Health
Treatment for pregnancy-related issues, pelvic floor dysfunction, and postnatal recovery.
Pediatric Care
Helping children with developmental delays, coordination issues, or congenital conditions.
Techniques Used in Physiotherapy
Manual Therapy
Hands-on techniques like massage, joint mobilization, and manipulation to relieve pain and improve mobility.
Exercise Therapy
Strengthening, stretching, and balance exercises tailored to the patient’s needs.
Electrotherapy
Techniques like ultrasound, TENS (Transcutaneous Electrical Nerve Stimulation), or laser therapy to reduce pain and promote healing.
Hydrotherapy
Water-based exercises to reduce joint stress and support movement.
Dry Needling and Acupuncture
Stimulating trigger points and relieving muscle tension using fine needles.
When Should You See a Physiotherapist?
Consider visiting a physiotherapist if you experience:
Chronic pain or discomfort.
Limited range of motion or difficulty moving.
Recovery from surgery, injury, or illness.
Postural problems or repetitive strain injuries.
A desire to improve athletic performance or prevent injuries.
Benefits of Physiotherapy
Pain relief and improved mobility.
Faster recovery from injuries and surgeries.
Improved quality of life for chronic conditions.
Prevention of future injuries.
Enhanced physical strength, flexibility, and balance.
Take the First Step to Better Health
Physiotherapists are dedicated to helping you achieve your physical health goals, whether that means managing pain, regaining mobility, or improving overall function. With personalized care and expert guidance, you can restore your movement, boost your well-being, and live life to the fullest.
Looking for professional physiotherapy care? Contact us today and start your journey to recovery!
0 notes
Text
The Bird Dog Exercise: Boost Core Strength and Stability

The bird dog exercise is a simple yet highly effective movement for improving core strength, stability, and balance. Widely used in fitness routines and rehabilitation programs, this exercise targets multiple muscle groups while enhancing coordination. Whether you're a beginner or a seasoned athlete, incorporating the bird dog into your workout can deliver excellent results.
What Is the Bird Dog Exercise?
The bird dog exercise is a bodyweight movement performed on all fours, involving the simultaneous extension of one arm and the opposite leg. This controlled motion challenges your core and helps build strength in your lower back, glutes, and shoulders.
Benefits of the Bird Dog Exercise
1. Strengthens Core Muscles
Engages the abdominal muscles and lower back to promote a stable and strong core.
2. Improves Balance and Coordination
The alternating limb movements challenge your body’s ability to stabilize and coordinate.
3. Enhances Posture
Strengthening the muscles of the back and core helps maintain proper posture during daily activities.
4. Low-Impact and Accessible
Gentle on joints and suitable for people of all fitness levels, including those recovering from injury.
5. Supports Spinal Health
Helps alleviate lower back pain by strengthening the stabilizing muscles around the spine.
How to Perform the Bird Dog Exercise
1. Start Position
Begin on all fours with your wrists aligned under your shoulders and knees under your hips.
Keep your back flat and your head in a neutral position.
2. Extend Opposite Limbs
Slowly extend your right arm straight ahead while simultaneously extending your left leg behind you.
Keep your torso stable and avoid arching your back or twisting your hips.
3. Hold and Return
Hold the position for 2–5 seconds, engaging your core.
Return to the starting position and switch to the opposite arm and leg.
4. Repeat
Perform 8–12 repetitions per side, maintaining control and form throughout.
Tips for Proper Form
Engage Your Core: Keep your abdominal muscles tight to maintain stability.
Avoid Overarching: Do not let your lower back sag during the movement.
Move Slowly: Focus on controlled, deliberate movements for maximum effectiveness.
Breathe Naturally: Exhale as you extend your limbs and inhale as you return to the starting position.
Bird Dog Variations to Try
1. Bird Dog with Elbow-to-Knee
Add a crunch by bringing your extended elbow and knee together before returning to the start.
2. Resistance Band Bird Dog
Add a resistance band around your hands and feet for increased intensity.
3. Bird Dog Plank
Perform the movement from a plank position for an advanced challenge.
4. Weighted Bird Dog
Hold light weights in your hands to engage the shoulders and arms further.
Who Can Benefit from the Bird Dog Exercise?
Athletes: Improves core stability and balance, essential for sports performance.
Beginners: A safe and accessible movement to build foundational strength.
Rehabilitation Patients: Often recommended for those recovering from lower back pain or injuries.
Older Adults: Helps improve balance and prevent falls.
Incorporating Bird Dog into Your Routine
The bird dog exercise can be included in warm-ups, core workouts, or as part of a full-body routine. Pair it with other stabilizing exercises like planks or bridges for a comprehensive core workout.
Strengthen Your Core with the Bird Dog Exercise
The bird dog exercise is a versatile, effective, and low-impact way to enhance your core strength and stability. With consistent practice, it can improve posture, balance, and overall fitness.
Ready to give it a try? Add the bird dog exercise to your workout today and experience the benefits firsthand!
0 notes
Text
Does Medicare Cover Physiotherapy? Understanding Your Options

Physiotherapy is a critical service for managing pain, recovering from injuries, and improving mobility. If you're wondering whether Medicare covers physiotherapy, this guide will break down the eligibility criteria, what services may be covered, and how you can access physiotherapy through the Medicare system.
Does Medicare Cover Physiotherapy?
Medicare generally does not cover physiotherapy for all Australians. However, under specific conditions, physiotherapy services can be subsidized through the Chronic Disease Management (CDM) Plan, previously known as Enhanced Primary Care (EPC) Plan.
Physiotherapy Through a Chronic Disease Management Plan
1. Eligibility for the CDM Plan
To qualify, you must have a chronic medical condition that has persisted for six months or longer. Common examples include:
Diabetes
Arthritis
Cardiovascular diseases
Persistent back pain
A referral from your General Practitioner (GP) is required to access physiotherapy services under this plan.
2. Number of Sessions Covered
Medicare offers a rebate for up to five allied health services per calendar year under the CDM plan.
These five sessions can be distributed across different services, such as physiotherapy, dietetics, or podiatry.
3. Medicare Rebate
Medicare provides a rebate of approximately $56 per session, which can be claimed after the physiotherapy appointment.
Note: If the physiotherapy clinic charges above the rebate amount, you will need to pay the difference (gap fee).
How to Access Physiotherapy Under Medicare
1. Consult Your GP
Schedule a GP appointment to discuss your chronic condition and its management plan.
2. Develop a CDM Plan
If eligible, your GP will create a tailored Chronic Disease Management Plan.
This plan includes a referral to a physiotherapist or other allied health professionals.
3. Book an Appointment with a Physiotherapist
Choose a physiotherapy clinic that accepts Medicare referrals.
Confirm the clinic’s gap fees, if applicable.
4. Claim Your Medicare Rebate
After the appointment, submit the receipt to Medicare to receive your rebate.
Many clinics can process this directly for you.
What Types of Physiotherapy Services May Be Covered?
The services provided depend on your condition and the physiotherapist’s recommendations. Common treatments under the CDM plan include:
Exercise Therapy: Tailored exercises to improve strength, flexibility, and mobility.
Pain Management: Techniques like dry needling, massage, or manual therapy.
Rehabilitation Programs: Recovery support for surgeries or injuries.
Education and Advice: Guidance on managing chronic conditions and preventing further complications.
Limitations of Medicare Coverage for Physiotherapy
1. Limited Sessions
Only five allied health services are covered annually, which may not be sufficient for individuals requiring ongoing physiotherapy.
2. Out-of-Pocket Costs
If the physiotherapy clinic charges above the Medicare rebate, you will be responsible for the gap fee.
3. Private Physiotherapy Needs
For acute injuries or non-chronic conditions, Medicare will not cover physiotherapy.
Alternatives to Medicare for Physiotherapy Coverage
1. Private Health Insurance
Many private health insurance policies include extras cover for physiotherapy, allowing you to claim a portion of the costs for each session.
2. Workers’ Compensation or TAC Claims
If your physiotherapy is related to a workplace injury or road accident, you may be eligible for coverage under workers’ compensation schemes or the Transport Accident Commission (TAC).
3. Community and Public Health Services
Some public health clinics offer low-cost or free physiotherapy services, though wait times may apply.
Why Physiotherapy Matters for Chronic Conditions
Physiotherapy is integral to managing chronic conditions by:
Reducing pain and inflammation.
Improving joint mobility and overall functionality.
Enhancing quality of life through better physical health.
Accessing physiotherapy under Medicare ensures that cost isn’t a barrier to receiving care, particularly for individuals managing long-term conditions.
Key Takeaways
Medicare can cover physiotherapy services through the Chronic Disease Management Plan, but only for eligible individuals with a GP referral.
Up to five sessions per year are subsidized, with a partial rebate provided by Medicare.
For ongoing or additional physiotherapy needs, consider private health insurance or other coverage options.
Physiotherapy plays a crucial role in maintaining health and mobility, particularly for those with chronic conditions. If you think you’re eligible for Medicare coverage, speak with your GP today to start your journey to improved wellness.
Take control of your health—access physiotherapy through Medicare and start feeling better today!
0 notes
Text
Understanding Sacroiliitis: Causes, Symptoms and Treatment Options

Sacroiliitis is a painful condition characterized by inflammation of one or both sacroiliac joints, located where the lower spine connects to the pelvis. This condition can be challenging to diagnose as it often mimics other forms of lower back pain. Here, we delve into the key aspects of sacroiliitis, including its causes, symptoms, and treatment options.
What Causes Sacroiliitis?
Sacroiliitis can result from various factors that lead to joint inflammation. Common causes include:
Trauma or Injury: Direct impact from falls or accidents can inflame the sacroiliac joints.
Arthritis: Conditions such as osteoarthritis or ankylosing spondylitis can contribute to sacroiliitis.
Pregnancy: Hormonal changes and the added stress on the pelvis during pregnancy can lead to joint inflammation.
Infection: Although rare, infections in the sacroiliac joint can result in inflammation.
Overuse: Repetitive stress from physical activities like running or heavy lifting may trigger sacroiliitis.
Recognizing the Symptoms of Sacroiliitis
Symptoms of sacroiliitis can vary and often overlap with other lower back or hip conditions. The most common signs include:
Lower back pain: Pain typically affects one or both sides of the lower back and can radiate to the buttocks or thighs.
Stiffness: Reduced mobility and stiffness, especially after periods of inactivity.
Pain worsening with activity: Activities like climbing stairs, standing for long periods, or running may intensify discomfort.
Tenderness: Sensitivity when pressure is applied to the lower back or buttocks.
How Is Sacroiliitis Diagnosed?
Accurate diagnosis of sacroiliitis involves a comprehensive evaluation that may include:
Medical history and physical exam: A healthcare provider will assess symptoms and perform physical tests to identify pain sources.
Imaging tests: X-rays, CT scans, or MRIs can help detect inflammation or abnormalities in the sacroiliac joints.
Diagnostic injections: An anesthetic injection into the joint may be used to confirm sacroiliitis if pain relief follows the procedure.
Effective Treatment Options for Sacroiliitis
Managing sacroiliitis typically involves a combination of treatment strategies aimed at reducing pain and improving joint function:
Medications: Nonsteroidal anti-inflammatory drugs (NSAIDs) are often prescribed to reduce inflammation and pain. In more severe cases, corticosteroid injections may be used.
Physical therapy: A targeted exercise regimen can enhance flexibility, strengthen surrounding muscles, and support joint stability.
Lifestyle modifications: Adjusting activities to avoid repetitive stress and incorporating rest periods can help manage symptoms.
Sacroiliac joint injections: Administering anesthetics or steroids directly into the joint can offer temporary pain relief.
Surgical intervention: In rare, severe cases, surgical fusion of the sacroiliac joint may be considered when conservative treatments are ineffective.
Preventing Sacroiliitis
While not all cases are preventable, you can reduce your risk by maintaining a healthy weight, practicing proper posture, and incorporating low-impact exercises to strengthen core muscles. Being mindful of body mechanics during activities and avoiding excessive strain can also help protect the sacroiliac joints.
Sacroiliitis can significantly impact quality of life, but with the right diagnosis and treatment plan, many individuals experience relief and improved joint function. If you suspect sacroiliitis, consult with a healthcare professional to explore the best management strategies tailored to your needs.
0 notes
Text
Effective MCL Rehab Exercises for a Stronger Recovery
Medial Collateral Ligament (MCL) injuries are a common knee injury that often results from direct blows to the outer knee or from twisting motions during sports and activities. Rehabilitation for an MCL injury involves strengthening, stretching, and stability exercises designed to restore range of motion, build muscle, and improve knee stability. Below, we outline key MCL rehab exercises that can aid recovery, helping to prevent further injury and hasten a safe return to activity.
1. Quadriceps Sets
Purpose: Strengthens the quadriceps muscles, which support the knee joint.
How to Do It: Sit with legs straight and relaxed. Tighten the thigh muscles and push the back of your knee into the ground. Hold for 5 seconds, then release. Repeat 10–15 times.
2. Heel Slides
Purpose: Increases knee flexion and range of motion.
How to Do It: Lie on your back with legs extended. Slowly slide your injured leg’s heel toward your buttocks, bending the knee as much as possible without pain. Hold for 5 seconds, then slide back down. Repeat 10–15 times.
3. Straight Leg Raises
Purpose: Strengthens the quadriceps without straining the knee joint.
How to Do It: Lie flat with your uninjured leg bent and the injured leg straight. Tighten the muscles in the straight leg and lift it about 6–8 inches off the ground. Hold for 5 seconds, then slowly lower. Do 10–15 reps, aiming for three sets.
4. Mini Squats
Purpose: Builds strength in the thighs and improves knee stability.
How to Do It: Stand with feet hip-width apart, holding onto a sturdy surface. Bend your knees slightly, keeping your back straight and not going below a 30-degree angle. Straighten back up and repeat 10–15 times.
5. Hamstring Curls
Purpose: Strengthens the hamstrings, which work with the MCL to stabilize the knee.
How to Do It: Stand or lie on your stomach, bending the injured knee to bring your heel toward your buttocks. Hold for a few seconds, then slowly lower. Repeat 10–15 times for three sets.
6. Calf Raises
Purpose: Builds strength in the calf muscles, which support knee stability.
How to Do It: Stand with feet hip-width apart and slowly raise onto your toes, lifting your heels off the ground. Lower back down and repeat for 10–15 reps. This exercise can be made more challenging by holding weights.
7. Clamshells
Purpose: Strengthens the gluteal muscles, which help with knee alignment.
How to Do It: Lie on your side with knees bent at a 90-degree angle. Keeping your feet together, lift the top knee as high as comfortable without moving your pelvis. Lower back down and repeat 10–15 times for each leg.
Tips for Safe MCL Rehabilitation
Consistency: Perform these exercises regularly, as advised by a healthcare professional.
Progress Gradually: Start with low-intensity exercises and increase resistance as tolerated.
Use a Support Device: Depending on injury severity, a knee brace can provide added support during early rehab stages.
Avoid High Impact: Skip exercises that place undue stress on the knee until strength and stability are restored.
Consult a Physical Therapist: To tailor a program that matches your injury and fitness level, consulting a physical therapist is beneficial. They can help monitor your form and progression to ensure a safe and effective recovery.
MCL rehab exercises are essential for regaining knee function, promoting healing, and preventing re-injury. With a focused and gradual approach, you can return to activities stronger and more resilient.
0 notes
Text
Understanding Lower Back Pain: Causes, Treatment and Prevention

Lower back pain is one of the most common health issues that people face, affecting millions of individuals worldwide. Whether it’s a dull ache or sharp discomfort, lower back pain can impact your daily activities, productivity, and overall quality of life. Understanding its causes, treatment options, and how to prevent it can help manage this common condition effectively.
Common Causes of Lower Back Pain
Lower back pain can arise from a variety of causes, and pinpointing the source is the first step in finding relief. Some common causes include:
Muscle Strain
Overuse, heavy lifting, or sudden movements can cause muscles and ligaments in the lower back to stretch or tear, leading to pain and stiffness. This is one of the most common reasons for acute lower back pain.
Poor Posture
Slouching or sitting for prolonged periods, especially with improper posture, can put excessive pressure on the lower back. Over time, this can lead to chronic pain and discomfort.
Herniated or Bulging Discs
The spinal discs, which act as cushions between the vertebrae, can become damaged or displaced. When a disc bulges or ruptures (herniates), it can compress nerves, causing pain that may radiate down the legs (sciatica).
Arthritis
Conditions like osteoarthritis can cause degeneration of the spine, leading to inflammation, stiffness, and lower back pain. In some cases, arthritis can also lead to spinal stenosis, a narrowing of the space around the spinal cord.
Injuries or Accidents
Traumatic events such as falls, car accidents, or sports injuries can damage the muscles, ligaments, or spine, resulting in lower back pain that may require immediate medical attention.
Medical Conditions
Underlying health conditions such as osteoporosis, fibromyalgia, or infections can contribute to persistent lower back pain. In rare cases, tumors or kidney infections can also cause discomfort in the lower back region.
Treatment Options for Lower Back Pain
Fortunately, there are many ways to treat lower back pain, depending on its severity and underlying cause. Here are some common treatment options:
Rest and Ice/Heat Therapy
For acute lower back pain caused by muscle strain or injury, resting and applying ice or heat to the affected area can help reduce inflammation and relieve pain.
Physical Therapy
A physical therapist can design a customized exercise program that focuses on strengthening the core, improving flexibility, and correcting posture. Regular physical therapy sessions can significantly reduce chronic lower back pain.
Medications
Over-the-counter pain relievers like ibuprofen or acetaminophen can be effective in managing mild to moderate lower back pain. In more severe cases, doctors may prescribe muscle relaxants or stronger pain medications.
Chiropractic Care
Chiropractors use spinal manipulation techniques to realign the spine and improve mobility. Many people find relief from lower back pain through chiropractic adjustments, especially when combined with other therapies.
Massage Therapy
Massage can help relieve muscle tension and improve circulation in the lower back. Regular massages can be particularly helpful for individuals dealing with muscle-related lower back pain.
Surgery
In rare cases, surgery may be necessary, especially for severe conditions like herniated discs, spinal stenosis, or fractures. Surgical options are typically reserved for those who do not respond to conservative treatments.
Preventing Lower Back Pain
Prevention is key when it comes to managing lower back pain. Here are some tips to help you avoid pain and discomfort:
Maintain Proper Posture
Whether sitting or standing, keeping a neutral spine is essential. Avoid slouching and use ergonomic chairs and workspaces to support your lower back throughout the day.
Exercise Regularly
Strengthening the muscles in your core and lower back through exercises like yoga, pilates, or swimming can improve stability and prevent future injuries. Incorporate stretches to keep your back flexible.
Lift Properly
When lifting heavy objects, bend at your knees and hips, not at your waist. Use your legs to lift, keeping the object close to your body, to avoid straining your lower back.
Avoid Prolonged Sitting
If you have a desk job, take breaks to stand, stretch, and walk around every hour. Consider using a standing desk or adjustable chair to reduce strain on your lower back.
Stay at a Healthy Weight
Excess weight, especially around the abdomen, can put extra pressure on your lower back. Maintaining a healthy weight through proper diet and exercise can alleviate this stress.
When to Seek Medical Attention
While most lower back pain improves with self-care, there are times when you should seek medical attention. If your lower back pain is accompanied by any of the following symptoms, contact a healthcare provider:
Pain that lasts longer than a few weeks
Numbness or tingling in the legs
Weakness in the lower body
Difficulty standing or walking
Severe or sudden pain following an injury
Loss of bladder or bowel control
Conclusion
Lower back pain can be frustrating and debilitating, but with the right treatment and preventive measures, you can manage and even avoid it. Whether caused by poor posture, muscle strain, or an underlying condition, understanding the source of your pain and seeking appropriate care can help you live a pain-free life. Take proactive steps to strengthen your back, maintain good posture, and seek medical attention if needed to keep your lower back healthy and strong.
0 notes
Text
Effective Rotator Cuff Exercises for Strengthening and Injury Prevention

The rotator cuff is a group of muscles and tendons that play a crucial role in stabilizing and moving your shoulder joint. Whether you’re an athlete, office worker, or someone recovering from shoulder injury, incorporating rotator cuff exercises into your routine is essential for maintaining shoulder health and preventing injuries.
Why Are Rotator Cuff Exercises Important?
The rotator cuff muscles are small but vital, helping with the range of motion and stability of your shoulder. Without proper strength and flexibility in these muscles, you may experience:
Shoulder pain: Weak or tight rotator cuff muscles are more prone to injury, leading to pain and discomfort.
Reduced mobility: A weak rotator cuff can limit your shoulder’s range of motion, affecting your ability to perform daily activities or sports movements.
Injury risk: Strengthening your rotator cuff can prevent common shoulder injuries such as tendonitis, tears, and impingements.
Best Rotator Cuff Exercises
To improve the strength and flexibility of your rotator cuff, incorporate the following exercises into your workout routine. These exercises can help you build resilience, reduce pain, and maintain shoulder health.
1. External Rotations with a Resistance Band
This exercise targets the infraspinatus and teres minor muscles of the rotator cuff, which are responsible for external rotation of the shoulder.
How to perform:
Attach a resistance band to a stable object at waist height.
Stand sideways to the anchor point, holding the band with your outside hand.
Keep your elbow bent at a 90-degree angle and tucked against your side.
Slowly pull the band outward, rotating your arm externally while keeping your elbow in place.
Return to the starting position and repeat for 10–12 reps on each side.
2. Internal Rotations with a Resistance Band
Internal rotations strengthen the subscapularis muscle, which is responsible for internal shoulder rotation.
How to perform:
Attach a resistance band to a stable object at waist height.
Stand sideways to the anchor point, holding the band with your inside hand.
Keep your elbow bent at a 90-degree angle, tucked against your side.
Pull the band toward your body, rotating your shoulder inward.
Slowly return to the starting position and repeat for 10–12 reps on each side.
3. Lateral Raises
This exercise strengthens the deltoid and supraspinatus muscles, helping with shoulder stabilization and mobility.
How to perform:
Stand with your feet shoulder-width apart, holding a pair of light dumbbells at your sides.
With a slight bend in your elbows, lift your arms out to the sides until they reach shoulder height.
Lower your arms back down slowly and repeat for 10–12 reps.
4. Prone Arm Raises (Y and T Raises)
This exercise targets multiple rotator cuff muscles and helps improve shoulder stability and posture.
How to perform:
Lie face down on a bench or exercise mat with your arms hanging straight down.
For Y raises, lift your arms at a 45-degree angle above your head (forming a “Y” shape) and squeeze your shoulder blades together.
For T raises, lift your arms directly out to your sides (forming a “T” shape) while engaging your upper back muscles.
Hold each position for a second, then slowly lower your arms back down. Perform 8–10 reps for each movement.
5. Scapular Retraction with Resistance Band
This exercise focuses on strengthening the muscles that support the rotator cuff and stabilize the shoulder blades.
How to perform:
Hold a resistance band with both hands, arms extended in front of you at shoulder height.
Pull the band apart, squeezing your shoulder blades together as you bring your arms out to the sides.
Slowly return to the starting position and repeat for 12–15 reps.
Tips for Safe and Effective Rotator Cuff Training
Start with light resistance: The rotator cuff muscles are relatively small, so using light weights or resistance bands is usually sufficient to start. Gradually increase resistance as you build strength.
Focus on form: Proper form is crucial for targeting the correct muscles and avoiding injury. Keep your movements slow and controlled throughout each exercise.
Consistency is key: Incorporating rotator cuff exercises into your routine 2–3 times per week can help improve strength and flexibility over time.
Consult a professional: If you’re recovering from a shoulder injury, it’s important to consult a physical therapist or healthcare provider before starting any exercise program.
Preventing Rotator Cuff Injuries
Along with regular exercise, practicing good posture and proper shoulder mechanics can help prevent rotator cuff injuries. Avoid repetitive overhead movements without proper warm-up and stretching, especially if you’re involved in sports or physical labor.
Conclusion
Strengthening your rotator cuff through targeted exercises is essential for maintaining shoulder health, improving mobility, and preventing injuries. Whether you’re an athlete or recovering from a shoulder issue, these rotator cuff exercises will help you build strength and resilience for long-term shoulder function.
0 notes
Text
Understanding MCL Injuries: Causes, Symptoms, and Recovery

The medial collateral ligament (MCL) is a critical structure in the knee that helps stabilize the joint, particularly during side-to-side movements. Injuries to the MCL are common among athletes and active individuals, often resulting from sudden impacts or twisting motions. This blog post will delve into the causes, symptoms, and treatment options for MCL injuries, offering insights for those looking to prevent or recover from this common knee issue.
What is an MCL Injury?
The MCL is located on the inner side of the knee and connects the thigh bone (femur) to the shinbone (tibia). An MCL injury typically occurs when the knee is subjected to force from the outside, pushing it inward. This can happen during sports that involve sudden changes in direction, like soccer, football, or skiing.
Causes of MCL Injuries
MCL injuries are often the result of:
Direct impact to the outside of the knee: Common in contact sports, where collisions or tackles can place excessive force on the knee.
Sudden changes in direction: Sports like basketball, soccer, or skiing can lead to MCL injuries due to the quick pivots and turns involved.
Overuse or repetitive stress: Activities that consistently strain the knee joint can weaken the MCL over time, making it more susceptible to injury.
Symptoms of an MCL Injury
An MCL injury can vary in severity, ranging from a mild sprain to a complete tear. Common symptoms include:
Pain on the inside of the knee: The most common symptom, often occurring immediately after the injury.
Swelling and tenderness: The knee may become swollen and tender to the touch, particularly along the inner side.
Instability: Depending on the severity of the injury, you may feel like your knee is unstable or "giving way" during movement.
Limited range of motion: Flexing or extending the knee may be painful or difficult, particularly in more severe injuries.
Diagnosing MCL Injuries
If you suspect an MCL injury, it’s essential to consult with a healthcare professional for an accurate diagnosis. They will typically perform a physical examination to assess the knee’s stability and may order imaging tests, such as an MRI, to determine the extent of the damage.
Treatment Options for MCL Injuries
Treatment for an MCL injury depends on the severity of the injury:
Rest and Ice: Mild MCL injuries (Grade 1) can often be managed with rest, ice, and over-the-counter pain relievers. Avoiding activities that stress the knee is crucial during recovery.
Physical Therapy: Rehabilitation exercises can help restore strength and flexibility to the knee, ensuring a smooth return to normal activity. Physical therapy is often recommended for moderate (Grade 2) injuries.
Bracing: A knee brace may be used to provide additional support and prevent further injury while the MCL heals.
Surgery: Severe MCL injuries (Grade 3), involving complete tears, may require surgical intervention, particularly if other structures in the knee are also damaged.
Recovery and Prevention
Recovery from an MCL injury can take anywhere from a few weeks to several months, depending on the severity. Following your healthcare provider’s recommendations and participating in a structured rehabilitation program can help ensure a full recovery.
To prevent future MCL injuries:
Strengthen the muscles around the knee: Exercises that target the quadriceps, hamstrings, and hip muscles can provide better support and stability.
Warm-up before activities: Proper warm-up routines can prepare the muscles and ligaments for the physical demands of sports and exercise.
Wear appropriate footwear: Shoes that provide good support and are suitable for your activity can reduce the risk of knee injuries.
Conclusion
MCL injuries, while common, can be effectively managed with prompt diagnosis and appropriate treatment. Whether you’re an athlete or someone who enjoys an active lifestyle, understanding the causes, symptoms, and treatment options for MCL injuries can help you stay on top of your knee health. Remember, prevention is key, so take the necessary steps to protect your knees and maintain your mobility.
0 notes
Text
Alleviating Plantar Fasciitis: Effective Tips for Pain Relief

Plantar fasciitis is a common foot condition that affects millions of people worldwide. It occurs when the plantar fascia, a thick band of tissue that runs along the bottom of your foot, becomes inflamed. This can lead to sharp heel pain, especially when taking the first steps in the morning or after long periods of standing. If you're suffering from plantar fasciitis, there are several strategies you can employ to alleviate the discomfort and promote healing.
1. Stretching Exercises
Stretching is one of the most effective ways to relieve plantar fasciitis pain. Regularly stretching the calf muscles and the plantar fascia itself can help reduce tension in the foot. Some beneficial exercises include:
Calf Stretch: Stand facing a wall with one foot in front of the other. Keep your back leg straight and press your heel into the ground while leaning forward. Hold for 30 seconds and switch legs.
Plantar Fascia Stretch: Sit down and cross one leg over the other. Gently pull your toes back toward your shin, holding the stretch for 20-30 seconds. Repeat several times on each foot.
2. Footwear Adjustments
Wearing the right shoes is crucial in alleviating plantar fasciitis pain. Opt for shoes that provide good arch support and cushioning. Avoid walking barefoot on hard surfaces and consider using orthotic inserts to provide extra support. For those who engage in running or other high-impact activities, ensure your footwear is specifically designed for those activities.
3. Ice Therapy
Applying ice to the affected area can help reduce inflammation and numb the pain. Roll a frozen water bottle under your foot for 10-15 minutes, or apply an ice pack wrapped in a cloth to your heel. This should be done several times a day, especially after activities that exacerbate the pain.
4. Night Splints
Night splints are devices that keep your foot in a flexed position while you sleep. This helps stretch the plantar fascia and prevents it from tightening overnight, reducing morning pain. Consult with a healthcare professional to find the right night splint for you.
5. Weight Management
Excess weight can put additional stress on your feet, worsening plantar fasciitis symptoms. Maintaining a healthy weight through diet and exercise can reduce the strain on your plantar fascia and promote healing.
6. Physical Therapy
If home remedies are not providing sufficient relief, consider consulting a physical therapist. A therapist can guide you through specific exercises designed to strengthen the muscles in your foot and lower leg, improving overall foot mechanics and reducing pain.
7. Avoid Overuse
Rest is crucial in the treatment of plantar fasciitis. Avoid high-impact activities, such as running or jumping, that put excessive stress on your feet. Consider low-impact exercises like swimming or cycling to stay active without aggravating your condition.
8. Massage
Massaging the bottom of your foot can help alleviate plantar fasciitis pain. Use your hands or a massage ball to apply gentle pressure to the arch of your foot. This can improve blood flow and reduce tension in the plantar fascia.
9. Medications
Over-the-counter pain relievers like ibuprofen or acetaminophen can help manage the pain and reduce inflammation. However, these should only be used as part of a broader treatment plan and not as a long-term solution.
10. Consult a Healthcare Professional
If your plantar fasciitis pain persists despite trying these remedies, it's essential to consult a healthcare professional. They may recommend additional treatments, such as corticosteroid injections, extracorporeal shock wave therapy (ESWT), or even surgery in severe cases.
Conclusion
Plantar fasciitis can be a painful and frustrating condition, but with the right approach, you can alleviate the discomfort and get back on your feet. Incorporating stretching exercises, wearing supportive footwear, and following a comprehensive treatment plan can significantly reduce pain and promote healing. If you’re struggling with plantar fasciitis, don’t hesitate to seek professional guidance to ensure you’re on the path to recovery.
By addressing plantar fasciitis with a multi-faceted approach, you can take significant steps toward pain relief and improved foot health. Contact us now today.
0 notes