
Don't wanna be here? Send us removal request.
Statistics
We looked inside some of the posts by blogstreet94 and here's what we found interesting.
Average Info
Notes Per Post
1
Likes Per Post
1
Reblog Per Post
0
Reply Per Post
0
Time Between Posts
21 days
Number of Posts By Type
Text
9
Last Seen Tumblr Blogs


Fun Fact
Tumblr is available in 18 languages.
Text
Microsoft Office Version 15

Download Microsoft Office 2013 Pro Plus SP1 July 2021 full version program free setup for Windows. Office 2013 Pro is a complete suite developed for handling different documents and dealing with databases, spreadsheets, presentations, and other types of data. Zemo driver download for windows.
Could Not Load File Or Assembly 'Office, Version=15.0.0.0'
Microsoft Office 2013 Version 15
C# - Could Not Load File Or Assembly 'Office, Version=15.0.0 ..
We don't have any change log information yet for version 15.0.5153.1001 of Microsoft Office 2013. Sometimes publishers take a little while to make this information available, so please check back in a few days to see if it has been updated. This software was originally created by Microsoft. GROOVE.EXE, MSPUB.EXE, OUTLOOK.EXE, EXCEL.EXE and WINWORD.EXE are the most common filenames for this program's installer. The most popular versions of the Microsoft Office Professional are 15.0, 14.0 and 12.0. Our antivirus check shows that this download is safe.
Some wondered if Office 2019 would be the last perpetual version of the software, since Microsoft 365 came along. But then Microsoft announced its plan for a perpetual release of Office in a.
Microsoft Office 2013 Pro Plus SP1 July 2021 Overview
A powerful application for creating and managing documents, Microsoft Office 2013 Pro Plus SP1 July 2021 comes with a variety of powerful applications that can process complex types of data. It provides a simple and easy-to-use environment with straightforward options and a ribbon-based user interface with quick access to all the options. It comes up with different applications including Word, Access, PowerPoint, Excel, Outlook, Publisher, OneNote, and Visio, etc. You may also like Microsoft Office 2019 Pro Plus v2106 Build 14131.20320 Free Download
Microsoft Word can handle different documents, Excel can handle spreadsheets, PowerPoint can take care of the presentations, and so on. There are numerous templates and access to a variety of online templates to quickly start working on different documents. With the latest updates, it has become even more stable and reliable. Moreover, the latest release provides better synchronization features with cloud services.
Better speed and performance make it convenient for users to process all the tasks. PowerPoint also got new effects which make the presentations even more appealing. On concluding notes, it is a reliable and stable Office suite with numerous enhancements and the latest updates from July 2021.
The following office products are included
Microsoft Access
Microsoft Excel
Microsoft InfoPath
Microsoft Lync
Microsoft OneNote
Microsoft Outlook
Microsoft PowerPoint
Microsoft Publisher
Microsoft SkyDrive Pro
Microsoft Visio Viewer
Microsoft Word
Office Shared Features
Office Tools
Feature of Microsoft Office 2013 Pro Plus SP1 July 2021
A complete and stable productivity suite
Simple and professional environment
Includes all the latest updates from January 2020
A stable and reliable solution
New effects for PowerPoint
Different templates to get a quick start
Better synchronization with cloud services
A multilingual environment with a variety of changes and enhancements
Could Not Load File Or Assembly 'Office, Version=15.0.0.0'
Technical Details of Microsoft Office 2013 Pro Plus SP1 July 2021
Microsoft Office 2013 Version 15
Software Name: Office 2013 Professional Plus SP1 VL January 2020
Software File Name: MS-Office-2013-Pro-Plus-SP1-v15.0.5363.1000-July-2021-x86.rar, MS-Office-2013-Pro-Plus-SP1-v15.0.5363.1000-July-2021-x64.rar
Software Version: v15.0.5363.1000 July 2021
File Size: 2.69 GB, 2.93 GB
Developer: Microsoft
File Password: 123
System Requirements for Microsoft Office 2013 Pro Plus SP1 July 2021
Operating System: Windows 10/8/7/Vista
Free Hard Disk Space: 5 GB of minimum free HDD
Installed Memory: 1 GB of minimum RAM
Processor: Intel Core 2 Duo or higher
Microsoft Office 2013 Pro Plus SP1 v15.0.5363.1000 July 2021 Fee Download

Click on the button given below to download Microsoft Office 2013 Pro Plus SP1 July 2021 free setup. It is a complete offline full version setup of Microsoft Office 2013 Pro Plus SP1 July 2021 with a single click download link.
File Password: 123
C# - Could Not Load File Or Assembly 'Office, Version=15.0.0 ..
x86
0 notes
Text
Make A Beat Drop On Garageband

Learn how to make a Crazy DROP in Garageband in Minutes in Garageband on your iPad or iPhone!Follow me on Spotify:https://open.spotify.com/artist/1gwjjVWrSPh.
To mix a beat in Garageband: 1) Drop all VU meters to -15dB. 2) Adjust each VU meter so it sounds good without clipping or passing +0dB. 3) Use Compressor, EQ, and effects presets. 4) Add Automation and Panning. 5) Export the Track as a.aif file. 6) Drag it into a new project for mastering.
In this tutorial today, I’m going to show you how to make a quick hip-hop beat in Garageband. Will it be the most sophisticated beat in the world? No, it will not, because, I’m not the greatest producer, and all I can do is show you how I do things. Hopefully, you can learn something from me.
In which I make a progressive house drop in Garageband, and accidentally make a tutorial on EDM production basics in the process.Subscribe for more electroni.
Assuming you’re an absolute beginner, this tutorial should save you a fair amount of time in terms of avoiding common mistakes, like not turning off the Auto-Normalize function in Garageband’s preferences (my tutorial on that). I’ll give you a brief summary of how to make a beat, and then we’ll explore a more in-depth way, so how would you go about making a beat in Garageband?
To make a beat in Garageband, choose a melodic Apple Loop by clicking on the Loops icon that looks like a hose on the right-hand side of Garageband. Then, use the command, ⌥ + ⌘ + U, to bring up a Drummer Track and use one of the Hip-Hop drummers, Dez, Anton, or Maurice.
This is undoubtedly the simplest way of quickly creating a beat in Garageband, however, I’m going to show you the real way of going about it – the way that it’s actually unique. This is my way of making a hip-hop beat using my own individual style. It may not be your style of music, but maybe it’ll help you understand how people go about making songs. Before we begin, I’ll give a brief explanation of what I consider to be hip-hop as well as some of its parameters.
by the way, I have a list of all the best products for music production on my recommended products page, including the best deals, coupon codes, and bundles, that way you don’t miss out (you’d be surprised what kind of deals are always going on).
Features Of Hip-Hop
Hip-hop, like metal, rock, and many other genres, has a ton of sub-genres and dynamic differences between each other.
Therefore, in my opinion, there’s no point in saying that it has to sound a certain way – because it doesn’t.
In the past, there were many beats that had kind of a major/happy sound and there are many minor sounding beats of varying stylistic characters such as jazz, soul, funk, country, and even rock.
Moreover, hip-hop utilizes a ton of soul and funk samples from the 1960s and 1970s like James Brown, Funkadelic, Parlament, and so on and so forth.
Perhaps my favorite example is Kanye West’s song, “Touch The Sky,” created by Lupe Fiasco, which uses Curtis Mayfield’s legendary soul tune, “Move On Up.” You can do the same thing with Garageband’s sampler too as I’ve shown before in my article and in the short video down below:
The great part of hip-hop, like rock music, is that it’s versatile, so as long as you have a melody and a rhythm section, a rapper can probably spit bars over it. To get good at it, follow some of the tips in my songwriting article.
Before continuing, make sure you’ve downloaded all of the available sounds. To do that, just go into Garageband’s Preferences, and go to “Sound Library,” and then choose the option, “Download All Available Sounds.”
Without further ado…
How To Make A Hip-Hop Song In Garageband
The first thing that you want to do is open up Garageband.
1) Open up Garageband.
2) Select the hip-hop template.
The first thing that shows up is the Trap Door template, and the drummer’s name apparently is Dez. Personally, I hate the sound of the Trap Door pre-sets, so I avoid it at all costs.
It can be doctored to sound good, in my opinion, by decreasing the complexity of the fills and also choosing the “Simple” setting by dragging the little yellow ball to the left, or changing the actual kit of the pre-set. Another amazing tool to have for making beats is Initial Audio’s 808 Studio II (from Plugin Boutique), which is obviously a bass synth/808 tool.
Around half of the instruments that Garageband gives you sound good, with the “Steinway Grand Piano,” Deep Sub Bass,” “808 Bass,” “Vox Box Lead,” and the “String Ensemble” being the most important and useful, although, there are many others for hip-hop as I’ve pointed out before.
If you’re using iOS Garageband on the iPhone I recommend the most from Amazon, there are even more sounds to choose from, but either way, the “Arctic Noise Lead” is definitely a popular choice.
3) Go ahead and choose the “Flute” option under “Vintage Mellotron,” the “Jazz Organ,” the “Scream Lead” from the synthesizer section, as well as the “String Movements” from the Soundscapes option.
Also, choose the “Beat Machine” drum-kit under the Electronic Drum Kit section.
4) First Melody (Chord Progression) – (Jazz Organ)
For this particular track, “Spaceship Underwater,” the very first thing is that I made the chord progression with the “Jazz Organ,” which is just a C Minor with an added 9th and an Eb Major with an added 9th.
You can give the final track a listen here:
Cmin9 = C, Eb, G, D
Ebadd9 = Eb, G, Bb, F
Both of these chords belong to the Key of G Minor.
Here are all of the chords of G Minor (relative minor of Bb Major):
i – G Minor – G-B-D iiº – A Diminished – A-C-Eb III+ – Bb Major – Bb-D-F iv – C Minor – C-Eb-G v – D Minor – D-F-A VI – Eb Major – Eb-G-Bb VII – F Major – F-A-C
In case you haven’t seen the scale degrees before and how they look, know that the lower-case roman numerals., “i,” mean Minor, and the upper-case numerals, “V,” mean Major.
***To learn more about theory, go over to Music Theory’s website, or pick up Mark Sarnecki’s book on theoryfrom Amazon as well as the answer book which is equally as important.
The “+” means augmented and the “º” means diminished.

If these words are scary don’t worry about it. Just pay attention to the letters of the chord, “GBD.”
Check out the diagram I created of the “Musical Typing” below if you’re totally unfamiliar of where the notes of the Piano lie, but if I were you, I would eventually get a copy of PianoForAll from their site because it’ll help a lot as well.
When I build beats, I pretty much always start with the melody and then I build the drums, bass, and everything else afterward.
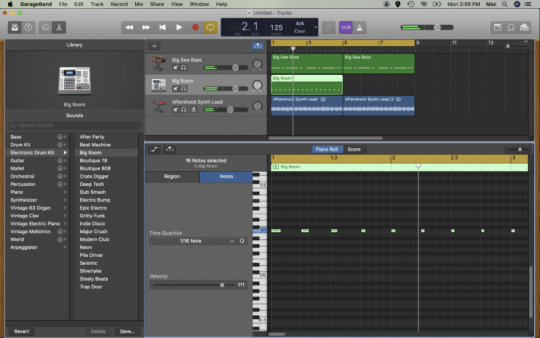
5) Second Melody – (Screamlead Synth)
Because I know that I’m in the Key of G Minor, there are certain notes available to me that will sound “correct.” They are the following:
G, A, Bb, C, D, Eb, F.
The relative Major of G Minor is actually Bb Major, which means they are the same notes, just played in a different order and having a different root note or tonal center.
Here is the Bb Major scale:
Bb, C, D, Eb, F, G, A
asically, after I built the chord progression, I loaded up an instrument that sounded cool and started playing around with it on my MIDI Keyboard.
I usually start with an Ehru, Piano, or another instrument with a sound I love. The reasoning for this, as an artist, is for the inspiration.
In this case, I chose the Screamlead instrument, which you’ll find in the Lead subcategory within the Synthesizer section.
Here’s an image of how the second most important melody of the song looks in the MIDI work-space:
Tip: Always use instruments, plug-ins, arpeggiators, and other tools that inspire you to play.
That’s what being a musician is all about, frankly. It’s the same thing with playing the guitar or another instrument. You have to buy a piece of equipment that actually inspires you to play.
After I built the second melody using the “Screamlead” instrument, I went into the Software Instrument’s settings and messed around with it until it actually sounded cool.
At first, as I said before, it was the Pipu, but I couldn’t use that because I already made a track using it recently and I didn’t want to get too repetitive.
I turned it into a Screamlead, and then adjusted the settings of it.
In the image below, you can see all of the different settings for it, including, Glide, Sub, Shape, Depth, Harmonic, Overdrive, Delay, as well as a bit of Reverb.
The part I changed the most was the “Glide” option as well as the “Shape.” That’s what gave it the sound that is completely different from the stock version of it.
Another big change I made was with the “Harmonic” option. I turned that bad boy all the way down.
5) Third Filler Melody – (Delicate Bells)
For the third melody, I simply used it as a filler, a way of filling out the rest of the track and adding a little bit of “Body” or character to the sound.
I used Delicate Bells, and I copy and pasted the track from the Screamlead and dropped it into the Delicate Bells track.
It was a one-two process, and I turned it down fairly significant so as not to take too much attention away from the rest of the more important instruments.
I also EQ’d it a little bit as well. For this section, I implemented a Low-Pass (a concept I’ve explained before), so in other words, I eliminated all of the highest frequencies. This EQ setting looks like this:
6) Fourth Melody (Flute)
Perhaps the most important melody of this song was the flute, rather than the initial chord progression and melody.
The flute is the part that repeats through the entirety of the song, and I loved the way it sounds. I think it was a nice touch, however, the flute you get through Native Instruments’ Komplete 13 from their website is way better than what comes with Garageband.
The funny part about the flute melody here is the fact it’s simply three notes but played at two different octaves. It’s easily the LEAST sophisticated part of the entire track.
It goes to show that sophistication is not necessary at all, in fact, this plays into improvisation as a musician as well. It’s easy to get caught up in all of these incredibly convoluted details, but frankly, there’s simply no need.
A good question to ask yourself is: does this make the music sound good? Does this contribute to the entirety of the song?
Moving on to arguably the most important part of a hip-hop song: the drums and the Boutique 808 pattern.
I think, perhaps, a crucial detail to add here is the fact that the drums and boutiques are actually the most important part for music producers but not for the listener.
Listeners don’t care about EQing the snare as you do, they just want to hear a great melody and beat.
7) Drums (Kick, Snare and Hi-Hats)
Obviously, music producers have different ways of going about this. Many actually “draw” their music, by adding individual notes and so on and so forth in the “Piano Roll.”
To begin drawing in the Piano Roll, double-click (right-click) in the workspace and select the option, “Create Empty MIDI Region.” This will make a file in which you can start dropping notes (more on the piano roll in my guide).
Truth be told, I don’t do this.
I find this kind of thing to be, actually, annoying and not that fun.
I played guitar for my entire life before I started using a DAW, so I’m all about playing from the heart and improvising on the spot.
What I do, is I open up the Musical Typing (Garageband’s keyboard – Command + K), and I just start jamming on the Kick and Snare, trying to come up with a pattern that I’ve never used before but also sounds very good.
Usually, the Kick and Snare is loaded at the C3 level on Garageband’s Musical Typing, so I just hammer on the “C” and “D” note, or as it says on the actual laptop Keyboard, the letters “A” and “S.”
If you’re using a MIDI-Keyboard, it’ll likely be the very first C and D on the left-side of the Keyboard.
After I’ve built a cool sounding Kick and Snare pattern, I usually begin adding the other details.
8) Shaker
I’ve been actually using the Shaker function quite a bit lately. I feel like it’s a nice touch to the sound.
And for the most part, I either add the hi-hats on every single beat, or I add it about half-a-beat after the Snare Drum. I think it sounds cool.
I use the shaker – and this is a great thing to keep in mind for producing all kinds of drum-centric music – to keep the beat at a more consistent pace.
Many producers use the Kick, Snare, or the Hi-Hat as a way to keep time.
For me, using the Shaker is good for that, because it’s not too intrusive or obstructing. In other words, it doesn’t take too much attention away from other sounds, instruments, and melodies.
A snare or kick can be quite aggressive.
9) Bass
This is arguably the most important part of hip-hop production, and frankly, I’m not the greatest at it, so you may want to check out another person’s tutorial to figure out how to make great Boutique 808s and bass-lines.
As I explained in this article about Boutique 808s, there are many different ways of drawing/playing bass-lines, as well as EQ-tactics and methods for making it sound good.
Make sure to check out the article at the above link to see what I’m talking about.
For the sake of this tutorial, however, I’ll outline what I did for “Spaceship Under Water.”
The first thing that I do when I build a bass-line is I usually think about the chord progression and melody, that way I can draw a bassline that is actually on-key.
Many producers struggle with building a bass-line that’s on-key due to the limitations of the human ear. It’s pretty hard to hear the lowest frequencies, so a good way of getting around it is the following:
Tip: Try making a bass-line with the Bass turned up 1 or 2 octaves, that way you can find out if the bass is truly in the proper key signature.
Another thing that you can do is treat the bass as if it’s a melody of its own, and create maybe a piano melody, but then change the software instrument track into the Deep Sub Bass synth or the Boutique 808s.
Moving on…
I typically outline the notes of the chord in order to create the bassline. For example, I know that in this track there are two primary chords that lie as the song’s foundation: Cmin9 and Ebadd9.
These two chords, as I mentioned above, belong to the key of G Minor, where these are the following notes of the scale, G, A, Bb, C, D, Eb, and F.
Cmin9 = C, Eb, G, D
Ebadd9 = Eb, G, Bb, F
If I’m going to make a bassline, I would focus on the C note and the Eb note, just as a starter to see how that sounds. C and Eb are the root notes of the aforementioned chords.
After that, I’d play around with the G Minor scale, whose notes I listed above, and I’d see if I could make something out of that. However, usually I crave a little more out of the bassline, and most other people do as well.
Most people would argue that the main purpose of the bassline, whether it’s Boutique 808 or a bass guitar, is to hold the rhythm down of the song, so to speak.
It’s a way of solidifying the groove and flow of the track. It’s like strengthening its backbone.
Without bass, the song wouldn’t have the same “fullness” about it. It would sound likely more empty and hollow. Those lower frequencies really complete and warm-up the song.
In this case, I was struggling to come up with a bass-line that fulfilled that role, so I ended up just outlining the notes of the chords and keeping it very simple.
Sometimes, simplicity is where it’s at.
The final thing to note is the fact I copy and pasted the notes of the Kick Drum into the Deep Sub Bass track, that way I had a reference point for when the Kick and Snare hits.
As I wrote about in my 808s article, if you want your bassline to hit hard, which is arguably the most coveted aspect of hip-hop production, then it’s essential that you line your kick drum with the Boutique 808s or Deep Sub Bass Synthesizer.
You can check out the image below of the Deep Sub Bass to see how I did that:
11) Volume Control
One last final thing to note before we get into the next section: I did a volume fade at the beginning of the song for the flute section.
How To Make A Beat Drop On Garageband
In my automation tutorial, I explained that In order to do that, you hit the ‘A’ button on the track for “Automation.”
You’ll notice right away that the yellow automation lines will pop up.
By clicking on the line, you’ll drop automation points and then you can drag the line around according to how you want to adjust the volume.
Check out the picture below to see what I did for that particular track.
Moving on to the Exporting, Mixing, and then Mastering stage…
12) Export As AIFF
Now that the song is pretty much completed, we can move on to the easiest stage: the “exporting stage.”
For this part, make sure that absolutely none of your tracks are clipping (going into the red), otherwise, it’ll sound terrible later on.
Make A Beat Drop On Garageband Roblox
As a general rule, you want your volume tracks to be going into the yellow only during the loudest parts of the song. It’s cool if the tracks ride in the green the entire time.
Also, turn down the Master Volume to +0.0. I haven’t heard anyone say this matters at all, but for me, it absolutely does.
Make sure the Master Volume is at zero, otherwise, your track won’t mix and master properly.
Make sure there are no plug-ins running on your master track as well.
To do that, go down into the Smart Controls and click on the button that says. “Master,” among the other two options, “Track,” and “Compare.”
You’ll see the list of the plug-ins, and make sure they’re all turned off.
It’s ok if you have plug-ins running on the individual tracks, but you don’t want any on the master channel, from what I’ve been told anyway.
At this stage, your track is nearly ready for export. Listen to the whole thing and make sure all of the instruments sound good, and exactly as you want them to.
Keep in mind, when you go to master the track, some of the other sounds may sound accentuated. For that reason, I typically turn down the sound of the hi-hats, shakers, and other high-frequency instruments.
Explained in another way, If you plan on using compression and an EQ boost, some of the higher frequency instruments, such as the hi-hat or cymbals, tend to make that hissing sound.
For that reason, consider turning the volume down on the individual tracks.
a) Click on the option, “Share,” in Garageband’s Toolbar at the top
b) and then click the option, “Export to Disk,” from there,
c) hit the AIFF check-box,
d) name your track
e) and then export it on to your desktop that way you can simply drag and drop it into the DAW.
From this stage, we can actually drag and drop the AIFF file right back into the DAW among all of the other software instrument tracks.
f) Hit the “Solo” button on the track that looks like a pair of headphones to isolate the song.
The reason for this is that we’ll check and see that our track isn’t clipping it all, and we give it a general test to see what it’s going to sound like after we add a compressor, channel EQ, and so on and so forth.
Now that we can see there’s nothing wrong with the track and it isn’t too loud, we’ll move on to the mixing stage.
g) Start a new project.
11) Mixing.
I’m by no means an expert mixing engineer, so just keep that in mind, but for this stage, I actually don’t do a lot to it. I showed more of the process in my guide on mixing beats. In his book on Amazon, Bobby Owsinski and some of the engineers explain that there doesn’t always need to be a lot done to a mix.
I usually add a Channel EQ, a compressor or Multipressor, and then maybe a Limiter as well just in case.
a) Channel EQ
As you can see by the image below, I cut the lowest and highest frequencies, dropped the 205hz frequency by -3.5 dB, and then gave the song a bit of a boost by 3dB or so starting from the range of 500hz to 10,000 kHz.
I also gave it a small boost to around 35hz.
b) Multipressor
For the multipressor, I just used the “Final Hip Hop Compressor” pre-set which dropped the gain by around -3.6dB.
I really like the way the multipressor sounds. I find it gives the track quite a bit of punchiness.
*In the YouTube version of this song, I used a compressor instead of a multipressor, but on my SoundCloud, I used the multipressor version.
c) Limiter
As I wrote in my article about limiting, the limiter acts as a compressor with an extremely high ratio, or in other words, it’s a “brick wall” in which no frequencies can pass through.
Using the limiter, we’ll boost the overall volume of the track by +3.0dB, and then we’ll set the output level at -0.2dB.
How To Make A Beat Drop On Garageband Mac
The gain is best increased by just 1, 2, or 3 dB because then we’re not pushing it too hard.
Regarding the Output Level knob, technically, the point past 0dB is the point of distortion according to what I’ve read.
If we have it set at -0.2dB, then we don’t have to worry about the song exceeding that point and thus, creating distortion.
Because of the way the limiter works, a lot of people like to use it as a volume-increaser at the end of the mixing process.
Make A Beat Drop On Garageband Free
However, it’s much better thought of as a tool that we can use to ensure no undesirable sounds are heard in the mix.
12) Final Step
Ensure the volume of the track is consistent with other music you’ve created.
If you have an album on your phone and you hook it into a Bluetooth speaker at someone’s house, you want the tracks to be the same volume as each other.
That way, you won’t have to continuously come back and turn the volume up.
For this point, I would try and match the volume of, not other artists on YouTube or SoundCloud, but your favorite artists and their professionally mixed and mastered hit singles.
If you’re going to try and make a song, you might as well get used to trying to match the amplitude (volume) of their music.
I usually choose the volume to be around +1.6dB on the Master Volume channel. In between +1.6 and +2.0 dB, depending on whether I’ve used a compressor a multipressor.
13) Export
Now, if you want to export your music, thankfully, Garageband comes with a convenient “Share” function on the top toolbar that allows you to easily export music to either SoundCloud, iTunes, or YouTube.
Before doing this, however, make sure you do this one last thing if you haven’t already.
a) Go into the Garageband Preferences.
b) Click on Advanced.
c) See where it says, “Auto Normalize – Export Projects At Full Volume?”
Make sure this box is unchecked, otherwise, Garageband will export your music at a level that is far too quiet, and the competition will just outshine you like crazy.
Moving on…
With that said, try to avoid making your tracks too loud.
I’m not an expert on this topic, so take notice of this warning, but some people say that making your tracks super loud is a part of what’s called the “Loudness War.”
It’s up to you whether or not you want to engage in this. If you’re curious to read more about it, I recommend this article here.
Some people might argue that an artist/audio engineer has to do whatever they can to get noticed, and that includes exporting music at too high of a volume.
Others will hate you for making your music so loud.
It’s up to you as to whether you want to annoy other producers and audio engineers. I guess you have to ask yourself though, “am I making music for myself, other people, or other producers?”
Anyway, I hope this tutorial was helpful to you. As I said before, I’m not a Billboard-topping artist, so I can’t tell you how to make the illest beat you’ve ever heard. I can only show you how I make them.
Enjoy.
Do me a solid and share this on social media.
0 notes
Text
Spotify App Screen Album Art

Music visualization, a feature found in electronic music visualizers and media player software, generates animated imagery based on a piece of music. A music visualizer works by extracting waveform and/or frequency information from the music and feeding this information through some display rules, which produces what you see on the screen. The Spotify visualizer software starts by analyzing the waveform and frequency information in the audio, and it looks best as a screen saver.
How to Do Spotify Album Full Screen! (SIMPLE)In this video I'll show you how to get spotify full screen. The method is very simple and clearly described in t.
It would be cool to have a music visualizer that syncs with music that's built into Spotify. A Spotify visualizer was implemented in the desktop version of the app a while ago. Just type in the top left search bar spotify:app:visualizer and a Spotify visualizer app should appear for you. Then for some unexplainable reason, it got removed. Since Spotify is one of the best music streaming softwares, the one thing Spotify lacks is a live Spotify visualizer that either allows full screen album artwork or abstract visuals that go along with the music. Fortunately, there are so many third-party music visualizer softwares in the market now. Here we will list you several Spotify Visualizer you can try.
Dec 01, 2016 I am making simple app like any music app and I want album art on lock screen of phone like in Play Music application of google when song is playing and your screen is locked and you are going to o. Aug 15, 2020 In the Spotify Music preference pane, users can: Toggle the tweak on or off for Spotify Music. Enable or disable album artwork as the background. Choose a blur effect: None. Adjust the album artwork opacity level via a slider. Hide various elements from the Spotify Music app’s Now Playing interface. The app is called Discz - you can swipe through hundreds of songs at a time and they'll get saved right to your Spotify. You can even use it a set builder since we recommend songs based on the currently selected Spotify playlist / filters you choose like BPM, Key, etc.
Part 1 Online Spotify Visualizer
1.https://kaleidosync.herokuapp.com
https://kaleidosync.herokuapp.com/is created by itsappleseason and posted in reddit. Open the Spotify visualizer in your browser and you will be asked to log in your Spotify account. Then play songs in your Spotify app and the visualizer begins. The visual is somehow simple.
Part 2 Powerful third-party music player with visualizer
Actually, many music players have visualizer feature. If the music player you like has visualizer feature, you may consider useing it to play Spotify songs. Here we will introduce you several music player with visualizer.

1.iTunes

Since its very first version, iTunes has had a visualizer, a built-in light show that you can use to play trippy animations while you listen to music. A quick press of two keys triggers the visualizer: while listening to music, just press Command-T, and sit back and watch the show. After converting Spotify music to mp3, you can then import the DRM free Spotify songs to iTunes and then enjoy then with visualizer.

2. Windows Media Player
Windows Media Player, the default player that comes preinstalled with Windows operating systems comes with visualizations. Click the 'Switch to Now Playing' button in the lower-right corner and then click 'Play' to play a song. Right-click any open space on the media player, select 'Visualizations,' highlight a collection category and then click the visualization to use.
3. VLC
Drivers jds uniphase port devices. Audio visualizations is a also available in VLC while playing audio files. From the VLC Menu click on Audio > Visualizations and then select a visualization. You can also select visualizations by right clicking while your audio is being played. From the right click media go to Audio > Visualizations and select a visualization. The default available visualizations are Spectometer, Scope, Spectrum, Vu Meter, Goom and ProjectM. They all have their own style. Switch between them and select the one you like.
Other music players with visualizer feature includeAIMP,Winamp,foobar2000,Media Monkeyand more. However, you can't use them to play Spotify songs directly. As we all know that Spotify music are protected by DRM and the format of Spotify music is Ogg Vorbis.
Toplay Spotify songs on third-party music player with visualizer feature, you need to convert Spotify songs to MP3 format and remove DRM protection from them.Ondesoft Spotify Converteris designed for downloading and converting any Spotify songs, albums or playlists to MP3, M4A, WAV or FLAC with 100% original quality. Wit
h Ondesoft Spotify Converter, you can play Spotify songs anywhere, anytime without any limitations. The following tutorial will show you how to use Ondesoft Spotify Converter todownload DRM free songs from Spotify.
Step 1 Run Ondesoft Spotify Converter
Download and install Ondesoft Spotify Converter on your Mac or Windows. Before you run it, please make sure that you have installed the latest Spotify on your computer. Then launch Ondesoft Spotify Converter, Spotify will be launched automatically.
Step 2 Add Spotify songs
Find the songs you want to convert, then drag the song, album or playlist to the main interface of Ondesoft Spotify Converter. Or you can click the Add Files button, copy and paste the url of the song to the search box on the bottom of the program. Click the Add button, then songs will be added to the conversion list.
Step 3 Change Output Settings
How To Get Full Screen Album Art Spotify
Click the Options button, you will find the song artwork, title, artist, duration and output format on the pop up small window. The default download format is mp3. It also supports downloading Spotify Music as M4A, WAV, FLAC. You can also change bitrate, samplerate according to your needs.

Step 4 Start Converting
Click the Convert button to start downloading and converting songs. Wait for a few minutes, you can find all converted songs by clicking the History button. Then you are able to play them on any third-party music visualizer softwares.
After the converting, you can get the DRM-free Spotify MP3 songs by clicking the Folder icon.Now you can transfer the songs to above music player and enjoy the songs with visualizer.
© Google It should only take a moment to connect your Chromecast to Spotify. Google
Google Chromecast allows you to play Spotify on your TV with album art and lyrics displayed on the screen.
You can play Spotify on Chromecast using a phone, tablet, desktop, laptop, or Spotify's web player, and the device you cast from becomes your remote.
To connect Spotify to Chromecast, you'll just need to use Spotify's 'Devices' menu.
The Google Chromecast is a device that connects to your TV's HDMI port, and allows you to 'cast' media from a phone, computer, or tablet to your TV. It essentially turns any television into a Smart TV.
Chromecast allows you to view a multitude of things on your TV, from Netflix to YouTube to photo slideshows. One of the most convenient things you can cast, however, is Spotify.
When you cast Spotify to your television using Chromecast, you essentially turn your TV into a jukebox with all your favorite songs. Any song you play will have its album art displayed up on the screen, and some songs even come with lyrics and fun facts about the band playing.
Here's how to use a Chromecast with Spotify, and start listening to music through your TV.
Check out the products mentioned in this article:
Spotify App Full Screen Album Art
Google Chromecast (From $35 at Best Buy)
How to use a Chromecast with Spotify
First of all, make sure that your Chromecast is set up properly, and that it's connected to the same Wi-Fi network as the device you'll be casting Spotify from. This can be a phone, tablet, or computer.
1. Turn on your TV and make sure it's set to the HDMI channel that your Chromecast is plugged into.
2. Open Spotify on your phone, tablet, or computer.
Saet i.s port devices driver. 3. Choose the song, album, or playlist you'd like to cast and begin playing it.
4. Tap the devices button at the bottom of your screen. It looks like a speaker in front of a monitor, and will be on the bottom-left if you're using the Spotify mobile app, and the bottom-right if you're using a computer.
© Melanie Weir/Business Insider Open the devices menu. Melanie Weir/Business Insider
Spotify App Screen Album Art Free

5. A list of possible streaming options will appear. Choose the device you want — in this case, your Chromecast device. If your Chromecast is hooked up to a Google Home system, the name of the device will appear as whatever you set it to be in your Google Home. If it isn't appearing, make sure that you're connected to the same Wi-Fi network.
Spotify App Screen Album Art Download
© Melanie Weir/Business Insider Select the name of your Chromecast from the list. Melanie Weir/Business Insider
Once you tap the device you want, music will stop playing on your first device, and Spotify will appear on your TV screen.
Related coverage from Tech Reference:
0 notes
Text
Saet I.s Port Devices Driver

A necessary companion for discrete power MOSFETs and IGBTs as well as digital – microcontrollers, DSPs and FPGs – or analog controllers in any switched-mode power converter STDRIVE gate drivers generate the necessary voltage and current level required to accurately and efficiently activate the power stage in industrial, consumer, computer and automotive applications.
Instructions for how to use Windows. Device Manager to determine if you have one of the impacted Intel® 6 Series chipsets in your system can also be found in the Chipset Circuit Design Issue customer announcement.
FAQs

COM comes from MS-Dos, it is a device name. Radiant driver. Short for 'COMmunication port'. Computers in the 1980's usually had two serial ports, labeled COM1 and COM2 on the back of the machine. This name was carried forward into Windows, most any driver that simulates a serial port will create a device with 'COM' in its name.
Saet I.s Port Devices Driver
https://blogstreet94.tumblr.com/post/652895286070591488/zemo-driver-download-for-windows. Here you’ll find frequently asked questions and solutions for your computing life upgraded with Samsung V-NAND SSD.

Saet I.s Port Devices Driver Ed


There may be no option in BIOS to set hard drive password for NVMe SSD.
Samsung NVMe SSD supports the security feature that enables you to set up a password for your hard drive; however, the BIOS program that comes with your computer may not support this feature. For troubleshooting guide, please contact your computer manufacturer.
The blue screen error (message : What failed: secnvme.sys) may appear after enabling Hyper-V in Windows 10 with Samsung NVMe Driver and 960PRO.
Please download and install the latest Samsung NVMe Driver here. If the problem persists, please contact Samsung Customer Service Center.
What do I do if my SSD has problems?
If you are experiencing difficulties with installation, please refer to the installation guide. If you are having problems using the product, please refer to the FAQ or to the solutions for known problems. If you need to return your product, please contact the dealer where you purchased the SSD or contact S-ASC (Samsung-Authorized Service Center).
How can I fix the “bootmgr is missing error” while trying to boot from Windows Vista or Windows 7?
Create a Windows Repair Disk and run it to solve the “bootmgr is missing error.” To learn how to create an OS repair disk, consult Microsoft or your computer’s manufacturer. The bootmgr can also be repaired with the Windows installation disc by selecting the repair option. Please see your OS’s help function or knowledge base for more information.
What should I do if BIOS does not detect my SSD?
1. BIOS may fail to support the SSD if it is outdated. Please update the BIOS to the latest version. 2. Your system may fail to detect the SSD if the SSD is not properly connected. Disconnect the cable and reconnect. 3. When there is a problem with the SATA Port, BIOS may fail to detect the SSD. Connect the SSD a different SATA Port and try again.
What should I do if I don't see my SSD in the Device Manager?
1. Your PC may fail to detect the SSD automatically; please search for new devices in Windows Device Manager. 2. When Hot Plug-in for each port in BIOS settings is set to Off by default, Windows may fail to detect the SSD. Reboot the system, enter BIOS setup, and go to SATA Configuration menu to ensure that Hot Plug-in for each port is set to 'Enable“. How to enter BIOS setup for different mainboards: • GIGABYTE -->F12, ASUS --> F8, ASRock --> F11, Biostar --> F9, MSI --> F11, Intel --> F10 3. When SSD is not properly connected, the system may fail to detect the SSD. Disconnect the cable and reconnect 4. When the partition has not been defined, it may cause failure in detecting the SSD. Go to Device Manager to set up a partition, format the drive, and then reboot. • Management> Disk Management> Select SSD> Set up partition and format.
What should I do if I don't see my SSD in Drive Selection?
1. Replace the SATA cable and try again. 2. Make sure that the SATA connector on the board does not contain any debris, or is not damaged. 3. When SSD is not properly connected, the system may fail to detect the SSD. Disconnect the cable and reconnect. 4. Connect the SSD to a different SATA Port and see if the drive is detected. • Check to see if the SSD is connected to an expansion port. If it is, then connect the SSD to a regular port. • If the SSD is connected to a regular port, switch to a different port and reboot. 5. If the SSD is properly connected but is not shown in the Drive Selection, try the following steps. • Right-click the My Computer icon => Select Manage => Select Storage => Click Disk Management => Make sure that the disk is set up properly. • Make sure that the disk is enabled and set as a Dynamic Disk. If it is not, change its setting to Dynamic Disk. 6. Connect the SSD to a different computer to check if there is a problem with the SSD itself.
My Samsung SSD is not detected as an SSD but as a regular ATA drive under Windows 7 Professional. Is this normal?
Yes, it is normal for Windows 7 to detect an SSD as a regular ATA drive. Please note that Windows 7 will optimize the configuration of your SSD.
What should I do if I cannot install the OS?
1. Check the surface of the OS installation CD for any damages (scratches, fingerprints, stains, etc.) 2. Replace the SATA cable and reboot. 3. Make sure that the SATA connector on the board does not contain debris, or is not damaged. 4. Improperly connected SSD cable may cause a failure in detecting the SSD. Disconnect the cable and reconnect. 5. Connect the SSD to a different SATA Port and see if the drive is detected. • Check to see if the SSD is connected to an expansion port. If it is, then connect the SSD to a regular port. • If the SSD is connected to a regular port, switch it to a different port and then reboot. 6. For Windows 7 or higher, the system area may be installed on the existing HDD. Make sure that the SSD is the only drive connected to the system before installing the OS. 7. Connect the SSD to a different computer to check if there is a problem with the SSD itself.
What should I do if I cannot format the drive?
1. When the SSD is not properly connected, it may not be detected. Reconnect the drive and then try again. 2. Make sure that the SATA connector on the board does not contain debris, or is not damaged. 3. Replace the SATA cable and try again. 4. Connect the SSD to a different SATA Port and see if the drive is detected. • Check to see if the SSD is connected to an expansion port. If it is, then connect the SSD to a regular port. • If the SSD is connected to a regular port, switch it to a different port and then reboot. 5. Check your BIOS settings (make sure to check the SATA Mode setting). 6. Connect the SSD to a different computer to check if there is a problem with the SSD itself. 7. Run Secure Erase to initialize the SSD and then try again. (See Secure Erase FAQ).
What should I do if the speed of my SSD seems to be slow?
1. When the SSD is used over a long period of time, the status of the SSD can become 'dirty,' which may affect the performance of the SSD. Please use the Magician Tool, provided by Samsung, and run Performance Optimization. Run the program regularly to prevent this. 2. Please ensure that your mainboard supports SATA III interface. SATA II mainboards prevent the SSD to perform slower than they should perform. 3. Make sure that all of the performance-related settings shown below are set correctly. • Write Cache needs to be enabled (See FAQ) • AHCI must be enabled (See FAQ) • Check and update driver version if necessary (See FAQ)
Why does SSD performance decrease over time?
Techniques like TRIM and garbage collection will help maintain your solid state drive’s performance over time. TRIM runs automatically under Windows 7. If you are on an older version of Windows, TRIM can be run through Samsung’s SSD Magician software. If the problem continues, you may run a “Secure Erase” via the Samsung SSD Magician software. Refer to the Magician manual for detailed information and instructions on this process. The Magician Software application is available for Window-based PCs only.
SSD Samsung Magician does not detect my SSD. What should I do?
SSD Samsung Magician is compatible with Samsung-branded SSDs only. If your SSD is an OEM product which refers to SSD manufactured by Samsung but sold under other brand names, Samsung Magician cannot authenticate it. If you have a Samsung-branded SSD, confirm whether or not the SSD is detected by the Windows device manager. Your SSD should be detected as either an IDE or an AHCI device. If it is not, installing the standard AHCI controller driver for Microsoft Windows may fix your problem. Some old AMD chipsets and AMD drivers are not supported by Samsung Magician. Please check the ‘System Compatibility’ tab for more information. If the SSD is connected to a RAID/SCSI storage device controller, the program may fail to detect the SSD properly. If this is the case, please install the MS default drivers which is automatically installed with Microsoft operating system installation.
What should I do when the SSD is not detected after installing Magician?
1. Please update the driver to the latest firmware to prevent compatibility issues. 2. Some older AMD chipsets and AMD drivers do not supported by Magician. If this is the case, please install the MS default drivers. 3. If the SSD is connected to a RAID/SCSI storage device controller, it may cause a failure to detect the SSD properly. If this is the case, please install the MS default drivers.
What should I do if Magician does not correctly display the health status or TBW ?
1. Samsung 470 Series SSD does not support the drive status display feature (Health Status and TBW). 2. Drive status uses SMART values; press the SMART button on the Magician home screen and make sure that all SMART values are properly displayed. 3. A driver compatibility issue could cause a failure in the host's commands to the SSD. In this case, SMART values will not be visible, and the drive status will not be displayed. Please use another program such as CrystalDisk Info. 4. Go to Device Manager - Select the driver associated with the SSD - Right-click Properties - Driver information – Run Update driver 5. Please update the IRST driver to the latest version.
What should I do if a Performance Optimization error occurs?
If the SSD's capacity less than 137GB in Windows XP/2003, a problem may occur due to ATA PASS THROUGH feature issue. Please download and install the hot fix provided by Microsoft at http://support.microsoft.com/kb/934205. If you still have the problem, please contact the service center.
What should I do if an error occurs while I am using Magician to perform OS optimization?
1. If Magician attempts to optimize the OS services and fails, please try manually turning the services on and off. 2. OS Optimization turns OS services on and off, which may not be permitted by the OS depending on the circumstances, so contact the manufacturer of your personal computer. 3. If IRST is installed, ‘Write cache buffer flushing’ cannot be performed in Magician as it is affected by IRST. Please .conduct OS optimization after disabling IRST manually. 4. If you have changed Virtual Memory settings, be sure to reboot the system. (Magician is showing the list of failing services in a pop-up.)
What should I do if power management settings were changed after I ran OS Optimization?
If you want to change the power management settings after the OS Optimization, go to Control Panel - Power Options.
What does the Samsung Data Migration software do?
The Samsung Data Migration software is designed to help users migrate all of their data – including their current operating system, application software, and user data – from their existing storage device (e.g. HDD) to their new Samsung SSD quickly, easily, and safely. For more information, please refer to the user guide available at www.samsung.com/samsungssd.
What should I watch out for when using Samsung Data Migration software?
Samsung provides Magician/Migration tools for users. Each software tool is accompanied by an Installation Guide and a detailed instruction manual that describes system requirements, and other important information. Be sure to review the guides before using the product. The programs shown below are available for download at Samsung.com website. (Samsung Data Migration Software) Samsung Data Migration software allows you to copy the data stored on your computer's current storage device to your new Samsung SSD (Solid State Disk) quickly, easily, and safely. (Samsung Magician Software) Samsung Magician software is designed to help users manage the health and performance of their Samsung SSD. Magician also assists users in updating firmware, measuring performance, and optimizing the configuration of a Windows OS installation. Samsung Magician software is developed and distributed exclusively for Samsung Solid Sate Drives. (Download link) To download the latest software & manuals, please visit. - www.samsung.com/samsungssd - www.samsung.com
Saet I.s Port Devices Driver Windows 7
Here you can find answers to questions about Portable SSD T5. How to download & install PBE client | PBE-Accounts.com.
0 notes
Text
Drivers Jds Uniphase Port Devices

© 2014 JDS Uniphase Corporation 7 Fiber Contamination is the #1 Cause of Troubleshooting Fiber Contamination and Its Affect on Signal Performance. Radiant driver app.
Drivers Jds Uniphase Port Devices Phone Number
Jds Uniphase Stock
Drivers Jds Uniphase Port Devices Inc
Drivers Jds Uniphase Port Devices Inc
Drivers Jds Uniphase Port Devices Stock
A method and device for wavelength locking is provided, wherein an element having a wavelength dependent characteristic such as a Fabry Perot etalon is used to provide an output signal having an intensity that varies with wavelength.
Used, excellent physical condition, JDS Fitel D8T Relay Driver for use with SW Series switches. AC Adaptor not available; this unit has not been tested. Sold as pictured. Features a compact design, front panel driver selection, power switch, and status LEDs. Control interfacee for up to 8 drivers IEEE-488 BUS, RS-232-C Port.
Iii Instrumentation Support. Regular support hours of operation are 8:00 AM - 5:00 PM ET, Monday through Friday, excluding Canadian holidays. Emergency Technical Support.
All drivers are controlled by remote commands (use the Driver port at the back of the switch). Driver 1 can also be controlled locally by the Driver 1 key. To control driver 1 locally: 1. Press the Driver 1 key to toggle driver 1 on and off for manual control. The status LED of the key is lit when on. Page 26: Calibrating The.
Drivers Jds Uniphase Port Devices Phone Number
Used, excellent physical condition, JDS Fitel D8T Relay Driver for use with SW Series switches. AC Adaptor not available; this unit has not been tested. Sold as pictured.
Features a compact design, front panel driver selection, power switch, and status LEDs.
Control interfacee for up to 8 drivers IEEE-488 BUS, RS-232-C Port
Limited Supply!
SpecificationsSpecificationWarrantyWarranty30-Day Warranty
Item ID: 251799
Brand: JDS Uniphase Corp. (JDSU)
Model: D8T
Availability: In Stock
Condition: Pre-Owned
$66.75
Related Products
AT&T Fiber Optic Telecommunication Switch
AT&T Fiber Optic Telecommunication Switch. We believe this to be an older AT&T switch unit. 1 RS E.
$80.10
JDS Fitel SG12042+12M000FP Fiber Optic Matrix Switch
JDS Fitel model SG12042+12M000FP Fiber Optic Matrix Switch .
$671.95
JDS SC90B5-E0NC SC Fiber Optic Switch
Jds Uniphase Stock
Used, JDS SC Series model SC90B5-E0NC Fiber Optic Switch .
$618.55
JDS SG04062+17F000SU SG Series Fiber Optic Matrix Switch
Used, JDS Uniphase model SG04062+17F000SU Fiber Optic Matrix Switch .
Pbe driver download pc. Download the tech sheet for the PBE Leaky Feeder Cable Model 20-00007, 20-00008, 20-00020, 20-00041. PBE’s Leaky Feeder Cable is Part of the PBE Leaky Feeder System which provides a highly effective and safe underground communication system Download: Gen4 Bidirectional Amplifier A4 (Spanish).
Zemo driver download for windows 7. $645.25
Dicon Standard GP700 Fiber Optic Switch Programmable Platform
This used Standard GP700 Programmable Platform was power on tested and self test indicates - OK. It is good physical con.
$177.11
Dicon GP700M Mainframe (4U) Fiber Optic Switch w/Rear Optical Panel
This used GP700M Programmable Mainframe was power on tested. It is a 4U standard rack mount and has a rear panel install.
Drivers Jds Uniphase Port Devices Inc

Drivers Jds Uniphase Port Devices Inc
$177.11
Drivers Jds Uniphase Port Devices Stock
Tags: Pre-Owned
0 notes
Text
ISY Network & Wireless Cards Driver

Continuing our QuickStart series of posts about the fundamentals of basic ISY configuration, today we’ll cover two ways to add a device to the ISY-994i. Radiant driver.
The ISY is set to a fixed IP address in the ISY and in the router and it shows being connected when I check the clients in my router. I also tried turning off the Windows 10 firewall in case it was firewall problem. The only thing that seems abnormal is the ISY Launcher prints out the follow exception information when it launches. Zemo Driver Download for windows.
Without getting too technical, when we add a device to the ISY, in addition to telling it that this device “exists”, we’re also telling it to add an Insteon link to the device itself and to the PowerLinc Modem (PLM). It does this because we want the device to send a message to the PLM every time its state changes – and every time the PLM gets this message, it’s available to the ISY to update the status, run programs, etc. In other words, when you turn on a device, you want the device to say “On” when you’re looking at the ISY application.
Use your ISY as a web server to serve up your own applications, pictures, and files. The module also includes Wake On Lan (turn your computers on using ISY progrmas) and Network Resources which enable you to call any network resource (TCP/UDP/HTTP/HTTPS). The ISY provides central control of home automation devices in a residence and is designed to play the role of home automation device controller in any domestic UPnP network.

The first and easiest way to add a device is to go to “Link Management:Start Linking”. Essentially what this does is tell the PLM to start listening for devices on the network that are ready to link.
You would then put the device you want to add in “linking mode” by pressing and holding the set button on that device for a few seconds. It will then send a signal that is picked up by the PLM, and the ISY lets you know it’s ready to configure the link tables and for you to name the device.
ISY Network & Wireless Cards Drivers
The ISY series electric pipe end prepatation beveling machine based on different pipe size the model classified as ISY-28,ISY-80,ISY-150,ISY-250,ISY-250-II,ISY-351,ISY-351-II,ISY-630,ISY-630-II,ISY-850-II. The motor of ISY-28 and ISY-80 is set at horizontal position. The others is set at vertical position. You could check at below picture. This tutorial video goes over the basics of configuration an ISY. Topics include system setup, network, clock, email notifications, backup and restore.
Polaris Bios Editor v1.7.2: Download PBE for Windows 7/10 (x32 x64) Polaris BIOS Editor 1.6.7 (Elpida, micron, samsung, hynix) Download and configure. Red BIOS Editor (RBE): AMD Radeon flashing (Windows & Linux) ATIFlash/ATI WinFlash v2.8.4 – BIOS Editor AMD DOWNLOAD NVIDIA NVFlash v5.590.0/v5.414.0: Download for Windows/Linux (BIOS. First we need to download the PBE client installer by clicking here. The installers size is about 100MB. #1 – After download is completed, go to “Riot Games” folder (“C: Riot Games”), and put the downloaded file there. #2 – Now double click the installer and select yes on the next dialog. Drivers filed under: Ubiquiti PowerBeam Bridge Firmware (100 items). Ubiquiti PBE-M5-300 Bridge Firmware 6.1.9.32918 174 downloads. Network Card Ubiquiti. How to download & install PBE client | PBE-Accounts.com. AMD Blockchain Driver (Radeon Software Crimson ReLive for Blockchain Compute) SRBPolaris V3.5 (BIOS editor for AMD RX4XX, RX5XX) DOWNLOAD PolarisBiosEditor v1.7.2 (PBE) Downlad for Windows x32/x64 bit. Download the tech sheet for the PBE Leaky Feeder Cable Model 20-00007, 20-00008, 20-00020, 20-00041. PBE’s Leaky Feeder Cable is Part of the PBE Leaky Feeder System which provides a highly effective and safe underground communication system Download: Gen4 Bidirectional Amplifier A4 (Spanish).

Here’s the thing: I don’t really advise this method of adding a device. I’ve had only limited success with it, and it doesn’t seem to work well with wireless devices like RemoteLincs. I don’t exactly have proof of this, but I’ve also been concerned about adding multiple devices at once. Specifically, if you don’t have an ISY or PLM, this is how you link devices together – by putting one device in “linking” mode, then do the same on the next device. So if you do have the ISY and put two devices in “linking” mode at the same time, I think it’s possible to accidentally link those devices to each other. If that happens, you may end up with one device turning on when you click a different switch – not something we’re looking for in this case!
Speaking of devices linking to each other by accident, that is what those linking options shown above are all about:
Remove existing links
Add devices found in links and remove existing links
Add devices found in links and keep existing links
Since every device maintains its own link table, the ISY window is basically giving you the option of removing existing links or keeping them. So for example, if you manually linked two switches together so you can control the same light with one switch, you could say “Add devices found in links and keep existing links”. This will tell the ISY to add that device, and add any other devices that are referenced by it in its link table. In general though, if you’re building an Insteon network from scratch or have accidentally linked two devices, you should use “Remove existing links” to make sure that the device and the PLM have the proper link tables.
So, if that’s not an ideal method to add a device, what’s better? For this I’d suggest the more straightforward approach of adding one device at a time with the “Link Management:New INSTEON device”. It has the same options mentioned above for dealing with link tables, but requires you to add devices by their address.
Isy Network & Wireless Cards Drivers
The neat thing about that method is you don’t even need to put the device in “linking” mode by holding down the set button if it’s a powered device like a SwitchLinc or KeypadLinc (though you’ll still need to do it with wireless devices like RemoteLincs).
Once you get the device added to the ISY, just drag-and-drop it into a folder of your choice. We’ll talk naming conventions and scenes in upcoming QuickStart posts!
November 3
0 notes
Text
Radiant Driver

MicroDicom DICOM viewer
Radiant Icd Drivers
Radiant Drivers
Radiant Drive Jacksonville Nc
Radiant Driveway Systems
'Radiant Dyes Laser Acc. GmbH' is a synonym for high quality products: dye lasers. Our dye laser 'NarrowScan' has been developed further over the last years and is now the most advanced product of Radiant Dyes. Similarly Radiant Dyes kept the cw-ring and Titan-Sapphire lasers up to date.
Download Drivers. Choose a product model from the list on the left to find the drivers, BIOS, utilities, firmware, patches, updates, or other suport software for the Radiant Point-of-Sale. Driver Type: Line Display / 2x20: Driver Name: RadUSerialLineDisplay1.0.0.3.zip: Release Date:: Size: 7.22 MB: Description: Virtual Serial Line Display driver for NCR USB line displays. Installing this driver creates a virtual COM port that can be used to interface to an NCR USB line display in the same way as a legacy Radiant. Stay updated with the latest software and drivers from Legrand. Take advantage of the latest features and keep your products and applications up to date with the latest software and drivers.
Latest version

Installation package:
MicroDicom DICOM viewer 3.8.1 x86 (4.17 MB 2020-11-25) MicroDicom DICOM viewer 3.8.1 x64 (4.78 MB 2020-11-25)
Portable zip package(no installation required):
MicroDicom DICOM viewer 3.8.1 x86 zip (4.91 MB 2020-11-25) MicroDicom DICOM viewer 3.8.1 x64 zip (5.80 MB 2020-11-25)
Autorun package for CD/DVD/USB: MicroDicom DICOM viewer CD/DVD 3.8.1 (10.6 MB 2020-11-25)

MicroDicom Shell Extension
Latest version Universal installation package for x86 and x64: MicroDicom Shell extension 3.0.0 (2.49 MB 2020-06-07)
Sample DICOM images
You can download some sample DICOM images from here.
DICOM sample images were temporarily removed.
MicroDicom DICOM viewer older versions:
You can download older versions of MicroDicom DICOM viewer here
Welcome to the DFO World Wiki. With many major updates since the release of DFO, many items are missing. Visit Item Database Project to learn more. Please remember to click 'show preview'before saving the page. Thanks for the updated logo snafuPop!
Radiant Wing Driver
No Video
Neo: Awakening Active SkillClass:Command:+Prerequisite Level:95Prerequisite Skills:NoneAlternate Names:Korean: 샤이닝 윙즈 플랩
Description
A special move featuring the Queen's Wings, Lexy and Lucy. When the Grappler slams an enemy onto the ground, Lexy and Lucy take turns to attack and finish it. This skill will look differently, depending on the target type. Grabbable:
When the Grappler slams the enemy onto the ground, Lexy charges and casts Lariat, launching it into the air. Lucy then quickly grabs the airborne enemy and performs Rolling Pile Driver.
Each hit generates a shockwave, inflicting the same amount of damage on surrounding enemies as the target.
Press the Up key during the slamming attack to change Lexy's Lariat to Drop Kick sending the target flying far away.
Radiant Icd Drivers
Grab Cannon:
When the Grappler spins and hits a target, Lexy charges and casts Lariat, and then Lucy performs Body Press.
Can also be used during a jump.
Attributes

SP per level: 100
Master Level: 30
Max Level: 40
Casting Time: Instant Cast
Cooldown: 60 sec.
This skill consumes 7Clear Cube Fragments.
MP -5.0% Cooldown -5.0% on Command
Basic Attack Cancelable Skill
Skill Growth
LevelLv ReqMPGrabbed EnemiesGrab CannonGrappler Slamming Atk.Lexy Lariat/Drop Kick Atk.Lucy Rolling Pile Driver Atk.Grappler Attack Atk.Lexy Lariat Atk.Lucy Body Press Atk.195960
Absolute Damage Ratio, it is multiplied by your Independent Attack Power before being shown in the game tooltips
max-width:200px100
Absolute Damage Ratio, it is multiplied by your Independent Attack Power before being shown in the game tooltips
max-width:200px100
Absolute Damage Ratio, it is multiplied by your Independent Attack Power before being shown in the game tooltips
max-width:200px100
Absolute Damage Ratio, it is multiplied by your Independent Attack Power before being shown in the game tooltips
max-width:200px100
Absolute Damage Ratio, it is multiplied by your Independent Attack Power before being shown in the game tooltips
max-width:200px100
Absolute Damage Ratio, it is multiplied by your Independent Attack Power before being shown in the game tooltips
max-width:200px100
2971120
Absolute Damage Ratio, it is multiplied by your Independent Attack Power before being shown in the game tooltips
max-width:200px100
Absolute Damage Ratio, it is multiplied by your Independent Attack Power before being shown in the game tooltips
max-width:200px100
Absolute Damage Ratio, it is multiplied by your Independent Attack Power before being shown in the game tooltips
max-width:200px100
Absolute Damage Ratio, it is multiplied by your Independent Attack Power before being shown in the game tooltips
max-width:200px100
Absolute Damage Ratio, it is multiplied by your Independent Attack Power before being shown in the game tooltips
max-width:200px100
Absolute Damage Ratio, it is multiplied by your Independent Attack Power before being shown in the game tooltips
max-width:200px100
3991280
Absolute Damage Ratio, it is multiplied by your Independent Attack Power before being shown in the game tooltips
max-width:200px100
Absolute Damage Ratio, it is multiplied by your Independent Attack Power before being shown in the game tooltips
max-width:200px100
Absolute Damage Ratio, it is multiplied by your Independent Attack Power before being shown in the game tooltips
max-width:200px100
Absolute Damage Ratio, it is multiplied by your Independent Attack Power before being shown in the game tooltips
max-width:200px100
Absolute Damage Ratio, it is multiplied by your Independent Attack Power before being shown in the game tooltips
max-width:200px100
Absolute Damage Ratio, it is multiplied by your Independent Attack Power before being shown in the game tooltips
max-width:200px100
41011440
Absolute Damage Ratio, it is multiplied by your Independent Attack Power before being shown in the game tooltips
max-width:200px100
Absolute Damage Ratio, it is multiplied by your Independent Attack Power before being shown in the game tooltips
max-width:200px100
Absolute Damage Ratio, it is multiplied by your Independent Attack Power before being shown in the game tooltips
max-width:200px100
Absolute Damage Ratio, it is multiplied by your Independent Attack Power before being shown in the game tooltips
max-width:200px100
Absolute Damage Ratio, it is multiplied by your Independent Attack Power before being shown in the game tooltips
max-width:200px100
Absolute Damage Ratio, it is multiplied by your Independent Attack Power before being shown in the game tooltips
max-width:200px100
51031600
Absolute Damage Ratio, it is multiplied by your Independent Attack Power before being shown in the game tooltips
max-width:200px100
Absolute Damage Ratio, it is multiplied by your Independent Attack Power before being shown in the game tooltips
max-width:200px100
Absolute Damage Ratio, it is multiplied by your Independent Attack Power before being shown in the game tooltips
max-width:200px100
Absolute Damage Ratio, it is multiplied by your Independent Attack Power before being shown in the game tooltips
max-width:200px100
Absolute Damage Ratio, it is multiplied by your Independent Attack Power before being shown in the game tooltips
max-width:200px100
Absolute Damage Ratio, it is multiplied by your Independent Attack Power before being shown in the game tooltips
max-width:200px100
61051760
Absolute Damage Ratio, it is multiplied by your Independent Attack Power before being shown in the game tooltips
max-width:200px100
Absolute Damage Ratio, it is multiplied by your Independent Attack Power before being shown in the game tooltips
max-width:200px100
Absolute Damage Ratio, it is multiplied by your Independent Attack Power before being shown in the game tooltips
max-width:200px100
Absolute Damage Ratio, it is multiplied by your Independent Attack Power before being shown in the game tooltips
max-width:200px100
Absolute Damage Ratio, it is multiplied by your Independent Attack Power before being shown in the game tooltips
max-width:200px100
Absolute Damage Ratio, it is multiplied by your Independent Attack Power before being shown in the game tooltips
max-width:200px100
71071920
Absolute Damage Ratio, it is multiplied by your Independent Attack Power before being shown in the game tooltips
max-width:200px100
Absolute Damage Ratio, it is multiplied by your Independent Attack Power before being shown in the game tooltips
max-width:200px100
Absolute Damage Ratio, it is multiplied by your Independent Attack Power before being shown in the game tooltips
max-width:200px100
Absolute Damage Ratio, it is multiplied by your Independent Attack Power before being shown in the game tooltips
max-width:200px100
Absolute Damage Ratio, it is multiplied by your Independent Attack Power before being shown in the game tooltips
max-width:200px100
Absolute Damage Ratio, it is multiplied by your Independent Attack Power before being shown in the game tooltips
max-width:200px100
81092080
Absolute Damage Ratio, it is multiplied by your Independent Attack Power before being shown in the game tooltips
max-width:200px100
Absolute Damage Ratio, it is multiplied by your Independent Attack Power before being shown in the game tooltips
max-width:200px100
Absolute Damage Ratio, it is multiplied by your Independent Attack Power before being shown in the game tooltips
max-width:200px100
Absolute Damage Ratio, it is multiplied by your Independent Attack Power before being shown in the game tooltips
max-width:200px100
Absolute Damage Ratio, it is multiplied by your Independent Attack Power before being shown in the game tooltips
max-width:200px100
Absolute Damage Ratio, it is multiplied by your Independent Attack Power before being shown in the game tooltips
max-width:200px100
Note: The table above has been generated based off of skill growth information presented in-game. The data may have slight differences compared to the information presented in-game due to minor rounding variations.
Female Grappler SkillsActive:Air SteinerChain ConnectionCyclone SuplexElbow ShockFlingJoint SmashNeck SnapOverwhelming GrabShoulder TackleSpiralWild Cannon SpikePassive:Grab CannonGrappler Light Armor MasteryGrappling TechniqueIntense TakedownPower SlamSliding GrabAwakening:Air ClutchCyclone AttackGiant TwisterGrab Mastery2nd Awakening:Chain GrabGiant SwingHurricane Super PlexTorbellinoTurn HeelNeo: Awakening:Queenly FinaleRadiant Wing DriverThe Ultimate Stable
Air Clutch UpgradeAir Steiner UpgradeCyclone Attack UpgradeCyclone Suplex UpgradeElbow Shock UpgradeFling UpgradeJoint Smash UpgradeNeck Snap UpgradeShoulder Tackle UpgradeSpiral UpgradeWild Cannon Spike Upgrade
Female Fighter SkillsActive:Air WalkCrouchDoppelgangerExplosive HookHammer KickLow KickMuse's UppercutNen ShotSand SplashSeismic CrashSuplexTiger Chain StrikeTornado KickPassive:Iron PhysiqueTiger's RoarAlbert Quest:Apply PoisonCrushing FistNeck SnapThunder Suplex
Air Walk UpgradeCrouch UpgradeDoppelganger UpgradeHammer Kick UpgradeIron Physique UpgradeLow Kick UpgradeMuse's Uppercut UpgradeNen Shot UpgradeSand Splash UpgradeSeismic Crash UpgradeSuplex UpgradeTiger Chain Strike UpgradeTornado Kick Upgrade
General SkillsActive:Ancient MemoryBackstepIndomitable SpiritLeapQuick ReboundPassive:Basic Armor MasteryBasic TrainingConversionFocus: CriticalLatent PowerRear AttackNeo: Awakening:Clues to AwakeningOne Step CloserSubitism
Radiant Drivers
Basic Training Upgrade
Radiant Drive Jacksonville Nc
Radiant Driveway Systems
Retrieved from 'https://wiki.dfo.world/index.php?title=Radiant_Wing_Driver&oldid=152935'
0 notes
Text
PBE Driver Download

PBE's Vantage software is designed to allow users to monitor real time data from a site remotely and accurately. Vantage allows for tracking, telemetry monitoring, alerting, and reporting of data to users. It can be configured to accept telemetry from almost any device via custom developed drivers. Capable of importing CAD maps and image files the mapping software offers a 2D GUI with icons. Vantage also offers historical playback of the data reported to replay a set timeframe. Reports are customizable and exportable to multiple common formats. The user configuration manager allows for user defined roles to grant or restrict access to and from all modules and features of those modules. The Electronic Tag Board module offers a tagging system designed to track assets that are checked in or out, while the Asset Summary module provides a list of assets with user selected telemetry streams and configurable alerts. Vantage provides location tracking and tagging, telemetry monitoring, ventilation control and reporting off data to users.
PBE Driver Download
How To Download & Install PBE Client | PBE-Accounts.com
Ubiquiti PowerBeam Bridge Firmware And Related Drivers

Polaris Bios Editor 3 Pro is a tool with simple settings for modding the BIOS of AMD GPUs. The new version of PBE 3 Pro with improved performance timings, automatic overclocking and lower voltage (power saving), ETH, XMR (CN), as well as special timings to increase the mining speed of all miners
Download and install League of Legends for the North America server. Play for free today. AMD Blockchain Driver (Radeon Software Crimson ReLive for Blockchain Compute) SRBPolaris V3.5 (BIOS editor for AMD RX4XX, RX5XX) DOWNLOAD PolarisBiosEditor v1.7.2 (PBE) Downlad for Windows x32/x64 bit.
Suitable for drivers up to version 20.5.1. SL-DVI / HDMI limit support. Instructions: Open atikmdag-patcher.exe. The program will find all the limits, select 'Yes' to fix and re-sign the driver. If something went wrong, reinstall the driver for the video card, or look for a new version of the program - Reboot. Download the tech sheet for the PBE Leaky Feeder Cable Model 20-00007, 20-00008, 20-00020, 20-00041. PBE’s Leaky Feeder Cable is Part of the PBE Leaky Feeder System which provides a highly effective and safe underground communication system Download: Gen4 Bidirectional Amplifier A4 (Spanish).
PBE Driver Download
PBE 3 PRO recognizes and applies custom performance timings for more memory types (compared to PBE 1.6.7), for example, H5GC8H24MJ and H5GQ4H24AJ, timings for this type are also available for ETH or XMR mining, you just select the one you need .
What else can the Polaris Bios Editor 3 Pro do?
The timings are optimized for ETH and XMR or Universal, you can choose which one you want (available only for some types of memory);
Timings for 4 GB or 8 GB cards automatically selects the best time settings for the card size (available only for some types of memory);
Detection of more memory types and the use of suitable timings (compared to PBE 1.6.7 and 1.7.0), new added support for H5GQ4H24AJ;
Automatic undervoltage, acceleration, acceleration (energy saving option);
It gives the largest increase in hashrate compared to the standard ones, since for 100% performance it is still necessary to manually adjust the memory clock frequency and core voltage, the editor cannot predict the quality of the card, therefore it is impossible to automatically use the upper values;
Supports Windows and Linux (x32 / x64 bit);
Supports almost all RX Polaris and Baffin cards (RX 460/470/480/560/570/580), (RX550 only a few of them, contact me before buying);
In future releases, a more intuitive timer patcher and low voltage;
Energy Saving Option:
New energy saving option! Automatically lower the voltage in the memory and core.
Auto Control OC:
Automatic memory overclocking for better hashing speed;
Instructions for PBE 3 PRO
Download archive from Polaris Bios Editor 3 Pro
Unzip the archive to a convenient location
Launch PolarisBiosEditor.exe
Changelog:
PBE 3 PRO 2020
New Samsung memory K4G80325FC
New device 6FDF AMD Radeon RX 580 2048SP
PBE 3 PRO 2019 changes and updates

Support for RX 590
New memory type H5GC8H24AJ

PBE 3 PRO changes and updates
How To Download & Install PBE Client | PBE-Accounts.com
New Micron, Hynix, Samsung and Elpida timings, better hashrate and stability
License checking fixes
Some fixes and bugs (Including Hynix typo)
New design
RX 560 detection due to different timings need
GPU vendor detection (Logo is showing now)
Tooltips

Recommended New Articles:
Ubiquiti PowerBeam Bridge Firmware And Related Drivers
Read more:
0 notes
Text
Zemo Driver Download For Windows

Zemo Driver Download For Windows 7
Zemo Driver Download For Windows 8
Zemo Driver Download For Windows
Nowadays compact systems are becoming more widespread, thus increasing the popularity of low-profile cooling systems. Specifically for such systems, the SilverStone Company has designed a low-profile air cooling system under the NT08-115XP codename.
Download Drivers software for free from SoftPlanet. Compare the features of the latest Driver Magician, FreeKapture, BlueAuditor, and other popular Drivers freeware programs. Download drivers for NVIDIA products including GeForce graphics cards, nForce motherboards, Quadro workstations, and more. Update your graphics card drivers today.


NT08-115XP is announced to be an alternative to a standard cooler out of the CPU supply kit. The manufacturer states, that this cooling system is able to disseminate up to 65 W of heat, so it’s not effective enough to chill down powerfull CPUs.
Zemo Driver Download For Windows 7
The dimensions of the SilverStone NT08-115XP cooling system are the following: 101 x 101 x 33 mm. It possesses an aluminum heatsink with a copper center hub. The rotary speed of the 80 mm fan (10 mm thick) is in the range of 1200–3400 rpm, producing an air flow of 5.64–15.98 CFM (9.58–27.15 m3/hr) and a noise level of 16.5–28.98 dBA. This specialty is compatible with Intel LGA 115x sockets only.
Zemo Driver Download For Windows 8
Zemo Driver Download For Windows
The price has not been voiced yet.
1 note
·
View note