
A blog which details various how-tos and what-nots for various sections of this silly game
Last active 4 hours ago
Don't wanna be here? Send us removal request.
Statistics
We looked inside some of the posts by borderlands-2-guide and here's what we found interesting.
Average Info
Notes Per Post
0
Likes Per Post
0
Reblog Per Post
0
Reply Per Post
0
Time Between Posts
7 days
Number of Posts By Type
Text
17
Last Seen Tumblr Blogs


Fun Fact
Forty percent of Tumblr users are between the ages of 18 to 25.
Text
Two Easy Pieces
Captain Blade’s Compass is an item that will lead to Captain Blade’s lost Treasure of the Sands. Fortunately for you the first mission Captain Scarlett gives you leads to “Two Easy Pieces” as the quest is called. The locale it takes you to is not one of my favorites in terms of enemy variety as it reuses crystalisks and skags in a not very interesting way.
https://borderlands.fandom.com/wiki/Two_Easy_Pieces
The majority of this mission takes place in Hayter’s Folly, a veritable green oasis located under the town of Oasis. The place is fairly verdant and has a lot of water in it. Shade comments on how he would be pissed if the inhabitants of Oasis had died of dehydration as they are obviously alive.
The entrance of Hayter’s Folly does not have much to say about except that there are two badass pirates that always spawn there.
The area between the entrance and the next pirate encampments are riddled with crystalisks and skags. The crystalisks in this are called cave crystalisks and deal shock damage meaning that they can decimate your shields at range.
The skags in this area are not at all different from normal skags from the campaign and will only serve to harass you during the quest.
The pirate camps are fairly dangerous as you can be fired upon from multiple angles and there is a pirate turret on the opposite side of the cavern. You will also be introduced to Buccaneers here, a bulky enemy who relies on swordplay with two cutlasses to cut you down.
https://borderlands.fandom.com/wiki/Buccaneer
In this area you’ll need to try to avoid cramped areas to reduce the effectiveness of Buccaneers and Powder Monkeys. The cover this area provides is fairly useful in achieving this goal but is a detriment to melee builds, particularly melee Zer0, as a lot of the enemies tend to have shotguns and may body block you, preventing you from getting into good positions and sometimes putting you into lethal situations.
The next part is fairly uneventful except the fact that you need to pull a lever to unlock the gate to Sandman’s crib.
Sandman is a midget who is accompanied by a new enemy called an Anchorman. This particular Anchorman is named Big Sleep.
https://borderlands.fandom.com/wiki/Anchorman
Anchormen are me of particularly large stature that wield two anchors, as hinted by in their name, and are capable of ranged pulling attacks and fierce melee attacks. They can utilize a pulling attack to get you into their melee range.
Fun Fact: there is no Anchorman reference to Ron Burgundy which is quite unfortunate that Gearbox missed a golden opportunity.
Big Sleep is not much different from a normal Anchorman except that he is tougher and sports a stronger shield than normal.
Sandman is also a normal midget and is not incredibly tough except for his shield strength.
Killing them will allow you to retrieve the compass piece in their possession as well as the location of another compass piece.
The compass piece is in the possession of a hyperion convoy located in Wurmwater. The convoy is comprised of 3 sand skiffs, two with weapon chests and one with the compass piece. They are guarded by 3 War Loaders although they are upgraded to Badasses on subsequent playthroughs. Killing them will allow you to take the compass piece but will prompt Hyperion to send some Loaders at you via moonshot. The first wave is comprised of EXP Loaders and the second wave is comprised of GUN Loaders.
I recommend repositioning your sandskiff away from the action so that you won’t have to walk to far if it is destroyed in the ensuing combat. Returning to Scarlett will allow you to advance in the DLC and to learn of where you might find the last compass piece
https://borderlands.fandom.com/wiki/Message_In_A_Bottle_(Hayter%27s_Folly)
If you haven’t found any yet there are Message in A Bottle Quests all over the DLC. They all lead to a red text item that has a curse attached to it. The Oasis Message in a Bottle quest for example leads to a strong Jakobs Shotgun that deals backlash damage every time you fire it. The one in Oasis is located in a garage with an X on it.
The one in Hayter’s Folly, leads to a rifle, called the Rapier, that triples melee damage but increases melee damage done to one’s self. It is located behind a false wall and you have to dig it up from under an X placed on the ground. The Rapier is the best weapon for increasing melee damage on melee Zer0 builds.
0 notes
Text
Captain Scarlett and her Pirate’s Booty
This is one of my personal favorite DLCs, particularly due to some of the new weapons that I like and Captain Scarlett herself in terms of her character. However, it brings in a few particularly annoying enemies that I dislike fighting, enemies with lifesteal and enemies that have wonky melee hitboxes. The last boss of this DLC is also fairly annoying to deal with.
https://borderlands.fandom.com/wiki/Captain_Scarlett_and_Her_Pirate%27s_Booty
When you first start out in the DLC you will be implored by a man named Shade to save the town of Oasis from pirates.
Quite a few of these pirates are reskins of normal bandit enemies but there are a few new enemies in this initial group. One of these are Powder Monkeys.
https://borderlands.fandom.com/wiki/Powder_Monkey

Powder Monkeys are pirates that rely mainly on grenades but can resort to using their weapon when you get too close. They also carry a barrel on their backs which detonate if they are shot killing them instantly but the ensuing explosion will harm you. As will a few grenades that spawn upon his death.
Another enemy with a new mechanic is the Corsair
https://borderlands.fandom.com/wiki/Corsair

Corsairs have a mechanic similar to invisibility but you cannot hit them during this “invisibility”. Outside of their “invisibility” they act like a normal psycho enemy. Them going into their invisible state is indicated by them standing still for a moment and then disappearing in a puff of black smoke.
The other pirate enemies in this short segment are fairly normal and do not have anything too out of the ordinary for what you’re used to.
When you clear out the first part of the town you will encounter a pirate named No-Beard

No-Beard isn’t anything exceptional and functions like a normal Bruiser enemy except that he can drop a gun called the Stinkpot when he is killed.
The Stinkpot is a corrosive Jakobs assault rifle that shoots corrosive grenades when fired that bounce around. This gun is not anything special and should only be used if you don’t have any good corrosive weapons.
After No-Beard is killed, you will soon meet a man named Shade.
Shade is a dehydrated, insane man who is the only inhabitant of the town of Oasis. He will offer you his sandskiff so that you can travel the desert quicker.
It will break down and you will need to repair it so that you can proceed.
You’ll retrieve the parts from the dead people of Oasis, who were given pre-recorded voicelines by Shade to ease his loneliness. It should still be mentioned that he is insane and believes that they are alive and hydrated people. All but one of the parts are easy to get as the last one, who is near Lionel, will be eaten by a Sand Worm Queen.
https://borderlands.fandom.com/wiki/Sand_Worm

Sand worms are snake looking things that inhabit the dry seabed of the area. They spit corrosive globs at you and can dive in and out of the sand to maneuver. They can also perform melee attacks if you get close. Sand Worm Queens are tougher versions of Sand Worms that can spawn Sand Worm Grubs. The Grubs can only bite and can only slither along like a snake.
Killing the Sand Worm Queen will give you the sandskiff part back.
Once you have the sandskiff fixed you can go meet Captain Scarlett herself.
Sandskiffs are vehicles best described as hovercraft but designed to look more like a boat than a hovercraft. They can be equipped with either rockets, harpoons, or sawblades.
Captain Scarlett is located in Wurmwater, a different section of the DLC. It is another part of the dried up sea that makes up most of the DLC and is the other main section of it besides Oasis.
Once you arrive at Scarlett’s ship you will find that it is being attacked by sandskiff raiders. She will let you on board once you kill the raiders. Caution should be taken as there will be Sand Worms spawning about and running into them will kill them instantly but will damage your sandskiff for a respectable chunk of damage, especially on UVHM.
Once all the raiders are killed, Captain Scarlett will lower down a ladder for you to board her ship. Taking the elevator to her will trigger a cutscene and then she will give you your next quest, locating a compass piece to a pirate treasure.
0 notes
Text
The Talon of God
The Talon of God is the Last Story Mission of Borderlands 2, the last battle (hopefully) between the Vault Hunter and Hyperion.
https://borderlands.fandom.com/wiki/The_Talon_of_God
Before setting out to the Eridium Blight, you can talk to several named NPCs in Sanctuary for some free Blue rarity loot. You can skip this segment by going and talking to Claptrap immediately.
He will relocate to Eridium Blight and will be near the entrance to Hero’s Pass.
Once you meet him in the Blight, you will need to infiltrate into the Pass. Claptrap will try to unlock the doors while you try to defend him from waves of Hyperion enemies. The enemies will be the run of the mill Loaders with the occasional surveyors.
After a while two turrets will spawn to attack you. Don’t destroy these as Claptrap will hack them and make them fight for you. They can be used as a distraction from other enemies while you can take shots at them from afar.
After their forces are depleted, Claptrap will open the door, then you can advance into Hero’s Pass
Hero’s Pass
https://borderlands.fandom.com/wiki/Hero%27s_Pass
The last story area of the main game. The enemies here are what you would expect. Hyperion soldiers, robots, and turrets. The first area usually has a mix of humans and Loaders.
The next part has Brick and Mordecai arriving to assist you in your quest. Mordecai will slag while Brick jumps down and fights alongside you.
Continue fighting along as normal. Be wary of any RPG Loaders that may spawn and keep on your guard.
You’ll continue fighting until you find an energy gate. While you’re at the energy gate you’ll have to wait for Mordecai to disable it so you can continue advancing. Enemies will be coming in waves until the gate is disabled, and there will be two turrets like from before. These turrets can’t be convinced into fighting for you so you may kill them if you wish. Killing them is probably good as they provide constant harassment against you.
After the gate is down, Brick and Mordecai are unable to continue after this point due to various reasons.
The first area after the gate always has a Constructor in it. There are a various assortment of enemies with it but there is a chance for there to be a Super Badass Loader around here.
The next point of interest is an L shaped area with a gate on the lower part of it. There is always a Super Badass Loader coming out of the gate. The next area has a bunch of SGT Loaders and a single Badass Constructor.
Handsome Jack
https://borderlands.fandom.com/wiki/Handsome_Jack
This is where you finally fight the man who has been giving you the most trouble throughout the entire campaign. This is the CEO of Hyperion. This is the man who exploited his daughter for money and power.
He starts off the fight with a shield that does not regenerate and a bunch of doppelgangers that you can kill for a second wind. He attacks with dual wrist launchers Once his shield is depleted he will continuously call on Protector Surveyors that make Jack invincible whenever it is protecting him. He will occasionally do aoe attacks and call upon other Hyperion forces to aid him. The Protector Surveyors are fairly slow and move in an orbit around Jack. He won’t attack you while the Surveyors are down so take that opportunity to damage him. Repeat until he is dead.
The Warrior

https://borderlands.fandom.com/wiki/The_Warrior
The Warrior is the final boss of the campaign. An eridian superweapon of terrifying power. It has a glowing crit spot that reveals itself after you destroy the 4 scales that are located on its chest. You can also get some crits on its mouth if you have good enough aim. It pops up from the lava from several places in the arena. It can attack with a slag laser from its tail, fire breath, lobbing pieces of lava or statues, and can walk on the area. It can launch you into the air with its tail and its chest scales regenerate when it dives into the lava. It also has melee attacks when you get too close. There are flying Rakk that you can use for second winds and there are Crystalisks that only require 2 of their leg crystals to be shattered to be killed.
Once The Warrior is killed it will begin spewing out loot. It will also spew out some more loot when you press a button to shoot it with a moonshot. And Handsome Jack will rant about how he should’ve won. He will also end in a lootsplosion once he is killed. Interacting with the Vault key will play a cutscene and officially end the game.
0 notes
Text
Toil and Trouble
You’ll need to locate explosives that are in Sawtooth Cauldron to bypass a Hyperion Bridge in the Eridium Blight
https://borderlands.fandom.com/wiki/Eridium_Blight
The Blight is a large area with a variety of enemy factions for you to fight. These include Hyperion, bandits, and wildlife. You can encounter a new version of bullymong here called a Bedrock Bullymong. These enemies are only tougher than your average bullymong but prefer lobbing rocks at you. Slagged Psychos are more common around here and can debuff you with slag.
You can find a mini boss called King Mong. King Mong is a massive bullymong who spawns randomly in set areas around the Eridium Blight
During the Toil and Trouble mission, you’ll have to trigger the Hyperion Bridge to raise before you can proceed to the Cauldron.
https://borderlands.fandom.com/wiki/Sawtooth_Cauldron
The enemies in the Cauldron mainly consist of bandits with a few areas having threshers in them.
The elevator that you need to get to is located in an underground area. This area is quite dangerous as you can fall in some areas and it is quite tight in others. You will need to take this elevator up the Buzzard’s Nest as its so called to where the explosives are. However, there is a problem. The Sawteeth don’t like Slabs, and the leader of the Sawteeth called Mortar has set up an ambush with several Nomad Taskmasters as the heads of this ambush. They will be approaching, along with other bandits, on both sides of the elevator.
You will need to kill them to be able to proceed.
To get Mortar to take the elevator down you have to destroy his prized Buzzard called the Boombringer.
You have to fight through a very large amount of bandits to be able to get to where the Boombringer is. Other piloted Buzzards will harass you when you try to get to the Boombringer and there will be turrets which will try to fill you with lead.
There is an optional objective where you can fulfill the trope of not looking at explosions. Doing this has no effect on how Mortar fights you. Killing Mortar is also optional
The next part is the trickiest part in my experience. You will have to kill 5 Buzzards to be able to advance. The area atop of the Nest has very little cover so you can either sit in the elevator or try and dodge the attacks from the Buzzards. There will also be other bandits attacking you while you are doing this. My advice is to clear out the bandits first as they are easier to kill.
Once all the buzzards are dead the rest is fairly easy. Mark the explosive crates, jump off the tower in the direction of the Eridium Blight, then drive to the Arid Nexus.
To Grandmother’s House We Go
This is a short mission I like to pick up once as it grants a nice skin customization that I like to use. It’s also fairly easy so there is no reason not to do it.
Handsome Jack wants you to go check on his grandma in the Blight. Her house is on the top of a hill in the Blight.
Arid Nexus - Boneyard
https://borderlands.fandom.com/wiki/Arid_Nexus_-_Boneyard
The Arid Nexus is the place where the penultimate mission of Borderlands 2 takes place. There is not much here except Hyperion bots, skags, and rakk about.
Mordecai instructs you to head to a pipeline which you should be able to use to get to the Info Stockade.
When you get to said pipe, the ladder you were planning to use breaks. Mordecai quickly devises a plan around this setback. He tells you to increase the pressure in the pipe so it will be easier to break.
There are 3 stations where you have to go to increase the pressure.
Each station is protected by Hyperion forces who will try to stop you from your objective.
Each group of Hyperion forces are not particularly tough most of the time but if you get a bad spawn with a lot of annoying enemies you may have some trouble.
One of the more annoying stations in my opinion is the one where it is located underground and has a fair amount of Loaders and Ion Loaders.
After the pressure is increased enough, you can break the pipe by ramming into it with your vehicle.
Travel through the pipeline to get to the Badlands, to where the Info Stockade is located.
Arid Nexus - Badlands
https://borderlands.fandom.com/wiki/Arid_Nexus_-_Badlands
This place is not much better than the Boneyard. There is just as much slag pools and no shortage of skags. There are also Junk Loaders around (which are just normal Loaders just more decrepit looking).
The Stockade is located above the area and requires you to take an elevator to get up there. The elevator is, quite unfortunately, guarded by an incredibly powerful Loader called Saturn.
Saturn is a massive Loader with a high hp bar to match. It has incredibly powerful ranged attacks and turrets on its body. It can’t be slagged and it has no critical hit points. You can destroy the turrets to get a second wind and there will be a skag pup nearby to kill too.
Killing Saturn is technically optional but is highly recommended as his ranged attacks are deadly.
Once it is killed you can advance to the Stockade. You will encounter heavy resistance ranging from moonshot reinforcements, Exp Loaders, a Badass Constructor, and two additional Constructors. Once you retrieve the data you will return to Sanctuary to prepare for the final showdown.
0 notes
Text
The Bunker
This is a key mission in defeating Handsome Jack for good. You will need to try to steal the Vault Key to prevent Jack from opening the vault and whatever lies within.
You will be directed to get Claptrap and head to the Bunker within Thousand Cuts. You will need to fight through a small force of Slab bandits again as they do not know that you were initiated by the Slab king himself. Instead of going right this time you will need to head to the left where the Hyperion base is. After you fight through No Man’s Land you will then need to meet up with Claptrap.
Once you get past the Death Wall with Claptrap you will have to fight through Hyperion forces to get to the Bunker at the top of the peak.
You’ll be met with turrets, Loaders, Constructors, Surveyors, Humans, and Badasses at the Bunker. The first area will have 2 turrets, an assortment of Loader and Human enemies, and one Constructor that you have to kill to get past.
After said Constructor is dead, a door that was blocking your way will open, and a force of Hyperion Soldiers will come out and attack you. Deal with them then you can move forward.
The road ahead is being bombarded by mortar fire. Avoiding the shots is essential to staying alive here. There will also be a few Loaders to spawn along this route who will harass you on your way up.
At the end of the road, there will be a gate guarded by two turrets. The turrets themselves are mere annoyances but the real danger comes after you kill those turrets. After those turrets are dead a force of Hyperion Soldiers and Loaders come out to greet you. Before killing the last turret you should get to cover so you can prepare for the enemies.
The area past the gate with the two turrets has a standard assortment of Hyperion enemies including a Badass Constructor. You will need to kill the Constructor to get past. You can hide behind the corner to chip away at the Constructor’s health if you want to play it safe.
After that is dead a force of Hyperion Soldiers will appear again to try and kill you. There are a few chests nearby so your efforts won’t be without compensation.
The next area will be the Bunker itself.
The Bunker is a fairly sparse area. The layout is simple, a ring area on the outer edge and a center, circular area. The only things there are Loaders, Hyperion architecture, and turrets about. There are also two chests around the area that will be unlocked after you defeat the area boss. You will need to kill a set number of turrets to advance. The turrets are in set locations and have a crit spot on their back. When you destroy a turret there will be laser countermeasures that will damage you if you come into contact with them. You can jump over them or stand on a box to avoid the damage. There are twelve turrets in total that you have to kill. Once all of them are destroyed a cutscene will play about the BNK3R the actual Bunker.
https://borderlands.fandom.com/wiki/BNK3R

The fight against the BNK3R is a bit tricky. You’ll need a good corrosive weapon to deal good damage to the Bunker. IItsmoveset is not particularly interesting as it only has autocannons on it, shoots mortar fire, has a huge gun it uses after a while, and flies around a lot. Its mortar shots explode after a delay.
Every so often it will stop and try and shoot you. Take this opportunity to destroy its cannons or to shoot its eyes (crit spot).
If you happen to be playing as Zer0 and have specced into B0re, there are a few spots you can shoot to kill Bunker quickly. One of these spots are the eyes right before the turrets spawn but there are others.
When you get it to low health it will relocate to an archway opposite of where it was before you fought it.
Once it is killed it will start spewing out loot in an explosion. There are also two chests in the area. One in the back of the outer circle and the other up some stairs where the Bunker was.
After you have killed the Bunker, you will be directed towards the security door into the control core.
After a bit of waiting you will be sent down an elevator to where Angel’s chambers are.
Once you reach Angel (who is revealed to be a Siren), you’ll learn that you have to kill her.
Handsome Jack will try to stop you from killing you, as he is Angel’s dad. You have to destroy the Eridium injectors that are keeping her alive. Jack will send waves of enemies at you, shield the injectors with a reflective shield, and spawn in hazards to kill you. You will have to survive hordes of enemies until Roland arrives.
Said hazards include teslas that pop out of the ground to shock you, laser cannons that will apply fire damage to you, and the occasional aoe from the ground.
When Roland arrives, he will try to disable the shields on the injectors so you can destroy them. He will continue this until the 3rd injector when Jack shuts off the bridges supporting Roland.
Lilith will soon arrive to support you and Roland. Survive for longer and soon Lilith will teleport Roland to the last injector so he can unshield it.
After this is done, Angel will soon expire and the mission is finished.
A cutscene will play, where Handsome Jack appears, shoots Rolands, and captures Lilith. She will send you to Sanctuary in Marcus’ shop which happens to be full of chests of loot.
You will turn the quest in to Mordecai.
0 notes
Text
Zer0 gear
I’ve never really talked about this before but I wanted to try my hand at showing the best gear/skills for certain characters.
Full disclaimer, I only play Zer0 and Maya so it will be a while before I can make this for other characters.
Best early skills for Zer0
HeadSh0t, Fast Hands, Precisi0n, and B0re.
HeadSh0t gives a 4% boost to critical hits with each level put into it. Most Zer0 builds have this skill due to its nature. It synergizes well with weapons with high base damage and will usually out damage weapons with high crit boosts.
Fast Hands
Fast Hands gives you a 5% boost to reload speed and a 10% boost to swap speed for each level. This skill is really good to put points into when you advance into UVHM and even before that. The extra swap speed is good for slagging enemies then swapping to your main damage dealer and the reload speed is always good.
Precisi0n
Precisi0n gives 5% for each level. While this skill is located in the sniper tree and most snipers are already incredibly accurate, a lot of other guns can use the boost. Examples include shotguns and ARs.
B0re
B0re is fairly infamous for being able to one-shot a couple of bosses with a bit of set up (one such boss happens to be a story boss, at this point you will have enough skill points for B0re). The exact effect of this skill (named a game changer skill for making an obvious change to gameplay) is that it makes all your projectiles (shots that don’t have a projectile i.e. rocket launchers don’t get this effect) pierce, doubling the damage with each penetration. While it is fun to one-shot bosses, a few other effects are far more valuable than one-shotting a few bosses. For starters it highlights crit points in Decepti0n, making it easier to aim for them. It also negates bullet deflection (but not damage negation) making a few bosses easier and removes the annoyance a quite a few enemies. While there are a few weapons that can use B0re effectively outside of boss fights, they are much further into the game than when you get the skill.
Best weapon companies for Zer0
This section is fairly short as it only includes Vladof, Jakobs, and Maliwan. They all tend to have great weapons that Zer0 can make use of. Vladof has high fire rate weapons which synergize with Critical Ascension and Rising Shot, both skills which work well with weapons that have a high rate of fire.
Jakobs weapons have high base damages which synergize really well with Zer0’s crit bonuses and Jakobs shotguns have low magazine sizes and combined with Zer0’s quick reloads, can make frequent use of his 0ne Sh0t 0ne Kill (gives a bonus to first shot in a magazine).
Maliwan Sniders (Maliwan barreled sniper rifles made by Maliwan) are just really powerful sniper rifles that most classes can make use of with ease. Their elemental bonuses are also really useful. Fun fact, splash damage from any weapon applies a portion of damage that is shown on the card, meaning they are dealing more damage than advertised.
Top tier guns for Zer0.
Real quick, before I continue, bullet spread is affected by time in the air, not distance. This means some bullet patterns can be screwed by having a few points in Vel0city, especially weapons that synergize well with B0re.
Pimpernel
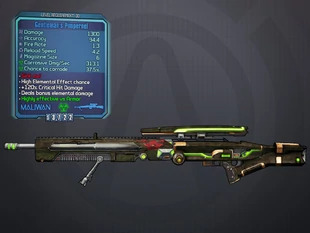
https://borderlands.fandom.com/wiki/Pimpernel
This Maliwan sniper is from the Captain Scarlett DLC. Its gimmick is to spawn 5 extra pellets above the point of impact. This, along with its splash damage means it can deal enormous amounts of damage if you can get all 5 pellets to land inside the enemy. These pellets are affected by B0re.
Twister
https://borderlands.fandom.com/wiki/Twister
This Jakobs shotgun is an incredibly rare but powerful drop from the Hammerlock DLC. It only drops from a unique enemy called Omnd-Omnd-Ohk that appears when a savage is leveled up enough times. It only comes in shock element and its firing pattern is quite unique. It takes the form of a tornado that is slow-moving, spins, but can pass through enemies multiple times, meaning that it can proc B0re on the same target. It is best with a lot of points into One Shot One Kill due to its small magazine size.
Lyuda
https://borderlands.fandom.com/wiki/Lyudmila
This legendary Vladof Sniper is Zer0’s best option for raiding 9 times out of 10. It has an innate crit bonus and high rate of fire. Its bullets also split into 3 after a distance. It has amazing synergy with Critical Ascension. It has the capability to kill a raid boss in less than a minute in the right hands.
Droog
https://borderlands.fandom.com/wiki/Droog
This Vladof Sniper is essentially the poor man’s Lyuda. It does not have an innate crit bonus and its bullets don’t split after a while. A low-level Droog is often used to stack up on Critical Ascension before a fight, although it is harder to do on some bosses than others because of CA’s strict rules.
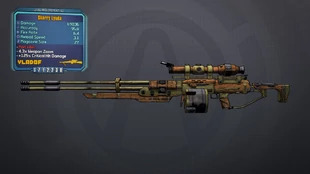
Rapier
https://borderlands.fandom.com/wiki/Rapier
While this Vladof rifle from the Scarlett DLC is less than optimal as a gun, it is amazing as a melee weapon. It boasts a 200% boost to melee damage while it’s in your hands, but at the cost of receiving extra melee damage. This is one of the few weapons that are strong regardless of level.
Rubi/Grog Nozzle
https://borderlands.fandom.com/wiki/Grog_Nozzle
https://borderlands.fandom.com/wiki/Rubi
They both serve the same purpose as they both are mainly used in Melee Zer0 builds due to their % healing from all damage that Zer0 deals. Grog Nozzle is preferred but unfortunately, it is only available during a mission and will not always have the bladed prefix. The Rubi has less healing and is not always in slag but you can have it permanently once you get it.
Bekah/Hammer Buster
https://borderlands.fandom.com/wiki/Bekah https://borderlands.fandom.com/wiki/Hammer_Buster
Both are incredibly powerful Jakobs ARs with a key difference between the two of them. The Bekah is much harder to farm for than the Hammer Buster. The Bekah only drops from Tubby enemies (loot enemies that have an incredibly rare spawn) and only if you have the UVHM 2 DLC and are above level 61. The Bekah also has a unique firing pattern. When you fire a shot with the Bekah, more bullets are spawned after a distance. Hitting all bullets on a crit means massive amounts of damage. The Hammer Buster however just has inflated stats instead of any special effects.
Maggie
https://borderlands.fandom.com/wiki/Maggie
The Maggie is an homage to the masher pistols in BL1. Instead of the normal shots of other Jakobs pistols, it has a shotgun like spread and pellets. The extra bullets, when they land on a crit, deal large damage. This is one of Pistolero Zer0’s favorite weapons.
Quad

https://borderlands.fandom.com/wiki/Quad
The Quad is a Torgue barreled Jakobs shotgun. This is mostly used on Shotgun Zer0 builds where the Twister cannot be obtained. It does have the added bonus of having a faster bullet velocity than the Twister, and putting points into Vel0city does not affect the damage negatively.
Striker

https://borderlands.fandom.com/wiki/Striker
This shotgun is a supplementary to Shotgun Zer0 builds that utilize the Quad. This is a good mid-range shotgun with good accuracy for a Jakobs shotty. It is out-damaged by the Quad and the Twister.
Top Tier Shields for Zer0
Antagonist/Blockade

https://borderlands.fandom.com/wiki/Antagonist https://borderlands.fandom.com/wiki/Blockade
Both are strong shields is all. They are best used on Gun/Sniper Zer0 builds with the Antagonist outshining the Blockade. The Antagonist is a Maliwan shield that deflects bullets at enemies and shoots slag orbs at them. The slag orbs can be detonated by your bullets and can block them. They can also slag you if they detonate near you. The Blockade gives damage resistance at full shielding and decreased resistance at every other point. They both come from the Tiny Tina DLC.
Hide of Terramorphous

https://borderlands.fandom.com/wiki/Hide_of_Terramorphous
This is arguably the best melee shield for Melee Zer0. It has novas, spikes, and roid boosts. Its roid boost is extremely high. It is only rivaled by the Love Thumper with its nova on each melee strike and extremely long recharge delay. It is however dropped by a raid boss at the end of the game.
The Bee

https://borderlands.fandom.com/wiki/The_Bee
The Bee is hands down, the best offensive shield in the game. It is an Amp shield with no drain on any shots and has increased amp damage. It does have a downside, however, as it has a large recharge delay.
Turtle Shields
https://borderlands.fandom.com/wiki/Turtle_Shield
These shields have high capacity but, unfortunately, a penalty to health. Zer0’s sniper coms deplete max shield capacity, but that is not why I’m mentioning this shield. At high OP levels, characters health does not scale, but the penalty to health from Turtle Shields increase with OP levels. There is a mechanic called “health-gating” that prevents your character from being one-shot when they are above 50% health. Zer0 has a class mod called the survivor class mod. Often times Turtle shields at higher OP levels bring you health down to negative, but with Zer0’s Survivor Coms, his health is brought back above positive and the regen from an on level Survivor Com at this point will be larger than your health bar. This allows Zer0 to abuse health-gate. The only things that are liable to kill you at this point are elemental damage or damage that gets you just under health-gate. Builds that abuse this is called Glass Tank Zer0 and are used for boss fights where you can’t safely use The Bee or for general tankiness.
Top Tier Grenades for Zer0
Pro-tip, don’t rely on rubberized or homing grenades. They are usually bad all around. The rubberized ones are unreliable and the rewards of them are not worth it. Sometimes it takes too long for homing grenades to reach their target.
Transfusion Grenades
https://borderlands.fandom.com/wiki/Transfusion_Grenade_(Borderlands_2)
These are Gun/Sniper Zer0’s main form of Healing. This grenade mod is even more important on Sniper Zer0 considering that Critical Ascension goes away when you switch to a non-sniper and the only Moxxi Sniper in the game is incredibly mediocre.
Chain Lightning

https://borderlands.fandom.com/wiki/Chain_Lightning
This Grenade mod from Tiny Tina’s DLC is best for stripping shields on Melee Zer0. Shield stripping is an essential part of Melee Zer0’s playstyle and the Chain Lighting can do than AND heal Zer0 if you are holding a Rubi/Grog. It is also instantaneous always so you won’t have to worry about a fuse timer. It slowly regenerates grenades.
Storm Front
https://borderlands.fandom.com/wiki/Storm_Front
This can also be used as a Shield Stripping grenade for Zer0. It deploys multiple Teslas around it dealing shock damage in a wide area. Its continuous shock damage makes it better for raid bosses as its shock damage will continue to heal you while you lay into the raid boss with your melee weapon.
Singularity Grenades
https://borderlands.fandom.com/wiki/Singularity_Grenade
The main use of these grenades is for grouping enemies together. It can be used to great effect with either the Pimpernel or the Twister in conjunction with B0re. These can also move most strong enemies. With proper use of these grenades, you can one-shot a raid boss (disclaimer only works on one particular raid boss results may vary).
Magic Missile

https://borderlands.fandom.com/wiki/Magic_Missile
This grenade is also an amazing slagging tool but there are better options for mobbing and raid bosses. Like the Chain Lightning, it also regenerates grenades over time.
Crossfire

https://borderlands.fandom.com/wiki/Crossfire
This grenade is used for raid bosses which shed slag quickly as a slag Crossfire can slag very quickly. An example is Terramorphous as it can get rid of slag quickly.
Top Tier Class Mods for Zer0
Let’s get the Legendary ones out of the way first.
Legendary Sniper, Killer, Ninja Class Mods
https://borderlands.fandom.com/wiki/Legendary_Ninja https://borderlands.fandom.com/wiki/Legendary_Sniper https://borderlands.fandom.com/wiki/Legendary_Killer
They are the best of the best for their respective Zer0 Builds with Sniper being inched out the Chaotic Neutral and Evil Class mods for raids.
The Sniper provides boosts to many skills that are in the Sniper tree. It also provides a large boost to sniper damage and crits.
The Killer provides a large crit bonus to you and your team and boosts to skills that are good for Gun Zer0 builds.
The Ninja provides the most boosts to the various skills in the Melee tree and a large melee bonus. The skills it boosts are great for Zer0 as it boosts Backstab, Ambush, and Follow Through.
Chaotic Neutral/Evil Rogue
https://borderlands.fandom.com/wiki/Rogue_(class_mod)
These are usually the best raiding coms for Zer0. The Chaotic Neutral boosts Fire Rate and Magazine Size while Chaotic Evil boosts Fire Rate and Crit. I think the Neutral com is better for longer boss fights where you get a chance to stack more Critical Ascension stacks or pre-stacking. The Evil is better for speed kills on Raid Bosses.
Disturbed Survivor
The Prefix Disturbed is usually best for glass tank builds as it provides a +6 boost to Rising Shot if the com in question is blue rarity. The health boost it provides as well as the regeneration that is required for Glass Tank Zer0
Top Tier Relics for Zer0
Bone of the Ancients
https://borderlands.fandom.com/wiki/Bone_of_the_Ancients
Best on Sniper Zer0 as usually all your snipers are elemental and this relic boosts cooldown and elemental damage. You’ll also need more Deception uptime as you can use Deception to apply kunai and set up a one-shot kill.
Proficiency Relic
https://borderlands.fandom.com/wiki/Proficiency_Relic
Can be used on Melee Zer0 as you’re relying on melee damage and Deception rather than elemental damage. The Bone is better in general, however.
Stockpile Relic
https://borderlands.fandom.com/wiki/Stockpile_Relic
Best for raids as the max sniper ammo is quite small. Best used with the Chaotic Neutral Rogue coms. It is also good for pre-stacking CA before a raid boss.
If you do prestack drop your main gear for the raid on the ground as going into your inventory resets stacks.
0 notes
Text
Opportunity
This area is a city that is being built by Hyperion, labeled as a soon-to-be perfect city. It is planned to be a utopia where only the incredibly wealthy can make it into. No worker is allowed in this place after completion. As being a city being built exclusively by Hyperion will imply, the enemies you will meet there are Hyperion forces building/defending the city. It would be incredibly useful to have corrosive weapons equipped while traversing this area due to the large number of Loaders here.
https://borderlands.fandom.com/wiki/Opportunity
When you first arrive here you will be bombarded with a Hyperion Spokeswoman speaking about how great Opportunity will be when it is finished. You will need to locate and kill a Handsome Jack Body Double to get an important item from him which will allow you to fool some security systems in the near future.
He is located at Opportunity Square, near a fountain. He is relatively tanky and has a strong shield but he also has a very small aggro range. Use this to your advantage as there are always enemies in the area around him.
He will try to make a run for it, lighting a flare that will summon reinforcements to his position. His position after this will be It is possible to kill him before this, but you would need some respectable burst damage to finish him off. After this, you will need to find 4 info-kiosks to get audio samples of Jack’s voice. There tends to be a concentration of Hyperion forces around the kiosks to prevent you from getting the samples.
After you get all 4 samples, you will need to upload the data to Angel who will enable you to speak in Jack’s voice until you get past the security systems at the Bunker. The console where you upload the samples is guarded by either a HOT Loader or a group of snipers.
After this, you will need to return to Sanctuary to talk to Roland to plan for the upcoming raid of the Bunker.
Before you do the story quest I would like to direct your attention to the side quest “Statuesque”
https://borderlands.fandom.com/wiki/Statuesque
It is given by Claptrap on one of the bounty boards near the entrance of Opportunity. He wants you to destroy several Handsome Jack statues spread around the city. The reward for this mission is a head customization. I think the quips from Jack is the best reason to do this quest, however.
It will start with Claptrap directing you to shoot one of the statues. You will soon find out that the statues are impervious to player damage and you must find and hack a constructor that is in the opposite side of Opportunity. It is located in a garage on the east side of Opportunity.
Getting it operational is as simple as pressing a button and waiting for the scripted event to finish.
After this, the rest of the mission is a simple escort mission defending the “Overseer” as it is so called from the enemies who want to stop you from vandalizing Jack’s statues.
Handsome Jack himself will try to dissuade you from destroying his statues. He has quite a lot of fun quips during this quest.
At the last statue, there is a Super Badass Loader which will spawn. Try to take out its arms as soon as possible to minimize its DPS on the Overseer. The same goes for any and all War Loaders that may spawn during the mission.
Hell Hath No Fury is another quest that I like to do because of its simplicity.
https://borderlands.fandom.com/wiki/Hell_Hath_No_Fury
Moxxi has a grudge against Handsome Jack after they broke up. All you need to kill a foreman and blow up a floodwall.

The Foreman in question is called Foreman Jasper, he is essentially a tougher version of the run of the mill engineers. He has an increased chance to drop the Legendary Black Hole.
The Black Hole shield is a combination of singularity grenade and nova shield combined. When depleted, it pulls enemies towards you before the nova is triggered.
It has one of the most damaging single novas in the game.
When Jasper is killed, he’ll drop his key. Moxxi will direct you to a container which contains explosives. These explosives, Moxxi decides, will be great in infuriating Jack.
The next part involves blowing up a dam. It isn’t really a dam but it is a floodwall preventing the nearby waters from flooding the construction site.
It is a short distance away and should not be too difficult to get to. Once the bombs are planted, they will explode after a short amount of time. Head back to Moxxi to receive the Kiss of Death Grenade.
The Kiss of Death sticks to a single target’s face for a duration, dealing elemental DOT for the entire duration, before exploding into health orbs for you. I find that it is inefficient and that there are better options because its fuse time is always 3 seconds.
Continued next week.
0 notes
Text
Thousand Cuts
This area is where there are a couple of important things of note. One is the entrance to the only raid boss in the base game for BL2, the second is that this area is somewhat key to two story missions. Your first trip here will be for one of the story missions to ask a favor from one of the bandit lords here. His name will be revealed to be Brick.
https://borderlands.fandom.com/wiki/Thousand_Cuts
Thousand Cuts is adjacent to the Highlands and has two main enemy factions. Hyperion and Bandit. You’ll face bandits the first time you need to go here with Hyperion Forces dropping in at the end of the story mission. When you arrive here, Brick will think you are another Hyperion assassin sent to kill him. There are mainly Bandits in this section of Thousand Cuts but an annoying thing about this level is that there will always be at least one aggroed Buzzard flying in the sky. I don’t feel that it is worth one’s time to try and kill it and it is just better to run to cover when it’s near.
In the Slab Bandit camp, there will be your garden variety of Bandit enemies. I have noticed, however, that Caustic Goliaths have a higher chance of spawning here.
Caustic Goliaths are equipped with higher health and caustic damage. They are limited by their movement speed and the fact that they only have melee weapons and are slow moving. When their helmet is knocked off, they enrage like a normal Goliath, but they have the ability to vomit acid as an attack.
While you’re advancing through the camps Brick will chime in about how he hates Hyperion oh how he hates them for killing his dog. After a bit more walking, he’ll “find out” that you are simply a new Slab recruit. This ends up being true, but it is more of an unintended consequence of asking the favor.
You’ll have to pass a bridge that is a tad precarious, as there are a few barrels on it and it leaves you with little to no cover. Once you cross it and head into the Buzzard Factory where Brick is holed up, you will have to face waves of enemies to succeed in his initiation.
There are about 4 waves in his ordeal for you. Here the enemies will range from normal bandits to Badasses, to Goliaths, to Midgets. There are a couple of Badass Goliaths in the stage which will drop down after a short amount of time.
Manage your resources, don’t go in head first, and try not to die. After you survive the ordeal, you will become an official Slab. You will be congratulated by Brick, and a Sarcastic Slab will appear to “congratulate” you on your victory. If you kill him, Brick will give you a pat on the back.
Soon afterward, Hyperion will be commencing a bombardment of the Slab town. You will need to work with Brick to destroy the beacons guiding the shelling.
While on your way to the beacons, Hyperion will try to stop you by sending Loaders at you and will attempt to bombard you with mortar shots that are telegraphed with a GIANT RED circle where the shots will land. The beacons are protected by a reflective shield, however, Brick can punch his way through it. After the two of you destroy the beacon, some fairly strong Hyperion Loaders will be shot in. These Loaders get progressively stronger after each beacon is destroyed. After the last beacon is destroyed, a Super Badass Loader will spawn. Destroy it and continue on. After this, you’ll have finished the story mission and you can return to Sanctuary to continue the fight against Jack.
Defend Slab Tower
https://borderlands.fandom.com/wiki/Defend_Slab_Tower
This mission is not really mandatory, I just liked the set up of the mission and how it played out. In this mission (you have to take its precursor mission Rocko’s Modern Strife to unlock it) have you work with some of the Slab forces to defend a Hyperion Supply Crate that has crashed down into the Slab Territory. You are first instructed to grab a few beacons. You have to place these beacons in 3 areas which are marked on your map. Each beacon will spawn in its corresponding unit. You place the Psycho, then Marauder, and then Goliath beacons in that order. I am unaware if there is any “best” placement for these beacons but I would recommend not placing the Goliath beacon close as they are better suited to the front lines.
After a while of fighting, Badass Loaders will be shot in much closer to the crate than the previous enemies. Do your best to clear them out as soon as you can as they can decimate the objective. After you clear out all the loaders, you will have finished the mission. The reward, sadly, is nothing special and is just the reward for finishing the mission. I do find the quest fun and I personally go out of my way to do it when I have the time.
0 notes
Text
Hyperion Exploitation Preserve PT.2
The Preserve, as I’ve mentioned beforehand, is home to a combination of Hyperion Forces and Pandoran Wildlife. The enemies here can easily catch an unsuspecting player off guard.
https://borderlands.fandom.com/wiki/Wildlife_Exploitation_Preserve
In the second area of the Preserve, you will face a mixture of Stalkers and Skags. I personally try to run past them since I find Stalkers annoying to deal with. I typically avoid fighting Stalkers unless I have to because they are jumpy. On subsequent run-throughs of the Preserve, you can encounter two unique enemies called Pimon and Tumbaa. You will have to infiltrate a building with Handsome Jack talking on the PA system. When you enter there is a Zed’s Vending Machine and Marcus’ Vending Machines inside. If you have the necessary DLC you can enter the Natural Selection Annex. Inside you can face waves of Wildlife enemies over 5 rounds. At the last round, you are rewarded with the Creamer rocket launcher.
The Creamer is a Moxxi weapon, meaning that it will heal for a small percentage of damage it deals. It also spawns in an extra projectile when fired. It is a good FFYL weapon as you can regain large amounts of health before getting back up.
Advancing into the next section there is a small chance to fight a small amount of Hyperion Forces. After you defeat them you will encounter some Stalkers in a dome-like area.
In the area after there are Stalkers and there will also be Hyperion Loaders being shot in from the Moon Base. You will have to continue killing them until the door to the next area opens. Some notable enemies include a Badass Stalker that has a 100% chance to spawn, and a Super Badass Loader (ultimate in UVHM) will spawn at the door.
In this area (called Specimen Maintenance) there are caged enemies in the area. These enemies include Spring Stalkers and Badasses, and the cages will open after a scripted event. If you accepted the Side Quest “Doctor’s Orders”, 3 Loot Midgets will spawn from the boxes. It is possible to farm these Midgets at OP Levels for powerful (or not) loot. Do be careful as Loot Midgets are effectively Badass enemies but much smaller.
When you survive that, you will need to go further into the Preserve. The area directly following that has a type of Stalker called Cyclone Stalkers. They turn into a cyclone as an attack and have one of the strongest Stalker Projectiles.
The area after has a lot of Skags in it. To advance, you have to murder a set number of them before a door opens with Hyperion Personnel flowing out of it to kill you. You should use the environment and your action skills to your advantage here but on higher OP levels and UVHM unless one of them has a slag weapon you should be fine. When you kill them, most of the enemies will be Hyperion Forces until you meet the Area boss.
During the Story Quest, the area boss will be Mordecai’s former pet bird Bloodwing
https://borderlands.fandom.com/wiki/Bloodwing_(boss)

Bloodwing’s boss fight has multiple phases in it. Each Phase corresponds to each elemental damage type in the game. Contrary to her introductory cutscene, she never fights slagged.
Her attacks mainly consist of spitting an elemental blast at you, dive bombing creating an AOE explosion, and attacking with her claws. Mordecai will call out these attacks so you won’t have to always keep your guard up. She will also land after you deal enough damage to her.
Her first phase is fire, then Shock, then Corrosive. When she changes phases, she regains health. She will not get crippled unless she is in corrosive form.
If you return to the Preserve, Bloodwing will be replaced by an enemy called Son of Mothrakk to keep with continuity and to pay homage to a boss in BL1.
After Bloodwing is crippled, Mordecai will tranquilize her. Handsome Jack remembers about the fifth element, explosive, and detonates a bomb which kills Bloodwing. After you get the chip you will need to bring it to Claptrap. Unfortunately for you, Jack will send Loaders via moonshot to stop you from leaving. Fortunately for you, Mordecai goes on a roaring rampage of revenge and will one-shot any Hyperion Forces on your way.
Back in Sanctuary, after bringing the upgrade to Claptrap, you will have to talk to Roland about breaching the Bunker defending Angel. Fortunately, he knows a guy who owes him a favor.
0 notes
Text
The Highlands
The Highlands is your next destination after the Fridge. It is home to a variety of enemies including Stalkers, Threshers, and Loaders. You’ll have to retrieve something from a Hyperion outpost before using it to retrieve a Fast Travel Point.
https://borderlands.fandom.com/wiki/The_Highlands
From the where you first enter the Highlands, you’ll notice that it is labeled “Highlands: Outwash”. This is because the Highlands is quite a large place so there has to be multiple Fast Travels in there.
The first area you have to fight through will be littered with a bunch of Stalkers. If you feel you cannot deal with them at the moment you can run past them easily enough. There’s a small area with a few HOT Loaders before the Hyperion Outpost. HOT Loaders are fire explosion shooting Loaders which explode when killed or when hit enough times in the tank on its back. On higher OP levels they pose quite the threat due to their chance to apply DOT. Inside the Hyperion Outpost itself, there is your general assortment of Hyperion aligned enemies of Loaders, Engineers, and Surveyors. There is a bridge that will be attempted to be destroyed by one of the EXP Loaders. If you manage to kill it before it explodes, you can cross the bridge without any troubles, if not you will have to cross over on an empty cargo container.
On the other side, there will be a small Hyperion force awaiting you, as well as a Constructor. After you clear those out you will be able to find the thing you were looking for, a Moonshot beacon. However, a large Thresher will eat it and it will gain a rapidly regenerating shield. Besides the rapidly regenerating shield, it fights exactly like a normal thresher. There will also be a number of Loaders fighting the Thresher as well so you can use them to aggro the Thresher. After you kill it you can pick up the beacon and head to the next part of the Highlands.
In the next part of the Highlands, you are tasked to go to the town of Overlook. In Overlook, you will have to place, and defend the beacon you got from the Hyperion Outpost.
Defending the beacon will take place over a few waves. Do not worry about the beacon taking damage as there are no negative repercussions for having it damaged. The only consequence for having the beacon broken too many times will be getting mocked by Jack. In the final wave, there will be a constructor that you will have to deal with.
In the waves themselves, you’ll fight an assortment of Loaders, HOT Loaders, Badass Loaders, EXP Loaders, a Constructor, and various Surveyors.
After you hold out long enough, a Fast Travel station will arrive and you can leave Overlook. Killing any stragglers is unneeded but feel free to do so.
Hyperion Exploitation Preserve https://borderlands.fandom.com/wiki/Wildlife_Exploitation_Preserve
The Hyperion Exploitation Preserve is home to a variety of wildlife and Hyperion forces. It is the next stop in your conquest to kill Handsome Jack. Mordecai will be there for you to brief you on what’s going on there.
To get to the Preserve you have to enter the Highlands again. After a short drive, you will find a small area with a few Stalkers surrounding the entrance to the Preserve.
The entrance area to the Preserve is littered with a multitude of Stalker enemies. They, for the most part, can be ran past but on subsequent playthroughs, Rabid Stalkers will spawn. Rabid enemies are tougher, faster, and stronger variants than normal enemies. They pose a high threat and should be killed on sight.
After meeting up with Mordecai you are tasked with infiltrating the Preserve to retrieve Bloodwing because she has an important item that is needed.
There is a single entrance to the Preserve that cannot be unlocked by you or Mordecai. You will have to damage three Loaders enough to gain access. Of course, you can just play the waiting game as the doors will open after a long enough time. Inside the Preserve, there are Hyperion forces and Pandoran Wildlife. Rarely are you fighting both factions at the same time in this so you usually don’t have to worry about having to swap elements for the Loaders or wildlife.
There is a red chest in the first area which you can access by shooting an explosive barrel on the roof of the building. The room with the chest can be used as cover against Surveyors. Continue fighting against them until you reach the area with skags. Here you will be given a small reprieve from Hyperion forces. There will always be a Badass Skag here whenever you go through here. After you reach the building with a New-U station Jack will chime in about planning to lure you here.
Continued next week.
0 notes
Text
Tundra Express
Tundra Express is where Roland sends you after saving him in the Bloodshot Stronghold. This place has mostly varkid and bandit enemies but the area preceding Wilhelm, the area boss, has Loaders in it.

https://borderlands.fandom.com/wiki/Varkid
Varkids are insectoid creatures which can evolve into a stronger form, given enough time. They are vulnerable while evolving but groups of them can become quite dangerous if you don’t thin them out quick enough. If you’re particularly unlucky you can have several badass varkids on your tail given you let them evolve. Larval Varkids are quick and annoying but are useful for second winds. Adult Varkids will fly until you damage them enough. Badass Varkids are armored and aggressively pursue you with melee attacks. On TVHM and beyond a varkid has a small chance to evolve into a dangerous raid boss.
When he first sends you to meet with his informant, he tells you to bring a fire weapon. This is technically not required as there is a fire spout and firemelons, plants which explode into flames when shot. Once you get there he tells you to set 3 varkids on fire without killing them. You can do this directly with a fire weapon, or with the firemelons or the fire spout. Successfully doing this will advance the story quest and introduce you to Mordecai, a playable character from the previous game. After some dialogue, you will be directed to another NPC named Tiny Tina. She’ll have you retrieve explosives from a bandit camp with buzzards flying around. She’ll go off on a tangent about how no one steals her “ladies”, “Badonkadonks”. After you retrieve the “Badonkadonks” she’ll prep the rockets needed to hijack the train that has the Vault Key on it.
To actually use the Badonkadonks you have to fight through a small bandit camp to get into the proper position. You’ll then soon blow up the tracks for the train and will have to climb through the wreckage to retrieve your objective.
Through the wreckage, there are a variety of Loaders and the occasional repair or shield Surveyor flying about. It will be a small amount of time before you get to the boss fight and he’ll be stuck under a train car before jumping out to attack you.

https://borderlands.fandom.com/wiki/Wilhelm
He is a cyborg Loader who works for Jack. Mechanically he isn’t very interesting. He’ll occasionally try to hit you with a melee attack. He’ll also spawn in surveyors occasionally to give him a shield and to restore his health bar. Depending on how long you leave him alive, he’ll free some other Loaders which are fairly dangerous. You can make this boss fairly easy if you can burst him down quick enough before he can spawn more enemies. He has an increased chance to drop some particularly weak red text loot. He doesn’t drop what you came for but he does drop a power core.
Taking the power core to Sanctuary will lead to a series of scripted events that will progress the story.
After being separated from the Crimson Raiders in Sanctuary you will have to find a way back to them. You’ll be directed to the area called the Fridge.
The Fridge is a freezing area that is quite expansive. It is filled with Rats, Rakks, Stalkers, and Crystalisks although you’ll likely only encounter Rats, Rakks, and Crystalisk on your first run through here if you head straight for the objective.

https://borderlands.fandom.com/wiki/Crystalisk
Crystalisks are rocky enemies that shoot volleys of rocks and crystals at you, stomp its legs to create shockwaves, and has money on its legs. To kill them you have to shatter each growth of crystals on each of its three legs, damage anywhere else on their body is rendered null. These crystals, when shattered, give you money.
https://borderlands.fandom.com/wiki/Stalker_(enemy)
Stalkers are enemies with cloaking capabilities. Their cloak only lasts when their shields are up so having a shock weapon handy will make it easier for you to deal with them. However, they do get jumpy when their shields are down so singularity grenades or Maya will have an easier time dealing with them due to their CC
The first groups of enemies you fight in the Fridge consist of Rats and their various subtypes. They aren’t too dangerous but their jumpiness makes them annoying to deal with, especially in FFYL. You’ll then proceed to the ice lake with all the Crystalisks. They can annoy you with their long-range projectiles. Try to take them out first if you can with weapons that have good burst damage such as Jakobs shotguns or snipers. There are flocks of Rakk flying overhead so try not to aggro them. You’ll then have to fight through another group of Rats while waiting for a door to open. This is the last part of the Fridge you have to go to but there are a couple of side quests that take place here. There’s also a few secrets and references here which I think are worth going through. After the Fridge, you will still not be able to reach Sanctuary yet.
0 notes
Text
Southpaw Steam and Power
Southpaw Steam and Power is an optional area in Borderlands 2. It has an associated quest called “Assassinate the Assassins”. Assassinate the Assassins is a level 8 mission when you start out and is immediately accessible when you arrive in Sanctuary. I personally think this place provides a decent challenge and is fun to play through on TVHM and beyond.
The power station is located in Three Horns Valley, the same area where you would later arrive in the Bloodshot Stronghold. To actually enter the place you have to fight through a small force of bandits who bar your entry to the power station.
Inside the station are 4 assassins who you have to kill for the quest. They are(in the order that you meet them) Wot, Oney, Reeth, and Rouf. They each have unique drops, one of which is a legendary SMG which they all can drop, and another unique skin for any character. Before you can fight any of the Assassins, you’ll have to clear out all of the enemies in their respective rooms.
The legendary SMG that they all drop is called the Emperor.
https://borderlands.fandom.com/wiki/Emperor
The Emperor is a Dahl SMG with increased stats but decreased fire rate. It is a good tool early in the game for mid-long range engagements.
Before you meet your first Assassin you’ll have to fight through a small force of bandits. There isn’t anything too special here so you won’t have to worry as much as you normally would. Soon you’ll come across a locked gate, which will open up to reveal Assassin Wot and his friend.

Assassin Wot is a stronger version of normal Marauder enemies and is accompanied by a Badass Psycho. He drops the red text Hyperion Commerce. An interesting thing to note about Wot is that he shares some voice lines with Zer0, so if you happen to hear any of Zer0’s voice lines while fighting him as Zer0, don’t be alarmed as it is supposed to be this way.
https://borderlands.fandom.com/wiki/Commerce
The Commerce is a Blue rarity SMG which is always in Shock. It has no unique qualities besides this and is quickly outshined by other SMGs.
The next assassin is Oney and to get to him you have to fight through more bandits. This time there will be burning Psychos and Suicide Psychos on the way to him.

Assassin Oney is a souped-up Nomad but he has his shield on his back. He is accompanied by Suicide Psychos, making this particular encounter dangerous if you can’t deal with them. He drops the red text Jakobs pistol the Judge
https://borderlands.fandom.com/wiki/Judge
The Judge is a souped-up version of a Blue Rarity Jakobs pistol and will be outclassed by other pistols later on.
The next assassin is Reeth. He is in a kinda rectangular room with a variety of bandit enemies within. There isn’t anything too special about this room that makes it particularly challenging. The entrance to this room, however, is a chokepoint with a few explosive barrels nearby it making it dangerous to stay there without destroying those barrels first.

Assassin Reeth entrance is a bit different from the previous assassins. There are two garage doors, one will open after all the enemies in this room are killed and the other will open when all the enemies from the previous garage door are killed. He is accompanied by a single Nomad Taskmaster. Reeth is a souped-up Burning Psycho who has an extra move. He’ll often times run away from you to get some distance to lob a volley of flaming buzz axes at you. If you find him running away from you, you should stop and let him get into his ax-throwing mode. He can drop the Fremington’s Edge sniper rifle.
https://borderlands.fandom.com/wiki/Fremington%27s_Edge
Fremington’s Edge is a Hyperion sniper with augmented stats and a much larger than average ADS (aiming down sights) zoom. It gains a critical hit bonus when aiming down sights. Its massive zoom does make it unwieldy in close combat
The next and last Assassin is Rouf and he is the toughest assassin to deal with.
The room that Rouf is in is fairly large and it spawns a larger amount of enemies than in previous rooms. There is also a small chance that a Badass will randomly spawn in here.

Rouf is a shotgun-wielding, souped-up Rat enemy who is quite agile. Pair this agility with a high damage weapon makes for a dangerous enemy. He spawns with two Nomad Taskmasters and can drop the Dog shotgun.
https://borderlands.fandom.com/wiki/Dog
The Dog is a bandit-made shotgun. While compared to other, higher rarity bandit shotguns of equal level, the Dog will have a higher rate of fire and magazine size at the cost of bullet spread and damage. After you kill all the assassins you can get back to the fast travel station of Southpaw Steam and Power via a door in Rouf’s room. There is a red chest in this room also so you get more rewards than what is shown in the mission card.
0 notes
Text
The Bloodshot Stronghold
The Bloodshot Stronghold is a location where you will spend some time performing a rescue mission as part of the storyline. There are a few side quests that appear here with one quest giving you a chance to experience a reference to the TMNT series and another giving talking gear.
The recommended level for the story quest is 12 and if you are two levels under, then do some sidequests to get to the recommended level or higher.
During the quest, you will be asked to rescue an important character because he is essential for your plan of overthrowing Jack.
You will be directed to get a vehicle and drive up to their entrance and honk. This won’t work, of course, and they will send out troops to fight back. After this you will have to drive to a desert area, aptly called the Dust, to get a Bandit Technical so they will open the gates for you.
Getting a Bandit Technical is more complicated than it needs to be, as you need to destroy hostile bandit vehicles for their parts. You will have to destroy 5 vehicles. You can find them driving around the area, but it does take some time to spawn and there will be Buzzards flying around harassing you. If you can’t find another Technical driving around, I find that save-quitting then reloading the games spawns another one for me.
Once you have acquired your Technical, drive up to their gate and honk. Since they won’t bother to send someone out to check they will let you in. They are then surprised that the person who they didn’t bother to check was a Vault Hunter who wanted to rescue their hostage.
There will be a small force of Bloodshots who will try to fend you off. After fighting through them and walking to where the entrance to the dam is located, a Nomad Torturer known as Bad Maw. Bad Maw does not have any unique drops.
Nomad Torturers are practically identical to their Nomad Taskmaster counterparts with one difference, they have a midget strapped to their shield. Freeing the midget can net you an ally while killing the midget will net you a second wind opportunity if you’re in FFYL or a clean shot at the hole.
Nomad Taskmasters are Nomads that hide behind a shield and can issue orders to other bandits. Such orders include ordering their allies to focus a player or to rush the player to melee them. Most action skills are capable of allowing the player to get past their shields. Axton’s, Zer0’s, and Gaige’s, for example, give the Taskmaster a distraction so that the player can flank around and shoot the guy. A personal gripe of mine is that on later playthroughs, their shields will negate all damage if you even nick them. What this means that if you are playing melee Zer0 and you just so happen to hit their shield on accident, all damage and negated and you’ve wasted your action skill and are in a completely vulnerable state.
Upon Bad Maw’s death, he will drop the key needed to get into the Stronghold. In the Stronghold itself is a large amount of Bandits who will not hesitate to kill you once they are alerted of your presence. While you’re traversing the Stronghold the leader of the Bloodshots will be trying to haggle with Hyperion to no avail. This makes for some amusing dialogue.
In the Stronghold itself, there are a lot of rooms which you have to fight through. There are about 8 rooms in total with a few rooms having some unique things about them. For starters, there are Echo Recordings lying around the stronghold which you can listen to if you want(do know that picking one up while a voice line from another character is playing cancels out the Recording). One room can only be passed once all of the enemies in there are killed so you can’t just run past it. Another room has a turret which you have to take out if you don’t want to get shredded. Another room has a unique enemy in it which wields a rocket launcher. There is another room with an electric gate similar to one found in the Southern Shelf, meaning you have to find and destroy a switch to turn it off to reap the rewards. This makes for a fairly dangerous mobbing area that is also fun if you know what you’re doing.
Once you fight through the area you’ll be greeted with the NPC, named Roland, you were sent to rescue. He will be abducted by Hyperion forces which means you will need to fight through the Bloodshot Ramparts. During the Story Mission, there will be Hyperion forces fighting the Bloodshots in the Ramparts along with several scripted events involving Hyperion robots killing Bandits.
You will have to traverse to the end of the Ramparts to free Roland from the Hyperion constructor sent to bring him to another area of the game. The constructor is called W4R-D3N. There will be a time limit to this fight as a drop-barge will transport W4R-D3N to a location in the Dust called the Friendship Gulag. Its red eye is its weak- point and will take critical hit damage when it is shot. It has a considerable shield and a large health pool so you will need to get it to drop its orange, bullet-deflecting shield by getting close enough and then unloading your magazines into it. If your weapons aren’t underleveled and you’re keeping up the pressure on the constructor and the random shield/repair surveyors that will spawn, you should be able to kill it before it takes Roland away. You can also walk behind it to avoid its orange shield and avoid most of the damage from it. After it is destroyed, Roland will fight alongside you as Hyperion sends lunar reinforcements to take you out.
After you finish them off you can proceed to the next Story quest in Sanctuary.
0 notes
Text
Windshear Waste and Southern Shelf
These two areas are the first among the many that you will have to fight through in this game. These are the tutorial levels, but there are a few things that the tutorial does not immediately tell you.
From Windshear Waste, the first unique enemy that you are given is Knuckle Dragger. Knuckle Dragger. To those who are new to this series named enemies usually have a unique red text drop that they have an increased chance of dropping.
Red text items are items with special effects that are, more often than not, more powerful than their non-red text companions. Red text items are always either blue, orange, seraph, or pearlescent. The red text item that Knuckle Dragger drops is the legendary Hornet.
The Hornet is a legendary Dahl pistol which is always in the corrosive element, has a 6 round burst, and has increased AOE. Given how early you can get it, it will be quickly outshined by other weapons that you will get later. However, there is a unique enemy that you will encounter fairly early in the Southern Shelf that is weak to corrosive damage. You will probably find a better gun by then, however.
In Southern Shelf, there are a few main areas in the storyline; Liar’s Berg, the bandit town, and the Soaring Dragon. Liar’s Berg serves as your temporary base of operations, the bandit settlements where you’ll be spending a lot of time fighting in, and the Soaring Dragon is where you’ll fight Captain Flynt, a bandit leader who has a thing for fire.
Captain Hammerlock will have a few missions for you starting out. I recommend doing a few missions as they will reward you with better gear upon completion. After completing one or two missions, you will unlock the mission Symbiosis. In this mission, you will be directed to kill the Bullymong known as Midge-mong and his midget companion. Midge-mong has an increased chance to drop the red text Kerblaster.
The Kerblaster is a legendary Torgue assault rifle that spawns grenades upon impact. It is a fairly strong assault rifle which can receive boosts for grenades. You should farm this for Axton on TVHM.
If you decide to go straight into the main quest you will have to follow Claptrap and escort him along as his minion. After clearing out a few bandit camps you will meet the two bandits Boom and Bewm. Right before Boom and Bewm, you will be introduced to Suicide Psychos.
Boom and Bewm are armoured enemies which take slightly reduced damage from everything except corrosive which it is weak to. Bewm will be jumping around with his jetpack and will be lobbing grenades while Boom is initially mounted on a cannon called Big Bertha. He will be dismounted after you damage Big Bertha enough. Together they have an increased chance to drop the Bonus package
The Bonus Package is a red text grenade manufactured by Torgue. It has increased damage and spawns extra child grenades which spawn an extra child grenade. It is really good and will last a while before you need to swap it out. Be careful as it is quite easy to get caught in the explosion produced by this grenade, especially if it is homing and there is an enemy near you.
After the encounter with Boom and Bewm, you will be separated from Claptrap and will have to fight through quite a few bandits to advance. The first area you have to pass through is gated. When the gate opens, a few enemies will be waiting for you.
After a bit of fighting, you will encounter a Badass enemy where near the Dr. Zed’s vending machine is. Badass enemies are essentially elite versions of enemies with higher health and damage output. They do not have an increased chance of dropping red text equipment.
You will have to continue fighting through the bandits to get back to Claptrap. You will find him being pummeled on by enemies. These enemies will be random, but they will have a chance of being Badass enemies on TVHM and onwards. After you save Claptrap, you will need to continue clearing out enemies until you reach a set of stairs. Claptrap can’t climb stairs so you will need to find a lever at the top of the building. Throughout the building, you will encounter some more bandits. There is an encounter where bandits will knock down a wall and start engaging you.
Claptrap will start speaking when you are nearby the lever that can lift him up. You will then be lead to the encounter with Captain Flynt so be sure to stock up on ammo.
Captain Flynt is the leader of the bandits in the Southern Shelf. He will be on his perch while he sends his lackies to soften you up. After a bit, he will jump down and fight you himself. He has a few unique abilities which he will use to take you down. He can throw grenades and try to burn you with his flame thrower. There are flame hazards that will harm you. Flynt can also set himself on fire which will greatly reduce the damage he receives and can deflect bullets back at you. He may also slam his anchor which will cause knockback. He has a chance to drop Captain Flynt’s Tinderbox and an increased chance to drop Thunderball Fists.
The Tinderbox is a blue rarity red text weapon that is admittedly only good for its increased chance of setting enemies on fire.
The Thunderball Fists, on the other hand, is a red text weapon focused on shock damage. It causes extra AOE electric explosions when it is fired. It is good for shredding shields on enemies.
0 notes
Text
Playable Characters in Borderlands 2 PT.2
This week I will go over the 3 most unbalanced characters in this game; Gaige, Krieg, and Salvador. They are unbalanced for a variety of reasons, mainly due to the fact that they all have quite a few broken setups that require very little skill to use. However, those builds are not the only ones that are viable, they just make the game incredibly easy if you get to that point.

https://borderlands.fandom.com/wiki/Salvador
Salvador the Gunzerker is a relatively short guy, who has used incredible amounts of steroids throughout his life. He is a native-born Pandoran who has a love for guns, violence, and excessive violence. He can be built to pump out massive amounts of dps while still be very tanky with his action skill. With the right gear combination, he can be nigh-invincible while killing everything in sight. Most of his weaknesses come in when leveling through your first playthrough without all the overpowered skills and gear combinations.
His action skill is Gunzerking

Draw a second gun. You instantly regain 50% of your health, gain damage reduction, and gain health and ammo regeneration. (does not regenerate rockets)
This is Salvador’s action skill, and it is powerful. The tankiness it provides is immense and drawing a second gun is more powerful than it may seem. There used to be a glitch where you could apply the hidden effects of one gun to another. Gunzerking enables this without care. It can add the hidden crit bonus of one gun to another, more potent gun. There is also a glitch with this that allows two weapons, the Pimpernel and the Flakker, to receive the damage of the right-hand weapon, meaning you can give those two guns rocket launcher levels of damage without the cons of rocket launchers(expensive ammo, low fire rate, long reload time). This, along with other interactions, makes Salvador incredibly unbalanced.
His skill trees are Gun Lust, Rampage, and Brawn.
https://borderlands.fandom.com/wiki/Salvador/Skill_tree

The Gunlust tree is focused on improving weapon swap speed and reload speed, while also adding a small amount of dps buffs. I would like to direct your attention to Moneyshot, a passive effect that increases your damage with the last bullet in your gun’s magazines. I will elaborate more on it later but there is an interaction which can decimate raid bosses if you get lucky.

The Rampage skill tree focuses on keeping ammo in your guns and keeping on Gunzerking. The tier 1 skill, Inconceivable, gives you a chance to not consume ammo. This chance increases to 50% when it is at max rank and you are on low health and shields. Remember earlier when I mentioned Money Shot? This is broken interaction it has. It is called Money Shot Chaining, it requires no skill, just requiring good rng and a good set of guns.

The Brawn skill tree, as its name implies, is focused on staying alive. This skill tree is actually useful in both single-player and multiplayer due to the tankiness it provides and the capstone aggroing enemies to you drawing fire away from your teammates and giving you full health and increased damage resistance.

https://borderlands.fandom.com/wiki/Gaige
Gaige the Mechromancer is one of two DLC characters implemented into Borderlands 2. She is an incredibly gifted technological genius who had developed a robot for a science fair project. Said robot was to be a combatant to bullying but received third place due to the first place winner’s bribes. The first place winner then shoved Gaige causing her robot, Deathtrap, to kill her. This series of events eventually lead Gaige to Pandora in search of a Vault Hunting career. Gaige generally serves as a nuker with high damage output while leaving Deathtrap and her teammates to clean up the rest.
Gaige’s action skill is Deathtrap

Summon Deathtrap to fight for you.
Gaige’s action skill is odd, to say the least. For most characters, their action skill is the bread and butter of their kit while for Gaige he kinda falls short in the late game. He is by no means non-viable but he loses a lot of his strength when enemies get tougher to the point where he is a damage sponge. You can, however, augment his abilities with various skills in Gaige’s skill trees to make him more effective
Her 3 skill trees are Best Friends Forever, Little Big Trouble, and Ordered Chaos
https://borderlands.fandom.com/wiki/Gaige/Skill_tree

Best Friends Forever is dedicated to enhancing your survival, accuracy(somewhat), and Deathtrap. The tier 2 skill, Buck Up, allows Deathtrap to restore yours or an ally’s shields and the tier 4 skill, Explosive Clap, enables Deathtrap to perform an explosive aoe in front of him. The capstone also gives Deathtrap a copy of your shield so you can either give Deathtrap a tanky shield or a roid shield for amplified melee damage

The Little Big Trouble skill tree is focused on elemental effects and their damage. It has a focus on shock damage and effects. The tier 2 skill, the Stare, allows Deathtrap to shoot a laser. The tier 4 skill, One Two Boom, allows Deathtrap to shoot an electrical ball which you can detonate. The capstone allows you to infuse Deathtrap with an element.

The Ordered Chaos skill tree is focused on damage at the cost of accuracy with the tier 1 skill Anarchy. While damage at the cost of accuracy does not sound entirely worth it, there are a few skills which allow you ricochet bullets off of surfaces towards enemies. With incredibly high stacks of anarchy, you can make rocket launchers into effective nukes.

https://borderlands.fandom.com/wiki/Krieg
Krieg the Psycho is the last DLC character added in Borderlands 2. He was likely a Vault Hunter before he became who he is now due to Hyperion experimentation. Now he is a wandering psychotic killer with a split personality that tries to prevent Krieg from killing any innocent people. He is best suited for solo play due to him relying on getting kills to be effective. He also has the lightest gear requirements technically as you can go through UVHM without gear whatsoever. He also has quite strong capstones for most situations.
His action skill is Buzz Axe Rampage

Go into a rampage, gaining increased melee damage, movement speed, and regain full health on kill.
Buzz Axe Rampage is an incredibly powerful skill once you put enough skill points it. It does, however, have an incredibly long cooldown rate. Said cooldown rate goes down when you take damage to your health bar or to your shield(it is more effective when it hits your health bar). This action skill is, however, quite weak when you start out.
His 3 skill trees are Bloodlust, Mania, and Hellborn.

https://borderlands.fandom.com/wiki/Bloodlust_(skill_tree)
The Bloodlust skill tree is focused on improving a new mechanic that is unlocked for Krieg when you spec into the first two skills of this skill tree. This new mechanic is called Bloodlust and Bloodlust stacks when any kind of damage is dealt into an enemy. The effect of Bloodlust depends wholly on the skills provided by this skill tree. One such effect that is provided by the capstone of this skill tree, Bloodsplosion, gives you the capability(with a bit of set up) to clear out entire rooms of enemies.

https://borderlands.fandom.com/wiki/Mania
The Mania skill tree is a very risk/reward type skill tree. Many of the effects have a bonus to getting hit with your shield down and increases the time it takes for your shield to recharge. The capstone of this tree allows you to turn into a Badass Psycho enemy when your health is at 33%.

https://borderlands.fandom.com/wiki/Hellborn
The Hellborn skill tree is based around setting Krieg on fire. This can actually be really strong at later levels depending on your gear combination. There’s this legendary shield in Borderlands 2 that causes fire novas every second it is depleted, and this pistol which has a passive healing effect when it is in your hands that converts damage dealt to health. This synergy, along with this skill tree, turns Borderlands 2 into effectively a walking simulator. It’s not all game-breaking though. It is still fairly effective on other builds to interrupt shield recharge so you can continue to make use of Krieg’s other benefits.
0 notes
Text
Playable Characters in Borderlands 2 PT 1.
There are a total of 6 playable vault hunters in this game, two of which are DLC which you have to purchase. The 4 base game vault hunters are as follows
Axton the Commando
Maya the Siren
Zer0 the Assassin
Salvador the Gunzerker
And the 2 DLC vault hunters are
Gaige the Mechromancer
Krieg the Psycho
They each have their own unique quirks, strengths, and weaknesses and they all have different synergies with different weapon types. All of them have a unique action skill which they unlock at level 5 which defines most of their uniqueness.
I will go over the more balanced characters; Axton, Maya, and Zer0 this week and the more unbalanced three next week.

https://borderlands.fandom.com/wiki/Axton
Axton the Commando is an ex-Dahl soldier who utilizes a sabre turret as his action skill. People who have played the first Borderlands game will see similarities between Axton and Roland’s abilities and archetype. He is easy to pick up character who can dish out a respectable amount of damage while still staying healthy due to his passive skills. He is also strong with grenades and weapons that benefit from both grenade damage bonuses and gun bonuses. In the end, I would have to say that he suffers from gear diversity later in the game.
His action skill is Sabre Turret

Deploy a turret that can automatically target and fire upon enemies
Axton’s Sabre Turret is a useful killing tool in the early-mid game but is more useful as an aggro sponge and slag painter in later UVHM and Overpower levels where it damage falls off significantly. In all parts of the game, you can throw this into a group of enemies to distract and chip down their health while you pick them off from afar. Augmentations can be applied to the turret later in the game when you get more skill points. Augmentations include but are not limited to another gun, slag bullets, two turrets, shielded turrets, and rocket pods.
Axton’s 3 skill trees are Guerilla, Gunpowder, and Survival
https://borderlands.fandom.com/wiki/Axton/Skill_tree

The Guerilla skill tree has augments to your turret and has a moderate balance of skills which improve survivability and damage output.

The Gunpowder skill tree has skills which are more focused on offense than defense. There are also a number of skills here which boosts grenade damage in this skill tree. I recommend going down this tree first to gain access to Battlefront, a skill which increases your damage output when your turret is active.

The Survival skill tree focuses primarily on staying alive with skills that increase maximum health and improve shields. This tree also has a skill which provides you with the chance to endure a killing blow whilst also restoring your health to 50%. Going down this tree first is also viable for the increased survivability

https://borderlands.fandom.com/wiki/Maya
Maya the Siren is one of 6 Sirens who can exist in the galaxy at any given time who can utilize her siren powers with deadly results. Maya is quite unlike the previous game’s siren, Lilith, despite being one of only a few Sirens in the universe they have quite distinct abilities. Maya is also fairly easy to pick up due to her action skill literally locking down most enemies in this game and doing a fair amount of damage instantly to others. She also has incredibly good healing abilities in her skill trees and is the best support character out of all 6. She is also the strongest mobber in this game, only outshined by Zer0 and Salvador in this regard. Despite her strengths, she does have glaring weaknesses. They include being dependant on her action skill for a large number of things including damage and healing. She also does not have incredibly large amounts of damage on her own.
Her action skill is phaselock

Traps enemies in a sphere of energy, temporarily removing them from the battlefield. Alternatively, directly deals damage to certain enemies.
This skill is Maya’s bread and butter. This single skill allows Maya to heal, debuff enemies, crowd control, and deal increased damage. This also presents to her two greatest weaknesses; situations where you cannot Phaselock an enemy(mainly during boss fights or raid boss fights) and the significant point investment required to have it do every fancy thing I said it could do
Maya’s 3 skill trees are Motion, Harmony, and Cataclysm.
https://borderlands.fandom.com/wiki/Maya/Skill_tree

The Motion skill tree is a more defensive skill tree which boosts shields and crowd control. Its capstone gives you the capability to brainwash an enemy into fighting for you.

The Harmony skill tree is focused mainly on healing you and your teammates. It also grants you the ability to instantly revive your teammates with phaselock should you choose to spec into it. I recommend going into this tree first for its capstone and Wreck, a skill which increases fire rate and damage during phaselock.

The Cataclysm skill tree is focused on elemental effects such as creating acid clouds and fire explosions. I recommend going down this tree at some point for its capstone(which is essentially a lower cooldown version of Harmony’s capstone but you can’t free aim it and doesn’t just slag)and Reaper, which increases your general dps.

https://borderlands.fandom.com/wiki/Zer0
Zer0 the Assassin is an incredibly skilled killer who yearns for a challenge and speaks mostly in haiku form. Zer0’s action skill is more reminiscent of the previous game’s siren than this games siren. They are also capable of insane damage when using sniper rifles or melee. Zer0 has a fairly high skill floor when compared to the other vault hunters, as well as the highest skill tree of the 6. If you want to get good with them, you’ll have to put in a lot of effort into making them effective. When put into the hands of a particularly skilled player, Zer0 is one of the most effective mobbers and raiders in this game. In contrast to them being marketed as either incredibly close-ranged melee combatant or a long-range marksman, Zer0 can make use of a very wide amount of weapons due to their bonuses to accuracy, critical hit damage, and reload speed being easily applied to most gun types. This allows Zer0 to easily level up without much care of gear, especially when you’re using snipers and have reached the Sniping skill tree capstone(Critical Ascension). Their weaknesses lie mainly with their lack of skills boosting survivability and the player's capabilities.
Their action skill is Decepti0n

Create a holographic decoy and vanish for a few seconds. The longer you are invisible the more damage your next attack deals, but ending invisibility sooner causes your next Deception Cooldown to refresh faster.
This skill is actually kinda subpar when compared to the other skills when starting out. Without strong guns, Bloodshed skill tree capstone(Many Must Fall) or the Cunning skill tree Capstone(Death Blossom), Deception is more useful for repositioning or getting out of sticky situations most of the time. That being said, once you get DB or MMF, you can clear out mobs quickly with only a few Deception activations. The gun types this skill is more suited for are weapons that can deal a lot of damage in a single shot such as snipers or shotguns.
Zer0’s 3 skill trees are Sniping, Cunning, and Bloodshed.
https://borderlands.fandom.com/wiki/Zer0/Skill_tree
The Sniping skill tree is focused around boosts to “sniping”. The boosts this tree provides are mainly centered around critical hit damage and accuracy. This trees capstone, Critical Ascension is one of the strongest and strictest skills in the game. CA grants you stacks every time you hit an enemy critical hit spot, giving you an increase of 5% damage and 6% critical hit damage with every stack. The catch is that the stacks only apply to sniper rifles and quite a few things remove your stacks entirely. Things include switching to a non-sniper, not hitting critical hits for a time period, climbing ladders, or opening any kind of menu. There is another skill, B0re, which allows your bullets to pierce targets and negate bullet deflection. Going for Critical Ascension early is what I recommend if you are interested in sniping so you can have a fairly wide range of sniper choices.

The Cunning skill is a balance between ranged and melee combat. Its capstone, Death Blossom, has a synergy with another skill in this tree, Death Mark, which allows kunai from Death Blossom to apply Death Mark. Death Mark is a fairly powerful skill which increases the amount of damage enemies take after they’ve been meleed or kunai’d. This interaction allows Zer0 to debuff a respectable amount of enemies without them knowing where it's coming from. I recommend going down this skill tree first because of Kunai and Death Mark being really good skills to have.

The Bloodshed skill tree is Zer0’s melee focused tree. Not very many of these skills in this tree are worth having unless you’re going for a full-on melee build but there are a few exceptions. Grim and Followthrough are decent enough to pick up on most builds as they provide a bit of extra survivability and damage. Execute is also nice to have for the extra mobility. I wouldn’t recommend going down Bloodshed when you first start out as it requires the capstone to really be effective and melee builds have strict gear requirements.
0 notes
Text
Borderlands 2
This series of somewhat weekly posts will be about Borderlands 2 and will essentially be a guide of sorts for various parts about this silly game. I’ll be going over build selections for a few characters, how to deal with certain bosses, and so on and so forth.
What is this game about?
Borderlands 2 is a First Person Shooter RPG game set on the Borderworld Pandora where you play one of 6(2 of which are DLC) “Vault Hunters” as your character. Each character has a different skill tree which gives them various boosts to their combative capabilities. They all also have an action skill which can each change either the battlefield or the character depending on the character. There is also a very large amount of loot in this game with each piece of equipment usually having randomized parts every time you get one to drop. After you beat the game the first time, you are given the option to start over again on True Vault Hunter Mode(TVHM) with the same character but with stronger enemies and better loot. If you decide to play through TVHM and have bought the necessary DLC, you gain access to Ultimate Vault Hunter Mode(UVHM) where the enemies are even stronger and loot, better still. And even then, if you have the Overpower level expansion, you can run through the Digistruct Peak Gauntlet at max level to gain an OP level, levels above the player cap(ie OP 8 has every enemy around level 80 where the Player cap with all the DLC is 72). This makes for an incredibly replayable game which can occupy hundreds of hours.
First, let’s go over: Why Borderlands 2? Why should you play this game? Well, there are a variety of reasons why I personally play this game and why I like Borderlands 2.
The amount of content
There are easily hundreds of hours of content in this game including DLC. I have not gone through it all personally, but what I have gone through was really fun, if not a bit frustrating at times.
The Replayability
As I’ve mentioned earlier, this game is incredibly replayable. There are a total of 6 playable characters in BL2, two of which are DLC, with a fairly wide variety in builds. That is a reason why I think this game has large replay value, but it is not the only one.
Mobbing(fighting through enemies in an area) in this game is also quite fun. Even if you have no real goal or objective, some areas in this game are quite enjoyable to fight through. There is also the option of UVHM, which allows you to reset your playthrough progress to go through all over again.
There is also a very large amount of side quests and loot in this game, along with all of the little easter eggs that you can find, make for a very large amount of content and dialogue which will take a non-insignificant amount of time to get through it all.
The Characters
While this is a smaller reason for why I enjoy this game, the dialogue of the characters are all really well written and always bring me to chuckle every now and then. The antagonist, Handsome Jack, is also really memorable and made this game what it is.
The dialogue does get a tad repetitive after a while but it still has its moments.
As with all things with a positive, this game does have a few negatives.
The Difficulty Spike
The transition from TVHM and UVHM and Overpower Levels is quite a rough one. In Normal Vault Hunter Mode(NVHM) and TVHM, most encounters are fairly easy to get through with whatever gear you find. Once you reach UVHM and OP levels, you’ll have to consider your build carefully and it may lead a more casual player to give up in frustration. There are also a few bosses that utilize nigh-unavoidable attacks, especially a few raid bosses.
The Grind
As I’ve mentioned earlier, builds have to be more constructed and with more specific gear, and a lot of the top gear in this game are drops from a certain unique enemy. There are also some bosses in this game which have a very large loot pool, making specific drops very rare. I personally dislike grinding in video games as it detracts the amount of time you use actually playing the game. It is, however, possible to make it through without the best gear unless you have a specific build that requires specific loot for it to work.
Unskippable Cutscenes
This is more of a nitpick than anything but I don’t like the large amount unskippable cutscenes in this game, especially if you’ve played through this game multiple times already.
0 notes