
Don't wanna be here? Send us removal request.
Statistics
We looked inside some of the posts by boxfishdev-blog and here's what we found interesting.
Average Info
Notes Per Post
1
Likes Per Post
1
Reblog Per Post
0
Reply Per Post
0
Time Between Posts
7 days
Number of Posts By Type
Text
9
Last Seen Tumblr Blogs


Fun Fact
Women make up for the other 50% of Tumblr’s audience.
Text
Fun with Compositing
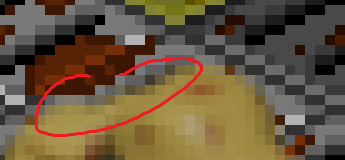
ight now, I’m at a stage of development in Colony Caseus where I’m producing more content instead of coding new stuff. Namely, now that my battle system’s ready and I have all the tools I need to create cool enemies, I’ve been grinding out enemy animations and behavior scripts. The only real technical thing I’ve really been doing is playing around with Blender’s compositing system to make pre-rendered sprites look less out of place. To give you an idea of what I mean, without any post processing, the sprites look like this in-game:
Now, I’m fine with sprites that look slightly off. In fact, I think imperfect sprites enhance the creepiness of the game. What I’m not a fan of is how they remove the retro aesthetic I’m going for. Everything else looks like it belongs in an NES-SNES title, but the enemies look like they belong on the PS1.
The first thing I decided to change was the anti-aliasing. Blender slightly blurs the borders of sprites, which means I had a “halo” around my enemies.
Obviously, not good. I don’t think even PS1 games had semi-transparent sprites, so it totally screws with my look. Fortunately, getting rid of the border was pretty easy using the compositor.
At this point, I had this:

Much better. Next, I tackled the color issue. In these sprites, there are way too many colors, which is why they look 3d while everything else looks a lot flatter. My first attempt was to use Blender’s color ramp node to limit the colors in the sprite. Here’s what it looked like:
Not too bad. But it suffered from one glaring issue -- I could only assign colors to intensities, not other colors. Basically, I could tell Blender, “make dark regions dark-brown and light regions light-brown”, but I couldn’t say, “make red regions this shade of red, and yellow regions this shade of yellow”. So it was back to the drawing board.
I finally decided to post-process the whole sheet with Python’s Pillow module. Using Pillow’s quantize function, I was able to reduce all colors down to a palette of most commonly used ones. The result?

The best one yet!
In short, Blender’s node system is hella cool, and always remember good old Python exists. Sorry for writing such a short entry, but I’ve got a ton of enemy animations to crank out.
0 notes
Text
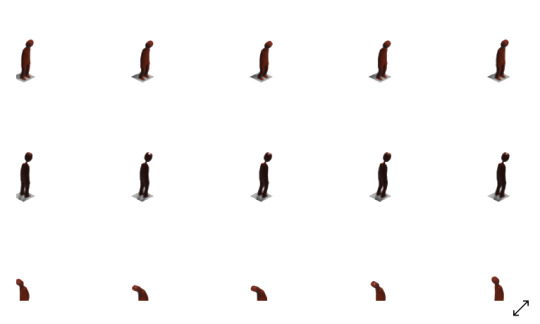
Model to Spritesheet Pipeline
Been pretty busy, which is why there was no post last week. Today, I wanna talk about my 3d model to spritesheet pipeline. I realized while creating my second enemy that manually creating every enemy animation would take way more time and effort than it’s worth. Every time I want an enemy to do a new action (and there’s a lot for them to do, from spawning to idling to dying), I’d have to create an animation for every direction the enemy faces. I’m also not the... best pixel artist, so a lack of precise artistic control isn’t an issue for me. That’s why I drew up this:

For people without magnifying glasses handy, here’s what the flowchart basically says:
We start off with a template Blender file. The template comes with four cameras (one for each direction) and a square tile (a reference to in-game floor tiles). The enemy gets modelled and animated, as one does.
In Blender, a script iterates over every camera and renders every animation, storing the renders in an “output” folder. Inside the output folder, renders are grouped by animation and direction (ex: a walk cycle facing right-down would be placed in “output/walk/RD/”).
A second script goes over every render in the output folder and splices them into a spritesheet. In the process, a json file gets generated that details the animations and the indices of the sprites they use.
A third script takes the output file and spritesheet and generates a file representing an enemy’s moveset (see the post on the Enemy Editor). Now, hitboxes and offsets can be defined from the editor.
This already would save me a ton of time. There’s just one issue, though. If I had to go back and define new animations or add new frames to old ones, my enemy file would get overwritten, and I’d have to define my hitboxes and offsets all over again. So as a last step, a script should take the old enemy file and the new enemy file and merge them so the sprite data gets updated, while the other data gets kept.
This sounds pretty simple, but how easy was it to implement in practice? Actually, it wasn’t that bad.

Step 1: Creating a template file. I was playing around with Blender to test out the idea, so I already had a sample file ready. I just removed the enemy model and animations and was good to go.

Step 2: Scripting Blender to render everything. I thought this would be a big hassle, but props to the Blender team for designing such a tight Python API. I just had to go over the cameras and animations, change the output directory for each animation, and render. I think it took about 10 lines to get what I needed.
Step 3: Generating a sprite sheet. I used Python with the Pillow image library for this one. First, I went over every render in the output folder and copied it over to a new folder. In the process, I renamed the image to the sprite index it would become (so the first render is 0.png, the next 1.png...). Then, I went over every renamed render and pasted it into an empty image. I also took note of which sprites represented which animation and saved it into a JSON file.
Step 4: Generating an enemy file. Basically, I just had to convert the info in the JSON file to XML, which is what my enemy file is structured in. Not a very hard task.
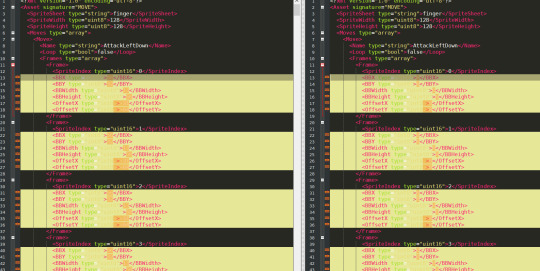
Step 5: Merging the old and new enemy files. This one, I feel, was the hardest part. First, I read in both old and new enemy files. If no old enemy file existed, I copied the new file over to where the old file should be and quit. If it did exist, I iterated over every move and copied the properties from the old file to the new one.
All in all, I was able to finish everything in about a weekend! My only concern now is making the renders look natural, as if they were hand drawn. Or rather, hand pixelled. Blender’s built in shader pipeline is pretty nice, though, so I'm looking forward to playing around with that.
0 notes
Text
Battle System
Some bad news. I was planning on spending a bunch of time over the weekend (and this week) working on Colony Caseus, so I release around the time of Halloween. Unfortunately, development’s been kinda slow, and I’ll definitely need some time to get people to test it, so that’s probably out the window. That also means I haven’t done anything major since my last post. Trying to think of something to write about, I remembered that I said in one post that I’d show off my battle system in more depth. So that’s what this post is gonna be about.

First of all, our player character has shading again! If you looked at some recent previous posts, I temporarily removed shading from his sprites so I could work on adding new animations in. The other new thing you might have noticed are those blue squares with items on top of them. All key items in game are picked up in interactive sections (what pops up if you go to a yellow tile). For really common items, though, like ammo packs, I wanted players to just walk over to them to pick them up. Couple reasons for that. One, having to click through a point and click section every time you pick up items like that can get really annoying and break immersion. Two, I’d have to create individual interactives for every such item, and I’m not doing that.
Here’s what picking up an item looks like:

These items are only useful when there are enemies to fight. So why not fight one?

..yikes, bit of a glitch there with that teleporting hopping. To defeat that enemy, I just have to click on it until its health runs out. Even though it only takes one hit to kill, its small hitbox and fast movement makes it difficult to take down without getting hit at least once. It might even be better to try to outrun it to the next room while its jumping onto the platform. Anyway, during our little battle, I’ve lost a little health and used up one bullet. This is where our items come in. All I have to do is click the new “Use” button on the items menu, and I’m good to go.

One thing you might worry about after watching that gif is whether you get enough space in your inventory to hold onto both key items and replenishing items. The short answer? You don’t. The scariest and defining feature of survival horror games to me is how much you have to micromanage your supplies. Yes, the game lets you shoot enemies and heal yourself, but that also means that you have a responsibility to be prepared at all times. Run out of ammo and walk into a room full of enemies? Well, you could have stocked up on ammo packs before exploring this section, so it’s not the game’s fault. Even now, the tensest parts of survival horror games aren’t the sections where a monster suddenly jump scares you or an unbeatable enemy constantly stalks you. It’s the sections where you’re about to die, you’ve spent all your ammo, and you’re too far away from a save point to preserve your progress. If you aren’t careful, any moment could mean having to replay your last thirty minutes all over again. That feeling is precisely what I want to capture in this game.
0 notes
Text
HackRU 2019
Over the weekend, a friend and I went down to New Jersey to compete in HackRU, Rutgers’ main hackathon. Normally, I wouldn’t enter a hackathon that takes ~9 hours to get to, but I basically grew up next to Rutgers, so it was a chance for me to come home for a little bit. Since it’s so close to where I live, I’ve wanted to go to HackRU since I first heard about it in high school. Not gonna lie, going there after all this time, I was a little disappointed. It wasn’t bad by any means, but I’ve seen better opening ceremonies, and I’m pretty sure only one tech company sponsored and showed up. It’s not like NJ has a thriving tech sector, though, and it is midterm season, so I guess I can’t fault them too much.
Before we even boarded the bus to NJ, my friend and I spitballed some ideas. We decided to go with a web app where users could upload videos, then dance next to them. If this sounds really familiar, it’s pretty much what you think it is. The difference between this and TikTok, though, is when you dance next to the video, at the end, you get a score of how well you mimicked the dancer in the video. By the time we finished, what we ended up with was Mimic.
We (rightfully) predicted that, since we’d be braindead in the latter half of the competition, we should figure out how the cloud services we use and our code should be linked up before we start. Here’s what we decided on:

Let’s break it down in human language. Our infrastructure made use of three Google Cloud Services:
AppEngine: Hosts our main web app and backend.
CloudSQL: Stores video related data.
Cloud Storage: Stores the videos themselves.
A Google AI service was also gonna be used to do handle our video analysis, but we decided to just host it on AppEngine instead along with our web app.
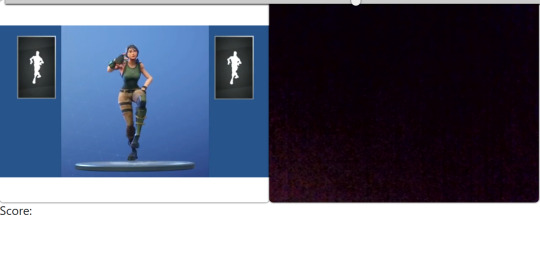
On the left is our video processing flow. When a user uploads a video to dance to, our backend breaks it down into a bunch of frames. Then, each frame gets fed into an AI model that spits out the location of hands, arms, feet, etc. Using that data, we can generate a “skeleton” of the dancer over the course of the video. The skeleton data and video gets saved in Google Cloud storage, while the location of both files gets saved in the database for easy querying.
On the right is our video grading flow. When the user selects which video they want to dance to, the database tells our backend which files to queue up. The webapp then displays two video streams: the video we’ve already processed, and the output of the user’s webcam. Our processed video plays, and once it’s finished, a video of the user dancing gets sent to our backend. From there, our AI processes it to look for poses, then skeletons from both videos are compared and the score is sent to the webapp.
While my partner handled the main webapp, I wrote the AI. Or at least tried to. I first needed to do some research on how to get this done in the first place, so I looked up how to analyze pictures for poses. That lead me to this link. From what I could gather, a popular technique is using convolutional neural networks to generate a “heatmap” of likely limb positions, then generating the skeleton off of that. Armed with my shaky knowledge of how to do this, I then went on a hunt for some pose data. The good news: I quickly found a nice resource, namely the MPII dataset. The bad news: each dataset piece is like 5 gigabytes, and there was NO way I was gonna download it and train my model in time. After wasting a bunch of time, I had to use a pretrained model from GluonCV. I should have done more research, though, because apparently Tensorflow has models that do pose estimation, and I would choose something built in Tensorflow over anything else in a heartbeat.
My partner also had a couple difficulties. Namely, uploading a video to a server in Node JS is apparently such a difficult task, the Internet doesn’t have a clear answer on how to do it. At one point, we even considered just having the frontend directly save to our cloud storage, but that would be crazy. Eventually, we rewrote everything in Flask, and that’s when we started making some progress. As always, someone smarter than us already created a library that did exactly what we needed to do, so we just imported it in and all was good.
In the end, we didn’t quite finish. I had trouble connecting the AI to our video files, so we just generated a random score after the video ended to get our demo to work. The one other thing I really wish we put in is some kind of countdown before the videos started playing. It was pretty awkward being like “check this out!”, then, with little fanfare, playing the default dance and a webcam stream of some sleep deprived hackers and a very confused judge.
0 notes
Text
Interactive Editor
It’s October break, so I’ve been splitting my free time between working on Colony Caseus and playing Resident Evil 7. Great game, I feel like Capcom really redeemed themselves after RE6. While it didn’t really involve the main storyline or cast, I loved the puzzles, item collecting, and atmosphere that made RE 1 - 4 so good. Once RE2make goes on sale, I’ll definitely be getting it.
But enough about my love of Resident Evil. I’m writing this to talk about my survival horror game. Last week, I covered my enemy editor, which lets me easily create bosses and enemies. This week, I want to talk about my interactive editor. In Colony Caseus, interactives are the point-and-click sections that pop up when you examine a yellow tile. Here’s an in game example:
Once an interactive pops up, you can interact with them to solve puzzles and pick up items. Since there are so many of these throughout the game, and players are gonna spend lots of time solving them, I needed a way to make interactive creation as quick, painless, and polished as possible. That’s where my interactive editor comes in.
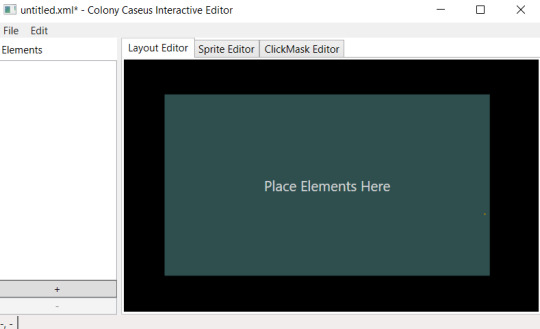
When you first open the program up, this is what you’re greeted with. Let’s take a little tour, shall we?

The first tab contains the layout editor. Here, I can drag and drop elements into their final positions. As you might have noticed from the GIF, all elements are locked to pixel perfect positions. That way, graphics don’t look slightly off and you get a nice retro feel. The first time I tried to make a game like this, I made everything in the Unity UI editor. It was a pain making sure everything was locked to integer coordinates, and selecting elements didn’t feel very good. I was also afraid the Unity renderer would mess up and have some pixels “bleed” into neighborhooding ones (although Unity’s improved its 2D tools since then). With this editor, I’ve tried my best to get rid of those minor but efficiency killing issues.

Next is the sprite editor. Another issue I had with working with my Unity prototype was how creating a sprite atlas was done. I’d create my spritesheet, import it into my project, split it into the sprites I needed, create a separate gameobject for each one, then manipulate them as needed. For interactives that had lots of elements, this meant that not only did I need to spend time splitting up the sprites, I also had to spend time making a separate gameobject for each one as well. With this editor, I decided to make element sprite creation and element object creation one step. By selecting the element I want and dragging a border over it, I can quickly go from spritesheet to interactive elements in a matter of seconds. This is especially useful when I go back and edit the spritesheet, as it takes much less time to redraw sprite boundaries.
(I decided not to implement the clickmask editor when writing the editor, so it does nothing.)
On the left is my elements list. Not only does it let me drag elements into the interactive, but double clicking also allows me to view the element’s scripts.
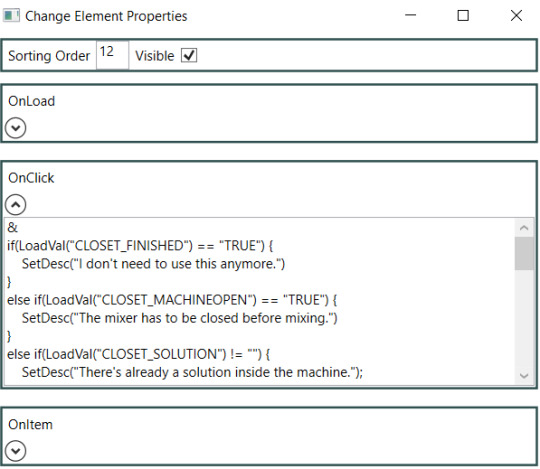
There are three important scripts I can plug in. One is OnLoad, which activates when the interactive loads or the element is no longer hidden. For example, I might want to hide a lock if I’ve set “UNLOCKED DOOR” in my save data to true. The second is OnClick, which controls what happens if the element is clicked. Obviously, that’s pretty important. The stuff in OnClick lets players get more info on elements, take items, push buttons, and a whole lot more. Finally is OnItem. This is like OnClick, except it only activates when an item is selected from the inventory. For example, I can have a lock remove a key from the inventory and unlock a door when that key is selected while clicking the lock. Another thing to note: to make interacting with interactives more intuitive, in game, selecting an element with either an OnClick script or an OnItem script causes a selector to appear over it.
This little tool took only about a week to make, but has saved me so much time and energy creating the most detailed and important sections of Colony Caseus. No wonder Iwata was able to dig Earthbound out of dev hell with the tools he programmed.
0 notes
Text
Enemy Editor
To my complete surprise, I wasn’t able to finish the rest of Colony Caseus in a week. In all seriousness, given the stuff I need to put in, plus my schedule in general, it probably won’t be ready to test for another month or so. During the week, I’ve been working on setting up the combat system. Prior to this, I was focused a lot more on item collection, puzzle solving, and exploration, so it wasn’t like I could just slide in something real quickly. Since your skill at fighting means life or death, I needed to make sure shooting enemies felt natural, but not too easy. It’s pretty buggy and unpolished at the moment, but here’s a little sample of how combat looks in game:

Once I finish up with the combat system, I’ll cover it in more depth. For now, I want to turn your attention towards the little things I’m shooting at. When creating an enemy, there are a lot of attributes that you have to define:
How much health they have
Where their hitbox is
How they move around
What animations they should use
...etc
If there’s one thing I’ve learned about mixing creativity with programming, it’s that the less you have to worry about the code itself, the better the final product. So hardcoding enemy logic directly into the game was a no go. To make prototyping a variety of enemies easy, enemy data would have to be stored in files that the engine would load at runtime.
My first crack at the problem was to create an asset file with the following properties:
Enemy ID
Health
Hitbox data (x, y, width, height)
Animation file name (defines what spritesheet to use and animations)
Script name (defines enemy behavior)
Unfortunately, I ran into a big problem really quickly. Defining my enemies like this meant that I couldn’t change my hitbox or offset on a frame by frame basis. For example, if I had an armored enemy that was only vulnerable when it took off its armor, I’d have to have the hitbox increase in size as the armor comes off.

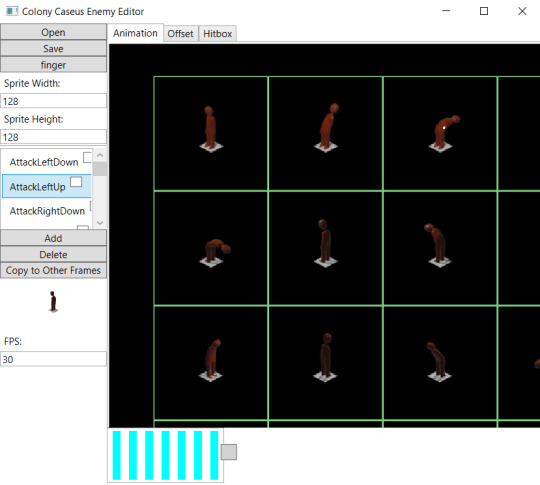
So instead of reusing my current sprite animation tool, I had to create my own enemy editor.
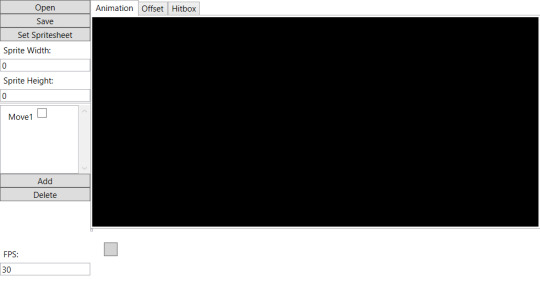
It’s mostly a frame selecting animation tool: you open up a spritesheet, create a new animation entry, and select the sprites that make up each frame of the animation. However, unlike a normal animation editor, I can also define the offset and hitbox of a move on a frame by frame basis.

The offset tab lets me control where the enemy is relative to the tile it’s on. For example, if I have an enemy that jumps from tile to tile, I can create the jumping animation, define which frames I’m using, then define the offsets so that at the end of the animation, the enemy is at the target tile.

The hitbox tab lets me control the position and size of the hitbox. Going back to the armored enemy example, for animations with armor on, the hitbox would be undefined or really small. Then, for unarmored animations, I’d define a hitbox at the weak spot. Another example is an enemy that jerks back and forth and has a weak spot on their head. Thanks to the editor, it’s really easy to go through every animation and select just the head.
If you’re wondering how I define enemy behavior, it’s just an external script with four functions. One activates when the enemy spawns, so things like health can be defined. One activates every frame, so you can do things like chase after the player or activate an idle animation if no combat happens for a long time. One activates when the player moves, to make player detection easier and more efficient. And finally, one activates whenever the player shoots it, so it knows to die and trigger a death animation after a certain number of hits.
So that’s how enemies are created in Colony Caseus. I’ll probably change a couple things as I work with the system, but so far, I’m pretty happy with how things work.
0 notes
Text
Colony Caseus
During my free time, I’ve been working on a game I’m calling Colony Caseus. It’s a retro point and click/isometric survival horror game (a whole bunch of stuff, I know) that takes place on an abandoned space colony. By reading notes left behind and solving puzzles, you have to figure out what happened and escape. Since it is a survival game, you also have to avoid and kill enemies with limited supplies.
The game combines two of my favorite genres: survival horror and point and click. Both are puzzle heavy and atmospheric, but in survival horror, you solve puzzles by interacting with the world (like pushing boxes to clear a path), while in point and click, you have really detailed puzzle sections with limited ability to navigate the world. I wanted to play a game where I could have sections of deep puzzle solving without sacrificing the ability to fully navigate through the game’s world.
My issue with both genres can be summed up in the following scenario. Let’s say I wanted a room where you walk in, shoot some zombies, then solve a puzzle on a table. In survival horror, it’s possible to have a good combat system to really make that encounter terrifying. You’d have to have some skill to maneuver your character around the enemy and kill it at a time critical moment. In a point and click game, it’s a lot harder to have skill based combat sections, especially if you want to have click-escape style sections later on, but the puzzles are more fun than ones in survival horror games (at least in my opinion). With this game, I’m trying to strike a balance between the two so both point and click sections and action sections feel like one cohesive game world.

At the moment, other than some fine tuning and testing, I’ve finished all the interactive portions of the game. Right now, I’m implementing a combat system for enemies and bosses. That involves adding a lot of game mechanics (health items, ammo, aiming, enemy data, etc), and adds a new dimension of play, too. To speed up that process, I’m writing an editor for enemy entities, so it shouldn’t take too long to add enemies into the game once it’s done. After that, I just need some playtesting, and it should be ready for release.
This actually isn’t my first attempt at a game like this. About two years ago, I put out a game that tried to do the same thing. Unfortunately, it wasn’t very good. Some parts were confusing, there wasn’t a clear storyline, and playing it just didn’t feel good. With this game, I plan on revamping every aspect that sucked in the original, from better combat mechanics to better storytelling. I’m also going do more playtesting, because I kinda sorta skipped that step in the first game. Releasing that game taught me an important lesson: never release something unless you’re proud to put your name on it.
That’s it for now. Tune in next week when I (hopefully) finish the game!
0 notes
Text
Big Red Hacks 2019
I went up (or down?) to Cornell weekend for Big Red Hacks. I’ve gone to two hackathons so far: one as a high school student, and a 6 hour one as part of college orientation. The nice thing about this one was instead of the usual 24 hour time limit, you had 36 hours. Those 12 hours made a HUGE difference; my team had time to start thinking about an idea and sleep over it for a couple hours before committing to anything. I also felt less stressed about how fast I had to work, even though my team didn’t end up quite finishing. But who’s ever really finished a project during an event like this?
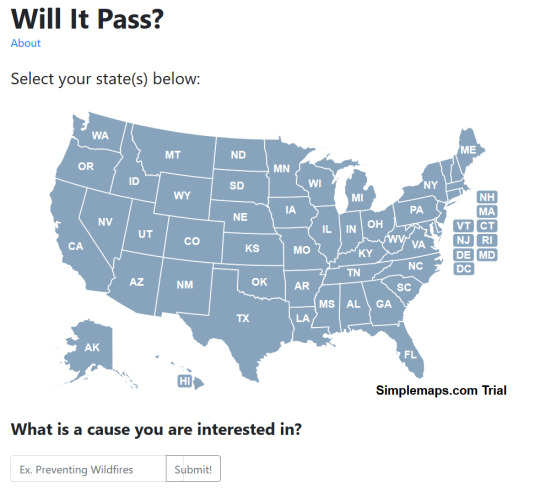
We initially were going with the idea of coordinating robots to fight wildfires, but we ran into a couple issues about an hour in. One, there are companies with more time and resources that were working on that very issue. Two, based on our research, forest fires are largely caused by human oversight, from campers recklessly throwing lit cigarettes away to government officials allowing people to build dangerously far into the woods. The second issue inspired our next idea: Will It Pass, a web app that uses machine learning to see how dedicated our representatives are to certain issues. There are people in Congress who we assume have certain positions because of their party, but when it comes down to it, have voted against issues that matter to us. Basically, this was the goal of Will It Pass:
Use bill vote data to train neural network models, so the models could predict how likely a lawmaker would be to pass a bill containing given keywords.
Have the user provide keywords associated with issues they care about.
Based on the keywords given, have the models predict the chance each person in Congress would say “Yes” to the bill.
The idea was, if you typed in something like “environmental regulation“ and found out that the people representing you were only 60% likely to pass bills for it, you could do some research into why and confront them at a town hall or something.
We had three people working on three distinct components of our final product. One person was working on creating the models in Tensorflow. From what I could tell, he was mapping words present in bills to integers, then yeeting those integers into our models as inputs. For output comparisons, he used the voting decisions of different politicians to associate words with pass rate. I’m new to data science, so seeing a real life example of it really fascinated me. I also got to saw the workflow data scientists use. Our AI guy was using Jupyter Notebook to run and test our models, so once he got everything working, he just had to put everything into one cell for the rest of the team to use.
Another person worked on the actual web app. One of the sponsors was Google, so we tried to get App Engine to work with our Flask app. To his credit, everything was fine until he uploaded a version that used Tensorflow to load our models about three hours before we had to submit. That instantly broke everything, even though things were working locally. I guess it was because the server had to install Tensorflow and its dependencies, but wow, was it a big shame. We couldn’t even upload code to the thing. For what it was worth, if it wasn’t for the Tensorflow integration, we would have totally finished everything. You can see above his interface, which let you type in keywords to predict the chance of bills passing and select states to view senators.
My job was to get the data nice and pretty for our models. Unfortunately, this was way harder than I thought it would be. We used the ProPublica Congressional API to gather data, but there were a few caveats. One, there was a limit of 5,000 requests per day, so we couldn’t just constantly query the server on the info we needed. Two, they didn’t just give you all the info we needed in one nice JSON file. First, you had to know which bills you wanted and their ID’s, which took an API call. Then, you had to get the roll call vote status of each bill, and save the yea/nay value for all the people who voted. Then, all that info had to be compiled into a csv file for our models to read. I actually had to do some more research in how bills get voted on to make sense of some of the process. I didn’t realize there were cases where you could get bills to pass without a roll call vote, for instance, by using a vocal vote instead where everyone just calls out their vote and people guess how many people said yes. I had to check if a bill was passed and voted on for it to make it into the set. This might sound obvious, but I also didn’t realize how mundane a lot of the bills are. Some of the bills just cover day to day government functions, without any political meaning. We used Google Natural Language to extract keywords from the bills, and while it was easy to figure out what the exciting ones were about based on the keywords, the blander ones were a bit... ambiguous. Despite initial difficulties, I managed to get the data working with our models, and we ended up with models representing the decisions of 20 senators.
We didn’t win anything, but I still had a ton of fun at Big Red Hacks. I got along well with my teammates, who I had just met there, and I learned a lot, too. This was my first time working with Google AI (and AI in general for a project), and I was really surprised how easy it was to integrate. This was also my first time gathering data and preparing it for AI, as in the past, I just used ready made datasets. That skill should come in handy if I start using AI in the real world. Last but not least, I learned a thing or two on how our democracy functions, and all I’m gonna say is for the majority of us, we know way less about the people in power than we think we do.
0 notes
Text
What am I Looking At?
Hey, welcome to my dev blog! I’ve been trying to find a way to document the projects I work on, and finally decided to start working on something like this. In the past, I tried using Twitter (failed because I don’t post nearly enough for it to be of real use) and Reddit (have absolutely never done anything productive on it), but decided to ditch them, at least for documentation purposes.
I’m going to be using this page mainly to post updates on projects I’m working on, and occasionally to post unrelated things like technologies I’m trying to learn. Hopefully, whenever I finish a project, you’ll be able to track my progress from start to finish by looking through the tags. Easy access to that kind of info is real important to me.
Come to think of it, why are you reading this? I’m literally writing this 10 minutes after hitting the “Create account” button. If I had to guess, you either:
Are a big fan of me from the future and can’t get enough of my posts (very unlikely)
Decided to look around and stumbled upon my blog by accident (in which case, hi)
Or are looking for something to cancel me with, because I somehow have become a public Internet figure (please don’t)
That wraps up everything I had to say. Stick around! It’ll be worth it. I hope.
1 note
·
View note