
Don't wanna be here? Send us removal request.
Statistics
We looked inside some of the posts by brief6-3dprinting and here's what we found interesting.
Average Info
Notes Per Post
0
Likes Per Post
0
Reblog Per Post
0
Reply Per Post
0
Time Between Posts
30 minutes
Number of Posts By Type
Text
3
Last Seen Tumblr Blogs


Fun Fact
There are dozens of funny blogs to kill time on Tumblr.
Text
Brief 6: 3D Printing (Reflection)

Figure 1 (Final concluded training dummy)
The final brief was very fun to work on. It made me feel like a little kid just messing around with clay and making a small humanoid or even a creature. I feel like during the middle of the assignment, I slacked off a bit and lost my interest in it. But I quickly firmed it and held on, attempting to complete the remaining dummy. However, I couldn't finish it fully.
I believe I can dedicate even more time to each particular subtools of the puppet and make it more detailed as it looks more robotic than possessing a natural side to it. If I dedicate myself to not slacking off and properly learning how to sculpt characters, I believe I might ignite a spark in being invested in 3D printing characters in addition to my interest in stylized environmental art.

Figure 2 (Sculpt of a tribal character, (Strangis, 2020))
I am now fully looking forward to spending my time refining two of my weekly briefs to put it on my portfolio ahead of the January deadline for the first semester. It is going to be an arduous path but I definitely feel as if I am improving as a 3D artist that can one day work efficiently in the art industry.
REFERENCES
Strangis, G., 2020. ArtStation. [Online] Available at: https://www.artstation.com/artwork/PmzXXr [Accessed 20 November 2024].
0 notes
Text
Brief 6: 3D Printing (Sculpting)
After the collection of reference images in PureRef, I started working on the training dummy. I took a standard approach of starting the sculpting by blocking out the dummy with basic primitive shapes like cubes and cylinders and resizing and placing them appropriately.

Figure 1 (Blockout of the training dummy)
However, I forgot to screengrab the full blockout of the training dummy in its primitive shape. However, the picture above gives a good understanding of how the puppet was in its initial stages.
From this stage onwards, I just focused on each individual primitive shape and started sculpting using various brushes.
The most common brush used was the move and the standard brush. Move brush was used for moving around the clay mesh and the standard brush was used for adding standard clay and smoothing the mesh.
I sculpted the hands of the dummy to create a stylized wood texture with chippings and wear in it. I used Dam Standard brush with thick skin enabled to around 7-8 points to create sharp wood chippings. I also used the same arm log for the vertical leg pole for the dummy.

Figure 2 (Arms of the Dummy)
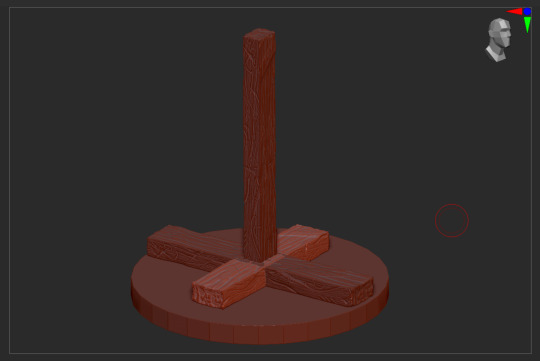
Figure 3 (Base of the Dummy)
I then focused on the sword. For the individual parts that are more complex, I introduced new subtools and worked on a similar scale to the reference for the sword. I used radial symmetry to target around the hilt of the sword, which I used after adding a small cylinder subtool. I also used a clip curve brush to clip off the edges of the blade to make it appear sharper. I also added a sword guard by sculpting it with a primitive cube. It's important to note that when the model had less vertices to manipulate, I used dynamesh to recalculate and carry on with my sculpting.

Figure 4 (Sword of the Dummy)
The shield of the dummy was fairly easy. Here, I used a circular mask brush and inflated it for the middle convex portion. I also used thick mask and the move brush together to create small portions pop out at fixed distance with radial symmetry enabled. The wood engravings and the chippings were introduced as before.

Figure 5 (Shield of the Dummy)
I then moved to the helmet of the character. It was fairly similar to the shield, heavily relying upon the use of thick skin, move brush and the inflate option. However, at times, I also made use of the mask lasso brush to accurately mask out how much portion of the helmet needed to be inflated.
The torso of the character was mostly manipulated with the move brush and recalculated with dynamesh. It was then smoothened out with the standard brush.

Figure 6 (Torso and the helmet of the Dummy)
As much as I wanted to complete the entire model, I simply ran out of time and as the deadlines drew closer, I concluded my project here, though I will definitely come back to this project in the future and work on completing the stylized training dummy.

Figure 7 (Final concluded training dummy)
0 notes
Text
Brief 6: 3D Printing (Research)
For the final weekly brief, us students were assigned a very fun assignment in 3D Printing. There are no constraints and one can make anything for a 3D Print. I decided to create a stylized training dummy with sword and shield on his hand with a bit of wear and tear to it.
There was no particular outside influence on my decision on creating a training dummy. I just felt it could serve as a good exercise for creating a stylized 3D asset. The reference images for the training dummy are collected in PureRef.

Figure 1 (PureRef file for the Training Dummy)
After I collected all of the reference images in PureRef, I decided to sculpt the training dummy solely in a sculpting application called ZBrush. To be honest, I am not that good when it comes to sculpting but I think I am definitely improving as an artist and this assignment will challenge me to my maximum potential as a digital sculptor.
0 notes