
Don't wanna be here? Send us removal request.
Statistics
We looked inside some of the posts by busicmox and here's what we found interesting.
Average Info
Notes Per Post
1
Likes Per Post
1
Reblog Per Post
0
Reply Per Post
0
Time Between Posts
21 hours
Number of Posts By Type
Text
8
Last Seen Tumblr Blogs


Fun Fact
There are dozens of funny blogs to kill time on Tumblr.
Text
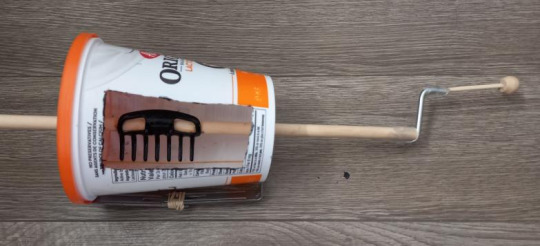
Step 6: The Final Result


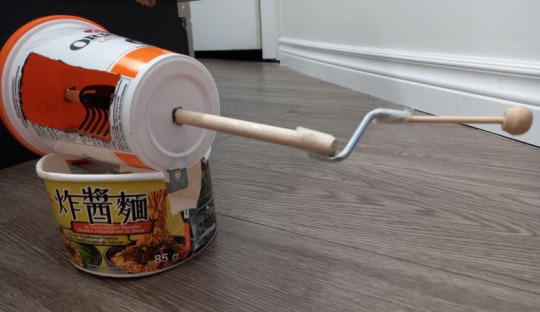
Here's the final music box working:
It can make exactly one sound but at this point that's good enough for me because I need to go finish my lab report for BIO 2A03 that is due tomorrow so I don't have much more time to work on this. Final Cost Breakdown:
-1.50$ Canada themed pinwheel -0.00$ Plastic yogurt container -1.25$ Plastic hair claw-style clips -0.00$ Metal can -3.99$ Superglue -0.00$ Leftover ikea shelf brackets -0.00$ Leftover ikea tool -0.00$ Elastic bands I had around
Total: 6.74$ Overall, I'd rate my music box a solid 2.1/10 because it can only make one sound which is some terrible music and overall it looks pretty terrible but it was fun melting plastic with a hot knife so it's not a 1/10.
0 notes
Text
Step 5: Building Round 2
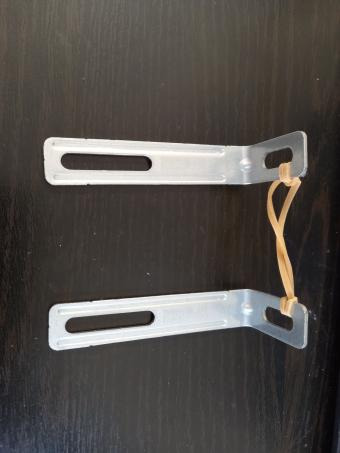
First off, I looked around for something I could use to attach the elastic band to the yogurt container with. I just realized now in hindsight I could have just poked some holes in the container, directly tied the elastic band on and called it a day but past-me found these brackets from my ikea shelf that I had hanging around and decided to use those for some reason.
Anyway, these had nice loops that I used to secure the elastic band in place.
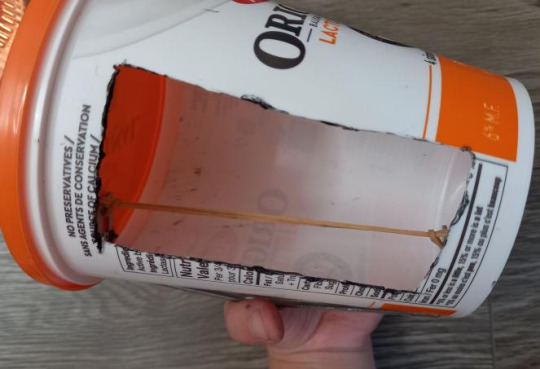
Now I just had to figure out how to attach them to the yogurt container with the elastics stretched out inside it. I figured out that if I could make two slots on either end I could slot the brackets in and secure them on the bottom. I also realized that I'd need to be able to access the inside the container so I would need some sort of hole on the side.
My scissors were not super strong and cutting through thick yogurt container plastic with them would not have been fun or easy so instead I decided to light an old candle and heat up a knife to melt through and cut the plastic which I thought would be more fun and easy and it indeed was. I made sure to do it with my big window open so I didn't huff too many possible fumes from the melting plastic.
After making two slots for the brackets and a big rectangular hole in the side this is what I had:

I had to detach the elastic band from the brackets to slot them in the holes and after that I threaded the elastic band back in which wasn't too hard because that nice hole gave me space to work in.
After that I used the knife and candle to make two holes on either ends of the container that would hold the axle.


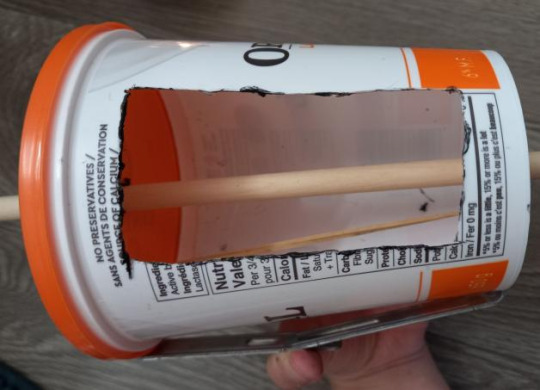
Those two brackets kept standing up from the force of the elastic inside pulling them so I then secured them with another elastic band.
Now it was super glue time.
I pulled out my stupidly expensive little tube of glue and glued half the claw clip I took apart back in Step 3 to the wooden dowel, making sure in the process that it could just reach the elastic band. I also had this screwdriver? thing leftover from the same ikea shelf the brackets were leftover from that I decided to use for part of the crank handle so I glued that to the main dowel I was using for the axle and glued the smaller piece of dowel that I accidently broke off also back in Step 3 to it. It looked like a crank handle but it didn't feel very secure (I don't think the superglue binds metal well) so I wrapped tape around it for extra support.
And after all that I had this:
It was pretty much done now but I decided to build a stand for it real quick so it wouldn't need to be held in the hand to turn the handle. I made the stand out of a cardboard instant noodle bow. The bowl was too wide for the music box at first so I cut some slits into the bowl and taped it back together to make it thinner. Then I cut out two sections for the music box to sit inside and it was done.


Woo I had finally finished it! It still looked like literal trash because I didn't have time to decorate it but that was ok as long as it could make sound.
0 notes
Text
Step 4: Coping with your failures AKA Back to Brainstorming
So, when I initially planned the design for my music box I also thought of a second idea which was a box that plucked an elastic string to make sounds. I decided to go with my first idea because this second design could only make one pitch of note and it would be super hard to get it to play a song but at this point the deadline for this project is rapidly approaching and I need to actually make something that makes sounds at least even if it can't play a song (rip hot cross buns you won't be happening).

Here's the second design that I'm going to call the Banjo Box This better work or I'm screwed
0 notes
Text
Step 3: Building Round 1
I started out by taking the paper label off the can and dismantling the pinwheel. The can label was super easy to rip off (pretty hard to mess that one up) but the blades of the pinwheel were held together by this little metal rivet which was a massive pain to pry off and I unfortunately managed to break the smaller wooden piece attached to the end of the dowel off in the process. Not off to the best start but I thought I could glue the dowel back together and all would be good.

Next I decide to start making the comb by breaking apart the two halves of one of the claw clips. This was pretty easy because dollarama is not renowned for its construction quality and so I just ripped out the metal pin I saw that was holding everything together and It all separated (nice). Then I realized I'd have to break off the end of the clip to allow it to sit at the right angle in the yogurt container so I used my hands to just snap it off.
Now the clip half could sit upright at an angle like I wanted and I planned to then break off the teeth at different lengths to make them all level again when the clip was at an angle. However, I realized due to the partial curvature of the teeth, they wouldn't be in line with each other anymore If I did that. I also realized the shortest teeth at the very end seemed like they would be too short to vibrate enough to make a sound. I decided to deal with this issue by abandoning the plan of making the music box able to play different notes and just having the comb be level like my initial idea.


After that mild issue I decided to start trying to put dents in the can to make the bumps of the drum. Turns out the metal they used for this can was way too strong and despite my best efforts, I couldn't dent it at all. I tried using a knife, scissors, a chopstick and a nail but at best I could just scratch the can a bit. This was a massive problem because the drum of the music box was one of the most important parts and without it, it wouldn't be able to make any sounds.
After all these issues, I decided to go back and heavily revise the initial design for my music box because this was really not going well.
0 notes
Text
Step 2: Gathering Materials

Here's all the stuff I planned to use to build my music box: 1.50$ Canada themed pinwheel- bought this at dollarama to be the axle, weirdly finding something that could be used as the axle was the hardest part of gathering all these supplies, l checked a home depot, canadian tire and a michels before finding this wooden dowel at dollarama that wasn't crazy long or too short or expensive, also I thought the bit that the pinwheel's spinning head attached to could be made easily into the handle for the crank if I removed the head
0.00$ Plastic yogurt container- saved this from the recycling to be the shell that contains all the parts of the music box, man I hope the yogurt is on sale this week I really want some right now
1.25$ Plastic hair claw-style clip- bought this at dollarama to be used as the comb because I saw it had the cool teeth shape already, also fun fact I went to two dollaramas and neither of them sold actual combs for some reason but these clips looked easier to attach to the shell so it was fine
0.00$ Metal can- saved this from the recycling bin to be the metal drum, bonus fact the spaghetti sauce I made with the tomato paste that used to be inside was pretty good
1.25$ Bobby pins- bought these at dollarama to possibly be used for the comb if the hair clips being plastic was an issue, did I forget what these were called and have to google it and end up falling down a hairstyling wikipedia page rabbit hole for half an hour? (possibly)
3.99$ Superglue- bought this from home depot and planned to use this to assemble and hold the parts of the music box together why was this tiny tube of glue so expensive
Total cost so far (not including tax): 7.99$ (rad)
0 notes
Text
Step 1: Brainstorming Round 2

This was my initial more detailed plan of what parts would I need to construct and how they would work together to create a music box. I first thought this up after semi-guessing how I thought a mechanical music box worked based on vague memories of some I saw in china in a gift shop like 7 years ago. Then I decided to do a quick google on how they make the sounds of different notes and found this video: https://youtu.be/COty6_oDEkk and learned that: A) my idea of how a music box worked was mostly pretty accurate minus the complicated wind up bit to control the rate at which the drum spins which I won't be doing due to said complicatedness so my music box will just make the music as you spin it and B) I'd have to make the teeth/spines of the comb different lengths to produce different pitches of notes and possibly add weight to the tips of them. Also, I decided to try and make my music box play hot cross buns for good ol' elementary school nostalgia. The poor photo got horribly compressed when I uploaded it on here but I think it's still readable.
0 notes
Text
Step 1: Brainstorming
aka: game plan time ya'll To start with, a multimedia tool (the thing I gotta make) is something that can be used to make or modify types of media. Examples of media: -audio -photos -video (pretty much animation + optional audio) -animation (pretty much photos/frames shown real fast) So, I decided my two options seemed to be to build something that either made or modified photos or audio. Make or Modify? I decided to try to make something that made and didn't modify media because it seemed harder and I apparently really like making my life harder but hey it gave me more stuff to post about on this blog which might get me a better grade so that's nice. Photos or Audio? I had (and still have) no idea of how photos work or how I'd make something that made photos with a 20$ budget. Making audio didn't seem as hard though so I went with that. So, I decided to try and build something that made audio. You can probably tell I decided to try and make a music box by the title of this blog and this choice was solely because it was the first thing I thought of and I thought it would be fun to make. Also I thought a music box would count as a low tech version of something like a CD or tape player if I could make it able to play multiple songs. Also if you were wondering, someone stole the name "musicbox" for a blog already and I didn't feel like being musicbox7853623689 or whatever so busicmox it is.
0 notes
Text
The Music Box Project
By: Yvonne Tong
This my second multimedia project for MEDIAARTS 1A03 2022 Spring. Goals: Create a low-tech multimedia tool to replace an expensive high-tech common multimedia tool. Guess we're going back to the caveman days. Budget: 20$ Maximum. Going to try and keep it nice and low as possible for my broke student life.
1 note
·
View note