
Don't wanna be here? Send us removal request.
Statistics
We looked inside some of the posts by bytedigitalcom and here's what we found interesting.
Average Info
Notes Per Post
1
Likes Per Post
1
Reblog Per Post
0
Reply Per Post
0
Time Between Posts
16 days
Number of Posts By Type
Text
9
Last Seen Tumblr Blogs


Fun Fact
The Tumblr app for Google Glass was released on May 16, 2013.
Text


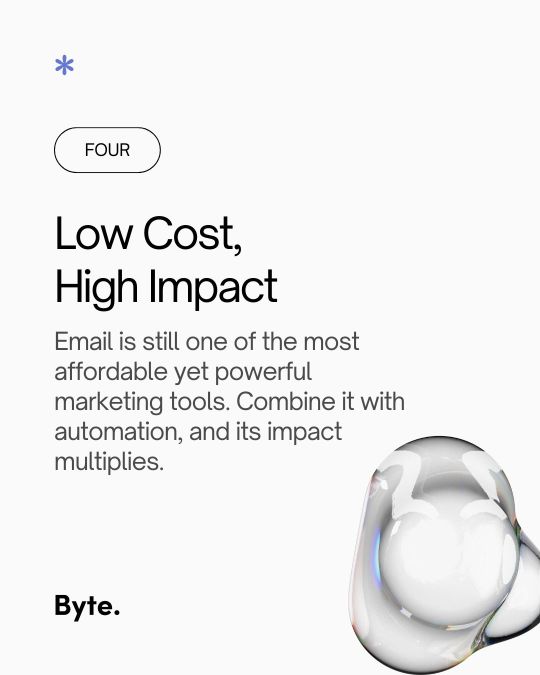

Looking to level up your marketing game? At Byte, we know that email marketing is a game-changer. We help you design strategies that increase engagement and drive results. Ready to grow your brand with the power of email? 📩 Let’s make it happen—Contact us today!
0 notes
Text


Writing SEO love letters to Google, one keyword at a time. It’s the relationship we’re all rooting for 💌
0 notes
Text


ChatGPT is now on WhatsApp. No need to bounce between tabs, apps, or second brains. Now your AI assistant lives in your most-used tool: chat. For teams juggling briefs, edits, and one too many Google Docs, this means less chaos, more clarity. Also: it never leaves you on read.
0 notes
Text
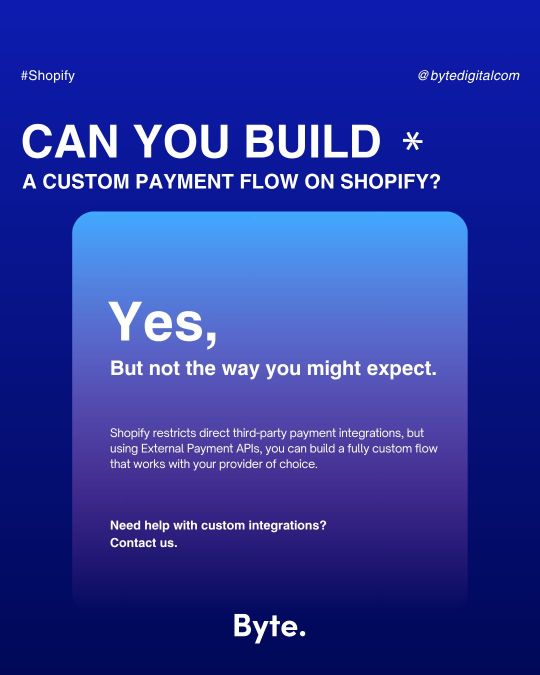
Shopify Plus gives you more power, but you still need to know how to use it. If you're looking to integrate a custom payment gateway (especially a local or unsupported one), Shopify's standard plans won't get you far. But with Shopify Plus, you get access to External Payment APIs, opening the door to a fully custom checkout flow. We recently implemented this for a client who needed to connect a regional payment provider. Here’s what we built: ✅ A fully customized checkout experience ✅ Direct integration with a non-approved gateway ✅ 100% compliance with Shopify Plus policies ✅ No external plugins or workarounds This type of flexibility is essential for businesses operating in specific markets or needing greater control over their payment systems. If you're on Shopify Plus and want to explore a solution like this, reach out to us. We’ll help you build it the right way. For more details, visit our blog: https://lnkd.in/eSCrpjZd
0 notes
Text
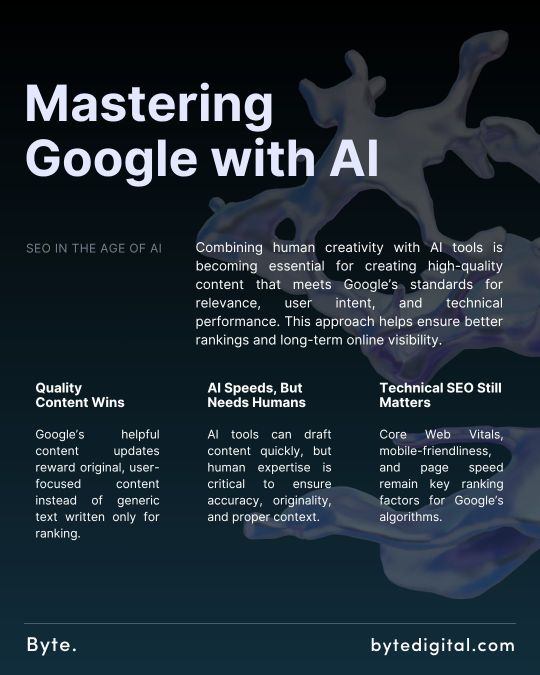
Google’s algorithms are becoming more sophisticated, placing strong emphasis on content quality, alignment with user intent, and technical site performance, rather than just keyword density. AI tools like ChatGPT and Jasper can streamline content production and improve efficiency. However, they should not replace human judgment. Achieving sustainable SEO results still depends on creating authoritative, user-focused content that directly addresses search queries and provides genuine value. Key factors for successful SEO today include: Developing high-quality, frequently updated content tailored to user intent Using AI to support workflows while ensuring editorial quality and originality Maintaining strong technical SEO practices such as fast loading speeds, mobile optimization, and logical site architecture Continuously tracking search trends and adjusting content strategies proactively In essence, combining human expertise with carefully integrated AI tools is the path to achieving lasting visibility in search rankings. We share more insights on this topic in our latest blog post: https://lnkd.in/e5rx87KP
0 notes
Text
Nofollow ve Dofollow Bağlantılar Nedir?
Nofollow ve dofollow bağlantılar, bir web sayfasından başka bir sayfaya verilen linklerin arama motorları tarafından nasıl algılanması gerektiğini belirleyen bağlantı türleridir. Temel fark, bu bağlantıların arama motorlarına bir sinyal iletip iletmemesi ile ilgilidir. “Dofollow” bir bağlantı, arama motoruna “bu bağlantı verdiğim sayfa güvenilir, değerli; bunu sen de dikkate al” der. Öte yandan “nofollow” bağlantı, “bu sayfaya yönlendiriyorum ama ona güvenip sıralamada avantaj sağlamanı istemiyorum” anlamına gelir. Kullanıcı için her iki bağlantı da tıklanabilir olsa da, arama motorları bu ayrımı görür ve değerlendirir.
Nofollow ve Dofollow Bağlantı Farkları Nedir?
Bu farklar özellikle SEO (arama motoru optimizasyonu) açısından çok önemlidir. Dofollow bağlantılar, hedeflenen sayfanın otoritesini artırabilir; çünkü Google gibi arama motorları bunları bir tür “referans oyu” olarak sayar.
Bu oylar, sıralamaları doğrudan etkileyebilir. Nofollow bağlantılar ise genellikle yorumlar, forum gönderileri, sponsorlu içerikler veya kullanıcı tarafından oluşturulan alanlarda kullanılır. Çünkü bu içeriklerde verilen linkler her zaman güvenilir olmayabilir. Google, 2005 yılında nofollow etiketini tanıtarak bu tür durumlarda sitelerin sorumluluktan kaçınmasını sağladı. 2019’daki güncelleme ile de artık bu bağlantıları ipucu olarak değerlendirebileceğini duyurdu, yani tamamen göz ardı etmeyebileceğini belirtti.
Yazılım tarafında ise bu bağlantı türlerinin belirlenmesi oldukça basittir. Bir bağlantının HTML koduna rel="nofollow" özelliği eklendiğinde, arama motoru botları bu bağlantıyı takip ederken “buna SEO değeri verme” komutunu alır.
Dofollow için ekstra bir kod yazmaya gerek yoktur; varsayılan bağlantılar zaten dofollow kabul edilir. Yazılımcılar, site içerisindeki güvenli sayfalara dofollow; kullanıcı kaynaklı, sponsorlu veya şüpheli kaynaklara ise nofollow kullanarak sitenin genel SEO sağlığını korurlar. Kısacası bu etiketler hem teknik bir karar hem de stratejik bir tercihtir: Ne tür bağlantıların otorite aktarmasını istediğinizi kontrol altına almanızı sağlar.
Bağlantılar Neden Farklı Türlere Ayrılır?
Web siteleri arasında kurulan bağlantılar, sadece kullanıcıları farklı sayfalara yönlendirmek ile kalmaz; arama motorları açısından da ciddi bir anlam taşır. Google gibi arama motorları, bir sitenin başka bir siteye verdiği bağlantıyı bir tür “güven oyu” olarak değerlendirir. Bu bağlantılar, arama sonuçlarında hangi sayfaların daha üst sıralarda gösterileceğini belirlerken önemli bir kriter olarak kullanılır.
Ancak her bağlantı aynı şekilde verilmez ya da aynı güven düzeyini yansıtmaz. Örneğin bir haber sitesinin içeriğinde verdiği bağlantı, içerik sahibinin onayını ve editoryal kontrolünü yansıtırken; bir kullanıcı yorumunda verilen bağlantı, site sahibinin doğrudan kontrolünde değildir. İşte bu noktada bağlantıların türleri devreye girer.
Bu ayrım, hem arama motorlarının spam içeriklerle manipüle edilmesini engellemek hem de web yöneticilerine bağlantı sorumluluğunu yönetme esnekliği tanımak için geliştirilmiştir. Özellikle sponsorlu içerikler, kullanıcı tarafından eklenen yorumlar ve forum postları gibi alanlarda bağlantıların nofollow yapılması, sitenin otoritesini korumak açısından önemlidir.
Peki Ya Nofollow? Google Bu Bağlantıları Hiç Mi Dikkate Almaz?
Nofollow bağlantılar uzun süre boyunca Google’ın sıralama algoritmalarında tamamen göz ardı edilen öğelerdi. İlk kez 2005 yılında tanıtılan bu etiket, blog yorumları gibi kullanıcı kaynaklı bağlantılardan gelen spam’i önlemek amacıyla geliştirildi. Web yöneticileri rel="nofollow" etiketi ile arama motorlarına, “Bu bağlantıya güvenmiyorum, sıralama için dikkate alma” mesajı gönderebiliyordu. Bu sistem, SEO açısından link manipülasyonunun önüne geçmeyi hedefliyordu ve uzun yıllar boyunca arama motorları bu bağlantılara hiçbir değer atfetmedi.
Ancak bu yaklaşım 2019 yılında değişmeye başladı. Google, yaptığı resmi açıklamayla nofollow bağlantıların artık tamamen yok sayılmayacağını, bazı durumlarda “değerlendirilebilir sinyaller” olarak ele alınabileceğini duyurdu. Bu değişimle birlikte, Google’ın algoritması artık nofollow bağlantılardan gelen içerik bağlamını, bağlantı metinlerini ve bağlantı desenlerini analiz ederek, bu bağlantılardan potansiyel değer çıkarabiliyor.
Ayrıca aynı dönemde iki yeni bağlantı niteliği daha tanıtıldı: rel="sponsored" (reklam ve sponsorluk içerikli bağlantılar için) ve rel="ugc" (kullanıcı tarafından oluşturulan içerikler, örneğin yorumlar için). Bu yenilikler, arama motorlarına her bağlantının doğasını daha net bir şekilde açıklama imkânı sundu.
Sponsored ve UGC Bağlantılar Nedir?
Google, 2019 yılında bağlantıların niteliğini daha iyi anlayabilmek için yalnızca “nofollow” etiketi ile yetinmeyip iki yeni bağlantı özelliği daha tanıttı: rel="sponsored" ve rel="ugc". Bu etiketler, bir bağlantının neden eklendiğini arama motorlarına daha açık biçimde belirtmek için kullanılır. Böylece hem sıralama algoritmaları daha isabetli çalışır hem de web yöneticileri bağlantıların doğasını daha ayrıntılı biçimde ifade edebilir.
rel="sponsored", reklam, sponsorlu içerik veya ücretli iş birlikleri kapsamında verilen bağlantılar için kullanılır. Örneğin bir markanın başka bir siteye ücret karşılığı içerik yerleştirmesi ya da banner gibi reklam alanlarına bağlantı vermesi durumunda, bu linklerin sponsored etiketiyle işaretlenmesi gerekir.
Diğer yandan rel="ugc", “User Generated Content” yani kullanıcı tarafından oluşturulan içeriklerdeki bağlantılar için geliştirilmiştir. Blog yorumları, forum yazıları veya kullanıcı profilleri gibi alanlarda paylaşılan linkler bu kapsama girer.
Web yöneticileri bu etiketi kullanarak, söz konusu bağlantının editoryal kontrol dışında bir kullanıcı tarafından eklendiğini arama motoruna bildirir. Bu, hem sitenin sorumluluğunu azaltır hem de spam linklerin SEO değerini nötrleştirir. Kimi zaman, ugc etiketi nofollow ile birlikte de kullanılabilir.
Dofollow ve Nofollow Bağlantı Farklarını Neye Göre Oluşturmalıyız?
Bir bağlantının dofollow mu yoksa nofollow mu olması gerektiği, o bağlantının kaynağına, amacına ve güven düzeyine göre belirlenmelidir. Ayrıca, Google yönergeleri gereği reklam, ortaklık (affiliate) veya sponsorluk içerikli bağlantılar mutlaka nofollow veya rel="sponsored" etiketiyle işaretlenmelidir. Aşağıdaki tablo, hangi tür bağlantıların hangi etiketle yapılandırılması gerektiğini özetlemektedir:
0 notes
Text
How to Set Up Google Search Console?
Google Search Console (GSC) is a powerful tool that allows you to analyze your website's performance, enhance your SEO strategies, and monitor how your site appears in Google search results. Following the steps below, you can set up a GSC account, verify your website, and integrate it with your Shopify store to make the most of this tool.
Setting Up and Verifying Your Google Search Console Account
Google Search Console (GSC) is a free tool that helps you monitor your website's SEO performance, track traffic, and increase visibility. With GSC, you can deeply analyze your site’s status, identify issues, and optimize your content for better results. To fully utilize GSC, you first need to create an account and verify your website. Proper setup ensures that Google collects and reports accurate data about your site. Here are the steps to set up your Google Search Console account:
1. Log in to Your Google Account
Go to the Google Search Console homepage and sign in with your Google account. If you don’t have one, you can easily create a free account.
Your Google account serves as the foundation for accessing all Google services. For added security, enable two-factor authentication to protect your account from unauthorized access.
2. Click the "Get Started" Button

Once signed in, click the "Get Started" button on the homepage. This initiates the process of adding your website to the system for data collection.
GSC’s user-friendly interface ensures that even first-time users can navigate the setup process with ease.
3. Enter Your Website URL

You will encounter two options for verification: "Domain" and "URL Prefix". The "URL Prefix" option is more flexible and widely recommended for most users.
Enter your website's full URL (e.g., https://www.example.com) correctly. This step is crucial to ensure accurate data collection and consistent analysis.
4. Choose a Verification Method

Google offers several methods to verify your site, including uploading an HTML file, using an HTML tag, Google Analytics integration, or Google Tag Manager.
For beginners, the HTML Tag method is the quickest and easiest. Select this option to simplify the process.
5. Obtain the Verification Code
After choosing your verification method, Google will provide a meta tag containing a verification code.
Carefully copy this code and keep it ready for use in the next step. The meta tag proves ownership of your website to Google.
6. Verify Your Website
Paste the copied meta tag into the section of your website's source code. Depending on your platform (e.g., WordPress, Wix), you may need access to the HTML editor.
Save your changes and return to Google Search Console. Click the "Verify" button to complete the process. If successful, you can immediately start analyzing your site's performance data.
Linking Your Shopify Store with Google Search Console
If you run a Shopify store, integrating it with Google Search Console can significantly enhance your site’s visibility and performance on Google. GSC helps improve your store's visibility and provides valuable insights for optimizing your product pages for SEO.
1. Log in to the Shopify Admin Panel
Access your Shopify store’s admin panel. This is where you can manage SEO settings, customize themes, and make changes to your store's structure.
From here, you can adjust theme files, add verification codes, and optimize other store features.
2. Log in to Your Google Search Console Account
Sign in to your GSC account or create a new one if necessary. This step allows you to analyze your store’s performance and collect SEO data.
GSC not only shows your store's overall performance but also provides error reports and improvement suggestions.
3. Add Your Website
In GSC, click the option to add a "Web Property". This step registers your Shopify store’s URL with the system.
Please enter your store’s full URL (e.g., https://www.example-store.com) accurately. Incorrect URLs may result in failed verification.
4. Choose HTML Tag Verification
Select the HTML Tag method from the available verification options. Google will provide a meta tag containing the verification code. Copy this code for use in the next step.
5. Add the HTML Tag to Shopify
Follow these steps to add the tag:
Go to "Online Store" > "Themes" > "Actions" > "Edit Code" in your Shopify admin panel.

Open the "theme.liquid" file.

Paste the meta tag into the section of the code. This ensures that Google can verify your store.

6. Save Changes and Verify
Save your changes in Shopify to activate the updates.
Return to Google Search Console and click the "Verify" button. Once verified, you can begin analyzing and optimizing your store's performance.
Data-Driven SEO Management with Google Search Console
Google Search Console is an indispensable tool for improving your website’s visibility in search engines. Following the steps above, you can easily create your GSC account and integrate it with your Shopify store. Proper configuration enables you to monitor your site’s performance, identify issues, and refine your SEO strategy effectively.
Regularly reviewing and utilizing the data provided by GSC ensures continuous improvement in your website’s search rankings and traffic. This integration offers Shopify users a convenient way to boost visibility and drive organic traffic. A well-optimized website, powered by GSC insights, is key to long-term success in e-commerce.
0 notes
Text
Understanding Shopify Hosting: A Comprehensive Guide

Shopify is one of the leading e-commerce platforms available today. It offers businesses of all sizes a simple and effective way to set up and manage their online stores. One of the features that make Shopify unique is its fully hosted solution. This means Shopify takes care of technical details such as hosting, security, and performance for you, allowing business owners to focus on growing their brands.
What Is Shopify Hosting?
Shopify is a fully hosted e-commerce platform, meaning your online store is hosted on Shopify's servers. Unlike self-hosted platforms where you must find your hosting provider, Shopify simplifies the process by including hosting as part of its service. This eliminates concerns about server settings, performance optimization, or uptime while setting up and managing your store.
Key Features of Shopify Hosting
Built-in Hosting: All Shopify plans include hosting, so you don’t need to purchase a separate hosting service.
Unlimited Bandwidth: Shopify offers unlimited bandwidth, ensuring your store operates smoothly during high-traffic periods without extra costs.
Global Content Delivery Network (CDN): With CDN, your website loads quickly for customers, regardless of location.
PCI DSS Level 1 Compliance: Ensures secure payment processing and protects customer data.
Automatic Updates: Shopify's hosting infrastructure is always up-to-date, so your store benefits from the latest features and security enhancements.
Exclusive Benefits for Shopify Plus: Shopify’s enterprise solution, Shopify Plus, offers advanced hosting advantages like dedicated IP addresses and more customization options.
How Does Shopify Handle Domain Names?
When setting up your Shopify store, you’ll need a domain name to make your website accessible to your customers. Shopify offers flexibility when it comes to domain management.
Using an Existing Domain Name
If you already own a domain name, you can connect it to your Shopify store by adjusting your DNS settings. Shopify provides clear instructions for configuring your domain, making the process straightforward and convenient.
Purchasing a Domain Through Shopify
Alternatively, you can purchase a domain directly through Shopify. This option is convenient for those who want an all-in-one solution. When you buy a domain through Shopify, it comes with additional benefits like:
Easy integration with your store.
Unlimited e-mail forwarding (e.g., creating email addresses like [email protected]).
Hassle-free renewals managed directly within your Shopify account.
The Benefits of Shopify Hosting
Shopify Hosting offers numerous advantages for e-commerce businesses, including cost-effectiveness, high performance, reliability, and advanced security measures. Automatic software updates and SEO-friendly infrastructure allow users to focus on business growth, while global CDN support ensures fast loading times, which improves customer experience and boosts conversion rates. Shopify Hosting is a reliable and comprehensive solution that frees businesses from technical complexities.
1. Cost-Effectiveness
Your Shopify subscription includes hosting costs, so you don’t need a separate hosting budget. Additionally, with unlimited bandwidth included in all Shopify plans, you won’t face unexpected costs during high-traffic periods.
2. Performance and Speed
Shopify's hosting infrastructure is optimized for e-commerce performance. With a global CDN, your store’s pages and content load quickly, offering customers a seamless shopping experience. This speed is crucial for reducing bounce rates and increasing conversion rates.
3. Reliability and Uptime
Shopify guarantees 99.99% uptime, ensuring your store is always accessible. This reliability is particularly vital during peak shopping periods like Black Friday and Cyber Monday.
4. Security
Shopify prioritizes security. Its hosting infrastructure is PCI DSS Level 1 compliant, which meets the highest security standards for payment processing. Additionally, Shopify provides SSL certificates for all stores, ensuring encrypted data and a secure browsing experience.
5. SEO and Performance Connection
Shopify’s fast and reliable infrastructure benefits search engine optimization (SEO). Fast-loading pages contribute to higher rankings on Google and deliver a better user experience.
7. Automatic Software Updates
On Shopify, you will be eligible for software updates at no additional costs and they’ll all be handled automatically. This means you’ll have immediate access to every new feature before you even have time to think about it. Recent examples include Apple Pay, multi-currency support, and Augmented Reality.
Handling High Traffic with Shopify
One of Shopify hosting's greatest advantages is its ability to handle high traffic effortlessly. Shopify’s infrastructure supports thousands of concurrent visitors to your store without performance loss.
Real-World Scalability
Shopify stores can handle up to 4,000 transactions per minute, making the platform suitable for both small businesses and large enterprises. Whether running a promotional campaign or experiencing traffic spikes, Shopify ensures your store remains fast and functional.
Automatic Software Updates
Shopify takes care of all software updates for you. This includes updates to the platform, security patches, and new feature rollouts. Automatic updates mean you don’t have to worry about maintaining or upgrading your store’s backend, allowing you to focus on your business instead.
Comparing Shopify Hosting to Other Solutions
Shopify hosting stands out for its fully managed, hassle-free solution, unlike self-hosted platforms such as WooCommerce, where you must handle server maintenance, security, and updates. Shopify eliminates these complexities by bundling hosting, domain management, and security into its platform. While other SaaS platforms like BigCommerce also offer hosting services, Shopify’s seamless integration, superior scalability, and robust performance make it a top choice for e-commerce businesses of all sizes. This ensures reliability and ease of use, allowing store owners to focus on growth instead of technical details.
Self-Hosted Platforms
Self-hosted platforms like WooCommerce require you to find and manage your hosting provider. While this offers greater flexibility, it also means you’re responsible for:
Server setup and maintenance,
Handling security issues,
Managing updates and backups.
In contrast, Shopify’s fully hosted solution eliminates these complexities.
Other SaaS Platforms
Other Software-as-a-Service (SaaS) platforms, like BigCommerce, also offer hosted solutions. However, Shopify’s seamless integration of hosting, domain management, and performance optimization sets it apart as a leader in the e-commerce space.
Data Center and Server Infrastructure
Shopify uses global data centers and robust servers to ensure fast loading times and a reliable user experience. This global infrastructure is a significant advantage for businesses looking to reach international customers.
Why Shopify Hosting Is Worth It
Shopify’s hosting solution is a game-changing service for e-commerce businesses. By managing technical aspects like hosting, security, and performance, Shopify allows business owners to focus on growing their brands. Whether you’re a small entrepreneur or an established enterprise, Shopify’s reliable and scalable hosting infrastructure makes it an excellent choice for your online store.
If you’re looking for a hassle-free e-commerce platform, Shopify is worth considering. With its powerful features, global performance, and unmatched reliability, Shopify enables businesses to thrive in the online retail world.
0 notes
Text
How to Set Up a Clone Site for International Sales on Shopify?

In the world of e-commerce, Shopify is one of the leading platforms for businesses looking to sell internationally. However, for brands that do not wish to sell globally, certain customizations in Shopify’s setup and the use of a clone site approach may be necessary.
What is a Clone Site?
A clone site is a version of an existing e-commerce site with the same structure but customized to suit a different market, language, and/or currency. A clone site typically involves copying the original Shopify store theme to the new store created for a specific region, followed by region-specific theme modifications and Shopify settings adjustments.
Setting up a clone site on Shopify is usually done to address specific needs, with currency management being one of the main reasons. For an e-commerce store built on Shopify serving global customers, allowing users to shop in their local currency is crucial for optimizing conversion rates.
This approach enhances user experience and increases customer trust in the brand. However, Shopify Payments does not support multi-currency payments for stores using third-party payment gateways. In such cases, creating a separate clone store for each region becomes the most reliable and seamless solution.
The process of creating a clone store is not only a technical task but also requires strategic planning. Currency differences impact more than just payment transactions; they also affect pricing and localized content. Therefore, the process should be handled carefully and professionally. To avoid errors, ensure customer satisfaction, and minimize technical issues, it is advisable to have Shopify experts manage this operation, ensuring successful global market operations.
Shopify Payments and International Sales
Shopify offers its own payment system, Shopify Payments. However, Shopify Payments is not available in all countries. You can check Shopify’s website to see the countries where Shopify Payments is supported. For countries where Shopify Payments is not available, alternative payment systems such as PayPal, Stripe, and other regionally available providers can be used.
Currency and User Experience Issues
For stores that cannot use Shopify Payments, third-party apps can display prices in the desired currency using real-time exchange rates. However, at checkout, the price reverts to the store’s primary currency. For example, if the primary currency of your store is USD, customers may see product prices in EUR based on the current exchange rate, but when they proceed to checkout, they will only see and pay in USD.
This inconsistency can negatively impact user experience, leading to confusion and mistrust. To resolve this issue and provide a seamless experience, separate clone sites can be created for different regions. For example, your main store could operate in USD, while clone sites could use EUR for European customers and GBP for UK customers.
Advantages of Setting Up a Clone Site
Setting up a clone site provides several benefits, including:
Enhanced User Experience: A site tailored to each region allows users to shop with higher conversion rates.
Currency-Compatible Infrastructure: Displaying prices in the local currency builds trust, and separate pricing strategies can be implemented for each site without real-time conversion.
SEO-Optimized Structure: Each clone site can have a distinct SEO strategy, making it more comprehensible for search engines and increasing visibility.
Higher Conversion Rates: Customers are more likely to complete purchases when prices remain consistent in their currency from browsing to checkout.
Single Theme Utilization: Cloning an existing theme minimizes development needs, reducing costs significantly compared to creating a new site from scratch.
How Does the Clone Site Setup Process Work?
Creating a New Store on Shopify
Before proceeding, remember that setting up a clone store for different regions requires both technical expertise and strategic planning. It is recommended to seek expert assistance. Shopify requires a separate store for each clone site. Follow these steps to set up a clone site:
Create a New Store: Open a new Shopify store specific to your target market.
Set Language and Currency: Configure the store’s language and currency according to the target market.
Adjust Tax and Shipping Settings: Customize tax and shipping policies to align with the regulations of the target country.
Design and Content Transfer
Design: Clone the original store’s theme and adjust colors and language settings for the target market.
Content Translation: Translate product descriptions, page content, and blog articles into the target language. Professional translation services are recommended.
SEO Configuration with Hreflang Tags
Hreflang tags inform Google that your site is available in different languages and regions, which is crucial for international SEO performance. Implementation includes:
Using Shopify apps or custom code for hreflang tag integration.
Accurately assigning country and language codes (e.g., en-us, en-gb).
Ensuring that hreflang definitions are correctly applied to all clone sites.
Key Considerations When Setting Up a Clone Site
Choose the Right Payment System: Select a payment provider that supports the target audience.
Ensure Currency Compatibility: Implement settings to prevent currency-related issues.
Develop a Unique SEO Strategy: Tailor SEO plans for each clone site.
Seek Professional Assistance: Working with experienced Shopify agencies can help prevent potential issues.
Recommended Shopify Apps for Clone Site Setup
The Shopify App Store offers several solutions for clone site management. Some recommendations include:
Location Detection and Redirection
Geolizr: Displays the store in different languages or currencies based on user IP and redirects visitors accordingly.
GeoIP Redirect: Automatically redirects users to the appropriate store based on location.
EasyLocation - Geo Redirects: Provides an easy-to-use interface for location-based redirection and notifications.
Stock Synchronization
Stock Sync: Synchronizes inventory levels across multiple sites.
Multistore Sync: Automatically syncs stock across all stores, enabling seamless inventory management.
Content and Translation Tools
Langify: A tool for translating content into different languages.
Weglot: An SEO-friendly translation app that automatically generates hreflang tags.
SEO Tools
SEO Manager: Helps optimize keywords and manage hreflang tags.
GWA: Hreflang Manager: Identifies technical SEO issues and provides solutions for multi-store hreflang implementation.
Common Issues and Solutions
Stock and ERP Integration Managing stock integration between different sites can be challenging due to ERP system inconsistencies. Solutions include:
API Integration: Use Shopify APIs to synchronize inventory data.
Manual Checks: Monitor stock levels manually during critical periods.
Hreflang and SEO Mistakes
For websites that offer international sales and services in multiple languages, hreflang configuration is one of the most critical aspects. When a cloned site enters the equation, this issue becomes even more complex and significant. To understand the root of the problem, let’s first take a brief look at how the hreflang structure works.
The hreflang tag informs search engines about the country and language a webpage is intended for. It is also a piece of code that specifies the existence of other language or regional versions of a page and provides their links.
Manually added hreflang tags on cloned sites work with the following logic:
link rel="alternate" href="{{ canonical_url | replace: shop.domain, example.com }}" hreflang="en-us" link rel="alternate" href="{{ canonical_url | replace: shop.domain, example.de }}" hreflang="de-de"
This snippet automatically generates hreflang tags based on the current page. For instance, on a dress collection page, it might produce the following output:
link rel="alternate" href="https://example.com/collections/dress" hreflang="en-us" link rel="alternate" href="https://example.de/collections/dress" hreflang="de-de"
At this point, a critical error may arise. Notice that the hreflang link for the international site still includes “/dress.” However, in the cloned site with German as the primary language, the correct equivalent should be “/kleid.” If the hreflang link does not point to an existing page, it can lead to SEO issues.
To manage this correctly, structuring Shopify clone stores properly and using necessary plugins if needed is essential. Therefore, when dealing with cloned sites, collaborating with an experienced Shopify agency specializing in international SEO, such as Byte, can be the safest choice.
User Experience Challenges
When cloned sites operate under different domains (or subdomains) with varying languages and designs, managing the user experience effectively becomes crucial. Each region and even each country has distinct e-commerce habits, meaning that simply cloning a design may not always be sufficient. Customizing the site based on language and regional preferences significantly enhances the user experience.
For languages like Arabic, which follow an RTL (right-to-left) script, direct design cloning is entirely inadequate. Major design changes must be implemented to ensure usability and accessibility, making customization essential for success.
Key Factors for Cloned Sites
To measure and optimize the performance of a cloned site, consider the following critical metrics:
Traffic and Visitor Behavior
Analyze organic and paid traffic sources in the target market.
Track the time visitors spend on the site and bounce rates.
Determine whether visitors arrive from the main site, external referrals, or direct searches.
Conversion Rate
Compare conversion rates across different language versions of the site.
Identify and fix payment process issues affecting conversions.
Sales and Revenue
Analyze which markets generate the highest sales.
Measure the average order value (AOV) and repeat purchase rates.
Customer Satisfaction
Review customer feedback and support requests.
Ensure customers are directed to the correct version of the site.
Offer transactions in the local currency to enhance user trust.
Implement improvements based on feedback from the target market.
Advantages and Disadvantages of Cloned Sites
Cloned sites provide significant opportunities for businesses but also come with certain challenges. By offering a localized experience, they help build customer trust and improve visibility in target markets through better SEO. Additionally, businesses can implement region-specific pricing strategies to cater to different purchasing behaviors. All these factors contribute to stronger customer loyalty and higher sales.
For businesses looking to expand internationally through Shopify, setting up a cloned site brings numerous benefits. However, the technical complexities of this process should not be overlooked. By working with Byte, you can achieve solutions that enhance both user experience and sales. While managing a cloned site might seem complex, expert support ensures a smooth and efficient process.
1 note
·
View note