
Don't wanna be here? Send us removal request.
Statistics
We looked inside some of the posts by caitsmeissner and here's what we found interesting.
Average Info
Notes Per Post
2
Likes Per Post
2
Reblog Per Post
0
Reply Per Post
0
Time Between Posts
21 hours
Number of Posts By Type
Text
9
Last Seen Tumblr Blogs


Fun Fact
In 2020, Tumblr had 29.4 million users in the US.
Text

A comforting and creamy tomato potato soup cooked to perfection in a pressure cooker. The combination of tomatoes, potatoes, and aromatic herbs makes it a delightful and easy-to-prepare meal.
Ingredients: 4 cups diced potatoes. 1 can 28 oz crushed tomatoes. 1 cup diced onions. 1 cup diced carrots. 3 cloves garlic, minced. 4 cups vegetable broth. 1 teaspoon dried basil. 1 teaspoon dried oregano. 1/2 teaspoon dried thyme. Salt and pepper to taste. 1 cup heavy cream. 1/4 cup all-purpose flour. 2 tablespoons butter. Fresh parsley for garnish.
Instructions: Set the pressure cooker on medium heat and melt the butter. Put in garlic, onions, and carrots. Saut until the meat is soft. Put flour on top of the vegetables and stir them all the time for two minutes. Add the vegetable broth and stir it in so that there are no lumps. Place potatoes, tomato chunks, basil, oregano, thyme, salt, and pepper in a bowl. Ten minutes of high pressure cooking. The lid should be closed. Let go of the pressure, open the lid, and add the heavy cream. Simmer for five more minutes, or until everything is hot. If you need to, change the seasoning. Serve hot with fresh parsley on top.
Tracey M
0 notes
Text

This Butter Leaf, Sprout, Carrot, and Pomegranate Salad with Turmeric Vinaigrette is a colorful and healthy salad that is full of flavor and good for you. It's satisfying and tasty to eat fresh butter leaf lettuce with crunchy sprouts, sweet carrots, and juicy pomegranate seeds. The Turmeric Vinaigrette makes the whole dish taste better by adding a zesty and fragrant twist. This salad is great as a side dish or as a light meal by itself.
Ingredients: 1 head of butter leaf lettuce, torn into bite-sized pieces. 1 cup sprouts e.g., broccoli or alfalfa sprouts. 2 medium carrots, julienned or grated. 1/2 cup pomegranate seeds.
Instructions: In a large salad bowl, combine the torn butter leaf lettuce, sprouts, julienned carrots, and pomegranate seeds. For the Turmeric Vinaigrette: Ingredients: - 1/4 cup olive oil - 2 tablespoons apple cider vinegar - 1 teaspoon honey or maple syrup - 1/2 teaspoon ground turmeric - Salt and pepper to taste Instructions: In a small bowl, whisk together the olive oil, apple cider vinegar, honey or maple syrup, ground turmeric, salt, and pepper until well combined. Drizzle the Turmeric Vinaigrette over the salad ingredients in the large salad bowl. Gently toss the salad to ensure all ingredients are coated with the vinaigrette. Serve immediately, garnished with extra pomegranate seeds if desired.
Jada C
0 notes
Text

Indulge in the creamy goodness of homemade vanilla bean ice cream. Its rich flavor and velvety texture will make your Ice Cream Social an instant hit!
Ingredients: 2 cups heavy cream. 1 cup whole milk. 3/4 cup granulated sugar. 1 vanilla bean, split and scraped. Pinch of salt.
Instructions: Heavy cream, whole milk, sugar, vanilla bean seeds, and salt should all be mixed together in a saucepan. Stir the mixture all the time while heating it over medium-low heat until the sugar melts and it gets warm. Leave it alone until it's cool enough to touch. Put the mixture into an ice cream maker and churn it according to the machine's directions until it gets thicker. Once the ice cream is smooth, put it in a container that can go in the freezer. Freeze it for at least 4 hours or overnight, until it is firm.
Trent
0 notes
Text

With each sip of this perfectly balanced espresso, you can feel the beauty of a sunrise. The Strietman ES3 makes sure that the extraction is smooth and full, bringing out the unique flavors of your favorite coffee beans.
Ingredients: 18 grams of freshly roasted and finely ground coffee beans. Filtered water.
Instructions: Preheat your Strietman ES3 espresso maker. Insert the portafilter and weigh out 18 grams of coffee grounds. Distribute the coffee grounds evenly in the portafilter and tamp with consistent pressure. Place your espresso cup or glasses under the group head and start the extraction process. Extract a double shot of espresso about 2 ounces or 60 ml over 25-30 seconds. Enjoy your Sunrise Espresso!
Lucas Middleton
1 note
·
View note
Text
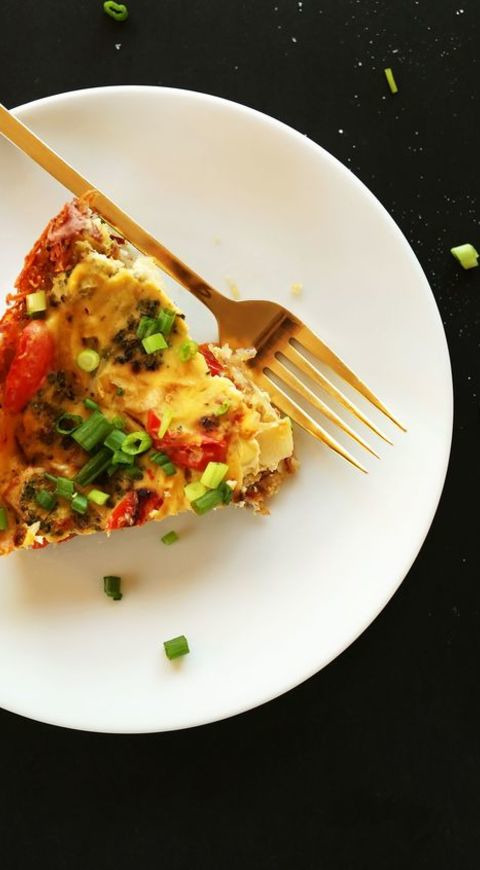
This tofu quiche is a delicious and satisfying plant-based alternative to traditional quiche. With a flavorful filling of crumbled tofu and mixed roasted vegetables, all nestled in a crispy hash brown crust, it's sure to impress vegans and non-vegans alike! Perfect for brunch, lunch, or dinner.
Ingredients: 1 package firm tofu, drained and crumbled. 1 cup shredded hash browns, thawed. 1 cup mixed roasted vegetables such as bell peppers, onions, and mushrooms. 1/2 cup nutritional yeast. 1/4 cup unsweetened almond milk. 2 tablespoons olive oil. 2 tablespoons all-purpose flour. 1 teaspoon garlic powder. 1/2 teaspoon turmeric. Salt and pepper to taste.
Instructions: Preheat the oven to 375F 190C. In a bowl, mix together the shredded hash browns and 1 tablespoon of olive oil. Press the mixture into the bottom of a greased pie dish to form the crust. Bake the crust for 10 minutes, then remove from the oven and set aside. In a skillet, heat the remaining tablespoon of olive oil over medium heat. Add the crumbled tofu and cook for 5 minutes. Add the roasted vegetables to the skillet and cook for an additional 2 minutes. In a small bowl, whisk together the almond milk, nutritional yeast, flour, garlic powder, turmeric, salt, and pepper. Pour the almond milk mixture over the tofu and vegetables in the skillet. Stir to combine and cook for another 2 minutes, until the mixture thickens slightly. Pour the tofu and vegetable mixture into the prepared hash brown crust. Bake the quiche for 25-30 minutes, or until set and lightly golden on top. Let the quiche cool for a few minutes before slicing and serving. Enjoy your AMAZING 10-Ingredient Tofu Quiche with Roasted Veggies and Hash Brown Crust!
Sofia
0 notes
Text

With this Cauliflower Cheesy Bread recipe, you can enjoy the sweet taste of cheesy bread without feeling guilty. This low-carb cheesy bread is made with grated cauliflower, eggs, and a mix of cheeses. It's full of flavor and great for satisfying your cravings. It's simple to make and tastes great when dipped in marinara sauce. You can eat it as a snack, starter, or side dish!
Ingredients: 1 medium cauliflower head, grated. 2 eggs. 1 cup shredded mozzarella cheese. 1/4 cup grated Parmesan cheese. 1 teaspoon Italian seasoning. 1/2 teaspoon garlic powder. Salt and pepper to taste. Marinara sauce for dipping optional.
Instructions: Preheat your oven to 400F 200C and line a baking sheet with parchment paper. Place the grated cauliflower in a microwave-safe bowl and microwave on high for 5-6 minutes, or until tender. Allow the cauliflower to cool slightly, then transfer it to a clean kitchen towel or cheesecloth. Squeeze out as much moisture as possible. In a large mixing bowl, combine the squeezed cauliflower, eggs, mozzarella cheese, Parmesan cheese, Italian seasoning, garlic powder, salt, and pepper. Mix until well combined. Transfer the cauliflower mixture to the prepared baking sheet and spread it out into a thin, even layer, forming a rectangular shape. Bake in the preheated oven for 20-25 minutes, or until the edges are golden brown and the bread is set. Remove from the oven and let it cool for a few minutes before slicing into squares or breadsticks. Serve the Cauliflower Cheesy Bread warm with marinara sauce for dipping, if desired. Enjoy this delicious low-carb alternative to traditional cheesy bread!
Roy E
0 notes
Text

Experience the magic of Ravenclaw with this enchanting blueberry-infused coffee, perfect for sipping while you delve into your latest intellectual pursuits. The hint of blueberry syrup adds a touch of sweetness, and the layered look represents the complexity of Ravenclaw house.
Ingredients: 1 cup of freshly brewed coffee. 2 tablespoons of blueberry syrup. 1/4 cup of frothed milk. 1/2 teaspoon of vanilla extract. A pinch of edible glitter optional. Whipped cream optional.
Instructions: Make yourself a fresh cup of your favorite coffee. In a different bowl, heat the frothed milk until it's hot but not boiling. While the coffee is still hot, add the vanilla extract and blueberry syrup and mix them in. Carefully pour the frothed milk into the coffee mixture to make it look like it's layered. For a magical touch, you can sprinkle a little edible glitter on top if you want to. If you want to go all out, you can top it with whipped cream. Let your Ravenclaw Brew sit in your Harry Potter Ravenclaw Mug while you enjoy it.
Ava Bryan
0 notes
Text

These Apricot Salsa Quesadillas Tacos are a tasty and sweet take on regular quesadillas. The apricot salsa adds a fruity and sour taste that goes well with the soft chicken and melted cheddar cheese. They are easy to make and everyone in the family will enjoy them.
Ingredients: 4 large flour tortillas. 1 cup shredded cheddar cheese. 1 cup cooked chicken, shredded. 1/2 cup apricot salsa. 1/4 cup sour cream. 1/4 cup chopped fresh cilantro. 1 tablespoon olive oil.
Instructions: Place a large skillet over medium heat and add the olive oil. Lay one tortilla flat in the skillet and sprinkle with 1/4 cup of shredded cheddar cheese. Add 1/4 cup of shredded chicken on top of the cheese. Drizzle 2 tablespoons of apricot salsa over the chicken. Sprinkle with 1 tablespoon of chopped cilantro. Place a second tortilla on top and press down gently. Cook for 2-3 minutes on each side or until the tortilla is crispy and the cheese is melted. Remove from the skillet and repeat the process with the remaining tortillas and ingredients. Slice the quesadillas into wedges and serve with a dollop of sour cream and extra apricot salsa on the side. Enjoy your delicious Apricot Salsa Quesadillas Tacos!
Kendra Dolan
0 notes
Text

Enjoy the delightful combination of fresh strawberries and kiwi in this homemade jam. Spread it on toast, use it as a topping for desserts, or give it as a thoughtful homemade gift.
Ingredients: 2 cups fresh strawberries, hulled and chopped. 1 cup kiwi, peeled and diced. 3 cups granulated sugar. 1/4 cup lemon juice. 1 packet fruit pectin. 1/4 teaspoon butter optional, to reduce foaming.
Zane DyerInstructions: Sterilize your canning jars and lids by boiling them in a large pot of water for 10 minutes. Remove and let them air dry. In a large, heavy-bottomed saucepan, combine the chopped strawberries, diced kiwi, and lemon juice. Mash the fruit mixture slightly with a potato masher or the back of a fork to release some juices. Sprinkle the fruit pectin over the fruit mixture and stir it in until well combined. Place the saucepan over medium-high heat and bring the fruit mixture to a boil, stirring constantly. Once it reaches a rolling boil, add the granulated sugar all at once, stirring vigorously to dissolve the sugar. If using, add the optional butter to reduce foaming. Return the mixture to a boil and cook for 1-2 minutes, or until the jam thickens and passes the gel test. To test for doneness, place a small amount of jam on a cold plate, and if it gels and wrinkles when you push it with your finger, it's ready. Remove the saucepan from the heat and skim off any foam that may have formed on the surface. Ladle the hot jam into the sterilized canning jars, leaving about 1/4-inch headspace at the top. Wipe the jar rims clean with a damp cloth to ensure a proper seal. Place the sterilized lids on the jars and screw on the metal bands until they are fingertip-tight. Process the filled jars in a boiling water bath for 10-15 minutes to seal them properly. Make sure the jars are fully submerged in boiling water during this process. Carefully remove the jars from the water bath and let them cool on a clean towel or cooling rack. You should hear the lids pop as they seal. Once the jars have cooled completely, check the seals by pressing down on the center of each lid. If it doesn't pop back, the jar is sealed. If it does, refrigerate that jar and use it within a few weeks. Label your sealed jars with the date and store them in a cool, dark place for up to a year.
1 note
·
View note