
Beginner maker, I post my processes and tutorials here
Don't wanna be here? Send us removal request.
Statistics
We looked inside some of the posts by camerasuits and here's what we found interesting.
Average Info
Notes Per Post
217
Likes Per Post
145
Reblog Per Post
71
Reply Per Post
1
Time Between Posts
3 months
Number of Posts By Type
Text
4
Last Seen Tumblr Blogs


Fun Fact
The Tumblr office adopted Tommy, an 11-year-old Pomeranian.
Text
Okay so adding onto this sometimes I have to play with voxel remeshing as the shapes overlap when I try to make the inner eye area! Something to keep in mind.
Fursuit Eye blanks in Nomad Sculpt (with pictures)
-
I saw very limited resources for making eye blanks on Nomad Sculpt so I thought it would be worth it to post here!!
DISCLAIMER: I am very new to the program! I would highly recommend playing around with the program! In addition I don’t have an exact way to measure dimensions, this is very much a loose process. I will update this once I 3d print the actual file, stay tuned!
The Eye Wall
This will be the section that fits nice and snug into the actual suit eye holes. It’s often the part with the most depth. I would highly recommending importing a reference image so the final eye looks how you desire!!
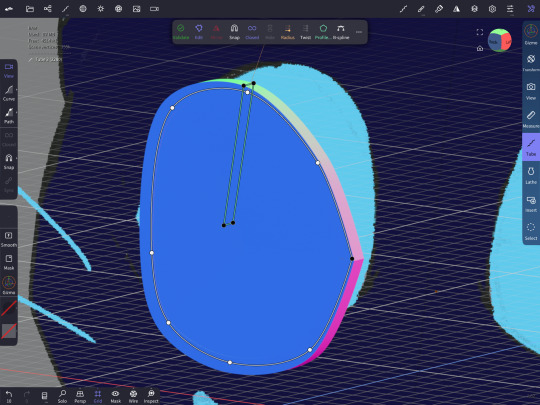
Step 1: Creating the shape
Press the “tube” button on the right side of the screen. From here press the “path” button on the left side of the screen, and if it isn’t activated press the “closed” symbol. From here tap on the point you actually want to start at. You should have a small white dot on your screen now (this is on the top of my character’s eye reference).
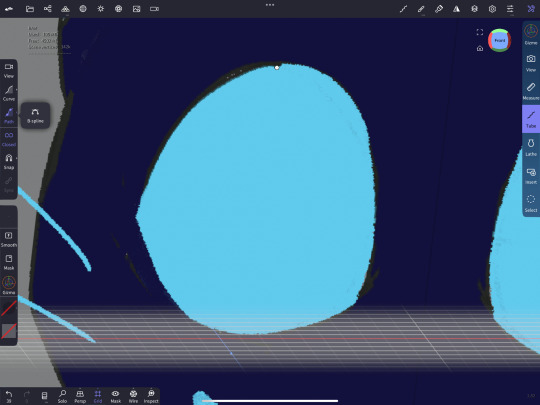
From there press and drag the circle, this should create two circles, one red and one blue when you select it. From here you have to go into the middle of your line and drag another point out of the line. It’s a closed shape so it acts a little funky.

Make the rough shape of your eye. If you want a sharp point (like the side of an eye), you can tap any of your white dots twice to make it uncurved (this will make the white dot black)!

BEFORE YOU FINALIZE make sure you are facing the front (or whatever side you prefer), if your angle is off your eye will be at an angle!! Once you are happy with the shape press the green button, this will make the actual tube.

You should now have a round tube roughly in the shape of your desired eye shape.
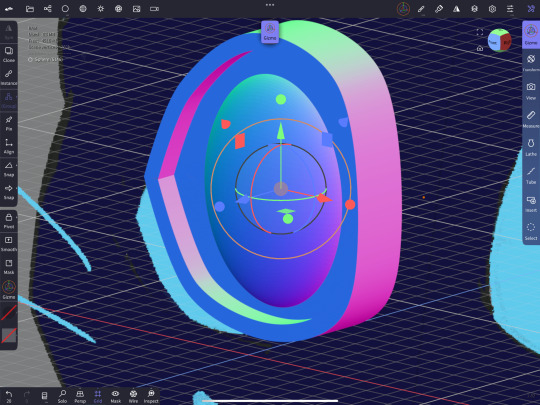
Step 2: editing the shape
It’s a round tube right now, which isn’t ideal for an eye blank! Therefor we will do some editing.
Press “profile”. Here I kept the default settings, which gave me 4 sides! The setting should look like they do below.
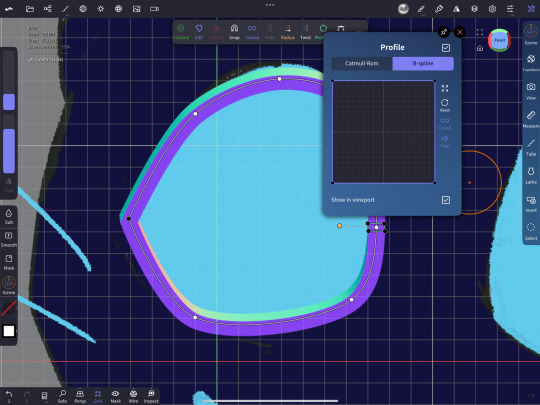
Lastly. DONT validate the shape (you will need to access it later) and use the gizmo tool to work around with the depth of the eye (by pressing and dragging the red circle)
The Inner Eye and Pupil hole
This is the area that will house the hole for the iris and pupil (I will be referring to it as a pupil for simplicity)!
Step 1: Duplicate the layer
Clone the layer your eye wall is on!
Step 2: Editing to fill the hole
This part is a little tricky. There should be four black dots where you can adjust the length the sides go to. Go on the side of the shape where you see all four of those shapes clearly (with the inner most black dots visible). Make sure you are on the side exactly! Or else the shape could have an angle.

Next you will drag the inner-most black circles to roughly the middle of the eye on the outer edges (you are ONLY dragging down, with dragging to the side as little as possible!!). This will fill in the whole eye if it reaches that halfway point or more!
If you look to the side of your shape, the whole area should be filled in, if not edit the lines slightly to better fit!
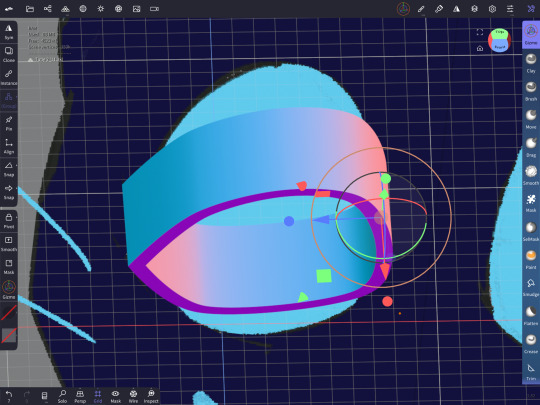
Step 3: Editing your new shape
Next up we will use our trusty Gizmo tool again. Decrease the depth to your liking and move the shape to either side of your eye blank, be careful to make sure it fits in properly and lines up with the wall!
Step 4: The pupil
For this tutorial I will use a simple oval pupil. Add a circle OR make another tube shape and close the hole (following steps one and two). The circle will leave a slight curve due to the shape, so if you want a flat or unique hole for the pupil, edit accordingly.
For ease I’m using a circle I modified. I added the circle in and moved and edited the shape until it was something I liked (using the gizmo tool)
Next you will negatively subtract space using that shape. Do this by unselecting the shape for your pupil and selecting the inner eye space. Then press “bolean merge”, then the “boolean” button. This will carve out the area creating a blank space (the blue background of the pupil is from my reference image)!

And that’s it!! If you try this out let me know what you think and how it worked!!
17 notes
·
View notes
Text
Fursuit Eye blanks in Nomad Sculpt (with pictures)
-
I saw very limited resources for making eye blanks on Nomad Sculpt so I thought it would be worth it to post here!!
DISCLAIMER: I am very new to the program! I would highly recommend playing around with the program! In addition I don’t have an exact way to measure dimensions, this is very much a loose process. I will update this once I 3d print the actual file, stay tuned!
The Eye Wall
This will be the section that fits nice and snug into the actual suit eye holes. It’s often the part with the most depth. I would highly recommending importing a reference image so the final eye looks how you desire!!
Step 1: Creating the shape
Press the “tube” button on the right side of the screen. From here press the “path” button on the left side of the screen, and if it isn’t activated press the “closed” symbol. From here tap on the point you actually want to start at. You should have a small white dot on your screen now (this is on the top of my character’s eye reference).
From there press and drag the circle, this should create two circles, one red and one blue when you select it. From here you have to go into the middle of your line and drag another point out of the line. It’s a closed shape so it acts a little funky.
Make the rough shape of your eye. If you want a sharp point (like the side of an eye), you can tap any of your white dots twice to make it uncurved (this will make the white dot black)!
BEFORE YOU FINALIZE make sure you are facing the front (or whatever side you prefer), if your angle is off your eye will be at an angle!! Once you are happy with the shape press the green button, this will make the actual tube.
You should now have a round tube roughly in the shape of your desired eye shape.
Step 2: editing the shape
It’s a round tube right now, which isn’t ideal for an eye blank! Therefor we will do some editing.
Press “profile”. Here I kept the default settings, which gave me 4 sides! The setting should look like they do below.
Lastly. DONT validate the shape (you will need to access it later) and use the gizmo tool to work around with the depth of the eye (by pressing and dragging the red circle)
The Inner Eye and Pupil hole
This is the area that will house the hole for the iris and pupil (I will be referring to it as a pupil for simplicity)!
Step 1: Duplicate the layer
Clone the layer your eye wall is on!
Step 2: Editing to fill the hole
This part is a little tricky. There should be four black dots where you can adjust the length the sides go to. Go on the side of the shape where you see all four of those shapes clearly (with the inner most black dots visible). Make sure you are on the side exactly! Or else the shape could have an angle.
Next you will drag the inner-most black circles to roughly the middle of the eye on the outer edges (you are ONLY dragging down, with dragging to the side as little as possible!!). This will fill in the whole eye if it reaches that halfway point or more!
If you look to the side of your shape, the whole area should be filled in, if not edit the lines slightly to better fit!
Step 3: Editing your new shape
Next up we will use our trusty Gizmo tool again. Decrease the depth to your liking and move the shape to either side of your eye blank, be careful to make sure it fits in properly and lines up with the wall!
Step 4: The pupil
For this tutorial I will use a simple oval pupil. Add a circle OR make another tube shape and close the hole (following steps one and two). The circle will leave a slight curve due to the shape, so if you want a flat or unique hole for the pupil, edit accordingly.
For ease I’m using a circle I modified. I added the circle in and moved and edited the shape until it was something I liked (using the gizmo tool)
Next you will negatively subtract space using that shape. Do this by unselecting the shape for your pupil and selecting the inner eye space. Then press “bolean merge”, then the “boolean” button. This will carve out the area creating a blank space (the blue background of the pupil is from my reference image)!
And that’s it!! If you try this out let me know what you think and how it worked!!
17 notes
·
View notes
Text
How I do my Bucket heads!!
Hello! This is how I do my bucketheads and after a lot of trail and error this is my favorite method!
—-
Materials needed:
- foam: I use 1.5 inch from Walmart for this specific project
- scissors
- flexible measuring tool
- hot glue gun and hot glue sticks
- sharpie or other marking tool
-optional clips: I used sewing clips to clamp foam while the hot glue cooled down
———
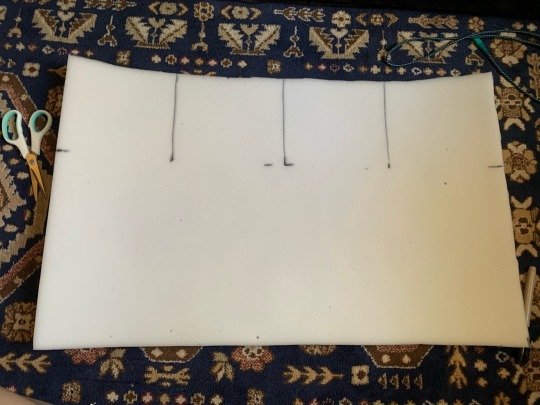
Step 1: cutting out the foam
I measure my head for this step, and I roughly got a 65cm circumference for my head and a 25cm height. For the height I added on extra to make it 40cm so I can cut the triangles to close off the top in the future.
Next I divided the 65 cm by 4 to mark my future triangles. I used all the area above the 25cm mark to add these lines. I then cut these lines after.
—
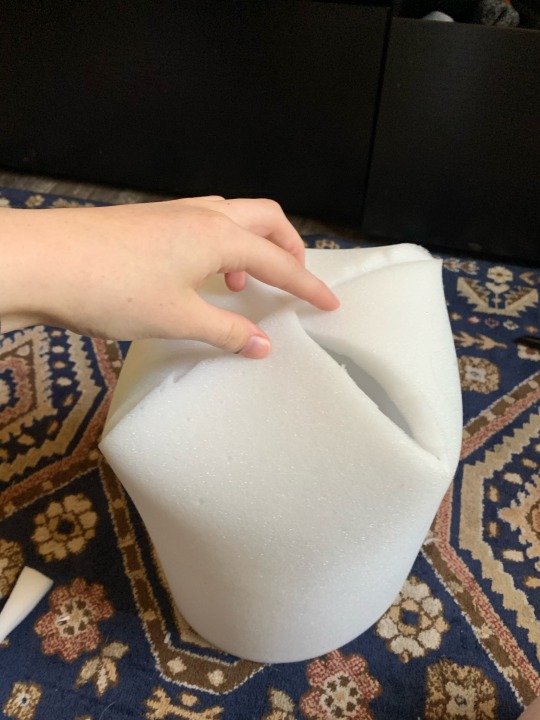
Step 2: Glueing the Tube
Here I glued to make a tube shape (this is where the head will fit inside). I did not glue the areas I marked off for the triangles, which is any of the space above the 25 cm mark.

—
Step 3: Cutting out the Triangles
Next up I cut the pieces dedicated for triangles into actual triangles! This results in the head having this kind of crown shape.

—
Step 4: Modifying and Glueing the triangles
I wanted all the triangle pieces to converge in the middle so I trimmed accordingly. From there I glued all of them in.
—
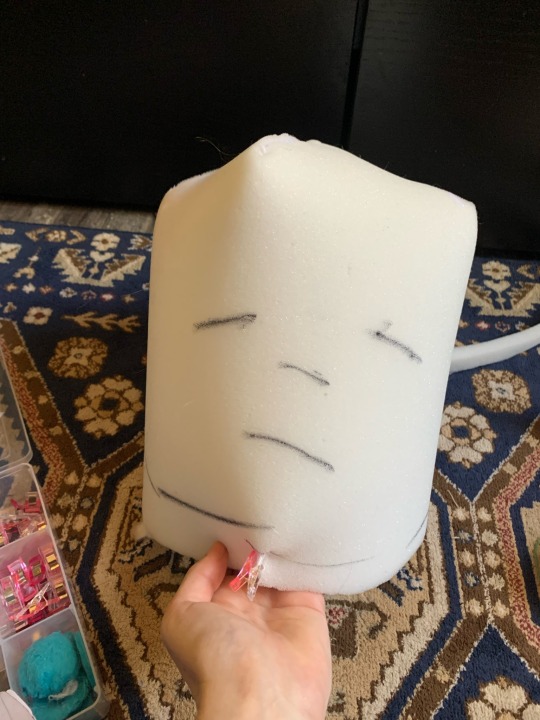
Step 5: marking area for the eyes and trimming to better fit my head
I slipped the buckethead on once the glue had dried and marked my facial features accordingly (nose, eyes, and mouth). I also added a dart below the facial features to better fit on my face.
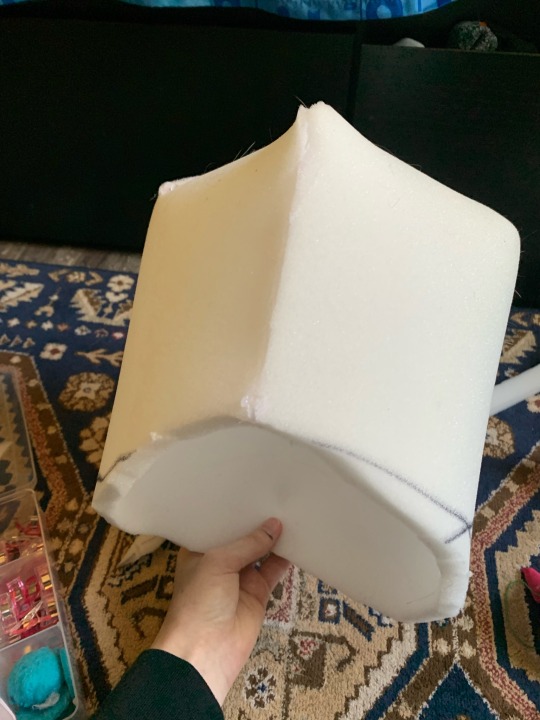
From then I trimmed the bottom of the head itself, in the way shown below. This makes it so I can look up with maximum mobility. (The back of the head is shown in the picture below)
—
Step 6: cutting out the facial features
Using the guides I made from step 4 (and some extra ones I drew in later on) I created a rough area that would allow for me to see and breath.
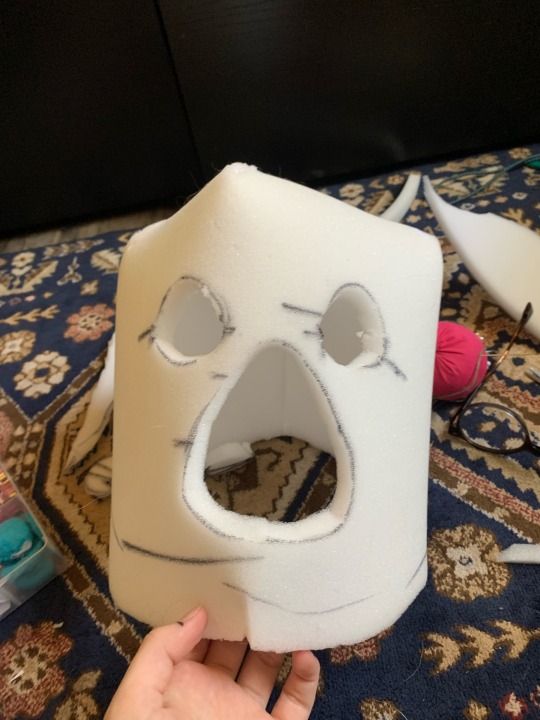
-
And the bucket head is finished!! This is a very rough tutorial and my first ever one, so I hope it makes sense! Thankyou for viewing :)
9 notes
·
View notes
Text
THIS
Die inside every time I remember Prey 2017 was so phenomenal of a game but did poorly commercially and therefore will not get the sequel it set up for and DESERVES
174 notes
·
View notes