
My name is Dustin Cantos and I'm an animator and illustrator living in South Florida. I currently work as a concept artist with Gridway Digital, creating characters for an upcoming 3D animated series. My hobbies include playing video games, reading and watching movies.
Don't wanna be here? Send us removal request.
Statistics
We looked inside some of the posts by canofsketch and here's what we found interesting.
Average Info
Notes Per Post
686K
Likes Per Post
391K
Reblog Per Post
294K
Reply Per Post
195
Time Between Posts
6 months
Number of Posts By Type
Video
1
Text
2
Photo
12
Note
1
Link
1
Last Seen Tumblr Blogs


Fun Fact
Tumblr has 16.74 million mobile monthly users in the US.
Video
vimeo
Bernays-Video-Final-Edit-Lynnette-Cantos.mp4 from Dustin Cantos on Vimeo.
2 notes
·
View notes
Text
10 inspiring and helpful YouTube channels for digital artists
People are asking us how the art we share can be so good.
The answer this time isn’t so simple. An artist has his own way on shaping his style, he takes his time to experiment and so it becomes quite difficult for others to try learning his art style and making it their own. It’s even wrong.
But we can tell you that many artists learn by getting inspired by others’ art. Watching an artist while he paints can be motivating - and of course it can teach you a few technical tricks.
So, here there are ten YouTube channels you should check out.

1. FZD School of design
It’s a school founded by Feng Zhu, amazing concept artist with a lot of experience in video games, films and commercials. His videos are real episodes/lessons and they are very helpful. And, well, they even have a school in Singapore…

2. China digital painting
This channel doesn’t feature tutorials but shares full video processes by Chinese artist. In this period we are seeing many young artists inspired by an art style that’s typically Chinese - it features dramatic lighting and mood. Though such a technique can be found in other artists like Bouguereau and Rembrandt.

3. Ctrl + Paint
A channel dedicated to the digital painting in Photoshop. Very helpful for those beginners who want to learn how to use this software and how to get better with art in general.

4. Level Up!
One of the most known groups of digital art of Facebook can be found on YouTube as well. The founders are Wojtek Fus and Darek Zabrocki. Each session (episode) features a different digital artist. This is great because you can compare the different painting processes. The main theme of this channel is concept art and fantasy/sci-fi illustrations.

5. JJ canvas
This is the channel of Jorge Jacinto. He uploads speedpaintings, but they are very inspiring if you want to look at how a wonderful surreal landscape can be created in twenty minutes - in time-lapse of course.

6. Webang111
Another channel with time-lapse videos. Very inspiring if you are into colorful and cartoony illustrations.

7. Ross Draws
His art is wonderful and his videos are super funny! Check out his channel if you want to see how a fantasy illustration can be created from a simple idea - I mean, he starts with two rough lines to close the video with a breathtaking illustration. Crazy.

8. The Portrait Art
Okay, we know. This channel is not about digital art. But it’s amazing art anyway and if you are into realistic portraits, you can get inspired by watching these videos.

9. Cubebrush
Another channel with time-lapse videos, but a few are commented. The videos are about 2D and 3D paintings.

10. Noah Bradley
This artist is a master in the concept field and he doesn’t only talk about his digital method but about his career as well, giving lots of hints on how to become a better artist and how to enter in the art industry.
We hope this post helps you. Good luck!
70K notes
·
View notes
Photo


A long ass beginner level tutorial for all of you comic folks who want to start using sketchup for your backgrounds but don’t know how to get started.
http://www.genkigirl.com/finesometimesrain/?p=771
69K notes
·
View notes
Text
Setting up Clip Studio Paint / Manga Studio 5
I’ve been using Clip Studio Paint (aka Manga Studio 5) for the last 2 years and I really cannot recommend it enough. It has the smoothness and blending of SAI, a really good brush system and some of Photoshop’s capabilities without the heaviness of the software. I mean, what more could you want?
Unfortunately I feel like the UI deters some people from using it (including my friends…). I can see why and I have to admit the default layout looks a little overwhelming in the beginning. On the bright side, CSP is incredibly flexible with its settings and there are many ways to adapt it to suit what you’re accustomed to. In my case, I wanted something more similar to SAI to make the software transition smoother (old habits die hard I guess).
* There’s a note at the end of this post with a download link to my layout and hotkey settings, plus instructions on how to enable it.
I hope this helps people who feel somewhat lost when they open the program for the first time ><
First things first: Close everything you don’t want and drag panels around. Re-arrange everything however you want, even down to tool order. Actually, most of this post may come off as common sense, but I think it still helps to have a rough idea of what exactly you can do with CSP if you find yourself just not getting into it at all.
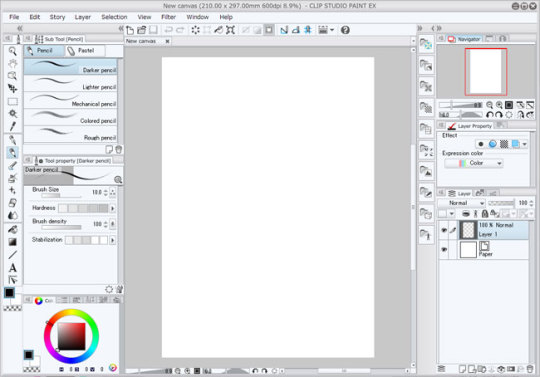
This is the default:
My current layout:
After that, there are four areas of settings you need to check on, under File:

Preferences
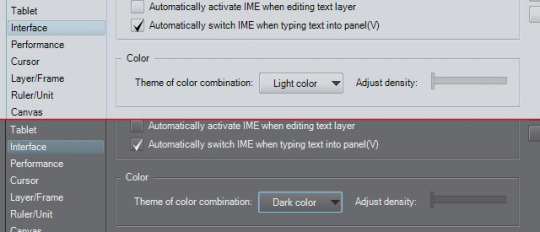
From the Preferences you can edit a lot of options regarding to how the software functions. From a UI and general ease-of-use standpoint, these are the key points you might want to look at: ► Interface tab: You can change the UI to have a light or dark colour using a slider, from a really light gray to really dark gray (almost black, similar to Photoshop CS6 default)
► Cursor tab: You can change what the cursor looks like when selecting certain tools. ► Layer/Frame tab: You can change the naming convention for when you duplicate a layer, and you can also set layer folders to [Through] layer mode as a default, instead of [Normal] layer mode. ► Ruler/Unit tab: For changing the guide lines for when you set rulers, also setting the default units you want to use (px or mm) ► Canvas tab: Under ‘Scale’ and ‘Angle’ you can set the zoom and rotate levels the zoom and rotate buttons snap to.
Shortcut Settings
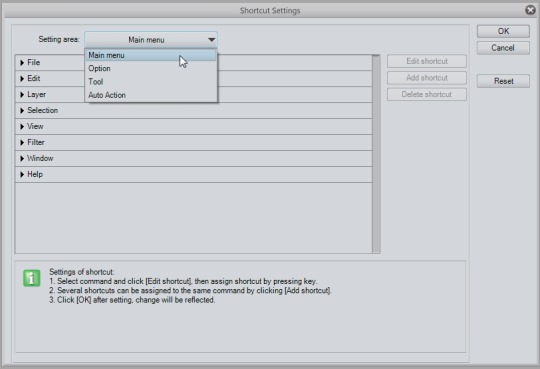
This is pretty self-explanatory and if you’ve modified Photoshop hotkeys, the window might look familiar. If you use hotkeys heavily like me, I recommend you look through it thorougly since some hotkeys might be different from what you’re used to or don’t have a hotkey set to it at all. You can set hotkeys to anything on the main menu, various general options (like increasing/decreasing brush size and main>sub colour switching), specific tools (even custom brushes) and auto actions. Settings I recommend checking, mostly because these are what I personally care about:
Main Menu: Edit > Clear Edit > Fill Edit > Convert brightness to opacity (converts degrees of white to degrees of transparency, useful for things like lineart) Edit > Transform Layer > Duplicate layer Layer > Merge with layer below / Combine selected layer (these two are different, and unlike in PS where Ctrl+E works for both, it is separate for CSP) Layer > Combine copies of displayed layer (Merges all visible layers into a separate layer, aka PS’s monster shortcut of Ctrl+Alt+Shift+E) Selection > Select All Selection > Deselect Selection > Invert selected area View > Rotate > Flip Horizontal (mirroring)
Option: Drawing color > Switch main color and sub color Drawing color > Switch to transparent color … Or any of the different combinations they have, depending on what you want. Unlike PS and SAI, CSP has a third colour option available, which is ‘transparent’, so you can ‘paint’ using transparency, which functions pretty much like the eraser without needing to change tools.
Modifier Key Settings
This is a pretty important part to stop by because it affects how you use your tools. Basically, for each tool, you can set what happens when you hold Ctrl, Shift, Alt, Spacebar or use the mouse wheel. With Photoshop and SAI, you may be used to normally having the colour picker / eyedropper when you hold Alt, and moving the layer’s contents when you hold Ctrl. Some of CSP’s default values of these shortcut keys are different, and I recommend getting a feel for the tools you use and changing these settings as you go.
To change a brush to eyedropper while holding Alt: ► Select ‘Settings for each process of tool’, and under ‘Sub Tool’ select which specific tool you want. ► Under the ‘Alt’ dropdown, select ‘Change tool temporarily’, then click the Settings button. Select ‘Eyedropper’ and click OK. (You don’t have to go all the way down the list of settings, unless you want to refine it to a more specific function)
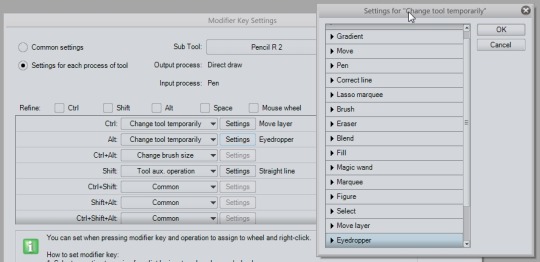
To change to move layer while holding Ctrl: ► Do the same except under ‘Ctrl’, select ’ Change tool temporarily’ to ‘Move layer’.
Other settings from the drop down: ► For Shift, you can go to ‘Tool aux. operation’ on the dropdown, and check the 'Straight line’ box to make straight lines that connect clicks when you hold Shift.
There are more so please look at the list carefully if you find yourself needing something regarding those key holds.
Command Bar Settings
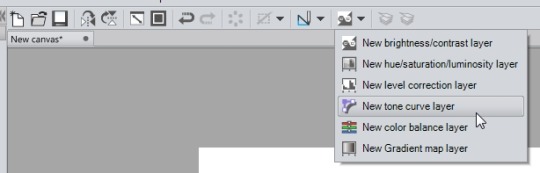
The command bar is the strip at the top with all the icons, just above the canvas tab. Basically you can put a bunch of shortcuts there of anything in the main menu. It’s really up to you. For mine, I keep the View > Rotate > Flip Horizontal icon on there so I can tell if my canvas is mirrored (because sometimes I forget the canvas is flipped and only realise when I’ve saved and looked at the pic). I also put the icons of all the correction layers I use the most, and the Layer > Combine selected layers icon since my Ctrl+E is already taken up by Merge with layer below.
Additional general notes on navigating and setting up CSP:
► I recommend checking out everything under the Window menu, you might find a really handy panel that isn’t normally open, or you can even disable the Command Bar if you want. I like to keep the Information tab somewhere on the side so I can see if I’ll start lagging any time soon because of big files (lol).

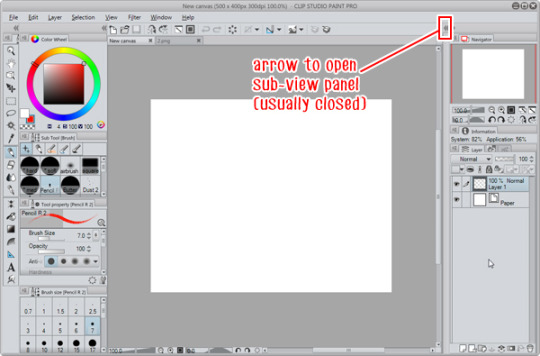
► The Sub View panel is also really useful that it works as a box to place reference images in. You can open an entire folder there and scroll through using the arrows. You can set it so that every time you hover over the panel, the eyedropper is automatically on (handy!)
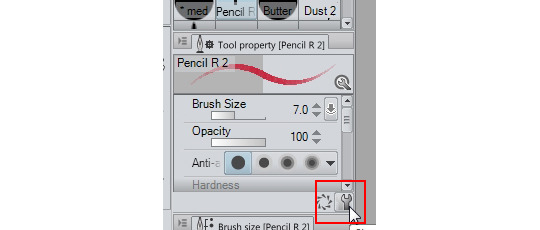
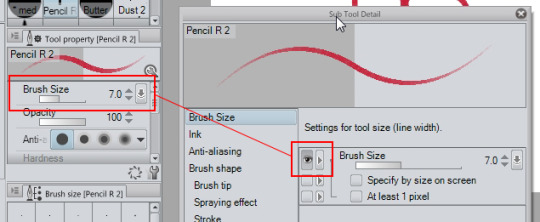
► Brush settings are accessible through this little wrench here at the bottom right corner of the tool property panel.
► Speaking of brushes, you can select which options are visible in the tool property panel by enabling the eye button.
► Each panel has this menu button. You’ll find even more display options there such as enabling/disabling panel-specific icon bars, changing the size of brush tiles, etc.

____________________________
TL;DR: Anyways, if you are too lazy to do this all yourself, you can just download my workspace file and open it yourself. Everything I’ve written about here (shortcuts, modifier keys, etc.) I’ve set to suit habits I’ve formed from using PS and SAI over the years. If you are in the same situation then I hope this will come in handy as a base for your own settings!
Personal hotkey list that’s included in the file (that I can remember): A = Brightness to opacity D = Clear layer F = Fill Ctrl+J = Duplicate Layer Ctrl+K = Flip layer/selection horizontally (as in the Transform command, and not mirror) Ctrl+U = Hue/Saturation Ctrl+L = Levels Ctrl+Shift+I = Invert selection Ctrl+I = Invert colours Ctrl+E = Merge to layer below Ctrl+Alt+Shift+E = Merge all visible layers to a separate layer Ctrl+T = Transform Z = Main > Sub colour switch Shift+Z = Switch to transparent colour X = Mirror canvas 1,2,3,4,5,6,7,8,9,0 = Change brush opacity in 10% increments End = Resets Rotate and Mirror
Things like Ctrl+Z / X / C / V / A / D / W / O / S etc. remain the same as normal in other programs. Ctrl+Y is Redo.
Download link: SAI…ish
Instructions: Put the file in your Documents \ CELSYS_EN \ CLIPStudioPaintVer1_1_0 \ Workspace Folder. Then open CSP and go to Window > Workspace and select “SAI…ish”. Click OK to importing the settings. Hopefully that should work! (If nothing changes, you can try Workspace > Reset “SAI…ish” and click Yes)
* Make sure the file is named workspace_2.spws * If that clashes with another workspace in your files, you can just change the 2 to any number
14K notes
·
View notes
Note
[pm] excuse me but did you work on skullgirls?
Yes I did, I was a clean-up animator on several of the SG characters.
0 notes
Photo

Idea for a comic: A hard-boiled detective loking for a killer in the 1930′s.
4 notes
·
View notes
Photo

Oh man, I haven’t uploaded anything in a looong time!
Have some Steven
41 notes
·
View notes


Photo


Some comic homework :p Based on an old DC comic pitch apparently.
3 notes
·
View notes

Photo

Here's a Steven Universe pic I never finished.
Tried to incorporate all the baddies from the show and focus on Steven.
27 notes
·
View notes
Link
My fiance and I have been building a website for the past 3-4 months now, and it’s a site that we believe will be very useful for young aspiring artists and professional artists alike.
It functions like a freelance job website, but its target...
836 notes
·
View notes


Photo

20 notes
·
View notes
Photo

ever wanted to do some stuff? like, different stuff? tired of having to scroll through your huge ref tag? LOOK NO FURTHER!! Have a masterpost of LITERALLY EVERYTHING which took me 5 hours to make so reblog it
Art:
Painting tutorial
Female/male arms
Kneeling + Sitting ref
Dragon head view tutorial
SAI brushes 86786
Drawing expressions
Sai Brushes 1
NGE colour palette 1
100+ colour palletes
Avoiding same face
Face contours/highlighting
free art MyPaint
Body anatomy help 1
How to shift images using blur in PS
Drawing clothe folding
How to draw ice
Colour palette 1
Colour palette 2
SAI brush settings 2
SAI/PS pixel brushes
Warm/Cool gray
Flower crown tutorial
Skin colour palette
Pink colour sheet
How to draw butts&thighs
The male torso
Drawing glowing stuff in SAI
Drawing horse/animal legs on humans
Drawing clouds
Muscular male with bow stock photos
Pastel colours
Drawing grass fields in SAI
Expressions&Legs
All about the human body
20+ colour palettes
Colour conversion
Kissing ref
Creature design
Colour meanings
Creating expression
Tutorial masterpost (100+)
Lineart
Canine
How to colour
Pose studies
Feline comparisons
How to draw penis
Leaf pressing
100+ anatomy references
How to draw folds
SAI brushes 3
Sitting poses
Colour palette 4
Cloud painting
How to draw 3D rooms
Colour info
Colouring ref
Hair tutorial
Clothing ref
Bodies and poses
SAI brushes 5
Colour scheme designer
Folding ref
Heads&Angles
Paint tool SAI masterpost
Drawing ref masterpost (10+)
Hair+Fur
How to draw faces
SAI brushes 4
Anatomy of mutant humans
What should I draw?
Free art software
pastel colour ref
Mass art ref
Soft SAI brushes
ways to draw stuff
SAI brush settings
baseball cap ref
Penis ref
Drawing human wings
Cool free art software
Huge art ref
Colour blender
2 SAI brushes
Photoshop for free
Writing:
Inspiration 1
Instead of ‘whispered’
Music for writing fight scenes
Writing fantasy
Emotions vocab sheet
How to reveal character
Writers block resource
Writing a death scene
BIO help
Music to help you write
Writing prompt generators
Got writers block?
How to torture a character
Degrees of emotion
ULTIMATE writing ref, 500+
Character names
Body language
25 days of fic
HOW TO DRAW ANYTHING
Writing people of colour
nanowrimo start kit
character flaws
General:
Becoming an adult masterpost
cute OTP things
Resource masterpost
For bored people
Anime + Manga recs
how to make a blanket nest
Getting an apartment
what should i read next?
If you’re bored
Delete tourists from photos
Cute pet nicknames
Family tree explained
Pulling an all nighter
masterpost of themes/pixels/emoticons
List of demon names
Demons & Deities in the bible
Moss graffiti
Types of attraction
Trampoline = outside bed
College textbooks
God masterpost
Creepypasta
OTP necklaces
Super silky summer legs
Plastic keychains
How to write cover letters
make music on itunes sound great
Documentarys
Classic lit
Makeup:
Black/gold ref 1
Cosplay eye makeup
Halloween eye gore makeup (tw eye gore)
Rotting skin halloween makeup
Eyeliner ref
bloody halloween nails
Gender:
Getting gender-neutral pronouns on facebook
Backgrounds:
Pokemon mystery dungeons iphone
Ghosty backgrounds
Themes/pixel/backgrounds
Clothing:
1000+ everything clothing ref
Awesome jackets
Cheer up/Be happy
If you’re having a bad night
Movies to watch when you’re down
Confidence
Sowing:
8ft giant squid pattern
Food:
Cheeseburger cupcakes
Deep-dish cookie for one
Exercise:
Burning stomach fat
Games:
PokéRadar guide
Play pokémon games online
Pkmn Shiny hunting guide
Animal crossing new leaf face/hair guide
Free RPG games
Mental health:
Talking about your mental health
460K notes
·
View notes
Photo
AAAAH. This totally goes with my own headcanon. 10/10 <3


it’s been a rough few years.
55K notes
·
View notes