Text
Final Project
youtube
Here's the final video! It's been a very exciting experience and I'm quite proud of how the final has turned out. A lot of the processes and programs were very new so being able to get a good result at the end of the pipeline is very gratifying.
0 notes
Text
Week 8 - Final Project Planning
This week we began planning for our final project as well as continued testing in The Void. This workshop was mainly a way for us to brainstorm and plan for what we wanted our final project to be.
The class decided to split amongst ourselves as we had a few ideas kicking around, throughout the semester. Early in the year, we made a few joke suggestions about creating a Minecraft parody with the mocap suits. This was due to the fact that it wouldn't require a facial performance and it also sounded pretty funny if we were able to pilot a Minecraft character and record some memes. We thought it would be good to incorporate some NDisplay as well to show our skills. This led to my suggestion that we do a parody to "Take on Me" by A-Ha due to the fact the music video had a sequence in which a 2D character becomes real, I thought we would be able to replicate this idea with the NDisplay and mocap.
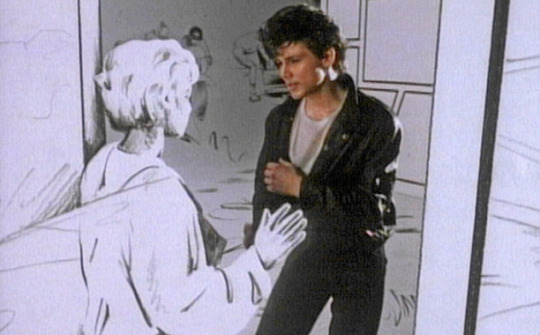
With the initial idea settled we began assigning and volunteering for roles that best suited our knowledge and skills. I volunteered to be the director while Jorji, who suggested the Minecraft parody first, became the producer. We also created a potential asset list of all the things we'd need to create/source for the Unreal scene and mocap.

After the group brainstorming session, we went back to The Void and did more project testing. Now it was definitive that both the groups were using some form of NDisplay and mocap characters we decided to launch a similar scene to the scene in Week 4, alongside the robot models from Week 1.
youtube
Aside from the regular marking, we were introduced to some fingerless markers that allowed for more articulation in the finger joints. A lot of the time, the finger and hand movements do not translate well due to how minuscule and tiny they are. Therefore, the addition of more markers on the knuckles of the fingers gives Shogun more tracking data for more accurate interpolation.
youtube
We wanted to test the realism of having a mocap and an NDisplay actor interact, so much of the set was overhauled to recreate the same lighting as the environment. It was also interesting to see the camera being used at the same time as the mocap actors, meaning they could only be performing behind the camera. Shogun even allows you to section off what area needs to be tracked and recorded, so the set-up would enable the mocap actors to perform without interfering with the NDisplay.
youtube
We had to play a lot with scale in the scene because obviously, we can't change the size of real people, but we needed them to be in line with the size of the character models and the environment. We discovered that our NDisplay actor was too tall in comparison to the scene so he ended up kneeling in the shot in order to be of the correct scale.

This week was just before the break so I was excited that we had a set goal and a means by which to achieve it. The refreshment on NDisplay and mocap was very insightful for the planning and timing of what needs to be done in the following weeks. I have a lot of anticipation (and some fear) about how the project is going to go because this kind of production is something I've never done before. So I am optimistic in the following weeks of how its going to turn out!
Sources
a-ha - Take On Me (Official Video) [Remastered in 4K] - https://www.youtube.com/watch?v=djV11Xbc914&ab_channel=a-ha
0 notes
Text
Week 7 - Faceware Analyser and Retargetting in Maya
This week we weren't in The Void, we were in the computer labs in order to utilise the Faceware Analyser and learn retargetting in Maya. We took the footage from last week and imported it into the Faceware Analyser software.
Here in the software, we were tasked with keyframing the largest points of difference so the software is able to track the movements in-between these frames. There is a full facial track mode but Jason suggested doing the elements of the face individually for a more accurate tracking. This was divided into the eyebrows, the eyes and the mouth. This is where the marks were significant because it corresponds to the points in the program. You essentially just line the points up with the dots for several keyframes.
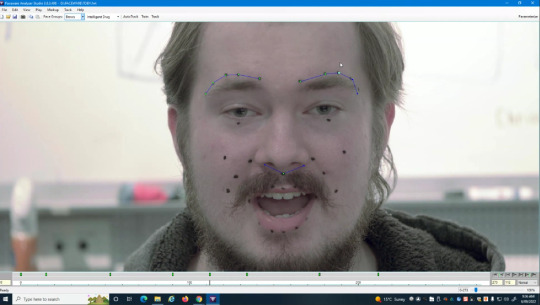

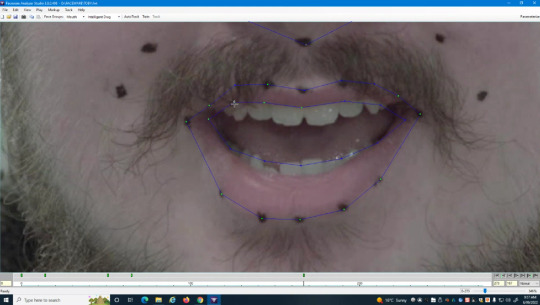

The trick is to not create too many keyframes as it can cause the track to become very rigid and jerky. After the keyframes are created the program can then autotrack from those keyframes. This is then exported to Maya where we can see the Metahuman facial and body rigs. Unfortunately, this we where we ran into a lot of problems! For Natalie's rig the Metahuman's model imported strangely, it seemed like the arms and legs were attached to a different body type than the torso so theyimported in as collapsed shapes.


This was really strange but it didn't conflict with the facial rig, which was the main focus. However, attempting to use the facial rig did not work. The rig didn't seems connected to the model, so moving the eyes and the mouth was not possible. This was an issue across all the models, so we ended up having to troubleshoot in The Void. It became evident that transfering the files from the computer in The Void to the computer lab caused an error in the file directory which caused the rig to break. We were unable to get the facial rigs to work in the end.

This week was essentially a lot of troubleshooting, the Faceware Analyser keyframes were quite simple and intuitive once it was finished but the issues came about with the Metahumans. It involved a lot of problem-solving as we contemplated what could have happened to the models during the file transfers. This was still a good learning experience as using this kind of tech involves a lot of trial and error and problem-solving.
Sources
Applying Metahuman face rig to any arbitrary face in Autodesk Maya - https://www.youtube.com/watch?v=qpIAgFAGfuU&ab_channel=AYAMExpert
0 notes
Text
Week 6 - Metahumans Part 2: Student Models
This week's workshop was split up into two different sessions. The first session was essentially set up for next week, where we would be using Faceware Analyser software to mocap an actor's recorded performance. We needed to mark the actor's face with dots so we could match it in the software.

When everyone was marked up we then recorded performances for mocap, later. Since we already had Metahumans for four of the students, we marked up those same four students so we could mocap their performance onto their Metahuman.


This recording required them to make clear and exaggerated movements so that it was easier to see the change in the facial expressions of the models. We also made sure to keep any fringes/floppy hair out of the frame of the face so it would be easier to see in Faceware Analyser.
The second session was a continuation of our workshop in Week 3 with the same Metahumans. We had only managed to get two working in the previous workshop so the aim of this week was to get Kalie and Toby into the same scene as Natalie and Callum. We followed the same process in Week 3, with exporting the mesh from Unreal into the desktop application of Metahumans, and then customising them to look more life-like.

It was very fun to see all four of the Metahumans on screen with their real-life counterparts. The uncanny valley was in full effect when they all stood together!

With the models finally ready for driving, all that was left was to get into suits and create a background for the characters to stand in. While the actors were getting into the suits, a few of the students took it upon themselves to build a warehouse/subway set for the Metahumans to act in.


This was probably the quickest we got the suits on and calibrated which resulted in some issues. Callum could not find gloves with his suit, which meant his fingers didn't exactly work and the model was somehow rigged with a twisted arm (due to the improper wrist and hand markers). The others all seemed to have normal tracking, but it just goes to show that the placement of the markers is actually really important. If markers are improperly placed or the suit is too loose it can actually break how the model is moving, and I think that can be seen in the final render (haha).
youtube
This week had a lot of moving elements with the set-up for next week as well as the continuation of a previous project. However, it was good to see the final culmination of a previous project! It was so fun to see all four of the models standing and moving together even if they were a bit wonky.
Sources
Applying Makeup for use with Faceware Analyzer - https://www.youtube.com/watch?v=xUC5W0yDMpU&ab_channel=Faceware
0 notes
Text
Week 5 - Project Testing
This week was focused on project testing for our final project. Jason and Cam basically asked us to test our knowledge of everything we had learnt so far by setting up our own scene and getting people into suits and into Vicon on our own. It was a little teaser as to what we would need to do if we wanted to pursue an avenue with motion-capturing several actors. I was lucky enough to be one of the actors this week so it was super fun to be one of the people in the suits and see your own movement translated in real-time to a 3D character!

At this point, the process of setting up the mocap is quite routine.
Set up Vicon with the wand and markers
Get the actors marked up and make sure their suits are calibrated
Go into MoBu and retarget the joints to the model
Launch in Unreal with animation blueprints connecting the live links to the characters
A lot of the characters we use are not our own so more often than not we get a few conflicting meshes that we don't encounter until the character's been retargeted. The characters we were using this week had weapons connected to the hands of the model and it resulted in a lot of floating weapons in the scene. We ended up just turning off all the meshes of the weapons so they wouldn't show up in the recordings.


We also spent some time marking up some props to interact with, in the scene. It was a similar process to suit calibration, where we need to assign clusters to certain actors. By marking up the props and then naming them in Shogun, the live link can then be connected to props in the Unreal scene. We ran into a few problems in Unreal such as props losing connection or breaking entirely (the door was particularly troublesome). But in the end, we managed to get them all working in conjunction to film some takes in Sequencer.
Sequencer is Unreal's in-house recording software which allows users to record camera movement, character animation and mocap. The amazing thing about Sequencer is that after the movement is recorded, the cameras and location can still be changed! For this shoot, we also managed to mark the camera in the scene which allowed us to control the camera in the scene on set.


After the initial project testing, a few others stayed behind to do more project testing with NDisplay and mocap. Similar to last week, it was an attempt to bridge real-life action with the mocap performance.
Being able to set up The Void by ourselves was super helpful for understanding the processes at hand. By being more hands-on with the software I was much more aware of how the experience works. I believe this will come in very handy when we need to pitch and record our own project.
0 notes
Text
Week 4 - NDisplay
This week we were introduced to the concept of NDisplay. NDisplay is a way to render an Unreal scene across multiple synchronised display devices. The main way NDisplay is used is for filming live action against a 3D background. Similar to the virtual production of The Mandalorian, the real-life actor is filmed against the digital screen which has a live 3D environment.
Flinders obviously doesn't have the money of a million-dollar production but a similar effect can be created in The Void with the giant monitor. The camera in The Void can be marked and tracked in Viacon and Unreal.


The effect it creates is quite uncanny as the background will create a sort of parallax that looks real to the camera. It's as if the camera and actor are in fact in the 3D world.


Jason and Cam had already filmed a video utilising this technique and the advantage of this is that it's super simple to use when it's set up properly. It also allows for the incorporation of real-life props in the scene to make the illusion more effective.

NDisplay works with the camera projecting onto a plane in Unreal. The plane is placed equidistant from the marked-up camera to the real-life screen in The Void. Therefore when the camera is moving, the viewing frustum is moving along the plane. This is what creates the illusion of a real background because the image on the plane is moving with the camera.


After the initial demonstration, we were tasked with setting up an NDisplay of our own, utilising a sci-fi scene (a Helpmann Academy asset). We actually needed to remove a lot of elements from the scene as it was a fully rendered game environment with independent animation and effects. These extra animations were causing the scene to run very slowly and attempting to launch NDisplay would take a while to load. While setting up the Unreal scene we also placed lights around the set to make the lighting more synonymous with the scene location.
Here's the final output we managed to create! With all the lights in the scene and the scene launched into Unreal, the illusion is quite effective. This workshop has provided a ton of inspiration for the final project as it means there are endless possibilities of what world/location we could set out production in, as long as we have an Unreal scene of it.
0 notes
Text
Week 3 - Metahumans
This week was all about Metahumans and Faceware. The aim of the workshop was to create a Metahuman that looked like one of us so that we'd be able to control the movement and facial expressions in Unreal. To do this we utilised the Faceware hardware which would record an actor's performance and translate it onto a character rig. This would allow us to motion capture the speech and facial expressions of an actor separate from whoever was performing the body movement.


Here is the Faceware software which records the performance and shows the movement on the character rig. These sliders on the side actually allow drivers to push how sensitive the rig is. So if the eyebrows aren't as expressive as need be, the slider can either exaggerate or tone down the performance from the actor.

To create a mesh object of the head we used an app called PolyCam. The app requires you to take multiple photos of the head in a panoramic view which the software then used to recreate the face and head into a 3D mesh. The accuracy of the mesh relied heavily on the kinds of photos taken, so photos that showed a wider array of detail created a higher fidelity model. We did this several times with four of the students so we could get the four Metahumans that could then be driven by us in the mocap suits.
With the final meshes created in PolyCam they could then be imported to Unreal Engine where the mesh could be altered and programmed. This required a neutral facial expression as it would then track and solve for a facial mesh. The final would then be sent to Metahumans, who would produce a model in turn.


This is where we ran into a few problems with the meshes. First Natalie's mesh, unfortunately, recorded an unneutral face which caused her mesh's eyes and mouth to skew to the left. We also did not account for the hair of each person, resulting in wildly different head shapes! From Callum's curly hair adding large bumps to the mesh or Kalie's hair obscuring her neck which caused the mesh to have large gaps on her shoulders.

This required a lot of fixing when the models were then imported to Metahumans. Since a lot of the mesh had large and small bumps, we used the software of Metahumans that aligned the mesh more with the programmed default models in Metahumans than the mesh data provided by Unreal. This smoothed the rough areas and aligned the models more with the actual faces of the students.

With the facial models imported, all that was left was to dress and customise the models with hair and makeup to look like their real-life counterparts. Afterwards, the models were rigged in Motion Builder (MoBo) which allowed them to be controlled by an actor. Here is a look at the models that were fully rigged with facial expressions as well.
youtube
This was another super interesting week in The Void. I was intrigued that technology has gotten to a point where creating a 3D model of yourself does not require a full VFX artist team to make sure the fidelity is correct. This takes a lot of the work out of creating models as the software has built-in elements that allow for that customization. Despite the problems we ran into it was a relatively fast process that in one day we were able to get models created and have them moving in motion capture.
0 notes
Text
Week 2 - Sally Coleman Music Video Shoot
This week was a little different than what was scheduled, as Sally Coleman was in The Void this week for continued support for her own project of her completely virtual band Big Sand!
youtube
(this is the first music vid haha) This meant that we were sort of split up as a workshop as a lot of problem-solving was involved in helping Sally as well as more work with the mocap suits.

Here is a much more full and detailed diagram of how the Vicon system interfaces with the computers. Now with the addition of Unreal Engine into the pipeline, it's much more clear how the mocap suits take live movement and translate it into live animation. By taking the tracking information from Vicon, the model rig is retargeted in Motion Builder which pairs the tracking markers to the 'bones' of the model. This is finally input into Unreal which will show the movement in real-time actors puppeteering the models.

Here is an image of the Unreal scene from Sally's music video. CDW Studios was kind enough to actually give the file to Sally so she's able to interact and pose her own character in the scene in her own time. The files are organised but 'dressed to camera' so it's not rendered in its entirety as a 3D scene, but it is still usable for filming. We have also gained access to the files so that we could experiment with the fully rendered environment if we so choose so.

We also got to do some facial motion capture! This was filmed in a separate software called Faceware which is much simpler than Vicon, (facial recognition software is scary) but has similar controls to a rigged face. So the sensitivity of the facial movements can be exaggerated to better fine-tune them to a specific model.

Here is both Unreal and Faceware open at the same time to see what the live performance looks like in Unreal with the actual model. It's good to have both programs open to see how changing the calibration of the Faceware software affects the animation on the model. This way it can be changed to better suit the performance in the suit as well as on the model.
At the end of the workshop, we managed to watch and aid in the filming of a few takes of Sally's new music video. This was the first time that all the programs and components were working together and in sync, ready for recording.
It was really helpful to see the software and technology in a commercial setting as it frames a lot of the work we do in perspective. The idea of using this kind of technology is to lessen the workload and burden for the post-production team. So it's interesting to see the production where a lot of the 3D and VFX are already finished and live.
0 notes
Text
Week 1 - Introduction and Overview of the Void
This was the first workshop in the topic, so it was mainly a way for our instructors to explain The Void and the processes in which the Motion Capture system works. This was not my first experience in The Void, but it was the first time the experience was much more informative and detailed than in other workshops. Essentially, we began to learn how to set up the area for our own use later in the topic for the major project.
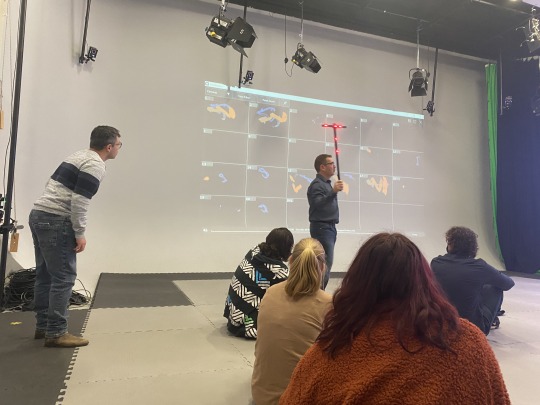
For my own benefit I've written down the process from what I remember on how to set up the Vicon system:
Let the cameras warm up (the cameras need to all have the same environment for the system to track properly)
Connect the cameras in the Vicon system
Turn the masking feature on in order to mask out the infrared lights from the other cameras
Calibrate the cameras by using the wand to 'paint' the cameras (see. image above with Jason)
Set the world origin and rotation by placing the wand in the middle of the space
Set the floor of the world by adding tracking markers in a rectangle/square
I think at this point the systems would be ready to use to begin calibrating the mocap suits which should have the markers placed on them.
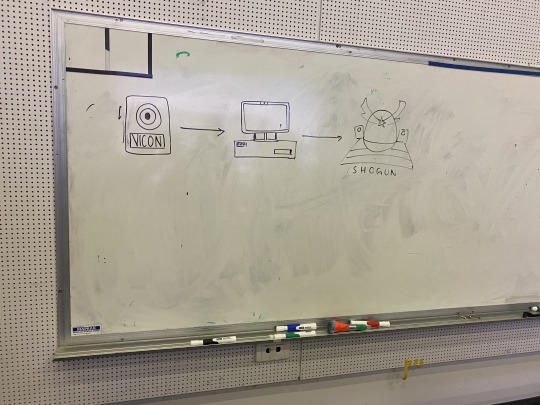
Here was the diagram that was drawn to explain how the motion capture actually works. Beginning with the tracking data from the Vicon camera to then gets input into the computer and using the program Shogun it allows the movement to be recreated within 3D space as well as recorded. It was super interesting to see how the two interact as I had never seen the actual software before, and it felt like the suits that just 'magically' recreated the movement.
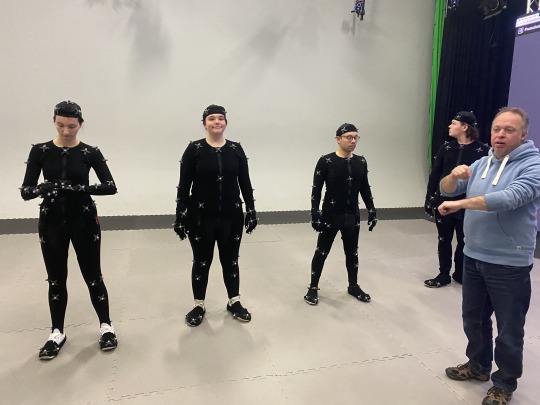
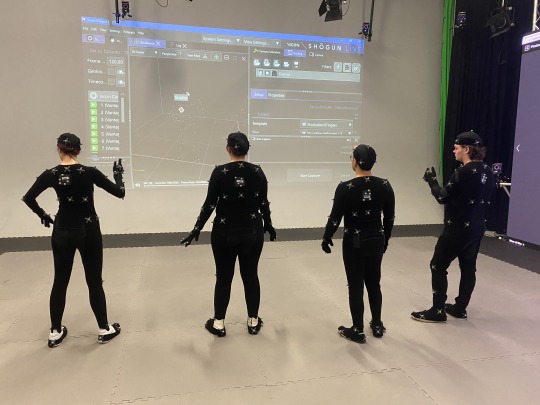
Here other students are all in the suits ready for capturing. The process for getting the suits up and running was actually much more involved than I initially thought. The marker placements are really important as it correlates to the skeleton rig within Shogun so a lot of the work goes into making sure the skeletons are calibrated properly so that when actors make big movements the program recognises that a wrist is a wrist and isn't teleporting bones around the space.
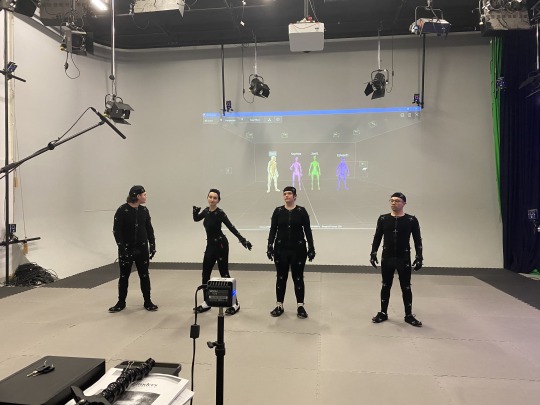
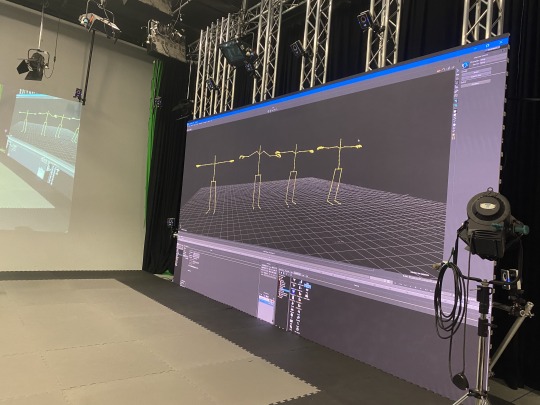
At this point the rigs were mostly calibrated for each of the performers, but it’s not entirely perfect! As seen in the second rig from the left there is a strange bend to the shoulders when the arms should be completely straight. This was due to time constraints where we were unable to properly spend time calibrating the suit. This shows that a lot of troubleshooting and onsite adjustments are needed for each person as the Shogun rigs are not specified to everyone's body type.
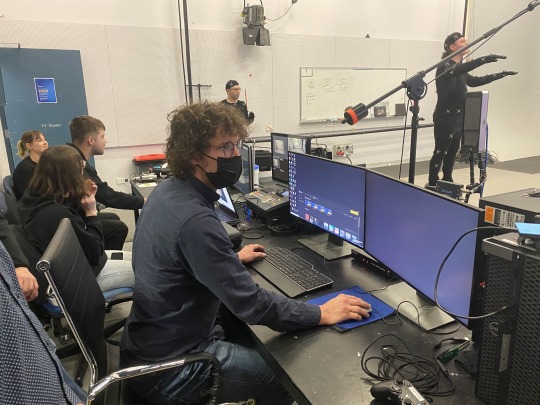
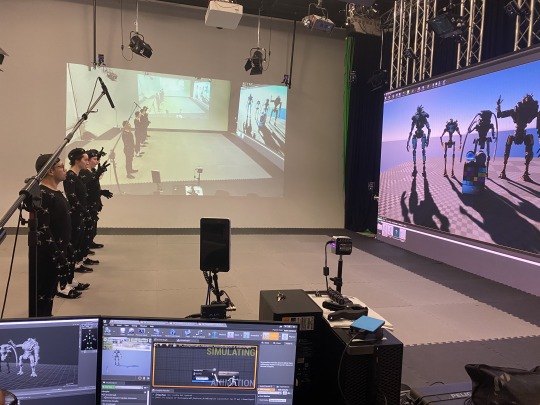
The next and final step was to get the rigs working in Motion Builder to sort of affix the live performance in Shogun to Unreal Engine 5 so that we could see some robot rigs controlled by the performers. This process was entirely new to me as it required a complete overhaul of the robot rig in order to pair it to a specific performer. I was able to do this process for a couple of the rigs and it was super cool! It made me understand why a lot of these animations begin with a T-pose so that it’s easier to recalibrate! I hope to become more proficient in this as I am more familiar with the 3D side of this process.
This week really felt like jumping into the deep end as we were introduced to a lot of the programs that run in order for the motion capture to work. It was massively informative, and I feel really excited to learn more about this topic and the possibilities that arise with this technology. I've also included a video of what it looked like when the rigs were finally coordinated, and the live performance was streaming into Unreal!
1 note
·
View note
Text
Final Project - Final Assets
The editing process was quite simple. I just colour corrected the .tiff files to get the same colour as the model images and then rendered each clip as an mp4 file. Below are the final video outputs for both of the animations I created, as well as a compilation of all the rendered clips.
youtube
youtube
youtube
I'm quite proud of my process this semester, and I think this is a good example of all I've learned from this topic. This was my first 3D topic so it was truly a challenge to learn the program as well as create actual 3D assets. I enjoyed a lot of the processes, especially the animation and rigging of the project. I feel that I was able to achieve the goal I set at the beginning of the project, as well as showing how I progressed and improved over the topic.
0 notes
Text
Final Project - Rigging and Animation
Rigging
For rigging this model, I mainly followed this series of Youtube tutorials as it was not a topic we had discussed in our workshops. This was completely new to me so it mostly involved a lot of troubleshooting with the rigging tools and some patience.
youtube
Essentially, I needed to create a skeleton for Pombun in order for the limbs to work in an IK fashion, where the joints are connected and move with an end effector. I used IK handles instead of FK handles for most of the limbs as it made the most sense, anatomically, that as the foot moved, the knee and hip would as well. All the joints were parented to the middle joint in the waist so that I could create a full-body movement if need be.
As I created the skeleton and bound it to the skin (mesh), I found I made a few mistakes with my mesh. I should have created the tail in a straight fashion so that when it was rigged it would have a much more natural bend and fold to it when I would move it. This was a problem I did not anticipate, and will definitely consider it the next time I rig another model!

A few other problems I ran into while rigging the skeleton:
Improper and unnamed joints - led to my mesh and skeleton buckling in strange places as extra joints would deform the mesh.
Orientation of the joints - some joints did not have the same orientation as the world so I ended up downloading a script that would orient all the joints to the same orientation, as well as some manual correction.
IK handles deforming other parts of the mesh - some of the joints would also move mesh that should not move, such as moving the ears would deform the collar. I ended up either creating more joints so that the IK handles would affect less of the mesh.

Eventually, I was able to get the skeleton in working order. So, I then created controllers with NURBS curves. I did this as it is the only way to keyframe the skeleton, as moving the joints just moved the entire mesh. I did this by constraining the curves with the centre and orientation of certain joints.

Animation
With the rig set up, animating the model is just a matter of keyframing the mesh. I ended up following a lot of horse and dog animation diagrams to chart the movements of Pombun. The rig was not perfect as some of the mesh deformed undesirably but I think this is due to my lack of modelling understanding rather than my rigging skills. When I was creating the mesh I should've been more considerate of how it would affect the rigging (but to be fair I hadn't done it before). However, I was still able to get some good animation from this!
The main movements I wanted to create were a walk cycle and a 'move' animation. So I keyframed the main movements first, such as legs and feet before adding in secondary animation of head movements, ear and tail flopping, as well as subtle body rotations.
youtube
This was quite a quick process with not too many controllers I had to keyframe. With the two animations keyframed I rendered the images and exported them to After Effects for final editing.
See part 4.
1 note
·
View note
Text
Final Project - Modelling and Textures
Modelling
This was the part I was most nervous to do, as most of this project hinges on how well I model the character. I was not familiar with character modelling at all (my only experience being this topic and some Blender experimentation), so it was a bit of a learning curve when creating this mesh.
I used a combination of techniques but mainly the box modelling technique for most of the limbs and body. I specifically used polygon modelling with soft selection to get the shape I liked for the head. I also used the boolean tool to create sockets for the eyes to sit in, inside the head. This created a strange problem as the mesh didn't appear in the rendering window or in the unshaded polygon view. I managed to get the mesh to appear in the window, by deleting the history of the new polysurface the boolean created, from the original derivative polygon. However, I am unable for it to appear like the other polygons in Maya (I don't know what I did but it shows up when rendering and that's all that matters hah).


I also used the multi-cut tool to create the mouth shape as well as created several repeating ovals in different orientations as the 'hairs' of the pompoms.
UV Shell Editing and Texturing
With the character modelled, I created textures according to the prompt given by the generator. So I pulled colours and textures from the prompt to create the textures of the body, eyes, claws, horn and pompoms in Photoshop. This was quite difficult as the configurations of the UV shells were strange looking and had several areas concentrated in one circular area. I found creating consistent patterns difficult as the shell would wrap around the polygon in odd ways, but through lots of trial and error (and reloading the mesh in Maya several times), I managed to create patterns that wrapped properly on the polygons.


(I turned off the shells when I imported these to Maya but left them on here as a reference to how strange the shell looked for certain polygons). I eventually textured the more convoluted UV shells (legs and ears) with just Lamberts in Maya. I also thought it would be better to use the lights within Maya as opposed to the HDRIs as I felt the style of realistic lighting and textures would not have the visual aesthetic I wanted.


Here are some final images of what the fully textured and lit model looked like. I felt the model came out quite charming with its big eyes and soft face. From here I will be able to rig and animate the mesh.
See part 3.
0 notes
Text
Final Project - Research & Concept
Final project time! I was both dreading and excited about this project, as it allows a lot of freedom but it is our major assignment. So, even before beginning the assignment, I had a lot of trouble coming up with ideas for what to do.
I was struggling with what to create, when I got an idea from a Youtube video I watched, from Drawfee. In the video, several artists were given the prompt of a fake Pokémon created by an AI generator and they had to draw them in the style of Pokémon game art. I thought this would be a really cool idea to recreate in 3D, as the current generation of Pokémon games (Sword & Shield, Arceus, and upcoming Scarlet & Violet) are all 3D models and I've been playing a lot of Pokémon.
In addition to modelling, I thought it would be good to do some idle animations for the fakemon as well. This would be another way to further emulate the game as the only time you get to see the Pokémon model in-game is when the Pokédex is open and you get to see a trio of little animations for the characters.
youtube
By the end of this project, I aimed to extend the skills previously taught in workshops, specifically modelling, texturing, and animation. I also thought it would do me some good to learn some further techniques such as rigging so that I'd have an easier time animating a fully rigged character.
Research
I began my project by looking at current and previous Pokémon games to gauge the kinds of animation they had. Pokémon primarily have one single idle animation in battle and then specific 'move' animations that generally correlate to the kind of move they make. So for example a 'Tackle' would have the Pokémon move forward in a body slam motion to indicate 'Tackle'. With this information, I thought it would be good to create a 'Move' animation for a final deliverable!
youtube
Additionally, in more recent games such as Sword & Shield and Arceus, the games have taken upon more open-world elements, so the Pokémon actually walk around now! So I thought it would be good to also do a walk cycle for my fakemon as well just so I have more deliverables.
youtube
Concept Creation
With the research completed, I went on to generate some fakemon prompts using Nokémon’s Fakemon AI Generator. I've included some of the other prompts I generated but ultimately didn't choose. The main reasons I didn't choose certain prompts were that the potential designs were too complex or I felt I would have difficulty modelling and animating.


I ended up choosing the Ghost-type fakemon as it had an appealing design and I felt like I could model it in the given time frame (plus Ghost-type Pokémon are my favourite).
I then did some sketches to simplify/finalise the design of the fakemon so that I could easily follow it in Maya. I also did some preliminary sketches so I could gauge the personality and anatomy of the character as well as maximise its charmingness for animation.


Ghost-type Pokémon are usually a little unsettling due to their nature so I felt that my fakemon's strange anatomy would lend well to their typing. I also decided on a name for my fakemon which is:
"Pombun" the Ghost Pom-Pom Pokémon
(creative I know).
From here, I was able to import my sketches into Maya to begin the modelling process!
See part 2.
0 notes
Text
Major Practical - Further Sword Exercise
For the major practical, I had a lot of options that I was considering taking further. I knew I wanted to animate something so it was a toss-up between the week 7 plane workshop or animating an earlier workshop.
I decided to work further with the sword exercise as I had been watching a lot of dnd/fantasy shows, at the time, so I had a lot of inspiration for the sorts of stories I could portray with the asset. The main goal for me with this practice was to improve my animation skills in Maya as well as texturing within the program. I wanted to see the kind of effect I was able to achieve when using the program's texturing features (as seen in the week 6 lighting workshop).
I brainstormed a few ideas, like a sword fight with motion paths or a magic flaming sword, but felt that this would rely too heavily on After Effects rather than the 3D aspect of it. So, I decided on a magic sword drop, a la loot crates, or treasure in certain video games.

I began with animating a camera and the main sword asset so that it landed with impact in the frame. I mainly just used keyframes to animate everything in the scene as I found motion paths a little stiff, plus I had much more control over every individual element with keyframing.

I wanted to create a shatter effect with the sword shattering a plane of glass when it landed on the ground. This proved to be far more difficult than I thought. I attempted to use the shatter FX in Maya but it was difficult to get the collision physics to work. I had already animated the post-slam into the ground movement and the hard body of the sword was interfering with the rest of the clip. The shatter also didn't look very good with the pieces not erupting in a way I was satisfied with.
In the end, I eventually scrapped the shatter as I couldn't get it to a point where I was satisfied with the actual visual impact, and I struggled with getting the effect to work half the time.


I still wanted to have something else alongside the sword dropping as I felt it would be lacking to just have the sword drop with no other effect. I wanted to portray the magical nature of the sword without it having to shatter the ground, so I ended up having the sword attune itself to the elements around it. I thought it would look cool to have some rocks sort of spin and rotate with the sword.

I created the rocks by using the same techniques introduced in the fruit workshop. I wanted the rocks to have lots of flat and somewhat sharp edges, so I kept the polygons with hard edges rather than entirely smoothing the objects.
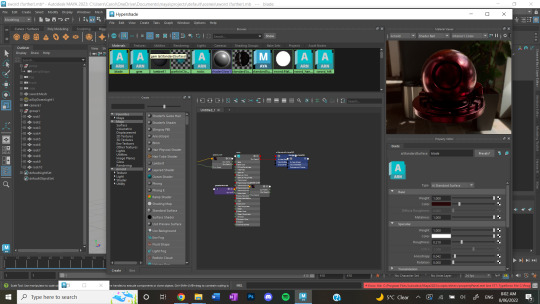
I then textured the sword and rocks with the Arnold standard surfaces, so that when I rendered the animation the material would be shiny to indicate what was metal and what was other, like the fabric of the handle and translucency of the gem in the hilt.
I spent most of my time key animating the individual polygons to get the timing of the spin and drop correct.
youtube
Here is the final product! With some additional sound effects and motion blur, I added in after the Maya render. I am quite pleased with the outcome and that I was able to salvage the project from the shatter FX problems I had. I quite like how the rocks spin with the levitation of the sword, I think it adds to the 'magic' of the sword even without any light FX.
I felt I achieved the goal I set for this practical, as this is a big improvement to the animation I did in week 7 and shows an advancement in my skills with the program. Rendering was not an issue (just time-consuming) and I was much more confident in my modelling and texturing skills.
Sources
Best Sword Sounds (Slice/Slash/Crash/Swoosh/etc) - https://www.youtube.com/watch?v=EgRvVq8mStE
5 Slam Impact - https://www.youtube.com/watch?v=ILtw7SKMjCQ
Stone Falling Sound Effect - https://www.youtube.com/watch?v=_hRgHPpV4GA
Anime-style, RPG Magic Sound Effects by WOW Sound - https://www.youtube.com/watch?v=ra9D6dOkJRY
0 notes
Text
Week 7 - Animation and Motion Paths
This week's workshop was all about animating within Maya, which mainly involved keyframing and motion paths. This was familiar ground as keyframing is essential in most video formats. This workshop I had the most trouble with, as I was plagued with technical and rendering issues. I fully lost some files during rendering which left me with some missing elements.
I had attempted to animate the demo car with motion paths, shown in the workshop, but lost the files to a crashed Maya during the rendering process. I ended up just showing the technique in the plane exercise below.
So I implemented a motion path for a second plane in the original plane scene.

I keyframed the original plane with rotation and movement to fly past the camera. I also made the motion path for the plane to fly over the same camera so it looked like one of the planes was trailing the other.
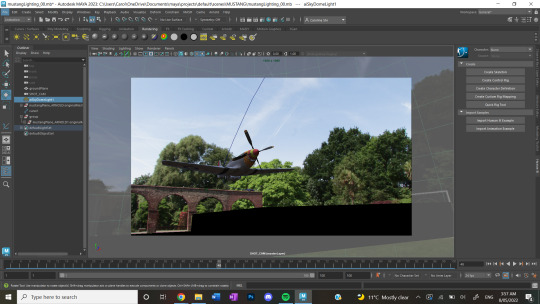
From this, I spent several hours rendering the scene but the final files were confusing. However much I changed the render settings, the files would render as .EXR regardless. This was not ideal as the EXR files would look like this in After Effects, where the shadows were now a big black shape. I rendered it twice only to result in the same problem. So I ended up having to render the frames individually as jpgs, which took even more time.

I took the final images into After Effects and added a camera shake just so that the final video looked a bit more cinematic and not too static and simplistic.
youtube
Here is the final outcome. It was a little bit of a struggle to get here but I managed to export an animation of the plane. I was able to utilise motion paths and keyframing but the rendering really was difficult and time-consuming.
0 notes
Text
Week 6 - Lighting in Maya
This week's workshop was focused on lighting techniques within Maya. This was quite different from my experience of Maya so far as instead of using an HDRI for lighting, the in-built Maya lighting tools are used.
For this the models were already provided, the main exercise was to light a scene and texture it. Mainly I placed the lights until I was satisfied with the way the contrast looked in the render view.

I dabbled with different coloured lighting. I was trying to emulate the coloured lighting that can be seen in neon-lit scenes or nightclubs. This was particularly difficult as the lighting often washed out any other colours in the scene. So I had the ambient and backlight be coloured while the direct light would be white just so the colours of the materials were more clear.

Here are the final render images. There is a slight difference as I had two passes at it. With the second image, I changed the depth of field for the camera and upped the intensity of the backlight just so the direct light was not so harsh and dimly lit. The final images have a sort of 2000s game graphics with the stylised textures and lighting, which I think is kind of fun.


I then repeated the exercise with Arnold rendering and materials for a more realistic look. Here I got to play a lot more with the transparency and reflectivity of the materials. This was much more familiar as I had done similar things in previous workshops.

Here is the final render image! This felt like a focus on an aspect I didn't pay much attention to in previous workshops. It felt good to focus my attention on one element and do my best at executing it.
0 notes
Text
Week 5 - Fruit Modelling
This was the final exercise for all the modelling and texturing exercises we had done in previous workshops. This workshop's final outcome was supposed to be a bowl of fruit.
First, I created an apple model from a sphere and then pulled and pushed the surface of the shape using the edge tool on soft selection. By doing this I was able to create a much more organic shape with the dips and curves an apple would normally have. I also used the curve tool, similar to the barrel exercise, to create a stem for the apple.
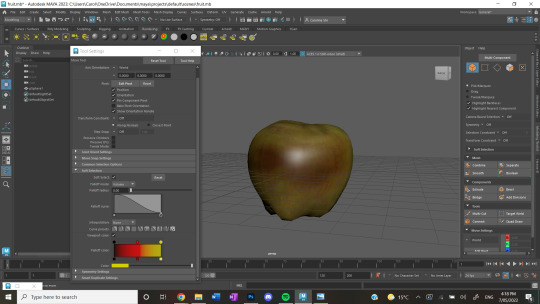
To add more variety to the scene, I made two oranges, utilising the textures within Maya rather than a provided texture file. This was done mainly by playing with the noise and grain for a bump map. I also thought it would be good to have red apples as well as green ones, so I made a second texture file of the apple and colour corrected it in Photoshop.

Using the same technique for the barrel, I created a glass bowl and applied an aiStandardSurface. I then arranged the elements so that it all looked like a full scene.


Here are the final render images! I am quite proud of how this turned out. The lighting and texturing of the elements look very realistic and the fruit looks like fruit! This was a culmination of techniques and exercises from previous workshops so I was glad for a task that combined them.
0 notes