
Last Seen Blogs

sornigrafix
Jeff Sornig

legodarktower
LEGO Dark Tower

iconsxskam
skam stuff

mothytea
MothyTea

mercurial-speed
Light Speed too slow!
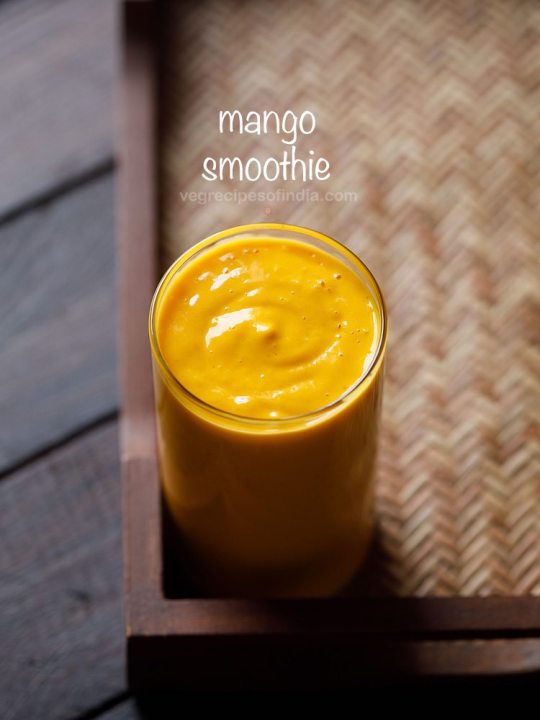
Text
Low FODMAP One Pan Chicken Cacciatore
This low fodmap chicken cacciatore recipe is brought to you in partnership with my friends at Fody Foods. All opinions are my own (obviously). Thank you for supporting the brands that make this site (and my SIBO healing) possible!
Earlier in December, Charlie and I hosted our second annual murder mystery party at his family’s home in South Carolina.
Yes, this is as dorky and sensational as you think it is. A pre-planned costume party that ends at 10pm? What 30-something dreams are made of!
Last year, we chose a mansion theme where someone dies at the will reading of a notorious billionaire. But after re-watching The Untouchables recently, we decided this year’s plot would need to be a period drama, preferably involving flapper dresses, short gangster ties, and chicken cacciatore!
Yes, I had the menu as much in mind as the fashions when we decided on Murder at the Juice Joint. I envisioned Baked Ziti alla Bugsy. Alley Cat Arugula Salad. Big Daddy’s Twigs in a Blanket. Cat’s Meow Chocolate Chip Cookies. Bathtub Gin Punch. And, of course, Al Capone’s reinvented low FODMAP Chicken Cacciatore.
Whenever I’m entertaining for the weekend, I try to make as many things in advance as possible, and I knew a main course that could be made in one pan and baked off to reheat right before the party would be perfect. More importantly, I wanted to make sure that I could safely eat most things on the menu, since even with the forgiveness of a little fringe, it’s no fun singing jazz music at the speak easy when you’re a bloated mess!
Though I’ve gone back to eating FODMAPs since I kicked my SIBO, I still feel my best when I do so in moderation. And though I would have called you a bold-faced liar if you told me I’d feel this way a year ago, the truth is: I don’t miss cooking with garlic and onion. It saves me time, makes me feel my best, and the end result tastes just as delicious.
One of the reasons for the latter is that I get some help from store bought staples like FODY foods. As you know, I am all for shortcuts when they’re from brands I trust (especially when I’m cooking for 10 people for the weekend!), so I used their garlic-infused oil and low FODMAP tomato-basil sauce in this chicken cacciatore recipe. (I will also say that their potato chips are some of the most insanely delicious potato chips I’ve ever eaten. Don’t put them in the cacciatore though. Or do…? Fuhgeddaboudit)
Even if you’re not discriminating against certain carbs, you can’t go wrong with this one pan chicken cacciatore for a weeknight dinner or larger dish for a crowd. It’s good for you, gluten-free, dairy-free, paleo, and also Whole30 friendly if you swap stock for the wine.
Read on for the recipe, and if you’re living that low FODMAP life, definitely check out FODY Foods. Not only are their products fantastic, they are also a proud sponsor of my new podcast SIBO Made Simple!! I’m incredibly grateful to be able to partner with a brand that’s so aligned, and for them to be supporting me on my mission to spread this gut knowledge far and wide. Listen to the trailer if you haven’t already – first 3 episodes drop next week!
With health and hedonism,
Phoebe
Garlic-infused oil and low FODMAP pasta sauce help make this Italian classic safe for those suffering from SIBO or IBS. But even if you’re not in that camp, it’s simply an easy, one pan delicious weeknight recipe that’s gluten-free, dairy-free and healthy.
Ingredients
4 tablespoons FODY Foods garlic-infused olive oil divided
Salt and freshly ground pepper
2 pounds boneless skinless chicken thighs
2 small carrots thinly sliced
2 medium celery ribs thinly sliced
1 red bell pepper diced
¼ teaspoon red pepper flakes
½ cup dry red wine or low FODMAP chicken broth
2 tablespoons thinly sliced pitted kalamata olives
2 cups FODY Foods Tomato-Basil Sauce
4 sprigs fresh thyme or 1/4 teaspoon dried
4 sprigs fresh oregano or 1/4 teaspoon dried
2 tablespoons fresh minced Italian parsley
Instructions
In a large skillet, heat 2 tablespoons of the garlic-infused oil over a medium-high flame. Season the chicken thighs with salt and pepper, and in batches, add to the pan in an even layer. Cook the chicken until a golden-brown crust has formed on both sides and the chicken is cooked through, about 10 minutes. Remove to a plate and repeat with the remaining chicken. Set aside.
Add the remaining garlic-infused oil to the pan along with the carrots, celery, and bell pepper. Sauté the vegetables, scraping up any brown bits from the bottom of the pan, until soft, about 5 minutes. Season them with 1/2 teaspoon sea salt and the red pepper flakes.
Pour in the red wine and simmer until reduced by at least half, 2 minutes. Add the olives and tomato sauce, stirring to combine. Carefully return the chicken to the skillet and nestle it in the sauce, making sure it’s fully coated. Tuck the herbs in between the chicken thighs. Simmer over medium-low heat until the sauce has thickened and the chicken is fork tender, 10 to 15 minutes. Garnish with the parsley and serve the chicken cacciatore directly from the skillet alongside gluten-free pasta or quinoa.
Recipe Notes
To make this Whole30 approved, sub chicken stock for the wine.
This low fodmap chicken cacciatore recipe is brought to you in partnership with my friends at Fody Foods. All opinions are my own (obviously). Thank you for supporting the brands that make this site (and my SIBO healing) possible!
Source: https://feedmephoebe.com/low-fodmap-chicken-cacciatore-recipe/
0 notes
Text
The Story Behind the Photo: Bread Pitt
Every photograph tells a story, but there’s also a story behind every photograph: the equipment, the techniques, the location, and the time that went into composing the shot. There are over 5,600 photos in Modernist Bread and nearly half a million more were taken—that’s a lot of stories to tell.
Visual imagery is a huge part of what we do, but we faced new challenges with Modernist Bread. The bright, bold color palette from our previous books shifted to shades of brown and off-white when our focus turned to bread. That meant that Nathan and the photography team had to be even more creative with the visuals, which makes for a lot of great stories. While we can’t share them all, the story behind our all-bread Giuseppe Arcimboldo tribute (internally known as Bread Pitt) is one that we’ve been looking forward to revealing.
The Inspiration
In addition to historical texts, Nathan and the team looked to historical artwork to learn how bread was shaped, served, sold, and eaten over the centuries. Visiting museums like the Louvre and archeological sites like Pompeii, they found clues in art: ancient frescos of markets, mosaics of bakeries, depictions of the last supper, still-life paintings of food and meals. Along the way, some of those works also became the inspiration for photographs in the book.
The 16th-century Italian painter Giuseppe Arcimboldo is best known for painting chimerical portraits and caricatures composed entirely of objects. Some of his “composite faces” were made up of household items, such as books, gilded vases, silverware, tools—even a spinning wheel. But like many artists of his time, the natural world and its curiosities was a source of inspiration for Arcimboldo. He captured the likeness of subjects from a wide variety of flora, fauna, and foods. From a distance, Arcimboldo’s paintings appear to be ordinary portraits. Luckily, they can’t be taken at face value. As you get closer to the paintings, the objects reveal themselves and his subjects transform into surreal faces carefully made up of tree branches, flowers, roots, grains, vegetables, fruits, sea creatures, snails, birds—not to mention roasts.
Building Bread Pitt
Bread Pitt began as a sketch. In addition to being an inspiration, Arcimboldo’s work helped us figure out we could arrange different breads to create our own composite face. After studying the paintings, head chef Migoya began to map out the breads that he could use to make a face, which proved to be one of the biggest challenges of the project. Making the bread, instead of painting it, presented a special set of considerations. Taking shape, size, and proportion into account, he had to creatively fit different types of loaves together like puzzle pieces.
All the breads, for example, had to keep the proportions of a face. Mini-breads, which might lose their shape, were out and the scale of the face became apparent. Its nose, a full-size baguette, put into context how big all the other loaves had to be. The sketch itself had to be as true to size as possible so that he could also determine how many loaves to make.
Facial feature by facial feature, the details of our bread face started to come together. We used almost every shape of bread possible: challah as impeccably groomed hair, bushy eyebrows made of epi baguettes, pretzels for ears, miches became full cheeks. He included a number of French regional breads, thanks to their inventive shapes. A pain d’Aix, for example, resembles a bow tie and a fendu could easily double as lips.
Then the baking began. Over a couple of days he and the culinary team baked over five dozen loaves of bread. During that time, chef Migoya sculpted a base out of a large piece of Styrofoam that he reinforced with wire netting. Once all the bread was ready, he began building the sculpture, using metal rods and glue to keep the bread in place. From start to finish, construction took between six and seven hours.
When complete, the finished sculpture came in at over 3-by-4 feet. Nathan photographed the portrait of Bread Pitt in our photo studio. From the lighting to the dark painted backdrop, the set was carefully built to mimic details found in many of Arcimboldo’s works.
Epilogue
After the shoot, Bread Pitt was moved to our library with other mementos we accumulated while working on Modernist Bread. The sculpture stayed intact for about six months—much to our surprise and delight. But like all things, Bread Pitt couldn’t last forever. Although Bread Pitt eventually became buggy and fell apart, he is immortalized in photographs, the book, and the sketch that still hangs in our kitchen.
Source: https://modernistcuisine.com/2018/02/bread-pitt/
0 notes
Text
Vegan lasagna for one in the air fryer
As an Amazon Associate I earn from qualifying purchases. Please see my Privacy Policy for more details.
Vegan lasagna is layered with pasta sauce, tofu ricotta, zucchini, fresh basil & spinach. This mini casserole is just the right size for one. And it’s ready in only 30 minutes thanks to the air fryer! Perfect for when you need something cozy fast.
When you’re a family of two (cats not included), there’s not a lot of occasion to make casseroles like lasagna.
And that’s a real pity. Lasagna is so cozy.
Layer after layer of sauce, fresh basil, spinach, and creamy tofu ricotta… Then there’s the tactile pleasure of pushing your fork through noodle after noodle until you have the perfect bite.
What’s a lasagna loving person to do?
Enter vegan lasagna for one – made in the air fryer. (This must be what the Flight of the Conchords were singing about…)
Vegan lasagna in the air fryer
That’s right. You don’t have to heat up the house for this lasagna. No leaving the oven on for an hour for everything to firm and crisp. Ideal for warm weather months!
This dairy-free lasagna is ready in just a half an hour.
Use mini loaf pans to make lasagna for one
To make individual lasagna, I’m using the 5.75 inch mini loaf pans frittering away in the cupboard.
I bought them for gift-sized zucchini bread or banana bread. But the rest of the year, they gather dust.
They are the just the right size for miniature lasagna.
(Remember: Any cookware that can go in the oven can also go in the air fryer.)
One mini loaf pan of lasagna feeds one person generously as a meal all on its own. And who needs side dishes when already have your vegetables, proteins, and grains in the form of lasagna?
How many personal-sized lasagnas can fit in the air fryer?
A 3.7 quart air fryer can hold one mini loaf pan. A 5.8 quart air fryer can hold two mini loaf pans. So plan accordingly if you’d like to make multiple personal-sized lasagnas.
A couple notes about the vegan lasagna ingredients
When buying lasagna noodles, remember to read the ingredients. Some lasagna noodles contain eggs, and obviously you’ll want to skip those.
I use jarred pasta sauce for this recipe. When I’m making a lasagna for one, I’m all about convenience. When getting jarred pasta sauce, keep an eye out for any hidden dairy in the ingredient list.
And if you’d prefer to make sauce from scratch, go for it!
How to make vegan lasagna for one in the air fryer
Start by breaking two 10-inch lasagna noodles in half. For one mini lasagna, you’ll need four 5-inch long noodles.
If you don’t break the noodles exactly in half, it’s no big deal. Once it’s all layered, it won’t make a big difference.
If you really want it to be perfect, another option would be to boil the noodles whole. Then cut them in half with kitchen shears or a knife once they are cooked.
Bring a pot of water to boil with a pinch of salt. Follow the package directions on boiling the noodles. (The noodles I use need to boil for 8 minutes.)
Drain the noodles. Then move them to a clean kitchen towel, so that they are completely dry.
Get out a 5.75-inch mini loaf pan. Put a thin layer of pasta sauce on the bottom, so that the noodles don’t stick to the pan.
Then add a 5-inch noodle. Sprinkle on your toppings of tofu ricotta, shredded zucchini, chopped fresh basil & spinach.
Add another noodle. Top with sauce, tofu ricotta, shredded zucchini, chopped fresh basil & spinach.
Add another noodle. You know the drill.
Finally, it’s time for the last noodle. Top that one with sauce and some dollops of tofu ricotta.
Then cover the top of the loaf pan with aluminum foil. Pop it into the air fryer. Air fry the covered lasagna for 10 minutes at 400 degrees.
Then carefully remove the foil. Air fry uncovered for an additional 3 to 5 minutes, so that the top can get some color.
The top should look nice and brown on top with some crispy outer sections. Even a little bit of black on top is a-okay.
Remove from the air fryer. The lasagna will come out of the pan a little easier if you let it sit for a few minutes before removing it.
Now it’s time for the toughest decision – whether to eat the lasagna on a plate or straight out of the tin. (Being careful not to burn yourself, of course!)
When I was testing this recipe, I always ate it right out of the tin. But for photo purposes, you get to see more of the enticing layers when it’s on a plate. Your call!
Do I have to use aluminum foil?
If you have an issue with aluminum foil, you don’t have to use it. Covering the lasagna for the majority of the cooking time helps everything to become more cohesive. And it helps the inside of the lasagna to get warm without burning the top layer.
However, everything in this lasagna is fine to eat at whatever temperature. So even if it’s a little saucier or not quite as warm in the middle, it will still be fine to eat.
If you’re not going to use aluminum foil, you could even try warming the sauce first before adding it to the lasagna.
And if you’re going to substitute with vegetables like mushrooms, for example, you could sauté them first, so that they’re already warm.
To make this lasagna without the foil, I’d recommend cooking it for 8 to 10 minutes. After that, the top will likely get overdone.
Make it your own
This vegan lasagna recipe is rife with possibilities. You could easily switch it up to suit the season and your preferences.
To make it your own:
Instead of jarred pasta sauce, use your own homemade sauce.
Use store-bought non-dairy cheese instead of or in addition to tofu ricotta.
Brown some seitan sausage and add it to the lasagna.
Substitute the zucchini or spinach with onions, browned mushrooms, sautéed bell peppers, garlic, and/or jarred artichoke hearts.
For one or two of the layers, substitute cilantro basil pesto instead of pasta sauce.
Just remember not to go overboard with the thickness of the layers. You want everything to gel, and all of those layers add up. So sprinkle lightly!
Vegan lasagna for one in the air fryer
Lasagna is the ultimate comfort food - full of cheesy, saucy layers... But making a full-sized lasagna is also a project. When you need lasagna now, make this lasagna for one in the air fryer. It's layered with creamy tofu ricotta, zucchini, spinach, fresh basil, and your favorite jarred pasta sauce. Plus, since it's made in the air fryer, you don't have to worry about heating up the whole house!
Print Pin Rate
Course: Entree
Cuisine: Italian, Vegan
Keyword: air fryer, casserole
Prep Time: 9 minutes
Cook Time: 21 minutes
Total Time: 30 minutes
Servings: 1 mini lasagna
Calories: 344kcal
Ingredients
2 lasagna noodles*
Generous pinch salt
1/2 cup pasta sauce
1/4 cup tofu ricotta
1 handful fresh basil leaves chopped, about 1/4 cup chopped, plus more for garnish
1 handful baby spinach leaves chopped, about 1/4 cup chopped
3 Tablespoons shredded zucchini
Instructions
Break two lasagna noodles in half, straight down the middle. After breaking them, you'll have 4 noodles that are about 5 inches long.
Bring a soup pot full of water to boil with a generous pinch of salt. Boil the noodles according to package directions. (On my lasagna noodle package, it says to boil the noodles for 8 minutes.) Drain the noodles. Then move them to a clean kitchen towel to fully dry.
Next you'll need a 5.75-inch mini loaf pan. Line the bottom of the loaf pan with about 2 Tablespoons of pasta sauce. Then top it with one 5-inch noodle. Top the noodle with about a Tablespoon of tofu ricotta, a pinch of chopped basil, a pinch of chopped spinach, and a pinch of shredded zucchini. Scatter everything evenly across the noodle.
Now add another noodle. Top that noodle with a couple Tablespoons of pasta sauce, about a Tablespoon of tofu ricotta, a pinch of chopped basil, a pinch of chopped spinach, and a pinch of shredded zucchini.
Add another noodle. Top that noodle with a couple Tablespoons of pasta sauce, about a Tablespoon of tofu ricotta, a pinch of chopped basil, a pinch of chopped spinach, and a pinch of shredded zucchini.
Finish with the last noodle. Top with a couple more Tablespoons of sauce, being sure that the noodles are fully covered, and a sprinkling of tofu ricotta.
Cover the loaf pan with aluminum foil. Put the loaf pan into the air fryer. Air fry at 400 degrees for 10 minutes. Then remove the aluminum foil from the loaf pan. Air fry for an additional 3 to 5 minutes, until the lasagna has some nice color & crispiness on top.
If you can wait two or three minutes, the lasagna is easier to remove once it's had a little time to cool. Move the lasagna to a plate or bowl to eat, or carefully dig in right in the loaf pan.
Notes
*Be sure to use egg-free lasagna noodles. One lasagna makes a generous serving for one person. A 3.7 quart air fryer only has room for one 5.75-inch loaf pan. A 5.8 quart air fryer can hold two loaf pans. So plan accordingly if you'd like to make multiple personal-sized lasagnas.
Nutrition
Calories: 344kcal | Carbohydrates: 52g | Protein: 14g | Fat: 9g | Sodium: 843mg | Potassium: 920mg | Fiber: 3g | Sugar: 7g | Vitamin A: 32.8% | Vitamin C: 23.9% | Calcium: 5.6% | Iron: 19.7%
Source: https://cadryskitchen.com/vegan-lasagna-air-fryer/

0 notes
Text
A Healthy Hedonist’s Guide to Mexico City
Mexico City has been top of my travel wish list for some time.
It seemingly has everything: walls of crazy colors, vibrant vegetation on (and inside) every block, dirt cheap accommodations and uber rides, a thriving contemporary art scene, and ALL THE TACOS. Needless to say, when I got invited to a wedding in Guadalajara this fall, I made stopping in Mexico City an essential leg of the trip flanking the weekend of festivities.
If you’re visiting Mexico City as a gluten-free goddess like myself, you will have an epic few days of eating your way around the city. Since the cuisine is primarily reliant on corn, there are very few risks of cross-contamination, though if you have a sensitive immune system like me, it’s a high possibility that you will return home with some sort of critter, even if you stick to the fancy restaurants. It’s the price of admission!
Tummy troubles aside, I have no regrets. The street food around the city rivals the best restaurants, and it’s hard to resist sampling some of the region’s typical dishes straight from the “specialists.” Still, we also made it a point to tick off some of the most popular upscale eateries off our list, and those too did not disappoint.
A few things to note: though the city is much safer than it used to be, it’s still best to use uber versus taxis (again, they are insanely cheap) and not walk around alone at night in certain areas. We stayed at a lovely B&B in Condesa for under $100 a night. I’d highly recommend making that neighborhood or Roma your hub. Polanco is fancier, has less of a personality and isn’t as central.
Like Los Angeles, the city is quite spread out, but if you bring walking shoes you can still cover a lot on foot—most sites are about a 30 minute walk from Roma or Condesa (or a $4 uber).
As for the food scene, like most big cities, you can find great versions of any regional dish, but I’d recommend not leaving without trying chilaquiles for breakfast, tacos al pastor (Mexico City’s most famous taco), pozole rosso, and sangrita, a tomato-based drink that’s served alongside the best sipping tequilas to cleanse your palate. I could have drank a jug of it with every meal.
Rarely will you find a flour tortilla, which means less risk that there’s an issue with tortilla chips being thrown into the same fryer, but if you’re celiac, it’s still worth inquiring about cross-contamination and mole preparations, since it’s an everything but the kitchen sink sort of dish. I’d highly recommend, if you’re worried and don’t speak much Spanish, that you check out my friend Jodi’s gluten-free travel card for Mexico City and her travel guide for Mexico.
Read on for some of the best restaurants we ate at in Mexico City, sites and activities that shouldn’t be missed, and some other helpful recommendations I got before our trip, including where to find the best gluten-free and vegan options.
With health and hedonism,
Phoebe
THE BEST UPSCALE AND TRENDY RESTAURANTS IN MEXICO CITY
Pujol (Polanco)
If you’ve sought out restaurant recs from any gringa “foodie,” Enrique Olvera’s world-renowned spot for artistic tacos was probably top of the list. He was featured on Chef’s Table a few seasons back, and like my globe-stalking of this Slovenian star, I knew that I needed to add Mexico City to my travel list just to taste his 1,000 day mole. The restaurant lived up to the hype and may just be one of the best meals I’ve ever eaten. It’s especially enticing for gluten-free folks since you’re able to eat 95 percent of the menu (save for dessert).
Reservations need to me made a month or so out for the Taco Omakase or the Tasting Menu. We did the latter, which I was kind of bummed about because the concept of 10 courses of tacos might be my dream, but it ended up blowing my mind. Chef Olvera’s food is pristine, but unfussy. Surprising, yet comforting. It’s exactly what you didn’t know you wanted to be eating.
Our favorite dishes were the octopus, softshell crab, quail egg papadzul, and all the street snacks. Also, order the tamarind margarita and thank me later.
Contramar (Roma)
This daytime seafood spot, with waiters toting giant clams and crab claws, feels like you stepped off the wrong plane and ended up in Miami. It was described to me as where the Mexi Mad Men go for their power lunches, and I was so into this idea, and the tuna tostadas included in it, that I went not once, but TWICE during my stay.
In addition to the atun, you should also try the crab tostadas, fish al pastor tacos, and if you have enough people, the whole fish with green and red salsa, which comes with a basket of warm tortillas. Everything is incredibly fresh and expertly cooked. They also served one of the best sangritas (little shot of bloody Mary-like mix that’s served alongside sipping tequila) that I tried in Mexico.
Paramo (Roma)
If you’re in Mexico City on a Sunday, make a reservation at this cozy, Mexican speak-easy, which is one of the few places on our hit list that was open that night. It’s a fun, lively crowd – a mix of locals and tourists – and between the exposed brick and twinkle lights strung along the ceiling, feels like somewhere in Williamsburg, Brooklyn. The service is a little slow, but luckily the delicious cocktails will keep you entertained. It’s a great spot to take a group since you can order any of the tacos as cazuelas—larger casseroles of the filling that you can share and DIY in your own warm tortillas.
Rosetta (Roma)
I know, I know. You didn’t come all the way to Mexico City for Italian food. But if you’re looking for an escape from the parade of tacos, Rosetta has a charming ambience that’s very much of the city: a candle-lit interior that’s covered in plants, including trees that are taller than most on the exterior sidewalk. They have plenty of vegetarian options, among them a mean mushroom risotto and a delicious beet appetizer with pink mole. Make sure to make reservations in advance, or try going for lunch when it’s easier to walk in.
THE BEST CASUAL RESTAURANTS AND TAQUERIAS FOR LUNCH AND BREAKFAST
Fonda Mayora (Condesa)
We ate at this little breakfast spot in the Condesa / Hipodromo neighborhood on our last morning before leaving for the airport. They had a great chilaquiles and rancheros, along with plenty of other options. If you have a stomach of steel, you can even try the green juice!
Lardo (Condesa)
A sister restaurant to Rosetta, this chic daytime cafe strikes a great balance between Mexican influences and more familiar dishes. For breakfast, the black rice porridge with mango is delicious, as well as the poached eggs in red sauce. They also serve an assortment of teas and homemade nut milks for your coffee. The interior is beautiful and I almost attempted to steal one of the stools and bring it back in my carry on.
Los Creadores Del Taco al Pastor (Condesa)
We mostly ate our tacos on the street in Mexico City, but after missing out on the city’s most famous taco—al pastor—we decided to pop into this taqueria that pretty much serves only that…since they claim the invented it. I’m sure Eater has sussed out the best al pastor (a shawarma-style pork with slices of pineapple) in the city, and that this is not it. But we couldn’t tell! I loved every bite of these juicy little guys, especially with the salsa and pickled vegetables served on the side.
La Clandestina
This mezcal bar was a great place to stop before or after dinner if you want a chill place to have one more sip of smoky libations. It’s in Condesa, right near many of these restaurants. I loved the spicy margarita, and a friend of mine ordered an interesting one with avocado and basil!
OTHER EATERY AND BAR RECOMMENDATIONS
We didn’t make it to even a fraction of the recommendations on our list. Here are some more in the same area that we want to try next time:
San Angel Inn — In the south of the city, which is why we didn’t make it, but incredibly charming for lunch in their courtyard among MXC elite. Very romantic!
Lalo – Another great breakfast spot similar to Lardo.
Masala y Maiz – In a slightly more far flung neighborhood near Casa Barragon. We were told to go for lunch and check out the cool interior and cuisine, which is Indian meets Mexican!
Azul – A spot for healthier Mexican favorites with great veggie enchiladas.
La Buena Tierra – Another veg-centric place for vegetarian options.
Tacos Veganas – A completely vegan taco place in Condesa!
Marrakech Salon – Sweaty silly fun drag bar, Mexican queens singing in Spanish standing on top of the bar in sequin dresses…on my list for next time.
COOL STORES WE VISITED
Goodbye Folk
If you’re into vintage finds or custom shoes, you should definitely stop in this little shop that sources great hipster shirts and sweaters, and also locally-made leather shoes and boots. It’s not too far from Rosetta and Arena Mexico if you need somewhere to stop on your walk to either.
Onora
In the upscale neighborhood of Polanco, this home store is small but packs in a lot of beautiful, artisan finds. If I wasn’t going straight to dinner at Pujol, I would have walked out of there with an entire dinner set and pile of linen napkins.
Lago DF
Also in Polanco, this trendy boutique has lots of local clothing designers if you’re looking for a chic caftan. They also have some vibrantly colored tequila glasses and other home goods.
THINGS TO DO AND SEE IN MEXICO CITY
The Best Markets of Mexico City
One of the most fun things to do is eat your way around some of the various markets. San Juan is the largest, and you can find a few tours during the day or at night through Eat Mexico if you want to really cover a lot of territory. A friend of ours raved about the nighttime taco tour. Mercado Medellin near Roma is a smaller indoor market but much more of a local’s affair. It’s a great place to pick up some dried chiles to take home with you or sample al pastor tacos. Mercado Roma is a more upscale hub of food stalls from restaurants around the city – similar to Chelsea Market in New York. They have an outpost for La Otilia, a gluten-free bakery! I didn’t love their cookies, but it’s a good option if you’re craving a sweet. Mercado de Artesanias is the craft market that is overflowing with finds. Great as a weekend activity if you like to shop and want to find some incredibly affordable wares.
Casa Barragon
This is the home of the most famous architect in Mexico, and definitely worth a visit. Tours book up months in advance, but if you are willing to risk it, I’d recommend just showing up early and hoping that the people there take pity on you, as they did us! The hallmark of his designs is that you can’t tell what kind of colorful treasures reside on the interior. This was one of the highlights of our trip.
Arena Mexico / Luncha Libre
If you’re skeptical of the magic that is Mexican wrestling due to the mediocrity of the movie Nacho Libre, please keep an open mind. This was the most fun thing we did in Mexico City and I am still giggling thinking about it. You will be surrounded by locals drinking, booing, cheering, you know…telling the wrestlers to go F themselves. It’s a rip roaring good time, especially on a Sunday afternoon in between meals. The stadium is small, so you really can’t go wrong with your seat, but I would recommend facing the side of the arena where the players walk out. The Luncha Libre show is on Tuesdays and Weekends. You can buy tickets at the booth right before the show – they don’t really sell out. Just try to avoid the annoying scalpers outside, who can be quite aggressive.
National Museum of Anthropology
We were told that this was a museum not to be missed, but honestly, we were a little lukewarm on it. If you like antiquities, old pots and the like, you will have a great time. It’s vast and very well organized. The building is also very cool. We were probably too hungover to fully appreciate it. It was also a Sunday, when tickets were free, and it was a zoo.
Xochimilco
My biggest regret is not making it to the floating canals on the outskirts of the city. As we learned at the Anthropology museum, Mexico City used to resemble Venice when it was first settled, meaning most of the city was built on the bottom of a lake bed that once housed a complex system of canals and waterways. Xochimilco is what’s left from that period. It’s a fun place to ride around in colorful, very instagrammable “gondolas.”
I was only in Mexico City for a weekend and was mostly interested in eating, so there are many sites that I didn’t get too. Also keep in mind that Mexico City has a great contemporary art scene (most of which Charlie has already done a million times) and many museums worth visiting.
Have you been to Mexico City? Tell me your favorite restaurants and sites! I will add them to the reader rec section and also to my to-do list for next time I go down there.

Source: https://feedmephoebe.com/a-healthy-hedonists-guide-to-mexico-city/
0 notes
Text
Healthy Kid Friendly Snack Ideas
A list of my favorite kid friendly, snack ideas that happen to be both healthy and delicious!
Snacks pretty much rule our life around here. With two growing boys ages 5 and 7, we basically live and breath by snacks. Hey, I love snacks too so I can’t say the apple falls far from the tree.
Since snacks are such a huge part of their diet, I am always looking for nutritious, healthy options that are not only delicious but good for my boys as well. As you know very well, we are long time fans of Stonyfield organic yogurt which is why I’m so excited to share that they have just released two NEW flavors of their snack packs for kids!
The two new flavors are Strawberry Yogurt and Chocolate Chip Cookies and Vanilla Yogurt and Chocolate Cookies. Available at national retailers across the country including Meijer, you will see these hitting store shelves near you soon if they’re not already there!
The best part? They are portable and easy to open, ideal for stashing in backpacks or serving on the go in between school, sports and other after school activities.
Why do I feel so good feeding these snack packs to my littles? Because, just like ALL Stonyfield products, they made without the use of toxic persistent pesticides or GMO’s which means it’s not only good for them but good for our planet too.
Want more healthy, portable kid-friendly snack ideas? Here are a few other snacks my boys have been loving lately:
What are your favorite kid-friendly snack ideas? I’d love to hear from you! In the meantime, head here to explore all of my snack recipes!
Photography by Alejandro Photography // Recipe by The Lemon Bowl
Disclosure: I am honored to be a Stonyfield Brand Ambassador. Thank you for supporting the brands that make The Lemon Bowl possible. All thoughts are my own.
Want more snack ideas? Check out my Pinterest board!
You May Also Like:
<![CDATA[.yuzo_pro .relatedthumbcursor:pointer.yuzo_prooverflow:hidden;padding:10px 0;margin:10px 0;width:100%;display:block;clear:both.yuzo_pro .yuzo_clearfixed,.yuzo_widget_wrap .yuzo_clearfixedclear:both;display:block;margin:5px 0.yuzo_pro .text-centertext-align:center;margin:0 auto;display:block.yuzo_pro h3margin-bottom:0!important.yuzo_pro .relatedpostsmargin:0 0 20px 0;float:left;font-size:12px.yuzo_pro .relatedposts h3font-size:20px.yuzo_pro .relatedthumbmargin:0 1px 0 1px;float:left;line-height:15px;text-align:left.yuzo_pro .relatedthumb imgmargin:0 0 3px 0;padding:0.yuzo_pro .relatedthumb aoverflow:hidden;text-decoration:none;display:block;padding:0;background-image:none;background-color:transparent.yuzo_pro .yuzo_textmargin-top:10px;display:block.yuzo_pro .relatedthumb .yuzo-img-wrapmargin-bottom:4px.yuzo_pro .yuzo__bf_textmargin:10px auto.yuzo_pro .yuzo__title--centeredtext-align:center;display:block;margin:0 auto#wp-admin-bar-admin_yuzo_views .yuzo_menu_bar_iconsmargin-left:5px;width:20px;height:26px;background-image:url(https://cdn.thelemonbowl.com/wp-content/plugins/yuzo-pro/assets/images/fires3.png);background-repeat:no-repeat;position:absolute;top:0;left:0#wp-admin-bar-admin_yuzo_views .ab-itemposition:relative;padding-left:26px!important#wp-admin-bar-admin_yuzo_views .yuzo_menu_bar_icons.color_normalbackground-position:-3px 5px#wp-admin-bar-admin_yuzo_views .yuzo_menu_bar_icons.color_flare_hotbackground-position:-22px 5px#wp-admin-bar-admin_yuzo_views .yuzo_menu_bar_icons.color_flare_hot2background-position:-43px 5px#wp-admin-bar-admin_yuzo_views .yuzo_menu_bar_icons.color_flare_hot3background-position:-62px 5px#wp-admin-bar-admin_yuzo_views .yuzo_menu_bar_icons.color_flare_hot4background-position:-83px 5px]]><![CDATA[.yuzo_pro .relatedthumb.box_shadow_related .yuzo-imgbox-shadow:0 1px 4px rgba(0,0,0,.2)!important]]><![CDATA[.yuzo_pro imgwidth:47.6px!important;height:200px!important.yuzo_pro .relatedthumbline-height:inherit;background:#fff.yuzo_pro .relatedthumb:hoverbackground:#FFFFD3!important;-webkit-transition:background 0.2s linear;-moz-transition:background 0.2s linear;-o-transition:background 0.2s linear;transition:background 0.2s linear;;color:!important.yuzo_pro .relatedthumb acolor:!important;text-decoration:none;outline:none;border-bottom:0.yuzo_pro .relatedthumb a:active,.yuzo_pro .relatedthumb a:focus,.yuzo_pro .relatedthumb a:-webkit-any-linkcolor:!important;text-decoration:none;outline:none;border-bottom:0.yuzo_pro .relatedthumb:hover acolor:!important.yuzo_pro .relatedthumb:hover .yuzo__text--titlecolor:!important.yuzo_pro .yuzo_text,.yuzo_pro .yuzo_views_postcolor:#919191!important.yuzo_pro .relatedthumb:hover .yuzo_text,.yuzo_pro:hover .yuzo_views_postcolor:!important.yuzo_pro .relatedthumbbox-sizing:border-box;margin:0% 1% 0% 0%!important;padding:5px 5px 5px 5px.yuzo_pro .relatedthumb .icon_middle_only_style_1display:none.yuzo_pro .relatedthumb .yuzo_metamargin:2px 2px 2px 2px;;font-size:12px;color:#c4c4c4;text-align:left;;line-height:12px.yuzo_pro .relatedthumb .yuzo_meta .yuzo_meta_view,.yuzo_pro .relatedthumb .yuzo_meta .yuzo_meta_date,.yuzo_pro .relatedthumb .yuzo_meta .yuzo_meta_category,.yuzo_pro .relatedthumb .yuzo_meta .yuzo_meta_authordisplay:inline;margin:0 5px.yuzo_pro .relatedthumb .yuzo_meta>div:nth-child(1)margin-left:0!important;text-align:left;margin-right:0!important.yuzo_pro .relatedthumb .yuzo_meta .yuzo_meta_view:beforecontent:'';font-family:'Fontawesome';font-size:13px;padding-right:1px.yuzo_pro .relatedthumb .yuzo_meta .yuzo_meta_date:beforecontent:'';font-family:'Fontawesome';font-size:13px;padding-right:1px.yuzo_pro .relatedthumb .yuzo_meta .yuzo_meta_category:beforecontent:'';font-family:'Fontawesome';font-size:13px;padding-right:1px.yuzo_pro .relatedthumb .yuzo_meta .yuzo_meta_author:beforecontent:'';font-family:'Fontawesome';font-size:13px;padding-right:1px.yuzo_pro .relatedthumb:hover .yuzo-img-webkit-filter:brightness(1.5);filter:brightness(1.5).yuzo_pro.ycolumns-widget .relatedthumbwidth:47.6px.yuzo_pro .yuzo_wrapsmargin-top:5px.yuzo_pro.ycolumns-8 .relatedthumbwidth:47.6%.yuzo_pro.ycolumns-7 .relatedthumbwidth:47.6%.yuzo_pro.ycolumns-6 .relatedthumbwidth:47.6%.yuzo_pro.ycolumns-5 .relatedthumbwidth:47.6%.yuzo_pro.ycolumns-4 .relatedthumbwidth:47.6%.yuzo_pro.ycolumns-3 .relatedthumbwidth:47.6%.yuzo_pro.ycolumns-2 .relatedthumbwidth:47.6%@media all and (max-width:1170px).yuzo_pro.ycolumns-8 .relatedthumbwidth:18%!important@media all and (max-width:1024px).yuzo_pro.ycolumns-8 .relatedthumbwidth:23%!important@media all and (max-width:899px).yuzo_pro.ycolumns-4 .relatedthumbwidth:47.6%.yuzo_pro.ycolumns-8 .relatedthumbwidth:23%!important@media all and (max-width:750px).yuzo_pro.ycolumns-4 .relatedthumbwidth:47.6%.yuzo_pro.ycolumns-5 .relatedthumbwidth:47.6%.yuzo_pro.ycolumns-6 .relatedthumbwidth:47.6%.yuzo_pro.ycolumns-7 .relatedthumbwidth:47.6%.yuzo_pro.ycolumns-8 .relatedthumbwidth:22%!important.yuzo_pro.ycolumns-5.yrows-1 .yuzo_wraps .relatedthumb:nth-child(5)display:none@media all and (max-width:700px).yuzo_pro.ycolumns-8 .relatedthumbwidth:30%!important@media all and (max-width:550px).yuzo_pro.ycolumns-3 .yuzo_wraps .relatedthumb,.yuzo_pro.ycolumns-4 .yuzo_wraps .relatedthumbwidth:48.6%.yuzo_pro.ycolumns-4 .yuzo_wraps .relatedthumb .yuzo-img-wrapheight:100%!important.yuzo_pro.ycolumns-4 .yuzo_wraps .relatedthumbheight:250px!important.yuzo_pro.ycolumns-4 .yuzo_wraps .relatedthumb .yuzo-imgheight:180px!important.yuzo_pro.ycolumns-8 .relatedthumbwidth:48.10%!important@media all and (max-width:420px).yuzo_pro.ycolumns-3,.yuzo_pro.ycolumns-4,.yuzo_pro.ycolumns-2,.yuzo_pro.ycolumns-5,.yuzo_pro.ycolumns-6,.yuzo_pro.ycolumns-7,.yuzo_pro.ycolumns-8margin:0 auto.yuzo_pro.ycolumns-3 .relatedthumb,.yuzo_pro.ycolumns-4 .relatedthumb,.yuzo_pro.ycolumns-2 .relatedthumb,.yuzo_pro.ycolumns-5 .relatedthumb,.yuzo_pro.ycolumns-6 .relatedthumb,.yuzo_pro.ycolumns-7 .relatedthumb,.yuzo_pro.ycolumns-8 .relatedthumbwidth:48.10%!important;margin:5px.yuzo_pro.ycolumns-3,.yuzo_pro.ycolumns-4,.yuzo_pro.ycolumns-2,.yuzo_pro.ycolumns-5,.yuzo_pro.ycolumns-6,.yuzo_pro.ycolumns-7,.yuzo_pro.ycolumns-8margin:0 auto.yuzo_pro.ycolumns-3 .relatedthumb,.yuzo_pro.ycolumns-4 .relatedthumb,.yuzo_pro.ycolumns-2 .relatedthumb,.yuzo_pro.ycolumns-5 .relatedthumb,.yuzo_pro.ycolumns-6 .relatedthumb,.yuzo_pro.ycolumns-7 .relatedthumb,.yuzo_pro.ycolumns-8 .relatedthumbwidth:100%!important.yuzo_pro.theme_standar-style-1 .yuzo_textdisplay:block]]><![CDATA[.yuzo_pro .relatedthumb]]>

Source: https://thelemonbowl.com/healthy-kid-friendly-snack-ideas/
0 notes
Text
Summer Fruit Pie
This luscious summer fruit pie is packed with plums, peaches, cherries and topped with a crunchy spicy crumb topping that tastes like glorious summertime. (Jump directly to the recipe.)
September is officially here, Labor Day has arrived, and I can’t wear white pants anymore. Not that I really wore white pants that often (I’m gay but not THAT gay) but I always like to keep my fashion options open. I’ve been home for nearly a month from my cross-country road trip but you probably would never know that from my Instagram Stories. I think I’m still in Mid-July with my daily uploads on IG Stories, slowly working my way up from D.C. to Maine then eventually back home. At this rate, I’ll be back in San Francisco sometime for Christmas. But despite the proliferation of pumpkin popping up EVERYWHERE on my social feed (thank you everyone for at least waiting until September, because I just can’t with pumpkin in August), technically summer isn’t over yet. According to Google summer doesn’t end until September 22! So I’m holding onto the season with this Summer Fruit Pie.
Recently I taught a class at the San Francisco Cooking School on Summer pies. Normally the class is done a little earlier in the season. But I wasn’t available earlier (are you tired of hearing me talk about my road trip? Sorry/Not Sorry about that) so we pushed the class to the end of August. And though there was a nectarine raspberry pie that I taught in the class, when I went to make a demo example pie ahead of time (which I like to do for all my classes) I realized that I had limited nectarines in my house but plenty of other summer stone fruit like plums, peaches, pluots (a plum/apricot hybrid) and late season cherries. So the summer fruit pie was born.
Despite how much everyone loves the way woven crusts and Instagram worthy double crust pies look, one of my absolutely favorite toppings for pie (and really for any baked good) is a crumb topping. I shower crumbs on everything, from to coffee cake and muffins to my babka in my cookbook Marbled, Swirled, and Layered to even cookies. Bakery streusel crumbs, with their slightly crunch and subtle spice may not look as sexy as the highly decorated cut out crust that garner 1000s of likes but the taste just makes me happy.
So I’m going to have a big slice of this pie for breakfast now and enjoy the last weeks of summer. As everyone else dives into their pumpkin spice lattes, I’m going to grab one more bag of pluots and peaches at the store. Fall may have started for everyone else, but summer is still here for me.
This summer stone fruit pie can be made with a combination of any sort of summer stone fruit like nectarines, peaches, plums, pluots, apricots or cherries. Just adjust the amount of tapioca starch to accommodate the juiciness of the fruit. If the fruit is more ripe or you notice more juice at the bottom of the mixing bowl with fruit, add more tapioca. If less juicy, use less starch. If you choose peaches, you will want to peel them but if you use any other fruit (including nectarines) no need to peel at all! I prefer using tapioca starch (sometimes called tapioca flour) for the filling of a pie. It is a more neutral flavor starch and can be found at most upscale grocery stores or online. But if you don’t have access to it or don’t want to buy yet another ingredient, you can substitute out the same amount of cornstarch. You might need to bake the pie a little longer, as cornstarch needs higher heat to set than tapioca starch.
Cook Time 1 hour 15 minutes
Ingredients
Pie Dough
1 3/4 cups all-purpose flour 245 g
1 tablespoon granulated sugar
1/2 teaspoon kosher salt
10 tablespoons cold unsalted butter 140 g or 1 1/4 sticks
6 to 8 tablespoons ice cold water
Filling
8 cups sliced summer stone fruit like nectarines, plums, cherries (see headnote above)
3/4 cup granulated sugar 150 g
6 to 8 tablespoons tapioca starch see headnote above
Juice and zest of 1/2 lemon
1/2 teaspoon ground cinnamon
Streusel
1 cup all-purpose flour 140 g
1/2 cup granulated sugar 100 g
1/4 cup Turbinado sugar 60 g
1 teaspoon ground cinnamon
1/2 teaspoon ground ginger
1/4 teaspoon kosher salt
6 tablespoons unsalted butter melted
1 teaspoon vanilla extract
Instructions
Make the crust by placing the flour, sugar and salt in a large bowl. Stir with a whisk. Cut the butter into 1/2-inch chunks. Sprinkle over the dry ingredients and toss to coat. Using your fingers, press and smash the cubes into small bits, about the size of peas (but flat, not round).
Sprinkle 6 tablespoons of water into the bowl and stir with a fork until it starts to get shaggy. Sprinkle more water, a tablespoon at a time, if the dough looks too dry. Once the dough starts to look shaggy, start to toss and massage it with the palms of your hand to incorporate the dry ingredients. Pat into a 1-inch thick disk. Cover with plastic wrap and chill in the refrigerator 1 hour or overnight.
Preheat oven to 400°F. Take the chilled dough out of the fridge place on a clean surface dusted with flour. If the dough feels too cold and firm, let it stand at room temperature for 5 to 10 minutes to warm up. Starting from the center, roll the dough toward the edge of the disk in all directions to form a round pie crust. Try not to roll back and forth but rather center out, rotating the dough in the beginning to keep it from sticking to the surface. You can add more flour to the top and bottom of the dough/work surface if necessary.
Roll the dough out to about 12 inches in diameter for a standard 9-inch pie or tart pan. Fold the dough into quarters and move the dough to the pie pan and unfold. Or loosely roll the dough over the rolling pin and unroll over the pie pan. Try not to stretch the dough as you do this. Trim the excess dough around the pan so you have about 1-inch of overhang then fold the dough into the pan edge and decoratively crimp the edges.
Place sliced and pitted summer stone fruit, sugar, 6 tablespoons tapioca starch, lemon juice and zest lemon and cinnamon in a large bowl. Gently mix the filling ingredients together, then pour into the pie crust. Add additional tapioca starch if necessary. Place pan on a rimmed baking sheet to catch any overflowing juices.
Bake for 30 minutes. While the pie is baking making the streusel by placing all the dry ingredients, flour, both sugars, spices, and salt in a medium sized bowl. Stir with a balloon whisk until all the ingredients are evenly distributed and uniform in color. Mix together the melted butter with the vanilla and then drizzle over the dry ingredients, tossing with a fork until they clump together and get crumbly. Cover and refrigerate until use.
Once the 30 minutes is up, remove the pie from the oven and sprinkle the crumb topping over the filling, breaking up any really big large chunks (but make sure there are still some nice size chunks in there). Turn the oven down to 375°F and continue to bake until the fruit juices are thickened and bubbling through the crumb topping, 35–45 minutes longer. If the crumb topping looks like it is browning too much, cover it with foil to keep it from browning as the pie filling cooks. Let the pie cool completely before slicing, about 4 hours.

Source: https://www.eatthelove.com/summer-fruit-pie/
0 notes
Text
7 Hidden Dangers That Are In Your House Right Now
A couple of years ago now, our aging oven nearly burned our house down. I’m still not totally sure of exactly how it happened. I just walked into the kitchen and saw that the oven was on fire, and found that the oven door had locked itself shut. And while we did manage to get the fire put out before anything else was damaged, that harrowing experience really opened my eyes to potential dangers and fire hazards in my home!
In order to help us all be a little more safe in our homes, today I’ll be sharing a list of 7 dangerous household items that you might not know about. Some of these items contain dangerous chemicals, while others can be a fire hazard when used incorrectly. For each dangerous item, I’ll share a simple and safe alternative you can choose instead!
Learning about these hazards in your home can’t prevent an accident entirely, but it’s a great place to start when it comes to making your home a safer place to live!
<![CDATA[.player-position padding-left:0px !important; padding-right:0px !important; padding-bottom:0px !important; .copy padding: 12px !important; font-weight: 700; font-size: 15px !important; ]]>
1. Air Fresheners
According to the Natural Resources Defense Council, many household air freshener products contain chemicals that can affect hormones and reproductive development, especially in children. These chemicals can accumulate in the body over time and and cause adverse health effects!
Safe Alternative: Instead of using commercial air freshener products, use natural methods to freshen the air in your home. They’re safer to use, and often cheaper than the store-bought options! Learn about 10 natural ways to make your home smell great at this link.
2. Oven Cleaner
Many store-bought oven cleaners contain corrosive alkalis that can cause harm to your gastrointestinal tract or respiratory system if inhaled or ingested. Find out more about the dangers of oven cleaner products at MedlinePlus.
Safe Alternative: Instead, try my easy overnight method for cleaning your oven. (Get the full instructions here.) This method uses ammonia, which is safe when used correctly. However, ammonia fumes can aggravate asthma symptoms, so asthma sufferers may want to try scrubbing their oven with Barkeepers Friend instead.
3. Dryer Lint
Dryer lint itself isn’t necessarily dangerous, but a buildup of dryer lint can quickly become a huge fire hazard! According to the U.S. Fire Administration, around 2,900 clothes dryer fires are reported each year. They estimate that 34% percent of those fires were caused by owners who failed to keep their dryer clean and free of lint.
Safe Alternative: Clean your lint trap every time you use your dryer, and vacuum out the inside of your dryer regularly. Find out everything you need to know about cleaning and maintaining your clothes dryer at this link.
4. Toilet Bowl Cleaner
Store-bought toilet bowl cleaners are highly acidic, which helps to dissolve tough stains and deposits in your toilet bowl. However, those corrosive ingredients that clean your toilet bowl can also cause burns on your skin and eyes! They can also produce caustic fumes when mixed with other types of cleaners.
Safe Alternative: There are plenty of safe, natural ingredients that you can use to keep your toilet sparkling clean. Learn how to make my favorite simple toilet bowl cleaner at this link.
5. Toothpaste
Most store-bought toothpastes bear the following warning: “Seek immediate medical help if you ingest toothpaste.” According to MedlinePlus, swallowing a lot of toothpaste can cause stomach pain and intestinal issues, or if the toothpaste contains fluoride, can even cause convulsions, difficulty breathing, and other scary side effects.
Safe Alternative: The good news is that toothpaste is perfectly safe to use when used correctly. Just make sure that everyone in your family (especially young kids) know how to dispense the correct pea-sized amount onto their toothbrush in the morning. And remind everyone to rinse their mouth thoroughly after brushing too!
6. Gas-Powered Space Heaters
Faulty gas-powered appliances (like an old space heater) can release carbon monoxide into the air. Carbon monoxide poisoning is the leading cause of poisoning death in the U.S., and even when it isn’t fatal, it can lead to permanent brain damage.
Safe Alternative: Make sure you have a working CO2 detector in your home. (Click here to check out the many options available on Amazon.) You can also opt for an electric space heater, or you can use these 10 hacks to keep warm!
7. Extension Cords
While the extension cord itself isn’t dangerous, the way that people use them can be. Many people aren’t aware of the voltage capacity of their extension cord, and end up plugging in more items than the cord can handle safely. This creates a big fire hazard, especially when the overloaded extension cord is placed near carpet or furniture. Extension cords are a leading cause of household fires in the U.S.
Safe Alternative: Learn how to use your extension cords safely! Check out this article of do’s and don’ts for using extension cords from Safety+Health magazine, published by the National Safety Council.
What’s your best tip for keeping your home safe?
Source: https://www.onegoodthingbyjillee.com/7-dangerous-household-items/
0 notes
Text
Tomato Avocado Corn Salad with Lime-Cumin Vinaigrette
Tomato Avocado Corn Salad with Lime-Cumin Vinaigrette – Simple, delicious, and refreshing summer salad packed with corn, cucumber, tomato, avocado and a drizzle of the best Lime Cumin Vinaigrette!
TOMATO AVOCADO CORN SALAD
Perfect for a BBQ, a lunch, or a potluck, this Tomato Avocado Corn Salad is an easy and light summer treat brimming with amazing textures and flavors. It makes a great side dish with grilled meats, but it’s also just as good all on its own. I can eat a ton of it. 🤷♀️
Our Corn Salad is a wonderfully quick-fix salad, without having to cook a single thing and it comes together in minutes. It’s probably one of the simplest recipes I have on Diethood, but honestly, this salad just felt like a great way to kick off this hot summer day.
If you were planning on having salad today, you.must.make.this.one. 😊Grab some juicy cherry tomatoes, sweet corn, creamy avocado, firm cucumber, and tasty red onions, so we can get this recipe started.
HOW TO MAKE TOMATO AVOCADO CORN SALAD
I know that fresh corn right off-the-cob is probably the best there is, and if you have some cooked, cool, but if not, grab a bag of frozen sweet corn kernels and thaw 3 to 4 cups of it.
Wanna use canned corn? SURE! Just rinse it really good.
Once you have decided on the corn, transfer the kernels to a large salad bowl.
Next, you want to slice up an entire English cucumber into half moons. Place those in the salad bowl with the corn.
Then, move onto the cherry tomatoes. We will need 2 to 3 cups of cherry tomatoes; slice those in half and transfer to the salad bowl.
Grab 2 average-size avocados; peel and remove pit, then cut into cubes. Add prepared avocado to the salad bowl.
Red onions will also make their way into this salad. You’ll want to cut thin slices of about 1/2 of an onion and stir those into the salad bowl. Set aside.
HOW TO MAKE LIME CUMIN VINAIGRETTE
In a mixing bowl combine olive oil, lime juice, lemon juice, garlic, cumin, chili powder, salt, and pepper.
Pour dressing over salad and mix until thoroughly incorporated.
Cover salad bowl with plastic wrap and set in the fridge for 1 hour.
Stir, garnish with chopped fresh cilantro, and serve.
CAN I MAKE CORN SALAD AHEAD OF TIME?
Yes! This salad can be made a day ahead of time. The longer it sits, the better it tastes, but I wouldn’t keep it for longer than one night in the fridge. STIR before serving.
This salad is filled with fresh summer flavors. Serve it as a side to grilled chicken or fish, you can also serve it as a dip, or in tacos!
MORE SUMMER SALAD IDEAS
ENJOY!
TOOLS USED IN THIS RECIPE
Tomato Avocado Corn Salad with Lime Cumin Vinaigrette
Simple, delicious, and refreshing summer salad packed with corn, cucumber, tomato, avocado and a drizzle of the best Lime Cumin Vinaigrette!
Course: Appetizer Salads, Salad, Salad Dressing/Marinade, Side Dish/Salad
Cuisine: American, American/Southern, American/Southwest
Keyword: avocado recipes, corn salad, healthy lunch, healthy salad recipe, salad dressing recipe, summer picnic recipe, tomato salad, vegetarian recipe
Servings: 8 serves
Calories: 197 kcal
Ingredients
FOR THE SALAD
3 ears of cooked or grilled corn, kernels cut off the cob (OR use 3 to 4 cups frozen (thawed) sweet corn kernels, OR, you may also use canned corn - rinse it well)
1 English cucumber, sliced into half moons
2 to 3 cups cherry tomatoes, halved
2 avocados, peeled, pitted and cubed
1/2 red onion, thinly sliced
chopped fresh cilantro, for garnish
FOR THE LIME CUMIN VINAIGRETTE
3 tablespoons extra virgin olive oil
2 tablespoons fresh lime juice
1 tablespoon fresh lemon juice
2 cloves garlic, minced
1/2 teaspoon ground cumin
1/4 teaspoon chili powder
3/4 teaspoon salt, or to taste
1/8 teaspoon fresh ground pepper, or to taste
Instructions
In a large salad bowl combine corn kernels, sliced cucumbers, tomatoes, cubed avocados, and red onions. Set aside.
In a mixing bowl whisk together olive oil, lime juice, lemon juice, garlic, cumin, chili powder, salt, and pepper; whisk until well combined.
Pour dressing over salad; toss gently to combine.
Cover salad bowl with plastic wrap and set in the fridge for one hour.
Remove from fridge; garnish with cilantro and serve.
Recipe Notes
WW FREESTYLE POINTS: 4
HOW TO MAKE AHEAD OF TIME
This salad can be made ONE day ahead of time. The longer it sits, the better it tastes, but I wouldn’t keep it for longer than one night in the fridge. STIR before serving.
Nutrition Facts
Tomato Avocado Corn Salad with Lime Cumin Vinaigrette
Amount Per Serving
Calories 197 Calories from Fat 117
% Daily Value*
Total Fat 13g 20%
Saturated Fat 2g 10%
Sodium 345mg 14%
Potassium 516mg 15%
Total Carbohydrates 20g 7%
Dietary Fiber 5g 20%
Sugars 5g
Protein 3g 6%
Vitamin A 8.6%
Vitamin C 27.1%
Calcium 2.4%
Iron 6.7%
* Percent Daily Values are based on a 2000 calorie diet.
Want To Save This Recipe?
SUBSCRIBE TO GET FREE UPDATES & A FREE ECOOKBOOK!
GET AN EMAIL WHEN THERE'S A NEW RECIPE

Source: https://diethood.com/tomato-avocado-corn-salad/
0 notes
Text
Flourless Peanut Butter Cookies
January 15, 2019 Leave a Comment
These delicious, 5-Ingredient flourless peanut butter cookies are so easy to make and naturally gluten free.
I couldn’t resist dipping these flourless peanut butter cookies into dark chocolate once they were cooled. But you certainly could skip the extra step and enjoy the peanut butter cookies as-is, sans the chocolate.
Flourless Peanut Butter Cookies
Yield: 16 cookies
Prep Time: 10 minutes
Cook Time: 10 minutes
Total Time: 20 minutes
Ingredients:
1 cup all natural peanut butter (I used salted)
1 egg
1/3 cup erythritol*
1 teaspoon vanilla extract
4 ounces dark chocolate
Directions:
Pre Heat oven to 325º F and line a rimmed baking sheet with parchment paper or a silicone mat.
Combine all ingredients in a large bowl and mix until well combined.
Scoop a tablespoon of the dough into your hands to form a ball and then flatten out into a disc-like cookie shape. Place on baking sheet and repeat until you have worked through all of the dough. You should end up with 16 cookies.
Bake for 10-12 minutes or until the cookies are cooked through, golden brown and fragrant.
Allow to cool to room temperature and then melt chocolate in the microwave or in a double boiler. Dip one half of the cookie into the chocolate and then place back on the cookie sheet. Repeat until you have worked thought all of the cookies.
Place the baking sheet in the fridge for one hour or until the chocolate has set up.
Transfer cookies to an airtight container and store in the fridge for up to one week. Enjoy!
NUTRIENTS PER SERVING: Calories 139 | Total Fat 9.7g | Saturated Fat 2.3g | Cholesterol 13mg | Sodium 24mg | Carbohydrate 11.4g | Dietary Fiber 1.9g | Sugars 4.6g | Protein 4.7g
Did you make this recipe? Snap a picture and tag @CleanAndDelicious on Instagram.
I LOVE to seeing your C&D creations. ❤︎ Dani
Reader Interactions
Source: https://cleananddelicious.com/2019/01/15/flourless-peanut-butter-cookies/
0 notes
Text
How to Make Perfect Oatmeal
Oatmeal is a breakfast staple for people around the world, and for good reason. It’s a healthy way to start the day, it’s easy to prepare, and it can be tailored to suit all sorts of dietary preferences. But all too often, oatmeal is not being made to its fullest potential. So how do you actually make perfect porridge? (Read that last word with a Scottish accent to add authenticity.)
The Best Breakfast Recipe in Every State
It really is very simple, so simple that you may doubt that one teeny tiny ingredient could impact a dish so significantly. Indeed this ingredient will take your porridge from drab to fab in no time at all. So what is it? Salt. That’s right, whether you cook your oats with water of milk, if you want to make an unbeatable bowl of oatmeal for breakfast, the key to making it perfect is a pinch of salt. Just add your oats and water (a 2:1 ratio is a good place to start, but add as much liquid as you need to reach your desired consistency) and a pinch of salt and stir regularly over a low heat for about seven minutes. Instant or rolled oats will be done faster than the old-fashioned variety. Steel-cut oats will take longer — though really, they're a whole different ballgame.
It may seem counterintuitive to add salt to a dish that is so often a sweet affair, but as with desserts, adding salt to your morning bowl of oatmeal will add depth rather than making it a savory dish. Garnish your porridge with your topping of choice, be it brown sugar, maple syrup or a handful of berries, and you’d never know there was a teaspoon of salt added.
So go ahead and try this tip for superior oatmeal — we guarantee you’ll never go back to a bland bowlful again. And while you’re in the process of correcting your culinary mistakes, it might be worth learning about 15 other foods you’ve been cooking wrong this entire time.

Source: https://www.thedailymeal.com/how-make-perfect-oatmeal
0 notes
Text
Hot Italian Focaccia Melts
I don't think I have ever made any secret of my love of and for sandwiches. I adore them in any way shape or form. The other day I created a delicious Focaccia melt for us to enjoy using some of the sliced Focaccia flat breads that Deli Kitchen makes. I adore their flatbreads.
They have a wonderful range of innovative flat breads that are simple, handy to use, very versatile and also healthy.
I love these Sliced Focaccia breads from their range. They are a delicious soft olive oil bread and much thinner than regular focaccia that you might see in the shops, making them PERFECT for sandwiches such as this Hot Italian Focaccia Melt I am showing you today. With each thin containing only 291 calories and with each one serving two people that makes for a mighty tasty somewhat low carb sandwich that is sure to please and satisfy even your most ardent bread lovers!
You could get four servings from each focaccia bread for your small eaters, but I would count on there being two each, for your heartier eaters.
The insides of the focaccia are spread with a parmesan herb butter and then layered with three deli meats . . . salami, pepperoni and Italian ham/prosciutto . . .
I have also added two layers of four cheese blend. You can use whatever four cheese blend you like. If you can get an Italian one that's great. I just use the one that I can get in my shops which includes Edam, Jack, Cheddar and Mozzarella.
I also add a layer of spicy marinated pickles. I get the slaw variety which includes carrots, onions and chilies. You could use hot pickled peppers if you wanted, or Giardiniera, or even those Peppadew peppers.
You want something that will give you a little bit of heat without going over the top
I brushed the outsides of the focaccia with some softened butter and sprinkled them with a bit more Italian Garlic & Herb Seasoning . . .
It adds a really nice finishing touch . . .
Once you've done that, you just lay them out onto several baking sheets . . .
I cover the baking sheets with foil and bake first . . . that gives the cheese a chance to melt and the meat a chance to heat through . . .
I then uncover them and bake them for a further 5 minutes, just to crisp up the outsides a bit.
The end result was fabulously tasty! We both really enjoyed these! Kind of like an inside out pizza . . . but without pizza sauce.
We enjoyed them for a light supper with a bit of salad!!
Yield: 8Author: Marie RaynerPrint Recipe
With ImageWithout Image
Hot Italian Foccaccia Melts
prep time: 10 minscook time: 15 minstotal time: 25 mins
Perfect for a quick and easy supper, and oh so delicious!
ingredients:
4 Deli Kitchen Sliced Focaccia
130g butter softened (1/2 cup)
2 tsp garlic Italian seasoning
6 TBS Parmesan Cheese
24 slices Salami
24 slices Pepperoni
24 slices Italian ham with herbs
375g four cheese blend (3 cups)
(Mine has Edam, Jack, Cheddar and Mozzarella)
Spicy pickled salad mix like pickled Giardiniera Mix (optional)
(I used Baxter's Spicy Slaw Deli Topper)
Topping:
softened butter
Italian herb and garlic seasoning
instructions:
Preheat the oven to 180*C/350*F gas mark 4. Slice your sub rolls almost all the way through from the top to bottom.
Cream together the butter, seasoning and Parmesan cheese. Spread a portion of this onto the insides of the focaccia Layer 4 TBS of cheese blend, 4 slices salami, 4 slices Pepperoni, 4 slices ham, 4 TBS hot pickle mix (if using) and 4TBS of the four cheese blend into each bun. Brush a bit of softened butter on the top of each and sprinkle with some Italian garlic seasoning. Place onto two baking sheets and cover with foil.
Bake in the preheated oven for 10 minutes, uncover and bake for a further 5 minutes, until the cheese has melted and all is heated through. Cut into quarters to serve.
With the more spring-like and summery weather coming up, these would also be delicious filled, wrapped in foil and popped onto the outdoor grill! I do so love my sandwich meals! You can buy the Deli Kitchen Sliced Focaccia breads at Sainsbury's where they retail for £1.35 a pack or 34p each! That spells winner/winnerto me! You can buy Deli Kitchen's tasty flatbread range from Asda, Morrisons, Tesco and Waitrose.

Source: https://theenglishkitchen.blogspot.com/2019/04/hot-italian-focaccia-melts.html
0 notes
Text
HEIRLOOM TOMOATO SALAD
So few things are perfect exactly as they come – but peak of the season summer produce are about as simply perfect as you can get. Their flavor is already fully realized, their textures ripe, their colors and juices bursting. When they’re at their best, I can eat a personal watermelon in one sitting. Honestly, a touch of acid, salt, or sugar is all you need to add a bit of finesse to a dish.
In this case, I simply sprinkled a plate of heirloom tomatoes with lemon juice, sea salt, and fresh herbs. I finished with olive oil for a bit of richness. You can do this with any fruit for a fresh and elegant salad, and any crisp and ready to eat vegetable – like avocado, zucchini, or cucumbers. Today, I’m going with vibrant heirloom tomatoes. Enjoy!
INGREDIENTS
For 6
4 large heirloom tomatoes, sliced thickly (this works best with each a green tomato, a yellow one, a red one, and then a brown one)
2 tablespoons mint, chiffonade
2 tablespoons parsley, roughly chopped
2 teaspoons, majoram, finely chopped
1 lemon half, juiced
1/4 cup olive oil
1 teaspoon flaked sea salt
Freshly ground pepper to taste
DIRECTIONS
Overlap the tomato slices on a large plate, starting with greener tomatoes and moving through yellow, orange, red, and ending with darker slices. Sprinkle with lemon juice then the salt, and sprinkle with all of the herbs. Finish with ground pepper.
Source: https://www.thekitchykitchen.com/?recipes=/heirloom-tomoato-salad/
0 notes
Text
I Tried to Quit Caffeine for a Week—& (Barely) Made It Out Alive
In C'mon, It's Just 7 Days, members of the Food52 team tell you about what it was like to face a personal challenge for one week, from going caffeine-free, to adopting veganism, to spending $0. (Spoiler alert: We all survived.)
For the past decade, I’ve started each day more or less the same way: I wake up with the sun, hit the snooze button twice, get up halfway through the second snooze, and then jump out of bed. I immediately make a beeline for the kitchen to fill my little electric espresso maker with freshly ground beans. After brewing, I’ll brush my teeth, read the news, and drink one cup of coffee before heading out for a run. And after that, there’s the second cup, either post-run or post-shower. No matter how rested (or unrested) I am, I always have two cups of coffee to start my day.
In the last 10 years, my morning routine alone has amounted to roughly 7,300 cups of coffee, over half a million coffee beans (figuring 70-plus beans a cup), and upwards of 1,200 hours of my time (assuming 10 minutes a cup)—that’s 50 full days! And this is not to speak of my long and storied past with caffeine, even before then: countless all-nighters in high school and college, fueled by Venti Caramel Macchiatos with extra shots of espresso; Red Bulls and Monsters aplenty; swigs of 5-hour Energy. It left my sleep cycle a mess and set the stage for my current caffeine-dependency.
Many of my colleagues are participating in our C'mon, It's Just 7 Days challenge. Some folks are trying new recipes every day for a week; others are spending $0; others are eliminating all animal products and animal-derived products. So when I thought about a way to challenge myself, to really push me outside of my comfort zone, it seemed like giving up caffeine was a good place to start—after all, it was just for seven days. But even then, I had doubts. Could I function normally without coffee? Or tea? How would it impact the start of each day, and affect my energy levels throughout? There was only one way to find out.
Day One: Dec. 24, 2018
Woke up craving caffeine; tried replacing coffee with hot apple cider (did not work). Fully exhausted myself by searching for ibuprofen, taking a nap, and boarding an airplane. Things are off to a solid start!
Day Two: Dec. 25, 2018
Went for the hardest run of my life; felt slightly like a woolly mammoth attempting underwater aerobics. Was so grumpy I picked fights with literally everyone I came across. Drank a single glass of wine and fell asleep at the dinner table… at 9 p.m. Merry freakin’ Christmas.
Day Three: Dec. 26, 2018
Cheated today (but just a little!) because my sister made some pretty incredible pour-over coffee. Was it worth it? Yes. Was I consumed by guilt the rest of the day? Also yes.
Day Four: Dec. 27, 2018
Tried becoming an “herbal tea” person (also did not work). Developed a raging–monster headache that didn’t go away, even with multiple doses of ibuprofen.
Day Five: Dec. 28, 2018
Experimented with golden milk, which I’d never tried before—and it’s actually pretty good. Cheated again with a teeny-tiny afternoon coffee, but also went to Barry’s Bootcamp, which I honestly would not have made it through without caffeine. Went to bed, woke up at 2 a.m., and couldn’t get back to bed for about an hour. Blast.
Baby's first golden milk! Photo by Me
Day Six: Dec. 29, 2018
Slept in until 10:30 a.m. (oops). Drank an In-N-Out milkshake with dinner, and couldn’t sleep until, like, 3 a.m. At least my sleeping hours are... consistent?
Day Seven: Dec. 30, 2018
Woke up late again, but went for a long walk and cooked all day to distract myself, and it kinda worked? Noticeably no headache or foul mood (not more than usual, at least). Is this what caffeine-free people feel like all the time?
Day Eight: Dec. 31, 2018
Attempted a rather virtuous eighth day, to make up for my bouts of cheating. Unsurprisingly, very non-virtuously cheated again, but only the itsiest bit (a few sips of sea salt–jasmine tea from my all-time favorite bakery, 85°C Bakery Café. I regret nothing.). I GET TO DRINK (sanctioned) COFFEE TOMORROW!
So, I barely made it through the week. But while plumbing the depths of (seemingly never-ending) despair, I arrived at some important takeaways:
The Good
I got a ton of extra sleep (hours-wise).
I drank a lot more water.
I realized I’m kind of into golden milk.
I switched up my routine and (sort of) put a hard-reset on my boring day-to-day; not sure what this did exactly, but I like it in concept.
I discovered how sensitive my body is to any sugar, caffeine, or alcohol.
The Not-So-Good
I virtually always had a headache.
I was super grumpy the whole time.
I was consistently exhausted and low-energy, despite the extra sleep; maybe this was psychosomatic, but either way, not a fan.
I mostly felt pretty terrible when running/exercising.
My sleep schedule was completely thrown off: nights went on way too late, and mornings started sluggish and off-kilter.
I really, really missed the taste of coffee and the peaceful ritual of making it.
Overall, I’ll give myself a C+ for this challenge. It was definitely not easy (and would’ve been even less easy if I’d kept myself honest the whole time). But it forced me to sleep more, and drink more water, and those are good and important things that I’ll try to continue outside of this week-long experiment. It also made me realize that I follow my morning routine for a reason—it’s something small and stable I look forward to each day—and I don’t really want or need to give that up again. If anything, I’ll drop my second cup of the morning, because I am so sensitive to caffeine. But then again, maybe I won’t. And that seems OK, too.
Have you ever given up caffeine? Let me know how it went for you in the comments!

Source: https://food52.com/blog/23617-new-years-resolution-quitting-coffee-caffeine
0 notes
Text
Freezer Breakfast Burritos
4 Freestyle Points 261 Calories
These freezer breakfast burritos, stuffed with scrambled eggs, scallions, bell pepper, bacon and cheese, are a great way to start the day! Make them ahead and freeze them for meal prep so you can have them ready any day of the week.
Freezer Breakfast Burritos
They also make a fabulous easy dinner. Add a side of refried beans and some cilantro-lime rice and you have breakfast for dinner, south-of-the-border style. Frozen burritos are quick and convenient. Your whole meal, wrapped in a portable package—ready to heat and eat.
I’m excited to bring you another recipe that I created in partnership with Reynolds. I’ve been focusing on freezer meals, making weekdays and nights a little bit easier! What I find works best for me, is taking a recipes I plan on making for my family and doubling it, freezing the other half rather than dedicating a whole day to meal prep. The reason I love doing it this way is I find it doesn’t really take me much more time to double a recipe. These breakfast burritos are perfect for a “there’s nothing in my fridge” breakfast, lunch or super-easy dinner.
For the freezer burritos, I used Reynolds Wrap Heavy-Duty Aluminum Foil which not only protects food over direct heat, it also helps prevent freezer burn when wrapping foods for freezer storage. To heat them up, I tested these out several ways: heating them in the oven from frozen which takes the longest but heats up great. Thawing them overnight in the refrigerator, then baking which cuts the time down and yields great results. And my least favorite, but works when you are pressed because it’s the quickest method is microwaving from frozen. In each case, I find toasting them at the end either by broiling or putting them on a hot skillet, greatly improves the taste of the tortilla.
How to freeze burritos for meal prep:
Place the aluminum foil on a work surface vertically, place the rolled burrito in the center bottom third, roll partially, then fold the sides over the burrito to the center, then continue to roll it tight.
Transfer to a freezer bag to prevent freezer burn (you can reuse the bags).
Use a sharpie to label it with the name and date. I find it helpful to also write down cook time and temp for reheating.
How to heat frozen burritos:
To reheat, thawed overnight in the refrigerator: (Best results and great if you remember)
Transfer burrito to the refrigerator the night before. Bake in foil, in a preheated oven 425F 20 minutes, turning halfway. Unwrap foil and bake uncovered 5 minutes. Optional, you can also broil 2 to 3 minutes at the end to toast.
To reheat direct from freezer to oven: (Best results if you forget to thaw the burritos, but takes longer)
Bake in a preheated oven 425F 45 minutes turning halfway. Unwrap foil and bake uncovered 5 minutes. Optional, you can also broil 2 to 3 minutes at the end to toast. Let stand 2 minutes before eating.
To reheat direct from freezer to microwave (Least favorite results, but quickest option) Remove the burrito from the foil and place on a microwave safe dish, cover with a paper towel microwave 1 minute. Turn then cook an additional 1 to 1 1/2 minutes. Let stand 2 minutes before eating. (optional, brown on a skillet 2 minutes on each side to toast, or broil 2 to 3 minutes.
Breakfast Burritos Variations:
Make them vegetarian by skipping the bacon.
Or swap the bacon for sausage or ham.
Skip the cheese to make them dairy-free.
Freezer Breakfast Burritos
These freezer breakfast burritos, stuffed with scrambled eggs, scallions, bell pepper, bacon and cheese, are a great way to start the day! Make them ahead and freeze them for meal prep so you can have them ready any day of the week.
Ingredients:
6 strips center cut bacon
10 large eggs, beaten
4 scallions, chopped
1/2 red bell pepper, diced
1/2 teaspoon salt
12 tablespoons shredded cheddar or pepper jack cheese
6 (8-inch) low carb flour tortillas (I used Ole Xtreme Wellness)
6 pieces Reynolds Wrap Heavy-Duty Aluminum Foil, cut 10 x 12 inches each
hot sauce for serving (optional)
Directions:
Char both sides of the tortillas on a hot griddle or over the open flame. Keep warmed in the oven if eating right away. This will help the tortillas become more pliable and also improves the taste, in my opinion.
Heat a large non-stick skillet over medium heat. Add the bacon and cook until cooked through, about 4 to 5 minutes. Transfer with a slotted spoon to drain on a paper towel lined plate.
In a large bowl whisk the eggs with salt. Mix in scallions and bell pepper.
Discard the bacon grease leaving 1 teaspoon then add the eggs, let them set on the bottom then stir a few times to cook through, set aside.
On a clean work surface, divide a generous 1/2 cup of the egg mixture onto the bottom third of the tortilla. Top each a slice of bacon and 2 tablespoons cheese. Roll from the bottom, folding the left and right corners in toward the center and continue and roll into a tight cylinder. Set aside, seam-side down, and repeat with remaining tortillas and filling.
If eating right away, heat a skillet over medium heat. When hot, spray the skillet with oil and add the burritos, seam side down. Cook, covered, until the bottom of the burritos are golden brown, about 2 minutes on each side. Serve with hot sauce or salsa, if desired.
How to freeze burritos for meal prep:
Place the foil on a work surface vertically, place the rolled burrito in the center bottom third, roll partially, folding the sides of the foil over the burrito, then roll it up.
Transfer to a freezer bag to prevent freezer burn (you can reuse the bags).
Use a sharpie to label it with the name and date. (also helpful to write down cook time and temp).
How to heat frozen burritos:
To reheat, thawed overnight in the refrigerator: (Best results)
Transfer burrito to the refrigerator the night before. Bake in foil, in a preheated oven 425F 20 minutes, turning halfway. Unwrap foil and bake uncovered 5 minutes. Optional, you can also broil 2 to 3 minutes at the end to toast.
To reheat direct from freezer to oven: (Best results)
Bake in a preheated oven 425F 45 minutes turning halfway. Unwrap foil and bake uncovered 5 minutes. Optional, you can also broil 2 to 3 minutes at the end to toast. Let stand 2 minutes before eating.
To reheat direct from freezer to microwave (Least favorite results): Remove the burrito from the foil and place on a microwave safe dish, cover with a paper towel microwave 1 minute. Turn then cook an additional 1 to 1 1/2 minutes. Let stand 2 minutes before eating. (optional, brown on a skillet 2 minutes on each side to toast, or broil 2 to 3 minutes.
To reheat in air fryer, thawed overnight in the refrigerator: (crisp results)
Transfer burrito to the refrigerator the night before. Unwrap and discard foil, spritz with a little oil and air fry in a preheated air fryer 400F 8 to 9 minutes, turning halfway until heated through in the center.
Refrigerate for 4 to 5 days. Freeze for up to 3 months.
Nutrition Information
Yield: 6 servings, Serving Size: 1 burrito
Amount Per Serving:
Freestyle Points: 4
Points +: 8
Calories: 261 calories
Total Fat: 16g
Saturated Fat: 6g
Cholesterol: 325mg
Sodium: 723mg
Carbohydrates: 18g
Fiber: 11g
Sugar: 0g
Protein: 21g
All images and text ©Gina Homolka for Skinnytaste
Disclosure: This post is sponsored by Reynolds. Thank you for supporting the brands that make Skinnytaste possible. All thoughts are my own.
posted March 27, 2019 by Gina
Don’t Miss a Recipe!
Get new free recipes and exclusive content delivered right to your inbox:
Source: https://www.skinnytaste.com/freezer-breakfast-burritos/
0 notes
Text
Garlic Mushroom Chicken Thighs
Garlic Mushroom Chicken Thighs (LOW CARB) is a quick throw together chicken recipe all cooked in one pan!
Golden seared chicken thighs in a delicious garlic butter mushroom sauce with a hint of herbs is THE weeknight dinner everyone raves about! The perfect dinner when your faced with minimal ingredient and no time. Serve these Garlic Mushroom Chicken Thighs over rice, pasta, mashed potatoes OR lower carb options like mashed cauliflower or zucchini noodles!
Chicken Mushroom
Who doesn’t love this flavour bomb? Many readers have been writing in asking how to simplify this Cheesy Garlic Butter Mushroom Stuffed Chicken recipe. Of COURSE I’m up for that and here it is! Garlic butter and mushrooms go hand in hand already, for breakfast, lunch or dinner. BUT throw in some juicy, golden chicken thighs and WHOA have mercy!
Boneless Chicken Thigh Recipe
We decided to use chicken thighs for this recipe because dark meat suits the natural juices released from mushrooms. Although we use chicken thighs, you can substitute them with skinless, boneless breasts or chicken tenders if you like and follow the rest of the directions. This is an extremely forgiving recipe!
Simple Ingredients
With only a handful of ingredients, you’ll have one of the BEST and easiest chicken recipes hit your dinner table.
Once your chicken is seared, move onto your garlic butter mushrooms! Cook them in the same pan your chicken was in, scraping up any browned bits from the base of the pan for extra flavour in the mushrooms.
Garlic Mushrooms
The simple sauce of the buttery garlic mushrooms mixed with the seared chicken is what really makes this Garlic Mushroom Chicken Thighs recipe amazing.
Butter — we use unsalted to better adjust the saltiness in the recipe
Garlic — use fresh or bottle minced garlic. Fresh is best!
Mushrooms — brown or white mushrooms
Herbs — we love thyme, rosemary and parsley! Not a fan of those? Use whatever herbs YOU like!
More chicken thigh recipes
Chicken Thighs With Creamy Mushroom Garlic Sauce
Garlic Teriyaki Chicken Thighs
Roasted Asian Glazed Chicken Thighs
Mushroom Chicken Thighs on VIDEO!
Garlic Mushroom Chicken Thighs
Golden seared chicken thighs in a delicious, buttery garlic mushroom sauce with a sprinkle of herbs is THE weeknight dinner everyone raves about! Serve over rice, pasta, mashed potatoes OR lower carb options like mashed cauliflower or zucchini noodles!
Course: Dinner
Cuisine: American
Keyword: Chicken Thighs
Servings: 6 people
Calories: 206 kcal
Author: Karina
Ingredients
For The Chicken:
1 1/2 pounds (700g) boneless skinless chicken thighs (around 6-8 fillets)
1 teaspoon each onion powder and garlic powder
1/2 teaspoon each of dried thyme and rosemary
1/2 teaspoon salt
1/4 teaspoon cracked black pepper
2 tablespoons olive oil
For The Sauce:
1 tablespoon butter
8 ounces (250 g) sliced brown mushrooms
4 cloves garlic, minced (or 1 tablespoon minced garlic)
1 tablespoon fresh chopped parsley
1/2 - 1 teaspoon each of dried thyme and dried rosemary (adjust to your taste)
Instructions
Pat chicken thighs dry with paper towel and trim off excess fat. Combine the onion powder, garlic powder, herbs, salt and pepper. Coat the chicken evenly with the combined seasoning.
Heat 1 tablespoon of oil a large pan or skillet over medium-high heat and sear chicken thighs in batches until browned on each side and no longer pink in centre (about 8 minutes each side, depending on thickness). Add remaining oil if needed for second batch. Transfer to a plate; set aside and keep warm.
To the same pan or skillet, melt the butter and add the mushrooms. Season with salt and pepper and cook until soft (about 3 minutes). Add the garlic, parsley, thyme and rosemary; sauté until fragrant (about 1 minute).
Return chicken to the pan. Taste test and season with salt and pepper to your taste. Garnish with fresh parsley. Serve immediately.
Recipe Notes
*You CAN use fresh herbs if you have them! 2 teaspoons each of fresh herbs is fine. If you don't like Thyme or Rosemary, substitute with Basil and Oregano, or use Tarragon.
Optional: For even more amazing flavour, add in 1/3 cup dry white wine with your mushrooms and cook it down to half before adding the chicken back into the pan.
Nutrition Facts
Garlic Mushroom Chicken Thighs
Amount Per Serving
Calories 206 Calories from Fat 99
% Daily Value*
Total Fat 11g 17%
Saturated Fat 3g 15%
Cholesterol 112mg 37%
Sodium 198mg 8%
Potassium 261mg 7%
Total Carbohydrates 2g 1%
Protein 23g 46%
Vitamin A 2.8%
Vitamin C 1.8%
Calcium 2.1%
Iron 6.3%
* Percent Daily Values are based on a 2000 calorie diet.
© 2017 CAFE DELITES. All rights reserved. All images & content are copyright protected. Please do not use my images without prior permission. If you want to share this recipe, please provide a link back to this post for the original recipe.
Related

Source: https://cafedelites.com/garlic-mushroom-chicken-thighs/
0 notes
Text
Franzia made personal-sized pouches that contain half a bottle of wine
If you are a millennial (give or take), it’s highly probable that you’ve tasted the sweet nectar of Franzia boxed wine. Slap the bag! Am I right? Well, for the first time in the brand’s 103-year history, boozers can buy new personal-sized wines that contain three glasses each.
We Bet You Didn't Know These States Made Wine
The 500-milliliter boxes, cutely dubbed “Little Franz,” currently come in four varietals: a semi-dry rosé with red berry flavors, a semi-dry stone fruit chardonnay with hints of vanilla and oak, a medium-bodied crisp white with floral aromas and fruit flavors and a light pinot grigio with citrus and pear flavors. The suggested retail price is $3.49 per pouch, which works out to a little over $1 for each glass inside.
These new alcoholic juice boxes are part of Franzia’s new “Franz for Life” campaign, an attempt to graduate from frat party to… whatever it is that we’re all doing as adults now. Instead of trying to attract the very people we used to be, Franzia is looking to grow old with us. Aw.
“While Franzia continues to have a strong pull with Boomers and GenX wine consumers, the brand’s largest demographic segment is millennials,” said Jeff Dubiel, chief marketing officer for Franzia producer The Wine Group, in a statement. “We want to be sure we’re growing with our customers at all stages of life. This new campaign is designed to reinforce the message that Franzia can be enjoyed at any age and encourages our customers to be ‘Franz for Life.’”
The OG, much larger boxed wine is nostalgic, but we won’t pretend we aren’t excited about these personal pouches that are practically begging us to drink them while we attend concerts and 50 other things we need to do this summer.
Source: https://www.thedailymeal.com/drink/franzia-little-franz-wine/040519
0 notes
Text
25 Fresh Recipes to Make Before Summer Ends
25 Fresh Summer Recipes - Cookie and Kate
"cookieName":"wBounce","isAggressive":false,"isSitewide":true,"hesitation":"5","openAnimation":false,"exitAnimation":false,"timer":"","sensitivity":"","cookieExpire":"14","cookieDomain":"","autoFire":"","isAnalyticsEnabled":true
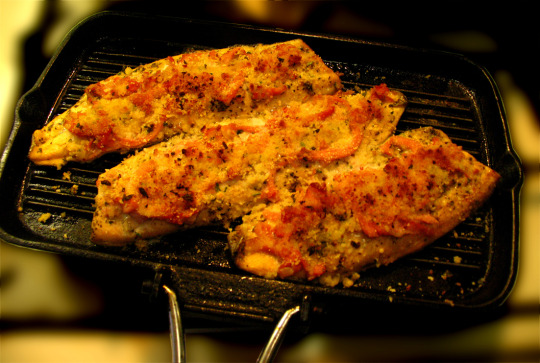
Source: https://cookieandkate.com/2018/25-fresh-summer-recipes/
0 notes