
Statistics
We looked inside some of the posts by cecilevadasblog and here's what we found interesting.
Average Info
Notes Per Post
0
Likes Per Post
0
Reblog Per Post
0
Reply Per Post
0
Time Between Posts
9 days
Number of Posts By Type
Photo
17
Last Seen Tumblr Blogs


Fun Fact
Tumblr was attacked by a cross-site scripting worm deployed by the Internet troll group GNAA on Dec 3, 2012.
Photo


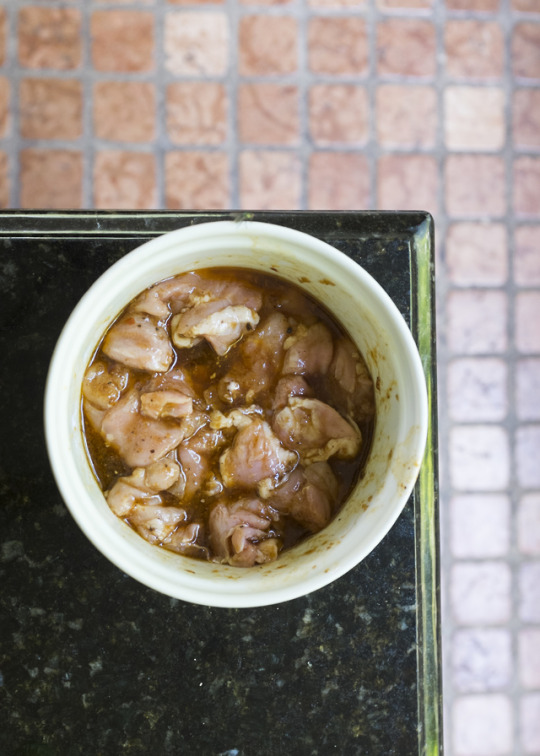


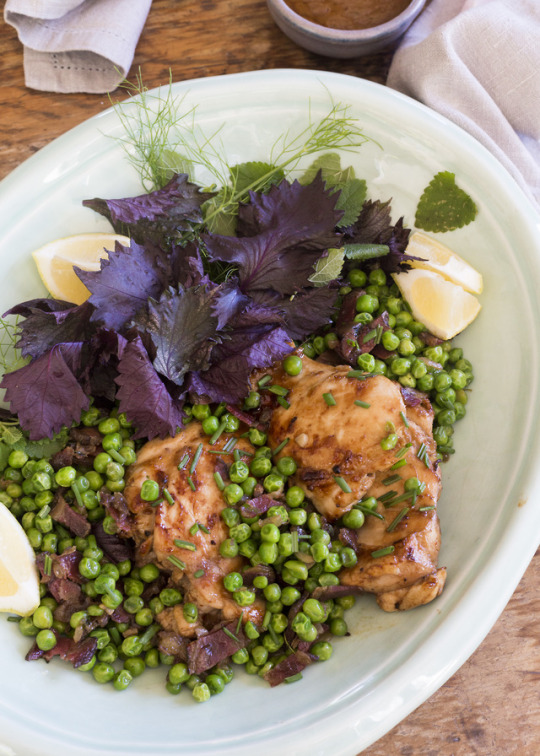
Warm Chicken and Pea Salad
Vibrant, flavorful, fresh but also filling - this is a great summer dish for any occasion. Served cold for picnics or fresh off the barbeque, this sure is a crowd pleaser and so simple for the cook!
Calling all bacon fanatics! Don’t I have a dish for you... feast your eyes on this Asian style marinated chicken with a pea and bacon salad. Now, grab a bite - don't forget to squeeze that lemon - and feel that burst of flavour from the chicken emulsify with the salted bacon peas.
Using fresh herbs as an accompanying salad, this dish screams summer party food, alfresco style. Of course, great for the kids as well. Reduced the marinade for an extra pop of flavour and a great dunking sauce moment.
Super simple, super easy... it sure will be a hit (and makes for even better leftovers).
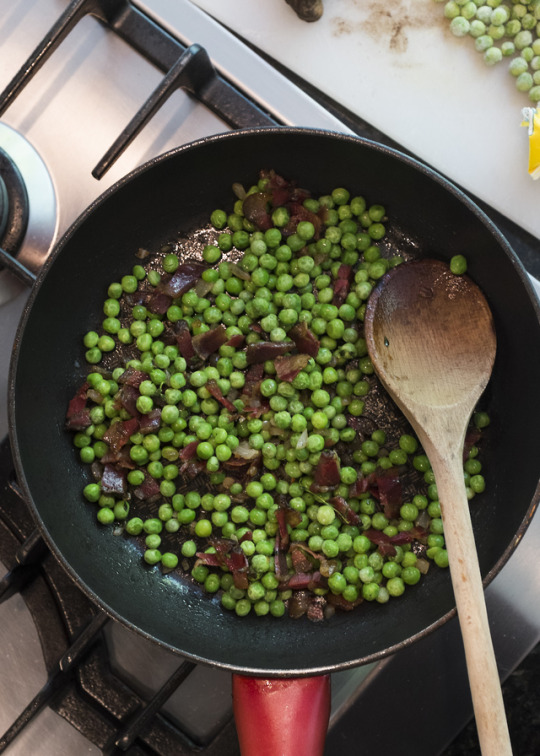
Asian Plum Chicken Thighs with a Pea, Bacon and Mint Salad
Inspired by Lindseyeatsla
Ingredients
For the Chicken and Marinade
500 grams organic free-range chicken thighs
2 tbsp Chinese plum sauce
1 tsp harissa
1 1/2 tsp roasted chilli jam
2 tbsp light soy sauce
1 tbsp rice wine vinegar
2 tsp sesame oil
For the Marinade cause
1 tsp corn starch
Salt and pepper
For the Pea and Bacon salad
100 grams of frozen peas
1/2 large white onion
2 tbsp dried bacon, sliced
1 tsp thyme, leaves removed from the stem
Salt and pepper
Mint and shiso for serving
Method
Prepare the marinade first by simply mixing the marinade ingredients together in a bowl. Add the chicken thighs and coat well. Cover, refrigerate and leave for at least one hour (better overnight).
To make the pea salad - start by heating 1 tablespoon of olive oil in a pan and add the bacon and onion. Cook for 2-3 minutes or until the onion begins to turn translucent. Add the thyme, peas, salt and pepper, cooking until the peas turn a rich green colour. Remove from the pan and leave to cool.
Cook the chicken in a pan with a tablespoon of canola oil. Pour the leftover marinade in a small saucepan and place on medium heat. Cook for at least 5 minutes on a gentle bubble.
Flip the chicken over. Cook for 10 minutes or until the chicken begins to brown. Remove from the pan. Pour the leftover juices into the marinade saucepan. Add the corn starch, whisking as you go to ensure clumps do not form.
Place the chicken on a serving platter along with fresh mint and shiso leaves. Scatter over the pea and bacon salad along with slices of lemon. Serve the marinade sauce alongside.
0 notes
Photo


Bread making. Have you ever experienced one of those times where it seems too difficult, too complicated, too time-consuming but you have always had this innermost desire to try it? This, for me, has always been making bread from scratch. With a little research, ie. like 10 minutes here and 10 minutes there, a little spare time, my mother's amazing kitchen and her helping hands, my desires had to be released. I gave bread making a go.
It was comical at times. It was frustrating at times. It was bonding (at only a few moments in time). It was challenging all the time. But mostly it was quiet invigorating. Don’t do it if you need a quick snack, a late lunch sandwich or a last-minute accompaniment for a dinner party. Bread making takes minimum 1-1.5weeks (this includes making the sourdough starter). And, yes, this is the good sh**... sourdough. With the small amount of research I had done, it became clear to me that there was no one way to make the starter. If you are unsure, the starter something that needs to be made before you begin even make the actual bread itself. It basically will grow to contain active yeast which creates the rise and form of bread. You can buy this of course and this will cut time off the whole process, but it’s one of the hardest challenges about bread making that I wanted to face. Firstly, I had to know how to make it, what to use, how much etc. But I couldn’t find a simple recipe that was the same as any others. So what to do? I found two recipes, that seemed most popular in terms of reviews and similar to others. I made both. I now not only am making bread, but I’m making a story, a comparison, a structured documentation of bread making. And of course, I should end with a conclusion... but things are never as simple as they seem. Starter 2 formed a lot better than starter 1 but bread 1 ended up so so so much better than starter 2. So... my conclusion is still yet to be determined. I need to probably make bread 10 times more, documenting each cycle, to really give a real and honest answer. For now, I left Australia and my mum with a whole lot of starter, bread and mess (enough for a good few weeks) but I can finally say I made bread from scratch. I struggled but it was a huge amount of enjoyment. They basically became my babies that were to be nature’s, fed, put to sleep, awakened... then baked? Anyway, you get my point. I have written out both processes. Give it a try... if you have some time to spare. It does only take a few minutes each step with a whole lot of resting, rising and rejuvenating.
Sourdough Starter 1
Ingredients
20 grams, 40 grams, 80 grams whole wheat flour
20 grams, 40 grams, 80 grams bottled mineral or flat water
Method
For this, you will need one-litre glass jar or sealable tall container which you can draw on using a marker. This is a 5-day process and should not be rushed. Sometimes, starters will not work out as hoped due to the cleanliness of the jar, mixing spoons that are not completely clean as well as other unknown particles in the air. Do let this get to you… simply start again but to avoid this, make sure you use clean equipment at all times.
Day 1
Weigh out 20 grams of flour and 20 grams of water into the jar (best way to do this equalises the jar’s weight on the scale and add on top. Mix well so the flour is completely incorporated. If there is still clumps of dry flour, add a little more water. Scrap the sides down with a spatula.
Mark the side of the glass jar with a thick marker, where the flour/water mixture reaches - this helps to know how much it rises and fulls over the period of 5 days. Leave to cultivate for a 24 hour period in a dark, room temperature place with the lid on (do not seal tightly).
Day 3
You should be seeing a slight bit of activation - a few large bubbles forming on the surface. Do not worry if this is not the case as this method, the activity happens more in the latter part. You should smell a slightly sour aroma from the jar - this is great!
Equalise the jar again and add 40 grams of flour and 40 grams of water. Mix well until the flour is incorporated. Scrape down the sides of the jar again and mark this increase.
Place the lid loosely on and return back to the dark place for a 24 hour period.
Day 4
Now you should really be smelling the sourness. The smell is slightly tart and not completely appealing but in someway very comforting. Note the slight rise and more bubbles.
Now to add the final feed. Equalise the jar and add 80 grams of flour and 80 grams of water. Mix well, scrape and mark.
Place back into the dark place again for the final 24 hour period.
Day 5
The starter should have risen slightly more with a few more large bubbles. With the method, there is not as much rise and fall in the starter than other methods but this is ok. It is really important to keep your starter active once you have finished the formation process. You will never have to make a starter again if you keep it in the fridge and feed it once a month (20 grams/20 grams).
Sourdough Starter 2
Ingredients
3/4 cup, 3/4 cup, 3/4 cup whole wheat flour
3/4 cup, 1/2 cup, 1/2 cup bottled mineral or flat water
Method
For this, you will need one-litre glass jar or sealable tall container which you can draw on using a marker. This is a 5-day process and should not be rushed. Sometimes, starters will not work out as hoped due to the cleanliness of the jar, mixing spoons that are not completely clean as well as other unknown particles in the air. Do let this get to you… simply start again but to avoid this, make sure you use clean equipment at all times.
Day 1
Weigh out 3/4 cup of flour and 3/4 cup of water into the jar (best way to do this equalises the jar’s weight on the scale and add on top. Mix well so the flour is completely incorporated. If there is still clumps of dry flour, add a little more water. Scrap the sides down with a spatula.
Mark the side of the glass jar with a thick marker, where the flour/water mixture reaches - this helps to know how much it rises and falls over the period of 5 days. Leave to cultivate for a 24 hour period in a dark, room temperature place with the lid on (do not seal tightly).
Day 3
You should be a bit of activation in the first 24 hour period and even more in the second 24 hour period. This method, the starter really loves to rise and fall and you end up with more quantity of starter than the first method. The bubbles are small and in mass. The sourness should be very much prevalent at this time too. There is sometimes a small amount of liquid that forms on the top - this is ok.
Equalise the jar again and add 3/4 cup of flour and 1/2 cup of water. Mix well until the flour is incorporated. Scrape down the sides of the jar again and mark this increase.
Place the lid loosely on and return back to the dark place for a 24 hour period.
Day 4
Now you should really be smelling the sourness. The smell is slightly tart and not completely appealing but in someway very comforting. Note the slight rise and fall and more bubbles.
Now to add the final feed. Equalise the jar and add 3/4 cup of flour and 1/2 of water. Mix well, scrape and mark.
Place back into the dark place again for the final 24 hour period.
Day 5
The starter should have risen and dropped with lots of small bubbles on the surface. With the method, do not worry about the dramatic rise and fall in the starter. It is really important to keep your starter active once you have finished the formation process. You will never have to make a starter again if you keep it in the fridge and feed it once a month (3/4 cup /1/2 cup).
Sourdough Bread
Ingredients
For the Leaven
2 tbsp activated sourdough starter
1/3 cup water
1/2 cup all-purpose flour
For the Bread
Leaven
4 cups all-purpose flour
1 tbsp table salt
2 1/2 cups tap water
Equipment
2 Dutch oven or heavy-duty ovenproof dish
Pastry Scraper
Bread proofing basket or colander/ mixing bowl
2 Tea towels
Plastic wrap or tea towel for covering
Method
To make the Leaven
This process must be left overnight so should be made 24 hours to 48 hours before. In a medium-sized bowl, place the activated starter, water and flour. Mix well to ensure all flour is incorporated. Cover with a loose tea towel and leave in dark, dry place.
To test if the leaven is ready, fill a small glass with water. Drop a small amount of leaven into the water - if the leaven floats it's ready but if it sinks, leave for a few more hours. Repeat until the leaven floats.
To make saltwater
Heat or boil 1/2 cup of water. Add the salt into the water, string well to ensure the salt dissolves. I find the heated or boiling water helps this process but you can also use room temperature water. Leave to cool.
To make the dough
Do not be afraid - there are a lot of small steps in this process but all are very important and can be broken up if you cannot complete this all in one day.
Mix the leaven and the remaining 2 cups of water in a large bowl. This will look a little watery but that is ok. Just ensure there are no clumps of leaven left. Add the flour, cup by cup, mixing well between. Make sure to use a spatula for this. You should begin to form a dough - it will feel rather sticky still. Cover and rest at this point for a minimum of 30 minutes a up to 4 hours.
Pour the saltwater over the dough and mix with your hands. The best way to do this is by pinching and pressing the water into the dough. It will feel very wet and loose.
Now the folding process - this takes 2 1/2 hours. This folding is done by grabbing one side of the dough, picking it up, folding it over on top of itself and repeating four times in a clockwise direction but keeping it in the bowl.
Do this for a total of 6 times every half hour - adds up to 2 1/2 hours. Over this time, the dough will tighten and become thicker. Cover at let it rest for 30 to 60 minutes. The dough may rise a little but this is not the rising stage so do not worry if nothing happens.
Sprinkle a generous amount of flour on the bench - when you think you have enough flour down, sprinkle with one more handful. The dough is not so wet now but it will stick more than you think. Bring the dough out on the surface and gently begin to work dough but avoid more than once or twice - divide in half using the pastry scraper.
Sprinkle a little more flour and begin to shape into rounds. Kneed it with the palm of your hand and by doing this you begin to form a slightly rounded shape. Rest each half for 30 minutes to relax the glutens.
Prepare two proofing baskets, colanders or mixing bowls. Layout two clean tea towels, sprinkle generously with flour and rub the flour into the towel surface. This may sound and seem weird but will prevent the dough from sticking during the next rest period. The four should cling to the tea bowl in a light layer. Carefully slide the proofing basket, colander or mixing bowl underneath the tea towel and gently press into the bowl to form its loose shape.
Dust with flour and begin the second round of shaping. Do this similar as earlier - grab the lip of one corner, gently pull it up and fold it over itself. Do this for all corners of the dough. Cup your hands around the dough and move spin the tighten this into a circular form. Repeat with the second ball.
Transfer to the proofing basket with the seam side down. Cover with a tea towel and leave to rise for 3 to 4 hours in dry room temperature place or for 12 to 15 hours in the fridge.
Heat the oven to 240 degrees. Don’t forget you need two cooking pots for each loaf. Place the dutch ovens or ovenproof pots, covered, into the oven. Heat for 5-6 minutes. If you cannot fit them on the same self then cook one after another - the temperature varies at different levels so you cannot place them on different shelves.
Remove from the oven. Oil the bottom of your dutch oven or ovenproof pot this makes sure the loaf does not stick and tip the loaf straight in. Score with a sharp knife - make sure to slice in both directions for the best crisp top.
Cover and bake for 20 minutes. Lower the temperature to 220 degrees and bake for a further 10 minutes.
Remove the lit and bake uncovered for 30 to 40 minutes. Have a look to see if there is a very crisp, almost burnt, looking top. You can test the interior by inserting a cake tester, if it comes out slightly wet, bake for longer.
Once the cake tester comes out dry but warm, the loaf is ready. Remove from the oven and turn out onto a cooling rack
0 notes
Photo


Top Stops for a Weekend in Paris
There are certainly harder things in life to face than a weekend in Paris. But with limited time and a city that spans over 105 square kilometres and an endless number of cultural, historical and leisure activities to do, where do you start? Here’s a mix of things to do that don’t leave you wasting away your weekend in long lines, trailing behind guided tours or freezing up your bank accounts.
First port of call, where to stay? The trendy, central, vibrant and also slightly hip area called Marais, is certainly a great place to set up your short-term shop. It’s a very accessible neighbourhood surrounded by a mix of fine dining and street style restaurants, endless alleyways that lead to a new and exciting adventure as well as small parks where locals and tourists intermix, catching those midday sunrays. The most unique part of the Marais is the hidden antique, vintage and thrift stores that line the cobbled streets - high-end fashion, collectable jewellery as well as second-hand clothes are all on offer.
If you are in need of supplies and a stroll through the Parisian streets, head over to the Grand Epicerie at Bon Marche. This is the be-all and end-all of French quality produce and local culinary supplies. Stock up on all essentials like bread, butter, cheese and meats. Fresh fruits, salad and vegetables are also available - it was hard to leave without all the different types of tomatoes and cheeses (in some cases, wheels of cheese) because everything looked and smelt amazing! Nibble on the testers, giving you a chance to try a few French staples (like their Brioche bun with dried raisins).
Mosey on to the surrounding parklands for a drink, alfresco style, or even to snack on those newly bought goodies like a baguette and ham lunch, Parisian style. The park directly out the front of the Picasso museum is great for kids with a large playground as well as sun/shaded area for the adults.
A main attraction in the Marais is the Picasso museum housing a beautiful collection of Picasso’s works in a minimalist style mansion home. The exhibition does change every few months, providing a different focus on his work, but it is also worth seeing the inside of the space for a truly mesmerising experience. The best time to see this exhibition is between 4.30pm and close as there are no waiting lines and the rush of people have dispersed so there is less congestion inside to freely see each work.
For a truly enjoyable, entertaining and memorable dinner (or special lunch), book into L’ami Jean. The food is absolutely amazing but really what stood out to me was the unique form of service. Down to earth, friendly but also relatable - the staff (who were the owners) became a part of the dining experience and really made each and every guest feel at home whilst sensually exploring their Basque/French menu. special requests were never an issue, larger bookings were easily accommodated and the cheap jokes were dished out as much as the food itself.
My two favourite must-try dishes were the razor clams with chilli and garlic and the Grandma Soup (cheese soup) with homemade croutons - I didn't want to count bread and butter as a dish but you must try this as well! For dessert, well there is one and one thing only... rice pudding. Before you say you don’t like rice pudding (which is exactly what I said), you should give this a try. Start off with a small portion, but I promise you, you will end with licking the bowl. They serve the creamy vanilla rice mix with homemade dulce de leche sauce, salted slightly, and homemade caramelised mixed nuts. Mix and match as you wish, but adding both on top, you could say gives me the shivers and a slight form of salivation just thinking about it.
For the second day, wake up early and head to this antique flea market called Port de Vanves around 7.30am. About a 20-minute uber ride out of the Marais district, you could spend hours rummaging through streets lined with stalls. It may seem a little daunting to begin with but there are some hidden gems for all. I picked up a great jewellery box, an antique ring and necklace. There were old collectable plates as well as vintage handbags, paintings and kids toys - really a market for all.
Stop off at the only food stall in the market for a ham, cheese and egg toastie as a breakfast meal or snack. Warning they do not false advertise on the ingredients used - each bite was that much more scrumptious than the last.
Once you tire from the flea markets, head to the Pompidou (Le Centre Pomidou). If you time things well you should arrive at the opening (11am) to avoid the waiting lines. Again, they change the works and shows on offer but there is an amazing photo exhibition during the month of July (2019) of Dora Maar and a link to Picasso.
No matter what exhibitions are on, there are two things to absorb when visiting the Pompidou. When the building was completed in the 1970s, designers Richard Rogers, Renzo Piano and Gianfranco Franchini attracted much attention. Designed opposite to that of a normal building - the exterior holding the normally hidden inner workings of a building such a gas, plumbing and water tubes as well as an endless zig-zag of ladders, a statement was made and this is an understatement. It is challenging both aesthetically, to look at, and mentally, to understand, for the everyday person.
Secondly, take a moment to look out from the top level and admire the expanse of the city and the perfectly clear site of the Eiffel Tower. Spend as long or as little as you like in this monumental structure, regardless, a drink is in order afterwards.
A perfect Parisian style bar calls your name - Au Petit Fer à Cheval. The street this is located on (Rue Vieille du Temple) is great for an eclectic, cosy but also very French-style cafe/bars. One thing to know, the service is slow, the drinks are expensive but this is the last stop on the weekend away... so live it up!
0 notes
Photo


A Baked Goody Bag
Summer, Winter, Autumn or Spring - any season of the year, sometimes a baked dip-like meal served with freshly grilled bread cannot be beaten. This baked ricotta with homemade tomato sauce is my childhood love and will add a smile on any dial for breakfast, lunch or dinner.
You can think of this as a version of shakshuka or dip turned into a meal and who doesn't love a laid back dinner idea or a slightly special breakfast dish? I first fell in love with baked ricotta because I use to eat it ALL the time when I was a child. My mum used to bake plain ricotta in a small ramekin as my own vegetarian option for dinner.
I have spiced my mum’s baked ricotta recipe up without complicating or losing focus on ricotta as the main ingredient. What makes or breaks this dish is the quality of the ricotta. Please use fresh and locally sourced ricotta because the flavours will naturally shine and you will not have to add a lot of other components to help provide flavour as ricotta has a fairly bland flavour.
Grill that bread, dunk and bite - feel every component melt in your mouth.
Baked Ricotta
Ingredients
1 medium onion, diced
2 garlic cloves, crushed
200 grams mixed very ripe tomatoes (can use 400-gram tin tomatoes), roughly chopped
100 grams good quality ricotta
3 sprigs fresh thyme,
Chives for garnish
Method
Place the onions with a pinch of salt in a pan and sauté for 4-5 minutes. Add garlic and thyme and cook for a further 1 minute. Add the mixed tomatoes, cooking for 15-20 minutes or until the tomato breaks down and begin to form a sauce. You may need to help this process by squishing them with the back of a fork or wooden spoon. Remove from the heat.
Preheat oven to 210 degrees Celsius. In individual ramekins or oven proof mini saucepans (serves 2-3), spoon out some tomato sauce, topped with 2 tablespoons of ricotta and a sprinkle the rough chives on top. Repeat until tomato sauce runs out.
Bake for 10-15 minutes or until the top of the ricotta turns golden and the whole mix is bubbling. Remove and serve hot with freshly grilled bread.
0 notes
Photo


Summer Style, Summer Salad
Blistering 40 degrees, all you want to eat is an ice cube. You know the rath that your stomach will hold over you if you follow through on this ice cube desire for lunch or dinner. So what do you make that’s super simple, light, refreshing and nourishing, all at the same time?
No cooking, little cutting, simple ingredients and a vision of summer - whip up this fig, burrata and herbed salad. Without a full mixed leaf or other filling bases, this salad packs a punch in the toppings so ensure you buy good quality ingredients. Apart from this, there are no rules, guidelines or real recipe to follow - simply roughly cut or tear (I prefer to tear herbs and burrata for a textural look) and place in a bowl. I used burrata (could also use mozzarella), mixed cherry tomatoes, figs, basil and shiso but adapt as you wish. Drizzle with balsamic vinegar and sprinkle with sea salt. That’s it!
So, don't let your tummy go hungry even when your motivation or desire to cook is at zero. Rustle up this easy, dreamy summer style salad for the perfect combination of light, fresh, simple and delicious heat wave option.
0 notes
Photo


Visiting Valencia
City or countryside? Small or big town? Beachside or cultural sites? Travelling leaves so many open doors, choices and options for one to decide. Even further, how can one decide when there is a group of you with all different travelling preferences, desires and wishes. Simple, travel to Valencia, via Madrid.
Our recent trip to Spain - Madrid then Valencia- saw for all different hurdles and challenges as well as memorable moments and cultural experiences. Travelling with 11 people for a 30th birthday weekend was sure out of the ordinary. Slow-moving, endless alcohol consumption, little sleep and a blinded drainage of the wallet, but Madrid and Valencia proved to be perfect locations for a group travelling journey. Surrounded by friends, the Spanish culture, cuisine and never-ending monumental aesthetic of both small and big cities, this is truly your one and only location for a perfect group getaway.
Valencia is a beautiful city - amazing old buildings with elegant Rome and Juliet style balconies, narrow cobbled walkways where locals sell antiques, handmade garments and fresh regional produce, as well a unique old river transformed into a below-ground park that is home to an endless number of orange trees. Valencia is mainly known for the birthplace of the orange and the formation of its name. It’s an interesting story - one of those misunderstanding moments - may be worth looking up. The city sure doesn’t let you forget their connection to this citrus fruit as these trees line pretty much every street.
Direct flights into Valencia is certainly possible but not always available. You can also arrive by bus - only four hours from Madrid. If you do decide to visit Madrid as well, the Prado and Sofía museums are highly recommended for not only the significant exhibitions in which they house but also the unique buildings that form their foundations. We stumbled on the Vintalogy vintage store which is great for high-end collectables as well as other alternative second-hand designs.
Things to do in Valencia include spending a sunny day at their main beach, absorbing every ray possible and supporting the locals in purchasing beautiful hand made beach blankets. Dining at the endless amount of Pintox bars around Civtat Vella, walking through the Parc Gulliver and visiting the famous Opera house.
Do not fear if you are in search of the perfect group vacation destination that caters to all needs, visit Madrid and/or Valencia. disfruta tus vacaciones (have a great vacation)!
0 notes
Photo


When The Seasons Cross
Who else gets excited at the thought of a salad, especially a salad during the warm summer months? Here is a little slice of something experimental but delicious.
At the beginning of summer, you can be blessed with the rare occasion of having seasonal overlap. One of my favourite things to do is mixing seasonal produce when/if this happens. Call me crazy, but boy do the mixing of hearty with light and fresh result in a unique and wholesome dishes.
Like a fridge-clean-out-recipe this recipe relies on substitution - if you have one thing but not another, then feel free to do the switch-a-roo. Because this seasonal overlap probably only lasts a few days and with varying ingredients, you cannot go to the shops and fetch what you don’t have. Be brave, be bold and be daring - it will often end is an accidental culinary masterpiece.
Pineapple, mint and crispy kale salad
Ingredients
2 stalks kale
1 tbsp olive oil
1/2 tsp salt
1/2 pineapple, skin and core removed
6 sprigs mint, roughly chopped
1 tsp sugar
1/2 lime, juiced
Your choice of cheese, to serve
Cheese crackers, to serve
Method
Begin by placing the kale, oil and salt in a pan and cooking on high heat for 4-5 minutes, stirring occasionally. The kale is ready when it has reduced in size, turned a dark green and some leaves are crisp. Remove from the heat and place in a bowl, in the refrigerator to cool.
Cut the pineapple into large cubes and then into four small cubes. Mix with mint, sugar and lime in a bowl.
Add the pineapple and mint on to the kale, mix well.
Arrange on a serving platter with your choice of cheese (I used a fresh goats cheese with a Heidi Gruyere. Make sure you remove from the fridge an hour before use to allow the cheese to reach room temperate.
Sprinkle with extra mint and cheese crackers.
0 notes
Photo


Drum Roll For The Drumsticks
When you need a little meat fix but are certainly in the summer vibe of loving lighter, fresher flavours and picnic-style food, what’s the best dish for this occasion? It has to be these crispy baked drumsticks!
One thing is for sure, using fresh herbs adds so much flavour, summery textures and always makes for the most beautiful colour arrangments. Mixing herbs with citrus as well as Asian sauces is one of my favourite combinations. It’s kinda like kids loving chocolate sauce mixed with their chocolate ice cream - hard to mess up.
This dish is great for preparing ahead and cooking when needed, par-cooking then finishing when needed or even cooking then bringing to a picnic and eating. Just drizzle with fresh lime, mint and chives for that burst of fresh flavour. It’s also a great dish for kids with the sauce being slightly salty and sweet, just maybe leave off the last squeeze of lime for their tiny taste buds.
Enjoy this summery dish with loads of friends and family - that’s the best part of eating!
Baked Drumsticks with a Sticky Honey Garlic Sauce
Ingredients
For the Baked Chicken
1.5kg chicken drumsticks/wings
1 tsp salt
1 tsp pepper
3 tbsp flour
1 tsp smoked paprika
3 tbsp olive oil
Fresh chives and mint to serve
For the Honey Garlic sauce
1/4 cup honey
3 tbsp soy
2 tbsp water
2 garlic cloves, crushed
1 tsp ground ginger
1/2 tsp chilli powder
1 tsp ground cilantro
Method
Pre-heat the oven to 200 degrees Celsius. Line a baking tray with baking paper.
In a large bowl, combine flour, paprika, salt and pepper. Add the chicken along with drizzling the oil. Massage the mix into the chicken, forming an evenly coated red oil and random crunch textures.
Place the chicken on the baking paper and cook for 30 minutes, flipping the chicken over halfway through. If you are unsure of if the chicken is cooked, insert a knife into a drumstick, opening up the flesh. If it is still pink, place back in the oven for a further 5-10 minutes. If it is brown, then it’s cooked
Meanwhile, in a small pot, combine the honey garlic sauce ingredients. Place on medium heat until the mix begins to boil. Cook on low for a further 1-2 minutes or until a thick sauce forms.
In a large dish, place the chicken and coat with the honey garlic sauce. You may find it easier to mix in a baking dish first and then serve. Sprinkle with chopped chives and a fresh mix mint salad.
0 notes
Photo


Dip and Crunch
We all love a good flakey savoury pastry that sheds its mark all over our clothes as well as impacting our taste buds. But what about a veggie option and better yet one that requires a few cupboard staples and 30 minutes of your time?
These perfectly crunchy little nuggets of joy are joyous to all. Vegetarian sausage rolls, I would say, are easier than normal meat sausage rolls and require nothing more than some leftover vegetables and cooked lentils. This recipe is easily made vegan as well with an egg substitute.
My favourite part is once you have stuffed, rolled, sealed and cut the pastry into party sized bites (also can be left bigger if you prefer), there is that final step of a sprinkle of sesame seeds to make them look professional.
Why would you even think of buying such items at the shops now? Bring on the little ones, the older ones and the in-between ones for a full family experience. I served these babies with my homemade plum chutney (see full recipe below) but they also go very well with sweet chilli sauce, creamy harissa mayonnaise or any other sauces that tickle your fancy.
Note: the wine is cooked off but if serving kiddies, you can also leave this off for the taste.
Vegetarian Sausage Rolls
Ingredients
2 small onions, finely diced
3 small carrots, finely diced
1/2 cup cooked brown lentils
300 grams brown mushrooms, finely diced
2 cloves garlic, minced
1/2 cup cauliflower stalk, finely diced
1/2 cup red wine
1/4 cup slithered almonds, roughly chopped
2 tsp dijon mustard
1 tsp salt
1/2 tsp pepper
2 tsp dried thyme
2 eggs
1/2 cup flour
2 sheets refrigerated puff pastry (do not let it thaw completely)
1/2 cup breadcrumbs
2 spring onions
3 stalks and leaves parsley
Method
To make the filling
In a large pan, add onions, carrots, garlic and cauliflower stalks with one tablespoon of canola oil on high heat. Cook for 4-5 minutes or until onions are translucent.
Add mushrooms, lentils, salt, pepper and thyme and cook for a further 2-3 minutes. Add red wine, almonds and mustard, mixing well and let the alcohol cook off (around 1-2 minutes). Remove from the heat and allow to cool.
In a large mixing bowl, place the cooled mushroom mix, breadcrumbs, 1 egg, spring onions, flour and fresh parsley including the stem. Mix well. Preheat oven to 200 degrees Celsius and line a baking tray with baking paper.
On a smooth surface, roll out the pastry and cut it in two (lengthways). Crack the third egg into a small bowl and beat. On one side of the pastry, brush with egg to help the sides seal.
Place a tablespoon of the mixture along one side of the pastry - making sure there is an even amount across the entire length. Fold the longer part of the pastry over the filling and close using the egg seal (as well as pushing slighting to ensure the seal has been made).
Press a fork into the seal and brush with egg. Cut into bite size pieces and place on the baking tray. Repeat with the second length of pastry. Sprinkle with sesame or poppy seeds and bake for 15-20 minutes or until golden brown. The filling will be enough for a second sheet of pastry and most likely some to be frozen for a later time.
Remove from the oven and serve hot with Plum or tomato relish (see previous links for these recipes)
0 notes
Photo


Celebrating National Hummus Day
Once a year, you have the pride and acceptance to shed light on the internationally loved and often very much under appreciated element called hummus. Hello National Hummus Day and let one of the most basic dips, spreads or salad essentials be worshiped.
Hummus has become one of the most versatile products in today’s society. Used by an international audience as well as with a range of different “add-ons” that have been influenced by cuisines from around the world, this chickpea base dip has offered much comfort, to many.
But with all the modern hummus dips flashing across your eyes, what are the few things to keep in mind when finding your match-made-in heaven hummus recipe?
1. Use oil - please no water or other liquids. If you use a good quality oil then the flavors intensify and ingredients are emulsified a lot easier/better
2. Always add salt and pepper - ingredients can be substituted for others but the salt and the pepper are you’re permanent best friends in this recipe
3. The chickpeas - canned is absolutely fine (actually I prefer them because they are slightly softer already) but use quality chickpeas otherwise you will get a lot of shells and the shelf life can be reduced
My two all-time favorite hummus flavors are roasted red pepper or sundried tomato. Yes, they happen to be both red and no, there is no reason for this other than they taste great!
Anyway, without further ado, send a little love to the chickpeas and get hummus making!
Roasted red pepper hummus
Ingredients
2 medium red peppers
800-gram tin chickpeas
1 cup olive oil
Salt and pepper
2 small garlic cloves
Method
Preheat oven to 200 degrees Celsius. Line a baking tray with parchment paper. Cut the red pepper so the skin is predominately facing up.
Cook on the highest rack for 15-20 minutes or until the skin has blackened and begins to blister. Remove from the oven and place in a paper bag to cool and sweat.
Meanwhile, place the chickpeas in a food processor along with the garlic and oil. Add a pinch of salt and pepper. Remove the skins from the pepper by pinching the blistered section and peeling. Add to the processor.
Blend until smooth. You may need more oil to be able to reach a smooth and spreadable consistency. Add salt and pepper to taste. Serve alongside cheese crackers or refrigerate and eat when desired.
0 notes
Photo


The Lazy Man (Or Woman’s) Asian Salad
The Poke Bowl has become one of those new crazes in the food scene around the world. It’s one of those fridge-left-over cross stylistic Asian dishes cross half healthy but often very filling salads that can be adapted to pretty much any form you wish. For me it ticks a different box - so what is that?
Poke bowls, for me, are not my go-to for a healthy or light lunch or dinner. This is not to say they are bad for you, but I just see other more leafy dishes, as healthier and lighter. Poke bowls fill another void for me - they are my go-to when I have left over rice or I just can't be bothered to turn my stove on.
Simply, poke bowls are ideal for throw some left over things, diced of course, in a bowl. Add a grain of your choice (or what your fridge processes) and all you need to make is a simple sauce to add an extra taste factor. Truth be told, sometimes I even leave the sauce out, especially if you use good quality produce as the ingredients then speak for themselves.
If you wish to create your own Pokie, the only things that create a bomb.com poke bowl are:
1. Include a grain base (quinoa, rice, pearl barley, bulgur or none grain like noodles are good too)
2. Include a crunch - it’s always nice to have a crunch factor in every bite so things like spring onions, fried onions, nuts or puffed quinoa are nice
3. Include Fresh elements - sliced raw ingredients always add a lighter feeling to this salad
4. Include Protein - this doesn't always have to be meat or fish as tofu or soy meats are also great add ons as well.
5. Include a final sprinkle - this is my favourite, the final touch! Sprinkle the sesame seeds, black poppy seeds or any other splash of colour that contrasts to the other elements. Simple but so satisfying.
TUNA POKE BOWL
Ingredients
400 gram tin coconut milk
1 cup basmati rice
1 tin tuna (good quality)
3 tbsp whole egg mayonnaise
1 corn cob, corn kernnels removed
6 radishes, thinly sliced
1 avocado, diced
3 spring onions
Mixed cherry tomatoes, halved
3 baby cucumbers
Cashews
Sesame seeds and black sesame seeds (optional)
For Sauce
2 tbsp sesame oil
1 tbsp rice vinegar
1 tsp lime juice
1/3 cup soy sauce
Pinch sea salt
1/2 tsp brown sugar
First, prepare the coconut rice - place in a medium pot, the rice, coconut milk and 1 cup of water. Cook on medium, high heat for the length of instructions on the packet (normally around 7-9 minutes). Remove from the heat and fluff with a fork. Leave to cool.
In a small bowl, place the tuna, mayonnaise and corn in a bowl. Season with salt and pepper. Mix well. Make sure to fork the tuna to fluff it up.
Prepare the dressing by simply mixing the sauce ingredients together - make sure to whisk well to ensure the sugar is dissolved.
In serving bowls, arrange the salad by first placing a a few tablespoons of coconut rice. Add a table spoon Top with radish, diced avocado, cucumber, tomatoes and spring onions. Sprinkle with raw cashews and white and black sesame seed.
0 notes
Photo


We Love Oat Milk
It’s true, oat milk is taking over. And not just taking over the vegan population’s choice in milk but ALSO none vegan/vegetarian preference as well. Have you ever tried oat milk?
You wouldn't believe how easy it is to make at home and even better, it’s so much cheaper to make than buying it! Why are a lot of people turning to Oat Milk - it has to do with the health benefits. So what are these?
Oat milk not only is soy, dairy, lactose and nut free but it’s a great cow milk substitute that keeps the benefits for your bone health. It is also known as a great source of vitamin B and also may lower blood cholesterol.
Things to keep in mind - if you are gluten intolerant and you are purchasing oat milk to try out, make sure to buy the one’s with a certified gluten free label on it as some other oat milk’s may contain gluten traces. Also, bought oat milk cartons may contain a higher amount of sugar, especially if it’s flavoured. This is simply for taste and shelf life.
Now, to avoid these few down sides completely, make your own! And this only involves one simple step... blend. One thing I found with making your own oat milk, is that it only keeps 2, maximum 3, days in the fridge. This is because it is pure and contains no added sugar or preservatives. So just make less but certainly making your own is the way to go.
Oat Milk
Ingredients
3/4 cup oats
3 cups water
2 tsp vanilla extract
4 whole dates, pitted
Method
Simple - blend all ingredients together for 8-10 minutes. No more than 10 as you can over blend the oats, causing them to seperate from the water. It does need a decent time blending though as otherwise the oats will not get emulsified with the other ingredients.
Note: this does make over a litre and only keeps well for 3 days (max 5) so if you do use/need as much, half quantities.
Note: If you are someone who likes to foam their milk for a coffee or hot coco extra, this is not the milk that will be able to do this. The foam is made with higher sugar content and this milk is extremely pure. You get a nature foam when blending but after this, this milk is much better cold and as is. Best is to use Oatly Barista style as this is delicious, has the lowest sugar content but creates the best foam.
0 notes
Photo


Hook, Line and Sinker
When I tell you that you will be sticking your whole hand into the jar to reach that last drop, then you will just have to believe me - this Bailey’s caramel sauce is too damn good!
There is always a surprise guest coming over for a weekend brunch or the dessert you forgot about after that extraordinary family dinner. Open the fridge and reach for the pot of Bailey’s caramel sauce that you keep tucked away, because it will solve all those problems.
The recipe is no longer a secret, this gooey sauce is perfect for any brunch, lunch or dessert treat. Lather onto pancakes, drop a spoonful onto sugarless muesli, serve it along side any loaves or brownies for that cherry on the top finish.
Do not worry, this sauce can be enjoyed by all ages, as the alcohol in the bailey’s is cooked off, leaving this subtle but delicious slightly nutty and creamy flavour. The only thing you will have to watch for, is that the jar doesn’t disappear before you even notice.
Bailey’s Caramel Sauce
Ingredients
1/2 cup butter
1 cup vanilla sugar (or plain)
1/4 cup full fat milk
1/4 cup Bailey’s Original
Method
In a medium sized saucepan, place all ingredients on high heat. Bring to a boil and lower to a medium heat. Simmer for 15-20 minutes or until the mixture turns thick and light brown. Pour into a jar or container. Enjoy on pancakes, cake toppings or a cheeky sweet toast treat.
0 notes
Photo


Summer Style Salad
With summer rolling around, stews go out of season and salads come in. But before the winter veggies disappear, bring together the summer vibe with the hearty greens in this bright, delicious and super healthy salad.
The only problem with salads in the summer is most of them never quite fill you up so the devilish munchies strike and ruin that summer feeling. This kale salad with grilled salmon and a homemade breadcrumb crunch ticks the healthy, fresh, light and delicious boxes at the same time as topping that belly up enough with the right nutrients and proteins, so you’re safe from those munchies.
This bright bowl seems rather complicated, and does involve a few steps, but all will be ready and on the table in under half an hour. For me, this isn't an everyday meal because I feel like salmon should be a weekly or fortnightly treat rather than a daily ingredient. It great for a simple dinner with friends or a romantic evening in front of Netflix with you and your partner.
Of course, when you whip this baby up, make a little extra salmon as they turn into the perfect leftovers for those tired afterwork evenings. New recipe coming soon for the best salmon leftover dish.
Greens and Pink Salad
Inspired by Whats Gaby Cookin
Ingredients
For the salad
3 stalks kale
2 small radishes, thinly sliced
1/2 avocado, sliced
2 tbsp Olive oil
1 small garlic clove
1 tsp lemon juice
1/2 tsp caramelised balsamic vinegar
1 1/2 tbsp Heidi Gruyere cheese, grated (I used smoked)
Salt and pepper
For breadcrumb crunch
1 tbsp butter
1/2 tsp salt
3 tbsp homemade breadcrumbs (bought if not homemade)
For the salmon
2 small salmon fillets with skin
Salt and pepper
Olive oil for coating and pan
Method
Wash kale thoughrly and break the leaves from the thick stalk. Roll up and thinly slice. Place in a salad bowl and top with the radishes.
Prepare the dressing next. Mince the garlic in a mortal and pestle until a paste forms (this can take a few minutes). You can also use pre-bought garlic paste for a cheats alternative.
In a small bowl, add the garlic paste along with other dressing ingredients. Mix well and taste for seasoning. Add extra salt or pepper if required. Set aside
In a small pan, add butter until melted on high heat. Place breadcrumbs and salt, mixing occasionally. Cook until golden brown - this should take 3-4 minutes. Remove from the heat and leave to cool.
For the salmon, sprinkle both sides of the fish with salt and pepper. Drizzle with a small amount of olive oil. In a large heavy duty pan, heat a table spoon of olive oil along with a table spoon of butter on high heat.
Place the salmon in the pan skin side down. Cook for 4-5 minutes ensuring the is a nice amount of butter sauce underneath (this will make for a delicious and juicy fish). Flip and cook for 2-3 minutes on the other. Remove from the heat and leave to cool slightly.
Pour the dressing over the salad and mix well. Roughly flake the salmon and scatter with the avocado. Sprinkle with the breadcrumbs and extra cheese. Serve and enjoy!
0 notes
Photo


Be one or ten
When you find a perfect combination, stick with it. There are certain elements in life that just fit together like ying and yang, but quite often combinations can go wrong - so what are the key elements to creating the perfect cheese board?
You certainly cannot go wrong with wine, cheese, figs and bread. Made even better with quality ingredients from local and trustworthy producers. Now this is very dependant on one’s location, but the best way to seek the best produce for your cheese board is to avoid commercial distributors and find small stores where you can talk directly to someone who can direct you in your choosing.
To add that “wow” factor, try to use slightly out of the norm ingredients. One of my favourites is smoked almonds that contribute the nutty flavour but also add an unusual element to the board.
Be creative in the bread types you pair or serve along side. How about using a casa baguette loaf instead of a normal baguette (thiner in size, slightly more compact and with a crustier outer layer) or try sourdough or loaves with olives/other naturally flavouring ingredients. This makes for a more rounded, fulfilling bite rather than fluffy, more processed mainstream bread types.
What ever you do, don’t forget to serve bread... whatever type it maybe. The board will never be complete without a bread or savoury cracker counterpart.
0 notes
Photo


Simply Spiced
Feeling something a little bit exotic, spiced up, hearty and healthy but you don't have enough time to make 20 ingredients blended pastes or overnight waiting times on marinades? This cream less but very creamy butter chicken blends these two worlds together, offering a unique Indian style butter chicken in a simple, speedy and such a satisfying way.
Buckle up kids. This recipe will become mummy, daddy and your next favourite flavour of Indian dinner night special! Not only does it taste delicious for you but it leaves mummy and daddy in the best mood because they can whip it up in under 30 minutes.
Try it, but promise me that you won't blame the chef when you simply can't get enough.
Easy Peasy Butter Chicken
Ingredients
5-6 organic free range chicken thighs, 2cm dice
1 large onion, diced
1 1/2 tbsp canola oil
2 tbsp butter
2 garlic cloves, diced
2 tbsp greek yogurt
2 tsp cumin powder
2 tsp ground coriander
1 tsp all spice (or gara masala)
1/2 tsp chilli powder
1 tsp ground ginger
1 1/2 cups pastata (tomato puree)
1/2 cup chicken stock
1/2 cup pure cream (or yogurt)
Jasmin rice to serve
Chives, parsley and fresh rocket to serve
Method
In a large pot, place the onion, oil and butter on high heat with a pinch of salt. Cook for 2-3 minutes or until turning translucent. Add garlic and chicken, cooking for a further 2-3 minutes making sure you coat well in the butter.
Add the cumin, ground coriander, all spice, chilli powder, ground ginger and greek yogurt. Mix well and cook for 5 minutes or until the chicken begins to change colour.
Add pastata and stock, cover and simmer for 20-25 minutes. Remove the lid and turn off the heat then add the cream or yogurt.
Serve with fresh herbs and jasmine rice.
0 notes
Photo


Subtle but superb!
This poached chicken absorbs every bit of sweet, anise and nutty flavour from the fennel as well a the peppery tang from the peppercorns in a full but none over powering way.
There are two parts to this recipe - the poached chicken and the creamy poached chicken open sandwich using fresh herbs. The poached chicken can be adapted for any other salad, sandwich or curry.
For a super simple and healthy lunch option, you cannot beat this fresh herbed and yogurt open sandwich. Are you feeling a little perish? I can assure you, the ingredients list will be ready and waiting in your fridge and pantry now…
Fennel Leaf and Pepper Corn Poached Chicken Sandwich
Ingredients
1 small organic free range chicken breast
2 fennel stalks with leaves
6 pepper corns
2 cups water
2 tbsp greek yogurt
11/2 tbsp mayonnaise
salt and pepper
Bread of choice
2 tsp chives, finely sliced
2 stalks parsley, finely sliced
Lettuce to serve
Method
In a medium pot, place the fennel and pepper corns followed by the water. Lay the chicken breast on top, the fennel leaves forming almost a bed underneath. Sprinkle with a salt and place on high heat.
Once the water comes to a boil, reduce heat for 1-2 minutes. Turn the stove off after this time, cover and leave for 10 minutes. This will finish the cooking process, resulting in a very tender poached chicken breast. Remove from the water and leave to cool.
Meanwhile, in a small bowl, combine the greek yogurt, mayonnaise, herbs, salt and pepper. Toast or grill your bread and arrange the lettuce on top.
Shred the cooled chicken breast, placing half in the mayonnaise bowl and mix well. The other half can be refrigerated and used another time.
Arrange the coated shredded chicken on top of the bread and lettuce. Sprinkle with extra chives, parsley, salt and pepper. Enjoy.
0 notes