
Don't wanna be here? Send us removal request.
Statistics
We looked inside some of the posts by chardscarf12-blog and here's what we found interesting.
Average Info
Notes Per Post
0
Likes Per Post
0
Reblog Per Post
0
Reply Per Post
0
Time Between Posts
3 days
Number of Posts By Type
Text
17
Last Seen Tumblr Blogs


Fun Fact
70% of Tumblr users say the Dashboard is their favorite place to spend time online.
Text
Wicked Healthy - Cookbook Review & Giveaway!
Here's a super fun and exciting new vegan cookbook to tell you about! I am so stoked to be a part of the Wicked Healthy blog tour. This book is so beautiful and interesting!
For years it seemed like every vegan cookbook that was published was aimed at people who had never heard of avocado toast or overnight oatmeal. I like those things as much as the next vegan, but I don't personally need a recipe for them. Also, I'm super, super stoked that there are so many wonderful cookbooks to support people who are starting their vegan journeys. That said, it is so exciting and thrilling when I get my hands on a cookbook that is NOT aimed at beginners.
roasted garlic, oh how I love thee
Wicked Healthy is such an exciting book - it's aimed at a competent home chef who loves cooking and loves innovative and adventurous flavors. The book is absolutely beautiful and is really fun and inspiring just to read. Wicked Healthy is written by two brothers, Chad and Derek Sarno, and there is a distinctly masculine tone to the writing - like two brothers playing and sparring in the kitchen. It's not off-putting though, and it's nice to see this voice in a vegan cookbook, since that genre is largely dominated by female authors. Both brothers are also trained chefs, and that is another cool thing about this book - I didn't just make great recipes from it, I also learned some fun and useful new-to-me kitchen techniques from their recipes. I really love that!! It's so exciting when a good book also teaches you how to improve your own skills in the kitchen.
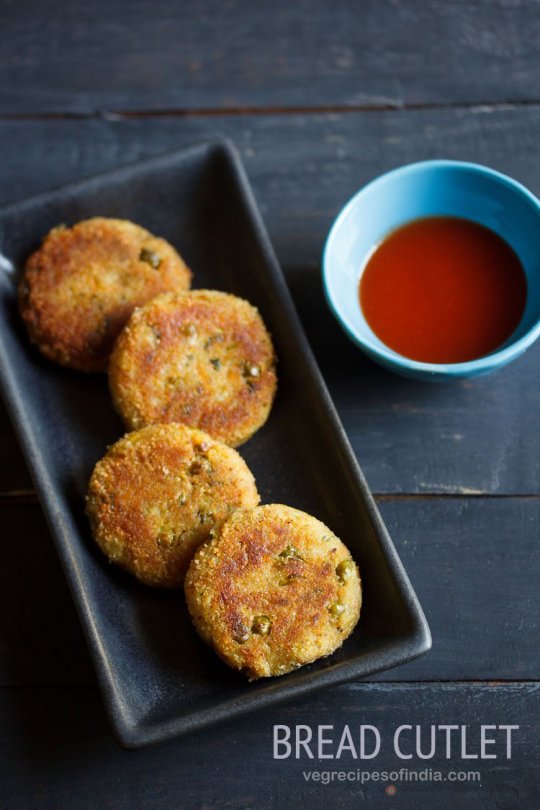
super, super thin bread slices - a trick I learned from Wicked Healthy:
freeze the bread first and then slice it into the thinnest slices ever! GENIUS.
(this recipe is at the end of this post!)
As soon as this book arrived, I started flipping through it, staring at all the amazing pictures, and writing up a (long) list of all the recipes I wanted to try. Happily, the next week was the birthday of one of my very best besties and I had invited her and her family over for dinner. I decided to make five different recipes from Wicked Healthy to celebrate!
When you love someone that much, you can make an entire 5-course meal out of recipes you've never tried before, because you know they will forgive you if the whole thing is a bust. Luckily, not a single thing I made was a bust. Far from it - we all loved our meal, and we had such a super fun evening together.
1st course:
Cucumber, Celery, Green Apple, and Kale Juice!
(from Juices and Cocktails / Juices and Coolers chapter)
Lately I've been kinda into green juice! I don't have a juicer though, so I pureed everything in my Vitamix and then strained it through several layers of cheesecloth. This recipes makes two big glasses of green juice, but I made 5 little appetizer / palate cleanser glasses - one for each of us. It was very yum - perfect hint of sweet from the apple, and a good balance of flavors!
2nd Course:
Roasted Beet Salad with Citrus and Tarragon Cashew Cream
I have the recipe for this beautiful and delicious salad at the end of this post! Check it out!
Wow, dudes. Check this biz out. I was very proud of myself. I got this plating idea straight from the photos in the book - because as you have probably noticed, I am not generally a plating wiz. I am more like an eating wiz. It was so fun to make something so gorgeous and have it all plated and ready when my friends arrived. I really wanted her to feel special!
This dish was so fun to prepare - there were many components, but none of it was difficult. The beets are roasted, the citrus is supremed, the little toasties are toasted, the tarragon cashew cream is pureed, the greens are tossed in dressing... It was such a pleasure to just take my time and enjoy all the different processes, and especially to have it all come together in such a beautiful and delicious result.
feeling pleased with the outcome!
3rd Course:
Minted Pea Ricotta and Zucchini Toasts
Oh man, I think these beautiful little toasts might have been my favorite recipe of the evening. These were so delicious - delicate and bursting with perfectly balanced springtime flavors. These toasts would be appealing for breakfast, lunch, or dinner! The toasts have a lovely ricotta mixture, topped with lightly seared zucchini ribbons, and a sprinkle of microgreens. I used my panino press to just lightly grill the zucchini ribbons. Lightly cooking the zucchini ribbons made them softer for a more delicate curl, prettier, and more tasty too. Win-win-win!
The Minted Pea Ricotta mixture is absolutely stunning - a hint of lemon zest, shallot, and fresh peas (or frozen if it's not peak pea season!). One suggestion in the book is to use that ricotta mixture in homemade ravioli, which would definitely be 100% amazing and I would like to try that!
The recipe calls for Kite Hill Ricotta as a base for the Minted Pea Ricotta. To that point, this book does call for a few brand name items in some of the recipes (Kite Hill ricotta, Ninja Squirrel Sriracha, Beyond Meat burgers). That's not always my favorite thing in a cookbook, but I don't mind it in this case. If you don't have access to those brands, you could easily adapt. And the recipes themselves really add a lot, so it's never just a recipe for a store-bought burger with ketchup on it or whatever.
You can find this recipe over here at Adventures In Cooking's blog post about Wicked Healthy
SO GOOD
4th Course:
Roasted Cauliflower Fagioli
(from Soups and Stews chapter)
I love a good veggie stew, and I loved the idea of repurposing Pasta Fagioli with a whole head of roasted cauliflower instead of all the pasta... to make it more veggie-dense. Three cheers for veggies! That said, I did also use the optional suggestion to add some little noodles - I used some of my tiny little noodles that are so small they are practically Israeli couscous.
We all loved this summery stew, and there was even some left over for me to enjoy the next day. The recipe intro says that this stew will be even better the next day, and - uh - that was true! Next time I will just make it a day ahead of when I intend to eat it! Ha ha.
This cookbook definitely has recipes-within-recipes: for example, in order to make this, I made the Nana Sarno's Red Sauce. Not paying attention, I ended up making about 8 cups of red sauce, when the Fagioli recipe only called for two cups. I used some later for another recipe from the book and froze some to enjoy later as well.
5th Course:
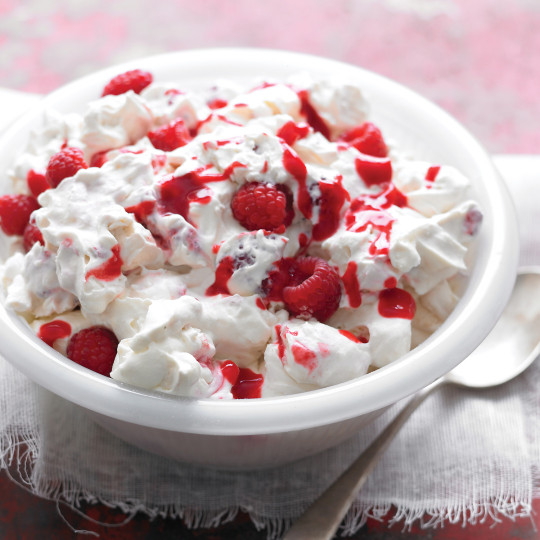
Drunken Berries with Amaretto Gelato and Ninja Nuts
YESSSSSSSS. Hot DAMN this dessert was seriously something special. I won't lie... it was also a lot of work. But I was in the mood for a culinary adventure and I enjoyed every moment of the process. All the recipes in this book came together as described in the write ups, no surprises and no instances where something took twice as long to cook or burned in half the time. You know what I'm talking about. Because the recipes were so well-written, that made it easier and not stressful to embark on a big project like this.
This was a real recipe-inside-a-recipe adventure:
Make the Mango Sriracha Caramel, to make the Ninja Nuts.
Make the ice cream base, chill, churn the ice cream
Cut and macerate the berries.
Assemble.
EAT!!!
Almost all the desserts in this book (there aren't too many) are fancy, complicated special-occasion deserts like this. Obviously, you could just make individual components - but based on our experience of this glorious gastronomic delight, I would suggest going the whole nine yards. This was seriously such a special and delicious combo of flavors and textures. Each component - the berries, the gelato, and the nuts - were excellent on their own, and just glorious in combination with each other! I'm quite sure that this was the best homemade ice cream I've ever made. Excellent flavor and texture.
Mango Sriracha Caramel
This caramel sauce is called for in making the so called "Ninja Nuts" that were part of the dessert. It is so delicious! I made a half-batch, and was still left with a whole lot left over (the nuts recipe only calls for 3 tablespoons). Luckily, it is delicious, and it lasts a little while in the fridge. I couldn't find 100% mango juice, so I used mango-apricot juice, which worked wonderfully. The finished product is carmelly, mango-y, apricot-y, with a nice spicy kick at the end. So good!
Ninja Nuts!
These "ninja nuts" (so called because the recipe suggests using Ninja Squirrel Sriracha) are toasted almonds coated with the Mango-Sriracha caramel. I made these tasty little power nuggets to go with our dessert, but then Mr. VE&T completely fell in love with them and declared them to be the "all time flavor of flavors." So I have made several more batches since then! Once you've made the caramel, these are quick and easy to make. But be warned, they are really hard to stop eating!
Beautiful berries macerating in a Chambord base
The "Drunken Berries" component of the dessert was just lovely - fresh berries macerated in a mix based on Chambord liquer. What a great idea. And it was so nice to pour a little extra of the liquid over the gelato. Such a great combo with the somewhat-subtle Amaretto Gelato.
Since that dinner party, I've also made the Whole Roasted Zucchini with Red Sauce
and the Sriracha Kung Pao Brussels and Tofu (but I made it with broccoli) - which was an instant favorite! There are still so many more recipes that I have my eye on to try:
Bibimbap
Grilled Cabbage with Mint and Peanut Butter Sauce
Kale and Avocado Salad with Wild Rice and Grapes
Spring Agnolotti
Black Garlic and Chive Panisse
Corn Dumplings in Corn Broth
Reuben on Dark Rye
Chocoholic Fudge Brownies with Sea Salt and Dried Strawberries
... and so many more!
---------------------------------------------------------------
*GIVEAWAY!!*
I am so stoked that the publishers have offered for me to do a giveaway! To enter, just leave a comment on this blog post and tell me about your favorite fancy recipe to tackle at home, or what you'd like to try from this book, or really anything nice and relatively on-topic! Also, make sure to include your email address or a way to reach you, or I will just pick a different winner. Good luck!
Also, check out their Wicked Healthy Facebook page - they have links to other reviews and giveaways as well as some great videos with more recipes to try out.
---------------------------------------------
Roasted Beet Salad with Citrus and Tarragon Cashew Cream
Serves 6-8
This was the most popular salad at my SAF Restaurant in London. Over the years since then, I’ve served it at many supper clubs and dinners. It’s always a hit. Slow roasting the baby beets gives them a deep sweetness that balances the earthiness. Watercress brings sharpness and bite. Cashew cream contributes richness. Sherry vinegar has the spark. Bread crisps give it crunch. Between the textures and flavors—and even the colors—this sexy dish just hits all the buttons. —Chad
INGREDIENTS
ROASTED BEETS
12 small beets (3 pounds), rinsed, stems trimmed
1½ tablespoons everyday olive oil
3 sprigs fresh lemon thyme or regular thyme
Sea salt and freshly ground black pepper
4 slices fresh lemon
2 tablespoons sherry vinegar
1½ tablespoons chopped fresh chives
BREAD CRISPS
1 small baguette (about 6 inches), frozen
1 tablespoon everyday olive oil, for pan-frying
1 teaspoon granulated garlic
½ teaspoon sea salt
ASSEMBLY
About 1 cup Tarragon Cashew Cream (see below)
2 grapefruits or oranges, segmented
1 cup small watercress leaves or microgreens
½ tablespoon best-quality extra-virgin olive oil
Squeeze of lemon
Flake salt, such as Maldon
Cracked black pepper
TARRAGON CASHEW CREAM
Makes About 1¾ Cups
INGREDIENTS
1½ cups raw cashews
About 1/3 cup water
Juice of ½ lemon
2 tablespoons nutritional yeast
1½ tablespoons minced fresh tarragon
METHOD
1. FOR THE BEETS: Preheat the oven to 250ºF. Cut a giant sheet of foil twice the length of a baking sheet and place half of it on the pan.
2. In a bowl, toss the whole beets with the oil and thyme sprigs and season with salt and pepper. Pour the beets onto the foil and scatter on the lemon slices. Leave space between the beets so they can steam. Fold over the other half of the foil and crimp all the edges, sealing the package tightly. Place the pan in the oven and slow roast until the beets are tender enough for a fork toslide in and out easily, 50 to 60 minutes, depending on the size of the beets. Open the package and let cool.
3. When cool, put on some gloves to prevent staining yourself and peel away the beet skins with a paring knife (not under running water). Then slice the beets into small wedges. At this point the beets can be chilled in the fridge for a day or two before serving.
4. Just before serving, toss the beet wedges in a bowl with the vinegar and chives. Taste a wedge, then season with more salt and pepper until it tastes good to you.
5. FOR THE BREAD CRISPS:
Defrost the bread slightly.
6. Heat the oil in a frying pan over medium-high heat.
7. While the bread is semi-frozen, cut into paper-thin slices on a mandoline. Place each slice one-by-one into the hot pan and cook until lightly browned and crisp, turning for even cooking, about a minute per side. Place on paper towels and immediately season with granulated garlic and salt. They will crisp up as they sit.
8. TO ASSEMBLE EACH PLATE:
Spread 1 to 2 tablespoons cashew cream in a line on the bottom of the plate. Arrange the beets, citrus segments, and bread crisps over the cashew cream, alternating the pieces.
9. Toss the watercress with the olive oil and lemon juice in a small bowl. Arrange the dressed watercress over the top of the salad. Finish with a pinch of flake salt and cracked black pepper.
PRO TIPS
*To get a jump on things, make the cashew cream and beets up to 2 days ahead and chill them in the fridge. You can even make the bread crisps a day ahead. Then just assemble everything and serve.
*Look for a mix of colorful beets like orange, red, and Chioggia (candy cane).
*Instead of crisping the bread in a pan, you could toss the paper-thin slices with olive oil and bake in a single layer at 350ºF until crisp.
Excerpted from the book THE WICKED HEALTHY COOKBOOK by Chad Sarno, Derek Sarno, and David Joachim. Copyright © 2018 by Chad Sarno and Derek Sarno.Reprinted with permission of Grand Central Life & Style. All rights reserved.
Source: http://veganeatsandtreats.blogspot.com/2018/06/wicked-healthy-cookbook-review-giveaway.html
0 notes
Text
Why we eat corned beef and cabbage on St. Patrick’s Day
These days, shamrocks, wearing green and drinking beer are all fairly synonymous with St. Patrick’s Day celebrations here in the United States. And when it comes to food, a corned beef with cabbage recipe is considered an essential dish for the Irish holiday. But have you ever stopped to wonder why we eat corned beef and cabbage on St. Patrick’s Day?
Eat Like an Irishman This St. Patrick's Day With These 14 Recipes
Ireland has a long history of exporting salted meats that dates back to the Middle Ages, but for much of the population, buying beef to cook at home was a luxury that was out of the question. Instead, for religious holidays and other celebrations, many turned to pork — a cheaper option, with salted pork (similar to bacon) a staple in most Irish homes along with (after it was introduced in the 16th century) the ubiquitous potato.
When Irish immigrants arrived in America, however, they discovered that rather than beef being more costly than pork, the opposite was true. And so they turned to corned beef — which happened to be a kind of beef all could afford, as well as a food their homeland had once been famous for.
What had once been considered a luxury ingredient was now much more readily available and affordable, and so the growing Irish-American population paired it with cabbage — a traditional accompaniment to salted pork — and the rest is history! Make the most of this year’s St. Paddy’s Day celebration — skip the chain restaurants, grab your corned beef and some cabbage and don’t forget to check out the best Irish pubs in America.
Source: https://www.thedailymeal.com/why-corned-beef-and-cabbage-st-patricks-day
0 notes
Text
16 Vodka Cocktail Recipes for Sunny Weather Sipping
[Photographs: Vicky Wasik, Elana Lepkowski]
If you're anything like me, you probably don't drink a lot of vodka. Sure, you might keep a bottle around for the occasional Bloody Mary. And yet vodka has its place—its crisp flavor is a natural match for refreshing summer cocktails. And because it's fairly neutral, you can pair it with just about anything: Earl Grey tea, lemongrass, or even tomatoes. From a classic Moscow Mule and updated Cosmo to vodka-spiked LaCroix, we've rounded up 16 of our favorite vodka cocktails to keep you cool on a hot summer day.
[Photograph: Vicky Wasik]
My first choice when it comes to vodka cocktails any time of year, the Moscow Mule is even more refreshing once the temperature starts to rise. It's so simple that you don't really need a recipe—just spike ginger beer with vodka and squeeze in half a lime. The copper cup isn't required, but I swear the drink doesn't taste right without it.
Moscow Mule Recipe »
Back to the full list
[Photograph: Vicky Wasik]
Simply pouring booze into LaCroix might sound good, but it doesn't really work—most of the flavors have a bitterness that doesn't work with alcohol without some help. Bring some other ingredients into play and the story changes—this Pamplemousse LaCroix and vodka cocktail is brought together with simple syrup, elderflower liqueur, and muddled cucumber.
Pamplemousse Cooler (Vodka-Cucumber Cocktail With Grapefruit LaCroix) Recipe »
Back to the full list
[Photograph: Elana Lepkowski]
This crisp, slightly spicy cocktail is made with bubbly Prosecco, dry vermouth, and vodka infused with fresh ginger. What really makes the drink is the garnish of watermelon rind pickled in a sweet and spicy brine flavored with cinnamon, peppercorns, clove, and red pepper flakes.
Fizzy Ginger Cocktail With Pickled Watermelon Rind Recipe »
Back to the full list
[Photograph: Vicky Wasik]
Sometimes you want to keep it simple, so we make this drink with just three ingredients: grapefruit juice, vodka, and Lillet Blanc (a citrusy wine-based aperitif). With such a short ingredient list it's important that each one is high quality—squeeze the grapefruit juice fresh and pull a decent bottle of vodka off the bar.
Great Gatsby Recipe »
Back to the full list
[Photograph: Vicky Wasik]
Mixing one or two individual drinks is fine, but pitchers are the way to go for summer entertaining. Next time you throw a cookout try stirring up a batch of this complex sipper made with Earl Grey tea, vodka, lemon juice, mint, and ginger syrup. Even better for entertaining, the tea and syrup can be made well ahead of time and kept in the fridge.
Lady Grey Recipe »
Back to the full list
[Photograph: Vicky Wasik]
I never let strawberry season pass without mixing at least a few cocktails. To make this one we muddle the fruit with simple syrup, lime juice, and mint leaves, shake with vodka, and top with club soda. Muddle the strawberries first before adding the mint—you want the berries to be completely pulverized, but the mint will turn bitter if you're too rough with it.
Strawberry-Mint Sparkler Recipe »
Back to the full list
[Photograph: Vicky Wasik]
These days gin is the most fashionable spirit for making a Martini, to the extent that some bartenders refuse to use the name for a version made with any other spirit. Vodka Martinis probably get a bad rep because of the sweet, flavored versions that took over in the '90s, but the simple mixture of vodka and sweet vermouth makes for a totally respectable cocktail.
The Kangaroo Recipe »
Back to the full list
[Photograph: Autumn Giles]
If you are going to flavor your Martini, stick with good, natural ingredients. This summery version turns to in-season produce by using tomato-infused vodka. We keep the drink super dry with just a dash of vermouth and add a tiny bit of acidic white vinegar to highlight the tomato.
Fresh Tomato Martini Recipe »
Back to the full list
[Photograph: Vicky Wasik]
I can't think of many drinks that are as maligned as the poor Cosmopolitan, and I don't doubt that most versions are less than stellar. But all it takes are better ingredients to make the Cosmo into a drink worth keeping in rotation—we make ours with citrus-flavored vodka, high quality triple sec, unsweetened 100% cranberry juice, and freshly squeezed lime juice.
The Cosmopolitan Recipe »
Back to the full list
[Photograph: JL Studios]
This recipe keeps the citrus-flavored vodka (Ketel One Citroen works well), Cointreau, and fresh lime juice from the classic Cosmo recipe, but from there we make a few changes. The big one is replacing the cranberry juice with cranberry sorbet, which adds just a touch of extra sweetness to the drink. We finish the cocktail with a float of sparkling wine for a little fizz.
The Upgraded Cosmopolitan Recipe »
Back to the full list
[Photograph: Vicky Wasik]
A classic Bloody Mary is never a bad choice for a summer brunch, but this intense Thai-style variation is even better. We start with the standard vodka and tomato juice, but replace the Worcestershire with fish sauce and the Tabasco with sambal oelek. Cilantro brightens the drink up, a brown sugar simple syrup adds sweetness, and beer gives it a little fizz.
Thai-Style Bloody Mary With Cilantro and Fried Shallots Recipe »
Back to the full list
[Photograph: Vicky Wasik]
One reason to use vodka over, say, gin, is that its more neutral flavor gets out of the way and lets other ingredients shine. That's the case in this spin on the Salty Dog, which is all about the bitter grapefruit and woodsy thyme. Don't skip salting the rim—it further amplifies the flavors.
Thyme for a Salty Dog Recipe »
Back to the full list
[Photograph: Elana Lepkowski]
A far cry from the vodka sour you'll find in the average dive, this cocktail is made with lemongrass-infused vodka and shaken with eggwhite to produce an elegant foam. You can infuse the vodka the old-fashioned way in a week or two, but with a whipped cream canister you can do it instantaneously.
Lemongrass Sour Recipe »
Back to the full list
[Photograph: Kelly Carámbula]
Rhubarb is puckeringly tart, so recipes often pair it with sweet fruits like strawberries or raspberries. Here we go in a different direction, making the rhubarb into a syrup and mixing it with spicy ginger ale (or ginger beer, if you want it even stronger). If you're looking for something non-alcoholic, this tastes great without the vodka.
Rhubarb and Ginger Cocktail Recipe »
Back to the full list
[Photograph: J. Kenji López-Alt]
The Tom Collins—made with gin, lemon juice, and simple syrup—is ripe for variation. Scott Marshall of The Hawthorne in Boston came up with this version, swapping the gin for cucumber vodka, which gets mixed with lime juice, Yellow Chartreuse, and a dash of cranberry bitters.
The Phil Collins Recipe »
Back to the full list
[Photography copyright: Kelly Puleio © 2019]
Vodka plays a supporting role in this batch cocktail, adding a kick of alcohol without disturbing the other flavors at play. Amaro, vermouth, and a mint tea syrup are allowed to fully shine in this bright, refreshing, and perfectly balanced summertime punch.
L'Aventura Punch (Vodka, Mint Tea, and Amaro Cocktail) Recipe »
Back to the full list
This post may contain links to Amazon or other partners; your purchases via these links can benefit Serious Eats. Read more about our affiliate linking policy.
Source: https://www.seriouseats.com/roundups/vodka-cocktail-recipes
0 notes
Text
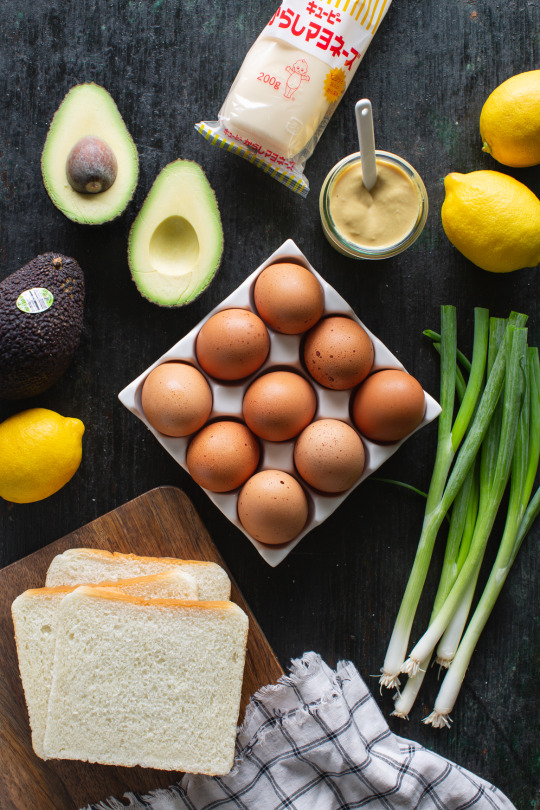
Avocado Egg Salad Sandwich Recipe
Have you seen this trendy egg salad sandwich from Konbi, a cafe in Los Angeles?

I’ve yet to get up to LA to give it a try, but luckily the New York Times recently posted the recipe. I made it. I ate it. And I loved it. It’s creamy and light with a fudgy soft-boiled egg in the middle.
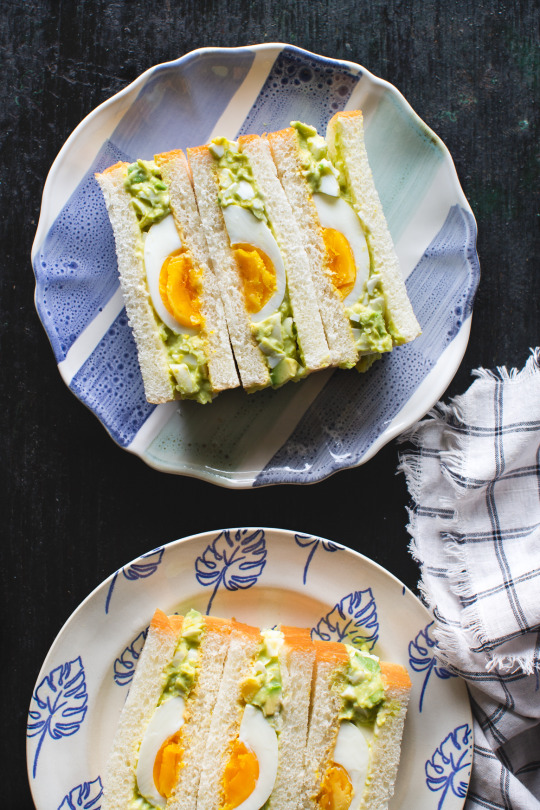
Sponsored by California Avocados, my version features rich, ripe California Avocados in two ways. You start by making a creamy dressing of sliced scallion, kewpie (Japanese) mayo, Dijon mustard, lemon juice and mashed avocado. You then fold in diced bits of avocado and hard-boiled egg. The avocado egg salad is then sandwiched between two slices of fluffy milk bread, concealing halves of soft-boiled egg within. Each bite is so luscious with a pleasant grassiness from the avocado. Such a treat!! Continue reading for the recipe.
Did you know that June is national California Avocado Month?! June is the peak of avocado growing season, so it’s the perfect time to enjoy all things avocado!
Avocados have always been a favorite of mine, and I’ve had the pleasure of working with the California Avocado Commission for a few years now. It’s been such a fun creative challenge to come up with so many different types of avocado recipes. Here are some of my favs:
What are some of your favorite ways to eat California Avocados?!
This recipe includes two Japanese ingredients: kewpie mayonnaise and milk bread. Kewpie is a silky mayo that’s got a pleasant sweet tanginess. It also has MSG (which btw is not bad for you). Milk bread is sweet, soft and airy. If you can’t find these ingredients, you can certainly use regular mayo and plain white bread.
Just avoid using breads with a stronger flavor like sourdough or whole grain!
Technique-wise, this recipe is fairly simple! You actually boil ten eggs in the same pot, and four of them come out after eight minutes (soft-boiled) while the rest stay in for a full 14 minutes (hard-boiled). The soft-boiled eggs should have a fudgier texture (not runny).
These sandwiches can be prepared in advance and stored in the fridge, but I’d recommend eating them the day you make them. The lemon juice in the egg salad will keep the avocado from turning brown.
Ingredients
1 ripe California Avocado, peeled and halved
1 scallion, roots trimmed, thinly sliced
2 teaspoons kewpie mayo or regular mayo, plus more for spreading
2 teaspoons fresh lemon juice, plus more to taste
1 1/2 teaspoons Dijon mustard, plus more for spreading
Kosher salt
10 eggs*
8 slices of milk bread or plain white bread
Instructions
Place 1 half of the avocado in a large bowl along with the scallion, mayo, lemon juice and mustard. Using a fork, mash and mix until combined. Season to taste with salt and lemon juice.
Bring a large pot of water to a boil and prepare 2 ice baths. Carefully lower eggs into the boiling water. Once the water comes back to a boil, reduce heat to medium-low and let simmer for 8 minutes. Transfer 4 eggs to one of the ice baths, and continue to simmer remaining eggs for 6 minutes. Transfer the remaining 6 eggs to the other ice bath, and let chill for 5 minutes. While the hard-boiled are chilling, carefully peel and half the soft-boiled eggs. Season with salt and set aside.
Peel the hard-boiled eggs, cut into 1/4-inch pieces and place in the bowl with the prepared dressing. Dice up the other half of avocado and add to the same bowl. Gently fold the egg and avocado into the dressing until well-combined. Season to taste with salt and lemon juice.
To serve, slather 1 slice of bread with a light, even layer of mustard and slather another slice of bread with a light, even light of mayo. Place 2 soft-boiled egg halves down side-by-side in the middle of the mustard-slathered slice. Top with a 1/2 cup scoop of egg salad, spreading it evenly to the edges of the sandwich. Top with mayo-slathered slice. Repeat with remaining bread, eggs and egg salad.
If you want to get fancy with the presentation, cut the sandwich in thirds to reveal cross sections of the soft-boiled eggs. Enjoy immediately or refrigerate for up to 1 day.
Recipe Notes
* If you are making these sandwiches for a special occasion, you may want to soft-boil a few extra eggs. I messed up a couple of my soft-boiled eggs as I was peeling them, and I needed to boil a few more to make sure the cross sections were on point! If presentation isn’t a worry, then just stick with 10 eggs total.
This post was written in partnership with California Avocados. Thoughts, opinions and recipes are my own.
0
Source: https://www.kitchenkonfidence.com/2019/05/avocado-egg-salad-sandwich
0 notes
Text
This Is Officially The Most Useful Snack You Can Buy
I’ve mentioned this in a few different blog posts at this point, but it’s still true: I tend to get a bit obsessive about food. My most recent food obsession is a particular brand of yogurt called Oui by Yoplait. It’s a French-style yogurt that comes in individual glass jars. And to be honest with you, I might be just as obsessed with the jars as I am with the yogurt that comes in them!
Since I’ve been eating a lot of this yogurt lately, I’ve been coming up with ways to repurpose all of the adorable glass jars I have refused to throw out. And I have so many ideas at this point that I can’t help but share them with you here! :-) But before we get to that, let’s ask the most important question: why is this yogurt sold in glass jars in the first place?
A Brief Introduction To French-Style Yogurt
The main difference between traditional French-style yogurts (like Oui) and other styles of yogurt is that it is “pot set.” This simply means that the yogurt is cultured and sold in the same container, usually in an individual portion.
Using glass containers for pot set yogurt is a very practical choice, because glass stands up well to heat and is easy to sanitize. And I’m certainly not complaining either, because there are so many wonderful ways to reuse these cute little jars! :-)
Put A Lid On It!
In the next section of this post, you’ll find a list of creative and practical ways to reuse Oui yogurt jars. Some of the uses don’t require any special equipment or alteration—simply wash the jars and go! But some of the ideas require a lid for the jar, but guess what? There are plenty great options out there for lids that fit Oui jars perfectly! Here are just a few:
Yoplait Lids – Yoplait offers both blue and clear lids for Oui jars, available for purchase on their website.
Wood Lids – These wood lids are designed for small Weck jars, but they fit perfectly on Oui jars too. They have a rubber gasket that forms an airtight seal.
Cork Lids – For fans of apothecary jars, try these stylish cork lids for your Oui jars!
Silicone Lids – If you want a simple lid that fits well and is easy to clean, look no further than these silicone lids from Amazon!
Okay, now let’s get to the good stuff! :-) Without further ado, here are 13 creative ways to reuse Oui glass yogurt jars.
1. Candle Votive
Use a yogurt jar as a candle votive. Just put a tea light inside (either the standard kind or battery-powered) and light it up. It you want to add a little something extra to your votive, pour a bit of colored sand into the bottom before adding your light.
2. Odds & Ends
Use a yogurt jar to corral collections of small items, like spare change, office supplies, craft supplies, and more.
3. Spices
Fill a couple of these yogurt jars with your most frequently used spices. For instance, I go through a lot of Italian seasoning, so I filled a jar with it and popped a cork lid on top. It’s always handy when I need it, and it looks greta on my countertop too!
4. Gift Jar
Need a quick and easy birthday gift idea? Fill one of these jars with small gifts like candy, money, accessories, etc. Cover the top of the jar with some cute tissue paper and secure it with a bit of string. So easy, and it looks great!
5. Succulent Pot
Generally speaking, most succulents do best in containers that have drainage holes. But if you fill the bottom of one of these jars with gravel first, you can absolutely use it as a pot for a small succulent! Be sure to use a cactus soil blend, which is drier than regular potting soil, and water your succulent infrequently for best results.
6. Bath Salts
Use a yogurt jar to store or gift your favorite homemade bath salt! (Don’t have a favorite homemade bath salt? Check out some of mine at the link below.)
Related: 3 Natural Bath Salt Recipes
7. Meal Prep & Portion Control
If Yoplait can use these jars to make single portions of yogurt, why not reuse them to make single portions of other foods? Get tons of single serving inspiration by reading my post about meals-in-a-jar at the link below.
Related: 21 Marvelous Mason Jar Meals You Need To Try
8. Condiments & Spreads
Fill these jars with jams, spreads, and other condiments for parties and get-togethers. It couldn’t be easier to do, and people will really appreciate how beautiful they look out on the table!
9. DIY “Sea Glass”
Love the greenish tinge of sea glass? You can transform your yogurt jar into a DIY sea glass container! I used this sea glass spray paint to coat the inside of the jar, then set it upside down on some paper to dry. How easy is that?
10. Air Freshener
Use a few yogurt jars to make your own gel air fresheners! Get the full instructions for making gel air fresheners by reading my blog post about them below.
Related: How To Make Your Own Gel Air Fresheners
11. Bathroom Storage
Use yogurt jars to store personal care items in your bathroom, like cotton swabs, cotton balls, and hair accessories. They’re as nice to look at as they are useful!
12. Snacks
These jars are the perfect size for snacks. Just fill one up with nuts, cereal, granola, candies, or trail mix, then pop a lid on the top and toss it in your bag for later! (As to whether you offer the snacks to your kids or keep them for yourself… that’s for you to decide.) ;-)
13. Mini Flower Vase
Have some little spring blossoms coming up in your yard or garden? Use a yogurt jar as a mini vase to display them in your home! There’s nothing like a vase of fresh flowers in the springtime, no matter the size!
How would you reuse these glass yogurt jars?
Source: https://www.onegoodthingbyjillee.com/13-uses-for-glass-yogurt-jars/
0 notes
Text
What the Label Won't Tell You: How to Buy a Good Bottle of Olive Oil
[Photographs: Max Falkowitz unless otherwise noted]
Have you ever tasted a tomato leaf?
As a bona fide black thumb who’s never taken to backyard gardening or the great outdoors, I sure haven’t. But ‘tomato leaf’ is a big tasting note in the olive oil industry, apparently, and at Cobram Estate’s reception lounge in Woodland, California, technical director and chief olive-oil maker Leandro Ravetti tells me it’s a common characteristic of oil made from picual olives. A minute before, I’d swigged a dram of chartreuse oil from a plastic pill cup, and sure enough, it tastes vividly of ripe tomato flesh warm from late-summer sunlight. There’s also a touch of bitter and bracing, as if I’d just mainlined a pile of fresh basil leaves. No—not basil, the taste is meatier, muskier in that compelling tomatoey way, but also inescapably verdant. It’s a breezy October morning and all I can think about is my sudden roaring hunger for raw tomatoes on toast.
Huh. I guess that’s what tomato leaves taste like.
Olive oil is one of those foods we embrace on faith. Science says it’s good for you, chefs say the quality stuff makes other foods come alive, and pretty green bottles of it can hit $40 on store shelves. We accept the idea of ‘good’ olive oil the way we accept the idea of ‘grassy’ flavors, despite never munching on blades of grass. But what is good olive oil? What makes it good, what should it taste like, and how do you shop for it if you can’t taste it beforehand?
These are the questions I came to California to figure out. Little did I realize the answers have as much to do with the weird world of food supply chains as they do with growing olives.
Most people can tell you how to spot a good tomato, but the traits of good olive oil, a food many of us eat every day, are surprisingly opaque. Take Colavita, which is Amazon’s best-selling extra-virgin, and at 29 cents an ounce you could call it the Two Buck Chuck of cooking fats. If you shop at a major American supermarket, you’re likely buying a commodity extra-virgin like Colavita. That doesn’t mean it’s bad, per se, but you should know what you’re paying for.
To vastly over-generalize the byzantine global olive oil trade, large commodity olive oil companies buy oils from all over, then blend them into a consistent product. The brokers and aggregators they buy from are in turn buying smaller lots of oils from regional producers, which are in turn buying harvests of olives from dozens to hundreds of small farms. A three-liter tin of commodity extra-virgin could conceivably contain oils from thousands of orchards, which is pretty cool when you think about it, but consider that for every one of those sources, there’s that many more ways for the processing to have gone wrong, or for the oil to have been mishandled. Assuming, of course, that it’s actually pure olive oil sitting in there, and not, say, adulterated with half a dozen refined fats.
Amazon says that bottle of Colavita is "imported from Italy," which is a clever way of saying the bottle itself was shipped from Italy without guaranteeing the provenance of the oil inside. If you squint at the back label though, you’ll see a fine print disclaimer: "Contains oil from one or more of these countries," with a legend you can use to decode the country codes printed on the bottle itself.
By olive oil standards, this is actually pretty responsible labeling! Other brands aren’t as above-board. The famously fraudulent global olive oil industry has little interest in arming consumers with actionable information about their product. Agents along a complex supply chain often blend Italian oils with olive oil from other countries and sell it as pure Italian. Companies stretch good batches of extra-virgin with tasteless soybean or safflower oils, or blend in oil made from older olives that’s refined just enough to make it palatable. A 2014 congressional report on adulterated foods, including olive oil, details these scams.
Fraud aside, even 100% pure extra-virgin olive oil will deteriorate in the bottle, and if it’s stored improperly or sits on a supermarket shelf for a year or two, it could taste rancid before you break the seal. Regulations exist to combat these practices, but they’re rarely enforced. After all, olive oil is a commodity governed by the iron laws of capital; for much of the industry, yield and profit matter far more than quality.
[Photograph: Vicky Wasik]
Then there’s the minority: small-batch boutique olive oils made by skilled producers around the world, either directly from their own olive orchard or from nearby sources. If Colavita is the Two-Buck Chuck of olive oil, these specialty brands are the natural wines and grower Champagnes. They’re intense and complex. They taste vividly of olives and give you a sense of place. They are, theoretically, good olive oils. You can expect to pay $1.50 to $3 an ounce for these, a price that reflects not just ostensibly higher quality olives, but the higher cost of labor, manufacturing, and distribution that accompanies artisan food production. Of course, there’s no guarantee that a $40 bottle of olive oil will actually be good, or if it is, that you’ll like its particular character. Like any specialty food, the relationship between price and value gets tricky on the high end of olive oil.
So what if you just want reliably good olive oil—less expensive than the boutique stuff, but still responsibly made, fresh, and delicious enough to make you smile? You know, like a good table wine, a bottle in the $15 to $20 range that has a lot going on but won’t break the bank. Brands like Manfredi Barbera & Figli's Frantoia, California Olive Ranch, and Cobram—where I visited—excel in this category. These are companies that sell olive oil in the vicinity of 75 cents an ounce, about triple the price of that Colavita, but half the price of a super-premium bottle.
Just like in wine, a lot of California companies are making good olive oil these days. California Olive Ranch is the biggest, but since launching in the US in 2014, Cobram Estate is one of the fastest growing brands in the category. It’s actually an offshoot of an Australian company called Boundary Bend, founded by agriculture school buddies Rob McGavin and Paul Riordan in 1998, that’s captured 30% of the Australian olive oil market. In addition to loving flat whites and having funny accents, Australians are big fans of olive oil; the average Australian consumes 1 3/4 liters per person per year, compared to just under a liter per person in the US. (Greeks, Italians, and Spaniards consume about 10 times that American figure, just so you know.) Boundary Bend’s success in Australia has translated to winning dozens of international olive oil competitions and a $360 million valuation.
So when Cobram’s PR team offered to fly me out to see their Central Valley orchard and factory firsthand, I was intrigued. I’m skeptical of press junkets, but the Cobram people pride themselves on transparency, from their on-site lab that reports findings to the California Olive Council to more than a dozen peer-reviewed industry papers on olive oil science. Besides, I’ve liked their olive oil for years. The first time I tried some, as an editor at a magazine that received free food samples several times a day, I swiftly palmed the half-liter office bottle to hoard in my home kitchen. It lasted about a week.
In a stark departure from the big commodity brands, Cobram Estate is completely vertically integrated: the company grows olives (directly or through contracts), picks them, mills them into oil, then bottles and ships them, all on-site. Most of California’s olive oil companies work the same way, but thanks to Boundary Bend’s vast coffers, Cobram has been able to expand aggressively, scale up production, and invest in pricey equipment. The idea, McGavin says, is to couple stringent boutique standards with a massive supply of raw material, using advanced technology and industrial scale to raise the standards of oil-making while keeping competitive with larger commodity brands. Here, then, was a chance to see what ‘good’ olive oil means at both ends of the manufacturing spectrum, and how they might meet in the middle.
A mechanical olive harvester looks like a car wash on wheels. As the 14-foot-tall leviathan rolls through the orchard, it swallows olive trees whole while rotary bristles inside the arch whack olives off their branches. While the harvester trundles down the row, a truck drives in tandem one row down, and a conveyer belt on the harvester reaches over the trees to deposit fistfulls of olives into the truck’s hopper.
The olives that Cobram is harvesting the morning of my visit are a mix of green, purple, and black; while color is an indicator of olive ripeness, Ravetti’s team relies more on the olives’ oil accumulation, flowering times, moisture levels, and other environmental factors. In July, the team starts testing olives, lot by lot, to determine the order in which they’ll be picked. Then they work out an action plan with president of US business, Adam Englehardt, to match that picking order with the factory’s capacity. California olive season runs a tight eight weeks in October and November, and once it starts, picking, processing, and milling becomes a 24/7 operation. Cobram’s factory sits in the middle of their 475-acre orchard with 10 different olive varieties planted, though as most of those trees are too immature to bear fruit, 90% of the company’s olives right now come from nearby growers that in many cases have exclusive contracts with Cobram.
With an orchard that size, scheduling picking and milling becomes a massive challenge of logistics and engineering, Englehardt explains. That’s because every olive is milled the same day it’s picked, usually within just a few hours, so it can be blended into larger batches for a consistently fresh product. Olives left off the tree too long undergo an enzymatic process called hydrolysis, where triglycerides (fat molecules) in the presence of water break down into diglycerides and free fatty acids. Meanwhile, oxidation breaks down chemical bonds in fatty acids, releasing peroxides that further break down into other compounds that cause rancidity in oil. Eventually the olives ferment, and after that, rot, and every stage of this degradation introduces off flavors to the finished oil. This happens a lot in regions where small commodity olive growers have to wait for space in a nearby crushing facility to become available. If the facility is backed up enough, the olives turn before they can get crushed, and the resulting oil will have to be heat- and chemically-refined in order to be edible. So once the olive is off the tree, the clock is ticking.
Cold-pressed olive oil is just that: olives crushed and ground into an oily juice, solely with mechanical pressure. About 20% of an olive’s fresh weight is oil, McGavin explains, but the oil itself is essentially flavorless. You have to rupture an olive’s oil sacs so the fats can marinate with the fruit’s flavorful skin, flesh, and seed. Cobram grinds the olives into a paste for about 45 minutes using a traditional hammer mill, which works on the same basic principle as those giant car crushers, then runs the paste through a 3,000 RPM centrifuge to separate out the now olive-infused oil.
But the clock ticks on. For one, the newly freed oil needs to rest so any residual water and solids can separate out. But even once you’ve removed any hydrolysis-inducing moisture, fresh oil in the presence of air will keep oxidizing. So after Ravetti’s team takes initial readings of the fresh oil and tastes it to see which batches to blend it with, it gets piped into steel tanks for cold storage, which are flushed with nitrogen to halt further air exposure. Sitting in these tanks, sequestered from heat, light, and oxygen, is as close to cryogenic storage as olive oil gets. But even under optimal conditions, the oil is deteriorating: you can’t halt oxidation completely, and enzymatic activity that began the minute the olive was crushed continues on, though at a slower pace. As we talk through the forest of tanks, Englehardt says that they aim to keep oil in this condition for no more than a year.
We move on to a smaller room with some crates on wooden pallets. Englehardt explains that these are boxes of bottled oil, ready to be shipped. “Is this it?” I ask, surprised by the meager size compared to the giant tanks we just left behind. He nods. Even the minimally air-exposed act of transferring olive oil to nitrogen-flushed bottles accelerates the oil’s deterioration. “We try to keep only four weeks’ worth of inventory in these bottles,” he says. The rest is sitting in cold storage as oil or still on the tree as whole olives.
Extra-virgin olive oil is generally defined as 100% cold pressed olive oil with a maximum of .8% acidity and no sensory defects. Virgin olive oil, the next grade down, allows up to 2.5% acidity with minor defects. Beneath these two tiers lie an assortment of lower quality grades that all require heat and/or chemical refinement to taste palatable; these make up the bulk of the commodity olive oil market.
You can measure acidity—and a whole host of other related critical factors, such as peroxide counts and signs of pests or disease—in a lab, but sensory defects come down to a tasting panel of experts trained to look for flaws like rancidity, barnyard or alcohol flavors, and ‘fustiness,’ a sign of fermentation. Nancy Ash is one of those experts. In addition to working as an California Olive Oil Council, a regional trade organization dedicated to raising standards for the California oil business and communicating those standards to the public.
“An olive oil that shows no flavor defects and passes chemical analyses such as acidity tests can be called extra-virgin,” she says, “but a passing grade just means you didn’t fail. It could be a D; would you be happy with a D?” An oil that lacks manufacturing defects could still taste bland, unbalanced, or just plain unenjoyable, yet it can earn the same grade as an award-winning bottle. That may be for the best, since the alternative, maybe something like a Robert Parker-esque point-based scoring system, is probably more cumbersome and subjective than it’s worth. The bigger issue, Ash goes on, is that since olive oils deteriorate over time, the grades they receive from a tasting panel aren’t necessarily reflective of what you get when you open a bottle.
“Even the best extra-virgin olive oils are going to taste rancid three years later.” For regular cooks in search of great olive oil, this is the most important thing to keep in mind. If you buy or receive some fabulous bottle of extra-virgin olive oil, don’t save it for special occasions in the back of the cupboard. Use it now, while it’s fresh and punchy and delicious. It’s not a collectible.
[Photographs: Vicky Wasik]
So what, then, is a regular American cook to do? Ash’s biggest piece of advice is to seek out oils with best-by dates as far ahead into the future as you can find. Very small specialty producers may put harvest dates on their bottles, but larger companies working with multiple lots and orchards, as well as the commodity giants, mostly go by bottling dates. In the EU, a best by date is typically 18 months after the bottling date, while in the US it’s closer to two or three years. A far-in-the-future best by date doesn’t guarantee an oil has been handled well along the supply chain, but it at least increases the likelihood that the oil in the bottle isn’t too old. Dark bottles are more resistant to heat and light deterioration than clear, and even though small bottles might cost more per ounce than three-liter tins, they’re generally preferable; once you open the bottle and expose the oil to air again it’ll begin to degrade even faster, and unless you’re cooking restaurant-sized batches of food on the regular, you probably won’t finish a hefty tin of olive oil before those flaws become noticeable.
Ash goes on to explain how California producers are getting more technical on labels to build demand for higher quality oils. The California Olive Oil Council has launched a pilot program of an endorsement seal for certain brands. Some producers are putting harvest dates on their labels, and others are listing polyphenol counts, which range from 150-200 on the lower end up to 600 or so. Higher polyphenol counts generally correlate to oils that last longer, Ash says, but that’s not a guarantee, and some may find the bitter, pungent taste that comes with super-high counts to be unpalatable. Cobram’s Australian division prints antioxidant data on each bottle, and McGavin says that once the US team gets enough data, they’ll replicate the practice here, possibly even this year.
For Cobram, coming to America was about more than venturing into a new market. With orchards in opposite hemispheres, the company enjoys the nifty advantage of two separate growing seasons roughly six months apart, which translates to fresher olive oil year-round.
Which has me thinking, finding a bottle of good olive oil is a lot like buying a tomato after all. Buy from reliable purveyors, seek out what looks fresh, don’t rely on fancy names and labels, and trust your instincts. After all of one day in a field and a few months spent thinking about olive oil, I don’t feel qualified to say what good olive oil really means. But I know it involves a lot more than the words ‘extra-virgin.’
[Photograph: Vicky Wasik]
When it comes to oils that she keeps in her pantry, Ash admits she’s a biased source—many of her favorites are made by friends, clients, or both. But she says she happily "blind buys," that is, orders without tasting the new batch to make sure she’ll like it, from Katz Farm, the Sicilian-leaning Bondolio, Grumpy Goats, and Frantoio Grove. I was also curious about great olive oils made in Europe, so I reached out to Nick Anderer, the founding chef of New York’s Marta, Martina, and Maialino, a trio of Italian restaurants from Danny Meyer that specialize, unsurprisingly, in high-end regional Italian specialty foods. Every fall, he and his team place advance orders for the first pressings of the following year’s olives from a small list of Italian producers he’s come to trust year after year.
“I’m looking for oil that’s alive,” he says. “I want vibrancy; I should cough if I’m tasting it raw, and I want peppery and grassy notes that feel very present.” Beyond that general principle of robust intensity of flavor, Anderer prefers different producers’ oils to finish different types of food. “For red meat dishes, I want more of a gut punch of bitterness,” he says, so he reaches for a high-polyphenol Tuscan oil by Laudemio. But an oil that strong would be overkill on, say, delicate fish or vanilla ice cream. His “rounder, almost drinkable” oil of choice for those foods is an unfiltered bottle from Capezzana, a deep-green oil that’s “super rich on the tongue,” ideal for a simple pasta like aglio e olio. He’s also a fan of Olio Verde, a Sicilian oil made exclusively from Castelvetrano olives, as its brininess works wonders with seafood. And for special occasions, he breaks out his bottle of Manni, a super-premium bitter Tuscan oil that mostly sees action in the fine dining restaurant market.
If you’re just starting to explore the world of high end olive oil, go try something similar. Hit up your favorite Italian restaurant—or Spanish, or Greek, or New American, or Lebanese—and ask what olive oil they keep in the kitchen. Then splurge on a few bottles, buy some pita or baguette, and get to tasting as much as you can. After all, they say olive oil is good for you.
This post may contain links to Amazon or other partners; your purchases via these links can benefit Serious Eats. Read more about our affiliate linking policy.
Source: https://www.seriouseats.com/2019/02/what-the-label-wont-tell-you-how-to-buy-a-good-bottle-of-olive-oil.html
0 notes
Text
Get Well Soon Pill Piñata
There’s no better way to cheer up a sick friend, than with a pill piñata filled with “get well” goodies! Sometimes illness can bring people down, and a little stuffed pill is the perfect pick-me-up to brighten their day.
There may be a hall in the hospital that would benefit from a Good Samaritan dropping by with these quirky treats that are sure to make recipients smile! It might be the perfect project for kids, to get them to think of others in the community. These could also be used as favors at a graduation party for a Doctor or nurse. If you work in a hospital, these would be great little presents to share with co-workers to celebrate birthdays or just to show your appreciation!
• Twisty balloons • Balloon pump • Newspaper strips • 1 C flour, 1 C water mixed • Apple Barrel Acrylic Paint (dark granite, white & color of choice) • Alphabet stamps • Dark gray ink pad • Washi tape / painter’s tape • Clear tape • Sponge brush • Toothpick • Box Cutter • Cooling rack • Scissors
Step 1 Tie a knot in a twisty balloon, about 1.5” from the opening. Continue to tie knots in the balloon, about 1.5” from each previous knot. Use a balloon pump to blow up the first section. Tie off the end, and then cut the section off just above the first knot. Blow up the next section, tie off the end, and cut just above the knot. Continue to blow up each section, until you have several pill-shaped balloons. Tape down the knots on each side of the balloons.
Step 2 Mix 1 C flour and 1 C water. Dip a newspaper strip in the mix, and use two fingers to “squeeze” off any excess paste. Lay the first strip across the top of the balloon. Continue to glue newspaper strips to cover the entire balloon. Glue at least two layers of newspaper to each balloon, and smooth out any lumps. Place on a cooling rack to dry overnight. Repeat with each “pill” balloon.
Step 3 Once the paper mache is completely dry, paint the pill white using a sponge brush. Allow to dry.
Step 4 Place a piece of Washi tape around the pill, so that one edge of the tape is directly in the middle. Push the tape down very well, so that paint does not seep through. Paint the side of the pill that has exactly half exposed in the color of your choice. Allow to dry, then peel off the Washi tape.
Step 5 On the right side of the white half of the pill, use your alphabet stamps and ink pad to stamp “mg” for milligrams.
Step 6 Use a toothpick and dark granite paint to write “20” right in front of the “mg”. Allow to dry.
Step 7 Use a box cutter to cut three sides of a small rectangle into the back of your pill. This will be the door that will need to open enough to place small candies and prizes inside. Pull out the remaining balloon, and shake out any glue flakes. Fill the pill with “get well” goodies, and close the small door.
Now you’re ready to share a dose of happiness with a friend! Happy crafting!
Source: https://www.handmadecharlotte.com/get-well-soon-pill-pinata/
0 notes
Text
BRISKET BAHN MI BURGER
The Bahn Mi is one of my favorite sandwiches. Rich grilled meat topped with fresh vegetables, surrounded by a French loaf with mayo and hot sauce – beautiful. So why not take these same flavors and try them with a burger? I love the fattiness of brisket with the fresh, crisp flavors of raw carrot, cucumber, and cilantro. Enjoy!
HOW TO MAKE A BURGER:
INGREDIENTS
These are very flavorful burgers, so if you don’t plan on using the garnishes, I’d recommend using a little less of the seasonings for the meat.
For 10 burgers
1 1/2 teaspoons freshly ground black pepper
1 1/2 teaspoons coarse kosher salt
1 tablespoon white sugar
1 1/2 teaspoons dry mustard powder
1 1/2 teaspoons chili powder
2 1/2 pounds top or 2nd cut brisket, ground
TOPPINGS
6 burger buns
unsalted butter
1/2 cup mayo
sriracha, optional
1 cup shredded carrot
1 large cucumber, thinly sliced
2 jalapeños, thinly sliced
1 bunch cilantro
DIRECTIONS
Mix together the spice rub and mix with the ground brisket. Form into 3/4 inch thick patties, about 4 or 5 inches wide. Set aside on a piece of wax paper. Heat a grill up to medium high heat, and grill for about 7 to 8 minutes total, flipping once for a medium rare burger. If you want a more well-done burger, add 90 seconds total to cook it further (about 8 1/2 minutes for medium, 10 minutes for medium well, etc.). Remove from the grill.
Lightly toast the buns and spread with butter and a bit of mayo. Top with the burger, drizzle with sriracha, add carrot, cucumber, jalapeños, and cilantro.
Source: https://www.thekitchykitchen.com/?recipes=/brisket-bahn-mi-burger/
0 notes
Text
Almond Flour Strawberry Crumble Bars
These days I’ve been known to linger in the kitchen because the oven is on. Or linger with the dishes , my hands under the warm water. I’m looking for warmth is basically any and every household chore… and I’m definitely also wearing socks with my slippers. It’s a mood, and these New Orleans houses are drafty.
These are the days perfect for long pre-heated home baking.
I’m working my way through a mountain of almond flour, these strawberry wedges being my latest experiment. They’re hearty, in a way that feels more indulgent and warming than it does healthy. There’s hints of maple flavor, bites of oats, and thick strawberry jam.
Simple. And satisfying. Very much like my sock and slipper combination.
Here’s what you’ll need:
• almond flour, oats, and coconut flour – a variety of gluten free things with varying degrees of absorption for balance.
• ground cinnamon, a good pinch of salt, and vanilla extract – some of our favorite baking flavors, ya know?
• maple syrup as our sweetener.
• melted butter, though you could use melted coconut oil if that’s your thing.
• strawberry, Ina Garten would suggest the good stuff and I would too though you can choose whatever fruit jam you enjoy the most.
In a medium bowl whisk together maple syrup, the egg and vanilla extract. Not the butter just yet.
Combine thoroughly, as we do.
Add the dry ingredients atop the wet starting with the almond flour.
Add the coconut flour. Coconut flour, if you used (read: made mistakes) with it before – you know that it’s VERY absorbant, very thirsty, will hog all of the liquid of a recipe so… we’ll just need a few tablespoons here.
Add dried old-fashioned oats for a heartiness that’s just right.
Ground cinnamon to add that warming flavor, and a good dose of salt for balance.
The mixture will be crumbly which is a very good reason indeed to add the melted butter.
The dough will begin to take shape once the butter is stirred in.
Using your eyeballs, to eye-measure about 2/3 of the crumble mixture. We’ll press it into an 8-inch round pan.
And listen… I did the extra steps and placed a round piece of parchment at the bottom of the greased 8-inch pan. It’ll really help in getting the baked crumble out of the pan when it’s cooled slightly.
Press the moist crumb into the pan.
Spread on a layer of good jam. Be generous, ya know?
Spread into an even layer and crumble the remaining oaty bits on top of the jam layer.
Preheat the oven to 350 degrees F and allow the crumble to bake for 35 minutes or so. The edges will brown to golden, the jam will bubble just slightly, and the kitchen will fill with the most lovely buttery aroma.
These little wedges are crisp, nutty, just lightly sweet, super satisfying and really quite lovely with black coffee. I found myself reaching for one at breakfast and again for an afternoon snack without feeling any guilt at all. This is all pleasure food, with warmth and sweetness so let’s!
Photographs with my dear Jon Melendez and recipe inspired by Ambitious Kitchen!
Almond Flour Strawberry Crumble Bars
Ingredients
1 large egg egg
1/3 cup pure maple syrup
1/2 cup old-fashioned oats (gluten free if that's a concern for you)
2 cups almond flour
2 tablespoons coconut flour
½ teaspoon ground cinnamon
1/2 teaspoon salt
¼ cup melted unsalted butter (or melted coconut oil if dairy is a concern for you)
1/2 cup good quality strawberry jam
powdered sugar for dusting (optional)
Instructions
Preheat oven to 350 degrees F. Line an 8-inch round pan with parchment paper and generously grease. Set aside.
To make the base and crumble topping, in a medium bowl whisk together egg and maple syrup until well combined.
Stir in almond flour, oats, coconut flour, cinnamon and salt until well combined.
Pour melted butter into the crumble and use a fork to evenly distribute and stir together until clumps begin to form.
Place 2/3 of the mixture into prepared pan (the remaining mixture will be used for the topping).
Use your fingers to evenly press dough to the bottom. Set the remaining dough aside for just a bit.
Spread jam in an even layer across the bottom crust.
Crumble the remaining oat mixture evenly over the strawberry jam. Bake for 30 to 35 minutes or until filling is bubbly and topping is lightly golden. Allow crumble to cool completely on a wire rack before transferring to the refrigerator to chill for 20 minutes. Once chilled, carefully invert the crumble, remove the paper, and slice into wedges.
Slices are delicious at room temperature, lightly dusted with powdered sugar.
Notes
* Feel free to use any type of jam you love!
* A flax egg will work in this recipe if you'd like to substitute the egg, the mixture may be a bit more crumbly: https://joythebaker.com/2014/09/baking-101-favorite-vegan-egg-substitutes/
* Many of you are asking about substitutes for coconut flour - I'm going to get in the kitchen this weekend and test alternatives for you! xo
0.1
https://joythebaker.com/2019/01/almond-flour-strawberry-crumble-bars/
Source: https://joythebaker.com/2019/01/almond-flour-strawberry-crumble-bars/
0 notes
Text
Cheesy Dorito Chicken Casserole
Cheesy Dorito Chicken Casserole is full of chopped chicken, black beans, Rotel tomatoes, and cheese with lots of crunch from crushed Dorito chips. One of my very favorite Mexican casseroles!
If your family likes the flavor of Mexican food but is a little tired of taco night, this comfort food casserole is just the thing to try. It’s perfect for a potluck or having friends over. Cheesy Dorito Chicken Casserole really feeds a crowd and it’s pretty much an all in one meal.
This is pretty much a dump and go recipe. You do need to saute the onion briefly to soften it, but then you just mix all the ingredients together. Put the mixture in a 9X13-inch pan, layering it with crushed Dorito chips and shredded cheese. Just 30 minutes in the oven and you’re ready to eat.
There is so much cheesy, crunchy goodness in this casserole.
Most of the spice comes from the 2 cans of Rotel tomatoes. Use hot Rotel tomatoes if you want it really spicy, regular for a little kick, and mild Rotel if you don’t want it spicy.
Use rotisserie chicken to make this meal a breeze to make.
Ranch Doritos can be used instead of Nacho.
More Spicy Casseroles
Cheesy Dorito Chicken Casserole
Cheesy Dorito Chicken Casserole is full of chopped chicken, black beans, Rotel tomatoes, and cheese with lots of crunch from crushed Dorito chips. One of my very favorite Mexican casseroles!
Keyword: easy dinner recipe, spicy
1 tablespoon butter
1 medium onion, diced
4 ounces cream cheese, cut into chunks
4 cups cooked and shredded chicken, I use a rotisserie chicken
2 (10.75-ounce) cans condensed cream of chicken soup
2 (10-ounce) cans Rotel tomatoes
1 cup black beans
1 tablespoon Chili powder
1 teaspoon ground cumin
1 regular size bag nacho Dorito chips
2 cups shredded Mexican cheese
Preheat oven to 350 degrees. Melt butter over medium heat in a large skillet. Add onion and cook until soft.
Add cream cheese,chicken, soup, tomatoes, black beans, chili powder, and cumin.
Stir until cream cheese is melted and everything is blended together.
Add 1/3 of Doritos into a lightly greased 9x13-inch baking dish. Pour 1/2 of chicken mixture on top and spread it evenly.
Top with 1/2 the shredded cheese and then remaining chicken mixture.
Finish off with remaining Dorito chips and shredded cheese. Bake for 30 minutes and serve.
Use mild Rotel tomatoes if you don't want t spicy. Regular Rotel plus the chili powder gives it a fair amount of kick. Use hot Rotel if you want it really spicy.
Disclosure: This post contains affiliate links.
Source: https://spicysouthernkitchen.com/cheesy-dorito-chicken-casserole/
0 notes
Text
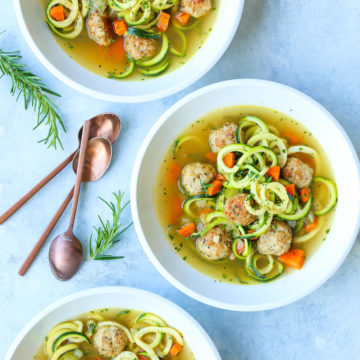
Chicken Meatball Zoodle Soup
September 3, 2018
Everyone’s favorite chicken noodle soup, but made even healthier with zucchini noodles and the most tender chicken meatballs!
It’s September. Which means I can say: Happy almost-Fall!
The season where the leaves start to change colors, and when we have every excuse in the book to order a pumpkin spice latte.
Except. Well. We went to a Dodger game yesterday. And left at the third inning. Because it was so stinking hot.
We then came home, turned on the AC, and had soup.
But not just any kind of soup.
We took a traditional chicken noodle soup, swapped out the noodles for zucchini, and then added my favorite chicken meatballs.
It. is. everything.
It’s warm, it’s cozy, it’s hearty, and there’s so much meatball goodness!
I also developed this bad habit of taking just a tiny bit of zoodles but then loading up on all the meatballs!
Yield: 6 servings
Prep Time: 20 minutes
Cook Time: 20 minutes
Total Time: 40 minutes
Everyone’s favorite chicken noodle soup, but made even healthier with zucchini noodles and the most tender chicken meatballs!
Ingredients:
2 tablespoons olive oil, divided
3 cloves garlic, minced
1 onion, diced
3 carrots, peeled and diced
2 stalks celery, diced
1/2 teaspoon dried thyme
1/4 teaspoon dried rosemary
4 cups low sodium chicken broth
1 bay leaf
1 pound (3 medium-sized) zucchini, spiralized
1 tablespoon freshly squeezed lemon juice
Kosher salt and freshly ground black pepper, to taste
2 tablespoons chopped fresh parsley leaves
For the chicken meatballs
1 pound ground chicken
1/3 cup Panko
1/4 cup freshly grated Parmesan
1/2 teaspoon dried oregano
1/2 teaspoon dried basil
1/2 teaspoon dried parsley
1/4 teaspoon garlic powder
1/4 teaspoon crushed red pepper flakes, optional
Kosher salt and freshly ground black pepper, to taste
Directions:
In a large bowl, combine ground chicken, Panko, Parmesan, oregano, basil, parsley, garlic powder and red pepper flakes, if using; season with salt and pepper, to taste. Using a wooden spoon or clean hands, stir until well combined. Roll the mixture into 3/4-to-1-inch meatballs, forming about 25-30 meatballs.
Heat 1 tablespoon olive oil in a large stockpot or Dutch oven over medium heat. Add meatballs, in batches, and cook until all sides are browned, about 2-3 minutes. Transfer to a paper towel-lined plate; set aside.
Add remaining 1 tablespoon oil to the stockpot. Add garlic, onion, carrots and celery. Cook, stirring occasionally, until tender, about 3-4 minutes. Stir in thyme and rosemary until fragrant, about 1 minute.
Whisk in chicken broth, bay leaf and 2 cups water; bring to a boil. Stir in meatballs; reduce heat and simmer until meatballs are cooked through, about 10-12 minutes. Stir in zucchini noodles during the last 3-5 minutes of cooking time.
Stir in lemon juice; season with salt and pepper, to taste.
Serve immediately, garnished with parsley, if desired.
Did you Make This Recipe?
Tag @damn_delicious on Instagram and hashtag it #damndelicious.
Get the Latest Recipes Right in your Inbox:
Source: https://damndelicious.net/2018/09/03/chicken-meatball-zoodle-soup/
0 notes
Text
The keto diet could lead to this scary lifelong side effect, studies warn
Keto flu, keto breath, keto crotch… What’s next? Unfortunately, new side effects of the keto diet continue to emerge. People are now breaking out in full-body, painful rashes after going on the extremely low-carb diet. And perhaps the worst part is that this “keto rash” can leave brown marks on the surface of the skin that stick around for life.
This Is What Happens to Your Body When You Quit Carbs
One of the most popular diet trends of this decade, the idea behind the keto diet is that restricting carb intake to an extremely low number while eating large amounts of fats will trick the body into entering ketosis, a state in which the body burns fats for fuel. Ketosis is difficult to maintain, but once it is achieved, the body can react in strange (and in this case painful) ways.
If you search “keto rash” on Reddit, you’ll find dozens of dieters begging for help with the condition, sharing anecdotes of excruciating itching and discomfort. The rash tends to start near the chest and spread, reaching every part of the body, including the scalp.
“I noticed a rash across my left boob within 3 days,” one Reddit user recalled. “By day 14 (Saturday), my rash was up and down both of my boobs, in my cleavage, along my bra line in the back and all over my neck, into my hairline. It was PAINFUL, burning, itching. I was insanely irritable. It looked horrific.”
One Reddit user, ketoko, said they had been wearing gloves to bed to prevent from scratching throughout the night. “I’m starting to develop scabs and blisters and it just hurts really bad,” ketoko said in a post.
Even once the rash subsided, some found that the marks stuck around for good.
“I spent years trying to overcome insecurities. I decided to try keto to finally change for the better,” user donut-peach said, “but now I have a totally different problem that prevents me from showing my skin … it was spreading too rapidly and left behind discoloration. I now am off keto and have hideous marks all over my chest, shoulders, neck, and back.”
The condition is called prurigo pigmentosa. Existing scientific literature shows a link between ketosis and the rash, though studies show other intervening factors (such as sunlight, extreme heat, allergens and sweating) may worsen the condition. Going on the keto diet is not the only way humans can enter ketosis. Conditions such as diabetes mellitus and anorexia nervosa can also lead to this state, as well as fasting and dieting.
A 2018 case study showed that prurigo pigmentosa can only really be treated by eating a lot more carbs — i.e., quitting keto. Other options, such as topical creams and anti-inflammatory drugs, may temporarily relieve symptoms — but if you don’t quit the diet, the rash is likely to return in full force once you stop using them. “There is no dietary treatment option to successfully treat the rash without sacrificing ketosis,” the study reads. And once the rash disappears, there is no known method of getting rid of the dark brown spots prurigo pigmentosa leaves behind.
Not everyone on the keto diet experiences this symptom. But you should know if there are serious risks to a diet before you try it. Keto isn’t the only diet with drawbacks — these other popular diets have hidden side effects, as well.
Source: https://www.thedailymeal.com/healthy-eating/keto-rash-side-effect-low-carb/071919
0 notes
Text
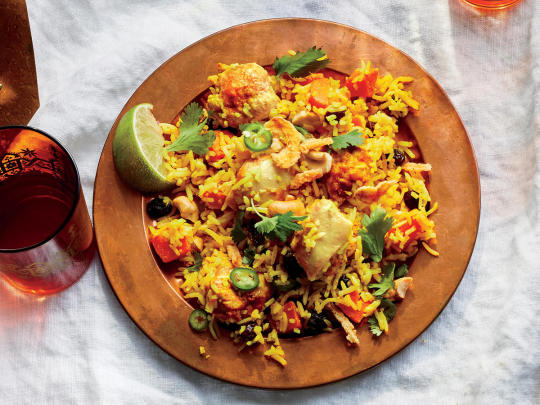
Ditch the Noodles! Make Chicken and Quinoa Soup.
Happy Post-Thanksgiving everyone!
This year was initially a little somber for us after finding out my Father-In-Law needed open heart surgery right before Thanksgiving. I’m happy to report the surgery went well and he is headed home from the hospital tomorrow.
We are feeling extra special thankful about that!
Anyway, Thanksgiving dinner turned out fabulous. Every year I get more confident, and things go more smoothly. I have this meal down pat!
My favorite thing to do during clean-up is to make stock.
My mom gifted me her ginormous pot after she moved which made this process so much easier. I covered the turkey carcass with water, added two onions, a head of garlic, the hearts of all my celery, two carrots, peppercorns, salt and let it simmer for 24 hours.
Then I strained the stock and chilled it overnight allowing me to remove the layer of fat in the morning.
A third of the stock went in my freezer for future use, a third went to my mom and the rest I used for this soup that came out delicious!
I usually make chicken noodle for the kids, but I end up eating most of it so this year I made it how I like it, with quinoa.
The texture is just so fun, and I love how it continues to soak up the broth, turning it almost stew or porridge-like. I added all the traditional chicken noodle soup ingredients, and it warms my soul on all these cold, damp days we’ve been having.
Here’s what I did…
Prep 5 mins
Cook 30 mins
Total 35 mins
Author Roni Noone
Yield 15 cups
I ditched the noodles for quinoa in this homemade chicken soup. It still warms the soul just like Grandma's did but with a slightly more fun texture.
Ingredients
12 cups broth/stock
2 cups uncooked quinoa
2 chicken breast cut into bite-sized pieces
~1 cup chopped celery
~1 cup chopped carrots
2 tsp poultry seasoning
1 tsp dried thyme
1 tsp dried rosemary
salt to taste
Instructions
Bring the broth and quinoa to a boil, then cover and simmer for 15 minutes.
Add the remaining ingredients. Continue to simmer uncovered until carrots soften to your liking.
Enjoy!
Notes
I'll be honest, I didn't really measure my carrots and celery. Add as much or as little as you like. It's carrots and celery!
I really enjoy this with some freshly grated parmesan cheese on top.
Calculating Nutritional Info with homemade stock is a guessing game. I just used a generic stock entry in MFP to estimate. It's all I really can do.
Courses Lunch, Dinner, Soup
Cuisine American
Nutrition Facts
Serving Size 1 cup
Amount Per Serving
Calories 138
% Daily Value
Total Fat 2 g
3%
Total Carbohydrates 20 g
7%
Dietary Fiber 2 g
8%
Sugars 2 g
Protein 10 g
20%
* Percent Daily Values are based on a 2,000 calorie diet. Your daily values may be higher or lower depending on your calorie needs.
I think I’ll use the rest of the broth to make my chicken and oat stew. That’s always a crowd pleaser.
1
Related
Source: https://greenlitebites.com/2018/11/26/chicken-quinoa-soup/
0 notes
Text
Refreshing Cucumber Mango Margarita
Poolside chillin? Then this Refreshing Cucumber Mango Margarita is right up your alley. Who doesn’t like a cool drink on a hot summer day or after a long day? Sometimes that’s all you really need. Whatever the case, try pairing this drink with one of our many recipes that go nicely with a side of tequila. Try our Roasted Cauliflower Tacos, or our Pepperjack Protein Tacos, or our Quinoa Enchilada Dip!
Many margaritas are loaded with sugar. Making your own margarita allows you to control what goes into your drink. This recipe is a healthier (and I think, a more delicious) alternative. The cucumber and mango provides an excellent, crisp flavor that beats all those pre-mixes!
Ever wanted to bartend? Now’s your chance! Peel the cucumber and mango, and slice into thick pieces. Blend the ice, cucumber, mango, lime juice, maple syrup, and tequila. Serve and enjoy!
Indulging in alcohol in moderation is totally okay! If drinking, it is recommended that women have up to one drink per day and men have up to two drinks. Have you made your own margaritas? Let us know what you think about this recipe below!
REFRESHING CUCUMBER MANGO MARGARITA
1/2 cucumber
1/2 small mango
8 ice cubes
1 tablespoon maple syrup
Juice of 1 lime
3 ounces tequila
Peel the cucumber and mango, and slice into thick pieces
Blend the ice, cucumber, mango, maple syrup, lime juice, and tequila
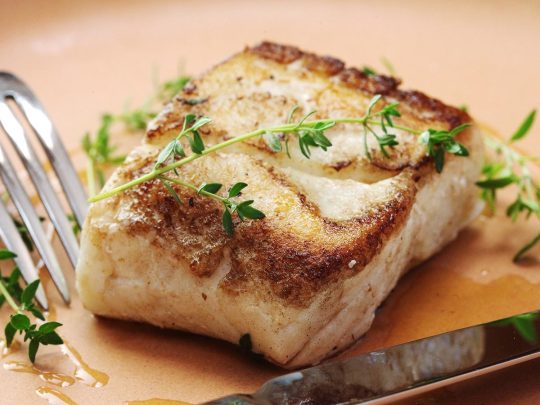
Source: https://foodheavenmadeeasy.com/refreshing-cucumber-mango-margarita/
0 notes
Text
Vegan Nam Khao (Lao Crispy Rice Salad with Greens and Herbs)
Back in January when I was in LA to film my latest episode of Home and Family, I ate for the first time at Night + Market.
As a longtime Thai food-a-holic, the restaurant, which focuses on street food from Isaan, has been on my hit list for a while. Sadly, being gluten-free kept me from trying many of the classic dishes. But one of the delicacies that I did eat – more like wolf – was the Nam Khao crispy rice salad.
When things are crunchy and carby, it sets off all of my gluten free alarm bells. Something is off, I thought, as I dug into the rice salad, which was so crispy it appeared to be deep fried (in the most delicious possible way). While it was indeed safe, I then assumed that the texture would be way too difficult to recreate at home. WRONG!
Luckily my friend sitting across the table from me was no stranger to crispy rice salads and immediately told me that she makes an even more delicious version (this Jessica Merchant recipe). When I got home, I read through the instructions and couldn’t believe how easy it was. I also couldn’t believe, as my friend told me, that it would remain crispy even as leftovers. LIES!
Well, needless to say, I tried my hand at Nam Khao once I was back in my kitchen, and was blown away at the results. Inspired by Jessica, I made her version which is vegan and packed with marinated kale. I didn’t miss the sour pork in the Night + Market version at all and was very happy not to have to deep fry anything.
Since this recipe revolves around greens, white rice, and herbs, it’s a great dish to adapt to be low FODMAP. You simply omit the shallot and garlic. I made it this way and it was still excellent.
If you’re not vegan, you can sub fish sauce for the tamari for an even more authentic Thai experience or add red curry paste for some heat. Regardless of what you mix in off the heat, the most important element is getting that crunch, which happens easily when you undercook the jasmine rice and then pan-fry it into a crispy rice pancake. Don’t rush this process.
One tactic for getting the rice extra crunchy is to wrap your pan lid in a dish cloth. Be careful here: mine got a little charred around the edges. If your towel isn’t long enough to tie at the top, use a rubber band to cinch it so there’s no fabric flapping over the sides and coming too close to the hot pan sides or flame.
Read on for this Laotian Nam Khao recipe, by way of Thailand, Los Angeles, and now Brooklyn…to wherever in the world you are.
With health and hedonism,
Phoebe
This Nam Khao recipe is adapted from the Thai Crispy Rice Salad on Jessica Merchant’s site, How Sweet Eats. It’s a much healthier version of the Night + Market recipe and also very easy to throw together on a weeknight. To make this low FODMAP, simply omit the shallot and white scallions. I made it this way and it tasted great! If you’re not vegan, you can sub fish sauce for the tamari for an even more authentic Thai experience or add red curry paste for some heat.
Ingredients
1 1/2 cups jasmine rice or other long grain white rice
4 tablespoons coconut oil
1 red bell pepper diced
1 Fresno chili or jalapeno ribs and seeds removed, minced
1 shallot thinly sliced
1 tablespoon minced fresh ginger
1 bunch lacinato kale stems removed and finely chopped
2 teaspoons olive oil
2 tablespoons lime juice
1/2 teaspoon sea salt
1/4 cup gluten-free tamari
1 tablespoon rice vinegar
1 tablespoon toasted sesame oil
2 scallions thinly sliced
1/2 cup roughly chopped cilantro
1/4 cup roughly chopped peanuts
1 lime quartered, for serving
Instructions
Place the uncooked rice in a fine mesh strainer and rinse well multiple times. Bring a pot of salted water to a boil and add the rice. Cook the rice for 5 minutes. Drain the rice in the strainer (it will be slightly undercooked and that’s okay!) and transfer to a large mixing bowl.
In a large lidded skillet or saucepan, heat 2 tablespoons of the coconut oil over a medium-high flame. Sauté the peppers and shallots until softened, about 5 minutes. Add in the ginger and cook for 1 minute more. Transfer the pepper mixture to the bowl with the rice and toss to combine.
Place the skillet back over medium-high heat and add the remaining oil. Once hot, add the rice mixture and use a spatula to press it into one layer, like a rice cake. Wrap the pan lid tightly in a large kitchen towel – be very careful it’s not touching the pan or it might char. Cover with the towel-wrapped lid and cook until the rice is golden and crispy, about 7 minutes. Using a flat spatula, flip a few parts of the rice cake and crisp the other side, another 5 minutes. Remove the skillet from the heat, keep it covered with the lid and let it sit for 10 minutes.
Meanwhile, in the large mixing bowl, toss the kale with the olive oil, lime juice and salt. Massage with your hands until dark green and wilted. Set aside.
In a small bowl, whisk together the tamari, vinegar and sesame oil.
Off the heat, gently toss the crispy rice with the kale and transfer to a serving platter. Drizzle with the tamari mixture. Top with the scallions, cilantro, peanuts and lime wedges.
Source: https://feedmephoebe.com/nam-khao-crispy-rice-salad-recipe/
0 notes
Text
Nectarine Tart
I know what you’re probably thinking – yes, we just posted a peach cobbler recipe last week! Well, I’m not one to shy away from baked goods – especially during stone fruit season. For me, it doesn’t get much better than a warm slice of stone fruit tart, topped with a scoop of vanilla ice cream. Dessert perfection! Nectarines work beautifully here, but peaches or apricots would be lovely as well.
There really aren’t too many secrets to making a delicious crumble topping. It’s a quick and easy way to top your pie or tart, without having to deal with a finicky crust. Oats are a common crumble ingredient, but for this recipe I used almonds, flour, brown sugar, salt and cinnamon. Cold butter is a must, as this will allow you all those chunky, sugary crumbs we love about a crumble.
Using a food processor, pulse the almonds, flour, brown sugar, cinnamon, and salt together until the almonds are in very small pieces. Add cold butter pieces and pulse another 10-20 times, until the mixture just starts to form small clumps. Chill until ready to use.
The best part about this dessert is trying to get a bit of everything all in one bite: warm, gooey filling; nutty, buttery crust; sweet, crumbly topping; cold, creamy ice cream. Now that’s what dreams are made of . . .
INSTRUCTIONS
For the Sweet Tart Dough
In the bowl of a stand mixer fitted with the paddle attachment, add the butter and granulated sugar and beat on medium speed for 1-2 minutes until mixed together evenly.
Add the egg yolks one at a time, then the flour and salt until the dough just comes together. Turn the mixer off and use a spatula to scrape the bottoms and sides to make sure homogenous.
Butter the sides and bottom of a 9-inch springform pan. Pour the dough into the pan and spread it evenly along the bottom of the pan and up the sides, it should reach about 2 inches up the sides. Use the bottom of a cup or the palm of your hand to get the dough as even as possible.
Freeze the dough in the pan for 30 minutes
To make the Crumble Topping
Using a food processor, pulse the almonds, flour, brown sugar, cinnamon, and salt together until the almonds are in very small pieces.
Add the cold butter pieces and pulse another 10-20 times, until the mixture just starts to form small clumps.
Chill the crumble until ready to use
Bake the Tart Shell
Preheat the oven to 375° F
Remove the tart shell from the freezer and line with aluminum foil and cover with pie weights (I always use dried beans!).
Bake for 20 minutes, then remove the foil/weights and bake for 5-10 minutes more until brown. Remove from the oven and set aside.
Turn the oven down to 350° F
To Assemble and Bake the Tart
Combine the nectarines with the sugar, cornstarch, vanilla extract, almond extract, and salt in a medium bowl. Stir gently to coat.
Transfer the filling to the baked tart shell and gently even it out with a spatula to fill any holes.
Sprinkle the crumble topping evenly over the topping.
Bake the tart for 50-60 minutes, until the crumble is nicely browned. The tart crust may look dark at this point but shouldn't taste burnt.
Let cool in the pan on a wire rack for 5-10 minutes. Run a knife around the edge of the pan to loosen the crust and remove the sides of the springform pan.
Serve warm or at room temperature with a scoop of ice cream or whipped cream.
(Photography by HonestlyYUM. Recipe adapeted from My Paris Kitchen by David Lebovitz)
Source: https://honestlyyum.com/24412/nectarine-tart/
0 notes
Text
Instant Pot Low-Carb Chicken Tortilla Soup
posted by Kalyn Denny on March 4, 2019
Instant Pot Low-Carb Chicken Tortilla Soup is served with low-carb tortilla strips made in the air-fryer (or the oven), but skip the tortillas completely if you prefer. Use Soup Recipes to see more low-carb soups.
Click here to PIN Instant Pot Low-Carb Chicken Tortilla Soup!

I’ve always been a fan of Chicken Tortilla Soup, so recently I decided to try making a Low-Carb Instant Pot Chicken Tortilla Soup that would would still have a good flavor and texture without using high-carb ingredients like beans, corn, or rice that are often found in this type of soup. And when we were testing, we came up with the idea to use my favorite low-carb tortillas to make the tortilla strips part of this much-beloved soup. And this soup was a winner!
Of course, you can find variations of Chicken Tortilla Soup all over the web. But the favorite ingredients I use to add flavor to the soup are what I think makes my version of Instant Pot Low-Carb Chicken Tortilla Soup especially good. I started by adding chopped Poblano Chile Peppers that get cooked with the onions to build flavor. (Your grocery store may call them Pasilla Chile Peppers if you’re in the U.S.; this is a relatively mild chile pepper with good flavor.) Of course I added seasonings like garlic and ground cumin to the soup, but I also included my favorite Green Tabasco Sauce and a good handful of chopped cilantro added before the soup cooks under pressure. And when the soup was done we stirred in a generous amount of fresh-squeezed lime juice, more Green Tabasco sauce, and more chopped cilantro for a final punch of flavor.
While the soup cooked in the Instant Pot we cut Whole Wheat Fajita size Mission Carb Balance Tortillas into short strips, misted them with olive oil, and seasoned with a little salt, and cooked them in the Air Fryer until they were golden brown. (They don’t take long, watch them carefully!) You can cook the tortilla strips in the oven too if you don’t have an air fryer.
And if you’re like me you’ll definitely want to eat your soup with some grated Mexican Blend Cheese, a dollop of sour cream, and a squeeze of lime juice to add at the table. Enjoy!
Chop up a medium onion and a large Poblano (Pasilla) Chile Pepper. Heat olive oil in the Instant Pot on SAUTE, MEDIUM HEAT, and cook until the chopped onion and chiles are starting to get soft and barely getting some color. Then add the minced garlic, ground cumin, salt, and half of the chopped cilantro and cook that for a couple of minutes. (Oops, didn’t take a photo of that.) While those ingredients are cooking, trim the chicken breasts if needed and cut each one into 3 or 4 thin strips. Drain tomatoes into a colander placed in the sink. When veggies and seasonings are done, add chicken breasts, chicken stock, drained petite dice tomatoes, and some Green Tabasco Sauce to the Instant Pot.
Lock the lid and set the Instant Pot to MANUAL, HIGH PRESSURE, 10 MINUTES. When the time is up, allow the pressure to release naturally. When it is released, use a slotted spoon to scoop out the chicken strips and shred chicken into chunks with a fork. Add chicken back to the Instant Pot. Taste to see if you want to add a little more salt and more Green Tabasco Sauce. Add the fresh-squeezed lime juice and the rest of the chopped cilantro to the pot.
While the soup cooks, cut Whole Wheat Fajita size Mission Carb Balance Tortillas (or low-carb tortillas of your choice) into short strips. Set Air Fryer to 350F. (My Cuisinart Convection Air Fryer Toaster Oven doesn’t have to be pre-heated, but preheat if your Air Fryer needs it.) Arrange the tortilla strips in a single layer in the Air Fryer basket, mist with olive oil, and season with a little salt. Cook tortilla strips 2 minutes, then shake the basket and cook a bit longer until they’re nicely browned. We cooked ours a total of four minutes, but I’d start to watch them after about 3 minutes. Here is How to Make Baked Tortilla Chips if you don’t have an Air Fryer.
More Mexican Recipes in the Instant Pot:
The BEST Instant Pot Mexican Food Recipes ~ Slow Cooker or Pressure Cooker Instant Pot Chicken Fajitas ~ Crunchy Creamy Sweet Instant Pot Low-Carb Southwestern Pot Roast ~ Kalyn’s Kitchen Instant Pot Steak Fajitas ~ A Mind “Full” Mom Instant Pot Salsa Chicken with Lime and Melted Mozzarella ~ Kalyn’s Kitchen Pressure Cooker Cafe Rio Sweet Pork Tostadas ~ Pressure Cooking Today 20 Amazing Recipes for Slow Cooker or Instant Pot Mexican Shredded Beef, Chicken, or Pork ~ Slow Cooker or Pressure Cooker
Love Your Instant Pot?
I use a 6 Quart Instant Pot for all my Instant Pot Recipes. Check out my growing collection of Pressure Cooker or Instant Pot Recipes! You can find more Pressure Cooker/Slow Cooker Recipes on my other site!
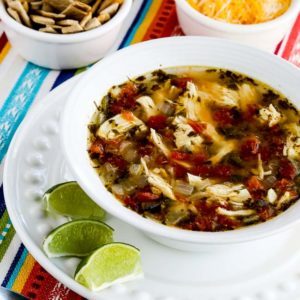
Instant Pot Low-Carb Chicken Tortilla Soup
Yield: 6 servings
Total Time: 25 minutes, plus additional time to come to pressure and release pressure
Prep Time: 15 minutes
Cook Time: 10 minutes, plus additional time to come to pressure and release pressure
This Instant Pot Low-Carb Chicken Tortilla Soup is garnished with low-carb tortilla strips made in the Air Fryer, but skip the tortillas if you prefer!
Ingredients:
Soup Ingredients:
1 medium onion, chopped small
1 large Poblano Chile Pepper, chopped small (Sometimes these are called Pasilla Chile Peppers in the U.S.)
1 T olive oil
2 tsp. minced garlic (garlic from a jar is fine for this)
1 tsp. ground cumin
1/2 tsp. kosher salt
1/4 cup + 1/4 cup chopped fresh cilantro (or more if you’re a cilantro fan like I am!)
4 – 5 cups chicken stock or canned chicken broth (Use the larger amount if you prefer a more brothy soup.)
3 large or 4 small boneless, skinless chicken breasts
2 tsp. Green Tabasco sauce, plus more to add when you taste the soup if desired
1 can (14.5 oz) petite dice tomatoes, drained in a colander in the sink
2 T lime juice, or more (see note)
Tortilla Strips:
4 low-carb tortillas of your choice
olive oil for misting or brushing on tortillas
salt to taste
Other Optional Condiments For Serving:
grated Mexican blend cheese
sour cream
lime wedges to squeeze into the soup
more Green Tabasco Sauce to add at the table
Directions:
Chop the onion and Poblano (Pasilla) Chile Pepper into small pieces.
Heat olive oil in the Instant Pot on SAUTE, MEDIUM HEAT, and cook until the onion and chile are starting to get soft and barely getting some color, about 4-5 minutes.
While those ingredients cook, prepare minced garlic (or measure minced garlic from a jar) and chop the cilantro. Trim the chicken breasts to remove any unwanted parts and cut each one into 3 or 4 strips. Drain tomatoes into a colander placed in the sink.
When the onions and peppers are done add the minced garlic, ground cumin, salt, and half of the chopped cilantro and cook that for a couple of minutes.
When veggies and seasonings are done, add chicken breasts, chicken stock, drained petite dice tomatoes, and 2 tsp. Green Tabasco Sauce to the Instant Pot.
Lock the lid and set the Instant Pot to MANUAL, HIGH PRESSURE, 10 MINUTES. When the time is up, allow the pressure to release naturally.
When pressure has released, use a slotted spoon to scoop out the chicken strips and pull chicken apart into chunks with a fork. Add chicken back to the Instant Pot.
Taste the soup to see if you want to add a little more salt and/or more Green Tabasco Sauce. Add the fresh-squeezed lime juice and the rest of the chopped cilantro to the soup and let it keep warm in the Instant Pot.
While the soup cooks, cut Whole Wheat Fajita size Mission Carb Balance Tortillas (or low-carb tortillas of your choice) into short strips. Set Air Fryer to 350F. (My Cuisinart Convection Air Fryer Toaster Oven doesn’t have to be pre-heated, but preheat if your Air Fryer does.)
Arrange the tortilla strips in a single layer in the Air Fryer basket, mist with olive oil, and season with a little salt. Cook tortilla strips 2 minutes, then shake the basket and cook a bit longer until they’re nicely browned. We cooked ours a total of four minutes, but I’d start to watch them after about 3 minutes. Here is How to Make Baked Tortilla Chips if you don’t have an Air Fryer.
Serve soup hot with tortilla strips, grated Mexican Blend Cheese, sour cream, lime wedges, and more Green Tabasco Sauce to add at the table as desired.
Notes:
I used my fresh-frozen lime juice for this soup, but I wouldn’t use bottled lime juice.
I tested this recipe with help from Jake and Kara and our experiments were inspired by tortilla soup recipes we spotted around the web as well as the Chicken Tortilla Soup in The Keto Instant Pot Cookbook.
Low-Carb Diet / Low-Glycemic Diet / South Beach Diet Suggestions: Instant Pot Low-Carb Chicken Tortilla Soup is a good side dish for any low-glycemic diet or most low-carb diets, including phase two or three of the South Beach Diet. It’s lower in carbs if you skip the tortilla strips of course, but they don’t add many carbs and give a nice added texture to the soup.
Find More Recipes Like This One: Use the Diet Type Index to find recipes suitable for a specific eating plan. You can also Follow Kalyn’s Kitchen on Pinterest to see all the good recipes I’m sharing there.
Nutritional Information? If you want nutritional information for a recipe, you can sign up for a free membership with Yummly and use the Yum button on my site to save the recipe and see the nutritional information. (New recipes won’t show up in Yummly right away and information there is not always 100% accurate.) Another option is entering the recipe into this Recipe Nutrition Analyzer, which will calculate it for you.
Categories: Air Fryer, Easy to Cook, Favorites, Kid Friendly, Pressure Cooker, Quick, Recipes, Soups Ingredients: Chicken, Fresh Herbs, Peppers, Tomatoes, Tortillas
posted by Kalyn Denny on March 4, 2019
Don’t Miss a Recipe!
subscribe to receive new recipes via email:
We are a participant in the Amazon Services LLC Associates Program, an affiliate advertising program designed to provide a means for us to earn fees by linking to Amazon.com and affiliated sites.
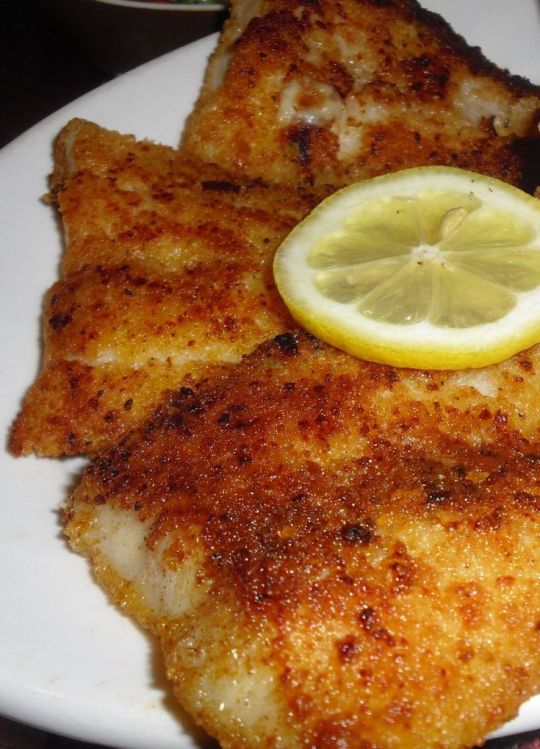
Source: https://kalynskitchen.com/instant-pot-low-carb-chicken-tortilla-soup/
0 notes