
Statistics
We looked inside some of the posts by chloesunit3fmp and here's what we found interesting.
Average Info
Notes Per Post
9
Likes Per Post
9
Reblog Per Post
0
Reply Per Post
0
Time Between Posts
12 hours
Number of Posts By Type
Text
17
Last Seen Tumblr Blogs


Fun Fact
In February 2021, Tumblr had 518.6 million blog accounts.
Text
My Commercial Cooking up Fashion
youtube
1 note
·
View note
Text
My evaluation on my Fmp
Through my first year of doing UAL Diploma Creative Practice in Fashion I have achieved and experienced so many knowledge and technique into a preview of the fashion industry. When I first started this first year I thought I would be strong in marketing and illustration because I studies art and business for my GCSE at secondary school so I have learnt more unlike pattern cutting in which I had very little experience in. Before college I only had experience in hand sewing and I did not have any experience using a sewing machine. I find pattern cutting hard to understand at first as it all was new knowledge and hands on in the deep end for me. However, as I started to develop and progress this year it come easier, and I constructed a garment from an illustration I had drew therefore I was proud and felt happy in my work. As before I would stress it was not perfect, but I still never gave up. Also, through illustration I learnt new techniques and learnt new media with using fresh style compared to my usual art style. I did find drawing figure illustration hard though since I found the proportioning and scale hard so using the grid method, I learnt helped my proportioning and scale. Yet my marketing and my business I previously studied (where I achieved a grade nine) did help me and found it easier to learn and not fall behind compared to my other units where it was new and difficult at first. I found it easier to manage as it had similar units such as the 4ps and branding which I manged to expand my knowledge. During FMP, I had several improvements compared to my previous units. I felt more confident in my work and felt an improvement as I went on in my FMP. In marketing I felt confident and understood my customer and how to manage my research to keep my project connected through my FMP. My illustration was stronger as I practised drawing hands and feet which looked better in my pose development and as well, I found my face development and portraits had become stronger and, in more proportion. I used fine liner to make my work professional and clean to improve my illustration. I also used my media experimenting and used new media in my FMP using my knowledge and practice in my first year. I felt like my clothes designs are stronger with a 3D and fabric movement with adding shading and different strokes to show movement. Through pattern cutting, I worked independently and use my previous technical file to help me where I struggled. I had a cleaner progress through construction and creating my toile. I did find times hard still but not when I first started. I managed to make the correct right and wrong sides and kept a 1cm seam allowance through my whole construction and had less errors made. My strengths of my FMP were my time management and kept organised using my action plan through this project. I found my marketing to help me as well because of my research and Harvard referencing help me during my FMP with understanding my customer making my designs stronger and meet my outcome of this project. Furthermore, my new development of textiles helped me design with creating new samples with fruit inspired from my FMP. I still need to work on my illustration with my hand and feet drawing and making my clothes look realistic to really showcase my designs. Additionally, I want to develop my pattern cutting technique to make better garments and work on new constructions. My drawing technique as well with finding my own style for illustration and having better outcomes and different ones to make my portfolio diverse. For my second year, I will take my textile work forward and my marketing work as I enjoy both and want my work to look professional for work after achieving my years at college. I will work on my illustration skills to make them ready for work and have a clean finish showcasing my portfolio with my years at college.
1 note
·
View note
Text
Action plan


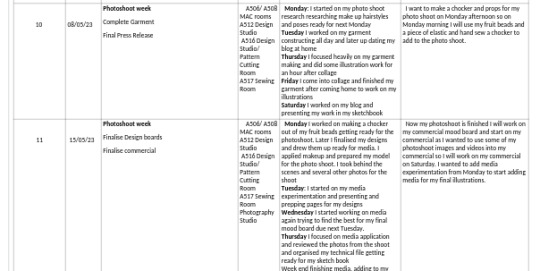

This is my action plan that I developed to ensure that all of my work was completed on time. Furthermore, I aimed to make sure that I maintained on target, so I recorded what I accomplished each day of my FMP . This was extremely beneficial because this ensured that I remained on target whilst additionally enabling me to demonstrate what I did and the processes that led to the final result.
Unit 3 FMP Notes.one
1 note
·
View note

Text
Final mood board
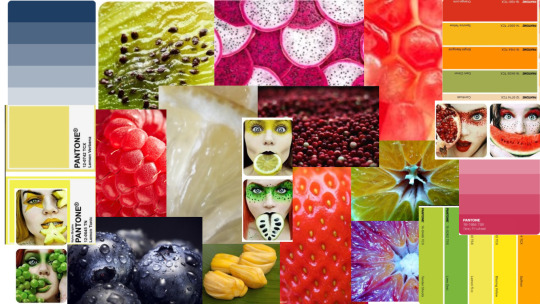
This mood board presents my final collection inspiration for this project. I was inspired by fruit with the vibrant colours, the texture and patterns. This mood board also includes my colour theme, and the picture of my ideas I focused on macro photography of fruit as I could use the texture in textiles to create samples to develop and experiment.
1 note
·
View note
Text
Press release:

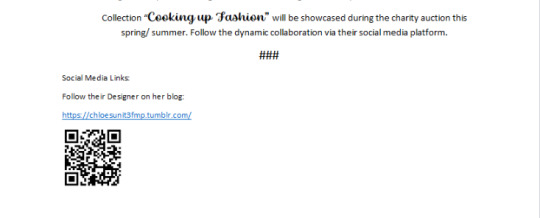
https://livebarnsleyac-my.sharepoint.com/:w:/r/personal/2341833_live_barnsley_ac_uk/_layouts/15/Doc.aspx?sourcedoc=%7B2D6225DE-94DF-476E-9D36-541A9DE4FC11%7D&file=Chloe%20Press%20Release.docx&action=default&mobileredirect=true&DefaultItemOpen=1&login_hint=2341833%40live.barnsley.ac.uk&ct=1685363114604&wdOrigin=OFFICECOM-WEB.START.REC&cid=3c901dba-8fcc-4c55-a042-23e2b754c3e5&wdPreviousSessionSrc=HarmonyWeb&wdPreviousSession=c8e2406c-1ed1-4346-a3de-e31e9344049b
1 note
·
View note


Text
Commercial plan

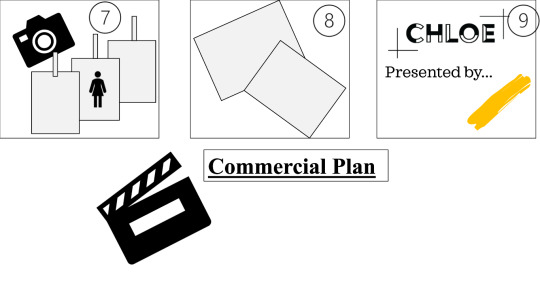
It will show a title screen with my brand logo and FMP title.
2. I will show some behind the scenes of making up my garment such as threading up the sewing machine.
3. I shall showcase my drawings of fruit / inspiration to make up my top by zooming in and out of my drawings to show the texture I created.
4. I show my embroidery pieces making them up and my textile experimenting as well.
5. Will show my illustrations experimenting with media to get the right media for my final boards.
6. It will show my pattern cutting and my build up of making up my garment on the sewing machine.
7. Present my photo shoot and garment showcase.
8. Shows my final boards of my final ten illustrations.
9. Ending showing my logo and finishing it off by presented by...
0 notes
Text
0 notes
Text
0 notes
Text
0 notes
Text
0 notes
Text
0 notes


Text
0 notes
Text
My garment method:
Cut garment using pattern cutting guidance Glue the interfacing to the facings the neck facing, and the embroidery pattern pieces and glue to wrong side using the fusing press. Apply textile techniques to the specific pattern pieces and prints. Sew the dart on pattern piece number one and press the dart. Sew pattern piece 1 and 2 right sides together at a 1cm seam allowance. Then overlock and press the seams. Sew pattern piece 3 to pattern piece 2 at a 1cm seam allowance. Overlock and press the seams. Sew the dart on pattern piece 4 and press the dart. Sew pattern piece4 to piece 5 at a 1cm seam allowance. Overlock and press the seams. Sew the two font pattern pieces together at a 1cm seam allowance matching the notches right sides together. Sew the darts in both pattern piece 6 and press the dart. Sew pattern piece 6 to pattern piece 7 and overlock and press the seams repeat for both sides of the back. Sew pattern piece 7 to pattern piece 8 and over lock and press repeat this step twice for both the right side and left side of the back of the top. Sew the side seams at the 1cm seam allowance matching notches. Overlock and press the seams at the left side seam and right-side seam. Sew the shoulder seams at a 1cm seam allowance matching the notches. Overlock and press the shoulder seams at both right-side shoulder and left shoulder seams. For the thrills take the largest thrill and sew the centre font and overlock and press the seam. Sew only one side of the thrill. Sew the smallest and middle thrill on one side and overlock and press the seam. Overlock the edges of the smallest thrill and middle thrill and press at 1cm on each edge. Just overlock the largest thrill no pressing needed. Place all three thrills together to make on tiered thrill and sew round the circle at the edge on the foot at 5mm seam allowance, Overlock both back seams. Sew the thrills onto the back bodice piece by matching the notches along the bottom of the back bodice. Then overlock and press the seam. For the sleeves sew together pattern piece 9 to pattern piece 10 at a 1cm seam allowance matching notches. Overlock and press the seams. Repeat for both sleeves. Fold the sleeve at right sides together and sew at the fold at a 1cm seam allowance repeat for both sleeves. Then overlock and press the seams for both sleeves. Turn both sleeves right way round inside out. Round the cuff fold it inside by 1cm and sew at 1 cm (top stitching.) Repeat for both sleeves. Overlock around the cuff of both sleeves. Attaching the sleeves, match notches and pin at notches on the bodice at the arm hole. Sew the sleeve to the garment at a 1cm seam allowance creating little waves as you sew round making a smooth seam repeat for both seams. Then overlock the sleeves and press the sleeves and the seams. Making the zip, switch the foot of the sewing machine and slide the foot t correct line the right side for the right. Make sure needle lines up. Close the zip and pin to the garment and line up. Pull the teeth of the zip and sew on the edge of the teeth without it being on the zip as the needle will break. Zip up the zip, pin the zip, and sew again at a 1 cm seam allowance. Zip up the zip to make sure it works. For the neck facing overlock the outer circle of the neck facing. Place the neck facing to the mask. It overhangs by 0.5mm and sew 1cm seam allowance right sides together. Fold the overhang to the facing until you feel the teeth of the zip. Match the notches of the neck facing Sew round it by 1cm seam allowance and push the interfacing to the back. Trim the neck facing by 5mm and press the neck facing. Spot tack the neck facing sew at the shoulder points and sew into the seams by 3 or 5 stitch.
1 note
·
View note


